
quahogchowda-blog
Quahog Chowda: My Life in a Quahog Shell
I was born and raised on the East Coast of the United States, in the smallest state in the union, named Rhode Island. I enjoyed the smells of the ocean, collecting seashells on the shore, and the amazing fun of Quahoggin'. I have many wonderful memories...
159 posts
Don't wanna be here? Send us removal request.
Last Seen Blogs

keebzcoolmailbox
something seems... off,,,

senzacertezza
Alone.

uzumakiwrites
lets get writing, bitch
keebzcoolmailbox
something seems... off,,,

mahaguro
gojo’s lower half
Text


Beautiful succulents... Pot I made up a couple years ago... Such pretty colors.
0 notes
Text

My Basil loaf didn't come out too bad ... Texture was quite good...
1 note
·
View note
Text
I have been experimenting and this is my... let my sour dough sit in the refrigerator for 4 days before baking experiment... SUCCESS. 😍


0 notes
Text
Beautiful very easy sourdough loaf... Dough went straight from the refrigerator... to shaping... to the oven.


0 notes
Text


Baskets of pretty succulents... I am happy with their progress.
0 notes
Text


Silver Dollar Jade with heart... 💗
0 notes


Text
Made an awesome dinner the other night... Homemade from scratch tomato soup and grilled cheese... So so good. HUGE HIT.


6 notes
·
View notes
Text
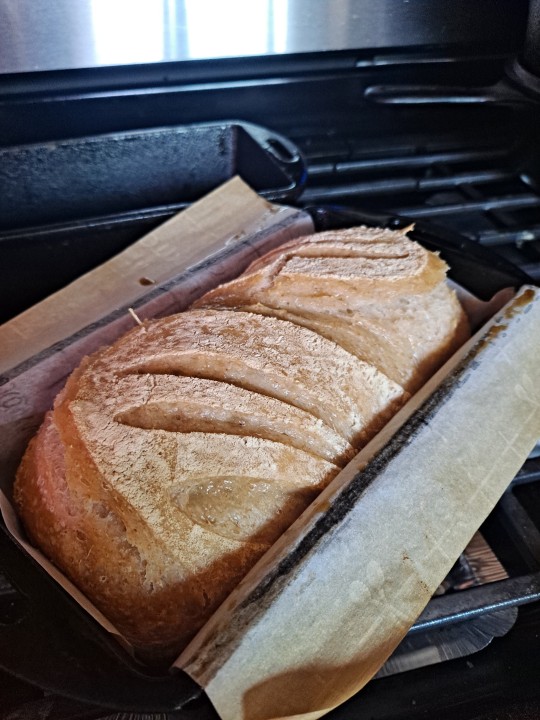
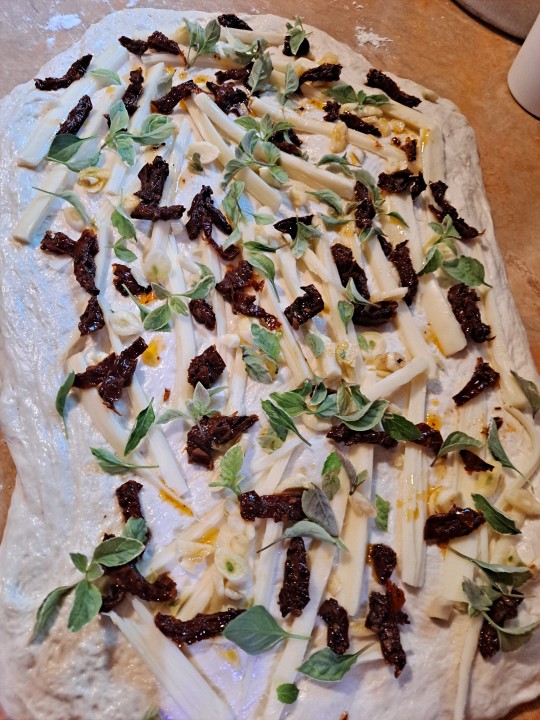
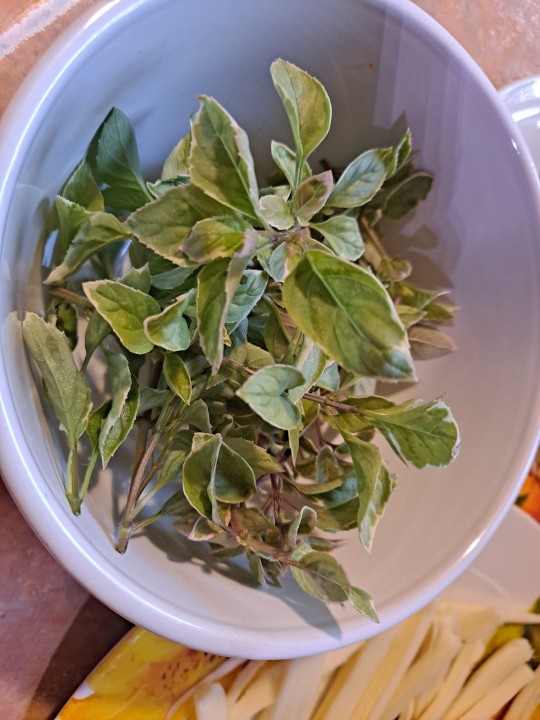
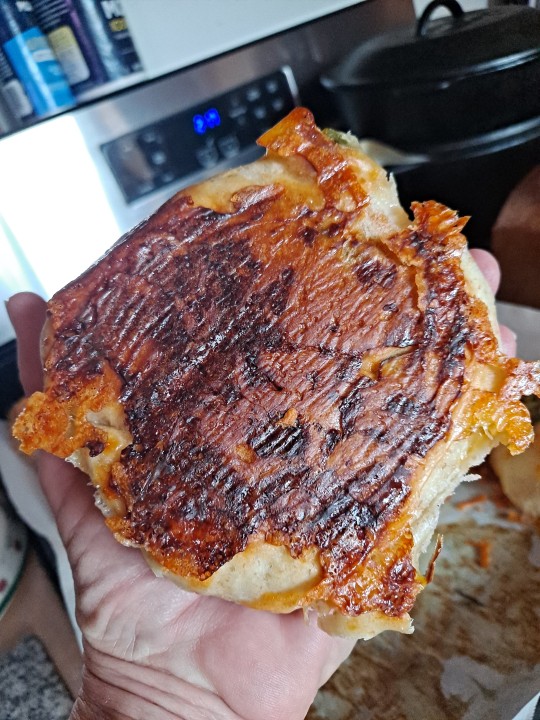
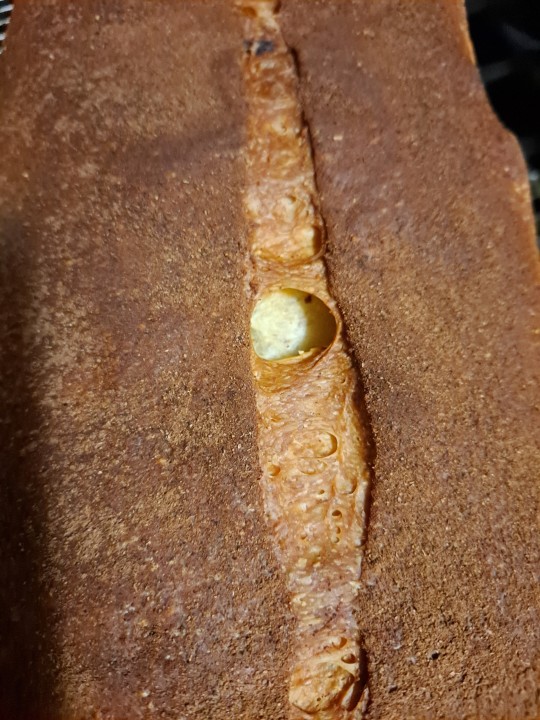
It's a really good thing I don't let nasty things that people say get me down... Because it hasn't stopped me from trying.... And trying whatever works for me... My sloppy mess has been working out just wonderfully 🤣... I tried for the first time making a Sun dried tomato... Cheese... Garlic and fresh basil loaf... It SMELLS totally amazing... And it definitely takes a lot longer to cook with all these inclusions... Hindsight being what it is next time I will probably keep the lid on for an additional 10 minutes... But this thing TOTALLY filled up the whole pan right to the top....😍❤️👍 The bits of cheese and tomato that poked out to the surface got a tad bit crispy 🤣... But I totally can't wait to EAT THIS ONE. And... BTW... If you're careful you can get away with using your parchment paper twice. I only did it due to necessity because I ran out but it worked out just awesome. Images in reverse....


1 note
·
View note
Text
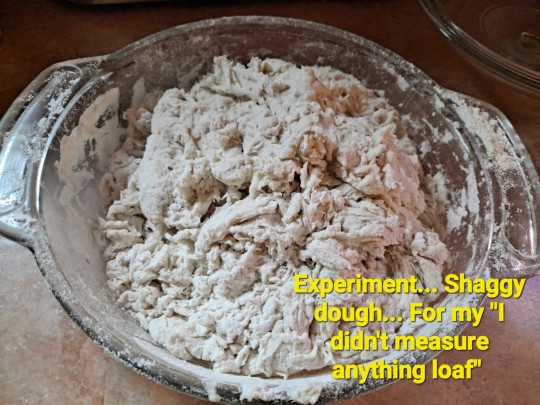
This was an experiment... "I didn't measure a single thing..." sourdough bread... 🤣 Even though I can't attach all of the images from the 4 days I wanted to save these posts from Facebook... because it was definitely a learning experience... And was very popular with my readers. Everyone seemed to enjoy it allot.


DAY 1...
So today when I got home from work... I realized I better feed my starters because it's been awhile and one of them had a really thick layer of hooch on top... After feeding the two of them (The only reason I have these two +1 more is because they're actually two different kinds)... Anyway... I had so much extra... but have ABSOLUTELY noooooo desire to actually bake anything with it today... Too tired from work... and I didn't want to throw it away... So what I did was... Literally started another experiment that I can bake in a couple days... I'm calling it my "I didn't measure a single thing loaf" 🤣🤣🤣 I didn't measure the starter... I didn't measure the water... and I have no clue how much flour I added I just kept adding flour till I thought it was good... I'll add a little more water and some salt in about an hour... But then throw it in the fridge... There's an enormous amount of starter in here so we shall see... Maybe it'll create a monster. And I'm quite certain this is the ONLY group I can post this in without getting completely razzed. I'll check back in a couple days with the results. 😛
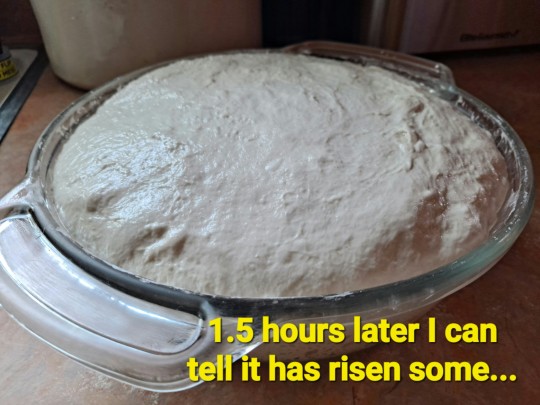
DAY 1... Post 2...
Okay.... since I'm one of the most impatient persons in the world I know that I would be going crazy waiting for results... And since I wasn't quite ready for bed yet... I decided to do my stretch and folds tonight... which actually it turns out needed to be coil folds due to the hydration level. This has got to be the most hydrated dough I've ever made... But as you all know... we're never going to know exactly what the hydration level is... 😜😝🤪 I'm posting these current results... I'm actually quite pleased so far.... But now it's waaaay past my bedtime at 6:30 p.m. 🤣 So the rest is going to have to wait until tomorrow. I'm hoping it can go about 2 days before I have to cook it. Because I know I'm going to be just as tired tomorrow when I get home from work. But we shall see how it looks tomorrow. #IDidntMeasureAnythingLoaf
Day 2...
UPDATE on the "I didn't measure a single thing" loaf dough... 🤣 Day 2... The plan is to leave it in the fridge until tomorrow when I get home from work at about 3 P.M. Then I'm going to take it out... let it warm up a little bit... form it and put it in the banneton... Leave overnight on the table to rise and then bake it first thing Friday morning. I think it's looking pretty good though... 😍 It definitely did a little something something in the fridge overnight and all day. 😊👍
DAY 3.... Post 1...
UPDATE... Day 3... On the "I didn't measure a single thing" loaf... 😂 Getting closer to "D" day... I'm not quite sure I'm going to be able to wait till the morning to bake it though. I hope so cuz I really don't want to stay up late or get up in the middle of the night. Not feeling the greatest today... But I don't think it's gonna make it much longer without running out of steam...
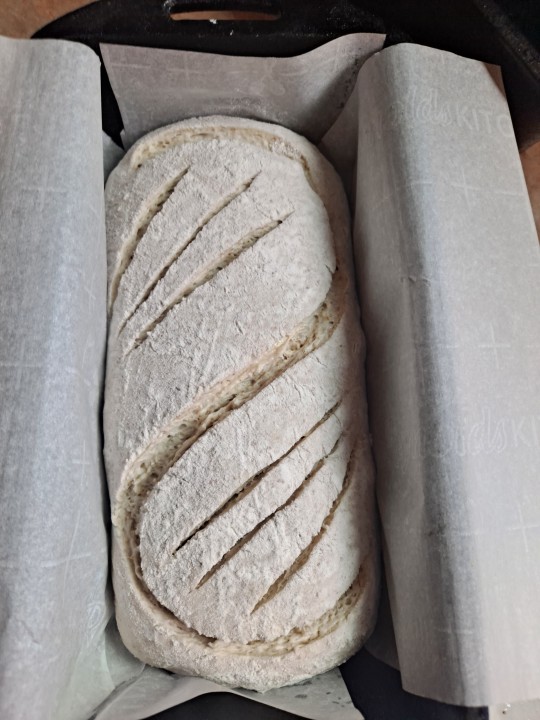
So today... When I got home from work I took it out of the refrigerator where it's been since day one... Left it on the counter for an hour and a half and I could already see... even though it was so cold from being in the fridge... it was rising some more... Gently plopped it out on the counter... sprinkled a tiny bit of flour just to make it easier to form... I'm not one of those bakers who likes to manhandle my dough so I try not to push too much of the gasses out... GENTLY formed it up... I folded two sides... One at a time to the middle... Well a little more than the middle... Then I folded the other two sides to the middle... And twisted it around a little bit to get the tension going. Talk about bubbles... there was a lot of fat bubbles poking out the sides... 😍 Maybe too many bubbles... Not sure... I popped them... 🤣🤪🤣Maybe in this case I should have been a little more aggressive with the forming... But I really didn't want to change anything more that I normally do except for the I didn't measure anything part. Now it's just waiting in the cool dark oven... out of the way... to rise enough to be baked... I was hoping to wait till the morning but I really don't want to put it back in the refrigerator.
I can honestly say this is been pretty kool so far. 😊🧊🥶❄️😃
DAY 3... Post 2...
It's finally baked...
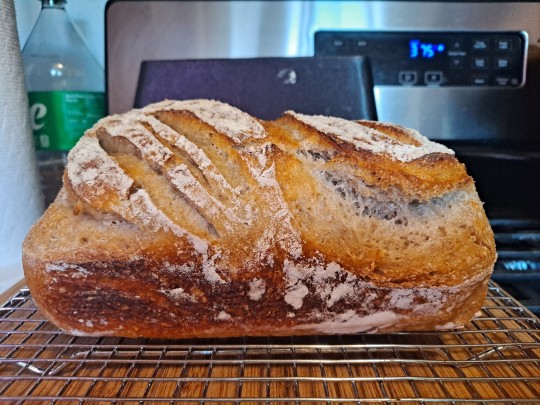
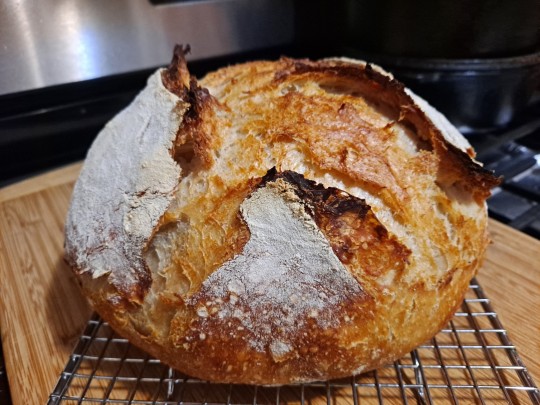
Woohoo... UPDATE... 🍿🍿🍿 On the "I didn't measure a single thing loaf..." Lucky day for y'all waiting in the wings... Bread is finished baking... 😍 I definitely could not have waited till the morning... It would have most definitely been over proofed...
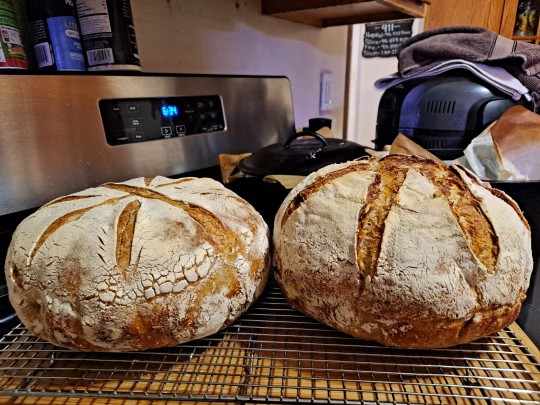
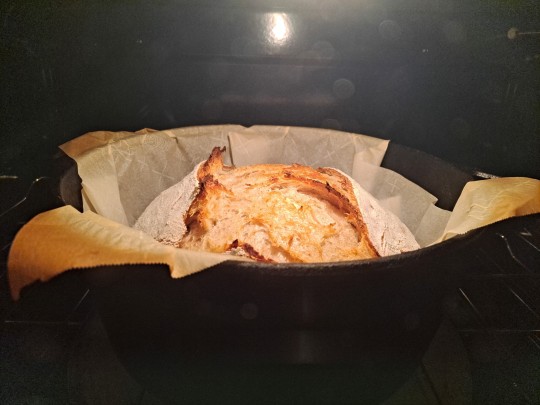
Almost final reveal... 😍 I'm going to have to call this a success though. Even though we won't see crumb shots till tomorrow... That will be the FINAL FINAL look at the actual success... This loaf was baked starting in a COLD cast iron Dutch Oven with the lid on... starting with a COLD oven and a temperature set at 455° for the first 55 minutes... Then I take the lid off and bake for another 10 minutes still at 455°. Final temperature of the bread 208.6°...
What do you all think of that???
I'm actually really very excited that this came out soooo well.
Once I plopped it into the Dutch oven and scored the top I started having doubts because it looked like the top was sinking in a little bit in spots and it was possibly overproofed... But looking at this now... even if the texture inside isn't all 100% sourdough perfection perfect with numerous holes and all that... I don't care. 🤣 Because it looks and smells amazing.
I would say this is absolute 100% proof that making sourdough bread... Does not at all have to be so scientific and exact... One should not stress out... One should have fun and break as many rules as possible... I do. 🤣🤣🤣
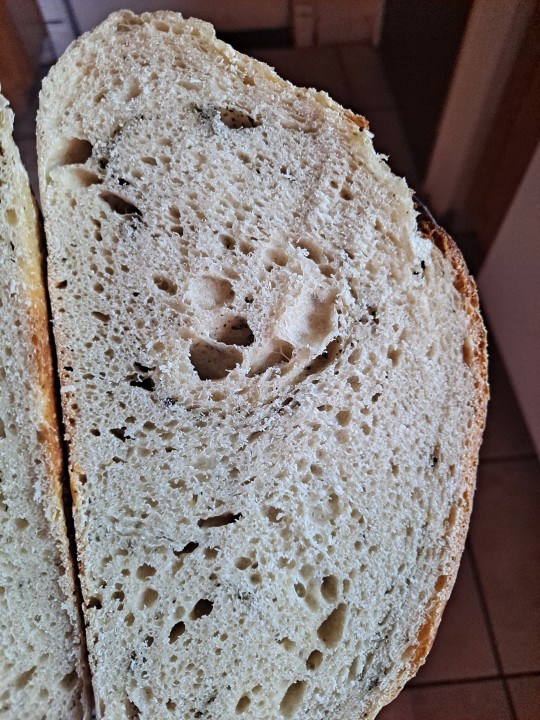
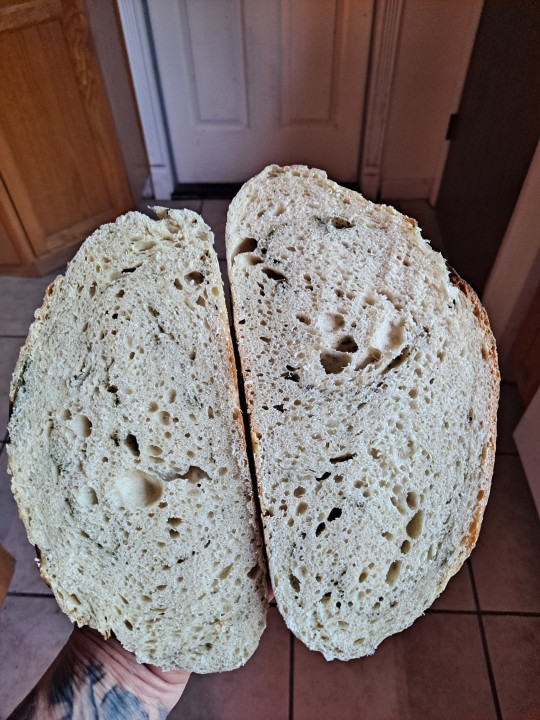
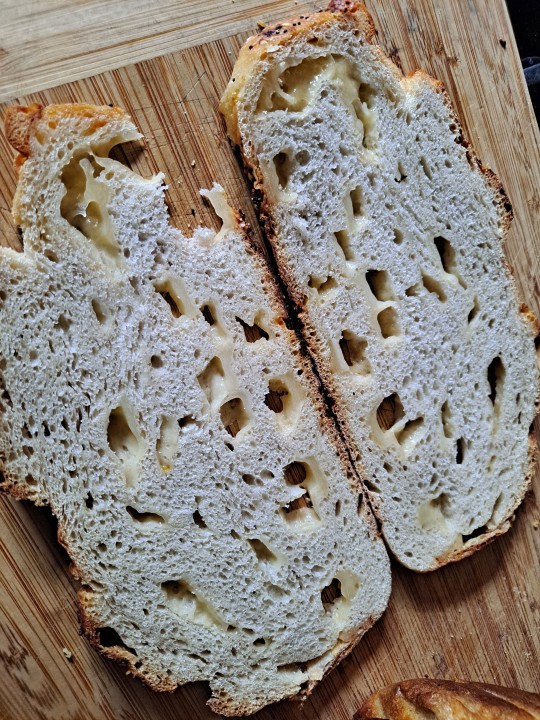
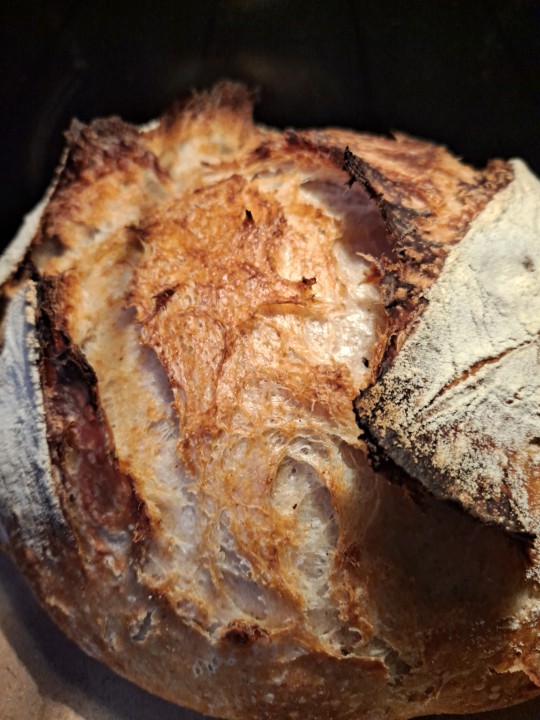
Day 4... FINAL CRUMB shots...
Crumb shot... "I didn't measure a single thing" loaf... I didn't measure the starter, I didn't measure the flour, I didn't measure the water, and I didn't even really measure the amount of salt I guesstimated by pouring it in my hand... And I literally fed the starter immediately before making the dough... That was after 2 weeks in the fridge without feeding... I let the loaf sit out overnight before cutting... I'm not 100% positive... but pretty sure this is the best crumb I've achieved so far... In all my years of making sourdough. I'm definitely quite pleased with this experiment and how it came out... Thank you all for the support it was fun. 😊😍👍
Also again...
Here's the links to the original few posts for those that want the whole story... 😍👍
Day 1 Post 1... https://m.facebook.com/groups/sourdoughrebelbaking/permalink/644412197756594/?mibextid=Nif5oz
Day 1 Post 2... https://www.facebook.com/groups/sourdoughrebelbaking/permalink/644463387751475/?mibextid=Nif5oz
Day 2...
https://www.facebook.com/groups/sourdoughrebelbaking/permalink/644966004367880/?mibextid=Nif5oz
Day 3... Post 1...
https://www.facebook.com/groups/sourdoughrebelbaking/permalink/645507320980415/?mibextid=Nif5oz
Day 3... post 2...
https://m.facebook.com/groups/sourdoughrebelbaking/permalink/645569687640845/?mibextid=Nif5oz
Day 4... Crumb shots here... 😍 https://m.facebook.com/groups/sourdoughrebelbaking/permalink/645819577615856/?mibextid=Nif5oz
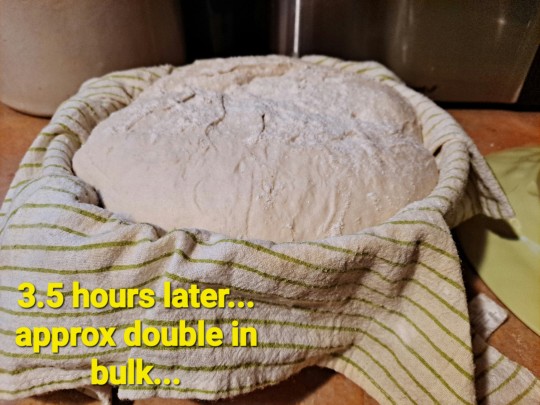
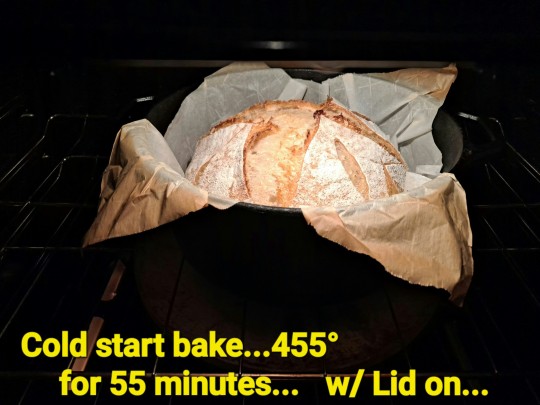
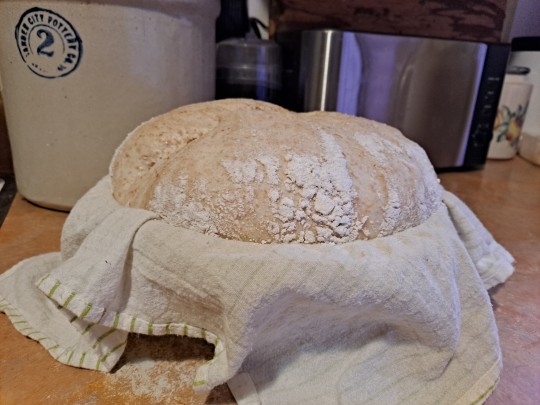
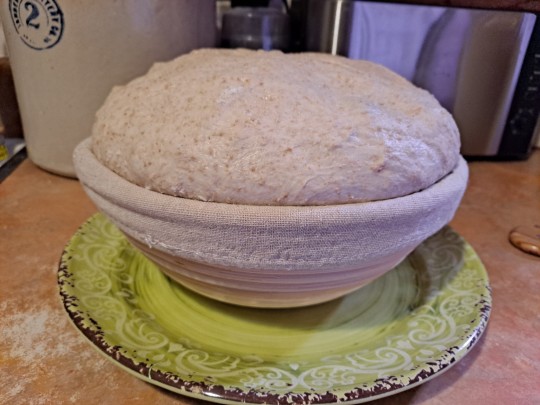
NOTE: The first image is after 3.5 hours final rise after shaping... Sitting on the countertop... The second and third images is after the first 55 minutes of baking with the lid on... The remaining pictures are after it was completely finished baking...
Note for Tumblr... The images in this post are not exactly as they were in the Facebook posts... Since I'm only able to put 10 images here.
1 note
·
View note
Text


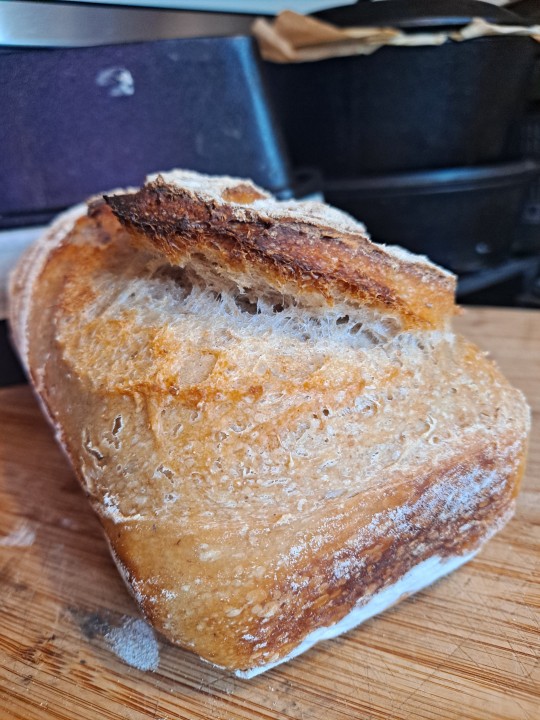
Same recipe as the 550,000 experiment... Using the Alaskan GOLD RUSH Sourdough Starter for the first time... ☺️ Except I had to use 1/2 cup extra water with the salt vs. the 1/4 cup. But worked out perfectly. Well... Except for the flattened looking loaf because that one was in a shorter pan and the lid kind of squished it. 😂 And the bread came out beautifully soft and tender with a light crispy crust.
1 note
·
View note
Text
Update... Omgosh... My whole house smells so good right now... Once the rolls finished rising... I brushed with egg... Sprinkled with more cheese... Added a few extra slices of Jalapenos to each roll... Soooo soft and yummy... I would say this is a success... Not quite spicy enough for me though... Next time I'll use some Habanero's too. But still very good. I really love the crispy cheesy bottoms. I will type up the recipe and add it later... 😍
Recipe added....
1.75 cups warm water
6 T. Whipping cream powder
2 eggs
.5 cup sugar
8 cups white flour
1 cup wheat flour
3 teaspoons yeast
1 1/3 cup sourdough starter
2 teas salt
1 cup butter
Note: I do not pack my flour tight into the cup. Liquid measurements can vary depending upon the thickness of your starter and the actual weight of your flour. But then again this is what makes us rebels. Lol. No scale.
Also: I warm my flour up before use. 1.5 minutes in the microwave... stirring every 30 seconds. Trust me this helps a lot where proof time is concerned. Especially when your house is cold like mine.
Mix all ingredients except the salt and butter. I used KitchenAid. I used the low setting #1 just until most of the flour is incorporated and #2 for approx 8 minutes. Until mixed well and no longer sticking to sides of bowl. Please KNOW that this is a LOT of dough. Borderline toooo much for the KitchenAid. But I always make it work by stopping and pushing dough back down often.
Add salt then mix for another minute or 2.
Add butter and mix until completely incorporated.
Note: The dough will be VERY soft and tacky... but should not be too gooey and too sticky. It should hold its shape a bit when you dump it out of the bowl.
I dump the dough out onto oiled counter and cut in half.
Knead each half briefly just to form into nice balls. Place each into an oiled bowl. Cover and let rest 1 hour or until doubled.
Roll into logs and place in loaf pans. I used 1 extra large 1000 gram pan. But this would make 2 - 1000 gram loaves or 4 regular sized loaves without a problem. Allow to rise again until at least doubled. This took about 50 minutes.
Score top if you choose. I did one long slit down the center.
Preheat oven to 425°. Place loaf pan in oven. Immediately turn heat down to 375° I baked this one large loaf for 46 minutes. I am not quite sure how long it would take to cook a regular size loaf.
I baked until bread registered 206°.
Note: if you do not have whipping cream powder or powdered milk replace the water using whatever milk you have. Whether it's cow milk... goat milk etc... 😍
For the Jalapeno Cheese rolls...
I used 1/2 of this batch of dough... Patted it into a rough rectangle shape approximately a half an inch thick. Divided into 12 pieces... Sprinkled liberally with jalapeno chunks and shredded cheese. I used three large deseeded jalapenos... but I have no idea the amount of cheese. Formed into balls. Placed on parchment covered baking sheet equally spaced. Let rise for at least an hour. Was probably a bit longer because I had my loaf of bread baking and I had to wait for that to be done. Brushed with scrambled raw egg. Sprinkled with more cheese and added a few slices of Jalapenos on top. Baked at 350° for approx 35 minutes. Final temp of baked roll was 208°.


0 notes
Text
Easier Sourdough directions for Mom
Sourdough directions....
Take the starter from the fridge the night before... And feed it. Leave on counter overnight.
In morning...
Mix up...
1 cup starter
4 cups white flour
1.75 cups water
1 to 2 teaspoon salt
Let sit and rest for 30 to 60 minutes in a covered bowl.
Then every 30 minutes for 2.5 hours gently stretch out dough and fold over itself 4 times... This is instead of kneading the dough. Just write down what time it is when you start so you don't forget...
After the stretch and folds are completed... form into a ball or loaf shape you want.. and let rise for 2 hours and 20 minutes... or until at least doubled.
When ready to bake... Slice a slit or two or three into the top of loaf with a sharp knife...
INSTEAD OF PREHEATING THE OVEN when you're ready to bake it... put the formed loaf in the Dutch oven... And with the cover on.... Place in cold oven and bake at 455 for 50 minutes... Then take the lid off and bake for another 10 minutes until it's golden brown.
I suggest you use that digital meat thermometer I gave dad... And take it's temperature... Once the bread hits 205 to 210 degrees it's done.
😍
0 notes
Text
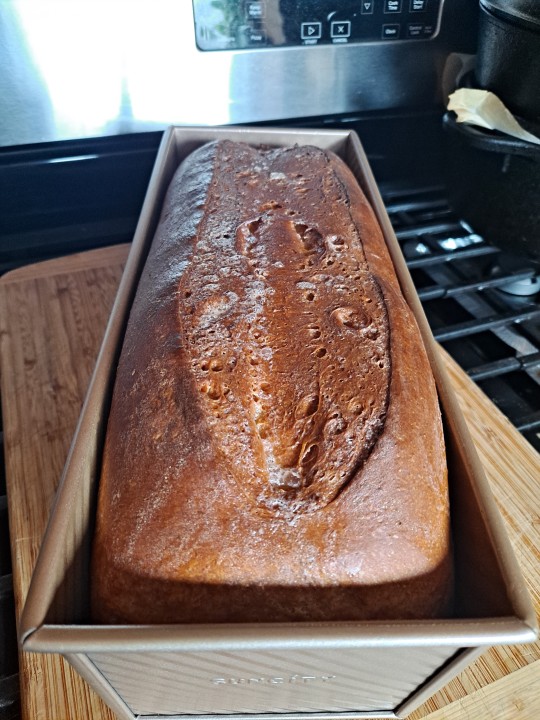
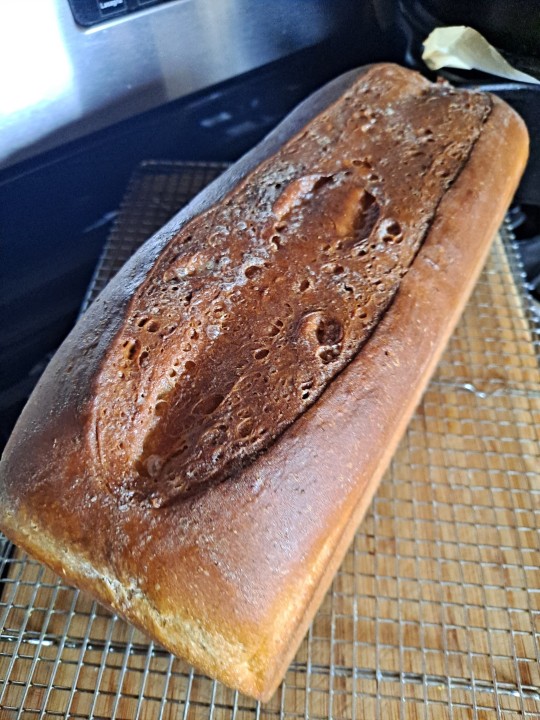
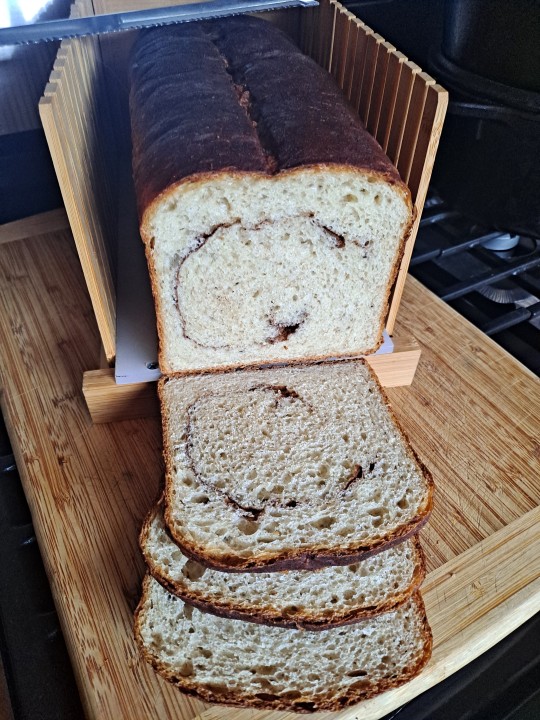
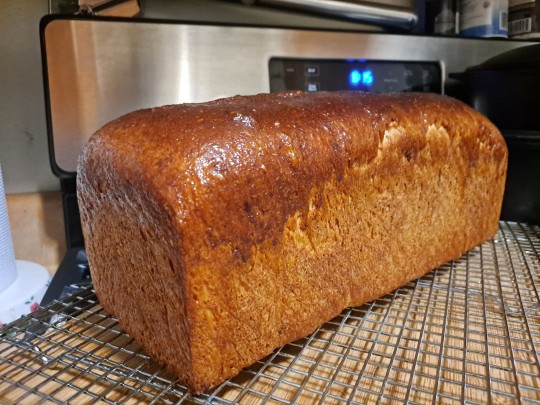
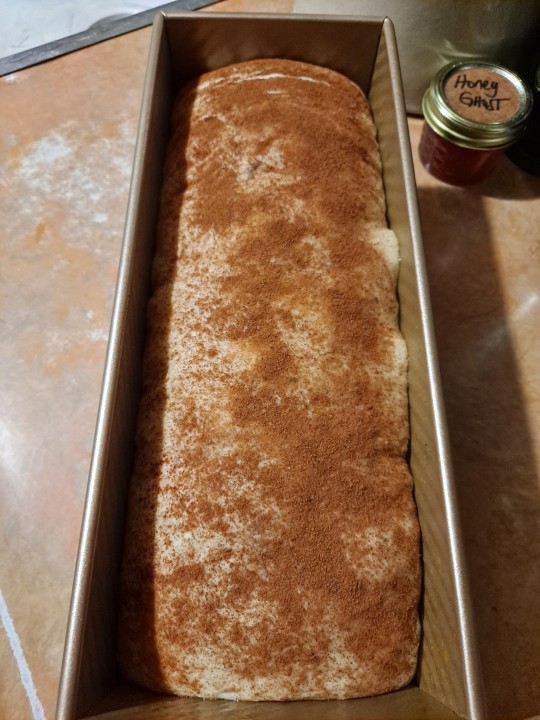
I'm really totally excited about this... It's a "Hybrid" loaf... Made with Yeast AND Sourdough starter... White flour... a tiny bit of wheat flour... Bananas and cinnamon... I really just wanted to make a sweet loaf this time because I've been doing savory for quite a while.... Unfortunately due to my rebel ways... 😂😂😂 I have to sit down and write down the recipe exactly the way I did it... That's the only problem sometimes when you fly by the seat of your pants... 🤪 But I used my new covered loaf pan... Only I didn't use the cover this time cuz I wanted to see how well the recipe would fill the pan... And I waited till this morning to cut it just to make sure the crumb was exactly what it was supposed to be... Anyway the recipe will follow. It'll just be a few... Images go in reverse...
Update.... Adding recipe...
Ok here's the recipe for the cinnamon swirl loaf I posted earlier.... Keep in mind... It's a first time recipe... And could probably benefit from a tweek or two. Also noting that with my recipes I don't normally use milk. I use water and whipping cream powder as a substitute... but most people don't have that on hand... So for ease I just put milk as the ingredient...
1.25 cups WARM milk
1 egg
.25 cup oil I used vegetable
.25 cup sugar
1 teas salt
4 cups white flour
.5 cup wheat flour
1.5 teaspoons yeast
.5 cup sourdough starter
2 very ripe medium sized bananas
Cinnamon... Just for dusting the dough before rolling it up into a log. And sprinkling on top prior to cooking.
I literally put all ingredients into a bowl at the same time. Squished it all up with my hands. It's a very wet and sticky dough. A bit messy. 😂 Once it was all mixed up. I formed a very loose ball shape. Oil your hands to assist with being able to form it. Or you can wet them with water. Then let sit in a covered bowl for about 30 minutes.
Every thirty minutes for approx 1.5 hours I completed stretch and folds. The amount of time this takes may vary a little bit depending upon the wetness of your dough. Due to the variables in how wet your starter is or how big your bananas are. But it'll start to come together pretty good (and be less sticky). It'll also begin to rise as well becoming thicker/more mass during this time. It'll still be a bit tacky. Try to avoid adding flour... You don't want it to be too stiff.
Once the dough is stable enough to hold it's shape without totally flattening out you want to leave it to rise for 1 hour or until at least doubled. Once it's doubled gently pat out on counter top form a rectangle. As if you were making cinnamon rolls. Sprinkle liberally with cinnamon. At this point you could add some sugar cinnamon if you want to... I just didn't do that. I used cinnamon only. I think next time I WILL add sugar at this time though... because I think I'd like it a little bit sweeter.
Roll into a log and place in loaf pan. I used 1 large 1000 gram pan. But this would make 2 regular size loaves without a problem. Allow to rise again until at least doubled. This took a little less than an hour. I wasn't really concerned about the time I just made sure that the dough has risen pretty close to the top.
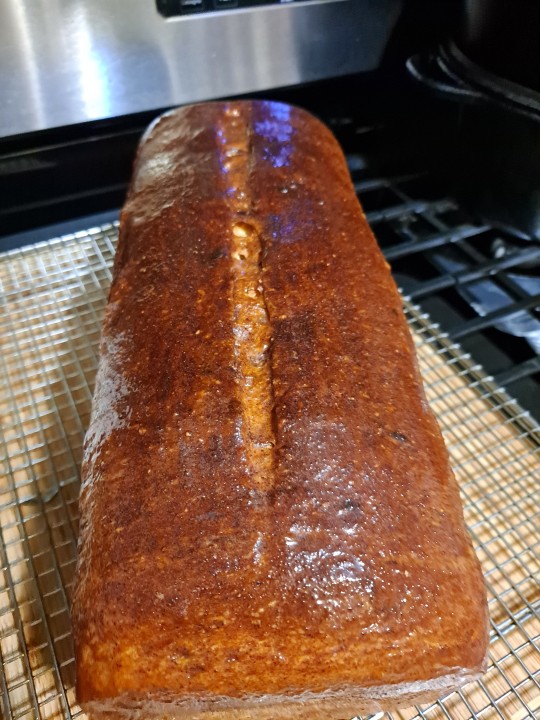
Score top if you choose. I did one long slit down the center.
Preheat oven to 425°. Place loaf pan in oven. Immediately turn heat down to 375° I baked this one large loaf for 46 minutes.
Note... at 40 minutes the loaf registered 171° (I think). So I added another 10 minutes to the timer. Waited only 6 minutes before checking it and it was already at 205°. I think 205° might have been a little bit too much for this. So I'll probably take a minute or two off the time off next time.
I have found that being able to take the temperature of the baked loaf has been very helpful. In the past I've had an issue feeling like the bread was done and taking it out... Only to find out it wasn't quite ready. But of course if you are an avid bread baker and can do this without the thermometer by all means do so. 😍


1 note
·
View note
Text
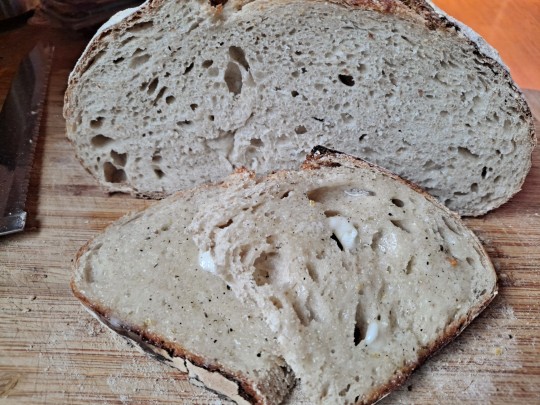
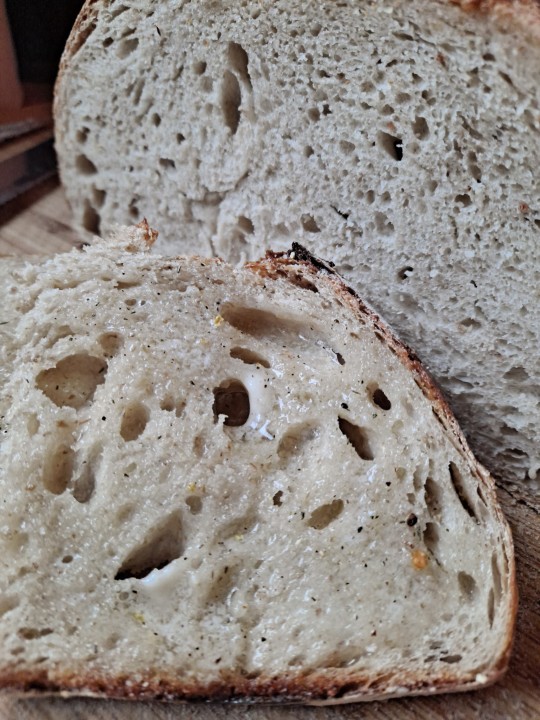
Experiment number 550,000 million is completed... 🤣🤣🤣 With most of the rise/proof "wait time" being while I was sleeping... 💤😴 What am I trying to prove? That baking sourdough bread is NOT an EXACT science. It is not that difficult and should not require all these "rules" that people want to make about baking SOURDOUGH... I have pretty much broken every single rule there is... And done exactly what works for me... in the time frame that works for me... I don't use a scale to measure my ingredients for my bread dough... I don't use a scale to weigh the measurements of ingredients that are going to go into my starter... I don't use heating pads or other contraptions or keep my house at a higher temperature so my sourdough starter or dough can stay warm or cold... I do not use filtered water. I use water straight from the tap despite the caution that it might kill the wild yeast. I don't worry about all this exactness with bulk ferment time... cold ferment time yadda yadda yadda...
Newest experiment... Can I make a decent sourdough loaf with minimal Hands-On time... With most of the wait time being while I'm sleeping... And how will it turn out if I use the "cold baked" method... Avoiding the excessive preheat times which to me is an absolute waste of our natural resources....
Came home from work yesterday and at 3:00 p.m. fed my cold straight from the fridge starter. I didn't think I was going to have enough starter for the two loaves I plan on baking today... so I added one full cup of flour and a half a cup of warm water.... (Normally I only do a half a cup of flour and a quarter cup of water but I gave it extra because I need extra starter today...)
By 8:00 p.m. the starter had at least doubled...
To a large Rubbermaid container I added:
1 full cup starter
3.5 cups white flour
1.5 cups wheat flour
1.5 cups water
Mix quickly just to get all the flour mostly incorporated... And Let shaggy dough sit with lid on for 30 minutes. After the 30 minute wait... I added another 1/4 cup water and 2 teaspoons salt... And immediately began stretch and folds every 30 minutes at 8:30 p.m. At 10:30 p.m. I moved the dough to a glass pyrex bowl with a lid. I was going to stop my stretch and folds there but thought better of it and 30 minutes later I did one more stretch and fold.
I left the bowl on the dining room table from 11 P.M. until I woke up at 5:00 a.m.
At 5 A.M. I gently plopped the dough onto the floured counter... And gently floured and formed my dough round to get a little more tension but also trying not to deflate the dough very much...
Placed that onto a piece of parchment paper... Scored the top with one slice down the center and plopped the whole thing into my cold cast iron Dutch oven. I did not have high hopes of this rising as well as it did that's why I only did one score down the center. I wish I had taken a picture but it was definitely much smaller than any of my other ready to bake forms.
As suggested I baked using the "cold bake" method for the first time.
Put oven on 450°. And placed the cold Dutch oven into the cold... But now preheating oven... immediately.
Baked at 450° for 50 minutes.
Removed the lid... And I was surprised to see that it definitely got a good oven spring... Continued baking with lid off for another 10 minutes.
Took temperature of the loaf it was 195°.
Took the loaf out of the Dutch oven and placed directly onto my pizza stone that was already in the oven.
Baked for another 10 minutes until bread reached a temperature of 205 and was more golden brown in color.
I don't know what the inside looks like but I'm not really concerned about that. It looks and smells terrific.
And it was EASY PEASY! Barely any hands on time at all... No fuss... No stress...
Experiment was a success! Total time... From starter initial feed at 3 p.m. to completed bake @ 6:40 a.m. = 16 hours... Hands on time equals approx a measly 20 minutes... 🤣
Note: Image of the starter is actually AFTER a 2nd feeding at 8 P.M. (I forgot to move the time band)... I added another full cup of flour to my remaining starter and another half a cup of water... It more than doubled by the time I got up this morning.


2 notes
·
View notes

Text

Egg Roll in a Bowl
Ingredients NOTE...
Originally recipe calls for...
1 pound lean ground beef
But I used... 1 lb hot Italian ground sausage (not links) and 1 pork roast approximately 2 lbs... Marinated in sesame oil and soy sauce prior to roasting.
The rest of the ingredients I tripled...
Originally recipe here... Find at: https://natashaskitchen.com/egg-roll-in-a-bowl-recipe/
Ingredients:
1 lb lean ground beef
1 Tbsp olive oil
1/2 tsp fine sea salt, or to taste
¼ tsp pepper, or to taste
½ onion, finely diced
1 carrot, julienned or coarsely grated
3 garlic cloves, minced
3 cups cabbage, thinly sliced
1 tsp ground ginger
1/4 cup low sodium soy sauce
2 tsp sesame oil
½ tsp granulated sugar
1 Tbsp chopped green onion, optional for garnish
1/4 tsp sesame seeds, optional for garnish
Instructions:
Set a large skillet over medium/high heat and add oil. Once hot, add ground beef and brown until no longer pink, about 5 minutes, breaking up the meat with a spatula as it's cooked. Season with salt and pepper.
Add onion and carrots and saute until onion is tender, 5-7 minutes, stirring occasionally. Add the garlic and cook another 30 seconds, stirring constantly.
Finally add the cabbage, ginger, soy sauce, sesame oil, and sugar. Continue sauteeing for 5-7 minutes, stirring occasionally, or until the cabbage is tender.
Serve garnished with green onion and sesame seeds if desired.
0 notes