#working with limited amount of markers and not knowing how to blend them in a contrasting way is haarrrdddd
Photo
May or may not have forgotten what I posted here myself months ago so the last post had a few repeats. oops.
Well I know for sure this one won’t because I stopped posting when I started the second semester, which is what this post is about.
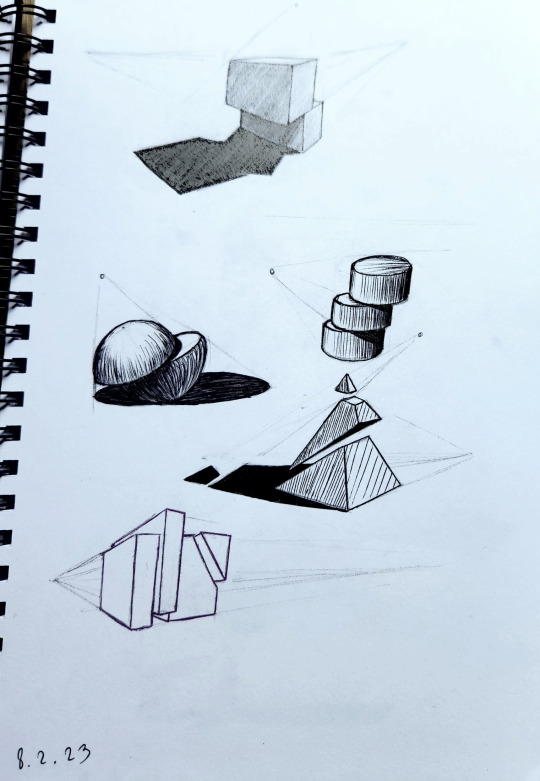
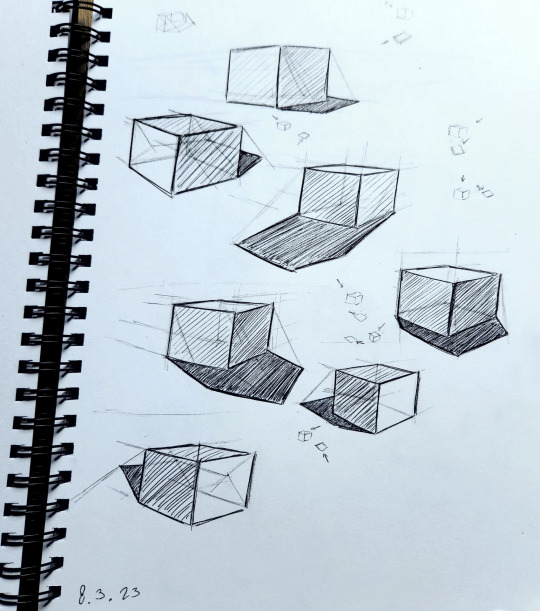
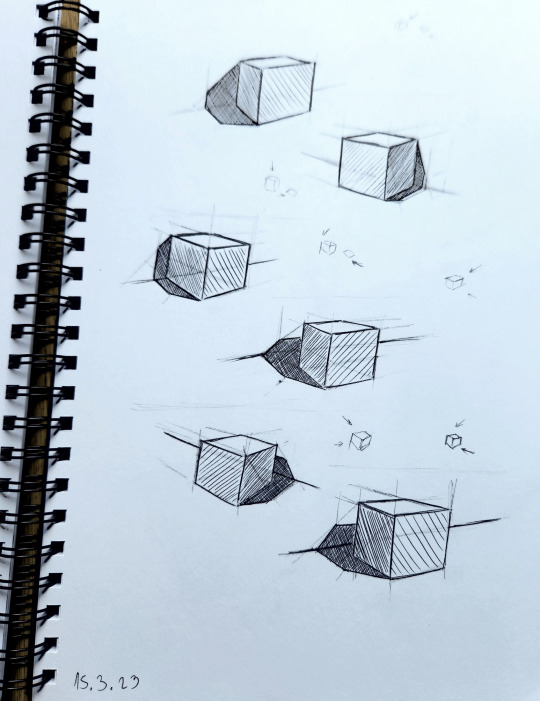
So the drawing above is the start of working with more complex shapes, using the ones we learned from last semester. This is also where things got interesting, since I could see the potential for architectural drawings.

There are a lot, and I mean A LOT of drawings like these in my sketchbook, I’m gonna show you only the ones I find interesting.
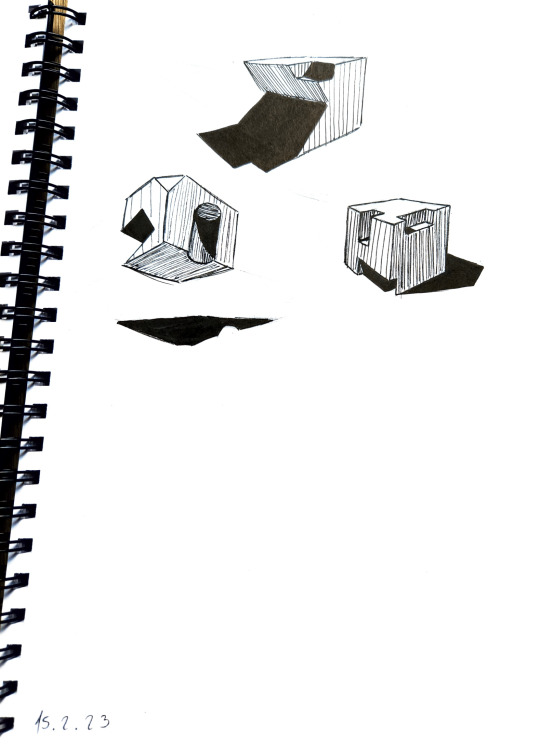
After that we went back a bit for cast shadows, which I have decided are my new mortal enemy in art. A long time ago it was rendering hair, but that’s nothing compared to this.

The amount of calculations you need to do for this and the different formulas for each shape make me wanna rip my hair off. And that’s before getting into more complex shapes.
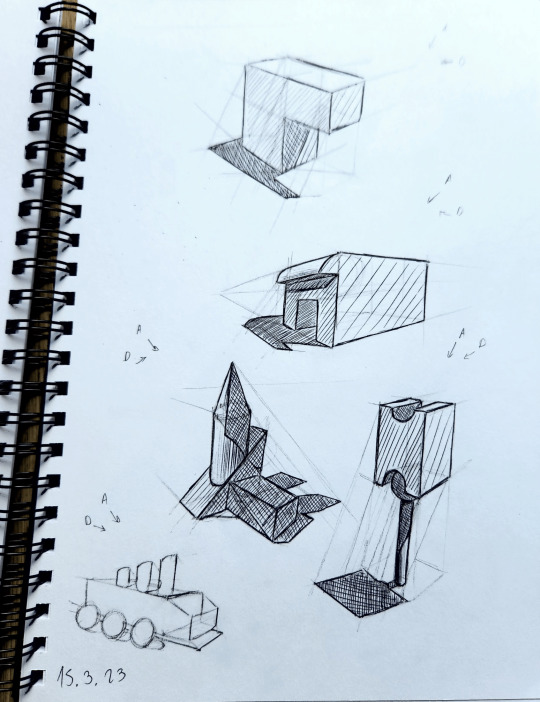
They're not 100% correct but my teacher said the majority of people won’t notice anything wrong so I shouldn’t worry about it. I won’t until I need it for a personal project, then I’ll get very annoyed again.
After that nightmare I got rewarded with finally using colors to render for the first time!!! I love rendering with colors so I was very excited haha

The copper (right middle sphere) is my absolute favorite, and my teacher really liked it as well.
We also had a small lecture on arrows and ribbons/fabric and we got to render them with colors as well.

For all the colored drawings I used a combination of alcohol markers and colored pencils. The markers melted and blended the pencils and I could use this to mix colors I didn't have. For example, I didn’t have a red marker at all.
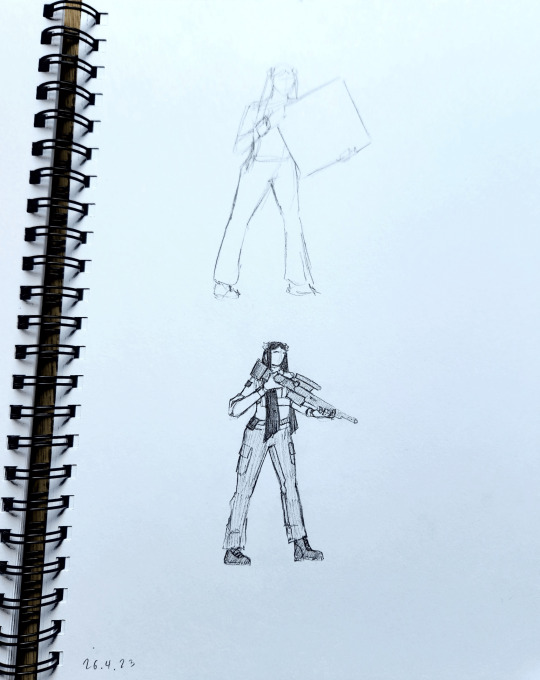
After that we had a fun exercise where we needed to either study an object or design our own. The purpose was to use the previous lessons about shapes in perspective, and the rendering of different materials.
I went with a gun design, but not just any gun-this one is technically 3 guns, a pistol and an SMG that you can connect and form an assault rifle. So I designed each gun separately (somehow I managed to turn this exercise to designing 3 objects instead of one, leave it to me to make it harder on myself lmao), and thought about how they connect, making sure the chambers kinda align and stuff like that.
I don’t wanna brag but I got the highest grade in the class for this assignment. Mostly because I’m the only one that actually rendered the different materials (or tried to), but also because my teacher liked the idea and thought it was interesting, and something people would actually buy if it was real.

It’s not the best but I literally didn’t have a grey marker so I was pretty limited. I chose a stained-glass theme for some reason, I didn’t want to make it a normal looking gun. The scan made it a bit more contrast-y than it is irl.
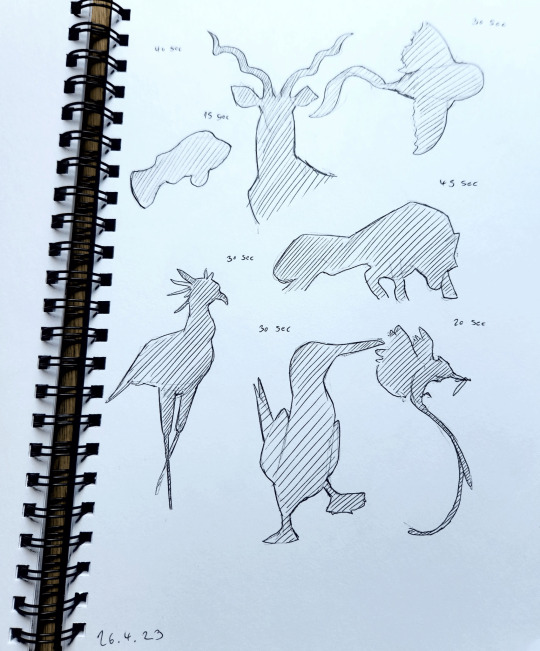
After a huge break we came back and had one lesson of silhouettes, something I kinda knew but never went out and made studies of. The challenging part of this was the time limit, at the start we had a minute, but it went down to 30 seconds. We were allowed to go overtime but it wasn't considered good.


On the same lesson, we also had life drawing, using each other as models. We had to get the pose down in one minute, and then take that as a reference for a more detailed drawing. I chose to completely change the context at that point lol


The next lesson was about isometric perspective. I don’t think I’ve actually talked about this here, but I got scammed by a guy who asked me to make him a city island in isometric perspective, then when it came time to pay, he “took a vacation” for two weeks. Came back to tell me he’s definitely gonna pay me. Proceeded to disappear.
Anyways I haven’t done isometric from that moment until this lesson, where we were given a prompt word and had to draw an environment following it.
I used only colored pencils for this one because I forgot to bring my markers, but it was a nice restriction to only use 12 colors and try to combine them to make the rest.
I really enjoyed this one since I got the freedom to make something cool.

(the prompts are top-to-bottom forest, COVID-19, underwater and space)
my teacher walked up to my desk to see what I’m doing while I worked on the space one, and he said “you are crazy” every time he passed by. He showed everyone’s work around, and a lot of people liked mine :)
The space one is based on a black hole btw, but if it was an eldritch horror.
The last lesson was a time for the teacher to review everyone’s work one by one, so most of the time we were waiting for our turn. He put up a pic of an old camera if any of us wanted to draw it, but I used it as a reference for a building because it reminded me of art deco architecture. After finishing that, I had an idea for a shrine kind of place, inspired by a spot I built for a friend’s minecraft server that we didn’t end up using. And I topped it off with Lykena and Eivrun sketches (that for Eivrun might turn into a full painting when it’s her turn)

The entire year my teacher was occasionally asking me if I’m not getting bored, because we were going through a lot of basics I was obviously proficient at already, but I always found something new to learn, no matter how small, even on topics I practiced a lot before. So I’d say this workshop was very useful for me. And besides, it’s always good to get critiques from a professional, and from people who are interested in art.
#original art#Art Studies#uni work#my teacher was pretty mean but he wasnt mean to me#probably bc i never gave him trouble but also i dont think i look like the person that can take his roasts lmao#i learned a lot about perspective from this year#which is good bc it was a weakpoint for me
5 notes
·
View notes
Text

Forgot to post this rip ;-;
Anyway-
Los Nevadas Quackity design baybee~~
#mcyt#quackity#quackityhq#quackity hq#dream smp#dsmp#gambling#gambling tw#tw gambling#my art#don't repost my art please#yes yes i know i KNOW his skin tone accidently blends into the color of his shirt#working with limited amount of markers and not knowing how to blend them in a contrasting way is haarrrdddd#I'm really really proud of the way those scars came out though#ALSO YES I ADDED HIS FIREWORK SCAR CAUSE NO ONE SEEMS TO REMEMBER THAT BIG Q ALSO DIED IN TUBBO'S FIREWORK EXPLOSION#and there's a red tie on the axe and i also did that for a reason cause those weapons AREN'T quackity's#and i have this narrative that after Tommy died and sam found his body an' all; he took tommy's bandana and tied it to his axe#as like a reminder of 1: Tommy just in general and 2: of his failure as warden#really sad but i think it's interesting!!!#if big q gets his own special weapons I'll make a unique design for them too :D#also also- he has card suits [heart diamond spade club] on his shoes; though its hard to see ;-;#he has hearts on the heel of his right; diamonds on the heel of his left; clubs on the toe of his right; and spades on the toe of his left#i know its completely unnoticeable I'm sorry ;-;#ALSO ALSO ALSO!!!! he has the :] face on the back of all his cards :D#cause. they're like. his own special cards for los nevadas :] its also why they're blue based instead of red!!!#los nevadas#<<< i fucked up tryin to tag it earlier that's why its so far down lol
11 notes
·
View notes
Photo

On The Edge
It feels like it's been quite some time since I sat down and got to work on a more involved mixed-media project. And in plenty of ways it has, but I have been working on other artsy projects behind the scenes, which I should be posting sometime soon, I hope.
Anyway, this artwork had to be moved to the top of my priority list and also my upload schedule (some of those other projects are already finished, just back-logged) because this is my entry into the Arteza Awards hosted by, shocker, Arteza, and the deadline to enter was the 24th.
I actually started working on this piece a week or two early, but me being me, I procrastinated and only just barely got it posted to Instagram with the appropriate tags (per the contest rules) with about 20 minutes to spare. Then again, maybe that's a good thing because I've been known in the past to pull some of my better work out of thin air at the last minute. If that proves the case this time, it would certainly be to my advantage.
Anyway. There was no set theme for the contest. The main rules were that you had to use Arteza supplies and they needed to be visible in the image posted to Instagram. I understand why, but I normally don't photograph my art with the supplies because I can usually get more accurate colors and proportions with a scan, and you can pretty much always see the details way better on a scan. But considering the prizes on offer, I wasn't about to let that stop me. I figured I'd just post the supply image first, then add the scan so you could swipe to see it. That way I could have my nice scanned version and still follow the rules. (Also, since they specify Instagram is the main platform for the contest, I'm assuming it doesn't matter if I don't post the supply picture everywhere else. If it does...whoops :P )
For reasons I don't think I should get into here, I knew I needed to go for something kind of high-impact when you first glance at it. But it also needed to not be too involved, lest I be working on it well after the entry window closed and my efforts become somewhat less valuable. I'm not exactly sure how, but this led me around to a concept I've had floating around in my head for a while: A girl (because I am one and know I can draw them better) standing on a mountain top, that looks as if she's one step from free-falling. Originally, I dreamed up this idea hoping to make it into an acrylic painting, but (aside from that fact that I didn't get around to executing the idea until now) I do not own Arteza'a acrylic paints (though I have wanted them for quite some time--It just hasn't happened yet) and also acrylics are not my strongest suit, so now did not seem like the time for an impulse-purchase that could compromise the integrity of my work and therefore my chances in the contest. Although for the day I do get my hands on their acrylics, I now have a solid idea to use to test them out. ;)
The Arteza supplies I do have at my disposal are their tube watercolors, woodless watercolor pencils, and 72 expert colored pencils. Which as I learned the last time entered a contest hosted by Arteza, is a fairly limited variety as to what I can actually do. The watercolors by far as the most versatile and my personal favorite of the three though, so they're what I used the most of here.
Also, somewhere between deciding to run with my standing-on-the-edge idea and actually doing it, I also decided to add-in the wings in this constellation style I've used somewhere infrequently but am very fond of. As a result, the whole concept has a very similar feel to me as this artwork that I found here on dA years ago and fell so in love with that it spent a good few months as my desktop wallpaper.
Obviously, the two images are very different, but to me the idea of the wings is similar: Their structural integrity to fly is questionable, as the wings in the original image appear to be made of glass. Maybe it matters, maybe not. Same thing here: Maybe the wings are really there and just look like a constellation, or maybe this girl just stood in exactly the right spot at exactly the right time. Is the girl even there? Is she real? Can she die? Does it matter if she falls? Would she choose to fly at all, whether the wings work or not?
It's sort of a Schrodinger's Cat situation, and something about that is really intriguing to me.
Anyway. I started out with a digital sketch this time, mostly to iron out the kinks with...well, everything.
I knew getting the right pose would be difficult, and I actually had a pretty different one of her looking out over the edge, maybe clutching her chest or something, originally, but I just couldn't get it to work the way I wanted to and I really struggled to find references for it, so I went with the pose you see here, that I found references for by accident while looking for the other one. I have to admit, seeing the final product I think this pose might actually have been the better choice anyway.
The mountain/cliff/whatever I was also having a hard time finding references for, at least for exactly what I wanted, so in the end I had to mostly wing it. I think it turned out okay, though.
The wings were probably the most challenging part to plan because I wanted something between traditional butterfly/fairy wings and something that stretches out farther like bird or bat wings. I toyed with the lines for a long time until I got something I was happy with, and then I actually went in and did the constellation lines for both sides by hand instead of doing one side and making a flipped copy, because I wanted to make sure I kept the overall shape of the wing on the (our)right (her left), as after all the warping I did to get the original lines, I wasn't sure I could replicate the process again.
I also drew 2 or 3 versions of a simple dress over the figure before giving up because I wasn't happy with how any of them were turning out and decided that I would instead preserve her modesty with magically misty cloud-things. Although, it's kind of a shame because that ended up mostly hiding the one piece of hair clinging over her left (our right) shoulder. :P
But once the digital sketch was done so I had some idea of what I was doing, it was time to move on to the traditional, actual artwork.
I cut a piece of my 100% cotton paper down to size (nice paper because I didn't want to be held back in that regard--go big or go home, as they say) and then held it up to me screen to trace my cliff lines into place, and some vague markers for the figure and her wings.
My idea from the very beginning was to make the galaxy largely with watercolor in such a way that it gives the wings color and focus, without having to actually color all the individual segments. This means lighter colors towards the main area of the wings, and getting darker as I moved out/away from them.
Now, because it has been a while since I was painting with watercolors regularly, I did set aside a smaller piece of the same paper and busted out a practice baby galaxy before diving into the final. I learned very quickly I was going to have to be extremely careful with my placement of this orangey color and black, less either of them ends up mixing with colors they weren't supposed to and leaving me with a big muddy mess. (The practice piece did survive though and I'll be posting it some other time.)
Before I could get to the fun part [the galaxy] though, I painted the mountain with a mixture of black and blue, which actually went a lot smoother than I thought it would. It took several light layers of blending out the paint built up slowly, but ultimately I'm pretty happy with how the color for it turned out...Even if it's still kind of up for debate how much it looks like a "mountain" or "cliff-edge" or not.
With that out of the way, I cut some paper to act as a mask for that section and then spent far too long going back and forth, putting down layers of color and blending them out, dabbing color on and waiting for it to dry, rinse, repeat, trying to get the Galaxy portion just right. I was actually having a fair amount of trouble getting the right color balance, and as sometimes happens with these things, I was pretty worried about how it was looking before I went to bed that night. (I had procrastinated just long enough that I had 2 nights to do this is; the bulk of the painting took place on night 2) But the next day, once it was fully dry, it didn't look so bad.
It did need just a few more touches before I went in and added the splatter/stars, though. So I broke out the colored pencils, which I really should have done sooner because they were much easier to blend out and had a bit more covering power over the watercolor than...more watercolor because watercolor is often transparent and there it can be hard to cover with it.
Admittedly, I still had more worries about the "naked" galaxy, but then I went to splatter town with the white, added a few pointed stars, and as it usually does, that really brought everything together and made it look a lot better. Never underestimate the power of a good splatter-fest! ;)
I must say though, I underestimated the combination of the white watercolor and white colored pencil together when I moved on to the figure and wings. I was trying very hard to not use my white gel pen (because the rules for the contest didn't say if it was okay to use non-Arteza supplies in conjunction with Arteza supplies or not) and so I was sort of bending over backward to find another way with my limited resources. (Although I assumed using a lightbox to see the lines underneath the paint, as is a normal practice for me, wouldn't really matter because it's not like you can really tell from the final product anyway.)
Still, even though a mixture of paint lifting, the white colored pencil, and the white watercolor were better than I expected, I still ended up having to punch the lines up a bit digitally to get them to pop the way I wanted them to. But oh well, at least it made a nice glowing effect and mostly worked for the cloud-mist covering. :P
Overall though, I do really like how it turned out. If it weren't a little on the small side I might actually consider using it as my new wallpaper/banner art everywhere. Maybe that's a conversion project of some kind for another day?
Point being, I'm pleased. I probably won't place in the contest because I'm just too small of a fish in this pond, but I made some pretty art and it was mostly fun, so no harm done. :)
Actually, if this could maybe be the excuse my brain needs to get back into posting regularly, that would actually be really great. I miss it, despite what my most recent journal entry and my spotty activity levels might lead one to believe. If it is, I hope you guys don't mind seeing some crafty things thrown into the mix! :D
____
Artwork © me, MysticSparkleWings
____
Where to find me & my artwork:
My Website | Commission Info + Prices | Ko-Fi | dA Print Shop | RedBubble | Twitter | Tumblr | Instagram
2 notes
·
View notes
Text
Important: How to Use Antimicrobial Herbs to Heal Your Gut
Antimicrobial herbs are the top natural treatment for gut issues, like SIBO, dysbiosis, parasites and yeast overgrowth.
Here’s all you need to know and how to use them.
Antimicrobial Herbs 101
Herbal therapies have been used for centuries as the preferred “drugs” of choice for addressing illness—from stomach aches, viruses, colds and flu’s.
Long before researchers mentioned the words “gut microbiome,” people knew there was powerful healing in nature’s medicine for reversing disease.
Types of Antimicrobial Herbs
Some of these powerful herbal agents include:
Peppermint
Berberine
Garlic (Alicin)
Olive Leaf
Oregano Oil
Grapefruit Seed Extract
Pau d’arco
Black Walnut
Resveratrol
Licorice
Echinacea
Goldenseal
Oregon grape
Barberry
Wormwood
Thyme
Stinging Nettle
Uva Ursi
Yerba Mansa
Caprylic Acid
Cat’s Claw
Manuka honey
Tea tree oil
Curcumin
Clove
Cinnamon
Astragalus Root
Colloidal silver
“Antimicrobial” protocols—herbal therapies—are often part of a “healing” gut protocol if dysbiosis (too much or too little gut bacteria), SIBO, fungal or yeast overgrowth, parasites or gut infections are identified as a “root cause” behind poor health. Treatment of these “gut issues” typically a two-stage treatment approach:
Eradicate or reduce pathological organisms
Restore a healthy gut microbiome
In most cases of dysbiosis, except for significant fungal overgrowth, a short period of antimicrobials (30-60 days) commences, followed by a more significant focus on restoring the healthy gut microbiome.
Generally speaking, a blend of botanical herbs in supplement form is recommended for most cases of dysbiosis for a “broad spectrum” approach to healing. However, depending on the certain pathogenic organisms identified on a stool or SIBO breath test, some people find treating specific organisms with research-backed specific agents may be effective (such as grapefruit seed extract for the overgrowth pseudomonas aeruginosa).
Lastly, given the fact that antimicrobial herbs can be powerful, is also recommended you combine antimicrobial treatment with adjunct supports to aid in both complete eradication/reduction of pathogenic organisms, as well as the preservation of any healthy bacteria you do have. Support agents for an antimicrobial protocol include:
Antimicrobial Treatment: Support Agents
Quality probiotic & symbiotic (a probiotic + prebiotic).
To maintain a healthy gut microbiome as some bacteria die off. (Ideally taken away from antimicrobial herbs; particularly a soil-based bacteria). Medium-chain fatty acids extracted from coconut oil that are antiparasitic in addition to being antifungal, antiviral, and antibacterial. Great for boosting immunity and warding off yeast.
Biofilm Disruptor.
Pathogenic bacteria can form biofilm around their outer layer—sort of like “steel armor” for preventing destruction. Biofilm may be one of the primary drivers of resistance and treatment failure in multiple disease, antimicrobial and/or antibiotic treatments. Biofilm disruptors help break up biofilm to allow your other antimicrobial agents to work. (ex. NAC, Cranberry, Biocidin, Colloidal silver, Xylitol, Manuka honey, Interfase Plus)
Least Restrictive “Real Food” Diet.
Many people go on an “anti-candida,” ketogenic or “no carb” diet while “healing their gut.” However, these can be counterproductive to resetting your gut microbiome, given the fact that some starchy plants and pre-biotics are needed to feed healthy gut bacteria and bring pathogenic bacteria “out to play.” Prebiotics found in starchy plants and veggies help your antimicrobials work even better (so there is bacteria for them to target). Aim for 1 to 2 servings per day of starchy plants and/or prebiotic fibers while on an antimicrobial herbs protocol.
“But isn’t medicine more powerful?”
Herbal therapies are at least as effective as rifaximin—the typical conventional antibiotic treatment for resolution of gut dysbiosis (i.e. SIBO, candida, parasites and IBS)—if not more. In one study, 104 patients diagnosed with SIBO with the lactulose breath test were treated either with Rifaximin (1,200 mg) or a cocktail of herbal antimicrobials (see below) for 4 weeks before repeating the lactulose breath test.
The study showed that 46% of the patients treated with herbal antimicrobials were successfully treated while only 34% were free of SIBO after taking Rifaximin (1).
Recommended Antimicrobial & Support Agents to Buy
Here are my top recommended supplements for using in your “gut healing protocol.”
Antimicrobial Herbs
Biotics FC Cidal + Dysbiocide
Roasted Garlic
Symbiotic Probiotic
Seed Probiotic
Soil Based Probiotic
Terra Flora
Monolaurin
Lauricidin
Biofilm Disruptor
Interfase Plus
-or-
Biocidin
Sample Antimicrobial Protocol
Pre-Breakfast:
Symbiotic Probiotic (probiotic + prebiotic)
Breakfast
Antimicrobial Herbs (broad spectrum supplement)
Monolaurin
Mid-Morning
Biofilm Disrupter
Lunch
Soil Based Probiotic
Mid-Afternoon
Biofilm Disrupter
Dinner
Antimicrobial Herbs (broad spectrum supplement)
Monolaurin
Post Dinner
Herbal Tea (optional)
Antimicrobial Protocol Treatment Timeline
Dysbiosis-Pathogenic (high amount of pathogenic and/or commensals bacteria): 60 Days
Dysbiosis-Healthy Overgrowth (high amount of “beneficial” bacteria on stool test and possibly yeast markers): 30 Days
Insufficiency Dysbiosis (lack of healthy bacteria with a few pathogenic bacteria): 30 Days, followed by emphasis on Probiotics & Prebiotics
Parasites: 60 Days
SIBO: Low/Mild: 30 Days, Moderate: 60 Days, High: 90 Days
Beware: Herx (“Healing”) Reactions May Happen
A die-off reaction, also called a Herxheimer reaction or “Herx reaction”, can occur whenever you first start a new supplement or antimicrobial protocol—often a sign of a “detox” or die off of certain bacteria.
Typically, Herx symptoms develop within a couple of hours to several days after treatment and last anywhere from a few days to several weeks or months—depending on the severity of the underlying pathology you are treating. However, depending on the location of the bacteria, symptoms may develop later. The Herxheimer reaction is especially seen during antimicrobial treatments (gut healing protocol) because antimicrobials destroy numerous microorganisms and bacteria.
Although the Herxheimer reaction is typically not harmful, it does frequently cause temporary pain, discomfort, and worsening of symptoms. Symptom severity is often indicative of the level of inflammation triggered by the immune system.
Common symptoms that may develop or worsen due to a Herxheimer response include:
Bloating
Brain Fog
Chills
Cold Sweats
Constipation
Cramps
Diarrhea
Fatigue
Fever
Headaches
Irritability
Joint Pain
Lethargy
Muscle Pain
Nausea
Skin Irritation
Sore Throat
Because of the sudden worsening of symptoms, it is common for patients to feel that the severity of their condition has increased due to the treatment. However, even though treatment causes a temporary increase in symptom intensity due to greater release of toxins the condition ultimately improves. The body responding in this way usually means that the treatment is actually working effectively.
Nevertheless, even though a Herxheimer reaction indicates that treatment is working effectively, it doesn’t make the patient’s condition any more comfortable in the immediate.
Fortunately, there are several ways of limiting the symptoms of a Herxheimer reaction without inhibiting treatment efficacy. The following suggestions can and should be used when detoxing, using antibiotics, or being treated for infections and other forms of chronic disease to limit Herxheimer intensity, including:
How to Deal with HERX Reactions
Drink H20. Drink plenty of fluids to aid in the removal of toxins and help cleanse the GI tract.
Get Your Zzzz’s. The body conducts many restorative processes while at rest that it cannot accomplish when it is awake. When experiencing a Herxheimer reaction due to greater toxicity, it is best to allow more time for quality sleep.
Sweat. Sweat it out with heated yoga, sauna and daily movement—a natural essential for detoxification.
Try Dry Brushing & Rebounding. Two lymphatic “cleansing” tactics to help flush the lymphatic track.
References
Chedid, V., Dhalla, S., Clarke, J. O., Roland, B. C., Dunbar, K. B., Koh, J., Justino, E., Tomakin, E., … Mullin, G. E. (2014). Herbal therapy is equivalent to rifaximin for the treatment of small intestinal bacterial overgrowth. Global advances in health and medicine, 3(3), 16-24.
The post Important: How to Use Antimicrobial Herbs to Heal Your Gut appeared first on Meet Dr. Lauryn.
Source/Repost=>
https://drlauryn.com/gut-health/antimicrobial-herbs-heal-gut-naturally/ ** Dr. Lauryn Lax __Nutrition. Therapy. Functional Medicine ** https://drlauryn.com/
10 notes
·
View notes
Text
How Is Auto Hail Damage Repair Done With Paintless Dent Removal
How Is Auto Hail Damage Repair Done With Paintless Dent Removal
You just got an alert on your phone that a severe thunderstorm is approaching your area. The storm is bringing with it strong winds, a possible tornado, and some large damaging hail. But your car is stuck outside and there is nowhere to get it covered before the hail starts falling.
You get yourself to a safe place to wait out the storm and hope that it will miss your location and your car will be saved from the large hailstones. Now that the storm is cleared you are able to go outside to see if your car has survived and at first sight, it doesn’t look like there is any damage. You now feel relieved that you’ve been saved.
The next day you decide to wash your car wanting to get it looking great again but as you are drying it off you start to notice a few small dents that weren’t there before. You continue cleaning the car and are beginning to see even more marks and you realize that your car did suffer hail damage.
youtube
What is Paintless Dent Removal For Hail Damage
You begin researching about getting the hail dents out of your car and come across a unique way to fix dents called Paintless Dent Repair. You find out that this is the best option to repair those little dings in your car and that it is actually recommended by your insurance company. Even your vehicle manufacturer says this is better for your car since it saves that original factory paint finish and keeps the car up to the OEM specs by keeping all the car’s original parts.
You’ve now decided that paintless dent removal is what you want to use to get your car back to its excellent condition. But you are curious about just how Auto hail damage repair is done with Paintless dent repair.
Do You Need Your Car Repaired? Contact Us Today For A Hail Damage Inspection Appointment
How To Repair Hail Damage On A Car With Paintless Dent Removal
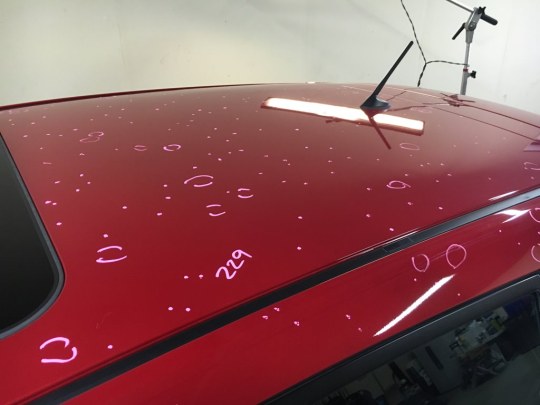
In order to properly fix all the hail damage to a car, it all starts with a thorough inspection of the damage. This starts with a clean car to better be able to see all the dents that are all over the vehicle.
Then a special light or reflection board will be used to find every dent that is on each panel. Sometimes a special paint marker will also be used to circle each dent so they can better be seen in a photo. This also helps to know the exact amount of the dent count.
One of the most common methods used to do paintless dent repair for hail damage is by pushing the dents out from inside the panel. To gain the access needed for this, many interior panels and exterior parts will need to be removed.
Many of the parts needed to be removed may include:
Headlights
Taillights
Hood insulator
Hood panel
Truck insulator
Trunk lid
Front and/or rear bumpers
Headliner
Sunroof assembly
Antenna
Inner door panels
Depending on how severe the hail damage is and if there are any other damaged parts that would need to be replaced there could be more items that will need to be removed.
For more info about how a vehicle headliner is removed for hail damage repair, check out this video. https://youtu.be/xaMYqpuOivI
The 3 Methods of Paintless Dent Repair Used for Hail Damage
The three methods a professional Paintless Dent Repair technician will use when repairing hail dents are
Pushing out the dent from the back of the panel
Glue pulling out the dents from outside the panel
Knocking down or bending the metal back from outside the panel
Pushing Out The Dents
When there are hundreds of small dents all over your vehicle the best and most efficient way to remove them. This method of paintless dent repair involves using special PDR tools. Most dent removal technicians will have thousands of dollars worth of these tools. The specialized tools include metal rods, sharp picks, small hand tools, and a variety of custom made tools.
The technician will then take these tools and apply gentle pressure and small micro pushes to the backside of the panel and under the dent. By using this slow process the tech is able to remove the dent cleanly and without any further damage to the panel or the outer painted surface.
Glue Pulling Out Hail Dents
In the process of dent repair for hail damage, there are many areas that there is limited or no access to the back of the panel. This can be due to obstructions or additional reinforcement to certain structural parts of the car.
In these areas is where glue pulling out the dents is used. A PDR tech can have hundreds or thousands of dollars to specialized glue pulling equipment. These glue tools included a variety of special glue tabs, custom glue guns, specialized glue, several different pulling tools, and a release agent.
This method of glue pulling takes the unique PDR glue that is designed just for cars. A small amount of glue is added to the PDR tab and then stuck to the center of the dent. After giving a few seconds or longer to cool and adhere to the panel, one of the dent pulling tools will be used to gently pull up the dent. If the glue is still stuck to the car, then a release agent will be used to remove it.
The process of glue pulling up the dent doesn’t result in just one try. Often the process has to be done several times to get the dent out. Most times the dented area will be left higher and knocking back down this high spot is needed. I’ll be sharing this next.
Knocking Down and Blending the Dents
When working on a car with hail damage there are a couple of reasons why knocking down and blending is needed. This is something that takes the skill of a highly trained Paintless dent tech to do correctly.
Whether it’s the process of pushing out the dent or glue pulling, knocking down any high spots or having to shape the metal from the outside will often be needed. Many techs will have several different types of knockdowns and tips they will use. These tools are designed to not cause any damage to the outside painted surface. The method of knocking down takes this tool and places the tip in the exact spot needed. Then by hitting it with a hammer with a light tap or several taps, it will slowly push the metal back down.
Blending is another form of dent removal. This special method is something that takes skill and practice to perform precisely. Special blending hammers are used for this technique. Blending is a form of knocking down but also uses the vibrations that happen when the metal is struck to move the metal back down or into the center of the dent.
Where To Have Auto Hail Damage Repair Car Fixed
Now that you know how paintless dent removal is done for hail damage and you want to know where a paintless dent repair shop near me is to remove your dents.
You can find us with our Excel Dent Removal location based in the Minneapolis Minnesota area. Our PDR technicians have over 20 years of specialized Paintless Dent Repair experience removing all kinds of dents from hail and just about every kind of car. You can trust that we will provide you with an excellent experience throughout the whole process.
For more information or to schedule an appointment to have our staff provide you with a hail damage repair inspection, you can find our contact info here at https://www.exceldentremoval.com/contact/ or just call us at (763) 780-4000.
We look forward to helping you get your car back better than it was before the storm.
© 2019 Excel Dent Removal | All Rights Reserved | Privacy Policy
763-780-4000 | [email protected]
Follow
Follow
Follow
Follow
Follow
This content can be found here
Excel Dent Removal
Home
How Is Auto Hail Damage Repair Done With Paintless Dent Removal published first on https://exceldentremovalblog.wordpress.com
0 notes
Text
How Is Auto Hail Damage Repair Done With Paintless Dent Removal
Via Excel Dent Removal
https://www.exceldentremoval.com/how-is-auto-hail-damage-repair-done-with-paintless-dent-removal/
How Is Auto Hail Damage Repair Done With Paintless Dent Removal
You just got an alert on your phone that a severe thunderstorm is approaching your area. The storm is bringing with it strong winds, a possible tornado, and some large damaging hail. But your car is stuck outside and there is nowhere to get it covered before the hail starts falling.
You get yourself to a safe place to wait out the storm and hope that it will miss your location and your car will be saved from the large hailstones. Now that the storm is cleared you are able to go outside to see if your car has survived and at first sight, it doesn’t look like there is any damage. You now feel relieved that you’ve been saved.
The next day you decide to wash your car wanting to get it looking great again but as you are drying it off you start to notice a few small dents that weren’t there before. You continue cleaning the car and are beginning to see even more marks and you realize that your car did suffer hail damage.
youtube
What is Paintless Dent Removal For Hail Damage
You begin researching about getting the hail dents out of your car and come across a unique way to fix dents called Paintless Dent Repair. You find out that this is the best option to repair those little dings in your car and that it is actually recommended by your insurance company. Even your vehicle manufacturer says this is better for your car since it saves that original factory paint finish and keeps the car up to the OEM specs by keeping all the car’s original parts.
You’ve now decided that paintless dent removal is what you want to use to get your car back to its excellent condition. But you are curious about just how Auto hail damage repair is done with Paintless dent repair.
Do You Need Your Car Repaired? Contact Us Today For A Hail Damage Inspection Appointment
How To Repair Hail Damage On A Car With Paintless Dent Removal
In order to properly fix all the hail damage to a car, it all starts with a thorough inspection of the damage. This starts with a clean car to better be able to see all the dents that are all over the vehicle.
Then a special light or reflection board will be used to find every dent that is on each panel. Sometimes a special paint marker will also be used to circle each dent so they can better be seen in a photo. This also helps to know the exact amount of the dent count.
One of the most common methods used to do paintless dent repair for hail damage is by pushing the dents out from inside the panel. To gain the access needed for this, many interior panels and exterior parts will need to be removed.
Many of the parts needed to be removed may include:
Headlights
Taillights
Hood insulator
Hood panel
Truck insulator
Trunk lid
Front and/or rear bumpers
Headliner
Sunroof assembly
Antenna
Inner door panels
Depending on how severe the hail damage is and if there are any other damaged parts that would need to be replaced there could be more items that will need to be removed.
For more info about how a vehicle headliner is removed for hail damage repair, check out this video. https://youtu.be/xaMYqpuOivI

The 3 Methods of Paintless Dent Repair Used for Hail Damage
The three methods a professional Paintless Dent Repair technician will use when repairing hail dents are
Pushing out the dent from the back of the panel
Glue pulling out the dents from outside the panel
Knocking down or bending the metal back from outside the panel
Pushing Out The Dents
When there are hundreds of small dents all over your vehicle the best and most efficient way to remove them. This method of paintless dent repair involves using special PDR tools. Most dent removal technicians will have thousands of dollars worth of these tools. The specialized tools include metal rods, sharp picks, small hand tools, and a variety of custom made tools.
The technician will then take these tools and apply gentle pressure and small micro pushes to the backside of the panel and under the dent. By using this slow process the tech is able to remove the dent cleanly and without any further damage to the panel or the outer painted surface.
Glue Pulling Out Hail Dents
In the process of dent repair for hail damage, there are many areas that there is limited or no access to the back of the panel. This can be due to obstructions or additional reinforcement to certain structural parts of the car.
In these areas is where glue pulling out the dents is used. A PDR tech can have hundreds or thousands of dollars to specialized glue pulling equipment. These glue tools included a variety of special glue tabs, custom glue guns, specialized glue, several different pulling tools, and a release agent.
This method of glue pulling takes the unique PDR glue that is designed just for cars. A small amount of glue is added to the PDR tab and then stuck to the center of the dent. After giving a few seconds or longer to cool and adhere to the panel, one of the dent pulling tools will be used to gently pull up the dent. If the glue is still stuck to the car, then a release agent will be used to remove it.
The process of glue pulling up the dent doesn’t result in just one try. Often the process has to be done several times to get the dent out. Most times the dented area will be left higher and knocking back down this high spot is needed. I’ll be sharing this next.
Knocking Down and Blending the Dents
When working on a car with hail damage there are a couple of reasons why knocking down and blending is needed. This is something that takes the skill of a highly trained Paintless dent tech to do correctly.
Whether it’s the process of pushing out the dent or glue pulling, knocking down any high spots or having to shape the metal from the outside will often be needed. Many techs will have several different types of knockdowns and tips they will use. These tools are designed to not cause any damage to the outside painted surface. The method of knocking down takes this tool and places the tip in the exact spot needed. Then by hitting it with a hammer with a light tap or several taps, it will slowly push the metal back down.
Blending is another form of dent removal. This special method is something that takes skill and practice to perform precisely. Special blending hammers are used for this technique. Blending is a form of knocking down but also uses the vibrations that happen when the metal is struck to move the metal back down or into the center of the dent.
Where To Have Auto Hail Damage Repair Car Fixed
Now that you know how paintless dent removal is done for hail damage and you want to know where a paintless dent repair shop near me is to remove your dents.
You can find us with our Excel Dent Removal location based in the Minneapolis Minnesota area. Our PDR technicians have over 20 years of specialized Paintless Dent Repair experience removing all kinds of dents from hail and just about every kind of car. You can trust that we will provide you with an excellent experience throughout the whole process.
For more information or to schedule an appointment to have our staff provide you with a hail damage repair inspection, you can find our contact info here at https://www.exceldentremoval.com/contact/ or just call us at (763) 780-4000.
We look forward to helping you get your car back better than it was before the storm.
© 2019 Excel Dent Removal | All Rights Reserved | Privacy Policy
763-780-4000 | [email protected]
Follow
Follow
Follow
Follow
Follow
How Is Auto Hail Damage Repair Done With Paintless Dent Removal published first on https://exceldent.wordpress.com
0 notes
Text
How Is Auto Hail Damage Repair Done With Paintless Dent Removal
https://www.exceldentremoval.com/how-is-auto-hail-damage-repair-done-with-paintless-dent-removal/
Via Excel Dent Removal
How Is Auto Hail Damage Repair Done With Paintless Dent Removal
You just got an alert on your phone that a severe thunderstorm is approaching your area. The storm is bringing with it strong winds, a possible tornado, and some large damaging hail. But your car is stuck outside and there is nowhere to get it covered before the hail starts falling.
You get yourself to a safe place to wait out the storm and hope that it will miss your location and your car will be saved from the large hailstones. Now that the storm is cleared you are able to go outside to see if your car has survived and at first sight, it doesn’t look like there is any damage. You now feel relieved that you’ve been saved.
The next day you decide to wash your car wanting to get it looking great again but as you are drying it off you start to notice a few small dents that weren’t there before. You continue cleaning the car and are beginning to see even more marks and you realize that your car did suffer hail damage.
youtube
What is Paintless Dent Removal For Hail Damage
You begin researching about getting the hail dents out of your car and come across a unique way to fix dents called Paintless Dent Repair. You find out that this is the best option to repair those little dings in your car and that it is actually recommended by your insurance company. Even your vehicle manufacturer says this is better for your car since it saves that original factory paint finish and keeps the car up to the OEM specs by keeping all the car’s original parts.
You’ve now decided that paintless dent removal is what you want to use to get your car back to its excellent condition. But you are curious about just how Auto hail damage repair is done with Paintless dent repair.
Do You Need Your Car Repaired? Contact Us Today For A Hail Damage Inspection Appointment
How To Repair Hail Damage On A Car With Paintless Dent Removal
In order to properly fix all the hail damage to a car, it all starts with a thorough inspection of the damage. This starts with a clean car to better be able to see all the dents that are all over the vehicle.
Then a special light or reflection board will be used to find every dent that is on each panel. Sometimes a special paint marker will also be used to circle each dent so they can better be seen in a photo. This also helps to know the exact amount of the dent count.
One of the most common methods used to do paintless dent repair for hail damage is by pushing the dents out from inside the panel. To gain the access needed for this, many interior panels and exterior parts will need to be removed.
Many of the parts needed to be removed may include:
Headlights
Taillights
Hood insulator
Hood panel
Truck insulator
Trunk lid
Front and/or rear bumpers
Headliner
Sunroof assembly
Antenna
Inner door panels
Depending on how severe the hail damage is and if there are any other damaged parts that would need to be replaced there could be more items that will need to be removed.
For more info about how a vehicle headliner is removed for hail damage repair, check out this video. https://youtu.be/xaMYqpuOivI

The 3 Methods of Paintless Dent Repair Used for Hail Damage
The three methods a professional Paintless Dent Repair technician will use when repairing hail dents are
Pushing out the dent from the back of the panel
Glue pulling out the dents from outside the panel
Knocking down or bending the metal back from outside the panel
Pushing Out The Dents
When there are hundreds of small dents all over your vehicle the best and most efficient way to remove them. This method of paintless dent repair involves using special PDR tools. Most dent removal technicians will have thousands of dollars worth of these tools. The specialized tools include metal rods, sharp picks, small hand tools, and a variety of custom made tools.
The technician will then take these tools and apply gentle pressure and small micro pushes to the backside of the panel and under the dent. By using this slow process the tech is able to remove the dent cleanly and without any further damage to the panel or the outer painted surface.
Glue Pulling Out Hail Dents
In the process of dent repair for hail damage, there are many areas that there is limited or no access to the back of the panel. This can be due to obstructions or additional reinforcement to certain structural parts of the car.
In these areas is where glue pulling out the dents is used. A PDR tech can have hundreds or thousands of dollars to specialized glue pulling equipment. These glue tools included a variety of special glue tabs, custom glue guns, specialized glue, several different pulling tools, and a release agent.
This method of glue pulling takes the unique PDR glue that is designed just for cars. A small amount of glue is added to the PDR tab and then stuck to the center of the dent. After giving a few seconds or longer to cool and adhere to the panel, one of the dent pulling tools will be used to gently pull up the dent. If the glue is still stuck to the car, then a release agent will be used to remove it.
The process of glue pulling up the dent doesn’t result in just one try. Often the process has to be done several times to get the dent out. Most times the dented area will be left higher and knocking back down this high spot is needed. I’ll be sharing this next.
Knocking Down and Blending the Dents
When working on a car with hail damage there are a couple of reasons why knocking down and blending is needed. This is something that takes the skill of a highly trained Paintless dent tech to do correctly.
Whether it’s the process of pushing out the dent or glue pulling, knocking down any high spots or having to shape the metal from the outside will often be needed. Many techs will have several different types of knockdowns and tips they will use. These tools are designed to not cause any damage to the outside painted surface. The method of knocking down takes this tool and places the tip in the exact spot needed. Then by hitting it with a hammer with a light tap or several taps, it will slowly push the metal back down.
Blending is another form of dent removal. This special method is something that takes skill and practice to perform precisely. Special blending hammers are used for this technique. Blending is a form of knocking down but also uses the vibrations that happen when the metal is struck to move the metal back down or into the center of the dent.
Where To Have Auto Hail Damage Repair Car Fixed
Now that you know how paintless dent removal is done for hail damage and you want to know where a paintless dent repair shop near me is to remove your dents.
You can find us with our Excel Dent Removal location based in the Minneapolis Minnesota area. Our PDR technicians have over 20 years of specialized Paintless Dent Repair experience removing all kinds of dents from hail and just about every kind of car. You can trust that we will provide you with an excellent experience throughout the whole process.
For more information or to schedule an appointment to have our staff provide you with a hail damage repair inspection, you can find our contact info here at https://www.exceldentremoval.com/contact/ or just call us at (763) 780-4000.
We look forward to helping you get your car back better than it was before the storm.
© 2019 Excel Dent Removal | All Rights Reserved | Privacy Policy
763-780-4000 | [email protected]
Follow
Follow
Follow
Follow
Follow
0 notes
Photo

The Dream Crosser
Surprise! NaPoWriMo didn't kill me (and I'm not abandoning dA because of the incoming Eclipse update either, more on that situation here), I just needed a week off to recuperate...and obsessively play Animal Crossing: New Horizons...
Admittedly, I actually drew this well over a month ago (and wrote up the majority of the description!), not just before NaPoWriMo but before I actually had New Horizons in my grasp. The plan was to post it the day I got the game. Which was supposed to be much closer to the game's launch (March 20th). That ended up not happening and the day I got the game was the first day of NaPoWriMo, but 1. I messed up with the non-uniform prompts and spent all of the day trying to catch up so I couldn't even play the game yet, and 2. As a side effect, I ended up having two posts that day and a lot of work to do to catch up the second, and I hardly had time to think about posting this. And even if I had posted it, it would've been drowned in the incoming NaPoWriMo posts.
And so, here we are.
Really, really, I do have to mention that I truly feel for anyone else still waiting on the game for whatever reason. You have my deepest sympathy and I'm so sorry I can't just give you the game right now and make it better. I know the wait was hard enough for me, being this is the one game I highly anticipated in over a year and I essentially had the rug yanked out from under me. But I'll save that story for after I talk about the art itself since I'm sure that's what most people are here for and not my pre-order frustrations.
So in case you don't know or couldn't tell, this is the lovely Luna from AC: New Leaf's Dream Suite. From what we've seen of New Horizons since it's release, the Dream Suite's functions and purpose have been mostly absolved into the Airport and Dodo Codes, and so I'm very doubtful Luna will actually be in the game in any capacity, which makes me sad. A typical player (including me) wouldn't even necessarily interact with Luna that much in New Leaf unless you really enjoy visiting other towns using Dream Codes, so I'm not sure what it is, but for some reason I just really like her.
That's why I picked her to draw to celebrate. I very nearly drew her a long time ago when I was on an Animal Crossing kick in 2018, but at the time I didn't like the idea of pressuring myself into drawing all and/or multiple AC characters just because I wanted to be "fair" to them all (much the same reason I don't draw Pokemon very often), so I ended up drawing One Little Spark, a crossover of the Disney character Figment drawn in the New Leaf style, instead. So in a way, she's had this coming for quite a while.
At the time I started working on her, (way back in early March, because I was hoping beyond hope my pre-order would arrive to me actually on launch day, but ha ha ha look who's got egg on her face for that ) I was running a bit dry on artistic motivation, and so while I tried to draw her in my usual manner: Making a sketch, transferring the sketch onto different paper with finalized lines, then picking whichever coloring method I was most into at the time), I was struggling with the sketch. I've had days where I have to work on a sketch for a really long time before I can get something I'm happy with, but this day I was just so not into the whole sketching process. I wanted to create, but I wanted it to be quick and easy and simple. I didn't want to have to poke at it for hours and hours and then still maybe not be happy when I was done. So when I got discouraged enough, I broke away from trying to draw Luna and just drew mandalas instead. (As had become my art-block crutch for a little while.)
Somewhere in me, as I worked on other things, I kept going back and forth on what to do about Luna, though. I did still want to draw her, but my usual formula just wasn't working for me. Not for her. I even tried briefly to draw her linelessly, digitally, as what was supposed to be a quick and simple experiment, but that went downhill even faster than sketching did. Although, for some reason, the lineless idea wouldn't leave me alone after that.
Finally, I decided to try something completely different. I was going to try and free-handedly draw her, without lines, traditionally. With, primarily, alcohol markers.
Honestly, the thought minorly horrifies me now just as much as it did before I started. And yet, here we are and I actually like how it turned out. Allow me to explain how this came together:
So, since I wasn't sure how this was going to turn out once I decided to try it, I opted to use my not-so-great mixed media paper so I wouldn't feel guilty about wasting better paper if I ended up hating it. Naturally, this did lead to some notable limitations, but not enough to discourage me from trying.
I dove right in with the dark brown for her head and body, focusing on getting the general shapes down. I'd noticed some glaring mistakes in my mostly unproductive sketching when it came to Luna's body proportions, so I tried to keep those things in mind and adjust accordingly as I went. It was scary because there is no erasing this way short of using white paint and because this paper feathers pretty noticeably with markers.
Then once I got to a certain point, I had to switch and bring in some pink and off-white markers to draw in parts of her dress so I knew where to put her other arm and her legs. And here is where I technically cheated; I did use my "clear" Stardust Gelly Roll pen to do most of the outlines for her dress. I needed some kind of guideline, but pencil tends to get yucky when you put markers on top and at the time I couldn't really think of a better option. (The joke was kind of on me because somehow I still got a nasty gray line that looked like pencil under her bust that I had to gently edit out later in Photoshop, but I digress.)
As I went with the markers, I was also doing some light shading. Not too much, because this paper is really fussy with layers and blending, but enough that I felt like it didn't look completely flat and I could tell where one shape ended and another started. Though, for her nose (trunk? I believe Luna is supposed to be a Tapir) and her raised arm, I had to get a little creative and I used a white brush pen meant for glass/ceramics to put in the lines so you could actually see them. And later I would use the same pen in 3-4 layers to add the white back in for her eyes.
With the base for her body, dress, and the bun part of her hair done though, then I had the task of figuring out what to do for her shoes and the details of her face. (Without having to mix and use specific paint for those tiny details.)
In the end, I opted to mostly use my classic red Gelly Roll pen for her shoes, and a little bit of a dark red alcohol marker for shading. And then I got to experiment with mixing the classic red and one of the Moonlight Gelly Rolls for her lips so that the color would be visible and not just a dark lip-shaped "what is this." This was because the classic Gelly Rolls don't show up super well on dark surfaces and the Moonlight ones do, but I didn't have the right color straight out of a Moonlight pen. It did take 2-3 careful layers, but I think I managed well enough in the end.
I used just one black pen, a Prismacolor brush-tip fine liner, for her eyes, though in-person the white base underneath makes her pupils look about a shade or two lighter from certain angles, which was a very unintentional nice touch.
My answer to everything else ended up being gouache, although I did try to come up with pen colors for her eye shadow and the blue dots on her cheeks before admitting defeat that I just didn't have the colors I needed.
Originally, I had actually been thinking of trying a lineless art piece with gouache, as I think it would work particularly well for that look, but I wasn't ready to fully commit to the idea, mostly because I seem to be even worse at mixing a non-excessive amount of a specific color with gouache than I am with acrylics, and that sounds like a fantastic way to waste a bunch of palette space because I mixed too much but it's gouache so it can be re-wet and re-use it and I don't want to just throw it away... (Although I suppose this could be half-way solved by getting a bigger palette specifically for mixing gouache, but I also don't want to have to buy yet another palette when I have some perfectly good ones...If I could just use up all the paint in them already...)
Anyway. Point: This is kind of a step between a full lineless gouache piece and not doing one at all. Baby steps, yes?
I knew from fairly early on that I was probably going to have to use gouache for the front part of her hair/bangs, since I did not thoroughly plan ahead enough and didn't leave a gap there to do it with markers. Fortunately, I didn't have to do much mixing since my gouache already has a nice yellow ochre color included, and I could use a bit of the other two browns and one I had some leftover mixed already from Roses in Your Eyes for shading. (White for the flowers, too, thank goodness.) And I actually ended up going over most of her bun with gouache too since, by comparison, the marker didn't look like it had much shading and it was bothering me.
I did have to mix my own blue and pinky-purple for her makeup, and I ended up with a lot of leftover pinky-purple. But it's kind of okay because by itself it's such a pretty color I'm sure I'll find an excuse to use that one.
After that, I just had to do some minor tweaks where the gouache had gotten a bit away from me and then I went ham on the shading for the dress based on my reference photo.
Then I realized I wanted some kind of background because this seemed awfully boring without one. And, naturally, I hadn't really planned ahead for that, me being me and being in habit of doing the background last...
At first, I wanted to do something hot pink, since her official Amiibo card has a hot pink background, but then I thought that might be a little too loud and I wasn't really sure the best way to apply one without potentially messing her up. And also, this isn't watercolor or paper thicker than 140 lb, which immediately threw watercolor out the window unless I wanted a very uneven paper when I was finished. I'd already pushed my luck with the gouache and been very careful about not using much water with it; I decided it was best not to push my luck any farther.
Also, I couldn't use my pink PanPastel, despite that being maybe my best option, because it is still perpetually screwed onto the little Pan Pastel stack with no hope of getting unstuck anytime soon. (One of these days I swear, I will order either another set like the one I have or an individual Pink one to solve this problem, but until then, I am going to bring it up every single time as a caution to others to please be very careful when screwing and unscrewing your own Pan Pastels if you store them screwed together.) And I didn't feel like dragging out some of my drawing pastels and/or makeup that's too expired to use on my face and very slowly building up color and hoping it'll do what the Pan Pastels do.
With no better ideas coming to me, I decided I'd leave the drawing for the night and come back to it the next day.
After yet more brainstorming the next day, I finally settled on doing a glittery rounded rectangle and filling it with washi tape stripes. This plan did change a little as I figured out which tapes I wanted to use (a purple-y, champagne gold, and light pink ones, the latter two of which look more different in-person than they do on the scan) and as I actually started applying the lines. Partially because this tape is a bit thin and partially because I'm not used to cutting tape around very specific shapes, it took a very long time to both place strips of the tape and then get them cut to fit right up to Luna without looking strange.
Once I got to a certain point going in one direction, I realized my next couple of cuts were just going to be too hard for me to stand. I had a choice: Ditch the tape, or figure something else out.
Taking a risk, I decided to try and salvage it by doing an almost-plaid/checkerboard with the tape, specifically leaving out certain areas where I knew it would be too tricky to cut the tape. This also turned out to be a good way to use up some of the pieces of tape I'd already cut off that were too small to be used the other way. It's still not the greatest background solution I've ever come up with, but it does the job of making it look less empty, and that's really all I wanted anyway.
And you know, compared to official images her proportions look wonky, but by herself (meaning, without comparing the two) I think Luna looks pretty good, actually. (Though, I admit I did have to tweak her right ear in Photoshop because it came out entirely too long and there wasn't really a good way for me to fix it by hand.)
To think, this piece started out as such a mess. Or rather, I was such a mess when I started. And yet, here we are, and it looks kinda okay. Okay enough that I finished it and am posting it, at least.
I have no idea if I'll be returning to this style/method for art-making in the future, but even if I don't it was a nice experiment to try, and that's what art is really all about isn't it? Experimenting, trying new things?
Speaking of experimenting though, about those pre-order frustrations I mentioned now that I've covered everything about the art itself...(in small text for those that don't care to easily skip over)
Back in February I tried twice to pre-order New Horizons from Target, since they were running an ad where if you pre-ordered the game you'd also get an AC themed journal with it, and that combined with my family member's employee discount made it the cheapest/best value way for us to buy the game. As I said, I tried to order it twice. Both times, it was sold out. My family member had even tried to go to the store and have them order it before then, to no avail.
After the second time, which was the day after Target sent out the sale paper with the new ad in it, while I was still frustratedly wondering how on earth do you sell out of a pre-order?? I kept refreshing the page every so often just to see if by some fluke it would miraculously not be sold out. I got very lucky around 3 in the afternoon and we managed to get the order in before it sold out again.
Now, we're a relatively cheap family, so we didn't pay for the "express shipping" or whatever. Although, this was a $60 game and we were ordering it three whole weeks (on March 2nd) before release. If you ask me, the least they could do is have it shipped out either on launch day (March 20th) or the day after. Especially if I can pre-order a book on Amazon with three days' notice and they can still get it to me on release day. But, okay, I could live with waiting an extra day or up to maybe three if I had to. (And, to be fair, this was all before a certain virus exploded into chaos here in the US.)
Much to my dismay, a week before NH release day, I checked the order status with Target only to be told I wouldn't get it until the 26th. A week later. That was pretty disappointing at the time, but it didn't really bother me until the day before and the day of launch when some people were getting their pre-orders early from places like Amazon and Best Buy (and some of them didn't even pay for the express shipping option from their selected source). If those two companies could plan around virus constraints to do that, why in the heck couldn't Target?
But, okay, fine. Maybe the virus had something to do with it and they were really doing the best they could. Whatever. A week. Fine. I'll wait a week.
A few days later though, we got an email saying: Surprise! Don't expect your dumb video game until April 3rd because we couldn't get our act together! (Okay, that's not what it really said, but that's what it felt like.)
And I know, I promise I so know there are much more serious issues going on in the world right now and a video game about talking animals isn't exactly a priority shipment. I know. But it was still massively upsetting after I'd already waited so long. And, honestly, I feel like they had plenty of time and notice to take care of the game before everything else exploded and messed it all up. Again, especially if other companies already had time to even ship orders early and/or get the games to people on launch day. Or the day after. TWO WEEKS after launch, and you don't tell me about the secondary delay until the week I started expecting the game to already be in the mail on it's way to me?
The only tiny silver lining is that as I was checking the order to make sure it didn't miraculously get pushed back to sometime in 2021 (because I really had no faith in Target's time estimates at this point) is that it did get bumped back up to April 1st. Although, I did think that it would be the absolute least funny April Fools' Day Joke ever if the day came and it was late because screw me. But it did arrive to me on April 1st as promised; I just had a million other things to do before I could play it. )
And I will say, I know I could've just canceled the pre-order and bought the game digitally, but it was enough of a hassle to order it in the first place, and if I did that I'd also lose my pre-order bonus. And all that aside, I specifically wanted a physical copy to begin with. I always prefer that when it's possible. So people on the internet that want to eat me alive for not canceling when the shipping got screwed up, there are my reasons. Take 'em or leave 'em. (Seriously, I've seen some people be really rude about this just because they didn't like hearing people upset that they didn't have the game yet...when they already had it themselves or didn't care about AC in the first place...)
Moral of the story: Don't pre-order from Target. Or, at least, don't expect the item to actually get to you right around release day. Account for at least two additional weeks of not having the thing.
...Seriously though, how do you sell out of a pre-order?? At least, when it's a highly anticipated game and you're a big company and not some small indie company with limited resources! Sheesh!
Anyway. I have the game now, I've been playing it as much as possible and enjoying it. I still have a ways to go before my island is "complete" per se, but it's coming along nicely and I feel more comfortable now taking some more time away from it to get back into the swing of making art and things like that. So hopefully I'll be getting back into a regular posting schedule and you'll have that to look forward to.
____
Artwork © me, MysticSparkleWings
____
Where to find me & my artwork:
My Website | Commission Info + Prices | Ko-Fi | dA Print Shop | RedBubble | Twitter | Tumblr | Instagram
2 notes
·
View notes
Text
How Is Auto Hail Damage Repair Done With Paintless Dent Removal
https://www.exceldentremoval.com/how-is-auto-hail-damage-repair-done-with-paintless-dent-removal/
Via Excel Dent Removal
How Is Auto Hail Damage Repair Done With Paintless Dent Removal
You just got an alert on your phone that a severe thunderstorm is approaching your area. The storm is bringing with it strong winds, a possible tornado, and some large damaging hail. But your car is stuck outside and there is nowhere to get it covered before the hail starts falling.
You get yourself to a safe place to wait out the storm and hope that it will miss your location and your car will be saved from the large hailstones. Now that the storm is cleared you are able to go outside to see if your car has survived and at first sight, it doesn’t look like there is any damage. You now feel relieved that you’ve been saved.
The next day you decide to wash your car wanting to get it looking great again but as you are drying it off you start to notice a few small dents that weren’t there before. You continue cleaning the car and are beginning to see even more marks and you realize that your car did suffer hail damage.
youtube
What is Paintless Dent Removal For Hail Damage
You begin researching about getting the hail dents out of your car and come across a unique way to fix dents called Paintless Dent Repair. You find out that this is the best option to repair those little dings in your car and that it is actually recommended by your insurance company. Even your vehicle manufacturer says this is better for your car since it saves that original factory paint finish and keeps the car up to the OEM specs by keeping all the car’s original parts.
You’ve now decided that paintless dent removal is what you want to use to get your car back to its excellent condition. But you are curious about just how Auto hail damage repair is done with Paintless dent repair.
Do You Need Your Car Repaired? Contact Us Today For A Hail Damage Inspection Appointment
How To Repair Hail Damage On A Car With Paintless Dent Removal
In order to properly fix all the hail damage to a car, it all starts with a thorough inspection of the damage. This starts with a clean car to better be able to see all the dents that are all over the vehicle.
Then a special light or reflection board will be used to find every dent that is on each panel. Sometimes a special paint marker will also be used to circle each dent so they can better be seen in a photo. This also helps to know the exact amount of the dent count.
One of the most common methods used to do paintless dent repair for hail damage is by pushing the dents out from inside the panel. To gain the access needed for this, many interior panels and exterior parts will need to be removed.
Many of the parts needed to be removed may include:
Headlights
Taillights
Hood insulator
Hood panel
Truck insulator
Trunk lid
Front and/or rear bumpers
Headliner
Sunroof assembly
Antenna
Inner door panels
Depending on how severe the hail damage is and if there are any other damaged parts that would need to be replaced there could be more items that will need to be removed.
For more info about how a vehicle headliner is removed for hail damage repair, check out this video. https://youtu.be/xaMYqpuOivI

The 3 Methods of Paintless Dent Repair Used for Hail Damage
The three methods a professional Paintless Dent Repair technician will use when repairing hail dents are
Pushing out the dent from the back of the panel
Glue pulling out the dents from outside the panel
Knocking down or bending the metal back from outside the panel
Pushing Out The Dents
When there are hundreds of small dents all over your vehicle the best and most efficient way to remove them. This method of paintless dent repair involves using special PDR tools. Most dent removal technicians will have thousands of dollars worth of these tools. The specialized tools include metal rods, sharp picks, small hand tools, and a variety of custom made tools.
The technician will then take these tools and apply gentle pressure and small micro pushes to the backside of the panel and under the dent. By using this slow process the tech is able to remove the dent cleanly and without any further damage to the panel or the outer painted surface.
Glue Pulling Out Hail Dents
In the process of dent repair for hail damage, there are many areas that there is limited or no access to the back of the panel. This can be due to obstructions or additional reinforcement to certain structural parts of the car.
In these areas is where glue pulling out the dents is used. A PDR tech can have hundreds or thousands of dollars to specialized glue pulling equipment. These glue tools included a variety of special glue tabs, custom glue guns, specialized glue, several different pulling tools, and a release agent.
This method of glue pulling takes the unique PDR glue that is designed just for cars. A small amount of glue is added to the PDR tab and then stuck to the center of the dent. After giving a few seconds or longer to cool and adhere to the panel, one of the dent pulling tools will be used to gently pull up the dent. If the glue is still stuck to the car, then a release agent will be used to remove it.
The process of glue pulling up the dent doesn’t result in just one try. Often the process has to be done several times to get the dent out. Most times the dented area will be left higher and knocking back down this high spot is needed. I’ll be sharing this next.
Knocking Down and Blending the Dents
When working on a car with hail damage there are a couple of reasons why knocking down and blending is needed. This is something that takes the skill of a highly trained Paintless dent tech to do correctly.
Whether it’s the process of pushing out the dent or glue pulling, knocking down any high spots or having to shape the metal from the outside will often be needed. Many techs will have several different types of knockdowns and tips they will use. These tools are designed to not cause any damage to the outside painted surface. The method of knocking down takes this tool and places the tip in the exact spot needed. Then by hitting it with a hammer with a light tap or several taps, it will slowly push the metal back down.
Blending is another form of dent removal. This special method is something that takes skill and practice to perform precisely. Special blending hammers are used for this technique. Blending is a form of knocking down but also uses the vibrations that happen when the metal is struck to move the metal back down or into the center of the dent.
Where To Have Auto Hail Damage Repair Car Fixed
Now that you know how paintless dent removal is done for hail damage and you want to know where a paintless dent repair shop near me is to remove your dents.
You can find us with our Excel Dent Removal location based in the Minneapolis Minnesota area. Our PDR technicians have over 20 years of specialized Paintless Dent Repair experience removing all kinds of dents from hail and just about every kind of car. You can trust that we will provide you with an excellent experience throughout the whole process.
For more information or to schedule an appointment to have our staff provide you with a hail damage repair inspection, you can find our contact info here at https://www.exceldentremoval.com/contact/ or just call us at (763) 780-4000.
We look forward to helping you get your car back better than it was before the storm.
© 2019 Excel Dent Removal | All Rights Reserved | Privacy Policy
763-780-4000 | [email protected]
Follow
Follow
Follow
Follow
Follow
How Is Auto Hail Damage Repair Done With Paintless Dent Removal published first on https://exceldentremovalblog.tumblr.com
0 notes
Text
How Is Auto Hail Damage Repair Done With Paintless Dent Removal
https://www.exceldentremoval.com/how-is-auto-hail-damage-repair-done-with-paintless-dent-removal/
Via Excel Dent Removal
How Is Auto Hail Damage Repair Done With Paintless Dent Removal
You just got an alert on your phone that a severe thunderstorm is approaching your area. The storm is bringing with it strong winds, a possible tornado, and some large damaging hail. But your car is stuck outside and there is nowhere to get it covered before the hail starts falling.
You get yourself to a safe place to wait out the storm and hope that it will miss your location and your car will be saved from the large hailstones. Now that the storm is cleared you are able to go outside to see if your car has survived and at first sight, it doesn’t look like there is any damage. You now feel relieved that you’ve been saved.
The next day you decide to wash your car wanting to get it looking great again but as you are drying it off you start to notice a few small dents that weren’t there before. You continue cleaning the car and are beginning to see even more marks and you realize that your car did suffer hail damage.
youtube
What is Paintless Dent Removal For Hail Damage
You begin researching about getting the hail dents out of your car and come across a unique way to fix dents called Paintless Dent Repair. You find out that this is the best option to repair those little dings in your car and that it is actually recommended by your insurance company. Even your vehicle manufacturer says this is better for your car since it saves that original factory paint finish and keeps the car up to the OEM specs by keeping all the car’s original parts.
You’ve now decided that paintless dent removal is what you want to use to get your car back to its excellent condition. But you are curious about just how Auto hail damage repair is done with Paintless dent repair.
Do You Need Your Car Repaired? Contact Us Today For A Hail Damage Inspection Appointment
How To Repair Hail Damage On A Car With Paintless Dent Removal
In order to properly fix all the hail damage to a car, it all starts with a thorough inspection of the damage. This starts with a clean car to better be able to see all the dents that are all over the vehicle.
Then a special light or reflection board will be used to find every dent that is on each panel. Sometimes a special paint marker will also be used to circle each dent so they can better be seen in a photo. This also helps to know the exact amount of the dent count.
One of the most common methods used to do paintless dent repair for hail damage is by pushing the dents out from inside the panel. To gain the access needed for this, many interior panels and exterior parts will need to be removed.
Many of the parts needed to be removed may include:
Headlights
Taillights
Hood insulator
Hood panel
Truck insulator
Trunk lid
Front and/or rear bumpers
Headliner
Sunroof assembly
Antenna
Inner door panels
Depending on how severe the hail damage is and if there are any other damaged parts that would need to be replaced there could be more items that will need to be removed.
For more info about how a vehicle headliner is removed for hail damage repair, check out this video. https://youtu.be/xaMYqpuOivI

The 3 Methods of Paintless Dent Repair Used for Hail Damage
The three methods a professional Paintless Dent Repair technician will use when repairing hail dents are
Pushing out the dent from the back of the panel
Glue pulling out the dents from outside the panel
Knocking down or bending the metal back from outside the panel
Pushing Out The Dents
When there are hundreds of small dents all over your vehicle the best and most efficient way to remove them. This method of paintless dent repair involves using special PDR tools. Most dent removal technicians will have thousands of dollars worth of these tools. The specialized tools include metal rods, sharp picks, small hand tools, and a variety of custom made tools.
The technician will then take these tools and apply gentle pressure and small micro pushes to the backside of the panel and under the dent. By using this slow process the tech is able to remove the dent cleanly and without any further damage to the panel or the outer painted surface.
Glue Pulling Out Hail Dents
In the process of dent repair for hail damage, there are many areas that there is limited or no access to the back of the panel. This can be due to obstructions or additional reinforcement to certain structural parts of the car.
In these areas is where glue pulling out the dents is used. A PDR tech can have hundreds or thousands of dollars to specialized glue pulling equipment. These glue tools included a variety of special glue tabs, custom glue guns, specialized glue, several different pulling tools, and a release agent.
This method of glue pulling takes the unique PDR glue that is designed just for cars. A small amount of glue is added to the PDR tab and then stuck to the center of the dent. After giving a few seconds or longer to cool and adhere to the panel, one of the dent pulling tools will be used to gently pull up the dent. If the glue is still stuck to the car, then a release agent will be used to remove it.
The process of glue pulling up the dent doesn’t result in just one try. Often the process has to be done several times to get the dent out. Most times the dented area will be left higher and knocking back down this high spot is needed. I’ll be sharing this next.
Knocking Down and Blending the Dents
When working on a car with hail damage there are a couple of reasons why knocking down and blending is needed. This is something that takes the skill of a highly trained Paintless dent tech to do correctly.
Whether it’s the process of pushing out the dent or glue pulling, knocking down any high spots or having to shape the metal from the outside will often be needed. Many techs will have several different types of knockdowns and tips they will use. These tools are designed to not cause any damage to the outside painted surface. The method of knocking down takes this tool and places the tip in the exact spot needed. Then by hitting it with a hammer with a light tap or several taps, it will slowly push the metal back down.
Blending is another form of dent removal. This special method is something that takes skill and practice to perform precisely. Special blending hammers are used for this technique. Blending is a form of knocking down but also uses the vibrations that happen when the metal is struck to move the metal back down or into the center of the dent.
Where To Have Auto Hail Damage Repair Car Fixed
Now that you know how paintless dent removal is done for hail damage and you want to know where a paintless dent repair shop near me is to remove your dents.
You can find us with our Excel Dent Removal location based in the Minneapolis Minnesota area. Our PDR technicians have over 20 years of specialized Paintless Dent Repair experience removing all kinds of dents from hail and just about every kind of car. You can trust that we will provide you with an excellent experience throughout the whole process.
For more information or to schedule an appointment to have our staff provide you with a hail damage repair inspection, you can find our contact info here at https://www.exceldentremoval.com/contact/ or just call us at (763) 780-4000.
We look forward to helping you get your car back better than it was before the storm.
© 2019 Excel Dent Removal | All Rights Reserved | Privacy Policy
763-780-4000 | [email protected]
Follow
Follow
Follow
Follow
Follow
How Is Auto Hail Damage Repair Done With Paintless Dent Removal published first on https://exceldentremoval.tumblr.com
0 notes
Text
Dear Mark: Collagen vs Whey Follow-Up
For today’s edition of Dear Mark, I’m answering questions from last week’s Collagen vs Whey post. You guys had a lot of questions, mostly about collagen, and I’m here to answer them. Can collagen help with plantar fasciitis? Should you take collagen and whey together in the same smoothie, or do they cancel each other out? If a person can’t have whey, is there an equivalent protein powder source? Is glycine a good replacement for collagen? What about liquid whey from raw milk—how does it compare to powdered whey? If I wanted to get my glycine from foods, what would I need to eat and how much of it?
Let’s find out:
Is there any evidence that collagen supplements can help with plantar fasciitis? Suffering from this recently and the stretching from MDA has helped but looking to get that last 10% of healing so there is no pain.
Fascia is basically pure collagen. If collagen supplementation has been shown to improve pain in other parts of the body made of collagen, like the knees or tendons, and improve collagen synthesis in collagenous tissues like skin and joints, I see no reason it shouldn’t also improve the fascia. Boosting collagen synthesis is boosting collagen synthesis, and supplemental collagen does it.
A good thing to try is eat 20-30 grams of collagen with 200 mg of vitamin C 30 minutes before a workout that you know targets your plantar fascia.
Hey Mark,
Is there any benefit to having them at the same time? Or do they cancel each other out?
I’m a big fan of stirring collagen into any foods I make that have sauce.
What about a 50/50 smoothie of whey and collagen?
Thanks for any insight!
I’m unaware of any unique benefit.
When you think about how collagen appears in the natural world, it’s usually alongside muscle meat.
Entire culinary traditions revolve around the consumption of collagen and muscle meat together. Think Vietnamese pho (bone broth and meat). Think French (reduced broth-based sauce poured over meat). Think Mexican (bone broth-infused rice served with meat). Hell, go all the way back to the Pleistocene and humans were boiling smashed bone fragments in stomach casings.
No reason to separate them.
It is possible for a person to be allergic to casein and I don’t think it’s possible to have fully casein free whey protein except maybe the isolate. However, if the person is allergic it wouldn’t be safe. What’s the next best complete protein if a person can’t use whey, and wants the convenience of a powder? I’ve seen beef protein before, but have no idea of the quality.
I’d say go for egg white protein. Extremely complete, tasteless, and blends seamlessly into anything.
Is it true that collagen doesn’t work/assimilate without vitamin C? I try to take mine with some cherries or lemons.
It seems to work better. The recent study that found pre-workout collagen improved tendons also included vitamin C.
I sometimes buy raw A2 milk from Jersey cows, and make my own whey. Wondering how that compares to powdered whey?
That’s awesome. The liquid whey will have a broader range of nutrients, but the powdered whey will be more concentrated and far higher in protein. Remember that whey protein is basically dehydrated liquid whey and you’ll get a picture of how much liquid whey goes into whey powder.
My interest in this has led me to start studying biology because I would like to know more about nutrition and digestion. Because the way that my nails changed seems incredible to me and it really makes me wonder what else collagen is doing.
You make a good point. I often use improvements in one area of health as assurance that other areas of health are also improving. I’m sure that’s not always true, but I think that’s a pretty safe assumption most of the time.
My question to you Mark would be to echo the same question others have posed, ie are there any downsides to me taking whey, collagen and glycine simultaneously in my pre-workout shake? Otherwise I have a real dilemma, as it appears that there is very good science to support having both collagen/ glycine as well as rapidly digested essential aminos (from whey) in your system before undertaking a ‘fasted’ workout.. A tough question I know but any insight you have would be much appreciated!
There’s no reason to avoid it. Do it. Should be good for both your connective tissue and your gains.
Would glycine supplements have a similar effect as collagen? Glycine supplementation would be way less expensive than collagen:
• 30 grams of collagen (=~10 grams glycine) from Great Lakes = 5 tablespoons, costs =~$1.13 if you buy the 8 pound bag.
• 10 grams of glycine from Bulk Supplements =~$0.18 if you buy the 5 kilogram bag.
Pure glycine is great for things like balancing your intake of methionine. As I wrote in the original post, muscle meat is high in an amino acid called methionine. Methionine metabolism depletes glycine, so the more meat you eat, the more glycine-rich connective tissue, bone broth, and collagen supplements you should be eating to balance out the amino acids. This is the basic foundation for eating all that collagen I recommend.
But balancing methionine for longevity and health isn’t the only reason we’re eating collagen. Collagen is the most abundant protein in the body, providing tensile strength to our bones, teeth, ligaments, tendons, and cartilage. It’s an important structural component of the skin, lungs, intestines, and heart. And as far as the evidence so far available suggests, eating the amino acids that make up collagen separately doesn’t have the same effect on those collagenous tissues as eating them together in a collagenous matrix.
In one study, rats with osteoporosis ate collagen hydrolysate that scientists had marked with a radioactive signature to allow them to track its course through the body. It survived the digestive tract intact, made it into the blood, and accumulated in the kidneys. By day 14, the rats’ thigh bones had gotten stronger and denser with more organic matter and less water content.
Another study found similar results, this time for cartilage of the knee. Mice who ate radioactive collagen hydrolysate showed increased radioactivity in the knee joint.
When you feed people collagen derived from pork skin, chicken feet, and cartilage, many different collagenous peptides appear in the blood. You don’t get any of those from isolated glycine.
All that said, pure glycine can be a helpful supplement. As mentioned, it’s great for balancing out methionine intake from muscle meat consumption. It’s also been used in several studies to improve multiple markers of sleep quality. And glycine is probably the most important component, if you had to choose just one, of collagen.
Collagen is ideal, but glycine isn’t a bad option. In fact, I’d argue that perhaps collagen plus supplementary glycine could offer the best bang for your buck.
Mark, can you please do a post examining the different amounts of glycine in actual foods, i.e. pork rinds, chicken skin, connective tissue rich cuts of meats, etc? I’d really like to get my collagen and glycine from food sources and know how much of the foods I would have to eat in order to get the 10g you mention.
I’ll do a quick answer.
An ounce of pork rinds gives you 3.38 grams of glycine.
An ounce of roasted chicken skin gives you 1 gram of glycine.
A pork tail of about 4 ounces will give you almost 3 grams of glycine. Oxtail should be about the same.
So getting your glycine from food alone is entirely doable, but you’ll probably have an easier time if you like chicharrones/pork rinds and animal tails. There are some higher quality pork rinds out there these days, like the Epic brand ones.
Hi Mark – thank you for all of your great information!!!
I make homemade Greek yogurt at home – I strain it in a fine mesh strainer and get an incredible about if whey as a result. I generally mix about 1/4 cup back into the yogurt to get the right consistency. I throw the rest out. Is this consumable as whey for the diet?
It is consumable. But keep in mind that liquid whey isn’t as protein-dense as whey powder. It’s still good to eat and a great source of probiotics.
Thanks for your questions, everyone. Take care!
(function($) { $("#dfW6S92").load("https://www.marksdailyapple.com/wp-admin/admin-ajax.php?action=dfads_ajax_load_ads&groups=954&limit=1&orderby=random&order=ASC&container_id=&container_html=none&container_class=&ad_html=div&ad_class=&callback_function=&return_javascript=0&_block_id=dfW6S92" ); })( jQuery );
window.onload=function(){ga('send', { hitType: 'event', eventCategory: 'Ad Impression', eventAction: '66572' });}
References:
Figueres juher T, Basés pérez E. [An overview of the beneficial effects of hydrolysed collagen intake on joint and bone health and on skin ageing]. Nutr Hosp. 2015;32 Suppl 1:62-6.
Shaw G, Lee-barthel A, Ross ML, Wang B, Baar K. Vitamin C-enriched gelatin supplementation before intermittent activity augments collagen synthesis. Am J Clin Nutr. 2017;105(1):136-143.
The post Dear Mark: Collagen vs Whey Follow-Up appeared first on Mark's Daily Apple.
Dear Mark: Collagen vs Whey Follow-Up published first on https://venabeahan.tumblr.com
0 notes
Text
Dear Mark: Collagen vs Whey Follow-Up
For today’s edition of Dear Mark, I’m answering questions from last week’s Collagen vs Whey post. You guys had a lot of questions, mostly about collagen, and I’m here to answer them. Can collagen help with plantar fasciitis? Should you take collagen and whey together in the same smoothie, or do they cancel each other out? If a person can’t have whey, is there an equivalent protein powder source? Is glycine a good replacement for collagen? What about liquid whey from raw milk—how does it compare to powdered whey? If I wanted to get my glycine from foods, what would I need to eat and how much of it?
Let’s find out:
Is there any evidence that collagen supplements can help with plantar fasciitis? Suffering from this recently and the stretching from MDA has helped but looking to get that last 10% of healing so there is no pain.
Fascia is basically pure collagen. If collagen supplementation has been shown to improve pain in other parts of the body made of collagen, like the knees or tendons, and improve collagen synthesis in collagenous tissues like skin and joints, I see no reason it shouldn’t also improve the fascia. Boosting collagen synthesis is boosting collagen synthesis, and supplemental collagen does it.
A good thing to try is eat 20-30 grams of collagen with 200 mg of vitamin C 30 minutes before a workout that you know targets your plantar fascia.
Hey Mark,
Is there any benefit to having them at the same time? Or do they cancel each other out?
I’m a big fan of stirring collagen into any foods I make that have sauce.
What about a 50/50 smoothie of whey and collagen?
Thanks for any insight!
I’m unaware of any unique benefit.
When you think about how collagen appears in the natural world, it’s usually alongside muscle meat.
Entire culinary traditions revolve around the consumption of collagen and muscle meat together. Think Vietnamese pho (bone broth and meat). Think French (reduced broth-based sauce poured over meat). Think Mexican (bone broth-infused rice served with meat). Hell, go all the way back to the Pleistocene and humans were boiling smashed bone fragments in stomach casings.
No reason to separate them.
It is possible for a person to be allergic to casein and I don’t think it’s possible to have fully casein free whey protein except maybe the isolate. However, if the person is allergic it wouldn’t be safe. What’s the next best complete protein if a person can’t use whey, and wants the convenience of a powder? I’ve seen beef protein before, but have no idea of the quality.
I’d say go for egg white protein. Extremely complete, tasteless, and blends seamlessly into anything.
Is it true that collagen doesn’t work/assimilate without vitamin C? I try to take mine with some cherries or lemons.
It seems to work better. The recent study that found pre-workout collagen improved tendons also included vitamin C.
I sometimes buy raw A2 milk from Jersey cows, and make my own whey. Wondering how that compares to powdered whey?
That’s awesome. The liquid whey will have a broader range of nutrients, but the powdered whey will be more concentrated and far higher in protein. Remember that whey protein is basically dehydrated liquid whey and you’ll get a picture of how much liquid whey goes into whey powder.
My interest in this has led me to start studying biology because I would like to know more about nutrition and digestion. Because the way that my nails changed seems incredible to me and it really makes me wonder what else collagen is doing.
You make a good point. I often use improvements in one area of health as assurance that other areas of health are also improving. I’m sure that’s not always true, but I think that’s a pretty safe assumption most of the time.
My question to you Mark would be to echo the same question others have posed, ie are there any downsides to me taking whey, collagen and glycine simultaneously in my pre-workout shake? Otherwise I have a real dilemma, as it appears that there is very good science to support having both collagen/ glycine as well as rapidly digested essential aminos (from whey) in your system before undertaking a ‘fasted’ workout.. A tough question I know but any insight you have would be much appreciated!
There’s no reason to avoid it. Do it. Should be good for both your connective tissue and your gains.
Would glycine supplements have a similar effect as collagen? Glycine supplementation would be way less expensive than collagen:
• 30 grams of collagen (=~10 grams glycine) from Great Lakes = 5 tablespoons, costs =~$1.13 if you buy the 8 pound bag.
• 10 grams of glycine from Bulk Supplements =~$0.18 if you buy the 5 kilogram bag.
Pure glycine is great for things like balancing your intake of methionine. As I wrote in the original post, muscle meat is high in an amino acid called methionine. Methionine metabolism depletes glycine, so the more meat you eat, the more glycine-rich connective tissue, bone broth, and collagen supplements you should be eating to balance out the amino acids. This is the basic foundation for eating all that collagen I recommend.
But balancing methionine for longevity and health isn’t the only reason we’re eating collagen. Collagen is the most abundant protein in the body, providing tensile strength to our bones, teeth, ligaments, tendons, and cartilage. It’s an important structural component of the skin, lungs, intestines, and heart. And as far as the evidence so far available suggests, eating the amino acids that make up collagen separately doesn’t have the same effect on those collagenous tissues as eating them together in a collagenous matrix.
In one study, rats with osteoporosis ate collagen hydrolysate that scientists had marked with a radioactive signature to allow them to track its course through the body. It survived the digestive tract intact, made it into the blood, and accumulated in the kidneys. By day 14, the rats’ thigh bones had gotten stronger and denser with more organic matter and less water content.
Another study found similar results, this time for cartilage of the knee. Mice who ate radioactive collagen hydrolysate showed increased radioactivity in the knee joint.
When you feed people collagen derived from pork skin, chicken feet, and cartilage, many different collagenous peptides appear in the blood. You don’t get any of those from isolated glycine.
All that said, pure glycine can be a helpful supplement. As mentioned, it’s great for balancing out methionine intake from muscle meat consumption. It’s also been used in several studies to improve multiple markers of sleep quality. And glycine is probably the most important component, if you had to choose just one, of collagen.
Collagen is ideal, but glycine isn’t a bad option. In fact, I’d argue that perhaps collagen plus supplementary glycine could offer the best bang for your buck.
Mark, can you please do a post examining the different amounts of glycine in actual foods, i.e. pork rinds, chicken skin, connective tissue rich cuts of meats, etc? I’d really like to get my collagen and glycine from food sources and know how much of the foods I would have to eat in order to get the 10g you mention.
I’ll do a quick answer.
An ounce of pork rinds gives you 3.38 grams of glycine.
An ounce of roasted chicken skin gives you 1 gram of glycine.
A pork tail of about 4 ounces will give you almost 3 grams of glycine. Oxtail should be about the same.
So getting your glycine from food alone is entirely doable, but you’ll probably have an easier time if you like chicharrones/pork rinds and animal tails. There are some higher quality pork rinds out there these days, like the Epic brand ones.
Hi Mark – thank you for all of your great information!!!
I make homemade Greek yogurt at home – I strain it in a fine mesh strainer and get an incredible about if whey as a result. I generally mix about 1/4 cup back into the yogurt to get the right consistency. I throw the rest out. Is this consumable as whey for the diet?
It is consumable. But keep in mind that liquid whey isn’t as protein-dense as whey powder. It’s still good to eat and a great source of probiotics.
Thanks for your questions, everyone. Take care!
(function($) { $("#dfqK8EX").load("https://www.marksdailyapple.com/wp-admin/admin-ajax.php?action=dfads_ajax_load_ads&groups=954&limit=1&orderby=random&order=ASC&container_id=&container_html=none&container_class=&ad_html=div&ad_class=&callback_function=&return_javascript=0&_block_id=dfqK8EX" ); })( jQuery );
window.onload=function(){ga('send', { hitType: 'event', eventCategory: 'Ad Impression', eventAction: '66572' });}
References:
Figueres juher T, Basés pérez E. [An overview of the beneficial effects of hydrolysed collagen intake on joint and bone health and on skin ageing]. Nutr Hosp. 2015;32 Suppl 1:62-6.
Shaw G, Lee-barthel A, Ross ML, Wang B, Baar K. Vitamin C-enriched gelatin supplementation before intermittent activity augments collagen synthesis. Am J Clin Nutr. 2017;105(1):136-143.
The post Dear Mark: Collagen vs Whey Follow-Up appeared first on Mark's Daily Apple.
Dear Mark: Collagen vs Whey Follow-Up published first on https://drugaddictionsrehab.tumblr.com/
0 notes
Text
Important: How to Use Antimicrobial Herbs to Heal Your Gut
Antimicrobial herbs are the top natural treatment for gut issues, like SIBO, dysbiosis, parasites and yeast overgrowth.
Here’s all you need to know and how to use them.
Antimicrobial Herbs 101
Herbal therapies have been used for centuries as the preferred “drugs” of choice for addressing illness—from stomach aches, viruses, colds and flu’s.
Long before researchers mentioned the words “gut microbiome,” people knew there was powerful healing in nature’s medicine for reversing disease.
Types of Antimicrobial Herbs
Some of these powerful herbal agents include:
Peppermint
Berberine
Garlic (Alicin)
Olive Leaf
Oregano Oil
Grapefruit Seed Extract
Pau d’arco
Black Walnut
Resveratrol
Licorice
Echinacea
Goldenseal
Oregon grape
Barberry
Wormwood
Thyme
Stinging Nettle
Uva Ursi
Yerba Mansa
Caprylic Acid
Cat’s Claw
Manuka honey
Tea tree oil
Curcumin
Clove
Cinnamon
Astragalus Root
Colloidal silver
“Antimicrobial” protocols—herbal therapies—are often part of a “healing” gut protocol if dysbiosis (too much or too little gut bacteria), SIBO, fungal or yeast overgrowth, parasites or gut infections are identified as a “root cause” behind poor health. Treatment of these “gut issues” typically a two-stage treatment approach:
Eradicate or reduce pathological organisms
Restore a healthy gut microbiome
In most cases of dysbiosis, except for significant fungal overgrowth, a short period of antimicrobials (30-60 days) commences, followed by a more significant focus on restoring the healthy gut microbiome.
Generally speaking, a blend of botanical herbs in supplement form is recommended for most cases of dysbiosis for a “broad spectrum” approach to healing. However, depending on the certain pathogenic organisms identified on a stool or SIBO breath test, some people find treating specific organisms with research-backed specific agents may be effective (such as grapefruit seed extract for the overgrowth pseudomonas aeruginosa).
Lastly, given the fact that antimicrobial herbs can be powerful, is also recommended you combine antimicrobial treatment with adjunct supports to aid in both complete eradication/reduction of pathogenic organisms, as well as the preservation of any healthy bacteria you do have. Support agents for an antimicrobial protocol include:
Antimicrobial Treatment: Support Agents
Quality probiotic & symbiotic (a probiotic + prebiotic).
To maintain a healthy gut microbiome as some bacteria die off. (Ideally taken away from antimicrobial herbs; particularly a soil-based bacteria). Medium-chain fatty acids extracted from coconut oil that are antiparasitic in addition to being antifungal, antiviral, and antibacterial. Great for boosting immunity and warding off yeast.
Biofilm Disruptor.
Pathogenic bacteria can form biofilm around their outer layer—sort of like “steel armor” for preventing destruction. Biofilm may be one of the primary drivers of resistance and treatment failure in multiple disease, antimicrobial and/or antibiotic treatments. Biofilm disruptors help break up biofilm to allow your other antimicrobial agents to work. (ex. NAC, Cranberry, Biocidin, Colloidal silver, Xylitol, Manuka honey, Interfase Plus)
Least Restrictive “Real Food” Diet.
Many people go on an “anti-candida,” ketogenic or “no carb” diet while “healing their gut.” However, these can be counterproductive to resetting your gut microbiome, given the fact that some starchy plants and pre-biotics are needed to feed healthy gut bacteria and bring pathogenic bacteria “out to play.” Prebiotics found in starchy plants and veggies help your antimicrobials work even better (so there is bacteria for them to target). Aim for 1 to 2 servings per day of starchy plants and/or prebiotic fibers while on an antimicrobial herbs protocol.
“But isn’t medicine more powerful?”
Herbal therapies are at least as effective as rifaximin—the typical conventional antibiotic treatment for resolution of gut dysbiosis (i.e. SIBO, candida, parasites and IBS)—if not more. In one study, 104 patients diagnosed with SIBO with the lactulose breath test were treated either with Rifaximin (1,200 mg) or a cocktail of herbal antimicrobials (see below) for 4 weeks before repeating the lactulose breath test.
The study showed that 46% of the patients treated with herbal antimicrobials were successfully treated while only 34% were free of SIBO after taking Rifaximin (1).
Recommended Antimicrobial & Support Agents to Buy
Here are my top recommended supplements for using in your “gut healing protocol.”
Antimicrobial Herbs
Biotics FC Cidal + Dysbiocide
Roasted Garlic
Symbiotic Probiotic
Seed Probiotic
Soil Based Probiotic
Terra Flora
Monolaurin
Lauricidin
Biofilm Disruptor
Interfase Plus
-or-
Biocidin
Sample Antimicrobial Protocol
Pre-Breakfast:
Symbiotic Probiotic (probiotic + prebiotic)
Breakfast
Antimicrobial Herbs (broad spectrum supplement)
Monolaurin
Mid-Morning
Biofilm Disrupter
Lunch
Soil Based Probiotic
Mid-Afternoon
Biofilm Disrupter
Dinner
Antimicrobial Herbs (broad spectrum supplement)
Monolaurin
Post Dinner
Herbal Tea (optional)
Antimicrobial Protocol Treatment Timeline
Dysbiosis-Pathogenic (high amount of pathogenic and/or commensals bacteria): 60 Days
Dysbiosis-Healthy Overgrowth (high amount of “beneficial” bacteria on stool test and possibly yeast markers): 30 Days
Insufficiency Dysbiosis (lack of healthy bacteria with a few pathogenic bacteria): 30 Days, followed by emphasis on Probiotics & Prebiotics
Parasites: 60 Days
SIBO: Low/Mild: 30 Days, Moderate: 60 Days, High: 90 Days
Beware: Herx (“Healing”) Reactions May Happen
A die-off reaction, also called a Herxheimer reaction or “Herx reaction”, can occur whenever you first start a new supplement or antimicrobial protocol—often a sign of a “detox” or die off of certain bacteria.
Typically, Herx symptoms develop within a couple of hours to several days after treatment and last anywhere from a few days to several weeks or months—depending on the severity of the underlying pathology you are treating. However, depending on the location of the bacteria, symptoms may develop later. The Herxheimer reaction is especially seen during antimicrobial treatments (gut healing protocol) because antimicrobials destroy numerous microorganisms and bacteria.
Although the Herxheimer reaction is typically not harmful, it does frequently cause temporary pain, discomfort, and worsening of symptoms. Symptom severity is often indicative of the level of inflammation triggered by the immune system.
Common symptoms that may develop or worsen due to a Herxheimer response include:
Bloating
Brain Fog
Chills
Cold Sweats
Constipation
Cramps
Diarrhea
Fatigue
Fever
Headaches
Irritability
Joint Pain
Lethargy
Muscle Pain
Nausea
Skin Irritation
Sore Throat
Because of the sudden worsening of symptoms, it is common for patients to feel that the severity of their condition has increased due to the treatment. However, even though treatment causes a temporary increase in symptom intensity due to greater release of toxins the condition ultimately improves. The body responding in this way usually means that the treatment is actually working effectively.
Nevertheless, even though a Herxheimer reaction indicates that treatment is working effectively, it doesn’t make the patient’s condition any more comfortable in the immediate.
Fortunately, there are several ways of limiting the symptoms of a Herxheimer reaction without inhibiting treatment efficacy. The following suggestions can and should be used when detoxing, using antibiotics, or being treated for infections and other forms of chronic disease to limit Herxheimer intensity, including:
How to Deal with HERX Reactions
Drink H20. Drink plenty of fluids to aid in the removal of toxins and help cleanse the GI tract.
Get Your Zzzz’s. The body conducts many restorative processes while at rest that it cannot accomplish when it is awake. When experiencing a Herxheimer reaction due to greater toxicity, it is best to allow more time for quality sleep.
Sweat. Sweat it out with heated yoga, sauna and daily movement—a natural essential for detoxification.
Try Dry Brushing & Rebounding. Two lymphatic “cleansing” tactics to help flush the lymphatic track.
References
Chedid, V., Dhalla, S., Clarke, J. O., Roland, B. C., Dunbar, K. B., Koh, J., Justino, E., Tomakin, E., … Mullin, G. E. (2014). Herbal therapy is equivalent to rifaximin for the treatment of small intestinal bacterial overgrowth. Global advances in health and medicine, 3(3), 16-24.
The post Important: How to Use Antimicrobial Herbs to Heal Your Gut appeared first on Meet Dr. Lauryn.
Source/Repost=>
https://drlauryn.com/gut-health/antimicrobial-herbs-heal-gut-naturally/ ** Dr. Lauryn Lax __Nutrition. Therapy. Functional Medicine ** https://drlauryn.com/
Important: How to Use Antimicrobial Herbs to Heal Your Gut via http://drlaurynlax.tumblr.com/
0 notes
Text
Important: How to Use Antimicrobial Herbs to Heal Your Gut
Antimicrobial herbs are the top natural treatment for gut issues, like SIBO, dysbiosis, parasites and yeast overgrowth.
Here’s all you need to know and how to use them.
Antimicrobial Herbs 101
Herbal therapies have been used for centuries as the preferred “drugs” of choice for addressing illness—from stomach aches, viruses, colds and flu’s.
Long before researchers mentioned the words “gut microbiome,” people knew there was powerful healing in nature’s medicine for reversing disease.
Types of Antimicrobial Herbs
Some of these powerful herbal agents include:
Peppermint
Berberine
Garlic (Alicin)
Olive Leaf
Oregano Oil
Grapefruit Seed Extract
Pau d’arco
Black Walnut
Resveratrol
Licorice
Echinacea
Goldenseal
Oregon grape
Barberry
Wormwood
Thyme
Stinging Nettle
Uva Ursi
Yerba Mansa
Caprylic Acid
Cat’s Claw
Manuka honey
Tea tree oil
Curcumin
Clove
Cinnamon
Astragalus Root
Colloidal silver
“Antimicrobial” protocols—herbal therapies—are often part of a “healing” gut protocol if dysbiosis (too much or too little gut bacteria), SIBO, fungal or yeast overgrowth, parasites or gut infections are identified as a “root cause” behind poor health. Treatment of these “gut issues” typically a two-stage treatment approach:
Eradicate or reduce pathological organisms
Restore a healthy gut microbiome
In most cases of dysbiosis, except for significant fungal overgrowth, a short period of antimicrobials (30-60 days) commences, followed by a more significant focus on restoring the healthy gut microbiome.
Generally speaking, a blend of botanical herbs in supplement form is recommended for most cases of dysbiosis for a “broad spectrum” approach to healing. However, depending on the certain pathogenic organisms identified on a stool or SIBO breath test, some people find treating specific organisms with research-backed specific agents may be effective (such as grapefruit seed extract for the overgrowth pseudomonas aeruginosa).
Lastly, given the fact that antimicrobial herbs can be powerful, is also recommended you combine antimicrobial treatment with adjunct supports to aid in both complete eradication/reduction of pathogenic organisms, as well as the preservation of any healthy bacteria you do have. Support agents for an antimicrobial protocol include:
Antimicrobial Treatment: Support Agents
Quality probiotic & symbiotic (a probiotic + prebiotic).
To maintain a healthy gut microbiome as some bacteria die off. (Ideally taken away from antimicrobial herbs; particularly a soil-based bacteria). Medium-chain fatty acids extracted from coconut oil that are antiparasitic in addition to being antifungal, antiviral, and antibacterial. Great for boosting immunity and warding off yeast.
Biofilm Disruptor.
Pathogenic bacteria can form biofilm around their outer layer—sort of like “steel armor” for preventing destruction. Biofilm may be one of the primary drivers of resistance and treatment failure in multiple disease, antimicrobial and/or antibiotic treatments. Biofilm disruptors help break up biofilm to allow your other antimicrobial agents to work. (ex. NAC, Cranberry, Biocidin, Colloidal silver, Xylitol, Manuka honey, Interfase Plus)
Least Restrictive “Real Food” Diet.
Many people go on an “anti-candida,” ketogenic or “no carb” diet while “healing their gut.” However, these can be counterproductive to resetting your gut microbiome, given the fact that some starchy plants and pre-biotics are needed to feed healthy gut bacteria and bring pathogenic bacteria “out to play.” Prebiotics found in starchy plants and veggies help your antimicrobials work even better (so there is bacteria for them to target). Aim for 1 to 2 servings per day of starchy plants and/or prebiotic fibers while on an antimicrobial herbs protocol.
“But isn’t medicine more powerful?”
Herbal therapies are at least as effective as rifaximin—the typical conventional antibiotic treatment for resolution of gut dysbiosis (i.e. SIBO, candida, parasites and IBS)—if not more. In one study, 104 patients diagnosed with SIBO with the lactulose breath test were treated either with Rifaximin (1,200 mg) or a cocktail of herbal antimicrobials (see below) for 4 weeks before repeating the lactulose breath test.
The study showed that 46% of the patients treated with herbal antimicrobials were successfully treated while only 34% were free of SIBO after taking Rifaximin (1).
Recommended Antimicrobial & Support Agents to Buy
Here are my top recommended supplements for using in your “gut healing protocol.”
Antimicrobial Herbs
Biotics FC Cidal + Dysbiocide
Roasted Garlic
Symbiotic Probiotic
Seed Probiotic
Soil Based Probiotic
Terra Flora
Monolaurin
Lauricidin
Biofilm Disruptor
Interfase Plus
-or-
Biocidin
Sample Antimicrobial Protocol
Pre-Breakfast:
Symbiotic Probiotic (probiotic + prebiotic)
Breakfast
Antimicrobial Herbs (broad spectrum supplement)
Monolaurin
Mid-Morning
Biofilm Disrupter
Lunch
Soil Based Probiotic
Mid-Afternoon
Biofilm Disrupter
Dinner
Antimicrobial Herbs (broad spectrum supplement)
Monolaurin
Post Dinner
Herbal Tea (optional)
Antimicrobial Protocol Treatment Timeline
Dysbiosis-Pathogenic (high amount of pathogenic and/or commensals bacteria): 60 Days
Dysbiosis-Healthy Overgrowth (high amount of “beneficial” bacteria on stool test and possibly yeast markers): 30 Days
Insufficiency Dysbiosis (lack of healthy bacteria with a few pathogenic bacteria): 30 Days, followed by emphasis on Probiotics & Prebiotics
Parasites: 60 Days
SIBO: Low/Mild: 30 Days, Moderate: 60 Days, High: 90 Days
Beware: Herx (“Healing”) Reactions May Happen
A die-off reaction, also called a Herxheimer reaction or “Herx reaction”, can occur whenever you first start a new supplement or antimicrobial protocol—often a sign of a “detox” or die off of certain bacteria.
Typically, Herx symptoms develop within a couple of hours to several days after treatment and last anywhere from a few days to several weeks or months—depending on the severity of the underlying pathology you are treating. However, depending on the location of the bacteria, symptoms may develop later. The Herxheimer reaction is especially seen during antimicrobial treatments (gut healing protocol) because antimicrobials destroy numerous microorganisms and bacteria.
Although the Herxheimer reaction is typically not harmful, it does frequently cause temporary pain, discomfort, and worsening of symptoms. Symptom severity is often indicative of the level of inflammation triggered by the immune system.
Common symptoms that may develop or worsen due to a Herxheimer response include:
Bloating
Brain Fog
Chills
Cold Sweats
Constipation
Cramps
Diarrhea
Fatigue
Fever
Headaches
Irritability
Joint Pain
Lethargy
Muscle Pain
Nausea
Skin Irritation
Sore Throat
Because of the sudden worsening of symptoms, it is common for patients to feel that the severity of their condition has increased due to the treatment. However, even though treatment causes a temporary increase in symptom intensity due to greater release of toxins the condition ultimately improves. The body responding in this way usually means that the treatment is actually working effectively.
Nevertheless, even though a Herxheimer reaction indicates that treatment is working effectively, it doesn’t make the patient’s condition any more comfortable in the immediate.
Fortunately, there are several ways of limiting the symptoms of a Herxheimer reaction without inhibiting treatment efficacy. The following suggestions can and should be used when detoxing, using antibiotics, or being treated for infections and other forms of chronic disease to limit Herxheimer intensity, including:
How to Deal with HERX Reactions
Drink H20. Drink plenty of fluids to aid in the removal of toxins and help cleanse the GI tract.
Get Your Zzzz’s. The body conducts many restorative processes while at rest that it cannot accomplish when it is awake. When experiencing a Herxheimer reaction due to greater toxicity, it is best to allow more time for quality sleep.
Sweat. Sweat it out with heated yoga, sauna and daily movement—a natural essential for detoxification.
Try Dry Brushing & Rebounding. Two lymphatic “cleansing” tactics to help flush the lymphatic track.
References
Chedid, V., Dhalla, S., Clarke, J. O., Roland, B. C., Dunbar, K. B., Koh, J., Justino, E., Tomakin, E., … Mullin, G. E. (2014). Herbal therapy is equivalent to rifaximin for the treatment of small intestinal bacterial overgrowth. Global advances in health and medicine, 3(3), 16-24.
The post Important: How to Use Antimicrobial Herbs to Heal Your Gut appeared first on Meet Dr. Lauryn.
Source/Repost=>
https://drlauryn.com/gut-health/antimicrobial-herbs-heal-gut-naturally/ ** Dr. Lauryn Lax __Nutrition. Therapy. Functional Medicine ** https://drlauryn.com/
Important: How to Use Antimicrobial Herbs to Heal Your Gut via https://drlaurynlax.weebly.com/
0 notes
Text
Important: How to Use Antimicrobial Herbs to Heal Your Gut
Antimicrobial herbs are the top natural treatment for gut issues, like SIBO, dysbiosis, parasites and yeast overgrowth.
Here’s all you need to know and how to use them.
Antimicrobial Herbs 101
Herbal therapies have been used for centuries as the preferred “drugs” of choice for addressing illness—from stomach aches, viruses, colds and flu’s.
Long before researchers mentioned the words “gut microbiome,” people knew there was powerful healing in nature’s medicine for reversing disease.
Types of Antimicrobial Herbs
Some of these powerful herbal agents include:
Peppermint
Berberine
Garlic (Alicin)
Olive Leaf
Oregano Oil
Grapefruit Seed Extract
Pau d’arco
Black Walnut
Resveratrol
Licorice
Echinacea
Goldenseal
Oregon grape
Barberry
Wormwood
Thyme
Stinging Nettle
Uva Ursi
Yerba Mansa
Caprylic Acid
Cat’s Claw
Manuka honey
Tea tree oil
Curcumin
Clove
Cinnamon
Astragalus Root
Colloidal silver
“Antimicrobial” protocols—herbal therapies—are often part of a “healing” gut protocol if dysbiosis (too much or too little gut bacteria), SIBO, fungal or yeast overgrowth, parasites or gut infections are identified as a “root cause” behind poor health. Treatment of these “gut issues” typically a two-stage treatment approach:
Eradicate or reduce pathological organisms
Restore a healthy gut microbiome
In most cases of dysbiosis, except for significant fungal overgrowth, a short period of antimicrobials (30-60 days) commences, followed by a more significant focus on restoring the healthy gut microbiome.
Generally speaking, a blend of botanical herbs in supplement form is recommended for most cases of dysbiosis for a “broad spectrum” approach to healing. However, depending on the certain pathogenic organisms identified on a stool or SIBO breath test, some people find treating specific organisms with research-backed specific agents may be effective (such as grapefruit seed extract for the overgrowth pseudomonas aeruginosa).
Lastly, given the fact that antimicrobial herbs can be powerful, is also recommended you combine antimicrobial treatment with adjunct supports to aid in both complete eradication/reduction of pathogenic organisms, as well as the preservation of any healthy bacteria you do have. Support agents for an antimicrobial protocol include:
Antimicrobial Treatment: Support Agents
Quality probiotic & symbiotic (a probiotic + prebiotic).
To maintain a healthy gut microbiome as some bacteria die off. (Ideally taken away from antimicrobial herbs; particularly a soil-based bacteria). Medium-chain fatty acids extracted from coconut oil that are antiparasitic in addition to being antifungal, antiviral, and antibacterial. Great for boosting immunity and warding off yeast.
Biofilm Disruptor.
Pathogenic bacteria can form biofilm around their outer layer—sort of like “steel armor” for preventing destruction. Biofilm may be one of the primary drivers of resistance and treatment failure in multiple disease, antimicrobial and/or antibiotic treatments. Biofilm disruptors help break up biofilm to allow your other antimicrobial agents to work. (ex. NAC, Cranberry, Biocidin, Colloidal silver, Xylitol, Manuka honey, Interfase Plus)
Least Restrictive “Real Food” Diet.
Many people go on an “anti-candida,” ketogenic or “no carb” diet while “healing their gut.” However, these can be counterproductive to resetting your gut microbiome, given the fact that some starchy plants and pre-biotics are needed to feed healthy gut bacteria and bring pathogenic bacteria “out to play.” Prebiotics found in starchy plants and veggies help your antimicrobials work even better (so there is bacteria for them to target). Aim for 1 to 2 servings per day of starchy plants and/or prebiotic fibers while on an antimicrobial herbs protocol.
“But isn’t medicine more powerful?”
Herbal therapies are at least as effective as rifaximin—the typical conventional antibiotic treatment for resolution of gut dysbiosis (i.e. SIBO, candida, parasites and IBS)—if not more. In one study, 104 patients diagnosed with SIBO with the lactulose breath test were treated either with Rifaximin (1,200 mg) or a cocktail of herbal antimicrobials (see below) for 4 weeks before repeating the lactulose breath test.
The study showed that 46% of the patients treated with herbal antimicrobials were successfully treated while only 34% were free of SIBO after taking Rifaximin (1).
Recommended Antimicrobial & Support Agents to Buy
Here are my top recommended supplements for using in your “gut healing protocol.”
Antimicrobial Herbs
Biotics FC Cidal + Dysbiocide
Roasted Garlic
Symbiotic Probiotic
Seed Probiotic
Soil Based Probiotic
Terra Flora
Monolaurin
Lauricidin
Biofilm Disruptor
Interfase Plus
-or-
Biocidin
Sample Antimicrobial Protocol
Pre-Breakfast:
Symbiotic Probiotic (probiotic + prebiotic)
Breakfast
Antimicrobial Herbs (broad spectrum supplement)
Monolaurin
Mid-Morning
Biofilm Disrupter
Lunch
Soil Based Probiotic
Mid-Afternoon
Biofilm Disrupter
Dinner
Antimicrobial Herbs (broad spectrum supplement)
Monolaurin
Post Dinner
Herbal Tea (optional)
Antimicrobial Protocol Treatment Timeline
Dysbiosis-Pathogenic (high amount of pathogenic and/or commensals bacteria): 60 Days
Dysbiosis-Healthy Overgrowth (high amount of “beneficial” bacteria on stool test and possibly yeast markers): 30 Days
Insufficiency Dysbiosis (lack of healthy bacteria with a few pathogenic bacteria): 30 Days, followed by emphasis on Probiotics & Prebiotics
Parasites: 60 Days
SIBO: Low/Mild: 30 Days, Moderate: 60 Days, High: 90 Days
Beware: Herx (“Healing”) Reactions May Happen
A die-off reaction, also called a Herxheimer reaction or “Herx reaction”, can occur whenever you first start a new supplement or antimicrobial protocol—often a sign of a “detox” or die off of certain bacteria.
Typically, Herx symptoms develop within a couple of hours to several days after treatment and last anywhere from a few days to several weeks or months—depending on the severity of the underlying pathology you are treating. However, depending on the location of the bacteria, symptoms may develop later. The Herxheimer reaction is especially seen during antimicrobial treatments (gut healing protocol) because antimicrobials destroy numerous microorganisms and bacteria.
Although the Herxheimer reaction is typically not harmful, it does frequently cause temporary pain, discomfort, and worsening of symptoms. Symptom severity is often indicative of the level of inflammation triggered by the immune system.
Common symptoms that may develop or worsen due to a Herxheimer response include:
Bloating
Brain Fog
Chills
Cold Sweats
Constipation
Cramps
Diarrhea
Fatigue
Fever
Headaches
Irritability
Joint Pain
Lethargy
Muscle Pain
Nausea
Skin Irritation
Sore Throat
Because of the sudden worsening of symptoms, it is common for patients to feel that the severity of their condition has increased due to the treatment. However, even though treatment causes a temporary increase in symptom intensity due to greater release of toxins the condition ultimately improves. The body responding in this way usually means that the treatment is actually working effectively.
Nevertheless, even though a Herxheimer reaction indicates that treatment is working effectively, it doesn’t make the patient’s condition any more comfortable in the immediate.
Fortunately, there are several ways of limiting the symptoms of a Herxheimer reaction without inhibiting treatment efficacy. The following suggestions can and should be used when detoxing, using antibiotics, or being treated for infections and other forms of chronic disease to limit Herxheimer intensity, including:
How to Deal with HERX Reactions
Drink H20. Drink plenty of fluids to aid in the removal of toxins and help cleanse the GI tract.
Get Your Zzzz’s. The body conducts many restorative processes while at rest that it cannot accomplish when it is awake. When experiencing a Herxheimer reaction due to greater toxicity, it is best to allow more time for quality sleep.
Sweat. Sweat it out with heated yoga, sauna and daily movement—a natural essential for detoxification.
Try Dry Brushing & Rebounding. Two lymphatic “cleansing” tactics to help flush the lymphatic track.
References
Chedid, V., Dhalla, S., Clarke, J. O., Roland, B. C., Dunbar, K. B., Koh, J., Justino, E., Tomakin, E., … Mullin, G. E. (2014). Herbal therapy is equivalent to rifaximin for the treatment of small intestinal bacterial overgrowth. Global advances in health and medicine, 3(3), 16-24.
The post Important: How to Use Antimicrobial Herbs to Heal Your Gut appeared first on Meet Dr. Lauryn.
Source/Repost=>
https://drlauryn.com/gut-health/antimicrobial-herbs-heal-gut-naturally/ ** Dr. Lauryn Lax __Nutrition. Therapy. Functional Medicine ** https://drlauryn.com/
Important: How to Use Antimicrobial Herbs to Heal Your Gut via https://drlaurynlax.blogspot.com/
0 notes
Last Seen Blogs