#so much handsewing
Text
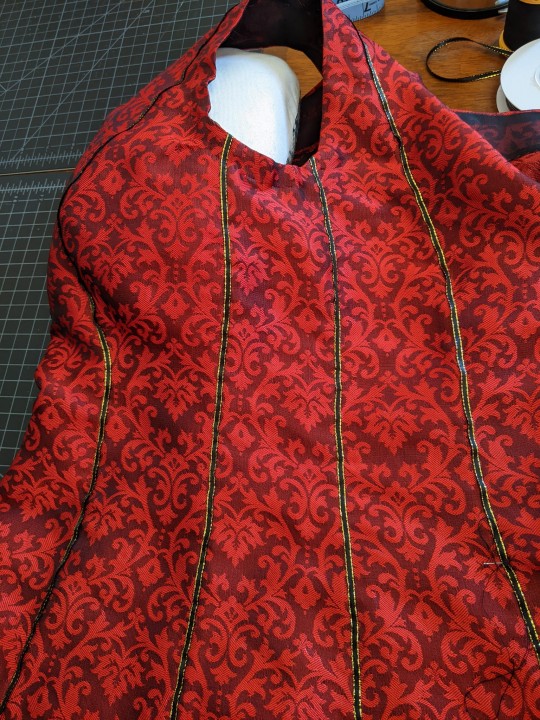
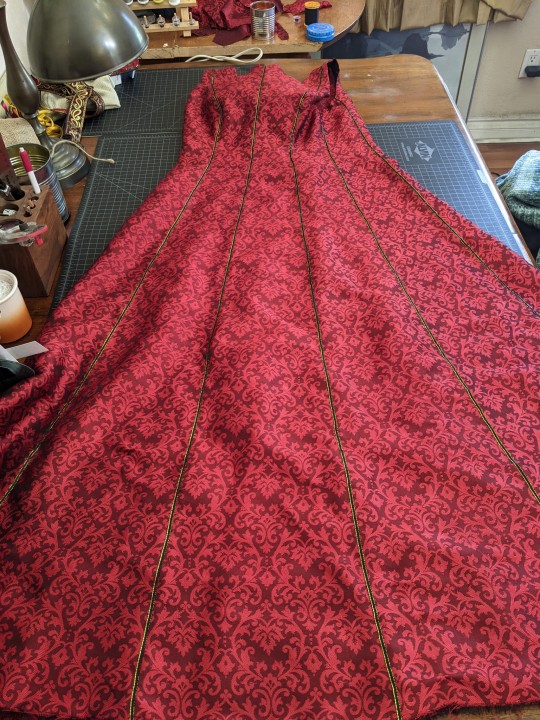
It feels like ages since I last posted an update for my Rhaenyra cosplay for Dragon Con 2023, but the last four weeks has been nothing but attaching the narrow trim to the seamlines of the overdress -- a tedious and fiddly process that had to be done by hand, and the trim had to be sewn down on both sides despite how narrow it is. I made good progress on it day to day, but the pictures were rather boring and similar week to week.
The nine vertical seams that have trim (no trim at center back, per the screen-used costume) come to a total of 447 inches. Sewing down each edge of the trim doubles that to 894 inches, or just under 25 yards of handsewing just to get the trim attached. At 7 or 8 stitches per inch, I figure that's something like 7000 itty bitty invisible stitches. Plus another two yards or so for basting the center front trim to make sure it was really centered once sewn down.
No wonder it took me four weeks, lol.
I still need to put the narrow trim on the edges of the sleeves, and I might get started on that today while watching Fourth of July movies (Independence Day and Hamilton at a minimum, maybe a few others), at least do the ironing to curve the trim slightly and baste it in place if nothing else. We're going to a friend's place for dinner and fireworks tonight, and while I certainly don't want to haul the entire (silk!) dress out of the house with me, taking one or both sleeves to sew on the ~30 minute drive over might not be a bad idea.
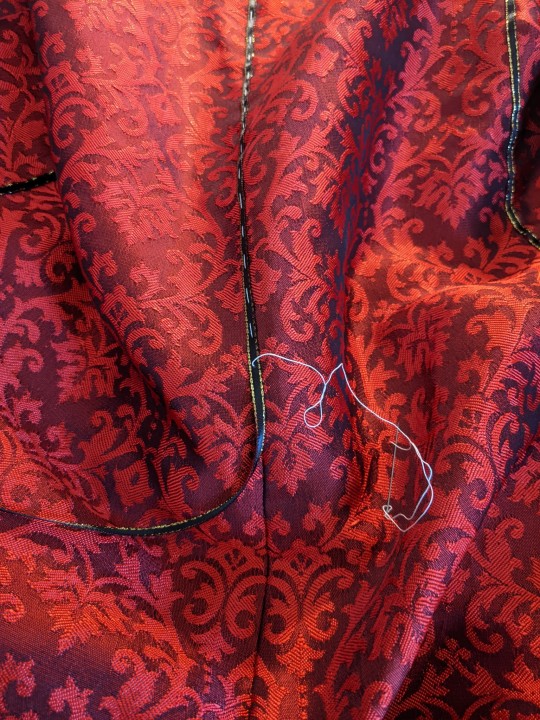
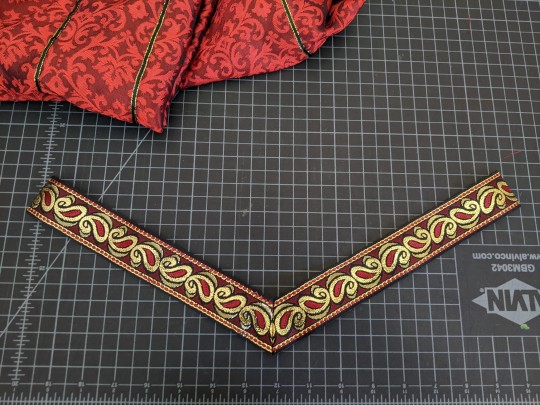
Besides getting going on the sleeve trim, now that the narrow trim is finished on the dress itself I've also been able to shift gears and start focusing on the wide neckline trim. I did a whole series of pinned tests to figure out what I wanted the center front to look like, how to make the pattern come together in the most visually pleasing way, and Jack helped me pick out the best option. Yesterday I trimmed the first two pieces to length and carefully handsewed the center front seam so the pattern matches up exactly:
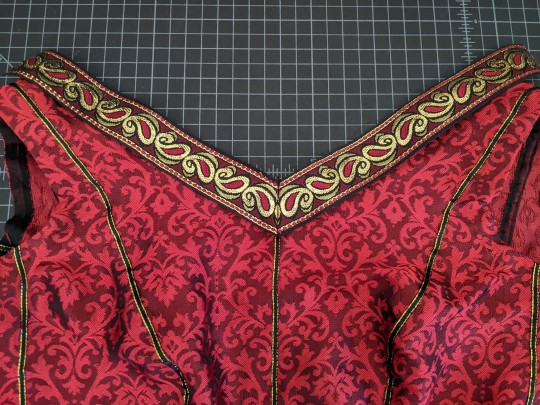
The raw edges are currently just tucked under and pinned, and I need to figure out how much extra I want to leave -- enough so it won't fray or unravel, but not so much that the center front is weirdly puffy or stiff. This trim is at least partially polyester so I have been able to singe the cut edges to keep everything in place. I might be able to carefully do that on the center front edges, too.
After thinking about it overnight, I think I'm going to do this same treatment at center back, that mirroring of the pattern, and then just let the shoulder seams be whatever. The wig will mostly cover the center back, but eh I'd rather have the symmetry there.
So the next major task is getting all this neckline trim cut and placed, handsewn to the neckline of the dress and frayed ends all tucked safely away. It's going to be a bit tedious, especially at the shoulder seams, but hopefully it won't take me weeks and weeks like the narrow trim did!
Getting that wide trim in place is the last thing blocking getting the grommets in, so I'll be heading straight into that once the trim is even just mostly applied. There are things like the hem and the question of needing a modesty panel at center back that I can't even start on until I can lace the whole dress closed. And if it comes right down to it, I can cut corners on things like beading and the styling of the wig, or sewing a little bag to carry my stuff in. But the dress absolutely must have closures, or it's not really a dress, lol.
Given that, I think the order of operations is more or less: neckline trim, then grommets at center back and armscye/top of sleeve. Then hooks and eyes at the wrists, and a hem for the dress. Wig styling is probably the next highest priority, then the bag to carry stuff with me since the dress has no pockets. Then finishing the underdress, sewing on the large beads at waist and wrists, and then the tiny beads over the neckline trim. I've got one or two little adjustments to do to the jewelry that should probably come before the little seed beads on the neckline, but hopefully I'll be able to get to all of it in the next 8 weeks (!!) until I need to pack for Dragon Con.
I've also gathered basically all the components for my Harley Quinn cosplay, just waiting on one length of lining fabric to arrive -- but I'll talk all about that in its own post sometime soon here.
Eight weeks feels like hardly any time at all, especially given that I spent the last four weeks on what ended up being just one check mark on my rather long to-do list. But I am thrilled with how the dress is looking, and the narrow trim was definitely worth doing. It makes the dress look so much more like the screen-used costume.
Hokay. Time for movies and sewing. Here's hoping I can get through that to-do list in the next 58 days!
#RRD cosplay#my cosplay#my sewing#so much handsewing#so much#Dragon Con#Dragon Con prep#Dragon Con 2023#Dragon Con 2023 prep#long post
7 notes
·
View notes
Text
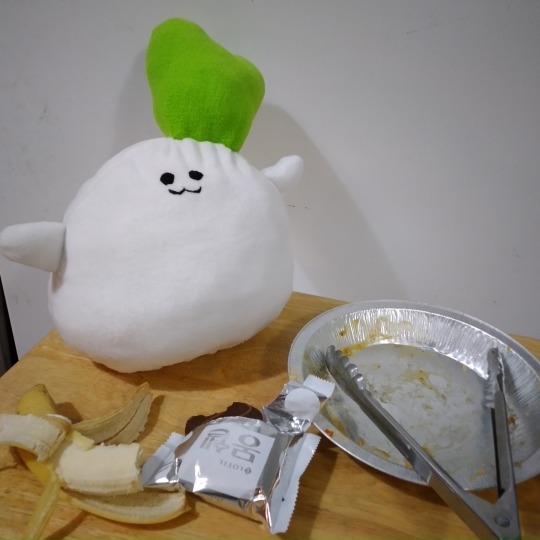
so...I made a thing...

Here they are, Marshmallow!!!
(More photos under the cut)


And here they is with my other plushies
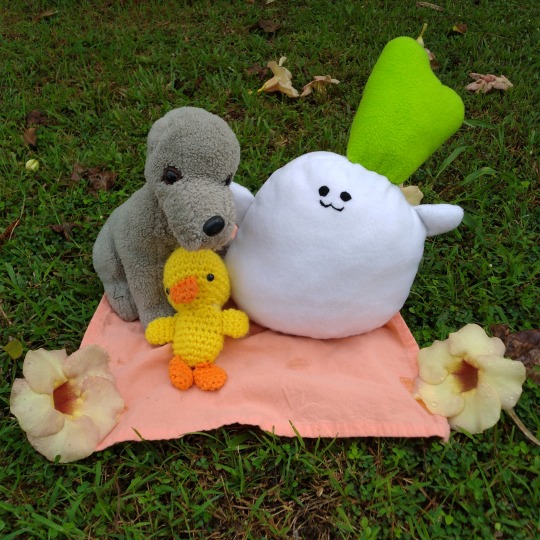
(the grey one is my childhood plush dog that I had ripped the ears and tail off and the other was a crocheted duck my friend made me)
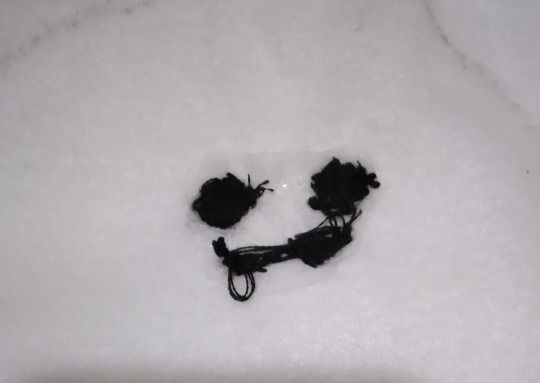
And here is what the inside of their face looks like!
(I kinda want to have more little photoshoots with them)
#After I told my mom about them she now wants to me make a huge one...yeah that's gonna have to wait a while...#i've been thinking about making them for a year#I had to handsew them cause my stupid machine doesn't like thick fabrics#Omg i have so much extra fabric#It took so much time to prep only to take a couple of hours to cut. sew. and embroider him#diy plush#custom plush#plushies#yohaji#youkai gakkou no sensei hajimemashita#a terrified teacher at ghoul school#hexi posting#Maybe I'll explain how I made them idk bleh
69 notes
·
View notes
Text

day 88
not my usual art medium BUT! since i did post about it earlier i thought it would be fun to show yall the finished product
i generated the pattern at freesewing.org using the Tristan Top design and lord having a pattern that was so easily printable AND fully customized to my measurements was such a game changer. 10/10 cannot recommend this site enough im like going fucking insane over it. (they also have a bootlegged version of the pattern for the blåhaj ikea shark plushie that you can scale up or down to make either a very tiny or a preposterously fucking huge shark of your own and i think that is so wonderful)
also dont mind my duct tape torso. dress forms are fucking expensive. broke bitches make do.
#day 88#year 5#cosplay#i THINK i have a tag for that#anyway. its cute it fits really well and im excited for ren faire now even though its over a month away#now i just gotta make the skirt!#also: this is not my first corset but it IS the first time ive done embroidered eyelets#instead of like. metal grommets#theyre a little wonky but i like the overall effect#i will however never be fucking doing that again. my fingies hurt i hate handsewing so much
29 notes
·
View notes
Text
i'm sorry but most sneakers in lolita are soooooo ugly 😭 like they really only look good in sweet coords and only when the sneakers themselves are cute and match the coord. not saying that people shouldn't wear sneakers with their coords because i know for many it's an accessibility thing but like, can we normalise making cute shoe covers or something? or at least like, upcycle your ugly, plain sneakers with some lace, bows, frills and charms?? it kills me to see an adorable coord then you get to the shoes and it's an ugly pair of grey sneakers. customisation is already a big part of lolita so I feel like we should be extending that effort to our footwear too. we can have comfort AND style, we really don't have to choose!!!!!
#i saw someone upcycle their sneakers with lace and pearls the other day and it was genuinely groundbreaking#they just handsewed everything so it's not like they needed any special materials or anything#anyway this is almost certainly an unpopular opinion#i just think if you've spent so much time on a coord your shoes deserve a little effort too#egl#egl community#lolita fashion#casual lolita
14 notes
·
View notes
Text
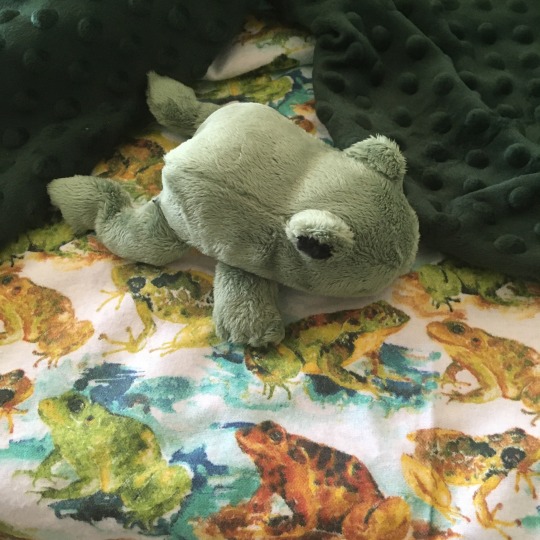
Frogs!!!!!!
#sewing#handmade#plushie#frog plushie#frog#baby blanket#frog baby blanket#frog baby set for my neighbor’s niece#this frog is entirely handsewn#because until I gave up on waiting to improve with time and requested the breakthrough asthma meds from my doctor#I very much needed to sit the hell still#and I am not good at that#but handsewing keeps me sitting still for longer#I only accidentally dropped a frog leg on the living room floor#because I forgot I was sewing and that it was on my lap once#okay maybe twice#also I broke a needle hand sewing it and half the broken needle went down my shirt#did not get even a little stabbed by the needle though! and it did not break while inside the frog#all shards of needle are present and accounted for#(and are currently in the empty pill bottle currently designated for broken pins and needles so that they don’t stab anyone in the trash)
43 notes
·
View notes
Text

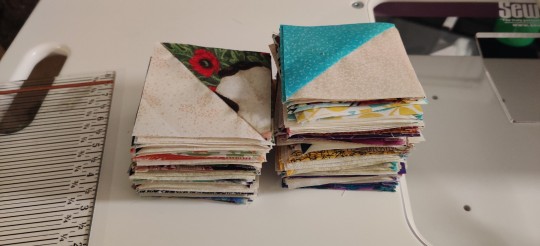
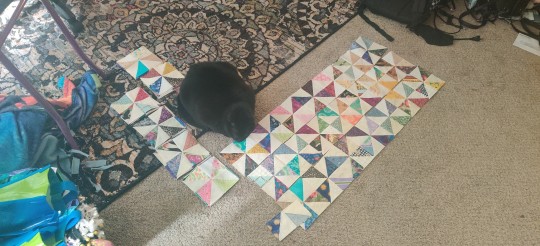


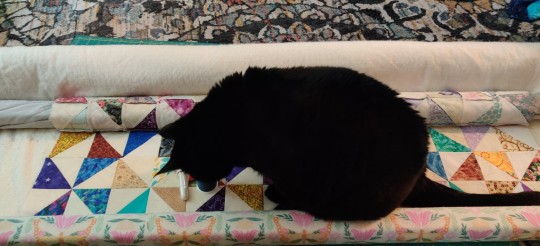
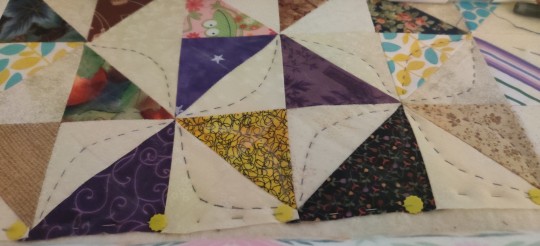

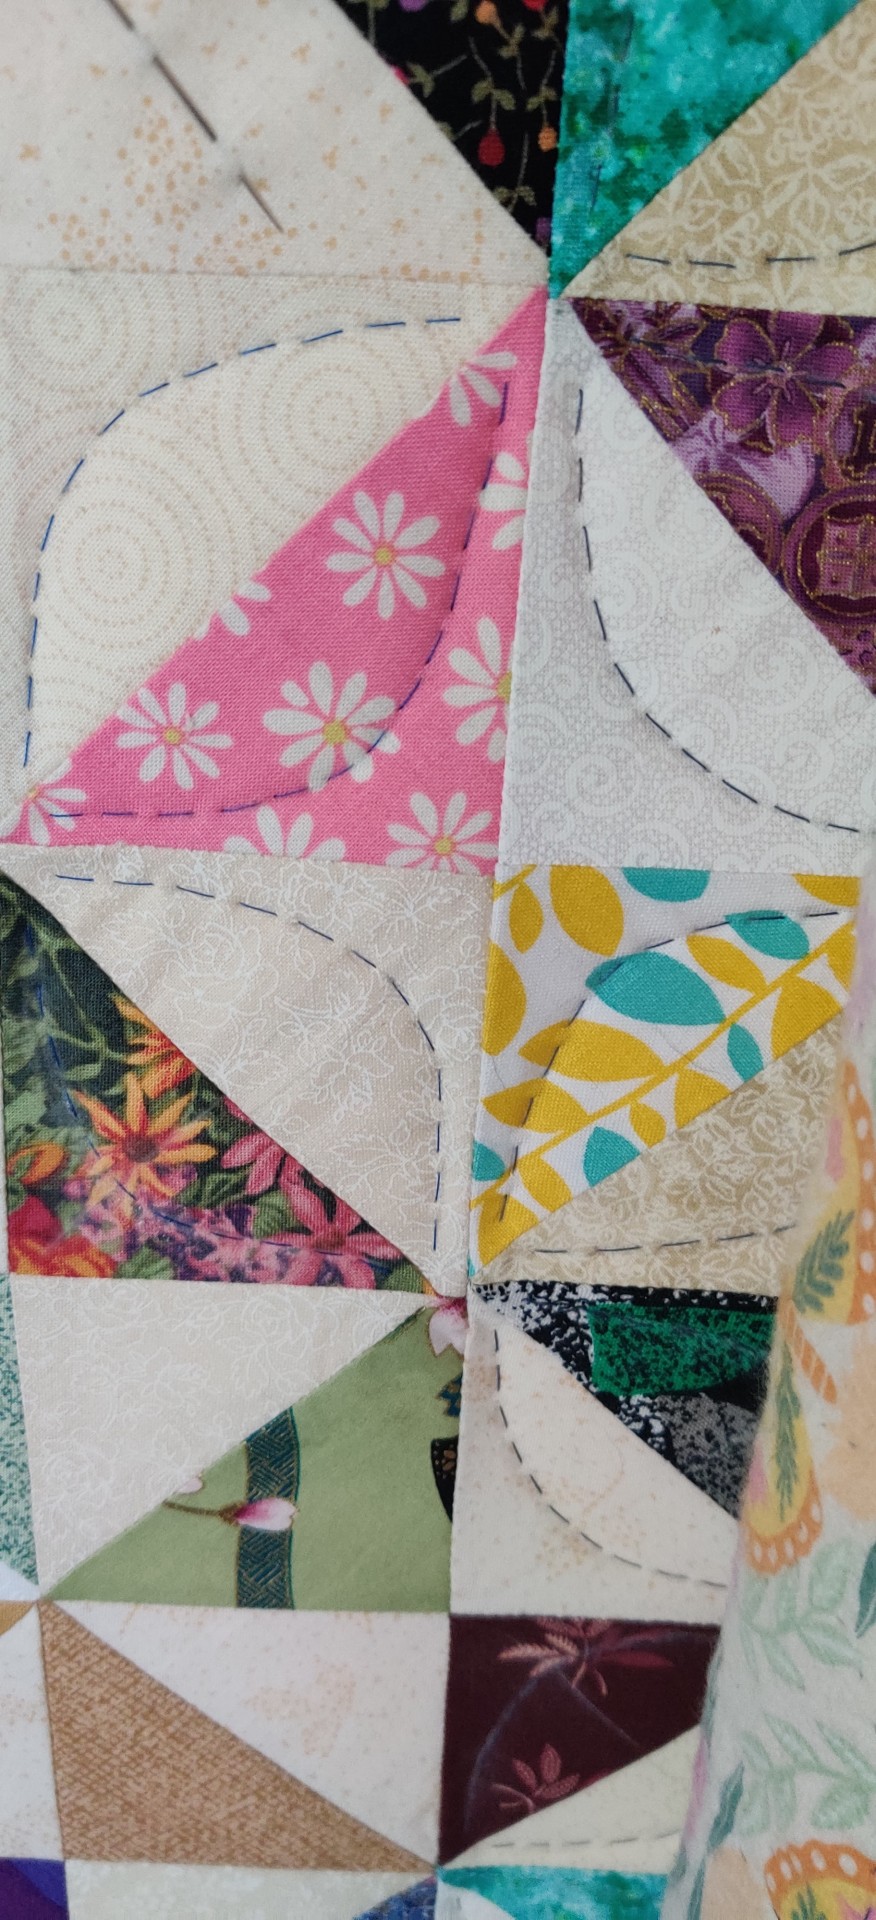
A collection over the last 6-ish months working on this quilt! I spent a lot of time on it, and even though it wasnt always how I wanted it to go, i'm still overjoyed with how it turned out in the end. Hit image limit so more in reblog!
#quilt#quilting#handmade#pinwheel quilt#2023#my art#my first finished project of the year and proof for myself of how much i love hand quilting ❤️#it takes 5ever tho so only for the projects i either really love or for ppl i rly love#bc whew the hand sewing alone took me 2 months#very lowball estimate of 30 hours for the hand sewing alone#i will say tho as much as i enjoy the handsewing on the frame#i need to see if i can just pin baste and then sew in a hand-held hoop#bc setup and teardown for sewing sessions was a bit ridiculous#very hard to get adhd brain to decide to do it#and hard on my body bc i couldnt easily get up and stretch without halting all momentum#but still fun nonetheless
33 notes
·
View notes
Text
Customer called my hoodie "stellar" 😭
#its the one i made!#well i didnt make the whole hoodie#just the batgirl symbol on it#and handsewed the whole thing bc i hadnt had my Revolutionary sewing machine lesson yet#there are soooo many batman hoodies. and zero batgirl ones. at least cass's batgirl symbol#so i made my own and i wear it soooo much#its not perfect and id def do things differently next time#but i love it#and i got a compliment on it.... OTL#bel speaks
7 notes
·
View notes
Text
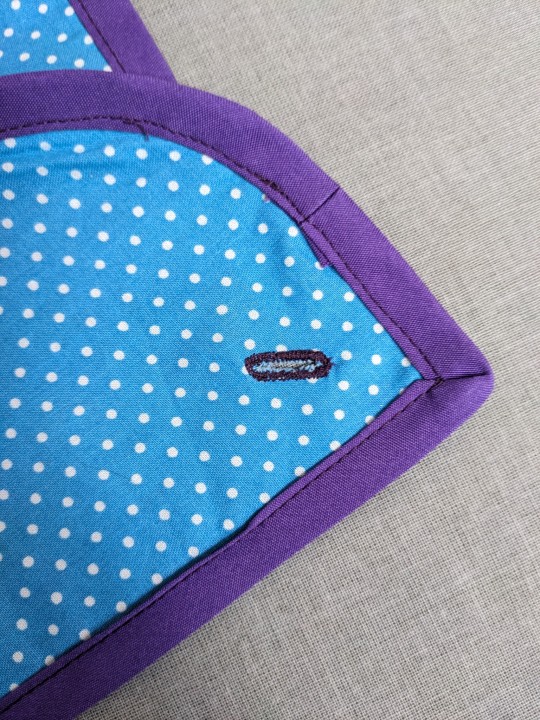
Well, it's a buttonhole, and I think any time you complete a buttonhole you should get a certificate of bravery
#sewing#singer featherweight 221#singer sewing machine#one thing that would be nice about a more modern sewing machine would be not having to deal with my vintage buttonholer attachment#it stresses me out so much but so does handsewing buttonholes
13 notes
·
View notes
Text


The plan
#AHHHHH I LOVE THIS FABRIC#i literally sat in class thinking about how much i wanted to do something with it#and it was incense this week so i just#doodled#sewing#handsewing#fashion#handmade fashion
8 notes
·
View notes
Text
if i dont post anything for a while, its cus im working on pomni cosplay and its kicking my asss
#i have a con i'm tryna get it ready for so i've been working on it all day and all night#i'm having fun making it but im also handsewing the entire goddamn thing cus i dont have a sewing machine KJDSFHSJKGHS#ACTUAL hell my hands hurts so much#taking my breaks! lalala!#i wanna post pics when im done hehe im excited :)c#blah blah ramblings
2 notes
·
View notes
Text
so after having read Crescent City and ACOTAR (yes in that order because i didn't know there's a suggested order), i'm so filled with inspiration and motivation to Make Stuff that i can hardly sleep at night. i've handsewn to most basic Night Court inspired crop top from the stupidest fabric possible (coat lining) and now i have plans to sew it again from a better fabric and give it sleeves AND try to make Feyre's Under the Mountain / Court of Nightmares "handkerchief of a dress" [vibrates with excitement]
anyway here's attempt one at the croptop:
#it's giving Amren. my favourite colour to wear is grey as well haha#i read books now#jolly has thoughts and feelings#i love playing dress up but cosplaying seems so overwhelming because it requires so much skill#skill that i do not possess... yet. i'm a humble creative i can only handsew the basic stitches#anyway it fills me with much joy. i hope at least one of my visions comes to fruition#is this enough tags?#acotar
5 notes
·
View notes
Text
I ended up spending most of yesterday fixing some fit issues with the scrappy sweatshirt -- which has somehow morphed into the Jyn Erso Sweatshirt in my mind, between the color and the sleeve details and the Star Wars-iness of it all.
I was hoping to finish it yesterday, but the fit issues were worth spending the time on, I think. Sewing on one of the sleeves revealed a large, weird bubble at the back of the armscye, and in dealing with that I ended up taking a chunk out of the tops of both the side back and side front panels where they connect with center back and center front, which fixed most of the issue I was seeing with the excess fabric problem.
But at that point the shirt was a weird in-between of not quite fitted enough, so I mentioned to Jack that I was thinking about taking out the two rectangular side panels that together were adding about 5" of width to the shirt. He suggested I just use a plain seam to take it in, instead of picking out all the stitching. That took out about 4" of that 5" width and resulted in a shirt that's significantly more fitted while still loose enough to pull on over my head. It also turned into this really cool seam detail at the side seam:

Of course, that'll be completely covered by the fitted vest I'll be wearing over top for our Batuu outing, but I like the way this sweatshirt turned out so I'll probably end up just wearing it on its own with jeans or whatever, too.
Once I had the body fitting the way I wanted it to, I fitted the sleeve into the armscye more or less by pinning it in place while wearing it. I was extra careful to match the inset panel on the sleeve with the inset panel on the shoulder, and I ended up having more fabric at the back of the shoulder than I needed (the other thing that was causing that weird bubble, as it turns out) but with the lapped seam and fitting it while wearing it, that was easy to shift that out and then trim it down later. I also ended up taking in the long seam of the sleeves themselves, so that the width matched up with the smaller armscye. The sleeves are completely fitted now, but there's enough stretch in this fabric that it's still comfortable and I have full range of motion.
With the sleeves attached, I was able to try the whole thing on and mark a couple of changes I wanted to make to the neckline and to level out the lower hem. I trimmed those to shape, then added the same sort of hem finish that I used for the sleeves: a narrow panel cut parallel to the knitted grain of the fabric, and thus unlikely to either roll or fray too badly. And with that, I could call the scrappy Jyn Erso Sweatshirt finished!

At some point in the next two and a half weeks, I want to gently hand-wash it to get all the chalk markings off, and then probably let it air dry. In the future I plan to throw this shirt in the wash with everything else, but for right now I don't want to risk something unraveling and needing fixed before I wear it to Batuu.
The other thing I may want to fiddle with later is the collar trim. When I wear it under the vest, it lays flat and sticks out exactly as much as I was hoping it would, for just a little bit of contrast color right at the neckline. But when it's worn on its own the neckline doesn't feel quite right. It probably just needs a couple of little darts at the shoulders to help it lay flatter against my neck -- or I might chop it down to a narrower width and let that be the solution. But either way, it's not something I'm going to mess with this month.
So with the shirt officially done and wearable, I can get back to fitting the vest. I left some pins in it from the last set of alterations I was thinking about, right before I decided to pause that project and make the sweatshirt to wear under it. But as soon as I put it on with the sweatshirt, I could see that my alterations were in the wrong place -- largely because I'd just done something similar with the sweatshirt.
During my last try-on a week or so ago, I had thought I needed to pinch in the top of the armscye to keep it from gaping over the cap of my shoulder, but that was making the bust fit weird, so I had started pinning that to take it in, before deciding that I really needed to be able to fit it over the shirt I'd be wearing it with.
With the complete flying-by-the-seat-of-my-pants nature of the sweatshirt project, I had come to realize that my pattern for both the sweatshirt and the vest (and probably a bunch of other things, come to think of it) are way too small through the shoulder, especially on the center front panel. The center back seems to be fine, weirdly.
So instead of pinching out a triangle from the armscye to the neckline, I seam ripped the shoulder seam and sewed an extra rectangle of fabric onto the shoulder of the front panels, being careful to match the grain lines. I've pinned a new shoulder seam in place -- the same shape as the alteration I had previously pinned, but now with two or three extra inches of height between the shoulder and the bust.
It's gotten too dark to try to fit this very dark blue fabric in the mirror so I've set it aside to finalize tomorrow, but I could already tell that the bust is fitting much better, now that it's sitting where it should be instead of trying to float two or three inches too high. I may not even have to make any adjustments to the bust itself, but I'll wait until tomorrow to decide, after I can see the vest in bright daylight.
Besides that, there are a couple of other tiny changes I want to make -- lowering the curve of the part of the neckline that folds over, bringing in the flare over the hips at the side seam just slightly, and trimming off the extra length especially in the back panels. Those are all very simple changes, so I'm hoping to get through them all tomorrow while the light is good.
Then I'll be able to transfer all those changes to the paper pattern and cut out the exterior fabric from this same blue linen. The lining will have a seam where I added to the front shoulder, but unless it shows through really obviously, I'm not planning to re-cut the lining. I'm hoping to put some pockets in that'll live between the exterior and the lining anyhow, so I'm not too worried about that one extra seam showing through. And worst case I'll just re-cut that piece of the lining, since I should have enough linen left over after the exterior is cut.
Once I've got the exterior cut out and assembled, it'll be down to attaching the exterior to the lining and finishing all the edges, then adding the zipper and any other closures, and adding pockets if I have time. There are a few other detail things I'd like to do for my outfit if I have time (covering up laces and buckles, mostly), but all of that will only happen after both the vest and Jack's jacket are finished.
Still lots to do, but I'm feeling really good about my progress, and how cool everything looks. The sweatshirt isn't something I could have imagined and sketched out in its final form, but I am thrilled with the ways that necessity led to such interesting design details. I wanted something long-sleeve in that blue-gray color, and I ended up with something so much better than that, something I just love.
I tried on all the pieces of my outfit together, and I'm really happy with the look overall, and particularly the way the sleeves of the sweatshirt work with the vest and the hooded wrap and my little fingerless leather gloves. I can't wait to get the vest done and really see the final effect of all these pieces I've made. Less than three weeks to go now, but it's easy to stay focused and motivated when everything just looks so wonderful.
More pictures and updates to come as I continue to check things off of my list!
#my sewing#scrappy sweatshirt project#Jyn Erso sweatshirt#Batuu vest#Batuu Bounding#2024 mood#I have been making slow progress on handsewing the pleated panel to Jack's jacket too#it's at the annoying phase where I have to stick my entire arm into the sleeve to pull the needle through#but it looks so COOL that it's keeping me motivated#and since I can't really work on the vest much after dark hopefully I'll start making more progress on the jacket in the evenings now#and sewing all of this and writing up these posts has kept me focused on and excited about this birthday trip#while also keeping me from vibrating in my seat from excitement lol
7 notes
·
View notes
Text
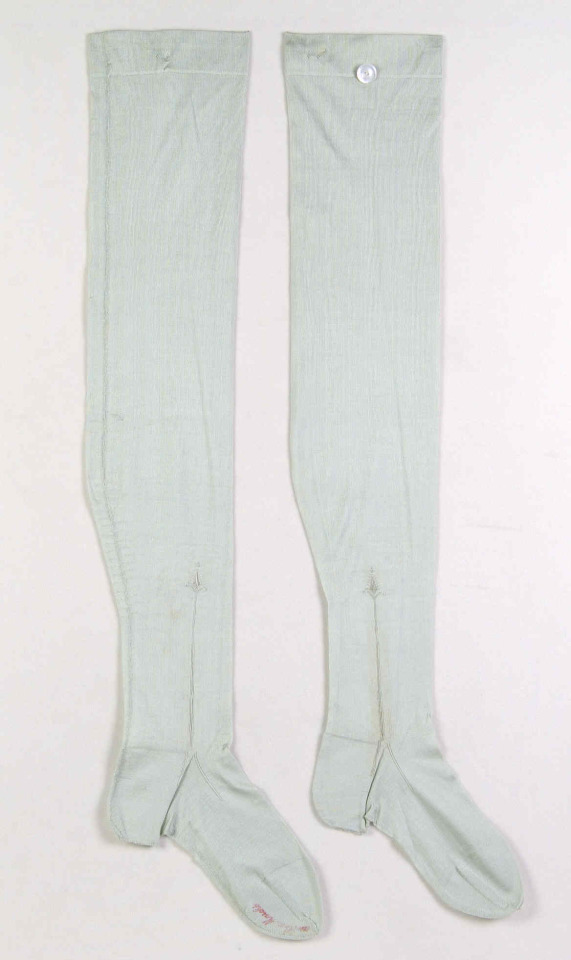
For a really long time now, I’ve wanted historical silk stockings, because they’re just *so fucking cool*.

Most people probably think of either drab brown and grey wool stockings or plain white silk stockings when they think of Olde Tyme Sokks™️. In reality, they used to be made in all kinds of colors, materials, lengths, so on and so forth.

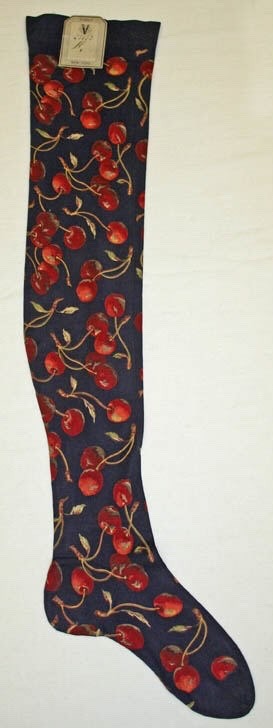
Those cherry print stockings are from the 1870s!
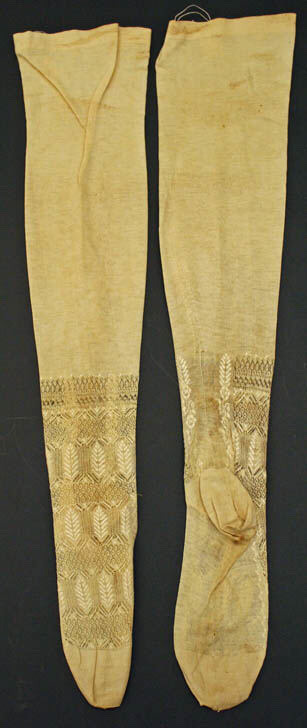
The elaborate embroidery at the ankles was were known as clocks or clocking, and originally was functional. It helped reinforce the seams of the ankle gussets back when stockings were seamed and not knit in the round. Later on the embroidery took on a purely decorative purpose, sometimes even being replaced by lace inserts:


The really fun thing is that for a long time, beautifully decorated stockings were totally gender neutral. Men embraced floral embroidery and lace and bright colors and wore heels to show off their (appropriately stockinged) ankles and calves. And since shorter breeches were in style for quite a long time before giving way to trousers as we know them today, men had way more real estate for showing off their socks.
What’s even more amazing is that the knitting machine was invented in 1589. No, that’s not a typo. You read that right. In the 16th fucking century, William Lee invented the first knitting machine for the express purpose of knitting stockings. The knitting machine was literally invented two and a half centuries before the first commercial sewing machine.
Really puts in perspective what human hands are capable of, huh?
#pancake talks textiles#yes this is a lead up to *another* project announcement#blame the adhd#machines still have not fully replace hand sewing by the way#like in an industrial context#there are some things machines still simply cannot do#it is my honest opinion that it will never be feasible to fully replace human handsewing in certain industries#much as some companies may try#the problem of course is that the engineers aren’t doing the sewing so they don’t Understand
24 notes
·
View notes
Text
i think i might pull a build-a-bear and put a little heart in the plushie :')
#smth smth the inherent poetry of the act of creation fhffkdl#if u spend so much time carefully handsewing a little body together u tend to get a little emotional abt it fhfkdl#i feel a little silly but ... this lil guy is gonna exist bc i made him :') thats just so amazing that i can just make stuff like this#he'll be a little lopsided ofc but there will be no other like him and theres smth wonderful abt that i think#<- this user gets emotional over art as a general rule so if u add on humanoid shape then things get misty-eyed real fast#this is probably so silly but thats okay fjdksl im a silly goose and a terribly earnest one at that 😭#dandy.cmd#dandy doll-making
2 notes
·
View notes
Text
ought we've been sewing pretty much all day + reviewing for exams >.<
#going to take a break and watch trigun 👍#were handsewing a lining into a hoodie we have#that the inside texture is Bad#so were covering it up w a cotton shirt#and its pretty straightforward just So Much Sewing#we r probably 1/3 through? if we dont attach the sleeves#vash.txt
2 notes
·
View notes
Text
hi hello just coming on here to say that sewing is the greatest joy in my life. i hope u are all doing well <3
#salisha speaks#oh my goddd#i just cried while handsewing some corset flossing#ITS SO PRETTY#for my castlefest costume#its so cute im so happy i love it so much#if anyone cares or if i remember ill post pictures of my final costume :#handsewing just brings me so much joy like!!! im making this WITH MY HANDS#looking at the parts i sewed by hand like. i did every stitch of this. wtf#anyways time away from here has been good ive been very busy with sewing this costume#and reading and hiking in the rain#i feel good. i feel so tired bc im so busy but im happy#and i already have so many other sewing projects planned and it makes me SO EXCITEDDDDDD man i love it here
1 note
·
View note
Last Seen Blogs

treasure-locks
treasure locks

k4iloveanimation
Dallas

newtness532
melancholy boy

tak24pr
Tokenpack

1d-insiders
Teenagers dirtbag