#set up cricut machine
Text
Cricut Explore Air 2 Bluetooth Setup: A Step-by-Step Guide

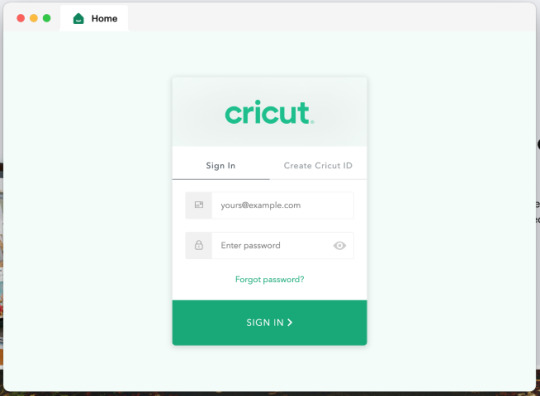
Have you got your Cricut Explore Air 2? Congratulations! You’ve got this powerhouse you can use to create anything. But how do you get started with it? I am talking about its setup. If you are not familiar with it, here you will learn everything about the Cricut Explore Air 2 Bluetooth setup.
Cricut is an incredibly fit machine for your regular crafting projects. Many users are relying on it worldwide. The Cricut Explore Air 2 is one of the highly smartest machines that users desire. When you have such a powerful machine, don’t wait to set it up and start creating something new. Here we go!
Cricut Explore Air 2 Bluetooth Setup on Desktop
If you are a computer user, complete these directions to place the Bluetooth connection on it. Follow these steps to setup your Explore Air 2 on a desktop.
For Windows
When you have a Windows PC, setting up your Explore Air 2 machine becomes easier. Go through these easy steps to setup your Cricut cutting machine via Bluetooth.
In the beginning, make sure that your Cricut machine is ON and not more than 10-15 feet away from the Windows PC.
Then, go to the Start menu and hit the Settings option.
After that, move to the Devices option and ensure that the Bluetooth option is enabled.
Now, select the “Add Bluetooth or other device” option.
On the next screen, choose the Bluetooth option and allow your Windows PC to find your Cricut machine.
Also, choose your machine and provide the PIN number. If you don’t know the PIN, simply add “0000”.
Lastly, hit the Connect button to connect the machine finally to a Windows PC.
The Cricut Explore Air 2 Bluetooth setup is not limited to the Windows PC, but it is also possible on a range of devices, including Mac and mobile devices. Let’s check out the steps for a Mac computer.
For Mac
As you know the Bluetooth setup is also possible on a Mac computer, check out the steps below to learn the Bluetooth connection steps for a Mac.
At the start, make sure that your Cricut cutting machine is not more than 10-15 feet away from your Mac.
Then, go to the System Preferences option in the Apple menu.
After that, search for the Bluetooth option on the screen.
When you see the Bluetooth option, toggle it on.
Now, select your Cricut machine’s model from the list and hit the Pair option.
At last, the connection will start.
So, finally, you have learned how to setup the Explore Air 2 machine on a Mac computer.
Cricut Explore Air 2 Bluetooth Setup on a Mobile Device
Here comes the step for the Explore Air 2 connection with mobile devices via Bluetooth. Look at the steps below to learn more.
For Android
If you own an Android device and want to setup your Explore Air 2 machine, follow the steps below.
Ensure that your mobile device and Cricut product are not more than 10-15 feet apart from each other.
Then, open the Settings option on the screen.
After that, hit the Bluetooth button on the left side. If you see the Bluetooth button off, turn it on.
A list of available devices will pop up on the screen.
Now, pick your Bluetooth name and start the pairing process.
When your screen asks you for a PIN, type “0000” and hit the Done button.
When the pairing process is completed, you will see your Cricut model under the Paired Devices option.
Finally, your machine is setup on your Android device.
That’s it for the Cricut machine pairing with your Android device. Try to connect your machine to your phone and see the results.
For iOS
If your focus is to connect your new Cricut product with your iOS device, follow these steps and go ahead with the connection.
To start, ensure that your devices are separated by a distance of 10-15 feet.
Also, you have to check that they are enabled.
Then, check the Bluetooth option. Turn it on if you see it off.
After that, select the Bluetooth option from the on-screen list.
Your iOS will start pairing with the machine.
When your screen prompts you to provide a code, you can put “0000” and hit the Done button.
Now, a new screen will pop up that will ask for your permission to connect the Cricut Design Space Login to iOS.
Next, tap on the Allow option to continue.
Now, you will be redirected to the Design Space.
Finally, your iOS device is successfully connected to Bluetooth.
Finally, the Cricut Explore Air 2 Bluetooth setup on iOS is completed. And the guide ends here.
FAQs
Why Is Cricut Explore Air 2 Not Connecting to Bluetooth?
If your Cricut Explore Air 2 is not connecting to Bluetooth, it can happen for many reasons. One of the reasons is the cache and cookies on the browser that may be interrupting with your machine’s Bluetooth connection. Also, it may be possible that your devices are far away from each other. Therefore, you must make sure that they are the minimum distance and the Bluetooth option is ON on both of them.
How to Set up Cricut Explore Air 2 on Laptop?
To set up your Cricut cutting machine on a laptop, you need to follow these steps.
On the first go, open an internet browser and navigate to cricut.com/setup.
Get the Cricut Design Space on your device.
Now, click on your Cricut cutting machine.
After that, connect your Cricut machine to a power source.
Then, turn on your Cricut product.
Continue with the on-screen steps to connect your device via Bluetooth.
Next, register your Explore Air 2 machine.
How Do I Pair My Cricut Explore Air 2 Using Bluetooth?
To pair your Cricut product via Bluetooth, follow these steps.
First of all, launch the Devices option on your Cricut machine.
Then, check if the Bluetooth option is selected.
Now, tap on the Add Bluetooth or other device option.
After that, choose Bluetooth and let your PC detect your Cricut machine.
At last, select your machine from the list.
For more information visit: www.cricut.com/setup login
Cricut new product setup
design.cricut.com
Source: Cricut Explore Air 2 Bluetooth Setup
#cricut explore air 2 bluetooth setup#how to setup cricut explore#cricut new machine setup#set up cricut machine#how to set up a cricut explore#Cricut new product setup#Cricut setup log in#Cricut machine setup
3 notes
·
View notes
Text
How to Set up Cricut Machine with Steps
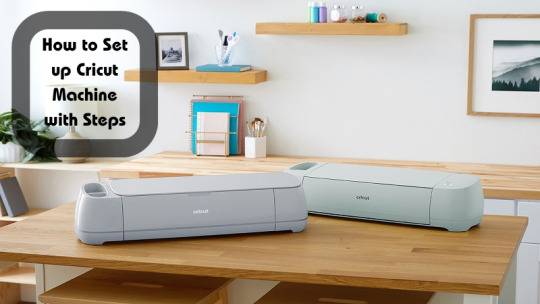
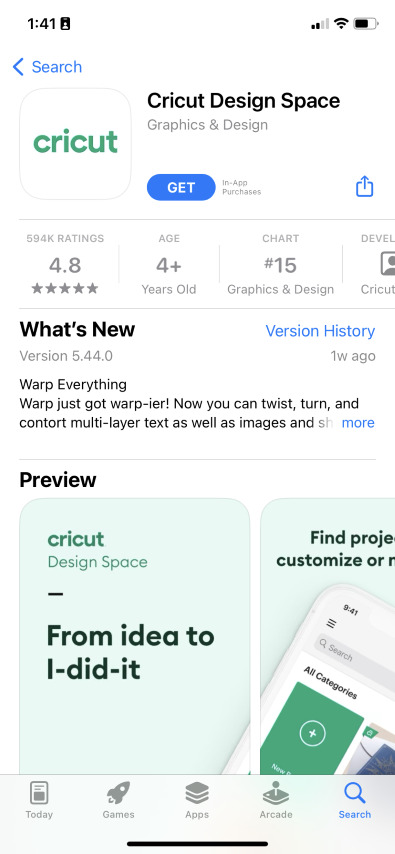
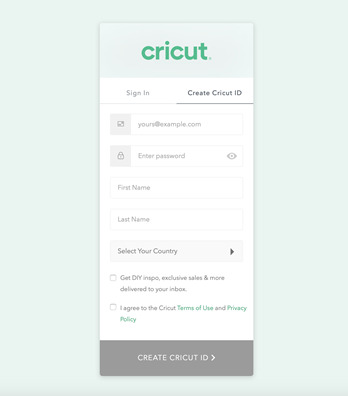
Setting up your Cricut machine is a straightforward process that opens the door to endless crafting possibilities. Begin by unpacking your Cricut and placing it on a flat surface. Connect the power, turn it on, and link it to your computer or mobile device. Download and install Cricut Design Space, the hub for your creative projects. Create or sign in with your Cricut ID to access a world of designs.
If required, calibrate your machine for precise cuts. Load your chosen material onto the cutting mat and let the Cricut work its magic by following the simple on-screen instructions. Within minutes, you’ll witness your designs come to life. The setup is intuitive, allowing you to focus on what you do best – crafting with precision and creativity. Welcome to the world of Cricut, where your imagination knows no bounds!
Setting up your Cricut machine is a breeze, and soon you’ll be crafting to your heart’s content. Follow these simple steps to get started:
Unboxing: Begin by carefully unpacking your Cricut machine set up and accessories. Take a moment to marvel at the sleek design and the possibilities it holds.
Place Your Machine: Find a clean, flat surface to set up your Cricut machine. Ensure there’s ample space for the materials and projects you’ll be working on.
Connect Power: Plug in the power cord and turn on your machine. The power button is usually located on the side. Watch as it comes to life, ready to bring your creative visions to reality.
Connect to Computer or Mobile Device: Depending on your Cricut model, connect it to your computer or mobile device using a USB cable or Bluetooth. Make sure your device’s software is up-to-date for seamless communication.
Install Design Space: Download and install Cricut Design Space from official website Cricut.com setup on your computer or mobile device. This is the platform where you’ll create and customize your projects.
Create a Cricut ID: If you don’t already have one, create a Cricut ID. This will be your gateway to a world of designs and inspiration.
Calibrate Your Machine (if required): Follow the on-screen instructions to calibrate your Cricut machine. This step ensures precision in your cuts.
Load Materials: Place your chosen material (vinyl, paper, fabric, etc.) on the cutting mat and load it into the machine. Adjust the settings in Design Space accordingly.
Design and Cut: Open Design Space, create or choose a design, and click “Make It.” Follow the prompts to load the cutting mat into the Cricut machine, and let the Cricut work its magic.
Admire Your Creation: Once the cutting is complete, carefully remove your project from the mat. Admire the clean cuts and intricate details, knowing that the world of limitless crafting possibilities is now at your fingertips.
With these simple steps, you’ve successfully set up your Cricut machine and are ready to embark on a creative journey like never before. Happy crafting!
Source:How to Set up Cricut Machine
#cricut machine setup#set up cricut machine#Cricut design space download#design.cricut.com#cricut explore air 2 setup#www.cricut.com/setup login#how to set up cricut maker#how to set up cricut machine
3 notes
·
View notes
Text
How to Use a Cricut Mug Press? [A Comprehensive Guide]
Are you curious to learn how to use a Cricut Mug Press? Well, this guide explores everything you need to know about the use of this machine. With this ultimate guide, you will be ready to use the Cricut Mug Press easily without anyone’s help. However, the Cricut Mug Press is a perfect choice for people who want to create a customized mug with pro quality.
This fantastic tool is compatible with markers, pens, and Infusible Ink transfer sheets. You also need a Cricut Design Space to create a design that can be further cut on the Cricut cutting machine. Moreover, you will need different materials, such as HTV and Infusible ink, to get desirable designs on mugs. After that, we will learn the process of using the Mug Press with step-by-step instructions. Let’s dive into it.
Step 1: Supplies You Need to Use Cricut Mug Press
Before learning how to use a Cricut Mug Press, you first need to know the requirements of supplies. These supplies are essential for using the Cricut Mug Press.
A desktop or laptop for setting up your Mug Press.
You can use any Cricut machine (Maker series, Explore series, and Joy).
Cricut Blank Ceramic Mug
Lint Roller
Butcher Paper
EasyPress mat or heat-resistant surface.
Infusible Ink Transfer Sheets and Infusible Ink Markers/Pens.
Oven Glove
Heat Resistant Tape
Laser copy paper
Step 2: Set Up Your Cricut Mug Press
In order to learn how to use a Cricut Mug Press, you must know about the Cricut Mug Press setup.
Follow the steps carefully to set up the Cricut Mug Press:
Insert the power cable into the back of your Cricut Mug Press, followed by a USB cable. Insert one end into your machine and another end into the computer.
Open the Cricut Design Space on your computer or laptop.
Then, select New Product Setup from the right-side menu.
Afterward, select Heat Press, followed by Mug Press.
You can follow the displayed instructions on the screen to download any updates you need.
While following the instructions, you will need to continue the Activate button to activate your Mug Press.
After this, the update will be completed.
Then, you can unplug the USB cable.
Now, your Mug Press is ready to use. Let’s learn how to use a Cricut Mug Press.
Step 3: Use the Cricut Mug Press
The Mug Press is relatively easy to use. After setting up, you can easily create a pro-customized mug. You can choose the design from Cricut Design Space. Always ensure that you choose the design with the exact size that fits your mug.
Once you have selected the designs, start cutting them using your cutting machine. Make sure your design is mirrored before the cut. You can follow the design given below.
After cutting the material, weed the unwanted materials.
Ensure your mug is clean and there is no dust present on it.
Then, place the design around the mug.
Afterward, you have to place the Cricut Mug Press on an easy press mat or any other heat-resistant surface you have.
Press the power button in your Mug Press, and the button will light the green color.
After that, you will hear the beep sound, meaning it is ready to use. However, you don’t need to set any temperature as it is already smart enough to set the temperature automatically.
Then, put the mug into the press.
It will take 6 minutes to sublimate the design onto the mug.
Finally, it will beep when it is done.
Turn off the device and take out the mug using gloves.
Final Words
In short, you should understand that a Mug Press alone can’t help you customize your mug. For this, you need various types of supplies that we have already mentioned in this post. Once you have all these items, you can proceed with the setup process. For this setup, you need a laptop or computer with a Cricut Design Space. When you are done with your setup, your Mug Press will be ready to use. Finally, you can design your mug like a pro!
FAQs
Question 1: How much time does a Cricut Mug Press take to heat up?
Answer: The only time your Mug Press will take to heat up is 5 minutes. After placing your mug into the press, it will take approx 6 minutes to finish it. However, the Mug Press produces a beep sound when it has finished its task. When you finally take out the mug from the press, it takes 15 to 30 minutes to cool down. Therefore, you must be cautious while taking it outside.
Question 2: Do I need a computer to use the Cricut Mug Press?
Answer: Well, you don’t have to rely entirely on a computer to use the Mug Press. Still, a computer is needed when you want to set up or activate your Cricut Mug Press. Also, you can update your firmware using your computer or laptop. All this is done when you connect your computer to your Mug Press via a USB cable.
Question 3: Is a regular mug compatible with the Cricut Mug Press?
Answer: There is no issue using your regular mug until it is made up of ceramic. Other than this, no materials should be used, such as stainless steel, plastic, etc.). Plus, the mug must be coated with sublimation material, which is suitable for your printer’s sublimation ink and Infusible ink. In short, the regular you buy from a local store is not going to work with the Cricut Mug Press.
Visit - Cricut.com/setup
Cricut Design Space Login
Cricut maker setup
Cricut Mug Press
Cricut Maker Machine
#Cricut Maker Machine#Set Up Cricut Machine#Cricut Mug Press#How to Use a Cricut Mug Press?#How to Use a Cricut#How to Set Up Cricut Maker Machine
0 notes
Text
Common Cricut Design Space Troubleshooting [Top 4]
If you frequently work with a digital cutting machine, you must know how excellent the Design Space app is. Although, users do face some of the common Cricut design Space troubleshooting issues while accessing the app. Crafters prefer software for their customized projects. Along with the app, the users also benefit from subscribing to the Cricut Access monthly/yearly plans. Let us provide you with some solutions to this software troubleshooting issue.
Visit- cricut.com/setup
Cricut design space
design.cricut.com/setup
Cricut explore Air 2 setup
cricut maker setup
Issue 1: Application Cache Troubleshooting
Question: How to get rid of the Desktop Design Space application cache?
Answer: Sometimes the software doesn’t load or shows a black screen. However, it can be resolved by deleting the application cache with the help of the following stages:
Windows
First, close the Design Space app from your respective Desktop.
Second, open the File Explorer folder.
Third, open the left side of the screen, click This PC, and then Local Disc [C] followed by Users folders.
Next, open the User folder and open the (.cricut-design-space)folder.
After that, tap the Local Data folder and cover all uploaded files.
Press Shift+Delete to permanently delete all the selected items and cross-check that items are emptied from the Recycle Bin.
Launch the Design Space for the Desktop and press the Select box visible on the top-left corner of the system. Then tick the Force Reload button.
The steps mentioned earlier will efficiently resolve the issue of your application cache. However, if the problem continues, then ASAP contact the higher authorities.
Mac
Under the Cricut Design Space Dropbox, tick Quit Design Space.
At the finder, tick the Go button, and inside its Dropbox, choose the Home box.
At the user files, select the (.cricut-design-space)file available in grey color.
Choose the uploaded files in the Local Data folder and drag them to the Trash folder.
To reload the page, tick on the Force Reload, appearing under the View Dropbox.
Issue 2: How to Dissolve Offload Troubleshooting on iOS App?
Answer: In some situations, it might happen to uninstall the app from iOS devices. With the help of Offloading, the app will save the projects saved into the Design Space along with the download images and fonts. However, an internet connection is required while commencing the process.
Open your phone home screen and press the Settings icon.
At the Settings page, choose the General option and scroll down to the iPhone Storage option.
Search for the Cricut Design Space app, choose it, and tap the Offload App button to confirm the selection.
After that, tap the Reinstall App and try to resume the project again.
If the process didn’t help, reinstall the app Design Space or contact Member Care for assistance.
Issue 3: Troubleshooting Design Space Desktop Icon
Question: Why my Cricut Design Space icon is missing from the Desktop?
Answer: You need to launch the software to solve the issue of the Design Space logo isn’t visible on the Desktop. You need to follow these steps:
You’ll notice the Design Space plugin running at the Desktop system tray. However, if you fail to locate it, then restart your computer.
Tap the Design Space logo and click the Launch Design Space box. You can also open it on the search engine of your choice.
Once you are done following the steps above, the Cricut icon will be visible on your desktop screen.
Issue 4: 404-HTTP Error Message Troubleshooting
Question: How to solve the issue of receiving a 404-HTTP error message while using Design Space?
Answer: Follow these steps to resolve the issue of receiving the 404-HTTP error messages while accessing Design Space:
Clear the browser cache and cookies, followed by attempting to open the app using another web browser.
Check the account menu on the page's upper left side, and if your name doesn’t exist, you need to sign in again.
Last, try to use the app on another Desktop. If you still encounter the same glitch, quickly contact the Customer Care Executives.
Every DIYer aced these technical glitches while trying to develop new crafts at the Design Space canvas. However, it can quickly end by following the steps explained in the above paragraph.
Conclusion
Every crafter knows the importance of Design Space for any event. Many times, technical issues affect their work. They shouldn’t get panic and solve the troubleshooting errors calmly. To clear your doubt, refer to the following FAQs.
Frequently Asked Questions?
Question: How to use the Design Space numbered error issues?
Answer: If you are receiving numbered errors such as (0) while operating the app, then follow the given steps:
Reboot your machine by powering it off and restart it.
After that, ensure that the system satisfies the minimum requirements for running the software.
Clear the browser history, cache, and cookies, and ensure your supported browser is updated.
If none work, adopt a different browser or contact Cricut’s Member Care.
Question: How to reset the Cricut Design Space?
Answer: To reset the software, select all the files and drag them to the Recycle Bin. Following this, you need to empty the bin to ignore unwanted space and then launch the Design Space, then reinforce the application.
Source url- https://cricutdesignmachine.wordpress.com/2023/05/16/common-cricut-design-space-troubleshooting-top-4/
#cricut design space troubleshooting#Cricut.com/setup#design.Cricut.com/setup#cricut machine set up#cricut setup download#cricut setup#cricut maker setup#cricut.com setup mac#Cricut design space#Set up cricut machine#cricut account setup#Cricut maker machine Setup#cricut.com/create
0 notes
Text
How to Connect My Cricut Maker 3 to Bluetooth: Easy Guide
How to connect my Cricut Maker 3 to Bluetooth is the most frequently asked question I receive from my readers. The question is easy to answer, and I will make it easier for you.
I remember the day I got my first Cricut Maker 3 machine. I was a little bit, but somehow, I learned to connect Cricut to a device using Bluetooth. When I can do this, you can also do it in no time. For this, you will need a compatible computer or mobile device to which you want to connect. Let’s learn how to connect a Cricut machine with different devices, including Windows, macOS, iOS, and Android. Let’s delve into this blog and start establishing a connection.
How to Connect My Cricut Maker 3 to Bluetooth on Windows?
Connecting your Cricut cutting machine to a Windows computer using Bluetooth is not rocket science. By following the simple steps given below, anyone can easily connect their Cricut to their PC.
Here’s how to connect Cricut Maker 3 to Bluetooth on Windows 10:
How to Connect My Cricut Maker 3 to Bluetooth on Mac?
Cricut is easily compatible with the MacBook. Besides, the first and second steps are the same for all devices as for the Windows computer. So, take out your Cricut machine outside or unbox it if you haven’t done it yet and start connecting it to your Mac.
Here’s how to connect Cricut Maker 3 to Bluetooth on Windows 10:
How to Connect My Cricut Maker 3 to Bluetooth on iOS?
So, now I am going to talk about the steps to connect your Cricut cutting machine to your iOS devices, including your iPhone or iPad. The steps will be the same for both iPhone and iPad devices.
Here’s how to connect your Cricut machine to your iOS device via Bluetooth:
How to Connect My Cricut Maker 3 to Bluetooth on Android?
Android users can also establish a connection between their Cricut Maker 3 and Android smartphones without any hassle. All you need is an Android phone that is compatible with Cricut.
Here’s how to connect your Cricut machine to your iOS device via Bluetooth:
FAQs
Question 1: What if I can’t connect my Cricut machine to Bluetooth?
Answer: Here are some things that you must try to connect:
Question 2: What’s wrong with my Cricut that it doesn’t connect?
Answer: It is probably some of the reasons that you must know. First thing, you will need to know whether you have connected your Cricut to your computer or mobile device. It should also be connected to the WiFi network. If everything is okay, you can check your other cable connection.
Question 3: Which MacBook should I try with my Cricut?
Answer: I think the Apple MacBook Air (M2, 2022) is the best, in my opinion, as it is comfortable and portable in performance. Windows computers properly need to connect with each other. For this, users can check their system requirements and choose Mac accordingly. Besides, I prefer to have this MacBook Air laptop.
Visit: install cricut design space app
www.cricut.com setup login
cricut.com/setup
Source: https://cricutdesignappspace.wordpress.com/2024/05/21/how-to-connect-my-cricut-maker-3-to-bluetooth-easy-guide/
#cricut.com/setup#cricut design space#cricut explore air 2#cricut new machine setup#cricut.com/setup mac#cricut drivers#cricut.com/setup app#cricut.com/setup login#cricut.com/setup windows#install cricut design space app#install cricut design space#cricut install setup#install cricut explore air 2#cricut create connect to computer#cricut setup on computer#cricut new product device#cricut new product setup#cricut.com setup mac#setting up your cricut maker#Cricut Maker 3 to Bluetooth
0 notes
Text
Cricut Setup on Computer: Easy Connection Guide
Setting up a Cricut machine on a computer may seem like a tedious task, but it’s not. Being a craft enthusiast, I have setup many Cricut machines on devices. With my experience, I can tell you the procedure involved in the setup of a Cricut machine. Thus, if you were searching for a guide to learn the Cricut setup on computer, your search is complete here.
I will show you the easiest ways in this guide. Cricut machines are excellent feature-rich tools that are compatible with almost all devices except Chromebooks. With the Cricut machine, you can make tons of things using numerous Cricut materials and supplies.
If you want to learn the process quickly and start your crafting journey with this ultimate machine. Never miss this opportunity to see what I can teach you here.
Cricut Setup on Computer (Windows and Mac)
Explore the steps to learn how to setup the Cricut machine on a computer. I’m using a Bluetooth connection to connect the machine to a computer device. Check out the steps below.
For Windows
If you’re a Windows user, you’ll need to consider the steps below to setup your Cricut on Windows.
That’s how to perform the Cricut setup on computer. Now, you can start crafting with your amazing Cricut machine.
For Mac
To perform the Cricut machine setup on a Mac computer, you’ll need to follow the steps given below. The steps for Mac are slightly different, so follow them carefully.
Finally, your Mac will connect to your Cricut product via Bluetooth. This is how to complete the Cricut setup on computer effortlessly.
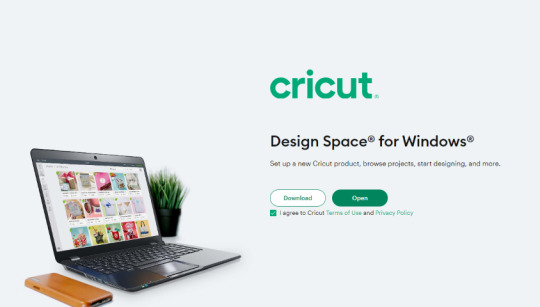
Download Cricut Design Space on Computer
The Cricut Design Space software is important for setting up your Cricut machine on any device, like a desktop or smartphone. This software will help your machine communicate with your device. Let’s get started with the steps.
For Windows
To get the Cricut Design Space on your Windows computer, follow the steps below.
That’s how you can get the Cricut Design Space software and start creating projects.
For Mac
To get the Cricut Design Space on a Mac system, you’ll need to follow these steps. Have a look at them.
That’s how you can get the Cricut Design Space application on your Mac. Finally, you have learned how to do Cricut setup on computer easily.
FAQs
How to Do Cricut Setup on Computer Windows 10?
To setup a Cricut machine on a Windows 10 PC, you will have to follow the steps given below.
How to Do Cricut Design Space Download for Windows 10?
To get the Cricut Design Space on Windows 10, follow these steps:
How to Setup Cricut on Phone?
To setup your Cricut machine on a phone, follow these steps.
Visit: install cricut design space app
Source: https://cricutspace6.wordpress.com/2024/05/14/cricut-setup-on-computer-easy-connection-guide/
#install cricut design space app#install cricut explore air 2#cricut.com setup download#cricut.com/create#cricut.com/setup#cricut.com/register#cricut.com sign in#cricut.com design space#www.cricut.com setup login#cricut new machine setup#cricut design space#cricut create connect to computer#setting up your cricut maker#cricut explore air 2#cricut explore air 2 setup#cricut setup#cricut new product setup#cricut setup on computer
0 notes
Text
How to Connect Cricut to MacBook: A Complete Guide
Do you want to connect your Cricut machine to your MacBook? If yes, then this blog will help you understand the connection between Cricut and Macbook. It’s not only about you; almost everyone who is starting with a Cricut machine finds the setup procedure difficult. Therefore, be with me and learn how to connect Cricut to MacBook here.
Before that, you need to understand that Cricut Design Space is an intuitive Cricut software that you need to set up on your device to connect your Cricut product. To get this software, you need to download and install it on your device. Then, you will be ready to set up your Cricut machine for a MacBook.
What Do You Need to Get Started?
To get started with the Cricut connection to MacBook, you need to keep a few things in mind. Look at the steps below to learn the necessary requirements.
Now, you are ready to start the Cricut setup on your MacBook. Let’s check the steps.
How to Connect Cricut to MacBook?
As you know, Cricut machines are compatible with Windows and Mac computers; you can set it up easily on any of your devices. Here, you’ll learn how to connect it to a Mac device. Look at the steps below.
Step 1: Connect Cricut to a MacBook via Bluetooth
Your first step should be to connect your Cricut to a MacBook using a suitable method. I’m choosing the Bluetooth connection method, which is the best wireless connection.
Finally, your pairing process will be finished. You have learned one step towards how to connect Cricut to MacBook.
Step 2: Download Cricut Design Space
In the second step of connecting Cricut to a MacBook, you need to download and install the Cricut Design app on your device. Look at the steps given below to install the Cricut software.
Finally, you have learned how to install Cricut Design Space and how to connect Cricut to MacBook. Now, you can start project-making with your amazing Cricut machine.
FAQs
How Do I Setup Cricut Machine on My Phone?
To set up a Cricut product on a phone, follow these steps.
How to Connect Cricut Maker to Mac?
Follow these steps to learn how to connect Cricut to MacBook:
Why Am I Unable to Run Cricut Design Space on My Mac?
This problem is common, and everyone might have experienced it. This issue may arise when your app is not updated or there are some issues with the device you’re installing. Hence, if you get such issues, immediately try updating your app. Otherwise, you can also uninstall it and then install it back.
Visit: install cricut design space app
www.cricut.com setup login
Source: https://explorenewmachine.com/how-to-connect-cricut-to-macbook-a-complete-guide/
#cricut.com/setup mac#cricut.com/create#cricut.com/setup#cricut.com sign in#cricut.com design space#cricut setup#cricut explore air 2#cricut#install cricut design space#cricut design space#install cricut design space app#cricut design space login#cricut design space app#www.cricut.com setup login#www.cricut.com/setup#www.cricut.com/setup login#install cricut explore air 2#cricut new machine setup#cricut software app#cricut create connect to computer#setting up your cricut maker#cricut setup for pc#cricut setup explore air 2 setup
0 notes
Text
How to Connect Cricut to App: A Stepwise Setup Guide
So, here you will learn how to connect Cricut to app. Right? But before I dive further into this blog, I would like to clarify one thing. This blog talks about how to connect your Cricut machine to an app (Cricut Design Space), but I don’t think it is the same as connecting Cricut to your computer or mobile phone.
Connecting a Cricut to an app and connecting Cricut to a compatible device are two different things. Don’t get confused! The question is, if both are different, then what are we going to learn from this blog? In this blog, I will teach you how to connect a Cricut machine to an app. However, it is also called a Cricut setup. We will be learning about machine setup on Windows computers. Let’s dive into it without any further ado!
Step 1: Unboxing a Cricut Product
Okay, so to get to the exciting part of the Cricut machine setup, we will first need to unbox the machine. However, if you have already unboxed it, enjoy🥳and move to the second step in order to learn how to connect Cricut to app.
Here, let me share my experience of unboxing my Cricut.
I opened the box’s lid and saw a matted folder over the top surface of the Cricut machine. Here I am, actually, opening my Cricut Explore Air 2 machine. It came with a blue LightGrip mat. Those who got the Cricut Maker machine then will receive a green StandardGrip mat.
The list is long; let me show you what else I got with my Cricut Explore:
Step 2: Open Your Cricut Cutting Machine
To open the Cricut machine, I pressed the Open button (on the left side). As I pressed the button, the rest of the doors opened on their own. Here, Cricut Maker users need to lift the top lid. After that, the front door will open on its own (automatically).
Note: Do not open the doors that open automatically. Just wait and let them open slowly on their own.
When your Cricut is opened, you need to remove the foam and other tape on the side.
Step 3: Plug Into a Cricut Machine
Plugging the power cable into the Cricut cutting machine is the first step in learning how to connect Cricut to app. Now, it’s time to turn it on. Yes! So, let’s grab the power cords that come with our Cricut machine.
You can just plug the main plug into the wall outlet and insert the other into the back of your Cricut machine. But, here, you have to plug in the machine; you don’t need to turn it on the machine here. We’ll do it later.
As the machine is turned on, you need to move to the next step, where we will start setting up our machine.
Step 4: Pair Cricut to a Computer via Bluetooth
I have connected my Cricut using a USB cable, too. Currently, I am using a Bluetooth wireless connection. So, let me show you how to connect Cricut to PC via Bluetooth:
Now, let’s download a Cricut app so that you can understand how to connect Cricut to app, i.e., how to setup Cricut.
Step 5: Download Cricut Design Space
The machine setup requires software called the Cricut Design app. To download the software, you need to go through the steps given below:
Next, follow the prompts until your installation is done. Once done, move to the last steps to learn how to connect Cricut to app.
Step 6: Finish the Cricut Setup
Launch the Cricut Design Space software, and you will see the option to select your Cricut cutting machine on the app. Select the type of machine you want to setup. Next, sign in to your Cricut account. If you don’t have an account, sign up to create one.
Once you have created an account, you need to sign in and then start connecting your Cricut to your app. Although you will get screen prompts to setup the machine, I will explain it briefly.
First, turn on the machine by pressing the power button, and then you need to connect your machine. After that, your setup is done!
HURRAY!!!!!!!!! 😍 YOU DID IT!
FAQs
Question 1: Can I connect my Cricut to an app on my mobile phone?
Answer: Yes, absolutely! Connecting Cricut to the app or setting it up is the same. For this, you will need a Cricut app that you can download from an online app store where you can download the app. For example, if you want to install the Cricut software on iOS, then you can get the application from the App Store, and for Android, you need to go to the Google Play Store. In short, you can easily connect your Cricut machine to an app.
Question 2: Is Cricut machine setup difficult or time-consuming?
Answer: Setting up the Cricut machine is easy and not that time-consuming if you have the right software. The simple-to-use interface of Cricut Design Space will walk you through the easy directions to setup the Cricut cutting machine, which will take you a few minutes. So, install the right software on a compatible device, and then you will be ready to go.
Question 3: Is Bluetooth compulsory for Cricut machine setup?
Answer: No, it is not necessary if your Cricut has a USB cable. Except for the Cricut Joy machine, all the Cricut models have USB ports so that they can be connected via USB cords, too. However, for Cricut Joy users, Bluetooth is compulsory when setting up the machine. In short, Bluetooth is compulsory only for machines for which Bluetooth is not available.
Source: https://desincricut.wordpress.com/2024/04/16/how-to-connect-cricut-to-app-a-stepwise-setup-guide/
#cricut.com/setup#cricut.com setup download#cricut.com setup#cricut.com setup mac#cricut.com setup windows#cricut.com/create#cricut.com sign in#cricut.com/register#cricut.com design space#www.cricut.com setup mac#install cricut printer#install cricut design space app#install cricut explore air 2#cricut explore air 2#cricut create connect to computer#connecting cricut maker to computer#cricut com setup#cricut setup#setting up my cricut maker#setting up your cricut maker#cricut new product setup#cricut design space app#cricut design space#cricut new machine setup#cricut software app#cricut explore 3#cricut account on setup#cricut setup on account#cricut
0 notes
Text
How to Connect Cricut to iPad: Two Methods Explained!
As you know, Cricut machines are amazing. You can use them to create thousands of creative stuff like tote bags, keychains, cards, stickers, decals, etc. If I tell you about my crafting journey, it's too long. I started when I was a teenager just for a hobby, but I didn't realize when it would become my business. Well, if I share my story, this blog isn't enough. So, let's discuss the matter we are here for. I know you want a little clarity on how to connect Cricut to iPad. Don't worry; I'll share everything with you to make your work easier.
My blog is dedicated to iPad users who are struggling with their Cricut machines and want to learn how to connect them to an iPad. Let me walk you through this guide and teach you the process.
Introduction to Cricut Design Space
Before we move forward to learn how to connect Cricut to iPad, let's learn about its special software and its excellent features. This application or software is designed for Cricut users to create creative designs. Also, you get multiple features in this software, including different fonts, texts, templates, and designs; you'll be able to design anything you want. To get this software or application, you need to install it from Cricut's official website.
How to Download Cricut Design Space on iPad?
If you want to download and install the Cricut Design app on your iPad device, follow the steps below.
That's it for the Cricut Design Space download on an iPad. Now, let's check its connection process.
How to Connect Cricut to iPad via Bluetooth and USB?
Here comes the final step, which is to connect your Cricut to an iPad. To do this, you'll need to use the Bluetooth pairing option. Go through the steps below to learn the connection process.
Method 1: Using a USB Cable
If you want to connect your Cricut to a wired connection like USB, you need to follow the steps below. A wired connection is helpful in many ways and can be set up hassle-free.
That's how to connect Cricut to iPad with USB. After this, you can utilize your Cricut to create anything.
Method 2: With Bluetooth
Check the steps below to learn Cricut setup on iPad via Bluetooth. This wireless connection is amazing and will work best for you.
That's how to connect Cricut to iPad via Bluetooth. If you want, you can go for a wired connection such as USB.
FAQs
Why Does My iPad Need to Download the Cricut App?
There are certain minimum system requirements you need to check before you download the Cricut app on your iPad. For instance, your iPad version should be 11 or the latest. Also, your internet connection should be strong and within 2-3 Mbps to download and upload. If everything meets, you can connect Cricut to iPad.
How Do I Connect Cricut to My Computer?
To connect your Cricut machine to a computer, follow these steps:
What to Do When My Cricut Is Not Connecting to My iPad?
When your Cricut is not connecting to your iPad it can happen when your Cricut or iPad device is not connected to the power supply. If you're using a USB cable, your cable may be loose, and if you're using a Bluetooth connection, maybe your device's Bluetooth option is not ON.
Visit: www.cricut.com/setup login
install cricut design space app
Source: https://setupcricutoncomputer.wordpress.com/2024/04/06/how-to-connect-cricut-to-ipad-two-methods-explained/
#www.cricut.com/setup login#www.cricut.com/setup#install cricut design space app#install cricut explore air 2#cricut design space#cricut maker bundle#cricut new machine setup#cricut.com/setup#cricut explore 3#cricut.com/setup login#cricut create connect to computer#cricut new product setup#cricut new product device#cricut install setup#connecting cricut maker to computer#cricut setup create account#cricut cutting machine setup#cricut setup on computer#setting up new cricut maker#cricut setup log in#cricut account setup#cricut printer setup#www.cricut.com setup login
0 notes
Text
Cricut Machine Set up: Essential Guide for Beginners
Are you wondering about the Cricut machine set up on computers and smartphones? Don't worry, as I am going to help you with everything. If you remember, last time, I taught you what exactly a Cricut is and what its models are. But this blog will teach you how to set up your machine on computers and smartphones. As mentioned in the previous blog, Cricut is a cutting machine that can cut 100+ materials with ease and accuracy.
Before starting the crafting process, all users are supposed to set up their respective systems on the Cricut machine. After completing the setup process, you must connect both devices. Besides, you need a Cricut Design app that will help you make a variety of DIY projects. This post will provide all the details on downloading and installing the Cricut software and setting up the Cricut machine with different systems.
How to Download Cricut Design Space on Mac?
As shared in the introductory paragraph of the Cricut machine set up blog, Cricut Design Space is one of the most essential tools for all DIYers. You can easily make numerous customized projects through its various features and tools within a few minutes. To get the app on your Mac, you are instructed to have a look at the below steps:
Start the process by visiting Cricut Design Space's official portal, design.cricut.com.
After arriving at the portal, tick the Terms to Use and Privacy Policy box.

Next, choose the folder to save the Design Space downloaded file.
Then, click the Start button, and the file will download to your system.
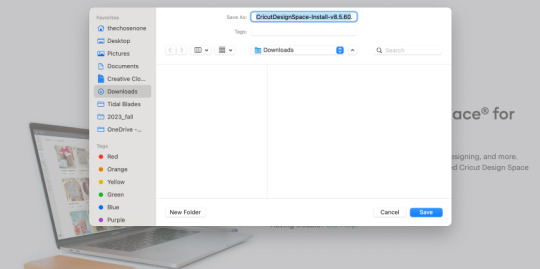
When the download is finished, minimize the window and go to the Downloads folder.
Now, double-click the .dmg file, and a small pop-up window will appear on your system screen.
Following this, move the Cricut software to the Applications folder to start the installation process.
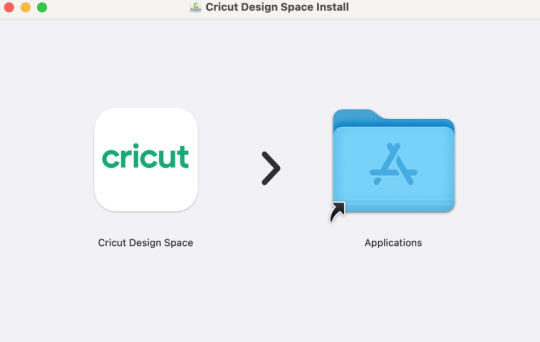
At this point, launch the app by double-clicking the Cricut app, which is available inside the Applications folder.
A small Mac window will appear, and you must click Open to continue the process.
In conclusion, sign in or create your Cricut account using your login details.
As a result of this process, you can now use the Cricut app to make uncountable DIY designs.
Cricut Machine Set up on iOS Smartphones
Answer: If you are an iPhone user and want to create your DIY ideas from a cutting machine, you must set it up with your mobile device. Have a look at the below steps to learn about the method:
First, plug your machine power cord into the nearby wall socket.
After that, pair your smartphone with the Cricut product via Bluetooth.
Next, install the Cricut Design Space app and create your account.
Now, launch the app, create your Cricut ID, or sign in by entering the details.
Following this, open the Menu tab and select the Machine Setup section.
Choose your model and complete the setup by following the on-screen instructions.
Cricut Machine Set up on Mac Computers
Simultaneously, you can set up your devices to get the appropriate craft out of the cutting machine by setting it up with your Mac computer. If you aren't aware of the stages that are part of the setup process, then follow these steps:
Initiate the process by plugging in the Cricut model and turning it on.
Afterward, unpack your device and connect it via USB cable or pair it up with Bluetooth.
Next, go tocricut.com/setup and download the Cricut Design Space app.
Now, follow the instructions to create your Cricut account and set up your machine.
Finally, you will learn that the setup was made when you were invited to cut a material.
At the end of the Cricut machine set up blog, it's pretty evident that to create your favorite DIY project, you need to set up & connect the craft plotter to desktop and mobile devices. Without performing the process, you won't be able to start the machine and work on the Cricut Design app.
Frequently Asked Questions
Question: How Can I Pair Cricut to My Windows?
Answer: With the help of the following details, you can easily pair up your cutting machine with Windows:
Begin by checking that your machine is on and comes under your computer's 10-15 ft. range.
After that, enable Bluetooth on your device and look for your model name inside the list.
Next, choose your model name from the list and enter the password.
Finish the process by clicking the Pair button in the middle of your screen.
Question: How to Install Cricut Design Space on Android?
Answer: To get the Cricut app on your phones, to get this designing app you need to follow the steps available below:
First, you need to open the Google Play Store and look for Cricut Design Space.
Next, press the Install button visible on the right side of the page.
After the installation is done, open the app and tick the Machine Set up or Sign In.
Finally, you can create various DIY projects on your canvas.
Question: What Do I Need to Use Cricut?
Answer: To use a Cricut machine, you need to have several supplies that will help you create the project as you wish. The names of certain supplies are:
Cricut machine
Cricut ID and password
Computer or mobile device
Materials
USB cable
#how to setup cricut maker#install cricut design space app#Cricut.com/setup#cricut.com/setup windows#cricut.com/setup pc#cricut.com/setup mac#cricut design space#install cricut explore air 2#cricut maker bundle#cricut new machine setup#cricut explore 3#cricut machine set up
0 notes
Text
How to Make Cricut Wine Glass: Full Tutorial
Last month, my son proposed to her childhood girlfriend, and she said yes! Since then, they have planned to make everything perfect for their special day. Being a mother and a businesswoman, he entrusted me with the duty of creating a custom-made Cricut wine glass, especially for them. It's crystal clear that it is very difficult to create any design on glass as it is a sensitive material.
With a Cricut cutting machine, I won't have to worry because supplies help me balance everything. The possibilities for making projects with the Cricut machine are endless. If you intend to make wine glasses with Cricut, there are a few supplies needed to help users complete their art quickly. In this blog, I will introduce you to the steps that will help you create the glass of your choice.
Stage 1: Create a Design on the Cricut App
If you intend to make a Cricut wine glass, open the Cricut designing software (Design Space) and tick the New Project option. After that, press the Upload tool, select your design from your system folder or given under the Recent Uploads,and then press the Insert Image button.
Now, fill in the space between the letters by selecting the Weld option mentioned under the Layers panel. Next, select the whole text, increase its size per your preference, and change its color from the material color dropbox.
After deciding on the text color, tick the Make It box and check that the design is correctly aligned. If not, return to the canvas, make the required changes, and hit the Make It button again.
Stage 2: Turn on Your Cricut Machine & Cut the Material
In order to choose the Cricut wine glass material, press Browse All Materials and select your material from the list before you. After finalizing the material, click the Done option and change the blade pressure to Default. Following this, load the Fine-Point Blade into Clamp B properly.
Then, cut a portion of your Cricut material and place it on the BlueGrip cutting mat. Next, load your mat and press the machine's flashing power button. At this point, you are supposed to wait till the Cricut machine is cutting the material. After the process ends, remove the material from the BlueGrip mat.
Stage 3: Remove Your Design & Apply Vinyl
Following this, take your Cricut weeding tool and remove the extra vinyl covering your main design. Now, use alcohol-free baby wipes or a lint roller to clear your glass blank. After that, cover your design with a Cricut transfer tape and use a scraper tool to connect the design and the tape properly.
Stage 4: Reveal Your Cricut Wine Glass
After a few minutes, start peeling off the transfer tape and then trim the extra tape with the Cricut scissor. Following this, place the design with your fingers or scraper tool to avoid any space or wrinkles between the design. Finally, start peeling off the transfer tape and repeat the same steps to stick the design on the second glass.
Congratulations on successfully completing your first-ever glass project made with a Cricut machine. I wish you all the best in the future and hope you shine like a star in the crafting world.
Final Words
This blog helped you understand the complete process of making customized Cricut wine glass using a craft plotter and its supplies. However, it's compulsory for all users to ensure that they are taking the correct steps while making any glass-related craft out of a cut-die machine. Keep going by making new projects, as they will boost your creativity skills.
Frequently Asked Questions
Question: Can I Put Customized Cricut Wine Glasses in Dishwasher?
Answer: If a customized Cricut wine glass is made with permanent adhesive vinyl, you can surely place it inside the dishwasher. To increase their lifespan, you are advised to wash the glass with your hands using warm water and light soap. This will balance the quality and shininess of the glass.
Question: Where Will I Get Unique Designs for My Wine Glasses?
Answer: The Design Space app is the best option if you are searching for unique designs you want to use while making customized wine glass. It is the designing software where you will come across unlimited images, designs, fonts, and ready-to-use projects, helping you make the design look more attractive.
Question: Which Cricut Supplies Do I Need to Make Wine Glasses?
Answer: The complete list of crafting supplies that you will need while making personalized wine glasses is as follows:
Visit: cricut.com/setup
cricut.com/setup
Source: https://cricricutdesigncut.wordpress.com/2024/03/22/how-to-make-cricut-wine-glass-full-tutorial/
#digital design#design space setup#cricut.com setup#cricut.com/setup#cricut.com/create#cricut.com/register#cricut.com sign in#cricut.com design space#design space cricut#cricut#cricut.com setup mac#cricut.com setup download#cricut.com setup windows#www.cricut.com/seup#www.cricut.com/setup\cricut explore air 2 setup#www.cricut.com/setup login#www.cricut.com/setup#install cricut explore air 2 '#install cricut explore air 2 setup#install cricut exlore air 2#install cricut explore air 2#install cricut air 2 setup#install cricut design space app#cricut new product device#cricut new machine setup#cricut new product setup#cricut create connect to computer#setting up your cricut maker#cricut setup on computer
0 notes
Text
How to Use Iron On Vinyl With Cricut: A Beginner’s Guide
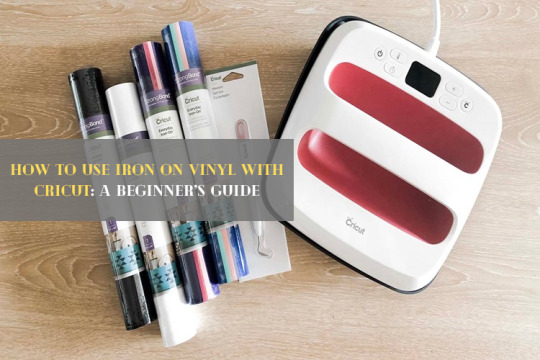
Have you ever wondered how to make something out of the box? Cricut gives you this opportunity with its impressive accessories and machines. If you are someone who wants to learn how to use iron on vinyl with Cricut, you are in the right place.
I know it’s your new journey with Cricut, and you are seeking the right guide to learn things. Don’t worry, I got you. Well, iron on projects are my expertise and can be yours as well after reading this blog. And the fun part is that you can actually create things for yourself with Cricut.
Now, there is no more window shopping for your favorite stuff; rather, make them at home. This blog will show you the simplest way of using iron on vinyl to create a beautiful apron. I will use Cricut Explore Air 2 — What’s your favorite machine? You can also use other Cricut machines. By the end of this blog, you will be ready to make personalized projects like me. So, let’s get ready and create a fun iron on project.
Step 1: Select a Design in the Cricut Software
If you are confused about the design, worry not; you have Cricut Design Space. If you don’t have a good hand in designing, the Cricut software offers you beautiful, ready-to-make projects that you can modify according to your choice.
I took my design from the Fashion category under the Cricut app. If you don’t like the text stuff, just change it; it’s no big deal when you are working in Design Space. Continue with my steps to learn how to use iron on vinyl with Cricut.
Step 2: Modify Your Design
Now, you will see the apron design on your canvas. It’s time to modify it. The first thing I am gonna do is to change the text color. Then, you can select the size and type of your apron to make it fit for your vinyl cutting at the end. If you want, you can change the color of your apron, too. But I like it in black, so I am keeping it.
Once you are done, click on the Layers option. Next, check the white box to see which layer you need to work on. As the project has only a single layer, click on the box just below the welded image.
If you are satisfied with the final design, you can save it. After saving the design, you can name your project. After that, you are ready to click the Go button on the top bar. Once you click it, it will show you a preview screen of the design.
Step 3: Load the Material on Your Mat
When you are learning how to use iron on vinyl with Cricut, you must know that you have to load the material into your Cricut machine to cut your final design. In the preview, check if everything is according to you. On the left side of the canvas, you will see the cutting settings. Ensure that you have selected the correct mat size and click on the small box that says mirror image. Otherwise, you won’t get the final design in the correct format.
As you already know, you will have to load the material on your mat before hitting the Go button. Make sure that you place the iron on vinyl correctly, and then the machine will cut the iron on vinyl as it has a backing on it that can be removed to transfer the design onto apparel. Then, finally, hit the Go button.
Step 4: Let the Vinyl Cut
On the next screen, you must check if the Cricut machine setup has the correct settings. Make sure you change the dial setting on your machine. Also, your machine should have a cutting mat to process the cutting. Well, you have already loaded the mat and your iron on vinyl; you need to move ahead. Allow the mat to cut your design.
During the cutting process, you will see your screen saying that the cut is in progress. When the cut is finished, you need to stop the arrow button and unload your mat. Now, take off the vinyl.
Step 5: Weed Out Excess Vinyl
After cutting the vinyl successfully, you need to remove all the extra pieces of vinyl from the final piece of the project. To do this, you can use a weeding tool that will help you remove the fine particles that may be stuck inside the vinyl. Once you remove all the extra stuff, you will be ready to apply heat and finish the project.
Step 6: Set Your Home Iron
As I prefer a regular iron, I am using my home iron. You can use a heat press, too. But, for starting, I would recommend you to use a regular iron. When you are using the iron, adjust its setting for cotton or linen to produce more heat. Your search for how to use iron on vinyl with Cricut has been completed with my blog. Here is the last option left.
Step 7: Apply Heat to Your Apron
On your apparel, apply the pre-heat with your iron for about 15 seconds. Then, fix your weeded vinyl piece on the apron with its liner part up. Next, cover that image with a clean towel and then apply iron on it for not more than 30 seconds with minimum pressure.
After that, flip your material and apply the iron for 30 seconds with minimum pressure. Here, you don’t need the towel. Avoid heating the material for too long. After applying heat, let your material cool and then take off the film. When you remove the film, you can see the design printed on your beautiful apron.
Conclusion
I’m glad you stuck to my blog and learned how to use iron on vinyl with Cricut. I am really happy to showcase my creativity in front of all of you today. One piece of advice that I want to give you is that you shouldn’t spend so much money while you are doing your first project, as most of the time, people spend too much time in excitement. I used my home apron in this project, and I used everything that I already had. So, arrange things out and go ahead and make your beautiful iron on project.
For More Information Visit: Cricut.com/setup app
Cricut Design Space Desktop
install cricut explore air 2
Source: How to Use Iron On Vinyl With Cricut
#how to use iron on vinyl with cricut#Cricut Explore App#Cricut Setup#Cricut Explore Air 2#set up cricut machine#cricut explore air 2 setup
1 note
·
View note
Text
How to Set Up Cricut Mug Press? [A Complete Guide]
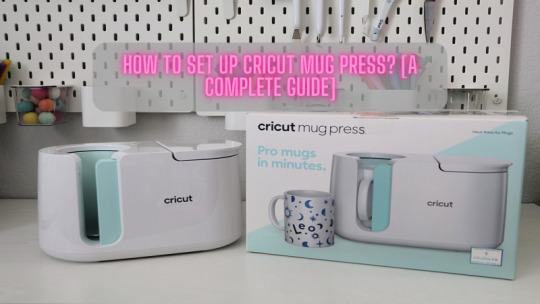
With a vision to make pro mugs at home, all the DIYers are introduced to how to set up Cricut Mug Press. Through this masterpiece, one can make custom-designed sublimation mugs with compatible Ceramic Mugs & Infusible Ink. Moreover, one needs to design, attach & insert the mug blank, and the press will do the rest of the work. The crafter can simply draw their design from the Design Space app/software.
Other than that, the Infusible Ink system gives smooth, pro-quality transfers, becoming one with a mug and making it long-lasting. This Cricut press allows the user to discover their creative side by creating various mugs for different occasions. Besides, the crafter needs to buy a Mug Press along with the bundle and other supplies to create the custom mug.
Let us help you out by showing in-depth Cricut setup Mug Press primary details in the coming section.
How to Set Up Cricut Mug Press on a Device?
Before getting the personal mug, all the users need to set up/activate their Mug Press. To complete the machine activation process, read the steps given below:
First, go to the Cricut setup official page and download Design Space on your system.
Following this, create your Cricut ID or sign in with your Cricut ID and Password.
After getting connected to the Cricut Setup page, choose Heat Press > Mug Press.
Next, plug into the Mug Press and Power on the wall outlet switch.
Following this, take the provided USB code and put it inside your device and the machine port.
After doing these steps, tick the Activate option and start reading the Terms & Conditions.
Lastly, choose Get Started and start creating your first project on Mug Press.
After finishing up the Cricut setup Mug Press process, take a step forward by knowing how to use it for crafting purposes.
How to Use Cricut Mug Press?
After setting up the Cricut Mug Press, the user can easily create custom mugs in minutes with simple and one-touch settings. Get to know about the steps given below:
Start the process by creating your design on the Cricut app by using a mug template or any pre-made mug design.
Next, spread the Infusible Ink sheet on the purchased cutting mat with color side up & shiny side down.
Following this, cover up the mug with the design using the transfer sheet to avoid any bubbles.
Now, preheat the machine by turning it on and pressing the Power button.
After the heating process is complete, it will start beeping, and the Power button will turn green.
Next, place the mug inside into the press and close the lid available on the right-hand side.
Now, you are suggested to wait till the heating process is going down.
After the mug cools down, remove the sheet without damaging the design.
Here you go; making a custom mug with this press is so much fun.
How to Change Cricut Mug Press Temperature Settings?
For top-quality custom mug results, all the users should be aware of the process by which they can modify the machine temperature settings. Get to know about the steps below:
First, enter the Temperature Setting mode, whether the press is switched on or off.
Next, select and hold the power button for 10 seconds.
After that, you will hear two chimes, and all the LEDs will start flashing at once.
Now, you will get to see that the power button will be flashing orange during the Temperature Setting mode.
Afterward, the LED row will start displaying the present setting. You have to push the Power button to cycle through the 3 settings options:
Following this, hold on the Power button for 3 seconds to select the settings after getting the desired LED setting on the display.
After that, a chime will be heard with an LED display, and a Power button will be flashed.
Next, your Mug Press will turn off, exiting the Temperature Setting mode.
Lastly, the new settings will come into action when the press is switched on.
Summing up the above-said section of the blog, we hope that you have understood how to set up Cricut Mug Press with Windows/Mac systems.
Frequently Asked Questions
How Can I Update the Cricut Mug Press Firmware?
The firmware ensures that the machine has the latest and greatest feature enhancements. However, to get those updates, they need to follow the steps given below:
Begin the process by putting the machine into connection mode and opening the app.
After signing in to the app, go to Mug Press and follow the on-screen steps.
Wait till the software scans the available firmware and will automatically begin it.
Once the update comes to an end, disconnect the USB coder from the press.
How Much Time Does It Take to Completely Heat up the Mug?
The Cricut Mug Press takes almost five minutes to completely get heated up. After inserting the mug blank inside the space, the user is supposed to wait six minutes during the process. The press will send a *ding” sound indicating that the press has completed its work. Take the mug out of the place and let it rest for at least 30 minutes before removing the transfer sheet.
How Can I Prepare the Mug Blank for Pressing?
To get the flawless result, press only the smooth, straight area of the mug. Other than that, it ensures that the design is completely flat against the mug surface. Align the design so it stops before the beveled or chiseled edge begins to ignore blurred transfer results. Other than that, flip over the mug upside-down and use the straight edge of the trip rum as a reference to get it on the right spot.
For more information visit: Cricut.com/setup
Cricut EasyPress 3 Setup
Cricut Design Space Login
Cricut Heat App
Cricut Machine Set up
#Cricut.com/setup#Cricut EasyPress 3 Setup#Cricut Design Space Login#Cricut Heat App#Cricut Machine Set up#Cricut.com setup mac
2 notes
·
View notes
Text
How to Set Up Cricut Maker Machine? [Step-By-Step Guide]
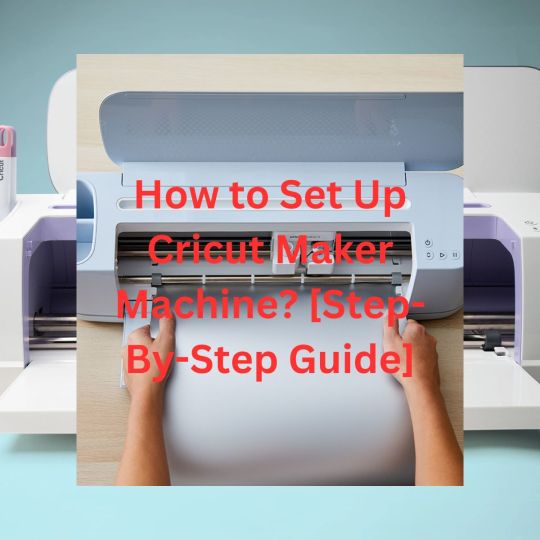
So, you have come to this blog to learn how to Set Up Cricut Maker. Calibration is one of the processes you have to do when you are using the Print Then Cut feature on the machine. Also, crafters need to calibrate the new blades after installing them on the device to ensure they are working correctly and fit at the right place to cut the projects. Also, calibration is a long and complex process, but it is easy to learn. If you are also new to calibration, then this blog is going to help you with everything you need. So, keep reading the following write till the end to acquire extensive info about calibration on the Cricut Maker machine.
Why Should You Do the Cricut Maker Calibration?
Before we jump on the process of how to calibrate Cricut Maker, let’s understand why you should do it in the first place. It is known to doubt Cricut is a perfect machine for cutting different types of materials with utmost precision and accuracy. However, if you are using the Print Then Cut feature on your machine, then you have to do some extra settings to get the flawless cut result. And to get the perfect cut result, you need to perform the calibration of your Cricut Maker machine. By doing the calibration, there is no chance of making any mistakes during the cut, and you will enjoy the pro-level designs cut for your projects.
The Process to Calibrate the Cricut Maker Machine
If you want to learn the complete process of how to calibrate Cricut Maker, then follow the follow-up steps and do as it suggest.
Step 1: Log in to Your Cricut Account
Firstly, open the Cricut Design Space app and sign in with your account.
After that, on the top bar of the app, click on the account menu (☰) option.
And then, from the open pane, click on Calibration.
After that,the knife blade, rotatory blade, and Print Then Cut options will show up on the screen; choose Print Then Cut.
Next, choose the printer you will use for the Print Then Cut feature and then click on Print.
In the next step, you are required to keep the printed calibration sheet on your machine mat. Also, position it on the top-left right of the screen.
Furthermore, click on the Continue option.
Step 2: Connect the Cricut Machine to Your Device
Now, make sure you have already turned ON your Cricut Maker machine.
After that, connect the machine to a device via Bluetooth or USB cord.
When you are on the next screen, open the drop-down menu and click on your Cricut Maker machine name.
Also, you need to choose the materials settings and load the mat onto the machine.
And then press the Go button.
Now, the machine will scan for the calibration markings on the sheets. Then, it will cut a small square at the center of the page. If the cut is up to the mark, then click on the Yes option to move forward; otherwise, choose No.
Furthermore, the Cricut machine performs the calibration cuts on the top side of the page.
After that, you have to check the lines without even unloading the mat from the machine.
The Design Space will ask you about the number and letters that are close to the cuts. Choose the numbers and letters, then click on the Continue option.
Next, the machine will perform the cut for the large rectangle on the sheet.
Step 3: Unload the Mat From the Cricut Machine
Once that’s done, you need to unload the mat from the machine and choose the following response based on your results.
You should click on the Yes option if the cut is as per your requirement.
If you are not happy with the cut, click on No to head back to the calibration process once again.
After that, click the Save & Close option to save the calibration settings.
Finally, you can perform the Print Then Cut feature on your machine.
Causes of Calibration Problems on Cricut Maker
You can get the issue in calibration if you are not following the steps correctly. Also, you should make sure you are loading the mat, paper, and machine blade correctly. Plus, calibration is important for cutting the projects. You can contact the Cricut customer care service to get more information about the calibration process and its correct process.
Frequently Asked Questions
How to Calibrate Cricut Maker Knife Blade?
Here are the steps you need to follow to calibrate the Cricut Maker knife blade.
On the design space, choose the Menu and then click on Calibration.
Then select the option Knife Blade when you are asked about the type of calibration.
Next, attach the blade to the machine and load a plane paper into it too.
After that, click on the Continue option.
From the menu, click on the Maker Machine option.
Then, choose the Go button to start the cut.
After that, the machine will cut the paper.
Unload the mat and check the cut lines to make sure they are correct.
Then, choose the Good Overlap or Bad Overlap option based on the cut results.
Follow the cuts until the blades start perfectly.
What is Calibration in a Cricut Maker Machine?
Calibration is a process where crafters can increase the precision and accuracy of the cuts while using a new blade. Also, it is necessary to do the calibration on the Cricut Maker machine when you use the Print Then Cut feature. By doing that, you will execute flawless results for your DIY design when you cut them on the machine.
Which Cricut Machine Comes with a Calibration Feature?
To enhance the alignment, precision, and cut performance of your Cricut machine, you can do the calibration. This feature is available only for the Cricut Maker machine. Plus, the calibration is currently available for Windows and Mac users only. Crafters who use iOS or Android devices cannot use calibration on their devices for their Cricut Maker machine.
Visit - Cricut.com/setup
design.cricut.com
www.cricut.com/setup
Cricut Design Space
#Cricut Maker Machine#Cricut.com/setup#cricut new machine setup#cricut design space login#design.cricut.com#cricut explore air 2#cricut design space#Set Up Cricut#Step-By-Step Guide#Set Up Cricut Machine#Cricut Maker Calibration
0 notes
Text
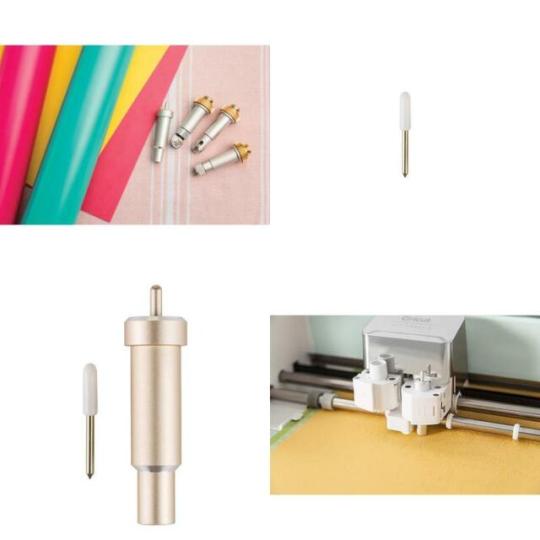
What is Cricut Fine Point Blade & How to
Load It?
Are you looking for an answer on the importance of the Cricut Fine Point Blade and how to load it before the commencement of the cutting process? Developed from German carbide steel, it can create the most twisted cuts with the machine. It also delivers long-lasting, accurate cutting, preparing you to impress every viewer.
Visit- cricut.com/setup
design.cricut.com/setup
Cricut explore Air 2 setup
cricut maker setup
cricut.com setup Mac
The total number of cuts that the blade can do depends upon the type of material loaded inside it. Crafters referred to Fine Point Blade as the German Carbide Premium Blade. The blade is compatible with Maker, Explore series and can be used with its housing.
However, it’s essential to keep replacing the blade on time to avoid getting its sharpness worn out and increase its life span. Furthermore, you are informed to grab all the details described in the following lines of the article.
How to Load Cricut Fine Point Blade in Cricut Maker?
It doesn’t matter which version of the electric cutting machine you use to create DIY projects. However, if you specifically use a Maker machine, loading the blade in it is very effortless. You need to follow the steps explained in the following lines:
Securely Seated Housing
Clamp Closure
Following the easy loading of the blade, you’ll get the appropriate result you were expecting from Cricut. Besides that, it’s very important to keep changing the blade occasionally; for that, you must read the information below.
How to Replace Fine Point Blade in Cricut Maker?
Suppose you observe that the machine is losing the capability to give the wished project. Then, it’s an identification to change your blade before it damages the project or machine. You must be careful while unwrapping the blade; otherwise, ignore any injuries. Follow these steps needed to replace the Fine Point Blade in Cricut.
● For Explore or Maker: You must open Clamp B and remove the blade housing.
● For Legacy: Remove the blade housing by unscrewing the right arm housing.
● For Explore or Maker: go back to the blade housing to Clamp B and close it.
● For Legacy: Tighten the screw by placing the blade housing inside the black arm.
Besides, there will be times when the installed blade won’t get detected. You shouldn’t need to get panic. For that, we’ve described the process that must be followed to resolve the issue.
How to Fix Cricut Fine Point Blade Detention Errors?
Under any circumstances, if your Maker machine isn’t detecting the installed blade, then the error can be resolved by going through the following footsteps:
Once the problem of detecting the blade is resolved, Cricut will resume its pending work and decrease the user’s tension.
Conclusion
Most crafters prefer using this blade to do complicated cutting of the material enveloping the thinnest to thickest material while crafting projects. The Fine-Point blade has a dimension of 11.4 x 2.5 x 7.6 CM with a weight of 0.2 pounds. Knowing about its loading process, replacement process, and many more are essential to get the proper result.
FAQs
Question: How can I keep my Fine Point Blade sharp?
Answer: One of the common methods to sharpen the Cricut Blade is to ball up the aluminum foil and remove the blade housing from the machine. Press the blade housing pin to stick the blade further. Then, punch the blade over the foil ball at least 50 times. Once the process completes, you’ll see the cuts much more cleanly.
Question: What is the time duration of Cricut Blades?
Answer: It's obvious that Cricut blades fade after some time. However, the time duration of the blade depends upon the material you upload. It might be assumed that the blade lasts for 03-06 months.
Question: What materials can be cut down by a Fine Point blade?
Answer: Materials such as cardstock, paper, sticker paper, infusible ink transfer sheets, adhesive vinyl, iron-on vinyl, and many more. However, the cutting process will completely depend upon the weight and size of the material.
source url- https://cricutdesignmachine.wordpress.com/2023/05/06/what-is-cricut-fine-point-blade-how-toload-it/
#Cricut fine point blade#Cricut.com/setup#design.Cricut.com/setup#cricut machine set up#cricut setup download#cricut maker setup#cricut.com setup mac#Cricut Mini Setup#Cricut design space#Set up cricut machine#cricut account setup#Cricut maker machine Setup
0 notes
Text
How to Connect Cricut Maker 3 to Bluetooth: Full Guide
Whether you want to connect Cricut Maker 3 to Bluetooth or a USB cable, this step is always recommended when you are up to the Cricut setup! However, this blog will especially focus on how to connect Cricut Maker 3 to computer and mobile devices.
Like many of you, I remember the day I started crafting with my first Cricut Explore Air 2, purchased with my savings. The excitement was real, but so was the confusion. I found myself unable to connect my device to the Cricut machine, a common issue for beginners. However, with the help of the internet, I was able to overcome this challenge and learn the steps to connect my Cricut machine.
Besides, the connection is exactly the same for all devices. Being an expert in crafting, I can teach you to connect your Cricut Maker 3 to your Windows, MacBook, Android, and iOS devices. So, let’s get started now!
Connect Cricut Maker 3 to Bluetooth on Windows 10
When it came to establishing a connection with Windows computers, I was very excited. It is still a cakewalk for me. I can do it within a minute, and so can you! Yes, you can also make this connection in a couple of minutes. Let me show you how.
Here are the superb, simple steps you need to follow to connect Cricut to a PC via Bluetooth:
Connect Cricut Maker 3 to Bluetooth on MacBook
Thanks to Cricut, we can use Cricut on our MacBook without any hassle. However, the first step would be the same for Mac as for Windows 10. To learn the steps to connect to Cricut, users need to do the following:
Connect Cricut Maker 3 to Bluetooth on Android
Android devices, including Samsung, Google Pixel, LG, Motorola, and One Plus, are compatible with Cricut machines. Hence, if you want to connect Cricut Maker 3 to your Android devices via Bluetooth, you need to go through the following steps:
Connect Cricut Maker 3 to Bluetooth on iPhone/iPad
Are you using an iPhone or iPad? You can also connect your Cricut to Bluetooth on these devices without hassle. To connect, you have to follow the steps below:
FAQs
Question 1: Why is my Cricut Maker 3 not connecting to my Android?
Answer: Whenever you encounter this issue on your Android, you will need to check for the following points:
Question 2: Can I connect Cricut Maker 3 to a PC via a USB cable?
Answer: Yes, you can! You can connect Cricut to your computer using a USB cable. To connect, you have to go along with the following steps:
Question 3: What do I need to connect my Cricut Maker 3 to PC?
Answer: In order to connect a Cricut machine to your Windows computer, you will need things as follows:
Visit: install cricut design space app
cricut.com/setup
Source: https://cricutmakermachines.com/how-to-connect-cricut-maker-3-to-bluetooth-full-guide/
#cricut install setup#install cricut design space#install cricut design space app#install cricut explore air 2#cricut.com/setup login#cricut.com/setup windows#cricut.com/register#cricut.com/create#cricut.com/setup#cricut.com sign in#cricut.com design space#www.cricut.com setup login#cricut new machine setup#cricut design space#cricut explore 3#cricut explore air 2#cricut setup maker#cricut setup#cricut setup create account#cricut setup download#cricut setup on computer#cricut create connect to computer#setting up my cricut maker#setting up your cricut maker
0 notes
Last Seen Blogs


wann-der-lusst
WANDERLUST

lupi-usque-ad-finem
╺⃝⃤ i deserve a tail as a treat ╺⃝⃤

kukisana
想像フォレスト

atd-sportscars-blog
ATD-Sportscars