#cricut.com setup mac
Text
How to Connect Cricut to Computer Bluetooth: Beginners Tutorial

Want to learn how to connect Cricut to computer Bluetooth? If so, you are in the right place! Throughout this guide, I will show you how I connect my Cricut to a laptop using Bluetooth. I know how difficult it can be for beginners to connect a Cricut machine set up. The process is similar whether you want to pair it to a Windows or Mac. Besides, you will need to keep some things in mind before establishing a connection. So, you must start with the system requirements.
Are you ready to start the connection process via Bluetooth? If yes, I will provide step-by-step instructions so you can easily connect your Cricut in no time. Start with the system requirements and then connect your Cricut machine to the desired device.
System Requirements to Use Cricut Design Space
So, are you ready to delve into the guide to learn how to connect Cricut to computer Bluetooth? If so, let’s individually discuss the system requirements for Mac and Windows computers. Once you have confirmed your system requirements, you will need to move to the next step, which is to connect Cricut to a computer(Windows & Mac).
For Windows
Operating System – Windows 10 or later (64-bit)
RAM – Minimum 4 GB
Disk – 2 GB free
CPU – Intel Dual Core or equivalent to AMD processor
Display – Minimum 1024px x 768px screen resolution
A USB port or Bluetooth is required
For Mac
Operating System – macOS 11 or later
CPU – 1.83 GHz
RAM – Minimum 4 GB
Display – Minimum 1024px x 768px screen resolution
A USB port or Bluetooth is required
Disk – 2 GB
Now that you have learned how to connect Cricut to a computer let’s move to the next section, where you want to connect your Cricut machine to a Windows PC.
How to Connect Cricut to Computer Bluetooth (Windows)?
Let’s start with the Windows computer. But wait, do you know what I like about Windows PCs when it comes to connecting any device via Bluetooth? Most of us are very familiar with them. Thus, it becomes easier to connect any device to Bluetooth.
Place your Cricut Explore Air 2 on a flat surface and ensure a distance of 10 – 15 between your PC and the machine.
Then, you will need to head to the Start menu and select Settings.
Afterward, you will need to tap on Devices.
Confirm whether your Bluetooth is ON, then rap on the Add Bluetooth or other device.
You should tap on the Bluetooth option and wait a while for your computer to find your Cricut model.
As it appears in the available list, you have to select the model and proceed.
Finally, you have done the pairing.
Since you have made the connection successfully, you are ready to set up your Cricut machine hassle-free.
How to Connect Cricut to Computer Bluetooth (Mac)?
You must rely on the instructions below if you are a Mac user. The steps are not difficult; it will take up to 2 minutes to connect with your Mac system. Once you are ready, start with the following instructions:
Check whether your desktop computer is turned on or off.
Once it is on, you must place the computer and machine within 10 to 15 feet.
Now, proceed to the Apple menu and select the System Preferences option.
Here, you have to find the Bluetooth option on your Mac.
Afterward, when the wireless Bluetooth is ON.
Next, you will need your Cricut machine from the available list.
Lastly, you are now connected to your Mac system when the pair is done.
Final Words
Overall, when you go through this guide to learn how to connect Cricut to computer Bluetooth, you will get your Cricut machine connected wirelessly in a few minutes. The easy-to-follow steps will help you establish the connection quickly, and you don’t need to worry about anything. So, get started with your Cricut product effortlessly with this guide.
FAQs
Can I connect my Cricut wirelessly?
Yes, it is possible and really simple for everyone to connect it wirelessly. The latest Cricut machine has a built-in Bluetooth feature that allows users to connect their Cricut to their desktop and mobile devices wirelessly. However, you must maintain an adequate distance between your Cricut and the compatible device that you want to connect.
Do I need to connect my Cricut to Wi-Fi?
It depends. Your computer must connect to the Internet to access resources such as images, fonts, or ready-made projects. However, if you have saved them already, you won’t need to connect to Wi-Fi or the Internet. Besides, the Cricut machine does not require Wi-Fi. It is completely run using Cricut software, which controls your Cricut.
Do I need to connect Cricut to computer for using Cricut Design Space?
Not necessarily! The Cricut machine does not need to be connected to your computer to use your Cricut Design app. This is a completely cloud-based software; hence, you can use it to design anything you want anytime, anywhere. Since Cricut Design Space is a free companion app, you will get thousands of images of ready-made projects for free.
Why won’t my Cricut connect to my computer?
Your Cricut might not connect to a computer for many reasons. Following are the reasons to make sure you resolve this issue:
Check network settings, as incorrect networking settings or corrupted adapters can hinder the app from working.
Check whether you have turned on the Bluetooth.
Check the USB connection and verify if there is no fault in it.
For more information visit: cricut.com setup mac
cricut design space desktop
www.cricut.com setup login
Cricut setup on computer
Source: How to Connect Cricut to Computer Bluetooth
#cricut design space app#cricut design space login#Cricut setup on computer#cricut machine setup#cricut explore air 2#cricut.com setup mac
2 notes
·
View notes
Text
5 Cricut Christmas Shirt Ideas to Elevate Your Holiday Style

In just a few more weeks, the Christmas holidays will start. I know many of you are looking for unique Christmas ideas that will stand out. Therefore, this year, I have created something new. Having already made 5 Christmas shirts with my Cricut Maker, I will share some Cricut Christmas shirt ideas for you to try on yourself or for your family members.
Trust me, it is always fun to make shirts for Christmas using the Cricut machine. You can wear these during the holiday season or on Christmas Eve. But, every year, during Christmas, my children want to try something unique to look different. So, I tried on many shirts for my kid and husband.
In this blog, you will find the best ideas for Christmas shirts that will be suitable for both children and adults. Ready to try these Christmas shirt ideas? Let’s start.
1. Christmas Shirt for Kids

This year, gift these elegant shirts to your kids. This green, black, and white color t-shirt will get your child in the holiday spirit. I made two pairs of T-shirts for my children, and I added the texts of their choices. Yes, my sons are also as creative as I am, and they helped me to find the best texts from the Internet. Finally, see the result after making it using vinyl material and a Cricut Maker machine. Try them today and bring a smile to your children’s faces.
2. Merry Christmas Shirt

What do you think about these cozy Christmas shirts? This is my all-time favorite from all Cricut Christmas shirt ideas. Yes, you can make it for your child and even for yourself if you are curious to try.
Cricut sees no age because the available designs on Cricut are meant for everyone. But the best thing about this design is that it is available on the Cricut website. Just navigate to the official site and try the design on your children’s T-shirts.
3. Snowflake T-shirt

Do you want to try something simple this Christmas? Here is the snowflake white T-shirt. I made this using a compatible infusion ink blank, and I also recommended you use the suitable blank. Otherwise, it will be difficult to transfer the material onto your T-shirt. Since the design is quite simple, you can easily make it on your Cricut Joy.
4. Christmas Crew Shirt

I added this ‘Christmas Crew’ text to my husband’s white t-shirt. He really liked it so much. For this, you will need a cutting machine. However, if you want to try this for your child, then you can. The red Santa cap gives it a good spirit of the Christmas holidays. Don’t delay, and try this elegant shirt this year on Christmas.
5. Shirt for Newborn Baby

Is it your child’s first Christmas? Then, gift them this beautiful, simple-looking white t-shirt. The color I have used in texts or pictures is black only. It is because it looks amazing on a White T-shirt. For this, I used heat-transfer vinyl along with my Cricut Maker 3. Vinyl materials are available in different types, such as permanent and removable vinyl. But, my recommendation is permanent.
Wrap Up
In this blog, I have explained 5 Cricut Christmas shirt ideas for everyone, including children. In contrast, most of the designs are suitable for people of all ages. But the last T-shirt design I have mentioned in this blog is only suitable for the child going to celebrate his/her first Christmas. Also, there are many types of materials but the two most common materials are removable and permanent. If you want permanent, then go with permanent Cricut vinyl.
FAQs
Can I make a Christmas stocking with a Cricut machine?
Yes, you can easily personalize your stocking for special occasions like Christmas. During this time, most people like to wear personalized stockings. However, making stockings using a Cricut machine is quite simple and does not require many tools and accessories. Just get your blank stockings in the desired color and add the designs you want to add to them.
What are some Cricut Christmas shirt ideas for beginners?
There are many types of text or graphics available that you can try on your shirts. But I have some of the best ideas for your Christmas shirt. Find the list below:
Matching Same-Color Family Christmas Shirts
Funny Christmas Shirts
Mini Santa Shirts
My First Christmas Logo Shirt
Santa Baby Shirt
What are the Christmas shirt ideas using Cricut Maker?
If you want to use Cricut Maker for your Christmas shirt, then you are free to try any kind of creativity you want. Maker is a versatile machine that cuts more than 300 materials easily. So, here are the best Cricut Christmas shirt ideas that you can create using Cricut.
Merry Christmas Bear Shirt
This Is My First Christmas T-Shirt
Merry and Bright Tree Delivery Shirt
Merry Christmas With Little Gnomes Tee
For more information visit: Cricut.com setup mac
cricut new product setup
install cricut design space app
Cricut Design Space software
#cricut christmas shirt ideas#Cricut Design Space software#Cricut.com setup mac#cricut design space download#install cricut design space app
2 notes
·
View notes
Text
Cricut Design Space Login - Cricut Setup
With an intention to make the Cricut app run on PCs & mobiles, all the DIYers need to know the basic system requirements. Each OS comes with its separate requirements, which should be fulfilled to support the app. Once the app satisfies the requirements, it will start running on the devices without any technical glitches. However, to get the app on the devices, they need to open cricut.com/setup.
Visit - design.cricut.com
www.cricut.com/setup
Cricut Design Space
cricut.com/setup windows
#cricut.com/setup#design.cricut.com#cricut crafts#cricut explore air 2#cricut design space login#cricut new machine setup#www.cricut.com/setup#Cricut Design Space#cricut.com/setup windows#Cricut.com setup mac#Cricut setup#Cricut.com setup download#Cricut.com sign in#cricut.com/setup pc#Setup Cricut.com#Cricut Design Space Login
2 notes
·
View notes
Text
How to Set Up Cricut Mug Press? [A Complete Guide]
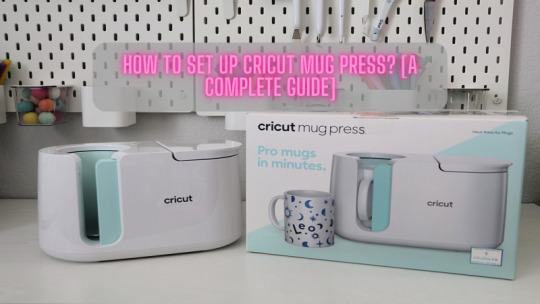
With a vision to make pro mugs at home, all the DIYers are introduced to how to set up Cricut Mug Press. Through this masterpiece, one can make custom-designed sublimation mugs with compatible Ceramic Mugs & Infusible Ink. Moreover, one needs to design, attach & insert the mug blank, and the press will do the rest of the work. The crafter can simply draw their design from the Design Space app/software.
Other than that, the Infusible Ink system gives smooth, pro-quality transfers, becoming one with a mug and making it long-lasting. This Cricut press allows the user to discover their creative side by creating various mugs for different occasions. Besides, the crafter needs to buy a Mug Press along with the bundle and other supplies to create the custom mug.
Let us help you out by showing in-depth Cricut setup Mug Press primary details in the coming section.
How to Set Up Cricut Mug Press on a Device?
Before getting the personal mug, all the users need to set up/activate their Mug Press. To complete the machine activation process, read the steps given below:
First, go to the Cricut setup official page and download Design Space on your system.
Following this, create your Cricut ID or sign in with your Cricut ID and Password.
After getting connected to the Cricut Setup page, choose Heat Press > Mug Press.
Next, plug into the Mug Press and Power on the wall outlet switch.
Following this, take the provided USB code and put it inside your device and the machine port.
After doing these steps, tick the Activate option and start reading the Terms & Conditions.
Lastly, choose Get Started and start creating your first project on Mug Press.
After finishing up the Cricut setup Mug Press process, take a step forward by knowing how to use it for crafting purposes.
How to Use Cricut Mug Press?
After setting up the Cricut Mug Press, the user can easily create custom mugs in minutes with simple and one-touch settings. Get to know about the steps given below:
Start the process by creating your design on the Cricut app by using a mug template or any pre-made mug design.
Next, spread the Infusible Ink sheet on the purchased cutting mat with color side up & shiny side down.
Following this, cover up the mug with the design using the transfer sheet to avoid any bubbles.
Now, preheat the machine by turning it on and pressing the Power button.
After the heating process is complete, it will start beeping, and the Power button will turn green.
Next, place the mug inside into the press and close the lid available on the right-hand side.
Now, you are suggested to wait till the heating process is going down.
After the mug cools down, remove the sheet without damaging the design.
Here you go; making a custom mug with this press is so much fun.
How to Change Cricut Mug Press Temperature Settings?
For top-quality custom mug results, all the users should be aware of the process by which they can modify the machine temperature settings. Get to know about the steps below:
First, enter the Temperature Setting mode, whether the press is switched on or off.
Next, select and hold the power button for 10 seconds.
After that, you will hear two chimes, and all the LEDs will start flashing at once.
Now, you will get to see that the power button will be flashing orange during the Temperature Setting mode.
Afterward, the LED row will start displaying the present setting. You have to push the Power button to cycle through the 3 settings options:
Following this, hold on the Power button for 3 seconds to select the settings after getting the desired LED setting on the display.
After that, a chime will be heard with an LED display, and a Power button will be flashed.
Next, your Mug Press will turn off, exiting the Temperature Setting mode.
Lastly, the new settings will come into action when the press is switched on.
Summing up the above-said section of the blog, we hope that you have understood how to set up Cricut Mug Press with Windows/Mac systems.
Frequently Asked Questions
How Can I Update the Cricut Mug Press Firmware?
The firmware ensures that the machine has the latest and greatest feature enhancements. However, to get those updates, they need to follow the steps given below:
Begin the process by putting the machine into connection mode and opening the app.
After signing in to the app, go to Mug Press and follow the on-screen steps.
Wait till the software scans the available firmware and will automatically begin it.
Once the update comes to an end, disconnect the USB coder from the press.
How Much Time Does It Take to Completely Heat up the Mug?
The Cricut Mug Press takes almost five minutes to completely get heated up. After inserting the mug blank inside the space, the user is supposed to wait six minutes during the process. The press will send a *ding” sound indicating that the press has completed its work. Take the mug out of the place and let it rest for at least 30 minutes before removing the transfer sheet.
How Can I Prepare the Mug Blank for Pressing?
To get the flawless result, press only the smooth, straight area of the mug. Other than that, it ensures that the design is completely flat against the mug surface. Align the design so it stops before the beveled or chiseled edge begins to ignore blurred transfer results. Other than that, flip over the mug upside-down and use the straight edge of the trip rum as a reference to get it on the right spot.
For more information visit: Cricut.com/setup
Cricut EasyPress 3 Setup
Cricut Design Space Login
Cricut Heat App
Cricut Machine Set up
#Cricut.com/setup#Cricut EasyPress 3 Setup#Cricut Design Space Login#Cricut Heat App#Cricut Machine Set up#Cricut.com setup mac
2 notes
·
View notes
Text
Best Cricut Machines You Should Buy in 2023?

Do you want to buy the Cricut cutting machine, or are you still deciding which one to buy? Don't worry; you are not alone - many people share this question: "What is the best Cricut machine?" This blog post is here to provide the answer to your question.
Today, many options are available when it comes to Cricut cutting machines. Crafters and DIY enthusiasts enjoy making their designs using these machines. It allows them to complete their task 10 times faster than the traditional methods. Crafters prefer the Cricut machine as it provides professional cutting and finishing. Therefore, we have created this blog to give you an overview of various Cricut machines. Also, we'll delve into the pros and cons of various types of cutting machines.
What is a Cricut and What Does it Do?
A Cricut is a famous brand that makes cutting machines to cut and draw on materials like paper, vinyl, and cardstock. Some of them can also cut tough materials, such as leather, fabric, wood, board, etc. You can simply consider a Cricut device like a printer. However, it doesn't print anything but can cut designs onto desirable materials using a movable blade.
In terms of quality, we must say the best Cricut machine must be capable of cutting anything precisely. Hence, this is the perfect choice for making personalized crafts, including T-shirts, custom wall art, and party decor.
Different Types of Cricut Cutting Machines
Currently, there are five different Cricut cutting machines: Explore Air 2, Explore 3, Maker, Maker 3, and Cricut Joy. All of them are electric craft machines and quite similar in terms of features. However, each machine comes with a unique feature, making it perfect for different purposes.
The Cricut Explore is the mid-level option and is still considered the best Cricut machine. Whereas the Cricut Maker 3 is the upgraded version of the Explore series and has the ability to cut a range of materials with different types of tools. In comparison, the Joy machine is the smallest model. Due to this, Joy is portable and easy to set up and use. Further, in June 2021, Cricut launched the two latest machines in their lineup: Cricut Explore 3 and Maker 3.
Regarding Cricut Maker 3, it is the best-selling machine in the maker series and has ten times the cutting force. Moreover, crafters consider Maker 3 as the best Cricut machine.
1. Cricut Explore Series
Now, let us have a look at the overview of exploring a series of machines. The Explore machine is the best Cricut machine for you if you want to cut materials such as vinyl, iron-on crafts, and greeting cards
Cricut Explore Air 2
The Explore Air 2 is one of the best-selling machines, and its size is perfect for both novice and professional crafters. The machine uses cutting mats, having sizes of 12" x 12" or 12" x 24". The cutting mat size is perfect for creating iron-on decals for T-shirts, 3D projects, and large vinyl decals. All these features make Cricut Explore Air 2 the best Cricut machine for 2023.
Moreover, the Cricut Explore Air 2 has a Fine-Point blade. It can cut over 100 materials, like vinyl, paper, and cardstock. In addition to this, you can cut even more materials by swapping out the Fine Point Blade for the Bonded Fabric Blade and the Deep Point Blade.
Pros:
It can cut, foil, score, and write
Works with 100+ different materials
Bluetooth available
Print then Cut feature
Free Cricut app
Cons:
Not suitable for Adaptive system, meaning you can’t use Rotary and Knife Blades, as well as Scoring Wheels
A Cricut mat is needed
Not work with Cricut Smart Materials like Vinyl
The maximum cutting length (23″ on a 24″ mat)
It is not portable
Cricut Explore 3
The Cricut Explore 3 was introduced in June 2021 in the Explore series. Due to its powerful motor, it can cut 2x faster. Plus, it is designed for cutting Smart Materials without a mat.
It is a full-size machine that can cut 100 materials such as cardstock, glitter paper, iron-on-vinyl, and vinyl. Also, it works with 6 tools: the Fine Point Blade, Scoring Stylus, Foil Transfer, and the Deep Point Blade, enabling you to cut a wide range of materials. It even allows you to cut leather and fabric.
Pros:
It can cut, foil, score, and write
Work with 100+ materials
Bluetooth available
Can cut with 2x speed than its predecessor when using Smart Materials
Print then Cut feature
Free Design Space app
Compatible with cutting without a mat.
Cons:
Not suitable for Adaptive system, meaning you can’t use Rotary Blade, Knife Blade, Scoring Wheels
It is also not portable
2. Cricut Maker Series
These Maker series models are the most powerful cutting devices. They allow you to create any project virtually.
Cricut Maker
The Cricut Maker comes under a commercial-grade machine that can deliver a professional level of quality. This is the most versatile cutting machine in full size. It can cut 300+ materials, such as acrylic, leather, felt, plastic, fabric, wood, and more. Besides cutting and writing, it can do more than this. The versatile feature of the Maker machine is compatible with the Adaptive Tool System, which includes the knife blade, engraving tip, foiling tip, rotary cutter, and debossing tool.
Pros:
It can cut, foil, score, engrave, deboss, write, and more.
It is compatible with 300+ materials
Bluetooth available
Can cut with 10x cutting force
Adaptive Tool System: You can use Rotary Blade, Knife Blade, and Scoring Wheels.
Print then Cut feature
Free Design Space app
Cons:
You will need a cutting mat, and you can’t use it with Smart Materials like Vinyl.
It provides a maximum cutting length of 23″ on a 24″ mat.
It is also not portable.
Cricut Maker 3
This is the upgraded version of the Cricut Maker series, and it was released in June 2021. This is the best machine anyone can have. So, if you are looking for the best Cricut machine with ultimate commercial-grade performance, then you must go for Cricut Maker 3.
This Maker 3 cutting device is compatible with 13 tools for cutting as well as with Smart Materials so that you can cut a long project up to 12 ft without the need for a mat.
Pros :
It can cut, foil, score, engrave, deboss, write, and more.
It is compatible with 300+ materials
Bluetooth available
Can cut with 10x cutting force
Adaptive Tool System, meaning you can use Rotary Blade, Knife Blade, and Scoring Wheels.
Print then Cut feature
Free Cricut software
Cons:
It is the most expensive machine.
Not portable
3. Cricut Joy
The Cricut Joy is the newest model. Its small and compact design makes it portable. Hence, it will occupy less space. Moreover, it can cut 50+ materials, including adhesive vinyl and paper. Plus, you can cut thick faux leather sheets. The maximum width for cutting a design is 4.5". Hence, it's a great mini tool that can make sticker sheets, greeting cards, and other small projects.
Overall, the Cricut Joy is the best Cricut machine for beginners.
Pros:
It can cut and writes
It is compatible with 20+ materials
Bluetooth available
Portable
It can be cut without a mat by using Smart Materials
Cons:
It has a maximum cut width of 4.5.”
It is not compatible with adaptive Tool Systems and the Print then Cut projects.
Conclusion
Cricut releases the best Cricut machine, but it also depends on your usage. You will find five types of Cricut cutting machines that we have already discussed in this blog. Plus, we have shared the pros and cons of using that particular machine. In contrast, you should buy Cricut Joy if you are a beginner. It will be pocket-friendly and won't occupy much space. And, if you only want to make crafts with paper and vinyl, then go for Explore 3. Also, you can consider Maker 3 if you are a creative crafter.
Source: https://cricutapp.wordpress.com/2023/08/29/best-cricut-machines/
For More information Visit: Cricut New Machine Setup
Cricut.com setup mac
Cricut Maker Setup
install cricut design space app
Cricut Machine Set up
#Cricut New Machine Setup#Best Cricut Machines#cricut maker setup#design.cricut.com/setup#cricut explore air 2 setup#Cricut.com setup mac#Cricut.com setup#cricut design space download#cricut setup
2 notes
·
View notes
Text
Cricut login design space
Unleash your creativity with Cricut machines for custom projects. Whether you're crafting for fun or small business, Cricut's versatile machines and Design Space offer endless possibilities. Visit cricut.com/setup to download and install the Cricut software and access a wide range of free and subscription-based designs. From customizing materials to crafting various projects, Cricut makes creativity easy and enjoyable.
#Cricut.com/setup#design.cricut.com#www.cricut.com/setup#Cricut Design Space#cricut.com/setup windows#Cricut.com setup mac#Cricut setup#Cricut.com setup download#Cricut.com sign in
2 notes
·
View notes
Text
Cricut Explore Air 2: A Smart Machine for Making DIY Projects

A Cricut machine is an electronic smart cutting machine that is designed to cut all sorts of different materials. The machine works similarly to a standard printer. The only difference is that Cricut doesn't print anything on paper but uses its blades to cut a design out of the paper. There are several Cricut machines with unique features and specifications. However, this blog will discuss Cricut's best-selling machine, i.e., Cricut Explore Air 2. We will talk about its features and specifications in more detail.
Features of Cricut Explore Air 2
We will begin with the specs, looks, and other features that made this machine. Let us begin.
Design
The Air 2 machine exposes the blades, and you can see how it moves, making it an attractive feature. It is where the user can see how the machine cuts the materials. It is a full-sized cutting machine that is perfect for any crafter. Also, the Cricut Explore Air 2 size is 5.91x22.17x7.01 inches and weighs close to 11 lbs.
Further, the machine can cut more than 100 materials, including paper, vinyl, cardstock, selected leather types, and fabric backed by a stabilizer. Moreover, it works with mats of 12 by 12 inches or 12 by 24 inches of mat size. So, the Explore Air 2 can easily be used to create full-size cuts on iron-on or large vinyl decals.
Double Speed
The Cricut Explore Air 2 is created to be faster and brings Fast mode. This machine becomes the perfect device to accomplish tasks for a crafter looking to work on complicated projects. Further, the double-speed mode is addictive; once you start using it, it will be difficult to cut to normal speed again.
Cutting Force
The cutting force of this machine is 350g, which makes it a stronger machine in its price range. Further, the machine with more cutting power means it can easily cut material. Along with its maximum cutting size of 11.5 by 23.5 inches. The Explore Air 2 can cut tougher and thicker materials like never before. Also, that is why it can cut upto 100 different materials.
Dual Carriage
The dual carriage is one of the attractive features of the Explore Air 2 machine. The two-carriage system means the machine can hold and use two tools simultaneously. So, if your projects contain drawing and cutting, this machine will do the dual task simultaneously.
Blades and Cutting Depth
The Air 2 can cut upto 2 mm thick material, which is the standard thickness. Further, the blade is made out of German carbide steel, which has high ultra resistance.
Connectivity
The Explore Air 2 machine comes with the ability to connect with computers and mobile phones. It can do that by using Bluetooth and USB cable. So, wireless connectivity helps to avoid extra wires, and your room will look more organized.
Pros and Cons of Cricut Explore Air 2
After briefly examining the machine's features, it is important to know the advantages and disadvantages of the Air 2.
Pros:
The Air 2 machine can cut, write, foil, and even score on the materials.
Further, the machine can cut more than 100 different materials. So, it allows you to work with any machine.
Another attractive feature of the machine is its ability to connect wirelessly using Bluetooth.
Also, with the fast mode, you can complete projects quickly.
If you want to cut a print design, the Cricut Explore Air 2 machine can do that.
Moreover, you will get free Design Space software to work with the machine.
Cons:
The Explore Air 2 machine is not compatible with the blades of the Adaptive Tool system.
Also, it requires a cutting mat since it cannot cut Smart materials, which can be cut without any mat.
Further, the maximum cutting length that a machine can cut is 23 inches.
If you are looking for a portable cutting machine, Explore Air 2 is not the one.
Conclusion
The Cricut Explore series machines are one of the best for beginners and experienced crafters. Especially the Cricut Explore Air 2 machine is a great machine that can cut at twice the speed as its older machines. If you are looking for a cutting machine that can cut precisely and accurately, then the Air 2 machine is the best. Also, the wireless connectivity makes it easier to work without getting trapped between the wires.
FAQs
What is included in the Explore Air 2 box?
The Explore Air 2 box contains many things to help you start crafting. You will get an Explore Air 2 machine and Premium Fine-Point Blade with its Housing. Also, you will get a Fine-Point Black Pen and a LightGrip Mat of 12 by 12 inches. You will get a Power Adapter and a USB cable for powering the machine to connect to the laptop. You will also see a Welcome Book, a Free Trial of Cricut Access, and 50 ready-to-make projects.
What materials can I cut with the Explore Air 2 machine?
The Cricut Explore Air 2 machine can quickly cut more than 100 different materials. So, you will be able to cut materials such as vinyl iron, bonded fabric, heat transfer vinyl, vinyl decals, normal paper, glitter paper, cardstock, or poster boards. If you want to cut tougher and thicker materials, the machine can cut leather, balsa wood, etc.
How to connect the Explore Air 2 to my computer?
You can connect the Air 2 machine to the computer in two ways. The first is with a USB cable, and the second is with Bluetooth. With USB, connect the respective ends of the cable to the machine and computer and let the computer detect the machine. Bluetooth is simple, like adding any other Bluetooth device to the computer.
Source: https://cricutair.wordpress.com/2023/08/04/cricut-explore-air-2/
For More Information Visit: Cricut.com/setup
how to setup cricut explore
Cricut.com setup mac
design.cricut.com/setup
Install Cricut Explore Air 2 setup
#Cricut Explore Air 2#Cricut Explore Air 2 Software#Cricut.com/setup#Cricut.com setup mac#Cricut New Machine Setup#install cricut design space app#design.cricut.com/setup#Install Cricut Explore Air 2#how to setup cricut explore
5 notes
·
View notes
Text
How To Use Cricut Transfer Paper On Vinyl? [Step By Step Guide]
If you usually make Cricut or Silhouette projects, you will have to use transfer paper once in a while. Cricut transfer paper eases the process of getting the design from backing paper and transfer it to final project. If you don’t know how to use Cricut transfer paper on vinyl, this guide is for you. The cut vinyl appears as a big sticker that you need to remove from the backing paper and attach to your project. However, the vinyl is very thin and difficult to transfer using your hands. Plus, it gets more difficult with complicated designs.
Hence, if you are starting to make vinyl craft stickers, transfer paper will be useful for you. We will reveal the use of transfer paper with vinyl. The process is simple- cutting and weeding the vinyl, transferring the vinyl to the transfer paper, and then transferring the design onto the final project.
There are many vinyl projects to create. You can increase your business with a Cricut machine, permanent vinyl, and good-quality transfer tape. If you haven’t used transfer paper on vinyl, read this blog that describes a step-by-step guide.
What Is A Cricut Transfer Paper?
Cricut transfer paper looks like a paper roll or A4 sheet pack. You can also say transfer paper as transfer tape. You can print on transfer paper via an inkjet printer. For instance, printing a design onto a shirt. Transfer paper is sticky and transfers vinyl to the final material and can work on various materials such as mugs, glasses, cups, etc. It is a good tool to transfer the vinyl decal to the material you need to personalize.
Cricut transfer tape has two sides. The bottom side is the paper backing that you need to remove, and the sticky upper side is composed of a plastic film. The top sticky side is attached to the top of the vinyl. Crafters use mugs, cups, and tumblers using adhesive vinyl. However, if you are working with heat transfer vinyl, you won’t need transfer paper. For the vinyl projects that have to be frequently washed, such as cups and mugs, you should use permanent adhesive vinyl.
What Are The Types Of Transfer Tape?
Transfer paper is available as a regular and strong grip. The standard transfer paper is used for most projects and has a strong grip on glitter vinyl, as you need extra strength to grip the surface. If you have an issue lifting the vinyl from the backing sheet, use a strong grip transfer tape.
How To Use Cricut Transfer Paper On Vinyl?
First, cut the design from adhesive vinyl with your Cricut machine. After that, weed the excess vinyl in and around the design. When you only have the design you need to transfer, you need to peel off the transfer tape.
Follow the steps to use transfer tape on vinyl:
First, cut the transfer tape a little larger than your design. Before you get rid of transfer tape you should use it several times. Hence, take a little larger transfer tape for your project for proper adhesiveness.

Then, peel back the backing paper. Keep the paper backing to use later to stick to the transfer tape.
Place the transfer paper on your design and burn it down. You can use a scraper or an old gift card or a credit card.

You can either turn the piece, take off the backing paper, or lift the transfer tape. You need to fix the design on the tape.

Now your design is on the tape, and you can move it to your project.

Then, press the vinyl down and burnish it once again.
After that, peel back the transfer tape. Make sure that your project surface is stuck properly to vinyl. Remove the tape and burnish it a little more if it is still lifting.

What Kinds Of Projects Can You Make With Permanent Vinyl?
You can make many projects using permanent vinyl and transfer paper. You can put the design prints on glass, plastic, ceramic, or acrylic surfaces. It means that you can transfer designs on wine glasses, notebooks, flower vases, and many more.
FAQs
Why Use Cricut Transfer Paper For Vinyl?
Cricut transfer paper or tape is generally used to transfer the vinyl with designs to materials such as water bottles, mugs, and tumblers.
Do I Need To Mirror Vinyl While Using Transfer Paper?
In the case of permanent vinyl, there is no need to mirror the design on the Cricut Design Space. The design mirroring is necessary in the case of heat transfer vinyl.
Can I Use Any Type Of Vinyl With Transfer Tape?
The answer is no; you cannot use any type of vinyl with transfer tape. For heavy vinyl, such as glitter, you must use a high-tack transfer tape. But for standard vinyl like holographic, you should use a medium tack transfer tape.
Is Cricut Transfer Tape Reusable?
Yes, Cricut transfer tape is reusable. Once you finish the project, put a Teflon sheet or parchment paper on the transfer tape and save it to use later. Next time you can use it if it has enough adhesion for the transfer.
Which Side Of The Vinyl Should I Put On Transfer Tape?
The shiniest or top side of the vinyl should be put on the transfer tape. On the other hand, the sticky side of the transfer tape should stick to the top of the vinyl.
design cricut.com download
design.cricut.com/setup
#cricut.com design space#cricut.com setup mac#cricut.com setup download#design.cricut.com/setup#design cricut.com download#cricut setup#Cricut.com/setup#www.cricut.com/setup
1 note
·
View note
Text
Cricut Explore Air 2 Setup: A Comprehensive Guide
Cricut Explore Air 2 is a magnificent machine if you want to start crafting and cutting your materials. If you are looking to buy a new Cricut machine and wondering what you should go for, I would suggest you buy an Explore Air 2 machine. The Cricut Explore Air 2 setup is one of the first things that you are going to need to learn. In this blog, I will cover everything you will need to know, like what’s in the box, complete machine setup procedure, and many more. So, without any further delay, let’s get started now!
What Comes in the Cricut Explore Air 2 Box?
Before you start setting up your machine, you have to open the box and check for the tools and the supplies. When you open the box, you will see the following things:
Cricut Explore Air 2 Setup on Your Operating System
You have to follow the steps below to setup your Cricut cutting machine on your computer or smartphone.
Download Cricut Design Space on Your Device
You have to download the Cricut Design app on your phone or computer in the process of the Cricut Explore Air 2 setup. You can download it from the Internet. Full details are given below.
How to Create a Cricut Account on a Device?
Before starting to cut on your Cricut cutting machine, logging into your Cricut account is necessary. You may log in if you have already made an account. But if you do not have an account, there is nothing to worry about. You can create an account by following these steps.
Conclusion
So, if you were worried about your Cricut Explore Air 2 setup, I am sure now all of them have gone away. These are the four simple steps that you can follow to setup your Explore Air 2 machine with your device. You have to check for the items and then setup the machine. After the machine is setup, download and install the Design Space app and log into the Cricut account. If you don’t have a Cricut account, create one so that you will be ready for your first cut.
FAQs
What software do I need for my Cricut Explore Air 2?
The software or app that you need to use for the Cricut Explore Air 2 is Cricut Design Space. This app is available on the Internet for free. You can open any web browser and go to cricut.com/setup. Next, download the Cricut software and log in to your account. But if you want a better experience and access to its complete features, go for the Cricut Access plan.
How to connect Cricut Explore Air 2 via Bluetooth?
Connecting your Cricut cutting machine to your device through Bluetooth is very easy. First, you have to plug in the machine and turn it on. Then, go to your operating device’s settings and open Bluetooth settings. If Bluetooth is off, you should turn it on. Now, search for your Cricut model. Once it pops up, tap on your machine and select connecting. It will be connected.
What is the connectivity issue my Cricut Explore Air 2 is having?
If your Explore Air 2 is having connectivity issues, check if your machine is on or not. When it is on, make sure it is not more than 10 to 15 meters away. In that case, your device will not be able to locate the machine. If you are trying to connect it using a USB cable, maybe your cable is old and has a straining problem. In that case, you will need to buy a new cable.
Visit: www.cricut.com/setup login
Source: https://cricricutdesigncut.wordpress.com/2024/05/17/cricut-explore-air-2-setup-a-comprehensive-guide/
#Cricut Explore Air 2 Setup#design space setup#digital design#cricut.com/setup explore air 2 setup#cricut.com/setup mac#cricut.com/setup#cricut explore air 2#cricut new machine setup#cricut maker 3#cricut design space#cricut.com setup mac#cricut setup#cricut setup explore air 2#cricut setup explore air 2#cricut setup explore air 2 setup#cricut com setup#design.cricut.com/setup#cricut design space setupp#cricut.com setup windows#setup cricut design space
0 notes
Text
How to Use Cricut Maker: Create a Siser Easy Color DTV Project!
Have you just bought a new Cricut Maker and are wondering how to use Cricut Maker? This brilliant Cricut machine may be overwhelming for beginners, but it is simpler than you think. You get many amazing features with this crafting machine. Let’s get ready to use it and make creative DIY projects with it. I will tell you how to prepare a desired project using this Cricut cutting machine.
Cricut Maker offers various adaptive features that help you create unique and beautiful projects effortlessly. Plus, you get a slot for inserting pens and a number of Cricut tools and supplies. It will be all fun to create something with this ultimate machine. Here, I’ll tell you the best methods to prepare personalized apparel using Siser EasyColor DTV. You’ll learn more about it later in this blog. So, let’s get started.
Supplies and Tools You Will Need for Your Cricut Project
Before we get started to learn how to use Cricut Maker, you must gather some important accessories. I’m listing all of the best accessories here. Use them and follow my step-by-step instructions to create your own project. Check the steps below.
● Brand new Cricut Maker or Explore
● Siser EasyColor DTV
● Siser Easy Mask
● An inkjet printer
● Cricut StandardGrip mat
● A weeding tool
● A Cricut EasyPress
● A Cricut scraper tool
Let me tell you what a Siser EasyColor DTV is. It is an iron-on vinyl type that is typically used on lighter blanks such as garments, T-shirts, etc. This unique vinyl is very convenient and useful for creating better designs and sublimation projects. Let’s check the complete method to create the best project.
How to Use Cricut Maker to Make Personalized Apparel?
Finally, we are here to learn the process of creating personalized T-shirts. So, before we move on to the final steps, measure your blank so that you can create an appropriate design. So, let’s check how to use Cricut Maker for beginners.
Step 1: Upload an SVG File to Cricut Design Space
In the first and foremost step, you’ll need to upload your SVG design file to the Cricut software. If you want, you can create a design manually as well. Once you’re ready, just resize your design and make it fit to your blank.
As you’ll have to print this image, ensure that your Cricut machine will recognize it as a printable file and not a file to be cut. To ensure this, choose your image and hit the Flatten option beneath the Layers Panel.
After that, your Cricut machine will show a preview of the image. When you’re ready, just click the Make It button. And now, this design will go through a Print Then Cut feature. To access it, hit the Continue button.
In the next step, you’re allowed to send that image to your inkjet printer and select the paper type you want to print on. I prefer specialty matte. You can select one based on your printer. Get ready with your printer and insert the Siser EasyColor DTV into it.
Step 2: Start Cutting the Siser EasyColor DTV
In the following step, you’ll need to cut your material. On your Cricut machine, select your material as Premium Vinyl Permanent Glossy and set the pressure to More using the drop-down menu.
Next, load your vinyl material on the Cricut mat at the left-side corner and make it stick to the mat using a brayer tool. Now, load the mat with vinyl into the Cricut machine and hit the Play button to allow your Cricut to cut the image. Continue with the steps to learn how to use Cricut Maker.
Once the cut is done, take off the paper sheet from your mat, turn the mat over, and take the mat away from your DTV. Please note that you don’t have to peel off the DTV from the mat. You can also use a pair of scissors to cut the design if necessary.
Step 3: Weed Out the Excess Vinyl
Once you cut your design, you should weed out the excess vinyl from your design. Do this carefully, so that your design doesn’t ruin. This step will add more detail to your project.
Step 4: Cover Your Image With a Mask
Moving forward, cut your mask to the size of your design. Now, take off the transparent film from the mask and then apply the mask alone to your DTV image. Moreover, ensure that the final design is flat and that there are no air gaps between the mask and the design.
Step 5: Transfer Your Design to Apparel

This design is so amazing; I love making it. This is how to use Cricut Maker to reap good results. All the best to all of you who are keen to make something unique and precise.
FAQs
How to Use a Cricut Maker to Make Shirts?
To create a shirt with your Cricut cutting machine, you’ll need to use the Cricut Design Space and a heating press to create a desired design. Get started with the Cricut software, make a design, resize it, and then print and cut it with your Cricut machine. Now, weed away the excess vinyl, and then preheat it with your Cricut heat press, and give a final heat to it.
Which Heat Press Is Suitable for Making an Iron-on Cricut Project?
As there are many options to create an iron-on Cricut project, you can use any of them depending on your requirements. So, the common machines are Cricut EasyPress, Cricut EasyPress 2 & 3, Cricut EasyPress Mini, etc. You can utilize a heat press to transfer the design to your apparel effortlessly.
Can You Use Regular Iron With a Cricut Machine?
Yes, you can. A regular iron is also effective for your minimalist iron-on projects. However, a regular iron may not deliver the results you want and not give a permanent design. Overall, we can say you can use a household iron for normal, sensitive projects but not for complex projects.
Read more: install cricut design space app
cricut.com/setup
cricut.com/setup mac
Source: How to Use Cricut Maker
#How to Use Cricut Maker#How to use cricut maker for beginners#how to use a cricut maker to make shirts#cricut.com/setup mac#cricut explore 3#www.cricut.com setup login#cricut design space#cricut explore air 2#cricut.com/setup#cricut new machine setup#cricut.com setup mac#cricut setup on computer
0 notes
Text
Discover 5 Best Printer for Cricut Projects in 2024
Searching for the best printer for Cricut projects? If so, look no further; I can help you with that! The only reason we need a printer for crafts is because we want to make some stickers, for which we need to use a Print Then Cut feature. I don’t know whether you have heard this term before, but some Cricut machines come with this new feature that makes creating a project that requires printed images. Cricut then cuts those printed images accordingly.
There are many printers in the marketplace, but which one is better? Well, this is what I will tell you in this blog. I know it can be daunting for many novice crafters when they start making their first project using a printer and Cricut machine. But you don’t have to worry at all, as I am with you in finding the best printers for Cricut users. Let’s get started!
1. Canon PIXMA TS9521C Printer
If you are looking for the best printer for Cricut projects, look no further than this Canon PIXMA TS9521C printer. This model has a big printer size and is also heavy compared to other branded printers, making it the perfect choice for your crafts. If you want something that prints high-quality images in no time, then the Canon PIXMA TS9521C printer is the perfect choice for you!
There are many pros and cons of using this printer. So, let’s get into it.
Pros:
Cons:
2. Epson EcoTank Printer
If you still couldn’t find the best printer for Cricut projects, chillax! So, what I think is that it is the perfect choice for those who are into everyday printing. Not only that, it can also be suitable for those who want the best sublimation printer. However, the one thing that you need to know is that this printer will use only sublimation ink. Besides, you can’t use any other inks that you use for other printers. So, what are the pros and cons? Let’s know it further!
Pros:
Cons:
3. Canon TS6420 Printer
If you trust the Canon brand, you can use the Canon TS6420 printing device. Also, it is the best printer for Cricut projects, with top-notch features and great quality. It can also help you explore the Print Then Cut feature. So, without wasting much time, you will need to know the pros and cons of using a Canon TS6420 printer; let’s explore:
Pros:
Cons:
4. HP Envy 6455E Printer
The HP Envy 6455E printer is the best printer for Cricut projects. Since it is a mid-range printer, it has satisfied many crafters. So, whether it is about price or quality, this Envy model will provide everything you need to try the Print Then Cut feature. You have to try this model for better quality, especially if you are looking for something in the mid-range.
Pros:
Cons:
5. Canon PIXMA TS3320
Last but not least, this is what I am using currently; it has done a lot of things for me. So, I bought this along with my Cricut Maker 3 machine last year. The sole purpose of buying this machine was to explore the Print Then Cut feature. I had never tried this before, so I wanted to give it a try! Now, it was a great experience. Besides, do you know what the best part was and what its pros were? So, let’s dig into it:
Pros:
Cons:
FAQs
Question 1: What should I check before buying a printer for Cricut?
Answer: Before buying a printer or any machine, you must check its system requirements. Once you are sure about it, then there are other factors you have to check.
Here are the factors you need to check before buying a printer for Cricut:
Question 2: What type of printer do I need for Cricut?
Answer: Many printers are available in the marketplace that you can use to create unique crafts with Cricut. They must meet some criteria, such as the type of paper they can print, the print quality, and more. Whether you want to create stickers or decals, this printer will help you stand out!
Below, I have mentioned some printers that you can use for your DIY projects:
Question 3: Should I choose a laser or inkjet printer for Cricut?
Answer: Although inkjet printers are a better option for many crafters, the laser printer has its own place for crafting. It is because, with a laser printer, you can have a high volume of coloring book pages, planner pages, and foiling craft paper that would be better suited for a laser printer. Hence, you can choose a printer that suits your needs and create your stickers or anything hassle-free.
Visit: install cricut design space app
cricut.com/setup
www.cricut.com setup login
Source: https://cricutdesignappspace.wordpress.com/2024/05/10/discover-5-best-printer-for-cricut-projects-in-2024/
#www.cricut.com setup login#www.cricut.com/setup#www.cricut.com/setup login#cricut.com/setup app#cricut explore air 2#cricut.com/setup#cricut new machine setup#cricut design space#cricut maker 3#cricut.com/setup windows#cricut.com/setup mac#cricut.com/setup login#cricut.com setup mac#cricut create connect to computer#cricut.com setup download#cricut setup download#cricut setup#setting up my cricut maker#setting up your cricut maker#cricut setup on computer#cricut design space download#cricut design space app#cricut design space login#cricut new product setup#cricut new product device
0 notes
Text
How to Connect Cricut to Computer [Windows/Mac]?

Congratulations! If you have got yourself a new Cricut machine and are ready to start your crafting journey, then this blog will tell you how to properly get started with your machine. Also, this post is gonna benefit even if you are still planning to get a new machine. As a result, there will be no need to seek help. Like any other machine, Cricut machines also require setup in order to start using them. The Cricut heat press devices are easy to use, and they do not need to connect to any device. But for cutting machines, you have to connect them to a computer or smartphone device through the brand’s Cricut Design Space app. So, get through the whole content to acquire the necessary guidance on how to connect Cricut to computer (Windows/Mac).
Steps to Connect Cricut Machine to Bluetooth
If you want to know how to connect cricut to computer then the first process is connecting it to your computer via Bluetooth. Here is the process to do the Cricut machine Bluetooth pairing on Windows and Mac.
For Windows
Initially, access the Settings window on your Windows device.
After that, you need to click on the Devices option in the Settings widow.
On the next page, enable the Bluetooth option and then select Add Bluetooth or other device.
And then select the Bluetooth option, and your device will search for the Cricut machine you are using.
Click on the model number of the Cricut machine you are using.
Afterward, the Bluetooth pairing of both devices will be complete.
Now, the machine will be ready to set up on your Windows device via the Cricut Design Space app.
For Mac
Turn on the Cricut machine and then keep the device near your Mac.
Then, open the System Preferences window from the Apple menu.
Now, in the open window, click on the Bluetooth option.
Next, check if the Bluetooth is ON and then choose your Cricut machine from the available list of devices.
If you are asked to enter a PIN code, then enter 0000 in the field.
Lastly, the Bluetooth pairing of your Cricut cutting machine and Mac system will be complete.
Note: Besides Bluetooth pairing both devices, you can use a USB cable provided with the machine box. Also, devices do not have a USB port, so you can use the adaptor to connect the cable.
Steps to Connect Cricut Machine to Your Windows
Once the Bluetooth pairing of your Cricut machine and Windows device is complete, you can move to the next and final steps of connection. Here are the points you should follow.
In the beginning, browse the official website of Cricut on PC.
Next, move to the Cricut Design Space page and click on the Download option. (If the downloaded option is greyed out, then click in the checkbox of the brand’s Terms and Conditions).
Once the app download is complete, click on the setup file in the browser. It will be located on the lower right side of the screen. (or move to the Downloads folder to open the downloaded file).
If a window opens to ask if you want to open the recently downloaded application, then select the Yes option to move forward.
Now, the download process will start, and the progress will show up on a pop-up.
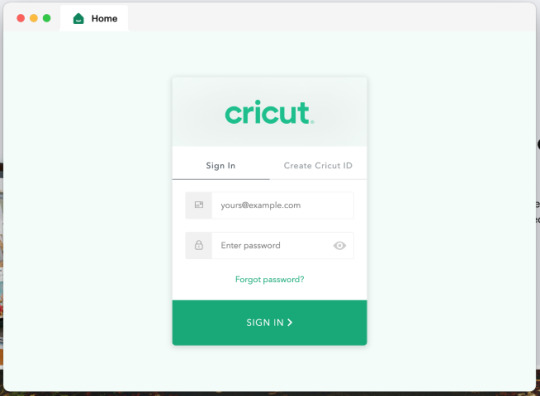
When the installation is finished, the Cricut Design Space will ask you to enter Cricut ID details to sign in.
Sign in to your account using the Cricut details on creating a new account by choosing “Create a Cricut ID” under the (Don’t have an account yet?) option.
After signing in with your account, the app will ask you to connect to the Cricut machine.
Connect the Cricut machine you want to use to the Cricut app.
Finally, the connection (setup) process will be complete.
If you are having any issues in the connection process of your machine, then repeat the process once again more carefully. For additional help, connect to the customer support team to get help.
Steps to Connect Cricut Machine to Your Mac
If you are a Mac device user, then follow the below procedure to know the correct steps of how to connect cricut to computer (Mac).
For the first, open the Cricut website and choose the Download option for Cricut Design Space.
Then the download will be complete, and after the downloaded .dmg file. (Other than that, access the file from the Downloads folder).
In order to start the installation process, move the Cricut icon to the Applications folder by dragging it.
After that, you can launch the app by clicking on the Cricut icon in the Applications folder.
A Mac notice will prompt on the screen asking you if you want to open the app; select the Open option to move forward.
On the sign-in window, enter the Cricut ID and password or create a new one if you do not have one.
Lastly, connect the Cricut machine and then start using it to create amazing DIY projects.
Frequently Asked Questions
How Do You Connect a Cricut Machine to Mac?
The following steps will help you connect your Cricut machine to Mac devices.
First, you have to connect the Cricut machine to the wall outlet to turn it on.
After that, connect the machine to your Mac device via Bluetooth or USB cable.
Next, open the Cricut website, and from there, download the Cricut app.
When the app install is complete, sign in with your Cricut account.
Connect the Cricut machine to the app by choosing the New Machine Setup option.
Now, the connection process will be complete.
Why Can’t I Connect My Cricut Machine to a Computer?
If you are trying to connect a Cricut heat press device to your computer, then there is no need for that. Cricut heat presses work independently except EasyPress 3, which works with the Cricut Heat App. If you are having problems with cutting machines, then follow the steps carefully: make sure the computer is compatible with the machine, update the OS on your computer, make sure you have an internet connection, and seek professional help if necessary.
Is It Necessary to Connect the Cricut Machine to a Computer?
Cricut cutting machines need to connect to a device, be it a computer or a smartphone. The machine works with the companion app that helps in completing the project and operating the machine. As a result, if you do not connect the machine to your computer (or mobile phone), you will not be able to perform your crafting jobs. So, in short, it is not necessary to connect the Cricut machine to the computer, but you must connect it to any other device.
For more information visit: Cricut.com setup mac
cricut explore air 2 app
how to setup cricut explore
cricut setup for pc
#cricut.com/setup#how to connect cricut to computer#cricut machine setup#cricut design space app#cricut setup for pc#Cricut.com setup mac#design.cricut.com/setup
2 notes
·
View notes
Text
How to Download and Install Cricut Design Space on a Device?

Cricut is a top brand that offers cutting-edge digital machines. Most crafters use Cricut machines to make various types of DIY projects, including birthday cards, gift cards, home decor, stickers, earrings, and other beautiful stuff. The best thing about the Cricut machine is that it comes with a companion app (Cricut Design Space). However, the Design Space offers a user-friendly platform for making intricate designs. But, before you make anything on it, you first need to install Cricut Design Space on your operating system. Also, this blog will explain the procedure for downloading and installing the Cricut software on both computers and mobile devices.
Let’s start with a brief introduction to Cricut software.
What is Cricut Design Space?
Design Space is a digital app that is used to lay out various projects and setup the machine. The app allows you to create, modify, and personalize different types of Cricut projects. Moreover, it offers multiple beautiful images, fonts, and ready-made projects that are useful for both beginners and experienced crafters.
However, this app works perfectly fine with various platforms, including Windows, Mac, Android, and iOS. Besides, the app is the only way that your machine can communicate with your devices. Plus, there is Bluetooth connectivity that can be used to pair the cutting machine with your systems. But when it comes to designing, you can use various software such as Canva, Adobe Illustrator, and more. But for sending the design to your Cricut machine, you will only need the Design Space app. Otherwise, you can’t cut anything on the materials using a Cricut device.
Now, let us understand how to install Cricut Design Space on a computer.
Steps to Install Cricut Design Space on Your Computer
You can use the Design Space app on both Windows and Mac computers. Also, downloading and installing the software doesn’t consume much time. But with easy-to-follow instructions, you can do this in a couple of minutes. Let us start with the download and installation process on Windows first, and then we will move to the Mac computer.
For Windows
Launch the browser and search the Cricut Design Space app or go to design.cricut.com.
Then, start downloading the app after checking the I Agree button.
Once the app is downloaded to your folder, open it by double-clicking on it.
After double-clicking the Downloads folder, the installation will start.
After this, an installation progress window will appear.
Once done, you will see the Design Space icon on the desktop screen. However, you can Pin to Taskbar for easy access.
For Mac
Go to any browser and visit design.cricut.com.
Download the app on your Mac computer by clicking on the Download button.
When downloading is done, double-click the .dmg file from the Downloads folder.
To begin the installation process on Mac, you have to drag the Cricut icon to the Applications icon.
After that, you have to double-click the Applications folder.
You may see a notice from Mac asking Are you sure you want to open it? For this, you need to select Open to continue.
Now, you have installed the app successfully on your Mac computer. To open it, you need to double-click the app and use it.
Steps to Install Cricut Design Space on Your Mobile
Users can install the Cricut app on Android and iOS easily. However, Cricut offers limited features for Android and iOS Design Space apps. Therefore, it is recommended to use the app on computers for a better experience.
Let us look into the process of installing the Cricut app on iOS first, and then we will install it on an Android device.
For iOS
On an iOS device, open the App Store app.
Then, type Cricut Design Space on the search bar.
Afterward, an app will appear with a green C icon.
Click on the Get button to install the app. Plus, verify the download using your iTunes password if it asks you for the same.
Finally, the Cricut app has been installed successfully on your iOS device; now you can easily setup the Cricut machine.
For Android
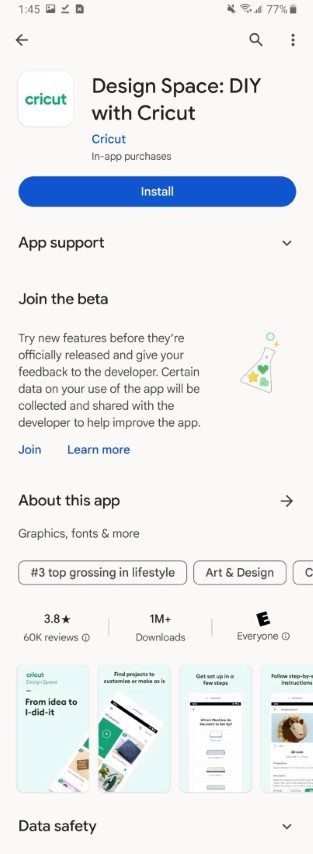
Open the Play Store and search for Cricut Design Space.
Then, you will find an app with a green C icon. Click on the Install button to download and install the app.
After installation, the app will be added to your home screen.
Conclusion
In this blog post, we discussed the procedure to download and install Cricut Design Space on Windows, Mac, Android, and iOS. Also, you will find the main purpose of the Cricut app, which gives you an overview of the app, like what it can do. With this comprehensive guide, you can easily install the Cricut software. As a result, you will be able to easily setup your Cricut machine on computers or mobile devices.
FAQs
How to download Cricut Design Space for free?
Design Space doesn’t cost anything to download the app to your computer and mobile devices. However, the application is compatible with Windows, Mac, iOS, and Android for free. But, if you need access to more beautiful fonts and images, then you may need to pay. Otherwise, it is free to use.
How can I open Cricut Design Space on my computer?
Make sure you have installed the Cricut app on the computer. If you have already done installation, then you have to click the Windows button on the keyboard.
Search for the Cricut Design Space app on the search bar.
Select Install and launch it on your desktop.
Can I use Cricut Design Space on Windows 11?
Yes, you can use the Cricut software on Windows 11. As per customer care support, users can download the Cricut app for Windows 11 by visiting design.cricut.com/setup. Afterward, they can easily install the software by following the steps on-screen prompts. However, the overall process will take a couple of minutes to finish.
For more information visit: install cricut design space app
Cricut.com setup mac
cricut design space download
#design.cricut.com#Cricut.com setup mac#install cricut design space app#cricut design space download#cricut design space login#Cricut.com/setup#Cricut maker setup
2 notes
·
View notes
Text
install cricut design space app
With the Cricut machine, you can unleash your creativity by crafting DIY projects such as stickers, cards, t-shirts, decals, stickers, and wood. For those aiming to work with over 300+ materials, the Cricut Maker 3 stands out as the premier cutting machine in the Cricut lineup. Equipped with 13 different tools, it facilitates cutting, writing, scoring, engraving, drawing, and more. To set up and use your Cricut machine, visit Cricut's official website at cricut.com/setup and download the install Cricut Design Space app on your device.
#install Cricut Design Space app#cricut.com setup mac#cricut.com/setup#cricut setup on computer#cricut design space app#cricut design space download#cricut design space login#cricut create connect to computer#www.cricut.com/setup login
0 notes
Text
How to Connect Cricut Bluetooth to Computer: Full Guide
Hey, Cricut folks, I’m going to show you the easiest way to connect Cricut Bluetooth. I know how hard it can be when we get a new Cricut machine. From setup up to performing a test cut, it seems like climbing a mountain. But wait, this is not as difficult as you think!
I recently finished setting up a friend’s machine, in which I briefly taught him how to connect Cricut to computer. Honestly speaking, I didn’t even touch a thing; I was just instructing him to do this and that. Following my instructions, he completed his setup in a matter of minutes. Do you also want me to instruct you on how to set up your Cricut machine? If so, join me on a board to connect your Cricut to your computer using Bluetooth. Let’s start!
Step 1: Unpacking the Cricut Product
In the first step, you must open your new Cricut machine. Be careful while unboxing the box because many accessories are included. You have to ensure that nothing breaks while taking things out. As you can see below, I have unboxed my Cricut Maker 3 machine, and the items inside the box are as follows:
Similarly, when you unbox other Cricut models, such as Cricut Explore or Joy, you will get a few similar items. Now that we have done the unboxing let's proceed with the second step, which is to connect Cricut Bluetooth.
Step 2: Place Your Cricut Machine
Now, you have to find a place where you can locate your machine properly. Ensure the surface is completely flat so that it will be easier to work for you in the future. If you have a table, you can keep it. Otherwise, the floor is also a good idea if you have none.
Now you have chosen the right place, let’s move on to plug the machine. To do this, you have to find a nearby power socket and connect your machine to it.
Once connected, you have to turn on the machine by pressing its power button.
Step 3: Connect Cricut Bluetooth to Your Device
Finally, we are heading to learn how to connect Cricut to a computer via Bluetooth. But here, one question that might arise in your mind is what computer will we connect to? Is this a Mac or Windows or others?
Don’t worry! I have got your back for both the computers. I will show you how to individually connect your Cricut machine via Bluetooth on a Mac or Windows computer. Let’s start with Windows first:
For Windows
For Mac
FAQs
Question 1: Can I connect my Cricut to my laptop?
Answer: As mentioned on its official site, Cricut works with iOS, Windows, Mac, and Android. However, it is not compatible with Chromebook or Unix/Linux. Hence, if you use the operating system mentioned above, you can use any brand’s laptop, such as HP, Acer, Dell, Asus, Lenovo, MSI, and Apple.
Question 2: Is the Internet compulsory for using Cricut Design Space?
Answer: No, it is not necessary to connect the Cricut software to the internet all the time. The internet is only needed when you want to access a certain feature in the app. Otherwise, there is no need to connect it to the internet. The offline option is available for the Cricut app on all devices except Android devices.
Question 3: Can I connect my Cricut machine without Bluetooth?
Answer: Absolutely, yes! You can also connect your Cricut machine and computer via a USB cable. To do this, insert one cable end into the machine’s USB port and the other end into the computer’s USB port. Once connected, you are ready to use the machine for cutting, scoring, and other operations.
Final Words
In conclusion, I discussed how you can connect Cricut Bluetooth to Mac and Windows computers. I explained everything stepwise so that every beginner Cricut user can connect their Cricut wirelessly and hassle-free. The connection is important if you want to set up your Cricut. Hence, connect it and set it up to get started with your Cricut cutting machine. Start setting up your Cricut machine in one go with this simple guide.
Source: https://desincricut.wordpress.com/2024/04/23/how-to-connect-cricut-bluetooth-to-computer-full-guide/
#cricut setup#install cricut design space app#install cricut printer#install cricut explore air 2#www.cricut.com setup login#cricut.com/setup#cricut.com setup download#cricut.com setup#cricut.com setup windows#cricut.com setup mac#cricut.com/create#cricut.com sign in#cricut.com/register#cricut.com design space#cricut#cricut com setup#cricut new#cricut new product device#cricut new machine setup#cricut new product setup#cricut create#cricut create connect to computer
0 notes
Text
How to Install Cricut Design Space: A Stepwise Guide
If you have just got a brand new Cricut machine, then you must be looking for a guide on how to install Cricut Design Space. Well, dear reader, you have reached the right place. Coming from a crafting background, I know the importance of machines in DIYers' lives. Using the Cricut model, Design Space is the main software for creating any project.
In simple words, Cricut's personal designing software helps users virtually create their inner ideas. In addition, the Cricut app offers free images, fonts, and pre-customized projects that allow users to complete projects within a limited time frame. This Design Space works with a Cricut machine and supports all computers and mobile phones.
Before getting the software, all users need to know the app's system requirements and the method for downloading it on a device. This blog provides details about the installation and minimum system requirements.
How to Install Cricut Design Space on a Desktop?
If users intend to make various designs on this Cricut app, they must adequately install it on their separate computers. Downloading the app depends upon the system you are using. The total number of steps that will help you in getting the app are available below:
For Windows
All users must have strong internet connectivity before beginning the installation process. With the help of the below steps, it will get a lot simpler for the user to get the app on their Windows computer:
You must begin installing the app by opening Design Space's official website.
Then, click the small box next to Terms & Conditions and hit Download.
After completing the download process, go to the browser or Downloads and double-click the .exe file.
Next, please select the I trust the application option and check the installation progress.
Afterward, return to your desktop home screen and open the Cricut app.
Now, if you are already registered, then sign in with your Cricut ID & password.
If you have downloaded the app, click Create a Cricut ID and create your respective account.
To create your account, you must fill in the required details inside the specific field.
Further, press the Create a Cricut ID, and then your account will be created on the software.

By giving preference to the earlier-said steps, you can quickly finish how to install Cricut Design Space task within a few minutes.
For Mac
Let's take a moment and start installing this easy-to-use Cricut software on the Mac computer. For that, you need to examine the below-given steps:
First, switch on your Mac and visit the official Design Space setup portal.
Then tick the Terms & Conditions box and then click the Download option.
After that, choose the folder where you want to save the downloaded file.
Now, go to your device's Downloads folder and double-click the .dmg file.
Following this, move your Cricut Design Space to the Applications folder and launch it.
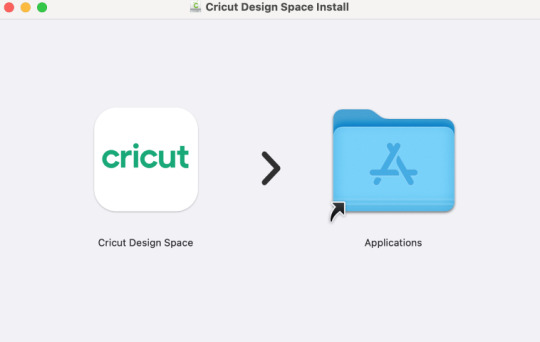
Next, a small Mac window will open before you read it, and then press the Open button.
Finally, create a Cricut account ID or sign in using your login details.
How to Install Cricut Design Space on a Mobile Phone?
Apart from the desktop, the Design Space app also supports Android & iOS devices. Here, you will notice the entire method of getting it on the devices.
For Android
In the first palace of the process, turn on your phone and then open the Google Play Store.
Next, look for the app or type Cricut Design Space inside the Search section.
After finding it, tick the Install button and install the app on your device.
Following this, you will see the app next to other apps on your home screen.
Now, tap on the Design Space and press the Sign in option.
Finish the method by starting to design your imagination on the canvas.
For iOS
Intending to grab significant details on how to install Cricut Design Space on iOS devices, you are most welcome to pay attention to the steps given below:
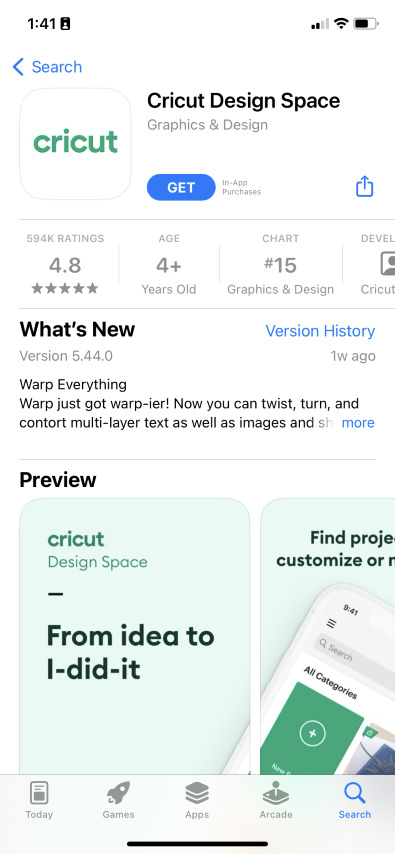
First, press the App Store icon on your iOS device's home screen.
Next, search for the app and select the Get option, which is visible in the center of your screen.
Following this, you must double-click your power button to start the installation process.
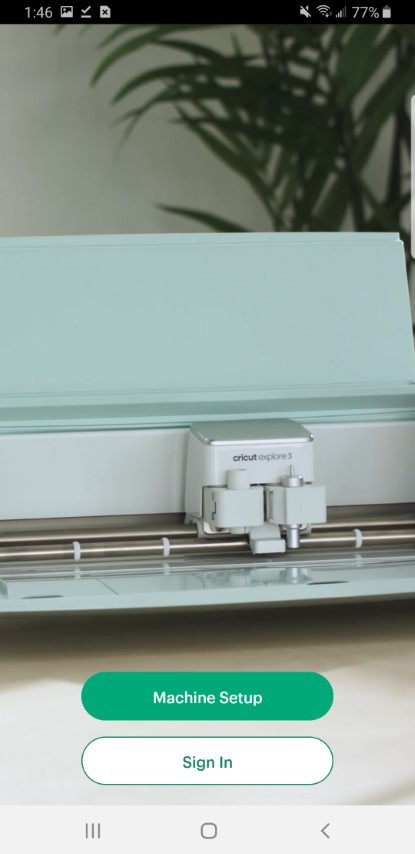
After installing the app, please open it and press Machine Setup or Sign In (as you choose).

Congrats! You can now freely use the app to make projects and share them wirelessly with the Cricut machine.
Final Words
Concerning this blog, it's evident that all your Cricut Design Space doubts must have gone clear. All the users need to know without any questions is that their devices fulfill the system requirements. This design software motivates users to discover their creative side and share it. Moreover, the Cricut app runs smoothly with a cut-die machine and supports all desktop and mobile devices.
#Cricut.com/setup#cricut.com/setup mac#cricut.com/setup pc#cricut.com/setup windows#cricut design space#design.cricut.com/setup#cricut explore 3#cricut accessories#cricut maker bundle#Cricut.com setup mac#Cricut Design Space#install cricut design space app#cricut design space login#cricut design space app#design.cricut.com#How to install cricut design space
0 notes
Last Seen Blogs


juniorsautodetailing
JR Auto Detailing

dramaticartisan
Inkblot

natsuri-off-content
official content

first89
Tiempos y ausencias