#prototyping
Note
I'm pretty sure my sprite just prototyped a ghost.
like it didn't even touch anything and went from a ball to a full on legendary swordsman.
is this supposed to happen, and how much luck am I gonna need if the enemies inheret the skills of said swordsman?
It's not supposed to happen, but it's not supposed not to happen, if you catch my drift there. Also yes, ghosts are real.
On one hand, the enemies are now going to have a bit of legendary swordsman in them. On the other hand you have an entire legendary swordsman on your side and they now have a code integrated in them that commands them to help you as much as possible without hindering your personal growth. For example, death is a pretty damn hindrance to personal growth.
Sincerely
SN Tech Support (Gear)
17 notes
·
View notes
Text
A Crash Course to Design Thinking: Empathy
●~•──────── Introduction ─────────•~●
Hello! Today I wanted to talk about UX design. This post was supposed to be longer but Tumblr deleted my draft and I’m feeling (╯°□°)╯︵ ┻━┻ so here is just part one.. We’ll be covering the “Empathy” step which includes:
Exploring the problem space
Conducting User Research
Defining User Personas
I believe that taking time to do design thinking when creating a product avoids bad door knobs and confusing app interfaces. Here’s a handful of hilariously bad UI demos for taste: https://mattw.io/bad-ui/.
Here’s some other common pitfalls:
Too many choices for a user (overcrowded toolbars)
Not enough options for users (accessibility)
Poor feedback (“Did that form actually go through?”)
Inconsistent interfaces (“Do I push or pull on this door…It says push, but has a pull handle!”)
●~•────────What is a prototype? ─────────•~●
A prototype is an early model mock-up of the product you want to build. We’re focusing on digital products in this case, so the product can be an app, website, or any other applications. Prototypes are useful for conceptualizing and visualizing your ideas for the product. It's also meant to showcase the "flow" of using the app from a user's perspective, as well as show the layout and organization of your product.
●~•───────What is the design thinking process? ────────•~●

The design thinking process is an iterative process to approaching designing products. It's not necessarily linear, but we'll walk through what you should consider at each step. In practice, you may find yourself revisiting steps to refine your problem, ideas, and mock-up itself after getting user feedback. Let’s talk about the first step, empathizing!
Part 1: Empathize
●~•─────── Step 1 ────────•~●
⭐ Pick a problem space.
What problem are you trying to find a potential solution for? It could be as simple as "Tumblr’s draft system sucks" or maybe your friend just said "This book tracking app could be better.." Sources of inspiration are everywhere!
Coming up with your own: Think about your own experiences as a user of different products or services. Have you encountered any frustrating issues or pain points that could be addressed with a potential solution? Maybe you struggle with finding parking in your city and wish there was a more efficient way to find available spots. Or perhaps you find it difficult to keep track of all your passwords and would like a more secure and user-friendly password manager. Consider your own needs and experiences as a starting point for identifying potential problem spaces.
Interacting with others: Talk to people in different industries or fields, or attend events or conferences related to areas you're interested in. This can give you exposure to different perspectives and potential problem spaces that you may not have considered before. For example, if you're interested in education technology, attending an education conference could help you identify common challenges and needs in that space. Or even reading through r/professors or talking to your own instructors!
📚 Resources:
https://www.uxchallenge.co/ - List of problems
https://uxtools.co/challenges/ - Walkthroughs on tackling specific problems focused on UX skills
●~•─────── Step 2 ────────•~●
⭐ Understand the users affected by the problem.
Once you have a problem space, don’t jump ahead and start thinking of solutions! First, we must understand the problem from a variety of user perspectives. Why? Because by understanding the users affected by the problem, we can gain insights into their needs, pain points, and behaviors. This understanding can help us develop effective solutions that address their needs and improve their experiences.
There’s a variety of user research methods we can use to collect user perspectives, this is just a handful of them:
Survey: If the product already exists (and it’s yours), you could add a survey in-app for feedback on a specific feature. Otherwise, you can create a survey assessing a user’s impressions on a problem they might have (“Do you encounter this..?”, “Would you be interested in a product that..”, “What kind of features are most important to you?”).
User Interviews: This involves talking to users one-on-one to gain insights into their experiences, needs, and pain points. It's important to ask open-ended questions and actively listen to their responses to understand their perspectives fully.
Online Research: Checkout user impressions on products by looking up existing reviews online. This can be from Amazon, Reddit, the app store, whatever. To make this kind of data useful, you can identify patterns of what is often mentioned or common pain points users express online. It’s going to be better if you can connect more directly with users about your specific problem area, but this is something to start with.
📚 Resources: (I love nngroup…)
https://www.nngroup.com/articles/ux-research-cheat-sheet/
https://www.nngroup.com/articles/guide-ux-research-methods/
https://www.nngroup.com/articles/which-ux-research-methods/
●~•─────── Step 3 ────────•~●
⭐ Create User Personas to represent the types of users your product will be addressing the needs of.
The user persona shouldn’t represent a specific (real) person, rather it should represent a realistic archetype of a person. I think of it as like a character sheet. For example, if we’re creating an app for book tracking our user personas might be “Reader Rhea - A college student looking to organize books from her classes” or “Bookworm Bryan - A young adult looking to get book recommendations”. The persona should be based on the research you did prior. Creating user personas will help you better understand and empathize with your users, and make design decisions that align with their needs and goals.
Here’s a quick checklist of what to include in a user persona:
Name: Give your persona a name that reflects their characteristics and needs.
Demographics: Include details like age, gender, occupation, and location.
Goals: What are the persona's primary goals and objectives when using your product?
Pain points: What are the main challenges or problems that the persona faces when using your product?
Behaviors: What are the typical behaviors and habits of the persona when using your product?
Motivations: What motivates the persona to use your product?
Personality: What are the persona's personality traits and characteristics?
Scenario: Describe a scenario in which the persona would use your product or service.
Quote: Include a quote that summarizes the persona's attitude or perspective.
📚 Resources:
https://about.gitlab.com/handbook/product/ux/persona-creation/
https://www.nngroup.com/articles/personas-study-guide/
https://www.justinmind.com/blog/user-persona-templates/ - lots of examples and explanations here
●~•─────── That's All! ────────•~●
Phew, ok that is all for now! In a future post, I will go over the second step in the design process. If you have anything to add to this topic, pls share! :D Thanks for reading
#ux design#user experience#ui ux course#prototyping#design thinking#tech#design#creative#user research#comp sci
59 notes
·
View notes
Text
It's 10pm, do you know where your RTK prototypes are? 🔧🛰️🎯
We juuuuust plugged in this uBlox RTK F9P shield into USB and given the intense cost of these modules we definitely had a nervous twitch but then we heard the "ba-dunk" of enumeration and wheeeewww it came up as a serial port. Heartened, we soldered on a right-angle SMA connector and connected a chonky active antenna . Start up a copy of u-center and huzzah, there is GNSS data streaming out. Next up, we have to figure out what we want to use as the underlying transport layer from base station to rover - maybe an ESP32-S3 Metro and ESP-Now? more research is needed!
#adafruit#ublox#rtk#electronics#opensource#opensourcehardware#zedf9p#arduino#prototyping#precisionlocation#uart#i2c#engineeringlife#gpsmodule#hardwarehacking#gnssdata#projectprogress#electronicsdesign#metrominute#esp32s3#prototypebuilding#manufacturing#nyc#technology
20 notes
·
View notes
Photo
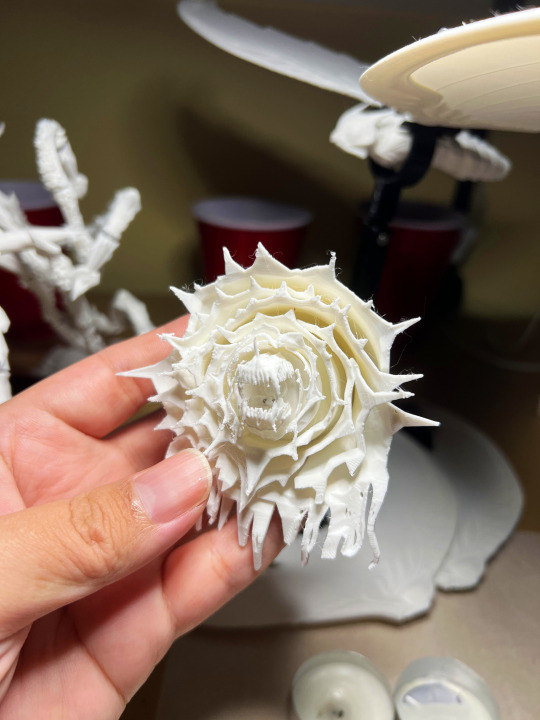
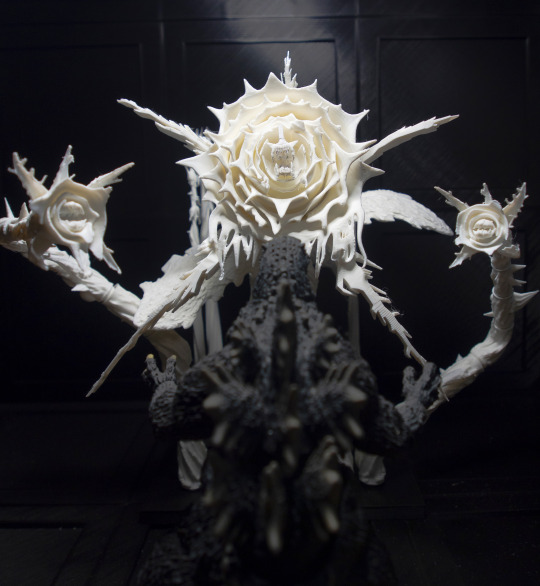
Currently I’m modeling and building the poster version of Biollante from “Godzilla vs Biollante” since she’s my favorite kaiju.
I’m pretty surprised the 3d printers, especially a filament one, produced something so small like the jaws and teeth. This was a fast produced product so I haven’t cleaned it up yet so you can still see filament threads and flash at a lot of places (sorry!). I’m going to update the model once I inspect it a little more so it’s going to be smoother and have more details.
This is going to be another articulated piece. The jaws can move and the head/neck will be able to move freely since I’ve updated how I do ball joints. The tendrils will have their own points of articulation but we’ll see how many of them I make...The body alone takes two days to print >__> And I still can’t buy z-brush so I’m doing textures by hand which...aint nobody got time for that.
On another note, my new insurance said “No.” to the migraine injections I take every two weeks...so we’ll see how I’m feeling in a few days :D
(Armor Mothra and Na Kika say “Hi” from the background.)
#biollante#3d printing#3d#articulated#mothra#armor#armor mothra#kaiju#na kika#na kika 3d print#mothra 3d print#armor mothra 3d print#prototype#prototyping#monster#monsters#godzilla#poster#godzilla vs biollante#rose#printing
73 notes
·
View notes
Text
PROTOTYPE MAYHEM!
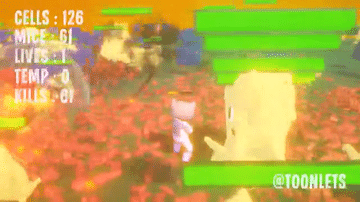
This is what game prototyping and debugging looks like!
I've got these crazy YetiMice, see, and they're supposed to be eating these nuclear power cells. But are they? I mean, are they eating them all randomly, without prejudice?
Turns out, no!
When all the power cells are at 100%, at the start of the game, the darn mice all run to the same power cell to chow down, and they don't switch it up until you start offing them.
That ain't right!
So now, if all cells are equal, they just pick something at random.
Another problem, I had them all "changing their minds" at the same time, so it's like they'd all pick the same "next" target in unison and charge along as a group.
Also wrong!
But that's all fixed now. Crazy what it looks like when you let these damned mice just have at it. Mayhem!
Full video below. And if you'd like to be updated on progress and free demos, I have a mailing list!
vimeo

#madewithunity#indiegamedev#prototyping#character design#coding#programming#game coding#game development#nintendo switch#hello kitty#sanriocore#mayhem#cats
38 notes
·
View notes
Text
How to Design & Prototype in Adobe XD
اضغط هنا :
#AdobeXD#Design#Prototyping#UIUX#AdobeCreativeSuite#UserExperience#UserInterface#DesignTools#DigitalDesign#AdobeDesign#ProductDesign
2 notes
·
View notes
Text

be careful, dude's got a stick
12 notes
·
View notes
Text
youtube
A process and equipment for making nice-looking custom dice (video):
https://www.youtube.com/watch?v=9SUD_i6rSgU
2 notes
·
View notes
Text

GD prototyping is a Prototypes&low volume manufacturer, provide (3&4&5axis)CNC machining, 3d printing, sheet metal, vacuum casting rapid tooling and surface finish. https://www.gd-prototyping.com/
2 notes
·
View notes
Note
How can i make more than 2 pre-enter prototypes?
In a standard playthrough you can’t. And it is strongly recommended you do not even attempt.
Sincerely
SN Tech Support (Gear)
3 notes
·
View notes
Text
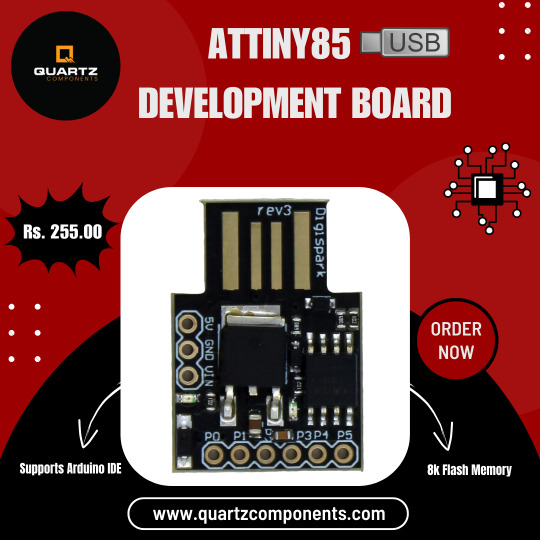
You can purchase the ATTINY85 USB Development Board for just Rs. 255.00 on quartzcomponents.com. This affordable and versatile development board is perfect for your microcontroller projects. It features an ATTINY85 microcontroller and USB connectivity, making it a cost-effective choice for DIY electronics enthusiasts and hobbyists. Don't miss out on this great deal for your electronics projects!
#attiny85#usb#developmentboard#microcontrollerprojects#diyelectronics#makercommunity#embeddedsystems#hardwarehacking#opensourcehardware#arduinoprojects#embeddedprogramming#circuitdesign#techinnovation#gadgetgeek#prototyping#electroniccomponents#electricalsky#electricalprojects#electricalwires#electricalengineers
2 notes
·
View notes
Text
ESP32 ItsyBitsy is in final testing zOne!
OK, after a long hiatus, the ESP32 Itsy Bitsy prototypes are built and ready for testing! We first designed this board Feb 20, 2020 - and it's been waiting oh so patiently for its turn. The ESP32 Pico module packs 8 MB of flash and 2 MB of PSRAM. Despite its small size this board can handle fairly complex programs. This board is very small but has lots of pins, with a USB-serial converter, NeoPixel, reset and user button, Stemma QT connector, and a 5V-logic output specifically for driving NeoPixels. to do my final 'all in one' test we're reading temperature and humidity from an I2C sensor, sending it to IO, then reading back the onboard NeoPixel color from the dashboard. It's an excellent way to make sure the whole thing is working the way we like. Last up, we'll do a low-power test, and then it'll be ready for fabrication!
#espressif#esp32#adafruit#ItsyBitsy#NeoPixel#hardwaretesting#pcbdesign#micropython#iotprojects#embeddedsystems#prototyping#makersmovement#technologyinnovation#electronicengineering#diyelectronics
7 notes
·
View notes
Photo

Everything I make is out of fun. I don’t have the tools nor the technology those studios have. I’m a novice- I don’t have a background in toymaking nor the experience so it’s a hobby in my spare time. All of it is run off my computer and a 3D printer my husband got for fun that we’ve both sunk countless hours into. It’s kind of strange holding something I made but it feels almost therapeutic for the little kid in me.
Overall I’m happy. Unfortunately print quality declined a bit since the temperature dropped significantly. Most parts either didn’t form properly, like the mouth, or in some cases didn’t have proper layer adhesion so there were some scrapped parts I couldn’t recover. The new joint system seems to work wonderfully and I all the pieces seem to fit nicely. But overall this is just a prototype and a great learning experience :D
Also, holy shit, I finished this in a couple of days and all off my migraine meds. Most of the time was spent printing the damn thing and I think I’ve cut and pricked myself like 40 times on the damn thorns while putting the thing together >:/
**Also, thank you to my husband for putting up with my nerdy ass and also taking some amazing pictures!
#kaiju#3d#3d modeling#3d print#art#articulated#biollante 3d print#prototype#prototyping#poster#3d printing#monsters#biollante#godzilla vs biollante#godzilla#monster
45 notes
·
View notes
Video
Here is a video on prototyping overlay transitions with thumbnails. Recently, I was working with a colleague and we were troubleshooting ways we can have thumbnails assembled into an auto layout frame, but also have hover previews that broke out of those frames with a higher zindex. This is what we came up with. Here is a link to the community file: https://www.figma.com/community/file/1185614750827595773
9 notes
·
View notes
Text
If you are wondering where I have been.
10 notes
·
View notes
Last Seen Blogs

arbellaart
Arbella-Art

destinyudogie
i love you (it's ruining my life)
casavanse
🎗️Avanse🎗️

lightemitting
Blog About My Teacher Crush

dmuthafkingmonayeee
Untitled