#photoshop shoelacing
Text
I wanted to have a post to link to that visually demonstrates why, even you don't plan to use any of the other rulers and features, Lazy Nezumi Pro's smoothing alone is reason enough to get it for Photoshop.

Here's our baseline. Photoshop without smoothing.

Now here's a comparison between the smoothing options.
This isn't a paid ad. I just think...
well, LOOK AT IT. "Smoothing". C'mon!
(I want to make a separate post for CSP. CSP's stabilizer is an order of magnitude more sane, but it has some huge weaknesses as you crank the stabilizer higher that requires a few more gifs to really show)
Here's affiliate link: https://lazynezumi.com/?ai=pharan
I *DON'T* get a kickback from the link, but if a lot of you use it, it does help me justify being annoying to them. :p
Lazy Nezumi Pro is an amazing feat of engineering/one-time purchase pen smoothing and rulers plugin application for Windows. It works with all sorts of digital art programs (there's a compatibility list on their site). You get free updates for one year.
#drawing#photoshop plugin#photoshop smoothing#photoshop stabilizer#lazy nezumi pro#lnp#digital art tools#photoshop shoelacing#stabilizer for photoshop
79 notes
·
View notes
Text

It’s so weird to me that Tumblr is “trendy” again but i’m happy to be back none the less 💖 (albeit i am a lot cooler now.) are we still doing the I like your shoelaces thing or am i old
#i like your shoelaces#i’m 100#andy warhol#morgainelegay#self#artist#artists on tumblr#photographer#shitty photoshop
2 notes
·
View notes
Text
as if dealing with a gif set I spent like 5 hours on not showing up in the tags all day wasn’t enough I see the most fucking condescending post to creators about the like function on this website I will fucking break into tungles server room and destroy them myself
#‘stop asking for reblogs u should be happy with likes’ FUCK you#5 hours in photoshop. two crashes. several redos after I had to redo the coloring. and it doesn’t show up on this broken website.#I think I deserve more for my work than a fucking ‘pat the head good job Like’ in my fucking notes#I want my work SHARED that’s the FUCKING POINT OF THIS WEBSITE#REBLOGGING TO SHARE OTHERS WORK#I’m going to strangle folks w/ the tungle shoelaces istg
3 notes
·
View notes
Text
Incorrect quotes with the five villains!
Menendez: Bye Menèndez! Bye Rorke! Bye Adler! Bye Graves! Bye Menéndez!
Rorke: You said 'bye Menéndez' twice.
Makarov: I like Menéndez.
.
Makarov: What did you guys get in your yearbook?
Menéndez: "Prettiest smile."
Rorke: "Nicest personality."
Adler: "Most likely to start a bar fight."
Graves: "Least likely to start a bar fight, but most likely to win one."
(new hc, adler and graves fight in bars occasionally /j)
.
Graves: Good morning.
Menéndez: Good morning.
Adler: Good morning.
Rorke: You all sound like robots! Try spicing it up a bit—
Makarov: GOOD MORNING MOTHERFUCKERS
.
Makarov: We've been conducting an ongoing study to see what Rorke will and will not eat!
Menéndez: Grass? Yes.
Makarov: Moss? Yep.
Menéndez: Leaves? Yes!
Makarov: Shoelaces? Strangely, yes.
Menéndez: Worms? Occasionally.
Makarov: Rocks? Nope.
Menéndez: Twigs? Usually, for some reason.
Makarov: Graves's cooking? Inconclusive.
Adler: How did you two.. Test this?
Makarov: You just hand him stuff and say "eat this" and if he eats it, he eats it.
Adler: I, don't know how to feel about this.
Graves, VERY concerned: IS THAT WHERE ALL MY SPARE SHOELACES WENT??
.
Graves: What does "take out" mean?
Rorke: Food!
Menèndez: Dating.
Adler: Murder.
Makarov: IT CAN MEAN ALL THREE IF YOU'RE NOT A COWARD.
Graves: Are we really going to let Menéndez keep Makarov?
Adler: We kept Rorke.
(hold on im getting vibes)
.
Menéndez: Poison is a magic transmutation that turns people into corpses.
Rorke: This knife is actually a magic wand.
Makarov: Meet me in the Denny's parking lot for a wizard duel.
Adler: *cocks gun* Magic missile.
Graves: What the fuck is wrong with you people?
Adler and Graves incorrect quotes, because I feel like these two could get along.
Graves, in a beach shirt: So sue me, and I'd like to be on Island Time for a day!
Adler: I have Spotify open right now on my computer, do you want me to blast you? Do you want me to put you on blast? Because I've got your history right here on the sidebar.
Adler: Take it back by Jimmy Buffet, Nautical Wheelers by Jimmy Buffet, Jolly Mon Sing by Jimmy Buffet, Steamer by Jimmy Buffet, TREAT HER LIKE A LADY BY JIMMY BUFFET, MAÑANA BY JIMMY BUFFET, WHEN SALOME PLAYS THE DRUMS BY JAMES BUFFET, HAVANA DAYDREAMIN BY JIMMY BUFFET— What the FUCK happened to you?!
Graves, laughing his ass off: I HAD A CASE OF THE MONDAYS—
Adler: ARE YOU HAUNTED?! ARE YOU FUCKING POSSESSED? DO I NEED TO GET AN EXORCIST?!
Adler: YOU USED TO BE MY FRIEND! WHO A R E YOU?!
Graves, crying and laughing: i ha d a c ase of the mon d a ys
.
Adler: Is something burning?
Graves: Just my love for you. (/j)
Adler: Graves, the toaster is on fire.
.
Adler: You know, I'm starting to regret showing you how that blender works.
Graves, drinking toast: Why do you say that?
Graves: Hey, look, it's efficient!
Adler: No the FUCK it's not.
Adler: Bad things keep happening to me, like I have bad luck or something.
Graves: Adler, you don't have bad luck. The reason bad things happen to you is because you're a dumbass.
Graves: Are you an 'arr' pirate or a 'yo ho ho' pirate?
Adler: I'm a 'I'm not paying $600 for photoshop' pirate.
#vladimir makarov#call of duty mw3#cod mw3#call of duty#call of duty modern warfare 2#cod bo2#raul menendez#call of duty black ops 2#gabriel rorke#call of duty ghosts#russell adler#call of duty black ops cold war#phillip graves#cod mw2
80 notes
·
View notes
Text
y’know when someone says something to you and you say “what” like 7 times but you still can’t tell what they’re saying? well. I have the perfect solution for you.
first, you have to make up a hamster. yeah, a fish or a rat could work as well, but hamsters are really the best. flesh out the fictional hamster a bit. give him a weird name. perhaps cheesecake, toadstool, or shoelace. give him a backstory. maybe you found him in a shoebox in the basement of your neighbor’s house. idk, be creative.
then, when you’re meeting a new person, bring up the hamster. bonus points if you can find a few pictures of a reasonable looking hamster. extra bonus points if you photoshop him into a selfie with you. make sure you bring up the hamster to the new person at least twice.
after you’ve been talking to the new person for like a week, you take action. call them crying and tell them that your hamster has died. make sure to make the death believable though. no one will believe you if you say it died of natural causes, those little motherfuckers can’t die naturally. they always die from getting flung from a fan into a fishtank or being chased through an air vent by a feral cat or something completely fucking stupid like that.
here’s the most important part. after you finish telling the new person about the death of your hamster, you start laughing. and then the new person gets confused and asks why you’re laughing, tell them that you always start laughing when you get too stressed out from bad news.
BOOM. now when the new person has repeated themself to you like 84 times and you have no clue what they just said to you, you can just laugh. and then if they were telling you that their grandma died or something, they’ll remember your dead hamster and deduce that you’re not laughing at their dead grandma, you’re just stress-laughing.
problem solved 😎
#ace speaks#listen. listen to me#I know this makes no sense#I am aware#but it is SO fucking funny to me#I was sobbing laughing while writing this#perhaps the anesthesia fucked me up worse than I thought
25 notes
·
View notes
Text
If staff were smart, they would put a bad photoshopped copy of Pedro Pascal or Din Djarin wearing the Tumblr Pants and watch the site blow up and mando-gremlins align to buy the pants just bc they see their favorite overworked, socially awkward tin can man wearing them.
Oh and Grogu wearing oversized shoes with tumblr shoelaces on him but in green
#grogu#din djarin#mandalorian#the mandalorian#tumblr#staff#tumblr staff#tumblr shoelaces#tumblr pants#tumblr ad#meme#baby yoda
12 notes
·
View notes
Text
Incorrect Quotes Tag
Thank you for the tag, @toribookworm22
I’ll be doing this from Transcendants: Skyfall
Rules: use this quote generator & list as many quotes as you like using characters from your WIPs, then tag as many people as quotes you listed.
Paige: I’m sick and tired of being called 'mortal' like, you don’t know that. Neither do I. I have never died even ONCE. Nothing has been proven yet. Stop making assumptions. It’s rude.
———
Edmund: Are you an ‘arr’ pirate, or a ‘yo ho ho’ pirate?
Albert: I’m a ‘I’m not paying $600 for photoshop’ pirate.
———
*The squad is having dinner together*
Darrius: Aaliyah, can you pass the salt?
Aaliyah: *Throws Brandon across the table*
———
Diamond: Is stabbing someone immoral?
Clementine: Not if they consent to it.
Magnolia: Depends who you’re stabbing.
Jason: YES?!?
———
Damien: We’ve been conducting an ongoing study to see what Everglow will and will not eat.
Emerald: Grass? Yes!
Archie: Moss? Yes!!
Emerald: Leaves? Ohh, yes!
Archie: Shoelaces? Strange but true!
Emerald: Worms? Sometimes!
Archie: Rocks? Usually nah.
Emerald: Twigs? Usually!
Archie: Otis' cooking? Inconclusive!
Anthony: How did you… test this?
Archie: You just hand her stuff and say ‘eat this’ and if she eats it, she eats it.
Anthony: ... I don’t know how to feel about this.
Damien: IS THAT WHERE ALL MY SPARE SHOELACES WENT?
———
Tagging: @arijensineink @helpless-hero @felixlib and @alright-mrfahrenheit
17 notes
·
View notes
Text
I've seen people talk about on here how Tumblr capitalizes on memes (shoelace etc) and I've seen people talk about 'oh the people who made that post might have grounds for suing' which. I think, after a point, memes become public domain? In a similar sense as the whole omegaverse suing scandal or how "photoshopped" has become a word, I suppose. So many people know and have made jokes about the shoe laces that, at this point, it's free use
Pikachu man is an entirely different thing tho and I'm surprised Nintendo hasn't noticed yet
4 notes
·
View notes
Text


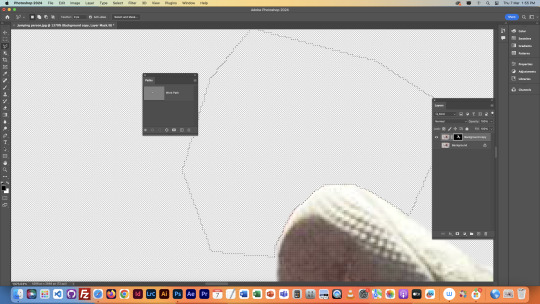
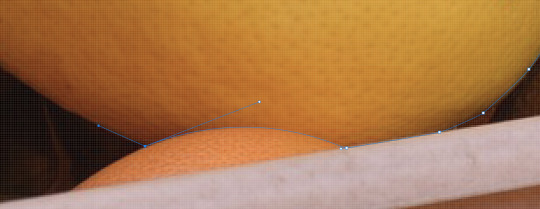
Today we used the pen selection tool mostly to select our objects. this allows to be able to select with curved points and straight cornered points. to turn it into a path- windows, paths and then command click on the thumbnail. We also learned and used mask layer a lot today and I got a far better understanding on it.
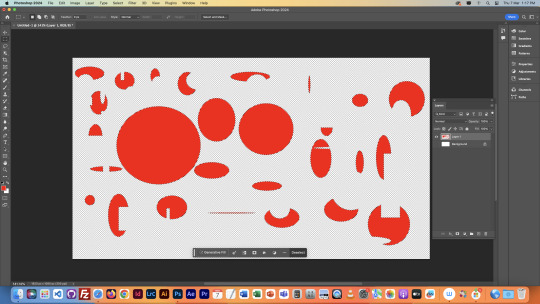
1st photo- we were using the marquee tool as a refresher from last class. I got a better grasp of using shift and option to take away and to add to a shape.
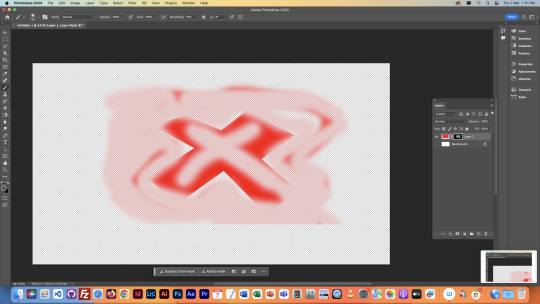
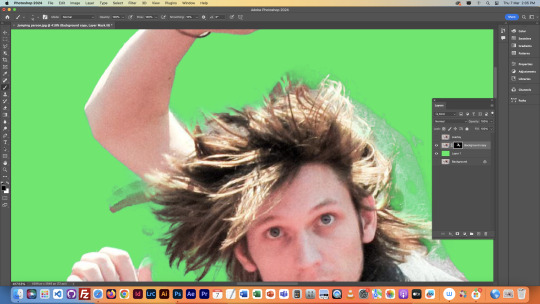
In photo 3 & 4 it shows what it looks like outside of the mask (3) and inside the mask (4). when I went inside the mask and drew with white with the brush tool, it showed up like that on the outside. This is because when you draw with white it 'shows up' and when you draw with black it disappears.
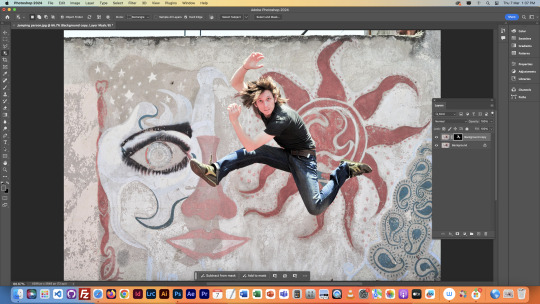
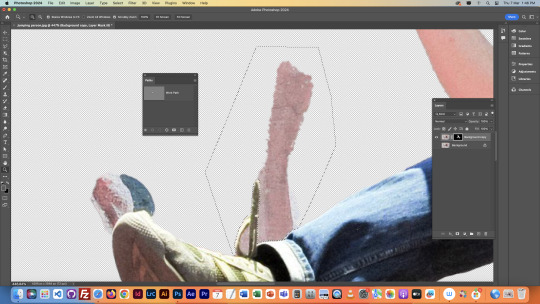
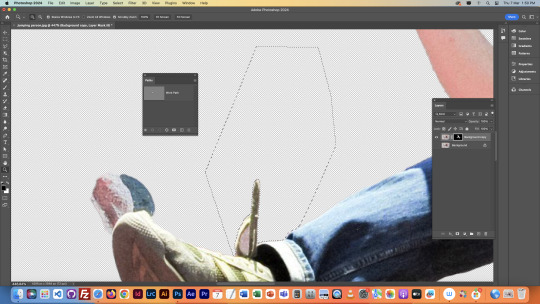
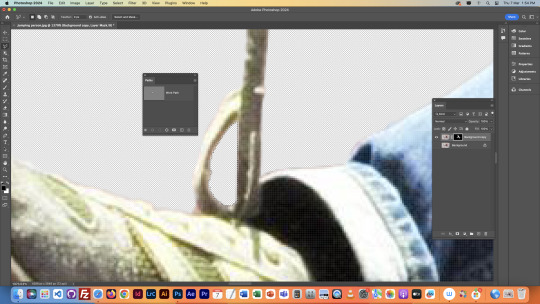
Photo 6- here we were able to use the pen tool to select this arm that did not look right in the picture. we used broken points to get around the tight corners and then turned it into a path and clicked delete, this got rid of the whole arm that we selected and it looked very neat. We were also able to fine tune the photo using the pen tool and we could zoom up and get rid of the whole in the shoelace loop that the object selection tool did not pickup on.
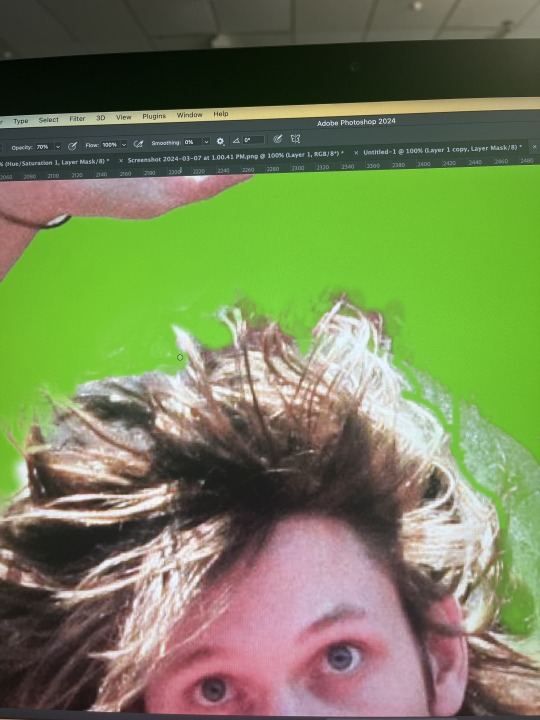
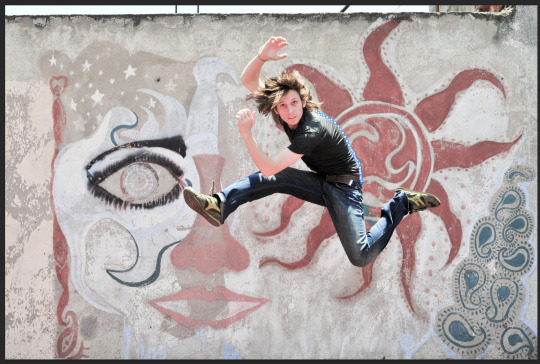
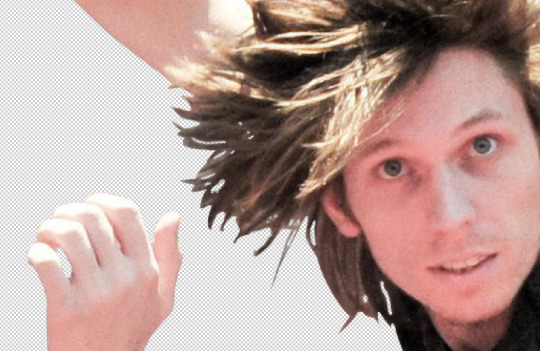
We also looked at cutting out hair (photo 7 & 8) and how to make it look as natural as possible. Playing with the opacity so it is not sharp and doesn't look straw like helps soften the edges and make it blend in and look more fluffy. I found this very tedious and it wasn't looking too good until I started using opacity so that it looked a bit more natural. We used the brush tool and put the first exercise (photo 3 & 4) into practise as we went clicked on the layer mask and put a green background on the back so it was easier to see what we were doing when fine tuning. We used the white and black fill and pressed X to swap between the two. When we were on black fill, it hid the part that we were painting and when we were using the white fill it would paint the photo back on. I also changed my brush instead of being round to a patch brush so it was more natural when painting instead of a vivid brush stroke.
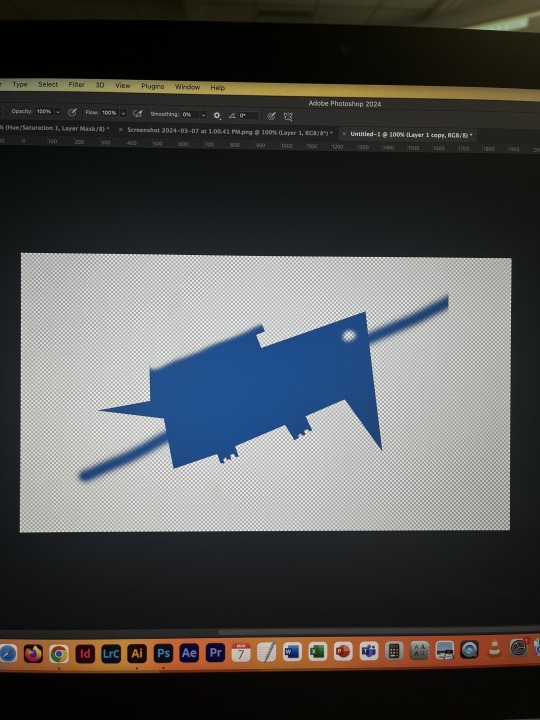
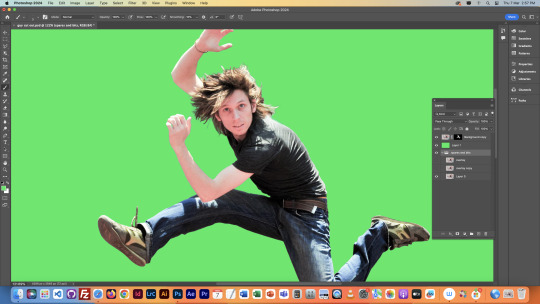
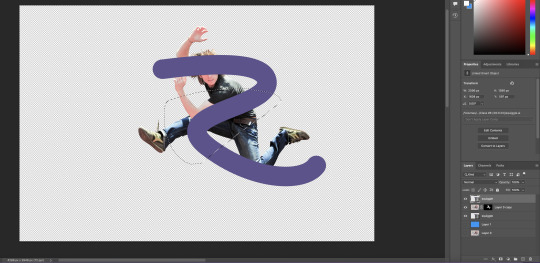
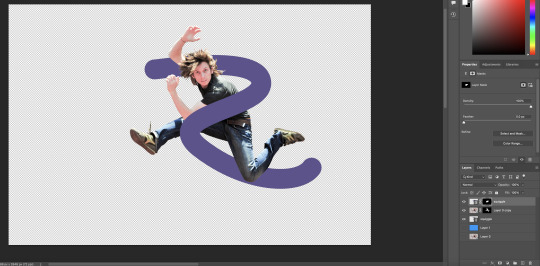
We then drew an S with the pen tool and made the stroke very large (photo 10). We used layer masks as the guy was on a different mask to the S, so we were able to use the layer mask and use the black fill brush and paint away some of the S so that his leg and arm could be in front of the S and we left the back arm so that it stayed behind the S. When doing this you need to just select the layer that you want to edit.
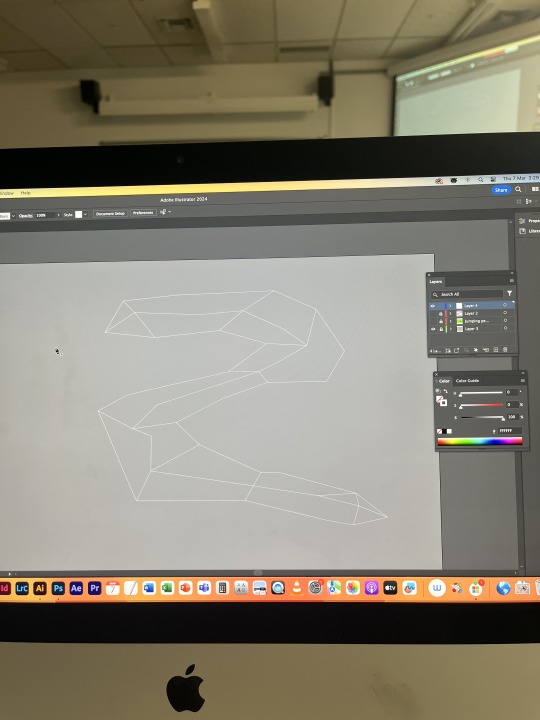
We then went onto illustrator and used the pen to draw a random S shape (photo 9). We could do as many points as we liked and we could make it as abstract as we liked. We filled in some of the shapes in the S and then changed the opacity to make it a little transparent. We then pasted it back onto photoshop (photo 11). We were able to add a background to finish off the picture.
I found this lesson very full on but it was cool to used photoshop and illustrator in tandem. Putting all the skills together was cool and seeing the type of thing that you can do with the skills and platforms. I found doing the hair the hardest because I kept getting the fills mixed up and using the wrong opacity so it looked messy. I also know that when I go to do the homework task I will struggle using the layers as I don't quite yet understand when to make a new one and when to add a layer mask but it will be good to practise and get a grasp of it somehow.
0 notes
Text
Sixth Class
Today's class was about compositing. Mixing elements into one image. We started off the same as last class, recapping or Marquees, filling areas, and masks. We learned new stuff about selections though, about how whilst creating a Marquee, holding the Shift key will add to the current selection, and holding Option will remove from it. These keys remain the same for most selection techniques.


Here is some photos of the masks we messed around with:
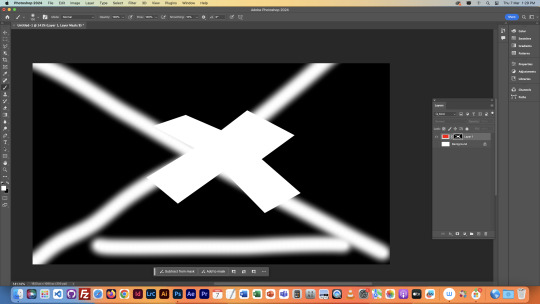
We learned here that when making a mask of a layer with a selection active, only the area within the selection is actually affected, which is what happened in the previous lesson with the bird wing.
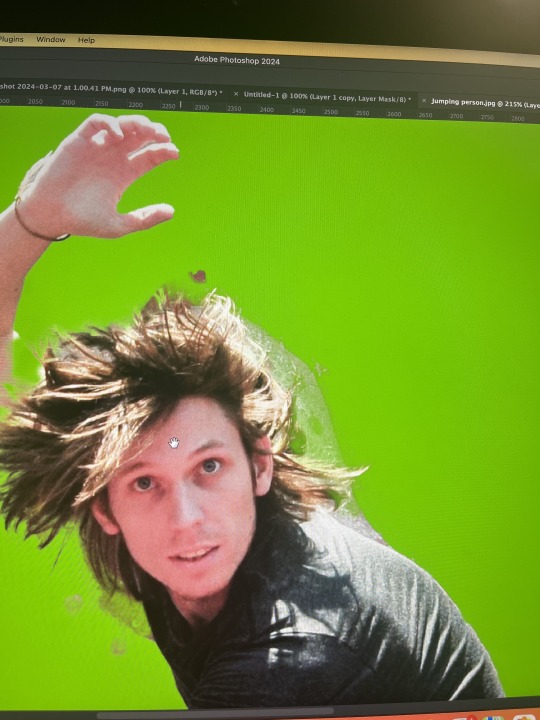
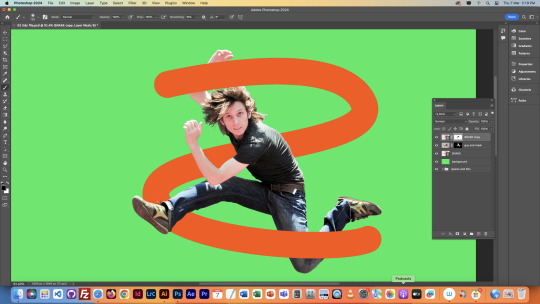
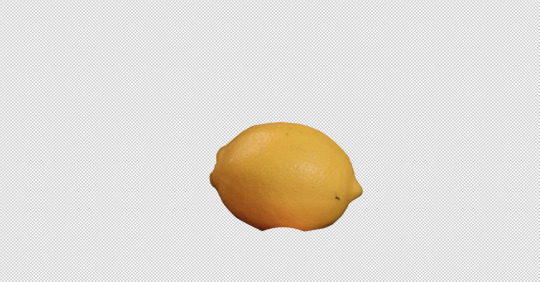
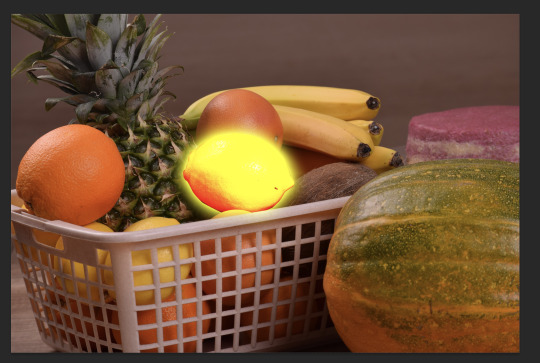
Next we began on the main project that took up the majority of this lesson. We used the object selector to cut the jumping figure out of this image on a new layer. We then realised that the object selector did a not so ideal job with selecting it, and that we would have to make precise adjustments to fix the cutout. We began fixing it by fixing the area around the messed up shoe and shoelace. We did this with the polygonal lasso tool, and the pen tool.
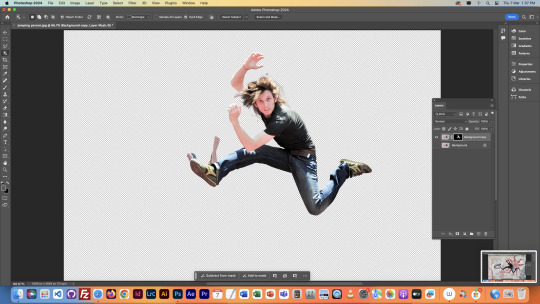


We then fixed the arm sticking out the top, both of the hands, and painstakingly fixed the hair. This part was done with the brush tool, and the mask we had created of this shape on this layer. It took ages, but was worth the result. We also put it on a green screen like the previous class as it makes it easier to see what we're working with. We also made an overlay layer so we could toggle it to compare our cutout with the original image.


We then sorted our layers out in photoshop, and then brought our image into Illustrator. We created an S-shaped line over the man, brought the image back into photoshop, and used layering, masks, and our brush tool to make the line go around the man, rather than on top.
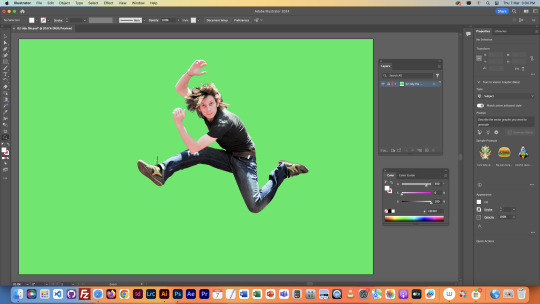

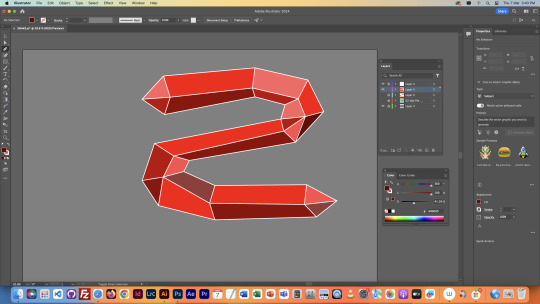
The shape above was just a tester, we went back into Illustrator and created a new shape. Same sort of S, but just with more going on. Mine ended up being a red polygonal thing. We then put this shape around the man in Photoshop, and lowered some of the opacity so we could see the man through the shape whilst still having it in front of him.


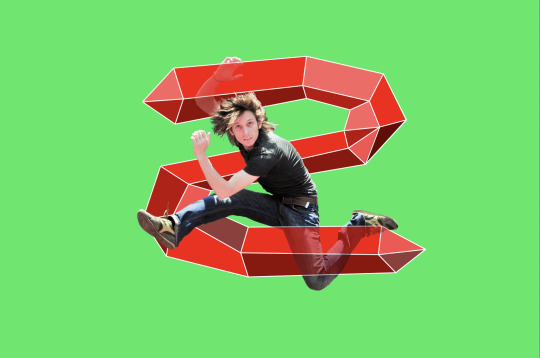
We would then finish by adding a new background, but I didn't have time in the end. Still, this was quite a challenge, but I enjoyed it, and am happy with how it turned out.
NOTES

0 notes
Text
Lesson #6 Photoshop + Illustrator (compositing)

This is me using shift and option to - and + selections with other shapes to cut out and add shapes to the ellipses which is demonstrating and practicing from the previous lesson the skills we had learnt again. This skill is useful in future when wanting to cut out and add shapes to simulate an idea that I would be trying to portray. This was also practicing using my colouring shortcuts using option delete and other colouring shortcuts from the previous lesson to grasp the idea.

After the catch up with using shapes and demonstrating more examples from the previous lesson, we moved on to opening a file of a jumping man with a busy background by then just selecting him and adding another layer to separate him from the background and begin to adjust the areas where the selection tool thought parts of the man jumping was connected to him. Above is using the selections tools and polygonal lasso tool and the pen tool selecting around areas we do not want. Then proceeding to close that shape off, press option delete and we are left with a clear outline of the shoelace with no background in it. I then repeated this step just with the polygonal lasso tool and fixed up that space above the top of his shoe and also inside the shoelace. Many other places also on the man. Overall making his outline look much more crisp and less blended from the previous background.

This is the man after being adjusted with the paint brush tool (B) by then using layers to blend out and get rid of the background, toggling between black and white using the shortcut X : swapping fs + bg. Really to make the object more crisp. With the hair, and that being one of the most tricky parts being so muddled, we did the same process but used the opacity level made lower so that it could be blended better with the hair and not too crisp. Then did more fix ups around the body as well. Once i was happy with how the man was looking, we then started compositing on Illustrator by using the pen tool on Illustrator and using multi arc curves making an 'S' shape that fit inside the mans length shown below. We then adjusted the stroke by making it much bigger, and then removed it being left with just a small line at the beginning.


After that we then used the pen tool to then create another outer line around the S shape as seen below. we made the stroke outline white to see better and then followed Toby's outlines and made it look how we wanted, with the aim of just playing around with the shape. We then began to connect these lines with the pen tool to the middle S shape and began filling it using the dropper tool and the foreground to be what colours we wanted, purple, cyan, Dark blue, green and yellow. Once that looked relatively ok, we then inserted that by place linked from Illustrator onto Photoshop, and saw this result.
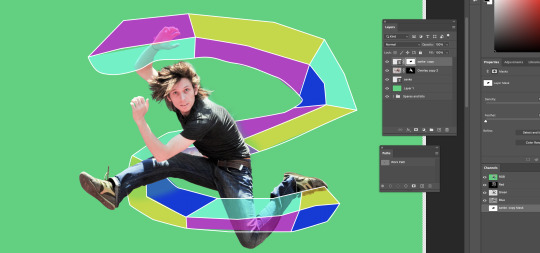
We then played with our many layers that we had an selected the top layer mask on the image, and used the brush tool toggling using X to erase the Illustrator S from the jumping mans body giving the effect of it looking like he is jumping out of the shape. I was pretty happy with how my composting came out, although had to leave the lesson a bit early and did not get to the final part of the lesson which was inserting a background on the image using another layer mask.
Reflecting on this lesson, it was a lot of information, but we went through it slowly which made it more understandable using layers, masks and shortcuts that are all useful in crafting this result. I will be sure that my upcoming homework reflects all of this again by adding four more elements into the image of this man.
0 notes
Text
Class #6
We started off the day by recapping some things we've done in the previous lesson and then went over the plan for todays session. Which is learning details around smart objects and how to work on files and switch between both Illustrator (AI) and Photoshop (PS).


We quickly started by recapping path selection. we talked about drawing with curves and handles and how to break and make points using tools such as, holding down option and or holding down command when placing points and or dragging handles.

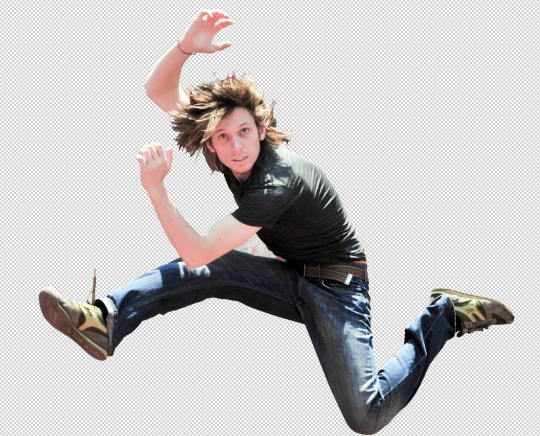


We then pulled up and image of a guy jumping in the air. We tried using the object selection tool but for an object as detailed as our guy the tool was unable to select him. We then moved onto the pen tool to start a detailed cut out of our jumping friend. Once I made the outer cut out I then started cutting out all the little gaps that the background till showed through, such as in between the fingers or shoelaces. Still using the pen tool adding points and curves and then turning them into selections and cutting these pieces out. Some trouble I ran into was when I was cutting out these little bits where the background shone through I found for one cut out that as I connected the rest or the selection to the last point it had a big curve but I needed that line to be straight. To fix this I just connected he point as it was pulling a small handle out the end. I then held down command and clicked on that first point I had made (and was trying to reconnect to) and I then moved the handle that I had created on that point to line up and make my curve straight creating a perfect selection.


I then moved onto fixing up his crazy hair. I clicked on the layer mask that was created and started to switch between black and white using 'x' to take away and or add to my image and clean up areas using the brush tool. I also thought his elbow looked weird so used this same process to slowly add his elbow back to a more normal shape. While I did the elbow I also moved around the opacity sliders on my brush tool to somewhat seamlessly blend into the background with out showing the old backdrop image.


I then started working with the blur tool which we learnt about last session to again make the image have that soft and seem less edge and help give the effect its not cut off another image. When doing this I also had a coloured background which stood out compared to my image so that I could see what the blur tool was doing as I worked.


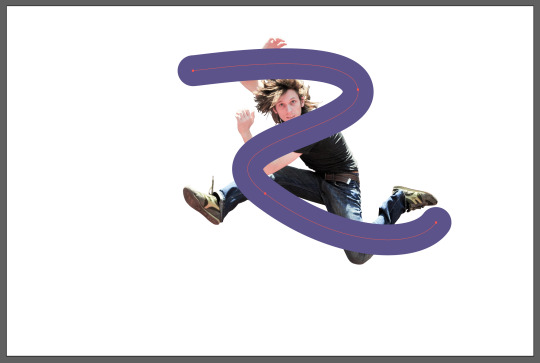
When then opened our saved out Photoshop file in illustrator, and created a thick stroke 'S' type shape which we where going to try wrap around his body. I originally has straight edges on the end of my stroke but wanted to created a curved end to fit in with the nice squiggly shape I had created. To do so I selected my path I had drawn withe the big stroke then opened up the stroke panel and changed the 'cap' from a 'butt cap' to a 'round cap'.
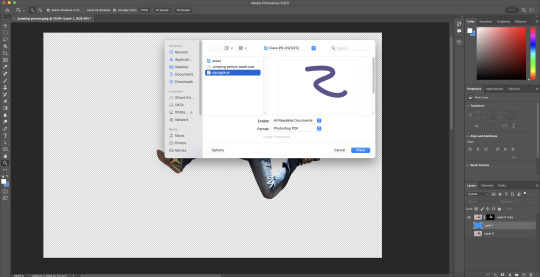

We then saved out of Illustrator with just the squiggle visible. We opened photoshop and went to the 'file' tab and clicked 'place linked' to add our Ai file of the squiggle we just saved. we clicked place to 'media box' so that it's linked into our PS file with little chains on them (showing the links). We then duplicated the squiggle layer and put on above his body and kept the other below. We then drew a cut out and created a layer mask on the top squiggle, just around the part of the body we wanted the squiggle top overlap.


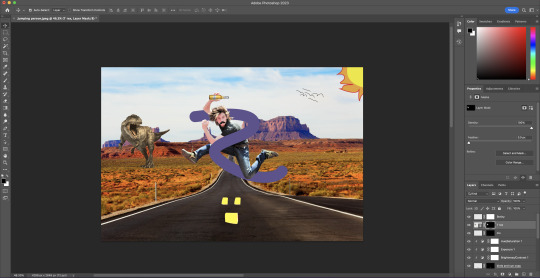
I then saved my photoshop file with the overlapping squiggle as a psd, then opened that psd in Ai. When II opened it I didn't click flatten this time meaning all of my layers were separated and worked as they did on photoshop. I then downloaded an image of a road from the internet and put it behind my squiggles and guy and this became my background. I then drew some birds and a sun using curves and handles in Ai. I then saved out and opened this file in Ps to start adding imagery such as him holding a beer, moustache and a T-rex.
0 notes
Note
2,33 random i know but been following your blog awhile and always liked your asks
that's so fkn sweet I'm sorry it took so bloody long to respond, been a bit of a hectic week AND i got sick so I haven't managed to log into Tungl on laptop which is where i always answer asks. But here ya go bestie
2. what would you name your future kids? BELIAL. ASMODIUS. BEHEMOTH. LUCIFER. lmao jk I ain't havin kids but I do plan on havin plenty of cats and other assorted creatures, with a range of names going from the cute to the truly bizarre. I really need a snake called shoelaces cuz that's adorable. Or a cat named Aguacate idfk so many options
33. something you want to learn EVERYTHING. You think I'm exaggerating but I'm really not. If it were up to me with endless time and energy I would learn fuckin everything. Im fina learn coding and design and photoshop and glasswork and carpentry and woodcarving and blacksmithing and like a dozen different languages and special effects and animation and botany and breeding several different animals bro I literally want to know it all, it's the only reason I would want to live forever cuz this bitch of a life ain't enough for the sheer amount of crap I would love to learn to do.
mucho thanks!!!!
#again sorry about the like.#SIGH#wEEK delay#but I was either dying or busy all week lmfao I usually blog only when I'm pooping#asks#anonymous
1 note
·
View note
Photo

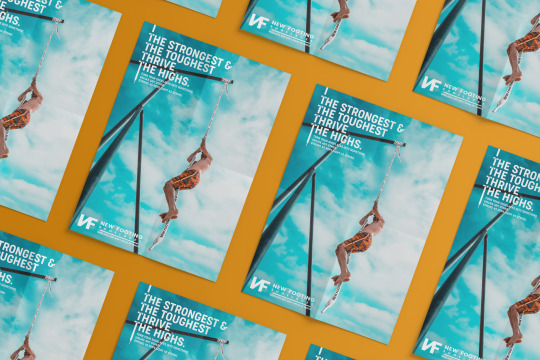
"New Footing Shoelaces Poster" 👟
A Creative Print Ad for our Marketing class, to cleverly and creatively promote a product. ✨
New Footing is... made up. It is a brand that produces quality and durable shoelaces for all laced shoes & footwear. Because shoelaces often break easily or end up being tied not well, thus being torn/broken apart. This raises the concern on the strength and life-span of the laces that come with the shoes we purchase.
So I present 🏃🏻♂️ New Footing Shoelaces
"Strong as rope, light as string" 💪🏻
Edited with Adobe Photoshop
🍱BEHANCE: behance.net/setherpiece
📸IG: @itskeithdannic
🦙DEV ART: deviantart.com/setherpiece
🍑TUMBLR: setherpiecemasterpiece.tumblr.com
.
.
.
.
.
#art #artph #artoftheday #artlovers #artist #artsy #artwork #illustration #ArtistsPH #DesignersPH #FilipinoArtists #FilipinoDesigners #GayArtist #GayLife #Gay #visualart #advertisement #brand #brandidentity #graphicdesign #photomanipulation #photoshop #poster #posterdesign #printad #printdesign #shoes #sneakers #itsKeithDanNic #Setherpiece
#art#art ph#art of the day#art lovers#artist#artsy#artwork#illustration#artists PH#designers PH#filipino artists#filipino designers#gay artist#gay life#gay#visual art#advertisement#brand#brand identity#graphic design#photo manipulation#photoshop#poster#posterdesign#print ad#print design#shoes#sneakers#itsKeithDanNic#Setherpiece
0 notes
Text
Since it took me forever to find an answer for this: if your drawing tablet is acting up, specifically you're suffering from shoelaces (long minimum length tapers at the end of strokes), checkmarks (stroke follows back while reseting your hand), or it continues drawing after lifting the pen, here is what you should do.
* Restart your drawing program and/or computer. Many problems can be fixed by a quick restart.
* Make sure your pen nib isn't wedged in too tight. Simply take the nib out and put it back in according to manufacturer's instructions.
* Check your drivers. Make sure they're up to date and reinstall if necessary. You can also try backpedaling to an older driver if the cause is a bad update.
* If the problem isn't fixed yet, test your tablet with different programs. The problem might be with them, not you. Photoshop in particular was noted as a bad offender in my research.
My issue was the nib. I tried everything else, but just taking the nib out and putting it back in fixed it.
Take care of your equipment! Clean it regularly! Don't get liquids in/on delicate electronics! And most of all: have fun!
1 note
·
View note
Photo


James Ransone in Year of the Rat (2013)
#James Ransone#PJ Ransone#jamesransoneedit#pjfa server#tie your shoelaces or you'll trip you loser#Year of the Rat#photoshopped by me#pj gifs#film gifs
176 notes
·
View notes
Last Seen Blogs
atreddy-blog
arjun reddy

boostrust-blog
Boostrust

itoldyouiwasgoingtodoit-blog
pussy memes

manglesquest1987
It's a Bright New Day...

wesleypresleys
Untitled