#jewelry tutorial
Text
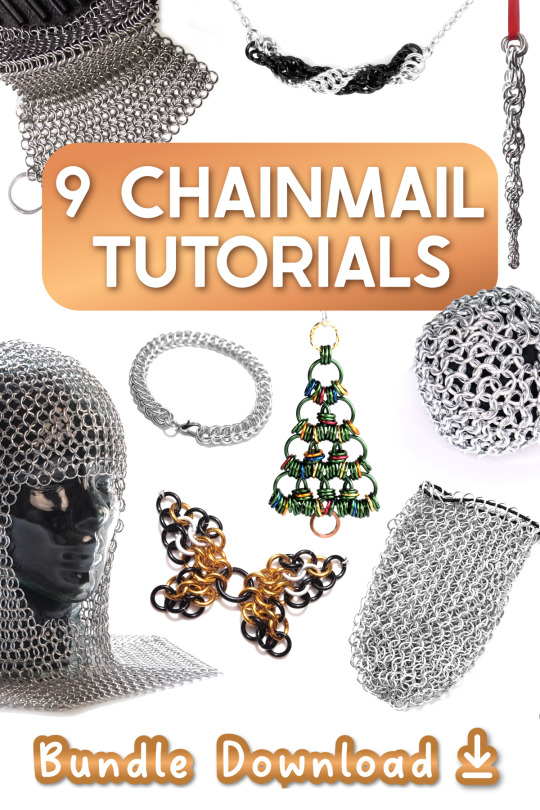
Start the new year with a new hobby! Learn to weave chainmail fabric and chains with one of my DIY kits or downloadable tutorials 📓
DIY Chainmail Kits: https://streetmaille.etsy.com?section_id=26148962
Digital Tutorials: https://streetmaille.etsy.com?section_id=32313335
#chainmail#tutorial download#how to make#diy kit#chainmaille#streetmaille#jewelry tutorial#dice bag tutorial#costume tutorial#chainmail butterfly tutorial#diy christmas ornaments#metal craft tutorial#crafting ideas#nerdy crafts#new hobby
2 notes
·
View notes
Video
youtube
Dragon Crystal Pendant Charm - **Detailed Tutorial** - Great for Beginnners
0 notes
Text
youtube
0 notes
Text
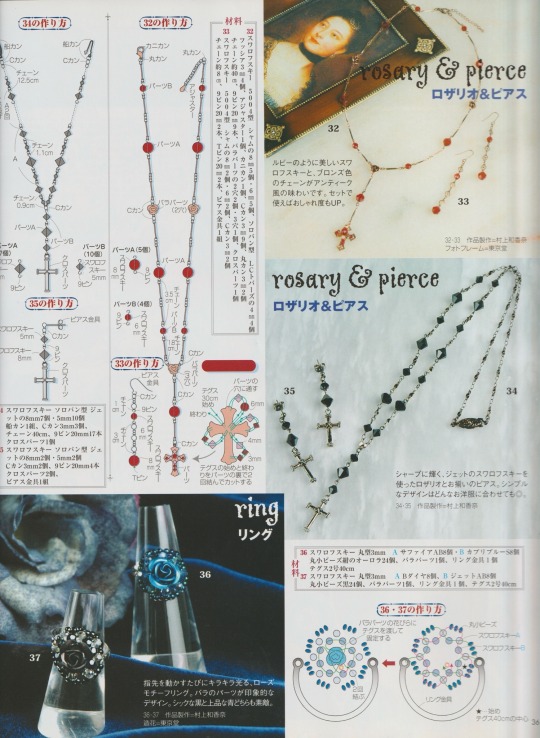
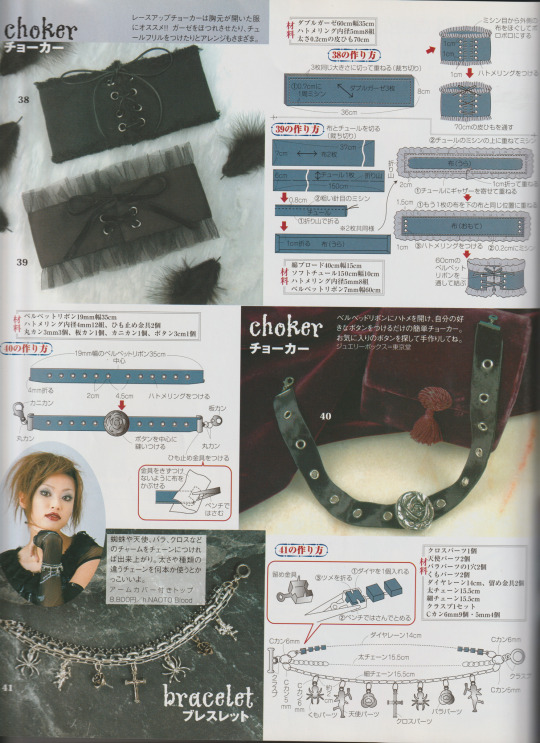
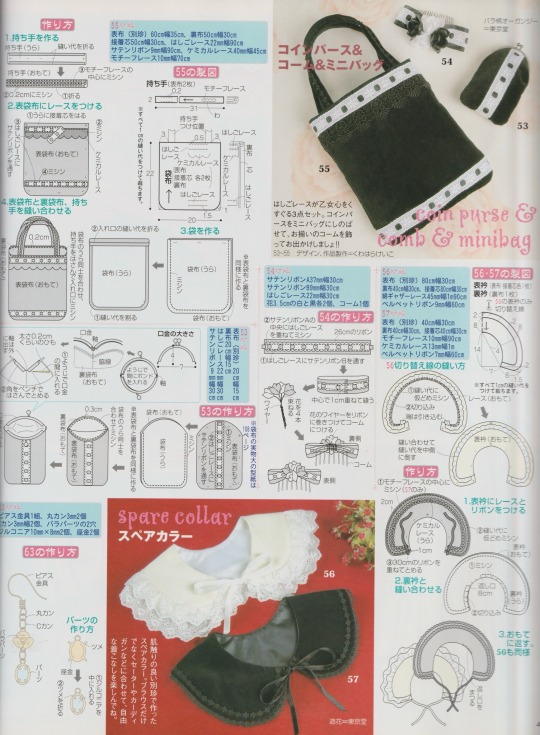
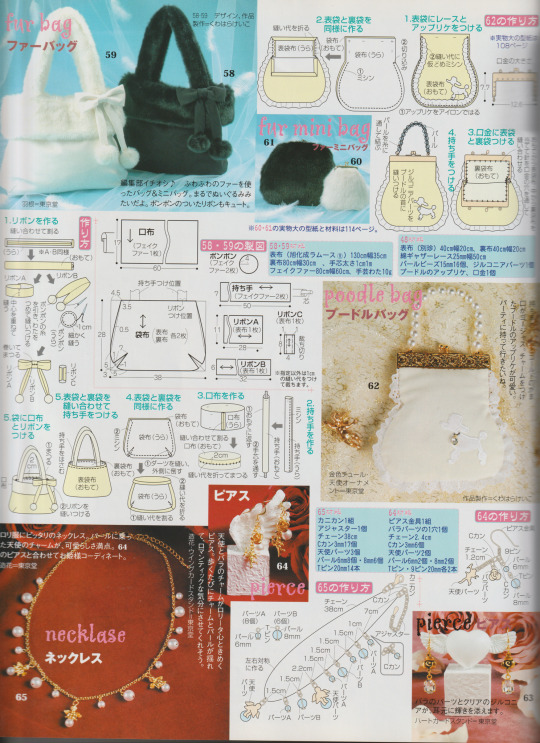
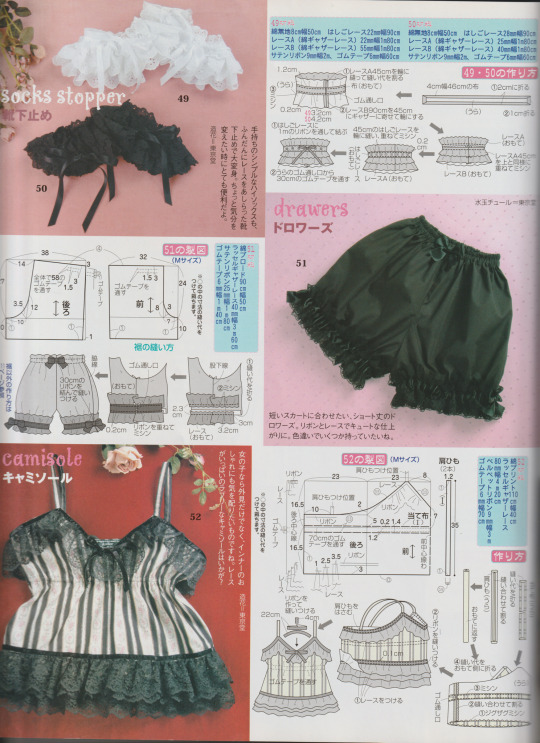
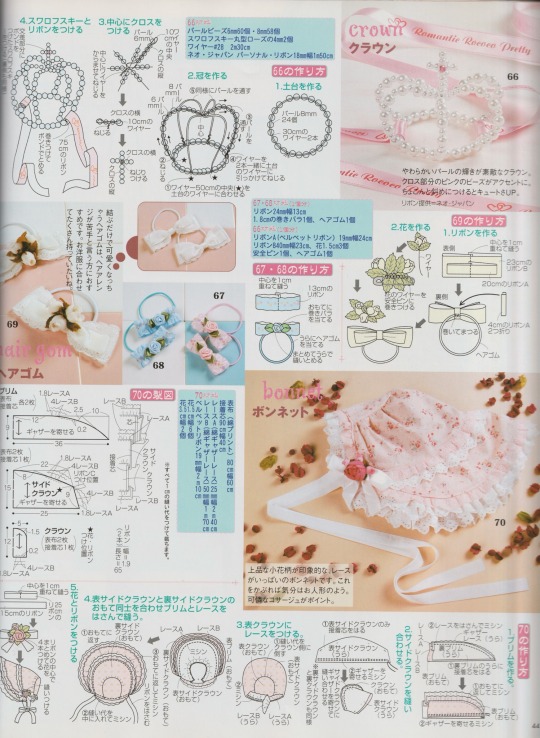
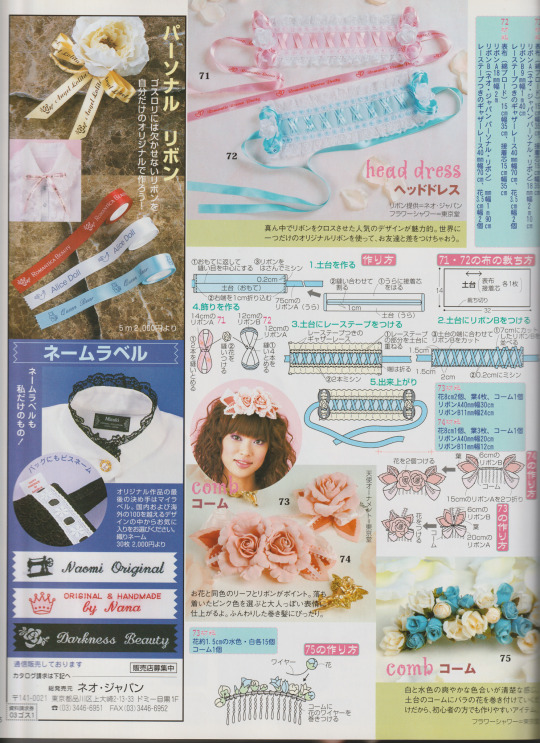
Lolita Accessory tutorial pages from Japanese mook “Gothic & Lolita Patterns”, 2004
Included are: head dresses, hair clips/ties, camisole pattern, drawers pattern, sock stoppers, multiple bag patterns, detachable collars, and jewelry.
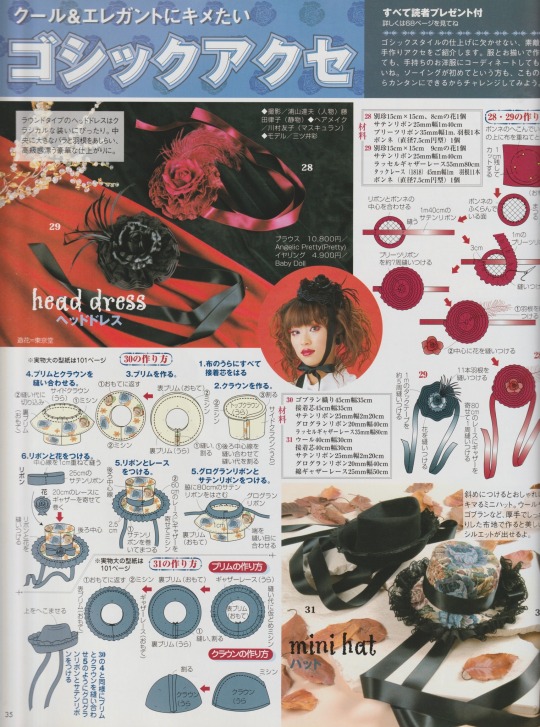
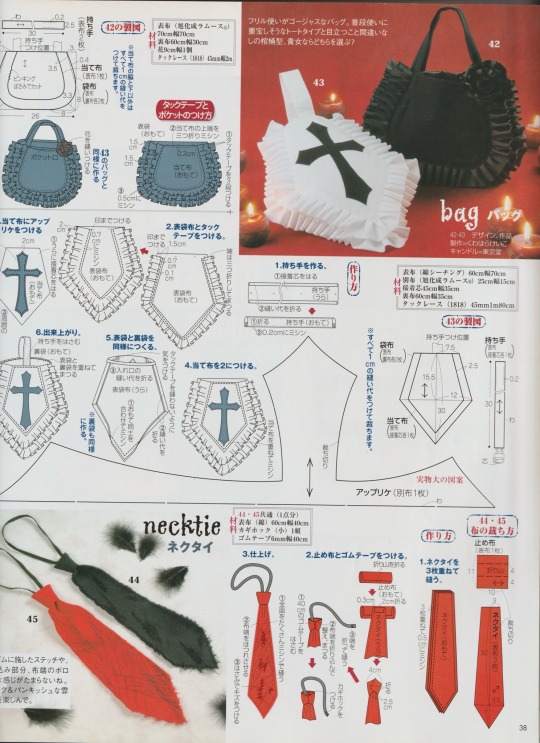
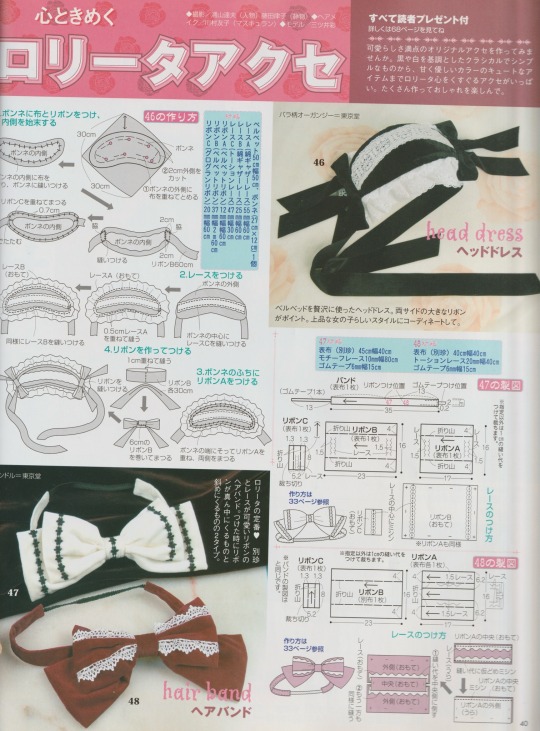
Consider this as my Valentine’s gift to you guys!! Thank you for being very kind about my post ^-^
*Also* If you would like the patterns to some of the tutorials (ie: the mini top hats, pattern 62) let me know so I can make a post later!
#gothic lolita#lolita fashion#j fashion#old school lolita#egl#egl fashion#coord#fashion#tutorial#magazine#sewing patterns#jewelry#goth#archive#my scans#happy valentine's day
719 notes
·
View notes
Text
Moth pin/brooch
A couple people asked me how I made this so I figured I’d just make a little post explaining it.
Before I start I WOULD like to disclose that the pin I’ve made is hugely inspired by the one by TheClosetHistorian (on YouTube) and you should definitely consider checking out her video if you want more instruction or like that format better.
I made a little graphic showing some work in progress pictures as well as materials and techniques used in the different areas. I will type it out in more detail below.
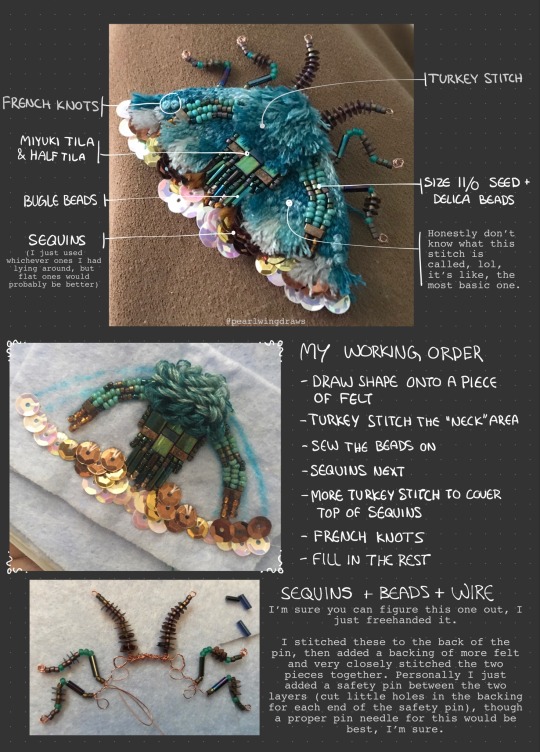
1. First draw out the shape I want on a piece of felt. Add some guide lines for different parts of the design. I layered mine double because it’s quite thin. I used an (unused) dish rag, so don’t worry about the quality of your felt.
2. I start off embroidering the “neck area”, using turkey stitch. Starting from the bottom up, I use a dark turquoise floss, then later mix in a lighter shade.
3. Next I sew on the beads. String on 5-6 at a time and then go back and tack them down with small stitches. I don’t know much about embroidering with beads, so this may not be the “correct” way to do it. The types of beads I used are size 11/0 seed beads and delica beads, as well as bugle beads and Miyuki’s Tila and half Tila.
4. Sequins. I recommend using flat ones instead of the ones I used. I work from the bottom up, trying to get a nice silhouette with the bottom layer, as this will form the outline of the finished piece.
5. After finishing with the sequins, I do some more turkey stitch around the top, so it covers up that edge where you can see the tread. Optionally you can do the whole thing with sequins if you want.
6. Next thing I did was some French knots, just above the turkey stitch in a contrasting color. This is just for some textural variety and decoration, as little “spots”. You can really add them wherever you’d like, or not at all.
7. Then I just finished embroidering the thing. Don’t know what the stitch is called, it’s just making little stitches beside each other until it’s all filled in. I did a little gradient because I felt like it.
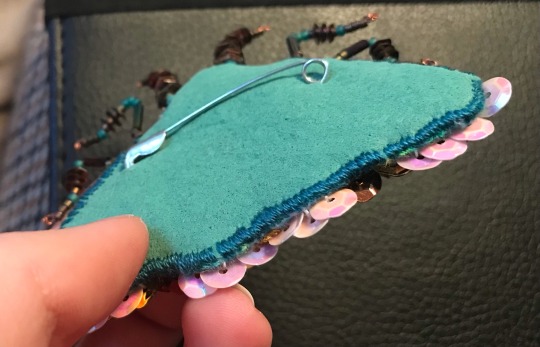
For the legs and antennae, i also just winged it. The legs and antennae got layered double in wire and twisted before adding the beads and sequins, then I just used the very tip of my round plier to curl the remaining ends into round little “feet”. Then stitch them securely to the backside of the pin.
I finish it off with another layer of felt, this one painted with a fabric paint I happened to have lying around, both for some extra strength and to match the color scheme better. I cut little slits to fit in a regular safety pin (I recommend get a proper pin/brooch needle) and stitched the backing on with very dense stitches. Pictures below.

Extra suggestions:
If you don’t have sequins, or want a different look, you can embroider the whole thing. Alternatively you can fill the whole space with sequins if you don’t want to embroider it all. You can of course do any shape, size and color scheme, whether based on real life moths or just fantasy!
Lastly I just want to thank everyone for the love you’ve shown for this silly little bug 💖 it means the world to me, and it has really inspired me. I wish I could sell these, but I don’t think that’s really an option for me right now. I’ll let you know if that changes in the future, but until then, I hope those of you who have the interest to make your own find this helpful.
#my art#art tag#embroidery#jewelry#accessories#embroidered pin#embroidered brooch#fabric art#textile art#tutorial#art tutorial#i guess??#moth#moths#insects#bugs
139 notes
·
View notes
Text

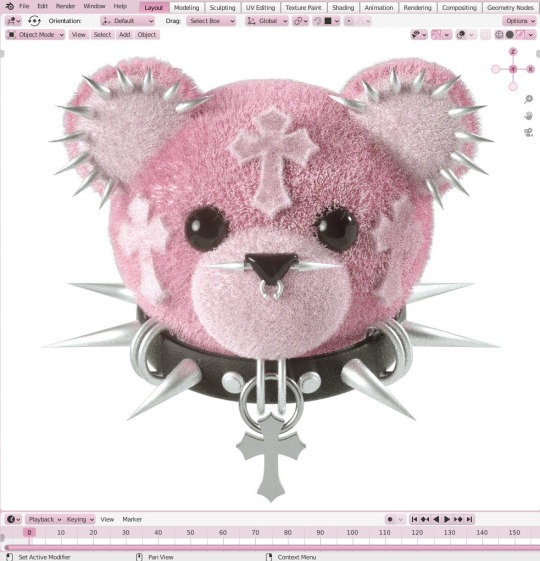
vamp collar +++ sculpted by me
If you enjoy my sculpts and work please consider donating to me as i am trying to escape my abusive household
#mine#misc#aespa#3d art#fashion#y2k#art#pink aesthetic#y2k aesthetic#goth#y2k core#xg#chrome aesthetic#chrometype#my art#cocquette#ariana grande#metal#goth art#goth fashion#vampire#custom jewelry#kpop#newjeans#dropdead#gothcore#webcore#pastel pink#tutorial#lgbtq
24 notes
·
View notes
Text
[ DANNY'S TUTORIALS: BOTTLECAP PIN ]
Hi there!! I'm gonna teach you how to make a bottlecap pin since I've gotten a lot of questions about where I got mine from baby punks and others who just find them cool! I've found that a lot of people buy their pins online from companies that overprice and over-process their designs, and often times steal them from smaller businesses. Punk has been gentrified over the years, so this tutorial acts as a way to reconnect to the roots of DIY fashion made by people with limited resources and time. This is a great way to show your interests, pride in your community, and pretty much anything else you want even if you don't have a penchant for traditional art. Don't worry about it looking good, just try to have fun! At the end of the day, the shittier the job, the more punk it is.
[ Step Count : 6 ]

Here's what you're gonna need! (optional materials have a star next to them instead of a regular point):
-> hot glue gun (in replacement of pliers)
-> safety pin
-> bottlecap (unbent, preferably a twist off)
-> can tab
✮ pencil/pen
✮ sandpaper
✮ paint & paintbrush/posca pens
✮ regular Elmer's glue
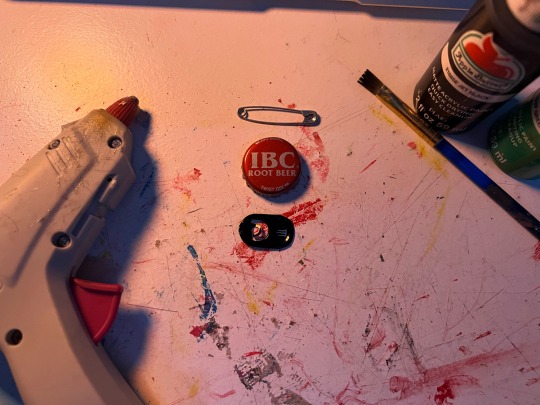
STEP 1:
Gather your all of your materials and place them on your workspace. I'm going to paint mine, so I got the sandpaper, paintbrush, and paints as extra materials.
STEP 2:
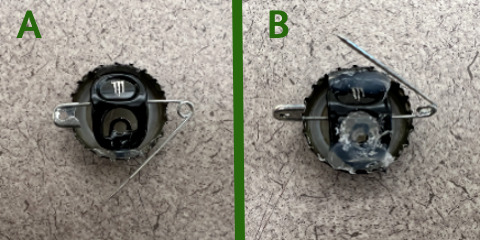
If you're not going to paint yours, go ahead and skip to step 3. Otherwise, get your sandpaper and your bottlecap, then sand down the surface (A). Paint your base, draw a design with the pencil/pen, and fill it in with your paints/posca pens (B)! After I'm done painting I'll usually seal it in regular Elmer's glue to make sure it doesn't get messed up anytime soon (C). I chose a little green skull since the person I'm gifting this too likes and spooky stuff and green is their favorite color :]

[ Also sorry for the change of scenery, I had to finish at the library cause I was studying. Visiting, donating, and helping your local library is Punk As Fuck. ]
STEP 3:
What you're going to do now is set your bottlecap aside, and take out your can tab. I have joint problems and I can't use pliers, so I bend it over the edge of a table by holding it half over the edge and pushing down to bend the metal. But try not to bend it too much so your safety pin stays in place!
STEP 4:
Okay, here comes the tricky part. Like I said, I have joint issues, so I can't use pliers because they hurt my hands. Instead I'm going to set aside my now bent can tab and bring back my bottle cap, then flip it over. Place 2 hefty drops of hot glue on the bottom and top of the pin, then get your safety pin and open it so you can place it on the back horizontally.
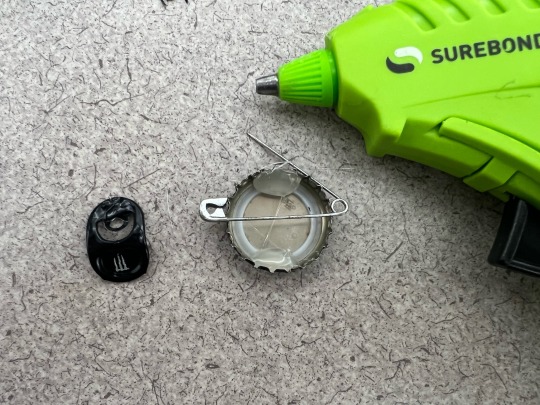
STEP 5:
Now, place your bent can tab on the back of the pin and over the open safety pin, pressing it into the hot glue drops and letting it dry for a little bit (A). If you like, you can also put two more drops of hot glue on the tops of the bent can tab for extra security (B). I also put some hot glue in the middle of the tab's opening for extra security on the safety pin. Please pardon the absolute dogshit photo quality it wasn't cooperating for some reason LMAO
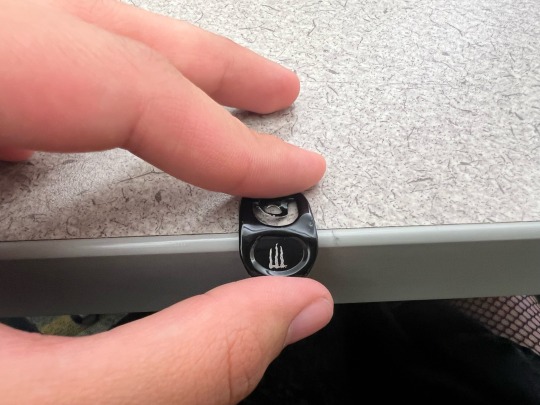
STEP 6 [FINAL]:
Wait for it to dry, then you're all done!! Your very own bottlecap pin. You can attach this to bags, jackets, shirts, pants, and pretty much any material that a safety pin can glide through.

Here's the finished product, as presented by my friend D at the library (everybody say thank you D for modeling)!!
[ -> Next (coming soon:]) ]
#punk#diy punk#bottle cap pin#diy tutorial#punk rock#bottlecap#bottle caps#punk tutorial#diy#diy jewelry#diy accessories#danny's tutorials
476 notes
·
View notes
Text

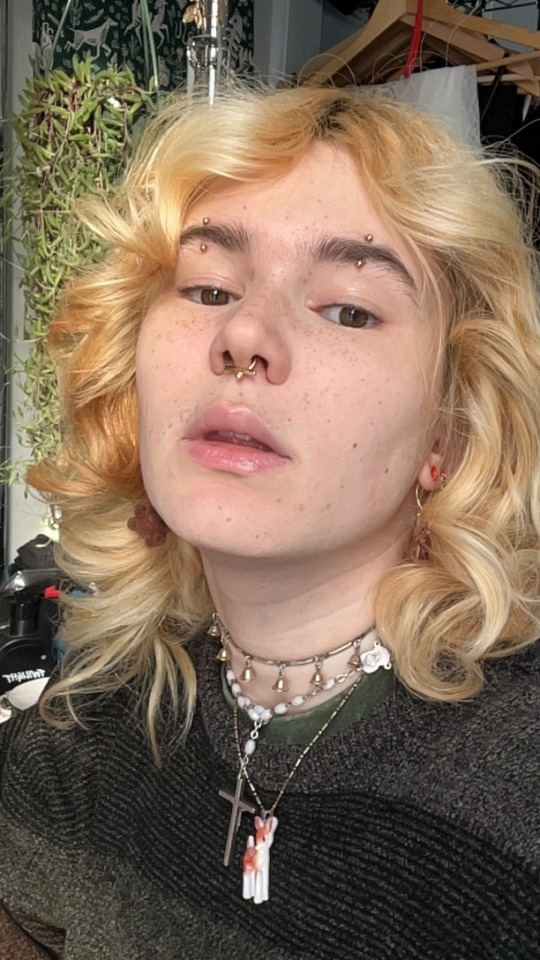
Sorry for being slutty it will happen again
#ok2rb#the me#fashion#photo diary#fit archive#tboy swag#gnc trans#I’m literally the master of fake freckles I should make a tutorial#also shoutout to my all matching face jewelry FINALLY#I waited over a year to change my eyebrows to gold they look so good now
43 notes
·
View notes
Photo


DIY Travel Jewelry Pouch
1 Fat Quarter or (1) 18 x 22 inch piece of fabric will make 1 jewelry pouch. If you would like the coordinating print, you can make 2 jewelry pouches with 2 fat quarters.
✖✖✖✖✖✖✖✖
sew-much-to-do: a visual collection of sewing tutorials/patterns, knitting, diy, crafts, recipes, etc.
#DIY#sew#sewing#pattern#easy#cloth#fabric#pouch#bag#drawstring#jewelry#jewellery#tutorial#craft#how to#make it yourself
143 notes
·
View notes
Text
How to draw Gems, Gemstones & Crystals
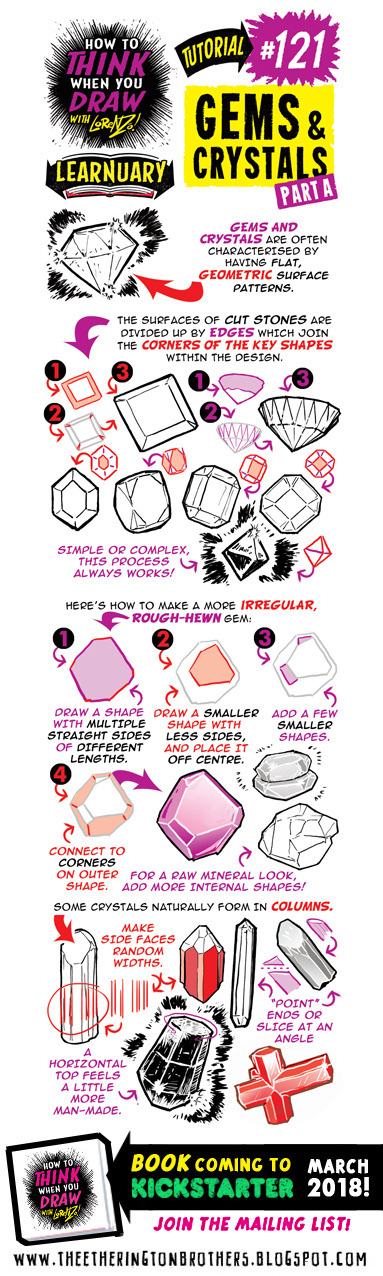

Credit: Etherington Brothers
#121#122#gem#gems#crystals#gemstone#jewel#jewelry#jewellery#rock#art tutorial#drawing tip#art tip#art tips#art tutorials#drawing#drawing tips#drawing tutorial#drawing tutorials#art#tip#diamond#ruby#sapphire#topaz#emerald
116 notes
·
View notes
Text

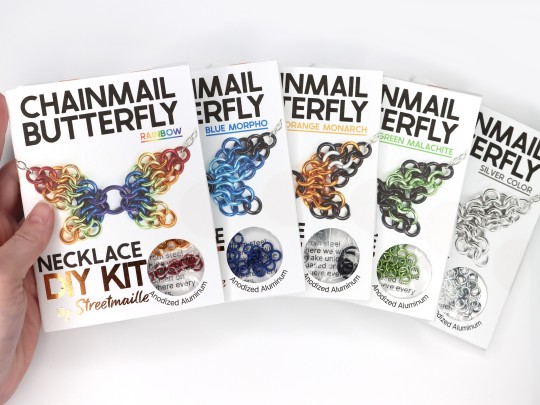
Learn to make a beautiful butterfly pendant this spring with my DIY Kits! Now available in rainbow and green malachite patterns in addition to the classic orange monarch and blue morpho 🍃🍃
See all the colors here: https://www.streetmaille.etsy.com/listing/660718261
#diy rainbow butterfly kit#learn to make jewelry#diy kit#pendant necklace#diy craft#streetmaille#chainmail jewelry#chainmaille necklace#butterfly necklace#rainbow butterfly#spring crafts#crafting#jewelry tutorial#learn to make chainmail#how to make pendant#rainbow#gift idea
3 notes
·
View notes
Text
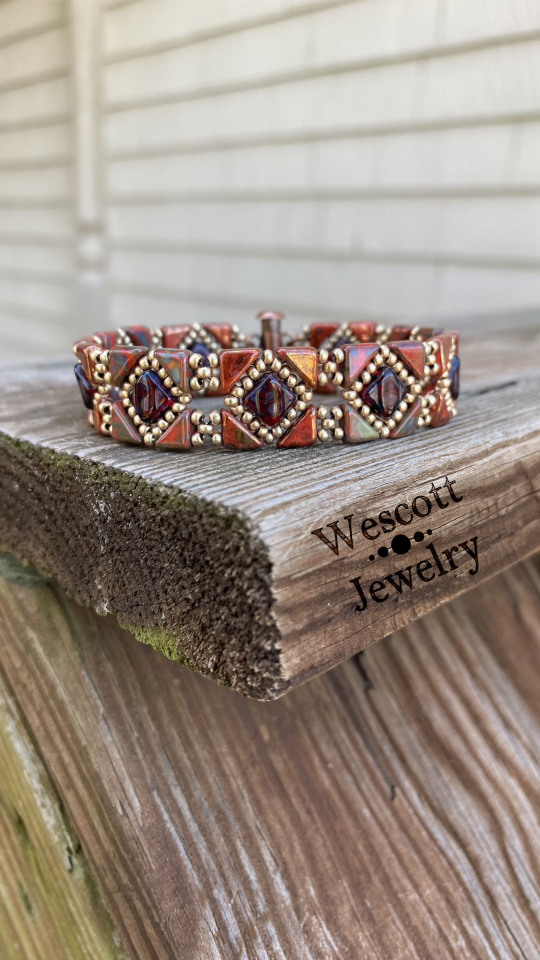


I finally listed this Backsplash Bracelet! It's hard to tell, but the Silky beads in the center are actually a dark ruby red and not black. It looks so killer in the light. You can sorta see it in the first photo!
This is one of my favorite of my original designs. I just never really got over how well the Silky beads and Tango beads fit together. If you're a fellow beadweaver, I do also have a pattern/tutorial available in my shop as well!
#beadweaving#beadwork#beading#beaded bracelet#beaded jewelry#handmade jewelry#beadweaving tutorials#beading tutorial
34 notes
·
View notes
Text
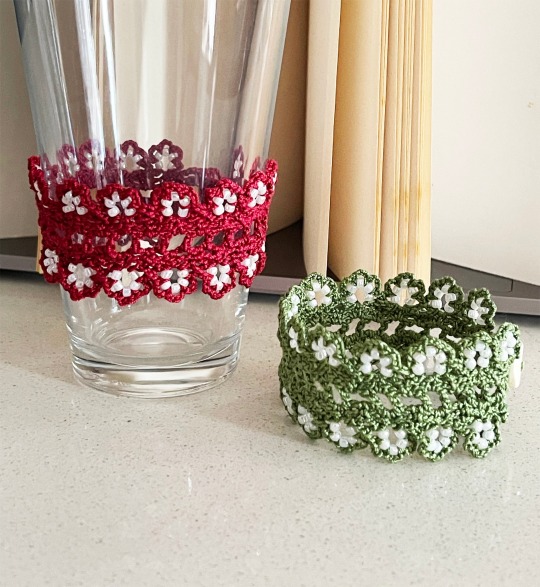
#crochet jewelry#crochet pattern#flowers#crochet tutorial#crochet#diy projects#easycrochetpattern#beaded flowers pattern#beading cuff
6 notes
·
View notes
Text

Peyote bracelet pattern that uses 24kt gold beads! Perfect for most occasions, you can find this pattern here https://www.etsy.com/shop/LizzieMig
#bead weaving#beading#seed bead jewelry#peyote stitch#beaded bracelet#beading tutorial#bracelet making#bracelet tutorial#diy bracelet#loom bead
5 notes
·
View notes
Text

babyfiend cubs created by me
please consider donating to me as i am trying to escape my abusive household
#mine#my art#aespa#3d art#fashion#goth#y2k#art#pink aesthetic#y2k aesthetic#cocquette#ariana grande#metal#goth art#goth fashion#vampire#custom jewelry#kpop#newjeans#dropdead#gothcore#webcore#pastel pink#tutorial
20 notes
·
View notes
Text
Made a spooky necklace last night so thought I'd make a tutorial of it, it took about 20 minutes:
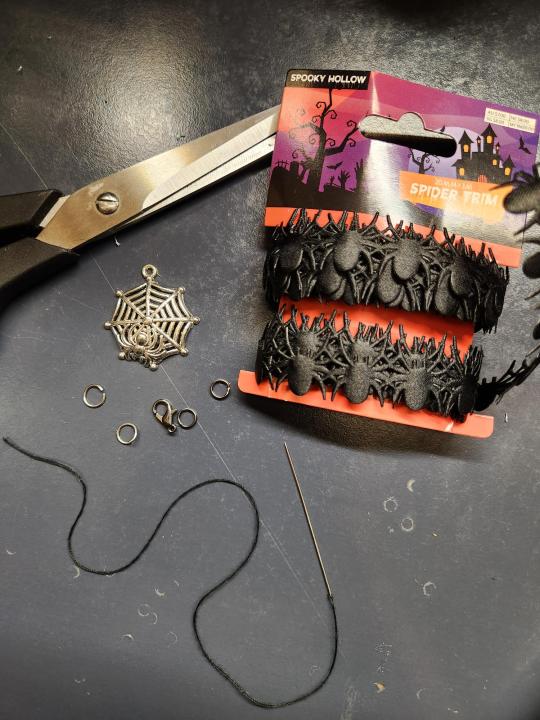

1: To make this I used 1 spider pendant, 2 jump rings, 2 split rings, 1 lobster clasp, scissors, needle and black thread, and spider trim I got last halloween.
2: First, cut the ribbon to about the right length. You want it to go around your neck with maybe a 1.5cm gap for the clasp and attachments.
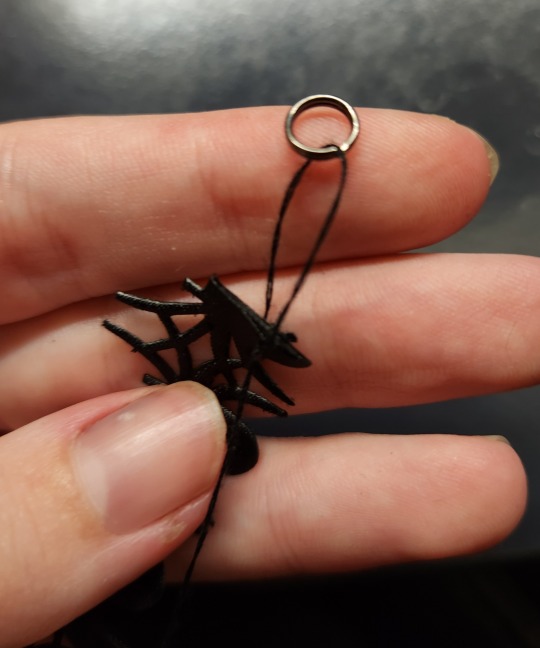
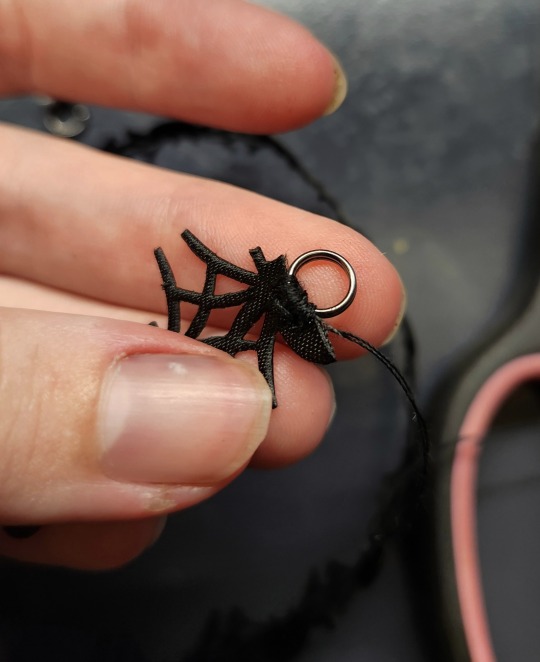
3: get one of the split rings. The ribbon I'm using is uhhh not great quality to say the least (the eternal problem of trying to make a thing that will last years from halloween items designed to be used once) so instead of looping it through the gaps in the ribbon I'm sewing it in place in the thickest bit of the material I can find. To do this, I'm just looping circles of thread between the centre of the spider and the split ring.
4: Continue this about 20 times until it's steadily held in place then tie the thread off.
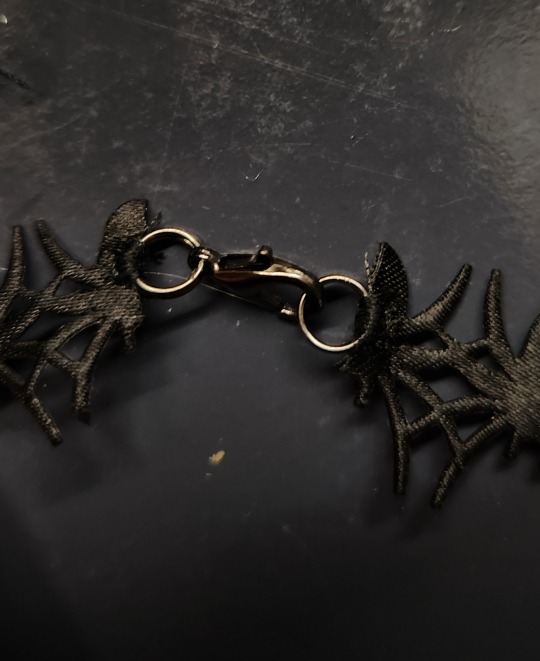
5: Attach the lobster clasp/whatever other clasp you're using to the second split ring, then do step 3/4 again to attach the second split ring to the other side of the ribbon. Now, the overall structure is complete.
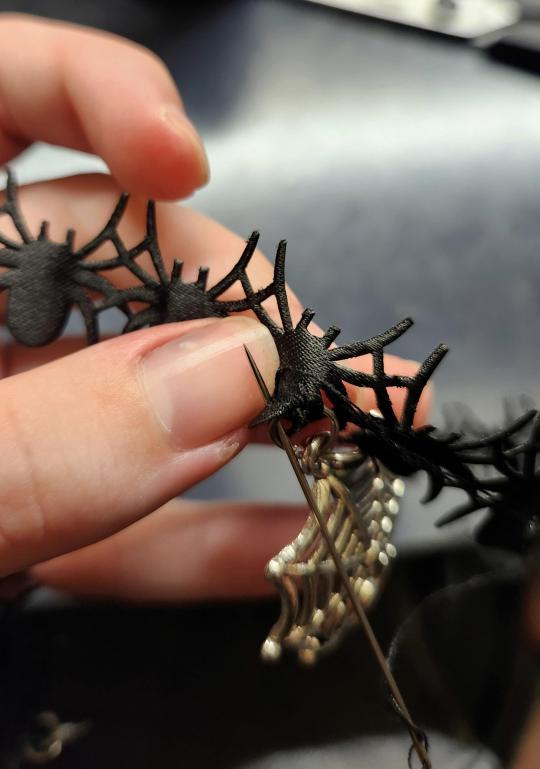
6: Add the pendant: I did this quite differently to how I usually do this (more discussion at the end) as the halloween spiders ribbon is so fragile and loves to tear apart. So I attached 2 split rings to the pendant, then used the same method as step 3/4 to sew the ends of the split rings onto the two spiders on each side of the pendant to distribute the weight. And that's it!
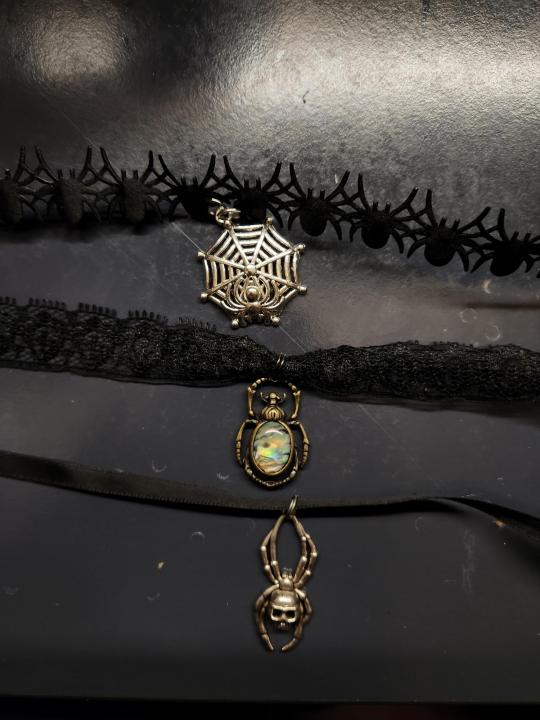
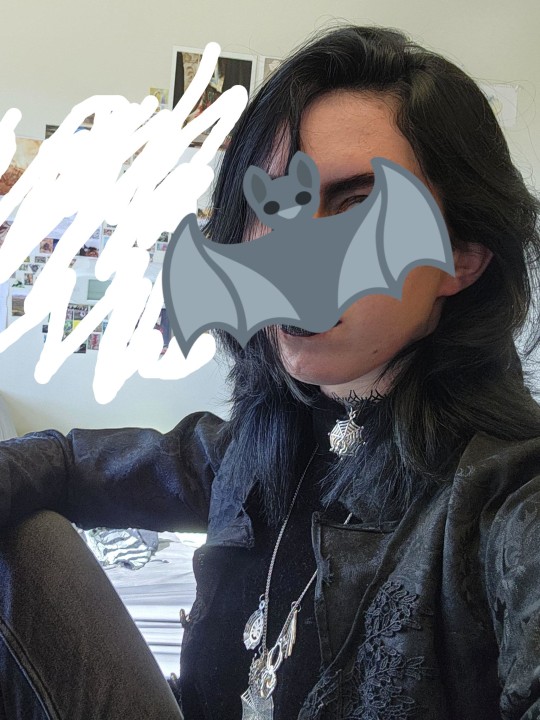
Here are 2 other necklaces I made with basically the same method. The other two are just hung on with split rings because 1: the ribbons are much sturdier, so I wasn't as worried about wear from movement 2: split rings are probably better for this because they'll scratch the ribbon less at the opening (currently having to redo an old project because I made some bad jump ring and ribbon decisions) and are less likely to fall off, but I had spent the afternoon hitting my thumb with a hammer so really could not be bothered opening split rings lol. Also, the spider with the skull on the thin ribbon is held closed with a safety pin because I was out of lobster clasps when I made it, so that's also an option. Then the last picture is me today with the necklace
#tell me if anything about the tutorial is weird and unclear I am going to try and run a workshop session for making these for our#entomology society stall and was thinking of basically using this tutorial#this is my first time writing a tutorial or anything... so not 100% sure how to do it#goth fashion#goth diy#goth goth#spider#jewelry
4 notes
·
View notes
Last Seen Blogs

bubblesprincessdoll
Princess

medics-glow
Medics Glow
teamfanfic2
Team Fortress 2 Requests

imonsterkive
Amy Jade.
ninicaise
capri understander