#i dont resize my canvas for nothing!
Text
clown party!
#project sekai#pjsk#wonderlands x showtime#wxs#tsukasa tenma#emu otori#nene kusanagi#rui kamishiro#isopodsart#hey wonderfans👋👋👋👋👋#emu i love ur outfit but#why u gotta wear all them bows#i wish tumblr wouldnt kill the quality#i dont resize my canvas for nothing!#*shaking fist at tumblr like a 90 year old grandfather*
480 notes
·
View notes
Note
hi im the anon from before about actions, i dont think i need help for that anymore but i was curious about ur image on ur watermark? how did u design iy? im trying to make one (nothing fancy, just the intials of my blog title in some cute handwriting) in microsoft paint (it turned out surprisingly well despite using a mouse lol >.<) but when i put it onto a gif, it looks horrible and pixelly! i was wondering what process u did >.<
hi anon !!! ♡ sorry for the late reply i was busy with assignments </3
so the thing is, for microsoft paint the bitmap and the size of the canvas that you’re using will be different that what you have in a gif, the gifs are set in pixels and i’m pretty sure microsoft paint is in cm/inch and all. So the logo u made in paint is either too huge/small when compared to the gif so when you’re resizing, it gets ruined. So first you need to match that both the logo and the gif are in pixels. I would suggest you to either use photoshop or photopea!
I made my logo using photoshop. i downloaded the kitten thing from a free pic site, converted it into a png and then made a 100x100 px transparent canvas and put the kitten png and my text on it and exported it as a png!
You can download a cute font u like and use it for your initials ! (dafont,, 1001freefonts are good sites)
i hope the video i linked in the last ask was helpful !! ♡
0 notes
Note
Hi!! I was wondering if you would mind sharing how you post your art, especially on Twitter, if not then that’s totally ok ☺️ Do you draw on a large canvas and then once you’re done, resize it? Or what dimensions do you use/How do you upload😭Because I’ve been having issues with my uploads forever and nothing seems to work. When I upload my jpg on Twitter even if its not heavy and the quality is good, the image is blurry and not sharp,plus I can’t figure the Twitter crop🤯Thank you soo much!!
hi! tbh i don’t have a set method of posting art and i dont think i intentionally optimize my art for posting on twitter either ahah it always ends up looking lower quality and more compressed than when i post on tumblr, but here’s some general guidelines i’ve seen for posting on twitter:
1. twitter algorithm will crop around wherever it thinks there is text, or wherever it thinks there is a face, or the most high contrast area in an image, ive seen people put their watermarks on areas they want their image to crop to try and get around this
2. twitter has image ratios depending on how many photos you upload in one tweet, this article has a list of each ratio so keeping your art in this size will help with the cropping
3. twitter image file limit is 5mb so i usually resize my artwork down from a larger piece - but only if it’s too big otherwise i just leave it as the original file size
4. twitter does not compress jpeg images anymore, IF it follows these rules; however, i almost never save in jpeg just to avoid any lossy compression in my file, there is also this twitter thread guide that goes over how twitter manages png files
so! those are some guidelines to keep in mind when posting art on twitter, that being said...i almost never really pay attention to it LOL;; i draw my art 300dpi on 11x17in canvas size because that’s just a poster size for print if i ever want to print my work later on
i save as pngs for web uploads and if its over 5mb ill resize it down by like 50% or so, but the file size is still usually big enough for twitter to still compress it...i usually just accept the fact that it will lose quality on twitter ;_; but i know some artists prefer that! or they intentionally upload lower quality images of their art so it wont get stolen or resold
i hope this helps somewhat! twitter really isn’t a great platform for artists unfortunately :’( i think i only have one upload on twitter where my art just so happened to fall under the jpeg conditions and twitter really did preserve it’s full quality, so maybe try following that!!
14 notes
·
View notes
Text
me trying to make a gif part 2 (thrilling finale, buildup ver.)
ok good news and bad news: good news being withheld for Spoilers (not that it’s that hard to guess anyway lol), bad news explained first bc, chronologically, it is first
so yesterday i mentioned in the tags of that post that i had seen that krita has an animation feature so i was gonna try importing the frames into that and then exporting it as a gif. easier said than done, as it turns out
i started by opening the file i made yesterday with 62 layers as the frames and importing that into krita, which worked fine (i didn’t know you could actually open .psd files in clip stuido ((this typo is so fucking stupid it made me laugh so im leaving it)) and krita, so that’s pretty neat, i wonder if it works the other way around too) but i ran into problems when i tried to convert those layers into frames in an animation. because, like, the layout of the program has the layers displayed in one tab, and the animation timeline in another, like so:
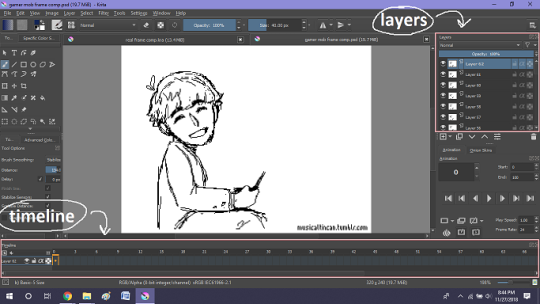
(do u like how im using pictures now, i thought of that yesterday after i published the other post and realized hey, visual reference would probably make my plight a lot easier to understand!! so enjoy these educational diagrams from now on)
so my goal was to get the frames from the layers into the timeline, and i still don’t know if i did it right bc lbr krita is not very intuitive at all,,.,, i mean i watched a video tutorial abt how to animate in krita which was v helpful (it’s the one by jesse j james on yt fuckin SHout out) but it was about animating from scratch, not importing an animation you’ve already done elsewhere
so like, the way krita’s animation thing works, from what i could piece together as i bumbled my way around w/ it, is that each layer in the layers tab is a separate timeline in the,,, timeline tab
i want them all to be in the same timeline, not separate ones, and there’s no way to combine them in the timeline tab bc doing that just overwrites whatever layer you’re pasting it down onto, and also if you define the number of frames for that timeline (62 for this project) it just puts the single image of that layer for all of the frames instead of just one of them, so you’d have to go through and delete all the other frames you don’t want it to be, which would be such a fuckin pain
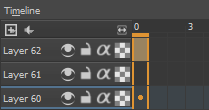
so i found a workaround, which is so tedious that it can’t be the right way to do it, but basically i started w/ layer 1 and defined 62 frames & then emptied frames 2-62, like this

(that blue box is the frame, btw, even tho it says 0, which actually kind of annoys me like why doesn’t it start the first frame on 1????)
from there i went up to layer two and selected that in the timeline, but for some reason the frame doesn’t show up automatically?

& i couldnt fuckin figure out how to make it into like, an Official Timeline Layer or whatever tf bc like, u see on layer 1 how theres that little lightbulb-looking icon on the right? that’s for turning on onion skin which only applies when you actually have frames with things drawn on them, so basically layer 2 in the layers tab has a drawing but in the timeline it doesn’t?
i didn’t find out what the actual reason for this is or how you’re /supposed/ to make the frame appear in the timeline, but what i did was right click on layer 2′s timeline & select “create blank frame” which magically made the frame i want appear

but it’s on top of the layer 1 frame, and i want it to be the frame after. also it’s still in a different timeline. this is the only easy fix in this whole damn process, u can literally just click & drag the frame from layer 2 to layer 1 and put it wherever u want on the timeline

and then u just delete layer 2 and that’s it, frame transferred!! then i just had to do that for 60 more layers and after [unspecified amount of time but it was a fuckin while ok] my timeline looked like this!

(the gaps near the end are held frames, to save me time so i didn’t have to copy a bunch of frames that were exactly the same)
krita is great because as far as i know ur animation can have an unlimited number of frames, at the risk of your own pc’s processing power, which is a definite upside to SOME expensive art programs i know (clip studio, i’m talking abt csp) and u can pick the frame rate too (cough photoshop elements 5.0 even tho u dont technically have an animation feature & it’s a miracle u can even make gifs at all) so once i finally got all the frames situated all nice and in order like on the same timeline, playing it was great! played at the right speed, looped perfectly, it was a dream come true right
well, time to export it as a gif
ha
haha
hoooo oo o
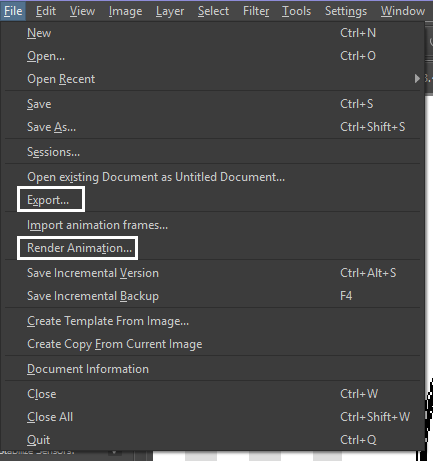
so u got 2 options for exporting ur animation, u can either hit “export,” which lets u save it as different file types, one of which being gif, or you can hit “render,” which gives you gif and video options
well
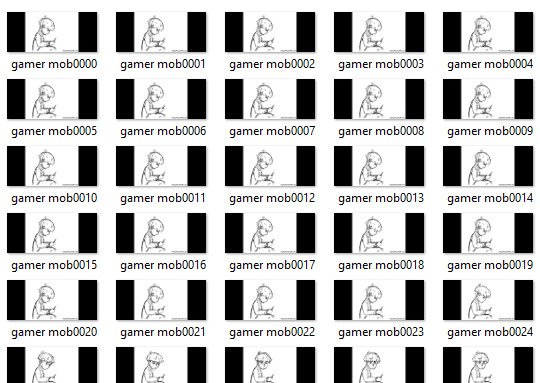
i tried export first, bc that seemed like a good idea, but the “””gif””” it made was distinctly not a gif, despite its claim to be one?? this is what i got:

notice: 1. it is not moving, and 2. the black bars to the sides?? those are supposed to be transparent. they’re transparent in the file i made so why didn’t they register as transparent in the export, when gifs have transparency capabilities??

so That was some real live bullshit but i still had the “render” option, right? export was wrong, so rrender must be the correct option to go to that will produce the results i am wanting to see produced in front of me like a silver dinner platter with a correctly functioning gif under the lid, that’s what i want to see and “Render Animation...” is gonna Give me that silver platter righWRONG ok look at this shit rn ok Look
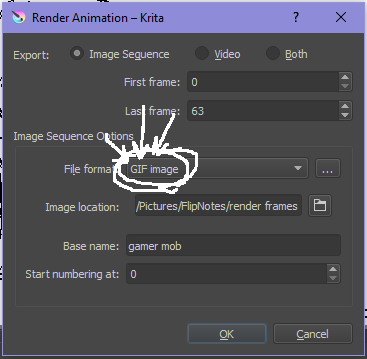
it says GIF it says it RIGHT THERE right??? right?????? then WHY

?????????????
and it also gave me all This bullshit
like did i ask?? did i fucking ask???? i already have all the individual frames why do i need even M o re i mfjgjgk
((rationally ok yea thats v useful for if ur making the animation in krita and want to export the frames to use elsewhere, but like uhhh 1. again, they’re not transparent & 2. i should have the option of saying i don’t want these??? bc *meme voice* i don’t want these)
so in the end i could find NO correct method of exporting animations as a gif in krita bc every ooption that says gif is fuckign LYING to ur face there are NO gifs in krita, aliens made the progam who looked at gifs and went “hmm i thikng this is how a gif works “ and just made jpegs instead but somehow got on the computers good side and got it to lie for them about it being a gif so thats why it says gif on the file still even tho its not a gif illimati confinr
so what is the conclusion to this? well i said there was good news too, and this is the portion where i divulge that sweet nectar (i type dthis 2 seconds ago and @ me what the fuck)
so after wasting a good 2 hours trying to figure out krita i gave up and watched some good old [youtuber name redacted bc what if it shows up in search & ppl see this dumbass post in there but it rhymes with fjackfsepticfeye] to relax into accepting my fate that i’ll never be able to upload my animations to tungle except in poor quality loopless video form, making me into a laughing stock on my own art blog, but THEN i had a stroke of genius, in my Brain
so if u read yesterday’s post u might remember that flipnote studio, the animation program i use on my ds, to animate, has the option to export files as gifs, both animated and sequential (meaning either as one fully animated gif or each individual frame separately), which is super convenient, but as i mentioned yesterday, any time i tried to open the folder with those files on my laptop, it crashed immediately
WELL today i thought “hey, how about instead of opening the folder in the sd card when it’s plugged in, how about i copy that folder from the sd card to my flash drive, and try to open it there, in case it’s the card’s hardware that’s causing the problem, not corrupted files”
so i tried that and it FUCKING WORKED THANK GOD GLORY HALLELUJAH
so now instead of spedning A THOUSAND YEARS trying and failing to force art programs to bend to my will i can just export the animations straight from my ds and drag them onto my computer Just As God Intended oh GOD im so fucking happy
here’s the gif in the end, i’m gonna post it to my art blog too but this is the Green Version bc i animate in green bc of some default settings in flipnote that i got used to, plus it makes me feel like i’m just sketching so nothing really has to be finalized so i’m comfortable while i work, and also it’s just nice ok it’s a Nice Green
(there’s a few frames at the end that are like the extra scraps from while i was working dw i got rid of those in the final version that i’m posting to my art blog later. also i added my blog url to that one too it’s aaaaaall good)
the only downside to this method is that i can’t change the canvas size to be 540px wide to fit with tumbrl s image dimensions but whatever i can just post them in a text post and fix the html to display it at its original size instead of the resizing bullshit tmurbl pulls constantly ugh. anyway it works great on desktop but it’s inevitably gonna look like shit on mobile no matter what i do *Big Ass Shrug*
anyway thats the end of my success story uhh i can’t make the like comment & subscribe joke again bc i already did that in the last post so like bye i guess thanks 4 watchign & have a great day i’ll see u in my next fvideo
https://www.youtube.com/watch?v=YYob4uDjEKI&t=0s
(^that’s my outro music)
#this started out so boring like a tutorial (but made by someone who doesn't know what the fuck theyre talking abt)#& then things derail Real Quick#that's why this is the ''buildup ver.''#retag later#talkin bout stuff#today posts#rieley's wips#(me: i can't mention this youtuber by name in case my post shows up in search#me: *adds a link to the post rendering that effort for naught*#me: *leaves it anyway bc it's funny*)#pls listen to the outro musi c it's rly good & tunmgmldnr wouldnt let me embed the video & idk how to do it thru html & too lazy to look it#up :(
2 notes
·
View notes
Note
I've been subscribed to your youtube channel for quite a while now and I just found your tumblr. I really admire your art and you are one of my biggest inspirations. I have been trying to get into digital painting and I must ask you, how do you manage to make everything looks so smooth but don't get an overblended mess?
Ahhh, thanks a lot! I think the major key to make things look smooth is to work big - like, really big, minimum 300dpi and 2500x2500 canvas size. If your computer and software can handle bigger than that, even better. Why is that?Because when you shrink the images to post online or print them, all the weird stuff kind of disappear.I’ve been currently working with 600dpi and around 5000x6000, sometimes smaller because SAI cant handle elephant size canvases very well.For example, one of my latest paintings:
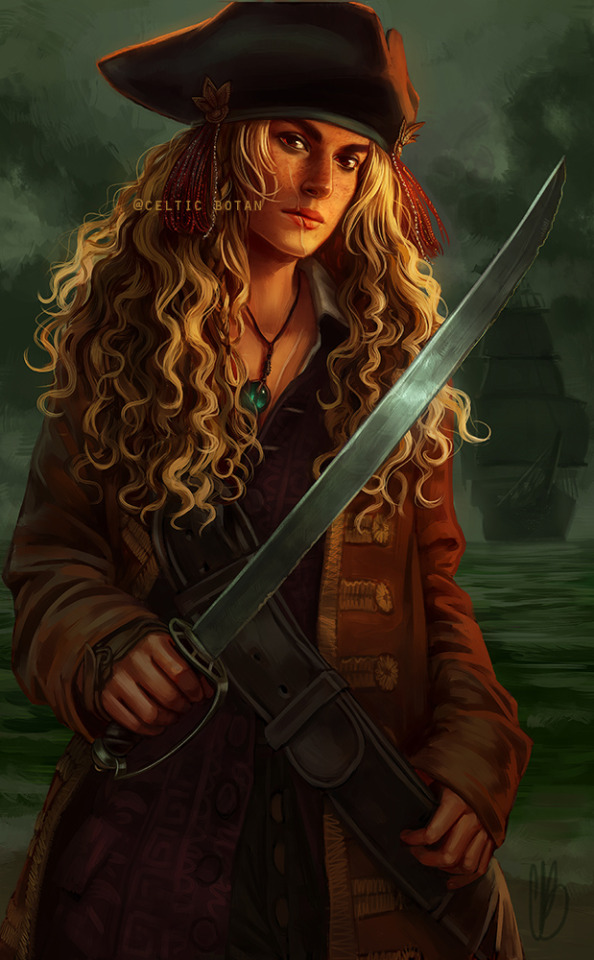
This was resized down to 72dpi and 1000x619 and all the details look super smooth, and the details of Lizzie’s coat look fairly realistic and all, right?But let’s look that part closer, on its original size - which are the ridiculous numbers of 600dpi, 4678x7559:


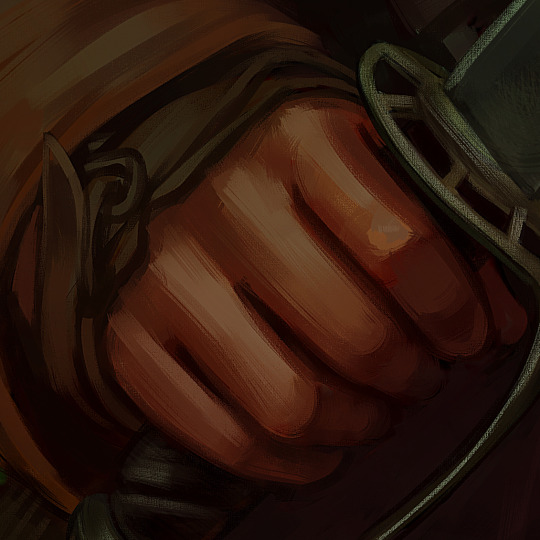
You literally can scribble on it and from affar, it will look like super elaborated patterns and embroideries lol. This is it, that my secret - doodling on high resolution, I am a fraud *flees the country* *gets a new persona*Back to the thing tho,
The only parts that are fairly well-detailed are her face and hands, because they are focal points of the illustration. Still, they are very textured and kinda messy, never 100% smooth:

Same with the commission I did of Sansa a while ago:

When we zoom in on the statues, they are literally blobs of grey and white lol

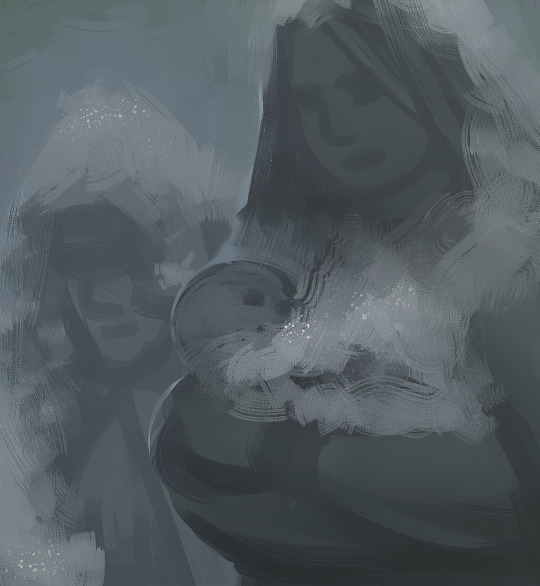
But Sansa is very detailed, and even with that, you can see nothing is super smooth. It is actually quite messy, and messy is kinda good.

You also made a very good point: overblending tends to leave the painting with what I call “the plastic-looking vibes”. If you dont know what you are doing, the paintings will look bland and fake-looking. Artists such as Artgerm are great at that type of style, cause they know how to apply it in a good, appealing way. Making art that look super smooth like that or using a more “clean” and simple style is surprisingly hard actually. So, that’s pretty much that,- try not to overblend/overwork everything, - avoid the default blur tool at all costs. - textured brushes will also give a different flavor to the painting, - studying from old masters’ paintings and other artists you enjoy will help a lot (like making studies from paintings and observing high definition images from their art to see the details).I hope that was able to help you :)
90 notes
·
View notes
Last Seen Blogs

keysuke1
Untitled

terrimanduca
Terri Manduca Agency
zevranraw
a kingdom or this
worm-sock
bleached bunny
ellieg14
Random Art