#historical costume sewing
Text
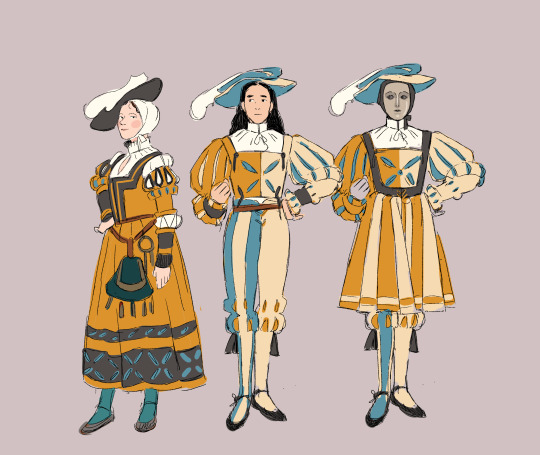

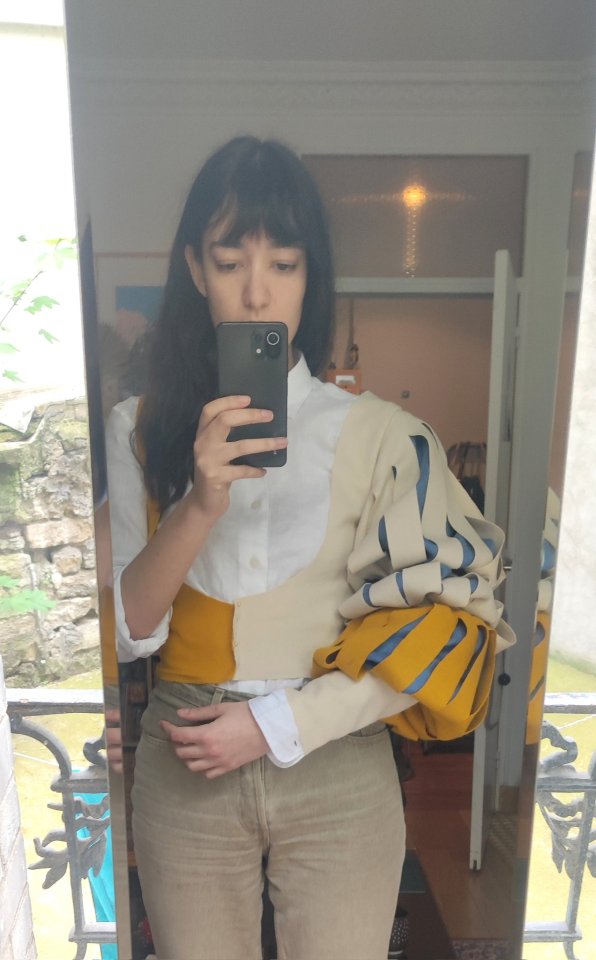
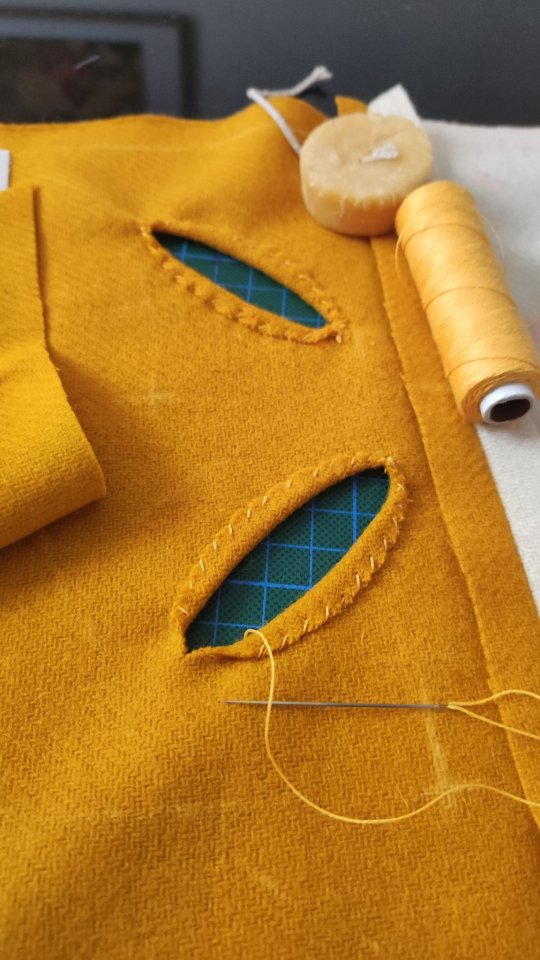

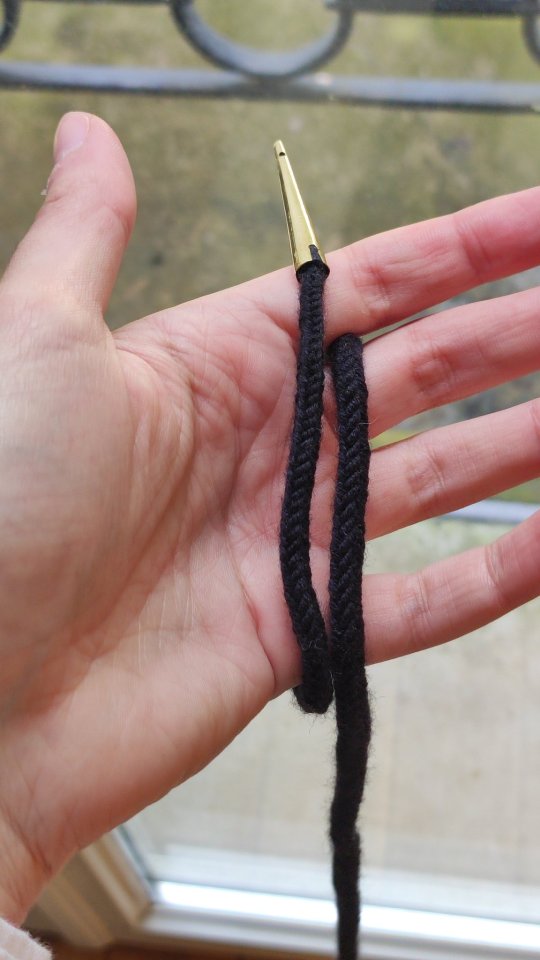
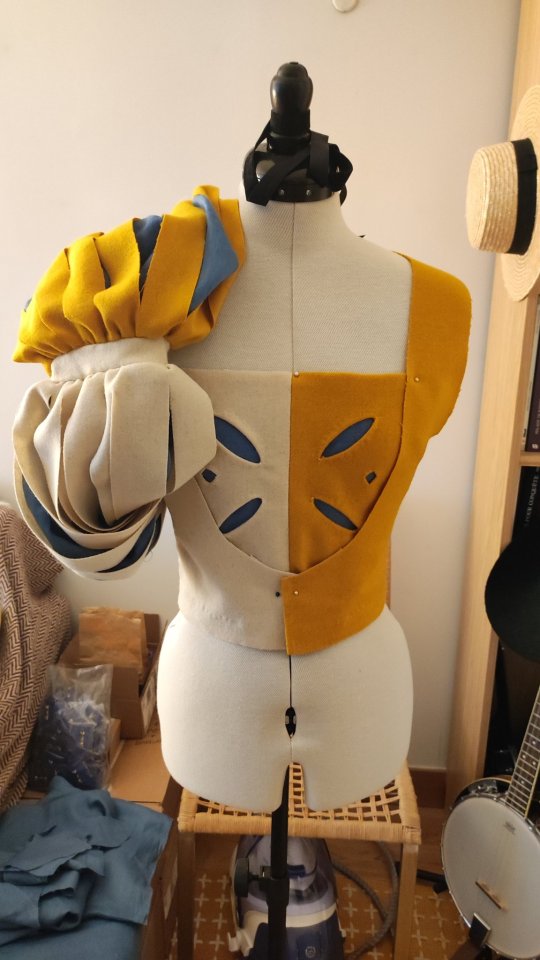


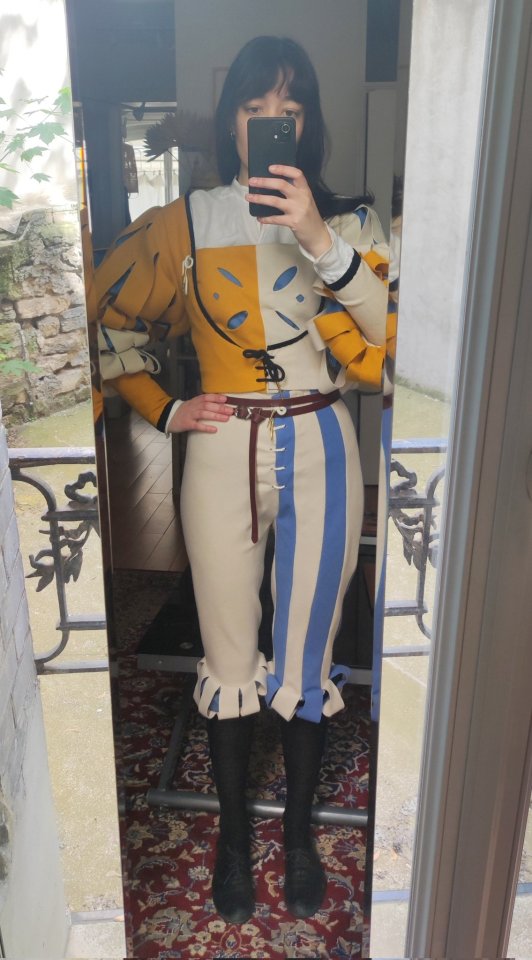
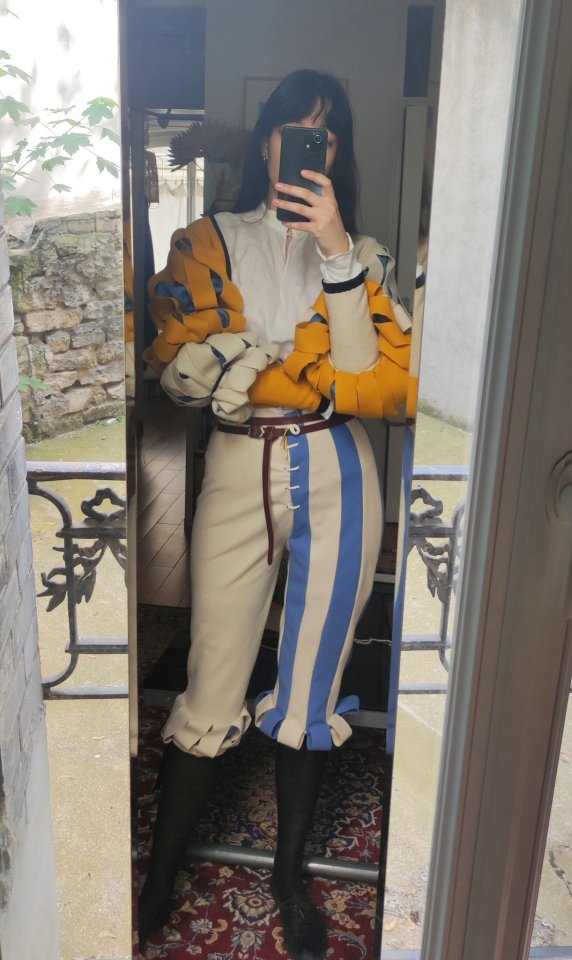

Progress on my current project ! Having some with stripes and slashing this time around. Didn't take any progress photos for the hosen/pants because it broke my brain a little, lol. I also started doing fingerloop braiding for the lacing cords.
I still have to fix a few things on there, including fixation on the brustfleck, and after that onwards to making the hat !
#historical costuming#sewing#16th century#landsknecht#germanic guard#renaissance#it's landsknecht inspired but I also like to think of it as#jestercore#first time draping an drafting everything myself woo !
11K notes
·
View notes
Text
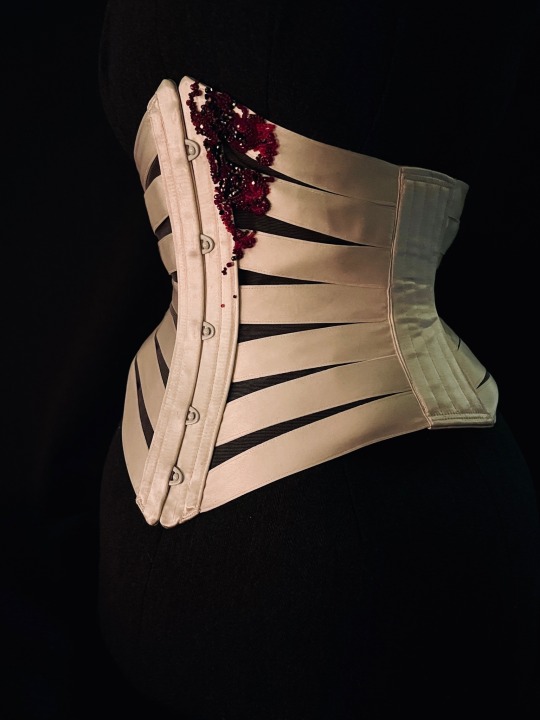
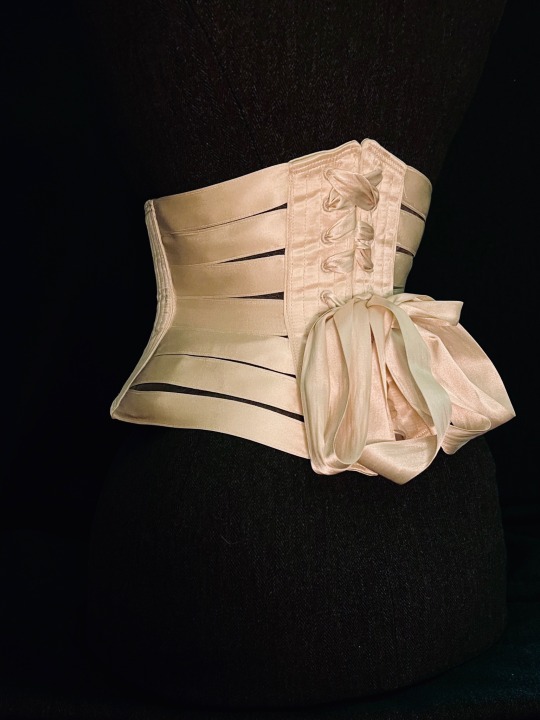
The Saddest Girl In The World
Edwardian-ish ribbon corset with beading, 2023
Silk ribbon, cotton taffeta ribbon, Czech glass beads
#project: crown prince kiriona#project: ribbon corset#project: historical sewing#cosplay#media: the locked tomb#tlt#the locked tomb#historical costume#Edwardian#Nona the ninth#historical sewing#costume#poetry in costume#beading#excuse the iffy lacing I used what I had on hand which is too wide and I didn’t want to unlace Helga#EDIT: upsetti#I captioned it something sensible rather than WHITHER THE HAMBURGER???#there’s time#not sure why this has broken 1000 notes but it is releasing all the brain chemicals
3K notes
·
View notes
Text
Larp shenanigans incoming


#colorful victoriana#historybounding#historical fashion#historical costuming#cosplay#sewing#19th century#afrovictorian
845 notes
·
View notes
Note
This is kind of random, but would it have been a struggle for a big busted women to wear fashionable silhouettes in the medieval era? I’ve heard some costume historians discuss that there were forms of bust support, but most of what I’ve seen pre-1500s seems like it would have been a nightmare for any ancestor with a similar bodytype to wear. Am I just from a line of women doomed to horrible back pain? (On the flip side of the situation, I’ve found corsets and stays to be rather comfortable, so that’s not a problem)
As a fellow big boob haver, I have good news for you! There were pretty good Medieval bust supporting garments and I have tested one of them.
With sturdy fabric, tailoring and lacing you can create pretty good bust support. Lacing was popularized first in 12th century in form of bliaut, and in 14th century tailoring became standard for everyday garments. I don't know how well bliaut supported the bust, but since it doesn't fit super snugly, I assume it doesn't distribute the weight of the boobs as well as tailored supporting garments and therefore isn't as supportive. I'm also not actually sure if there was proper bust supporting garments before that, I haven't looked into it. I know Romans bound their breasts with cloth wrapped around the chest, so maybe that technique continued (at least for those who especially needed it) till lacing and tailoring became a thing. For more about how supporting garments developed in Europe through history, I have a post about development of lacing, which coincides pretty well with that history from 12th century forward.
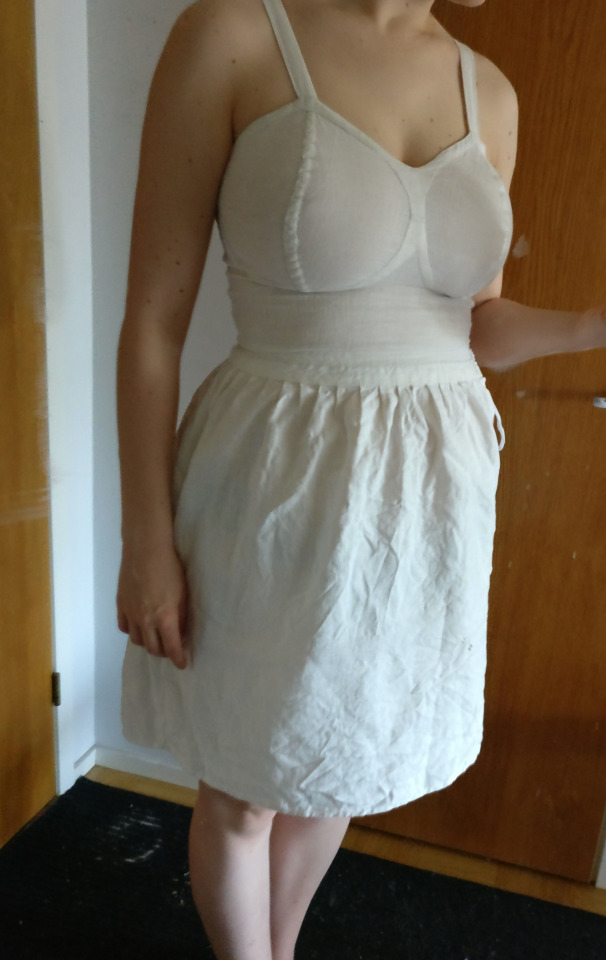
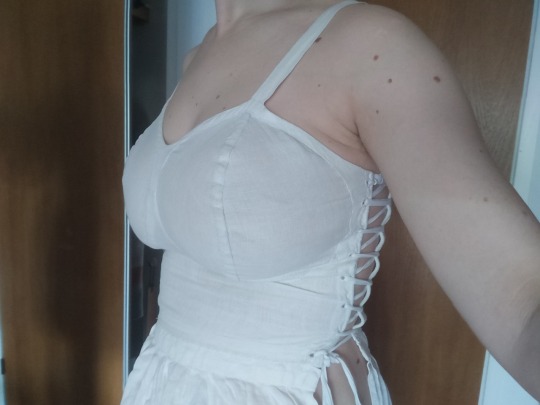
Personally I have experience with Medieval Bathhouse dress, which was used in the Germanic Central-European area roughly in 14th to 16th century. It's called the Bathhouse dress because most depictions of it are from bathhouse settings, but there's depiction also in bed chambers and other contexts, so I think it's pretty safe to assume it was used more generally as an undergarment. It often had separate cups for the boobs (see the only extant garment left of it, the so called "Lengberg Castle Bra"), but not always. Unlike most other undergarments at the time, it was sort of a shift (the lowest layer) and a supporting garment combined into one.
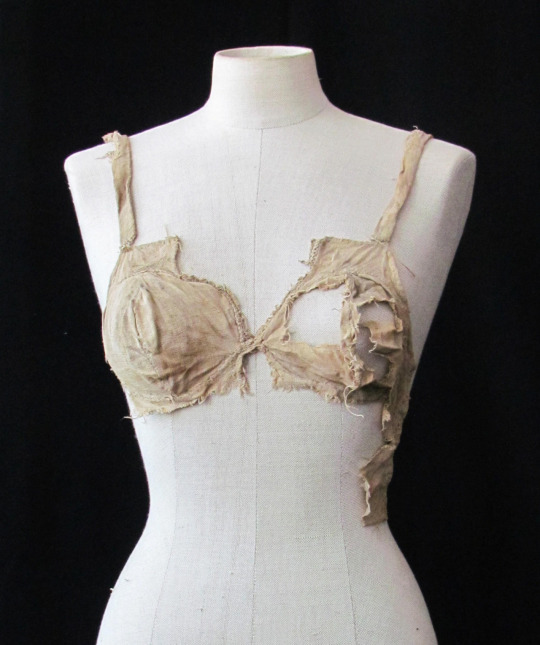
I sewed my own recreation of it (with some alterations because I made it for my everyday use, not as a historical recreation) and did a post about my results, where I go deeper into the history of the garment too. I didn't construct it very well and I did an error in the design of the back, which cause the strain of the shoulder straps to focus too much on very specific spots in the back panel, which eventually made the fabric there break too many times. (There were some other smaller design flaws too, like the waistline is lower than my natural waist so it rose and wrinkled annoyingly.) I did use it daily (except when I washed it) for a fairly long time though and it was super comfortable and helped a lot with back pain (and shoulder pain caused by use of modern bras). I hate that I've had to go back to modern bras because I haven't had the time to remake it yet. (I'll probably make a follow up post once I get around to it, where I go through the issues of the first version and how I addressed them in the next attempt.) Well fitted and shaped bodice which is then laced does surprisingly much even without any additional reinforcements.
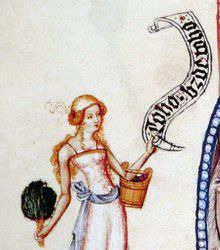
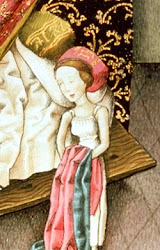
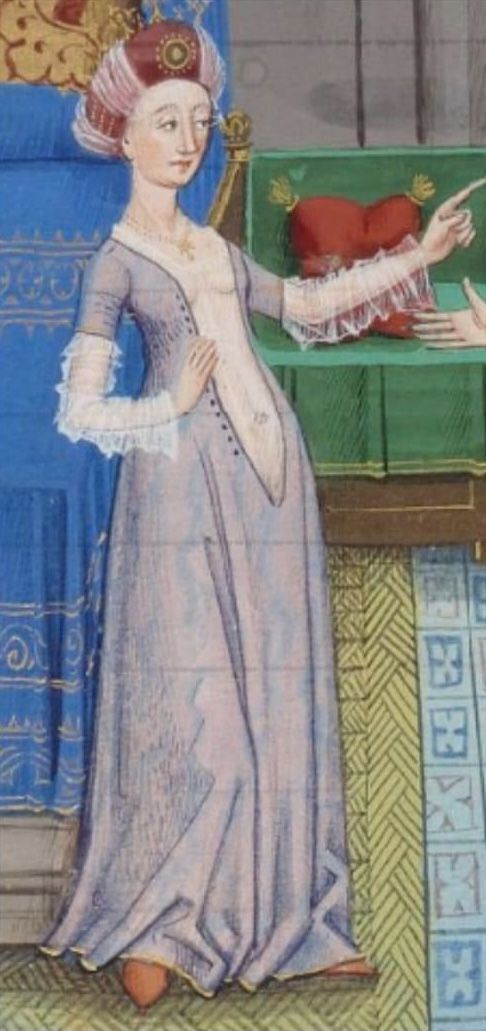
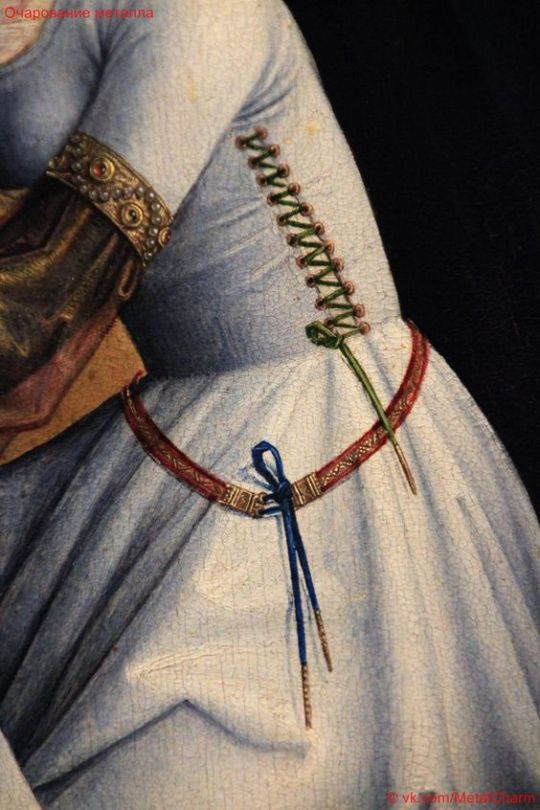
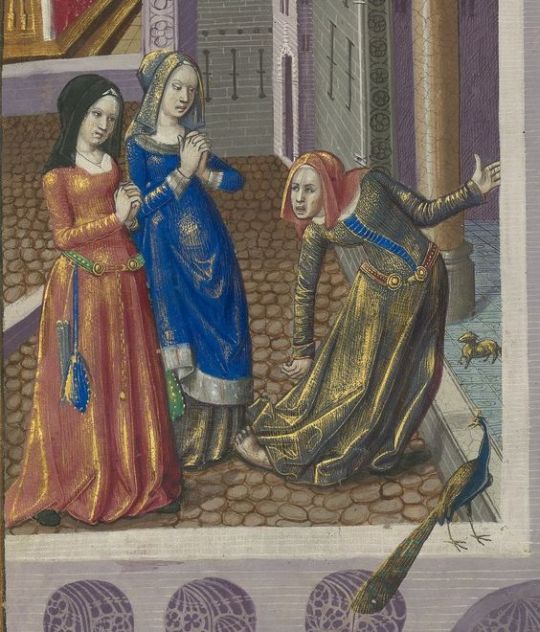
I haven't made a Medieval kirtle (though I will some day), but it was the more widely used Medieval supporting garment, which eventually replaced Bathhouse dress in the area where that was used. Kirtle is worn over a shift, but it broadly works similarly. Kirtles could be front, side or back laced depending on the time period and how the Kirtle was constructed. Multiple layers of kirtles could be used and looser overgarments (like houppelande) were often used on top of it. Kirtle was used by everyone, including men, but for those who didn't need bust support, it's purpose was mainly to create the fashionable silhouette. Here's three depictions of kirtles from 15th century. First unlaced, but has lacing on the front, second close up of the side lacing and third shows nicely how both front and side/backlacing shaped the bust.
Morgan Donner is a costumer, who focuses a lot on Medieval costuming and has a big bust, so while I haven't personally tested the supportiveness of kirtle, she certainly has. The kirtle bodice part needs to be patterned to accommodate the breasts by giving it round shapes and the kirtle needs to be a little too small so there's room to lace it to fit well. Lining also helps to reinforce the fabric and make it more firm and supportive. Here's Morgan's pattern from the tutorial in her website and how the kirtle eventually fits for her. (Also look at the handsome boy in his handsome matching outfit.)
She also has a video relating to the same kirtle project, where she explains her method to pattern a kirtle specifically so it's supportive for big bust.
In 16th century more stiffness was added to kirtles, first with very stiff lining and then with boning, but that doesn't necessarily add to the bust support, rather it just allows the kirtle to shape the bust and the body in general more and better support a heavy skirt. Firm fabric secured snugly with lacing is already very good at distributing the weight of the boobs to the whole torso.
In conclusion, at least since 14th century people with our body type were not doomed to eternal back pain and even before that some ways to help with it were probably used.
#historical fashion#fashion history#dress history#history#historical costuming#historical sewing#sewing#crafts#costuming#fashion#medieval fashion
232 notes
·
View notes
Text
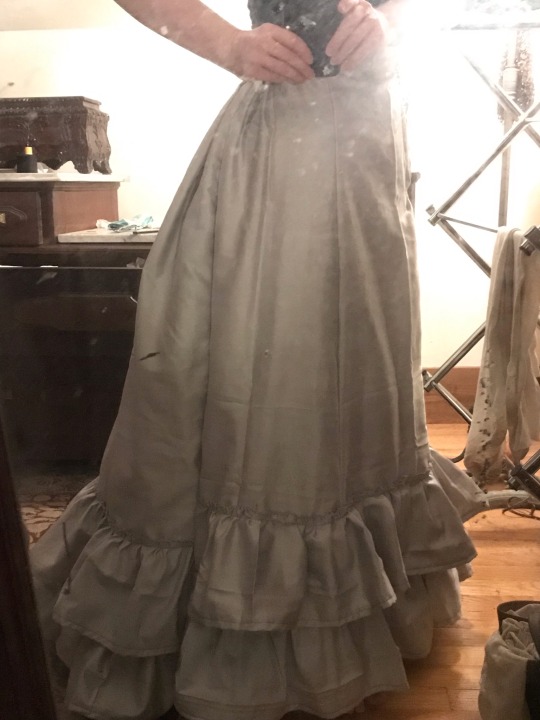
ignore the water spots on the mirror I REMADE MY NATURAL FORM PETTICOAT
HELL YES
NATURAL FORM GOWNS AHOY
#sewing#historical costuming#God I have missed fitting things over a corset#I hate not being able to be a Glove-Fitting Bitch#The joys of being able to craft a silhouette over a comfortable rigid structure
192 notes
·
View notes
Text
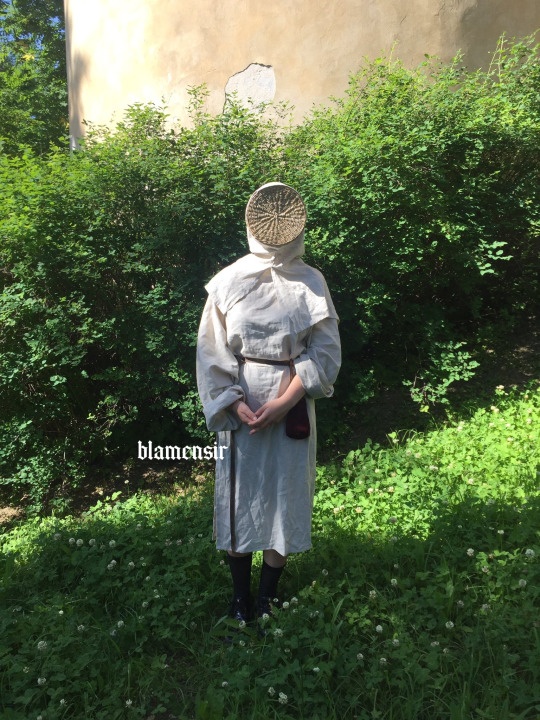

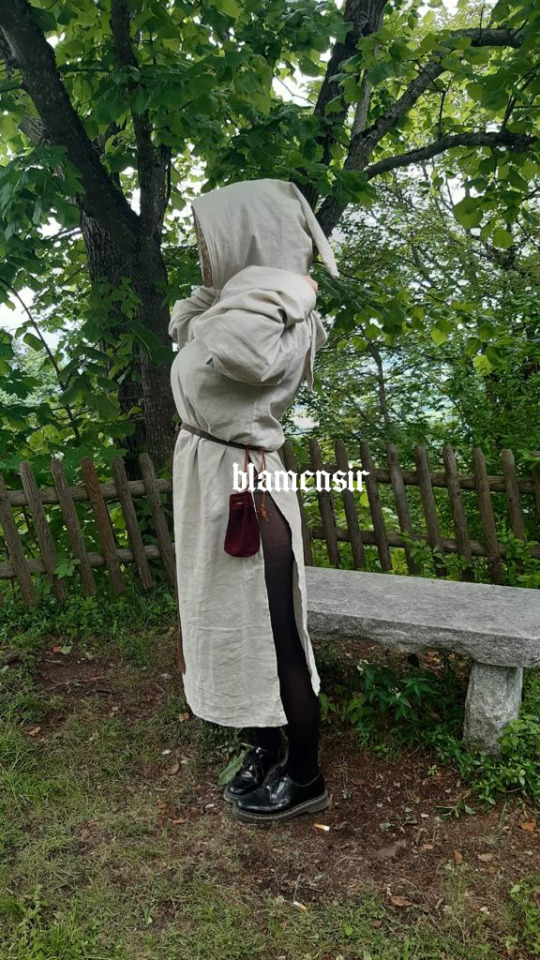
more beekeeper me
#me#beekeeper#medieval beekeeper#my legacy#historical costuming#larp#medieval market#renfaire#renaissance fair#medieval#costuming#sewing#crafts
991 notes
·
View notes
Text

Didn’t have my sewing machine in London, so I hand-stitched this tea dress using a 1905 pattern!
#sewing#historical clothing#edwardian#hand sewing#historical costuming#princesscore#royaltycore#light academia
427 notes
·
View notes
Text
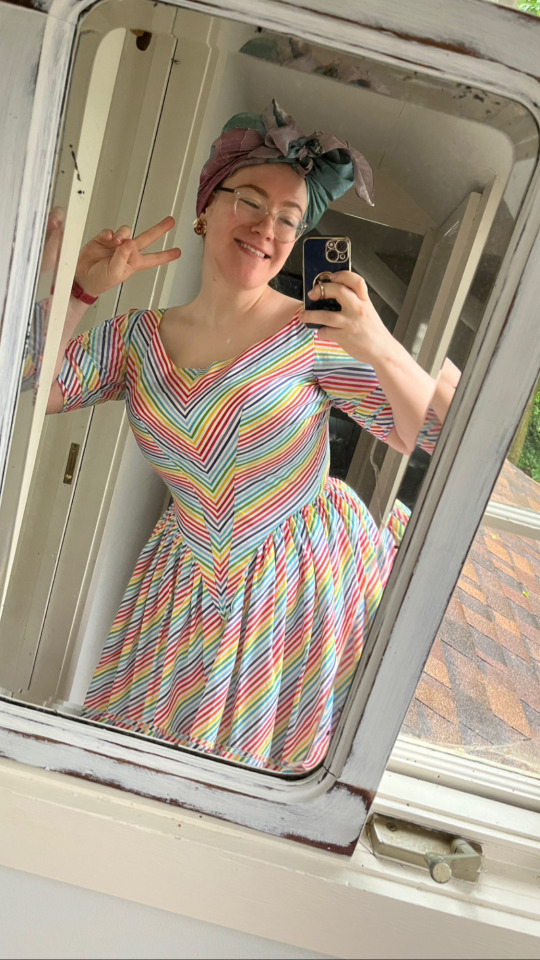
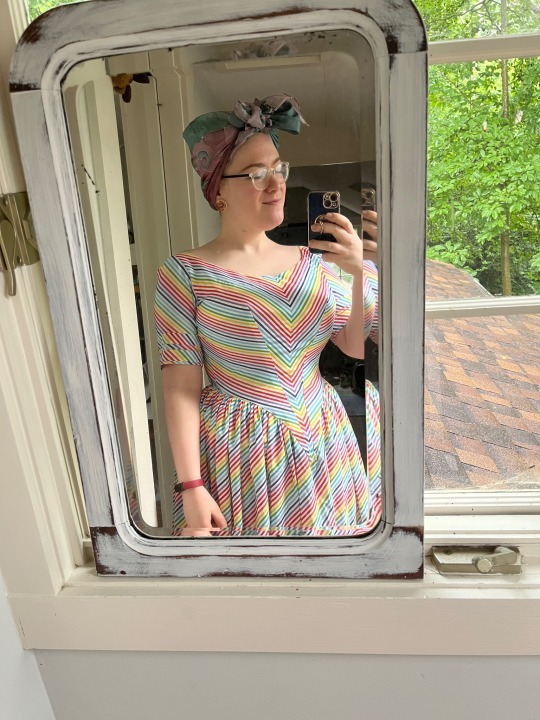
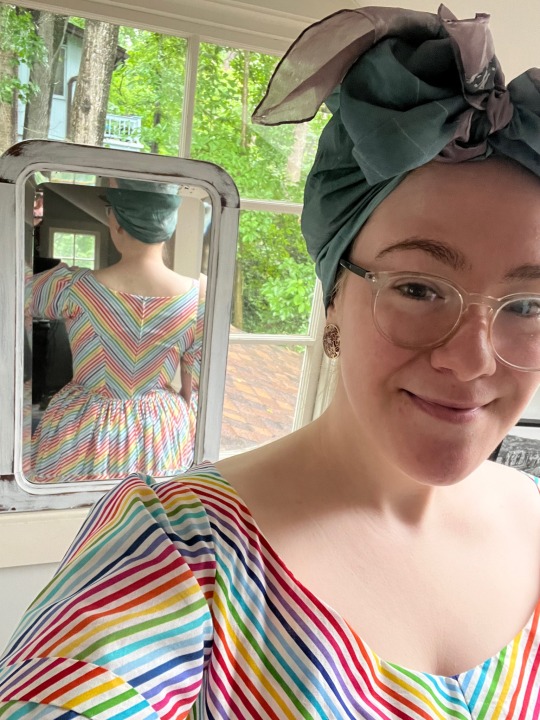


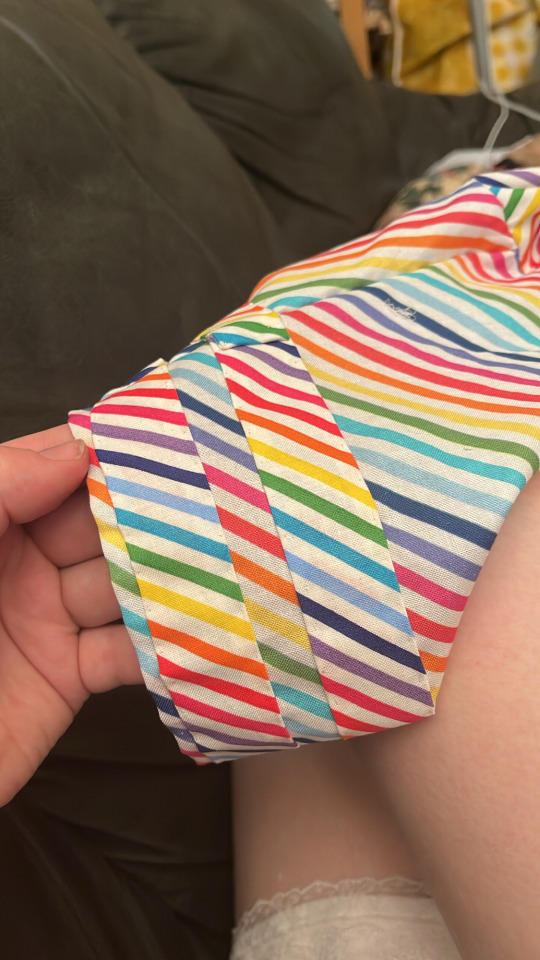
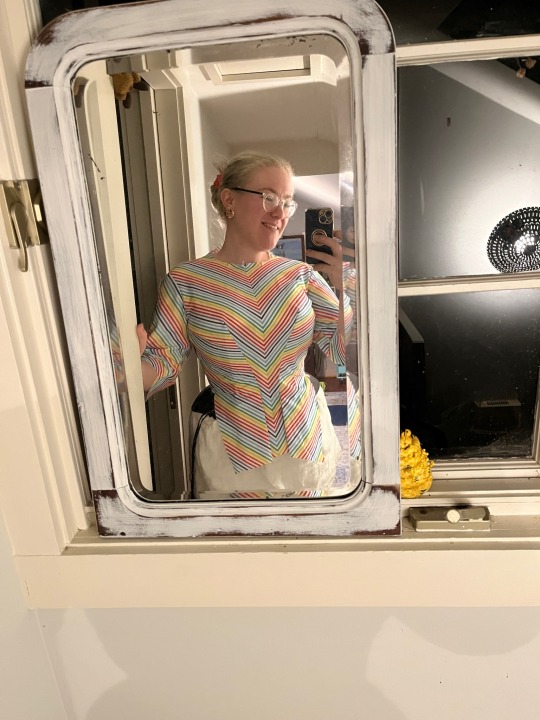
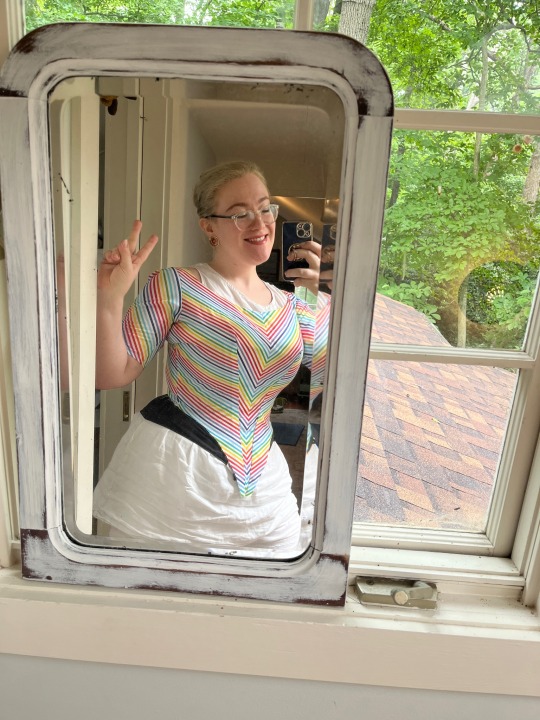
Going to a vintage-dresser pride party on Friday and realized I didn’t have any rainbow clothing. 12 hrs later, problem fixed!
I used the pattern block I made for my 1840s cabbage rose dress (did I ever post that here?) and extended the front before trying it on and drawing out the point I wanted. The stripes on this fabric are diagonal, so it was actually kind of difficult to place all my pieces so that they’d be doing the right thing 😅🏳️🌈
I needed to make this quickly and I don’t have a serger here, so it’s unlined and I only finished some of the seams after sewing it together, but I think that’s pretty historically accurate anyway 🤣 I’m super happy with how it’s turned out!
[ I drafted the bodice pattern from Elizabeth Friendship’s book Making Working Women’s Costume, and I’m wearing it over my old Redthreaded 1860s corset. ]
#victorian fashion#1840s fashion#historical fashion#historical costuming#pride month#sewing#rainbow dress
506 notes
·
View notes
Text
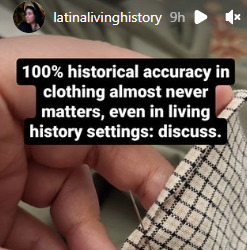
I have a lot of opinions on this but I would love to know what other people think.
#sewing#living history#historical costuming#history#historical reenactment#historical accuracy#historically accurate#historically adequate#historical sewing#museums#material culture#experimental archaeology
326 notes
·
View notes
Text
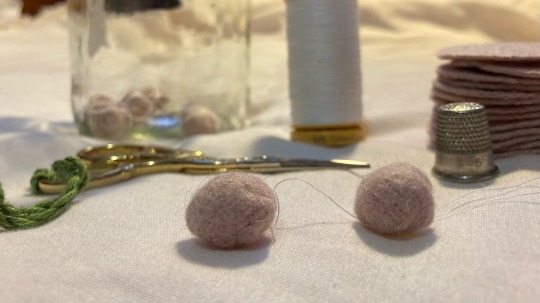
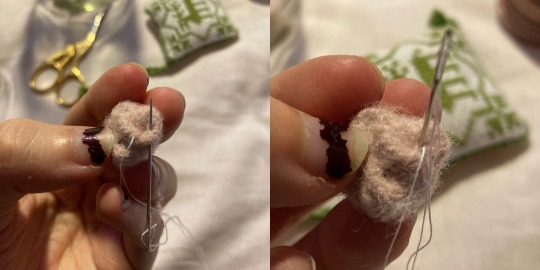
How To Make Medieval Fabric Buttons
You will need:
• fabric (I’m using a medium weight wool)
• a sewing needle
• cotton or silk thread (it MUST be strong)
• a thimble
• dressmakers pins
Using this style of button as a fastening technique was very prevalent in 14th century Europe, on both men’s and women’s clothing. It was used for anything from sleeves and openings on the front of garments, to the iconic liripipe hoods (which is what these are gonna be for!).
They were usually made out of leftover fabric from the same material that was used for the garment they were intended for. As well as using every scrap of material possible, they also save you from having to buy metal buttons, which… aren’t cheap (both now and then).
The trade off is of course having to make them, which can be a painful process (literally - try not to get stabbed by the hedgehog ball at step 4!!). I thoroughly recommend a thimble to push the needle through as you form the ball - this is hard enough without having to pull it through.
Making buttons in my experience is 10% knowledge, 60% spite, and 30% hatred. It is a contest of wills between you (who wants a button) and the fabric (who doesn’t want to be a button). I wish you luck soldier.

To start with, cut a circle out of your fabric. How big will depend on what fabric you use - if it’s linen, you’d cut a larger circle than you would for wool. Mine is about 30mm.
Using a long long thread, bind on and then sew running stitches around the outside, about 5mm from the edge (may vary with fabric).
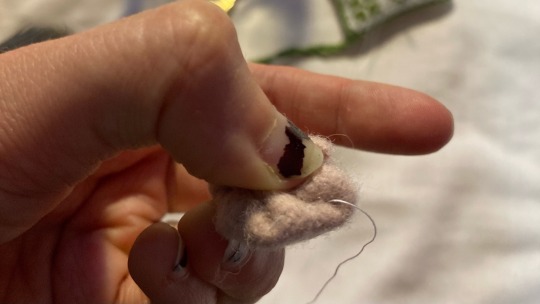
Pull this thread tight like a pouch, and turn the raw edges inwards in one direction. Try and tuck them inside the “bag” section. It will likely be more of a squashed oval at this point than a sphere.

Now, get your dressmakers pins and go absolutely ham. Continue to squish it “inward” (towards where the opening was) as you pin. The button should now resemble a very unfriendly little creature now (good luck with not getting stabbed, it can be a bit of a prick).
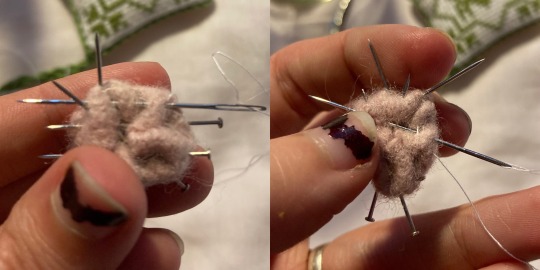
Next, basically use your needle to try and get it to stay in that shape. I usually do a bunch of stitches around the edge of the “back” end, and then spend some time criss-crossing the back. Try and put your needle in close to where it came out, so that you don’t get long pieces of visible thread.
Once you are confident that it will hold A Shape ™ (but also isn’t so stabbed that you can’t refine it further!), remove the pins. Your button will most likely resemble a little tiny messy wool brain at this point, but that’s ok!
The next step is to use your needle and thread to continue tucking the ball inwards to the centre of where the opening was. Above illustrates how I’ll flip the open part of a fold inward, by coming up through the fold and then levering it downwards so it gets tucked away. You can also just use the thread to pull errant folds inwards. Use the hand holding the button to squash it into form, and then sew it into place.
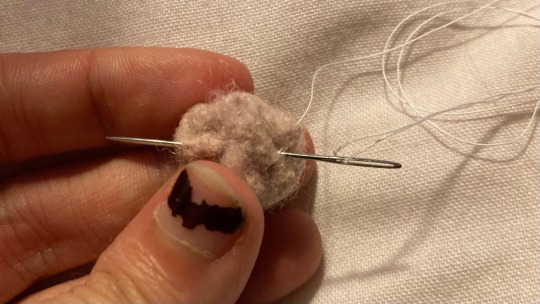
Once the button is actually a ball shape, crisscross the back of it a bit so that everything is firmly held in place. It should now (all things going well!!) actually be a sphere.

Once you’re happy with the shape and firmness, take your thread to stem out of the centre back. Bind off, and then slide the needle off the thread, leaving the long end. This can then be used to sew the button onto the garment.
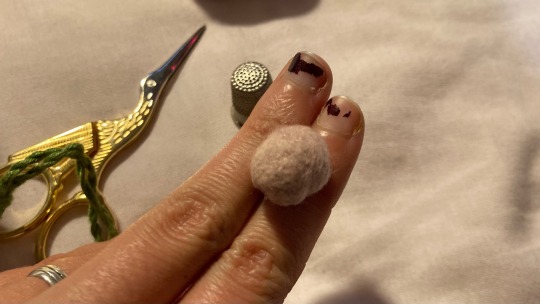
The back will still be somewhat messy, but the front should be smooth, and the whole shape roughly spherical. When the button is sewn on using the remainder of the thread, you won’t be able to see the back!
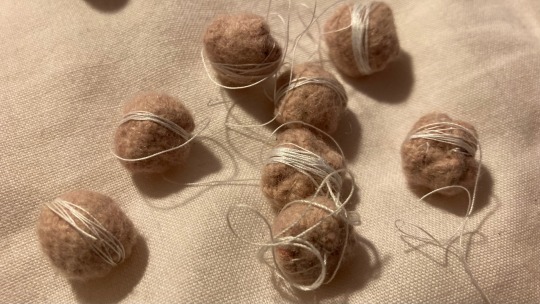
I wrap the remainder of the thread around the finished button so it won’t get tangled, and then pop it in a jar with the rest while it waits to be sewn onto the garment.
Good luck with your crafting! Feel free to ask any questions in the notes, or straight into my inbox :)
#sewing#tutorial#medieval#medieval reenactment#medieval clothing#medieval costume#historical fashion#historical costuming#medievalcore#14th century#buttons#crafting#diy#i’ll be on my merry way now#I have…… sO many of these to do#truly pain torture and misery hours over here
520 notes
·
View notes
Text
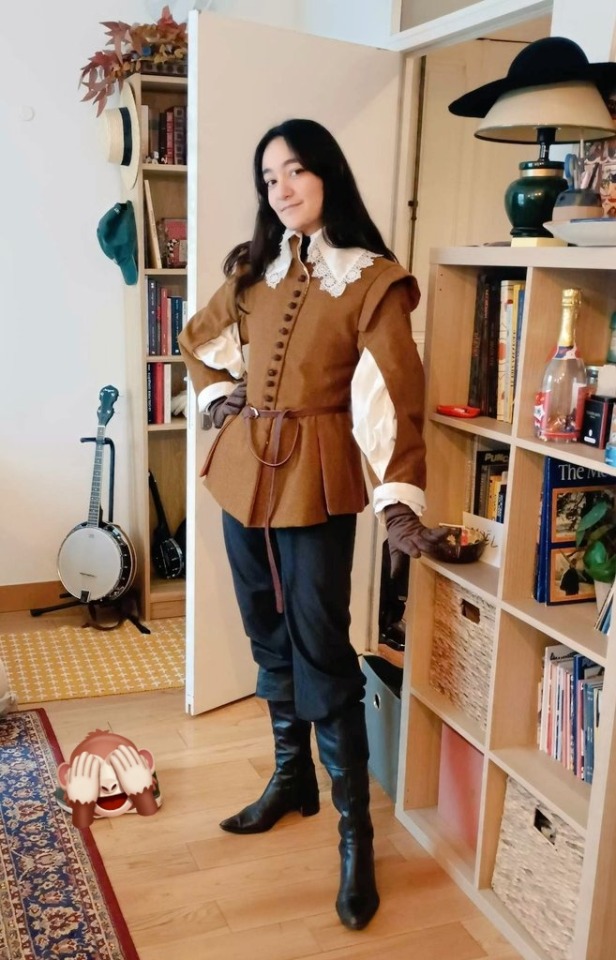
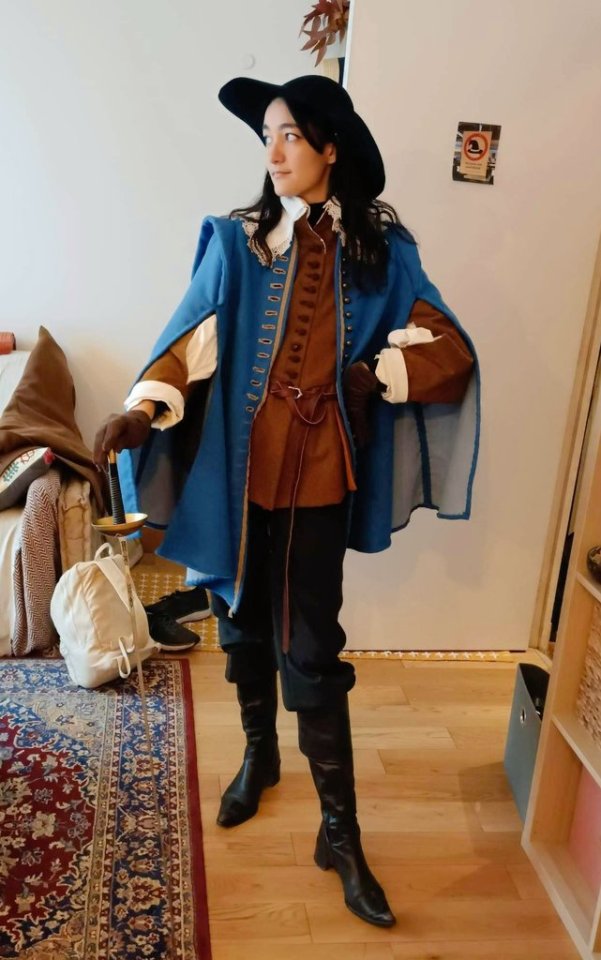
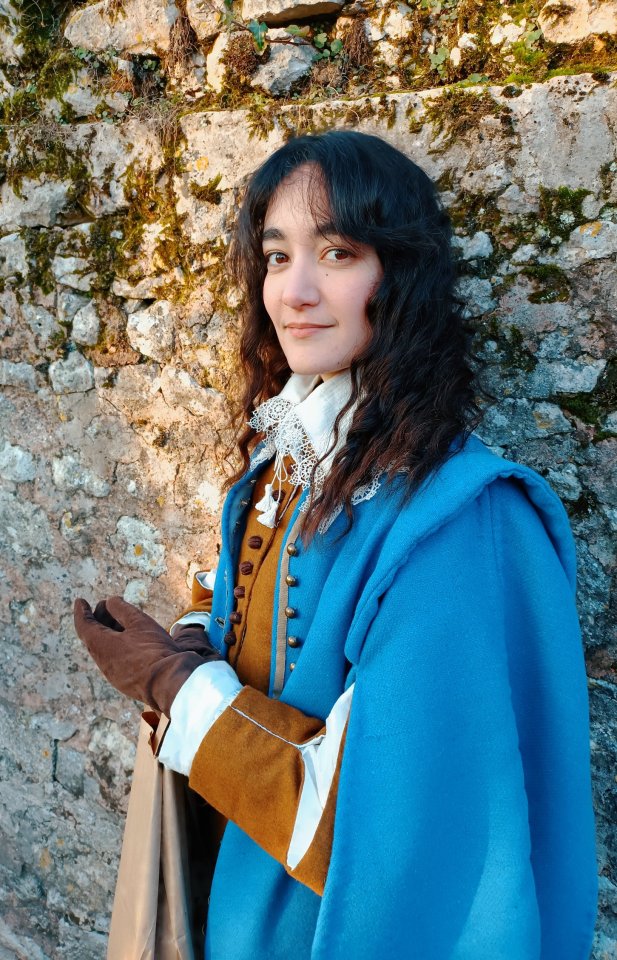
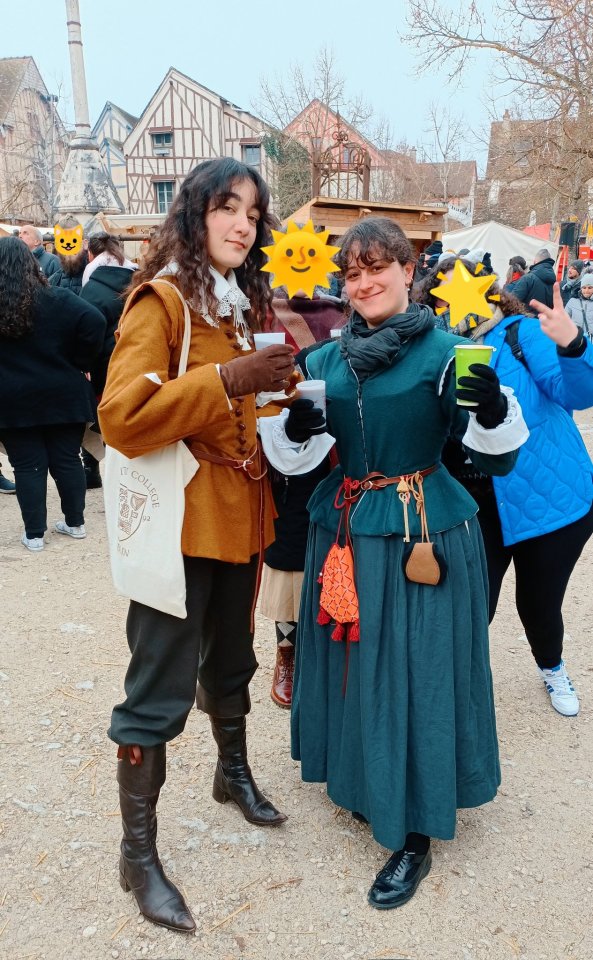
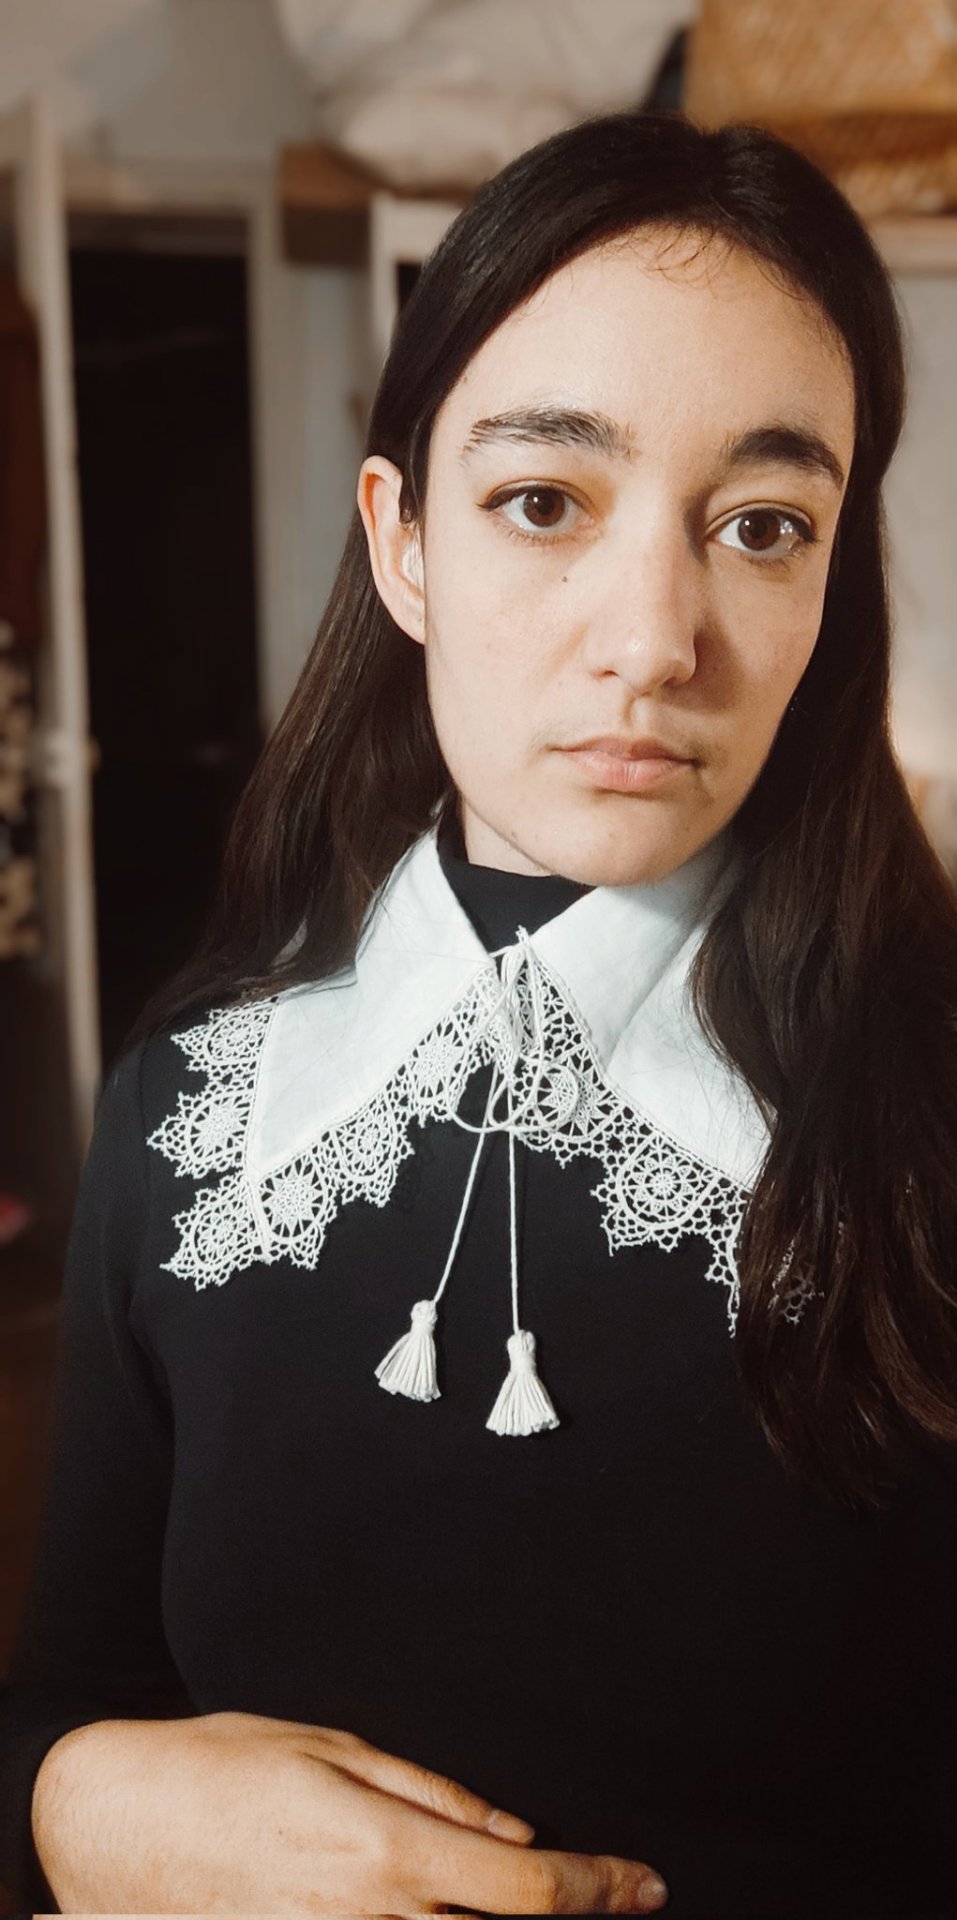
Costume update !! I finally got to wear my 17th century outfit at Provins last weekend. I made the doublet with handmade threaded buttons, the linen shirt, the falling band & tassels, and a very rushed cassock that I'll probably fix or re-make when I have more than a couple of days ahead of me, lol. The lace is from tudor tailor and the boots & pants were thrifted.
I one day I'll find a way to make nice pictures of my costume, too, that'd be nice.
#mine#17th century#historical costuming#cavalier fashion#historical tailoring#sewing#1620s#partner in costume crime is @surikane !#that might be a face reveal for a lot of you lads hehe
7K notes
·
View notes
Text
17th century dress inspired by my beloved Versailles royal court fashion. It's mostly handsewn, made out of satin and trimmed with lace. It was the first serious historical costume i have ever made. And to be honest, my favourite one <3
Hair, makeup, model and photo by me <33

#louis xiv fashion#baroque fashion#historical reenactment#louis xiv#french#versailles#17th century#1600s#historical sewing#sewing#historical fashion#17th century fashion#baroque#history#historical costuming#costume
206 notes
·
View notes
Text
Things are afoot
211 notes
·
View notes
Text
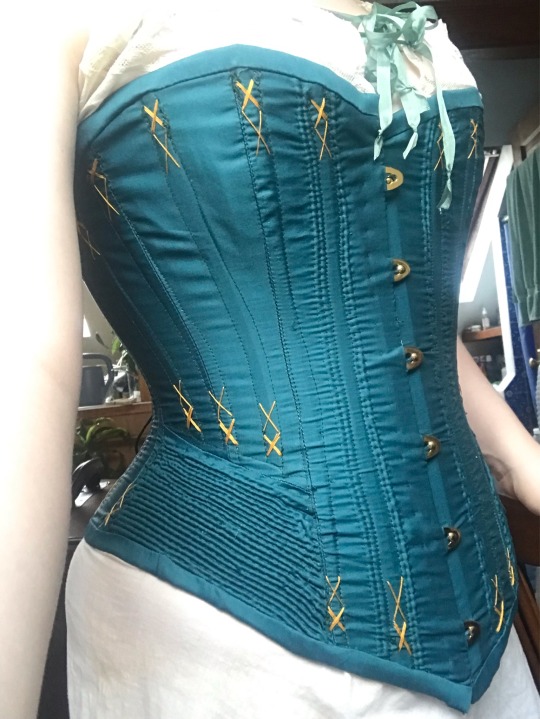
Better corset shot!
Corset pretty and nice to wear. Car ride in corset Uncomfortable (car’s fault)
352 notes
·
View notes
Text
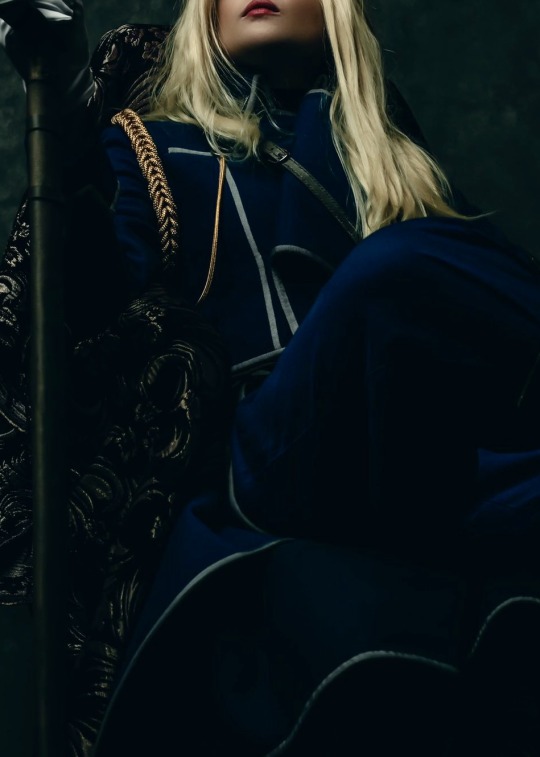
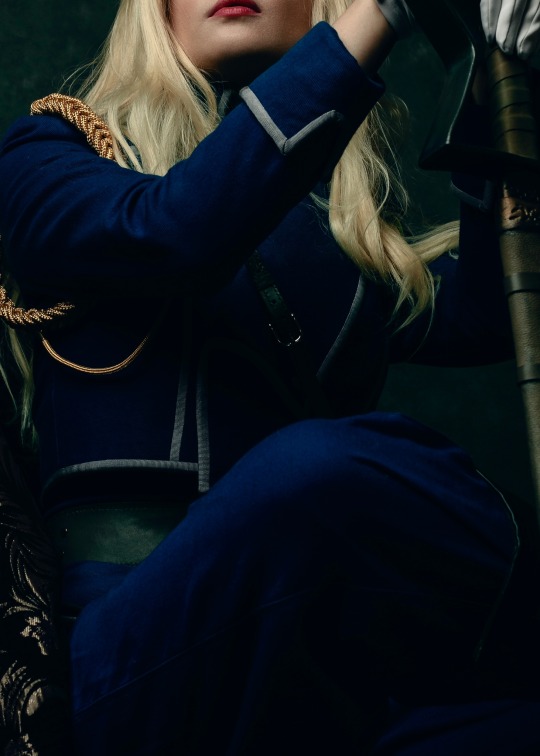

On October 3rd, Elric asked me what day it was.
I said, ‘How dare you to talk to me, you coward.’
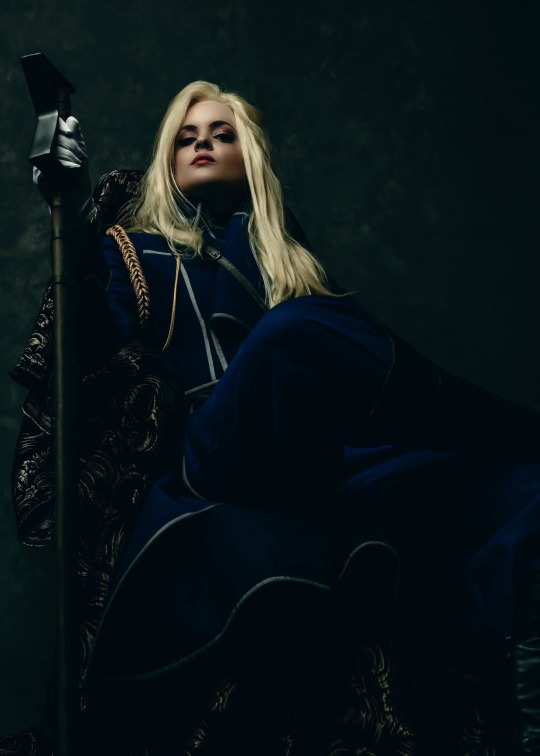
Major General Olivier Mira Armstrong
Traditionally tailored uniform, 2019
Japanese twill, canvas, grosgrain, leather, gilt braid
#project: major general Olivier Mira armstrong#media: fullmetal alchemist#fma#fullmetal alchemist#Olivier Armstrong#fullmetal alchemist day#extant projects: 2019#tailoring#historical costume#historical sewing#cosplay#poetry in costume#I’m still so sad about my wig in this shoot - it took me a while to really nail the armstrong curl plus this was the hottest day that year#and I moved a bunch of furniture around after I was bewigged so that really messed things up. oh well!#at least I nailed it for competition#tho I have exactly one selfie to prove that
398 notes
·
View notes
Text
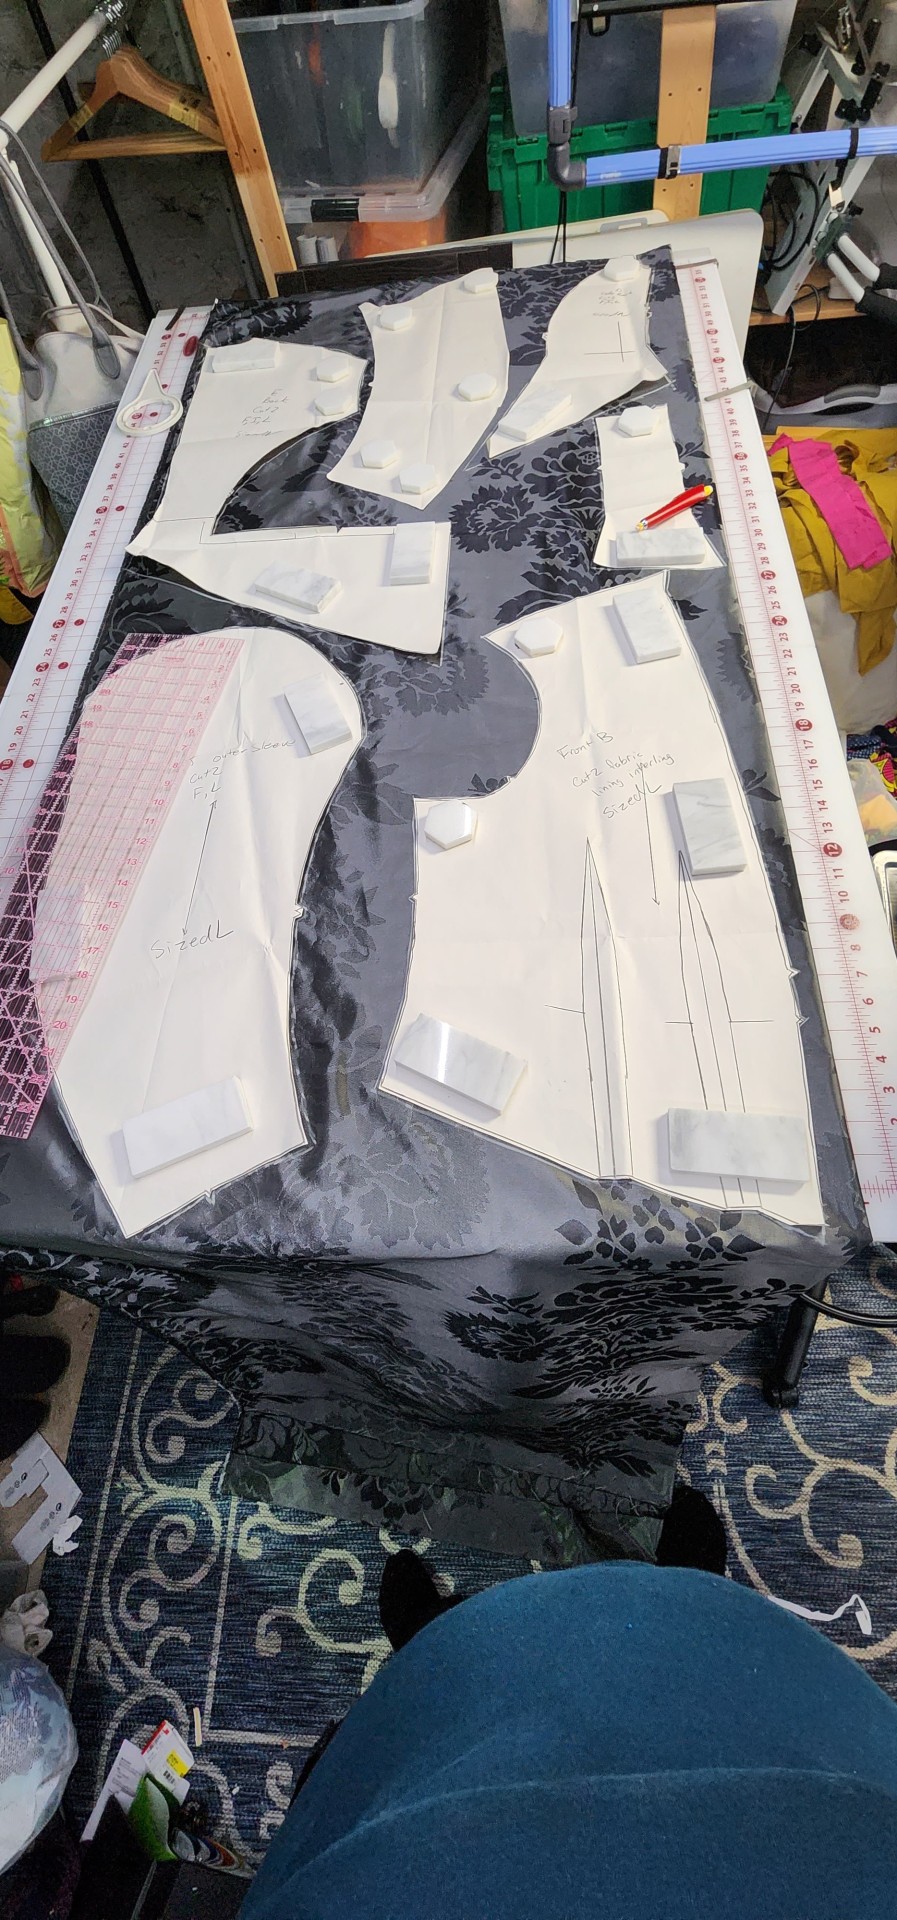
sick and tired of seeing people use zip ties for boning. listen to me i am a costume designer stop using plastic which does not hold your shape (the whole point of boning) you do not need to buy proper coiled boning or anything: go to a hardware store and find flat metal tension spring (google tells me that's what it's called, unfortunately i also don't know what its used for in hardware store related things so i cant describe it if that isnt the correct translation, soz) you can get a roll of 15m x 4mm tension spring for about 15 euros where i live and then you just have to cut it with metal shears (you can use a regular cutting pliers probably but if you have metal shears you will be happier) then either file down the edges a bit if you're genuinely gonna wear it a lot, or you just wind some tape around the edges to make sure putting them in the channels isn't gonna rip your fabric and anyway now you have an actually functional boned garment. go to a hardware store and show them this pic btw:
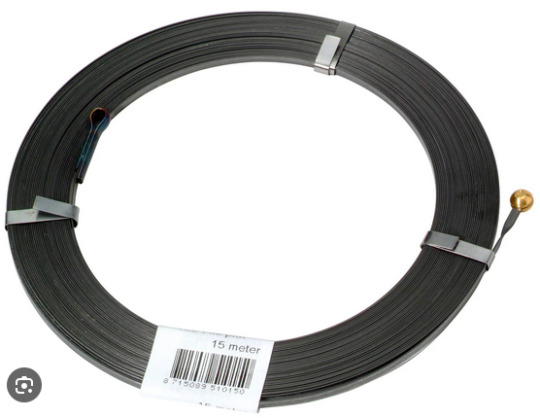
^ this is what you want. also bc this is 4mm wide around stress points like closures you want to make 2 channels right alongside each other and put in 2 pieces of tension spring for stability
#seriously zip ties are so bad for anything you want to do with boning and like i get why people use them and i DO get that most ppl dont#actually want a corset in terms of shape restriction but then im just like. use a different fabric that's stiff and is gonna look structure#just by the fact of it being a thicker fabric and you putting a bunch of seams in it#and if you want it for underwear USE TENSION SPRING BONING ANYWAY its just better in every way than plastic nonsense !!!#costuming#cosplay#sewing#historical costuming#idk dude im not on costuming tumblr just. stop it. i hate that im writing 'listen up tumblypoos' posts but like#i just got an instagram reel with ziptie boning and its like. a) if you dont know about zip ties by now its too late and b) use tension spr#-ng. this was like some dude also who thinks himself a fashion designer like baby girl i know you are not actually designing with zipties#ok. tumblypoospost over
130 notes
·
View notes
Last Seen Blogs
valdez-and-the-argo-crew
Listen Im Too Emotionally Invested In The PJO

walletspade09
The Journaling of Williams 478

trendywendy11
Untitled

goldpeaking
Golpeaking

officespacehn
Officespace