#demomaker
Video
youtube
SCRATCH SESSIONS #04
#demomaker#pioneerdj#dvs#rekordbox#cdj-850#djm-850#ddj-sp1#rmx-500#house#djmix#housemusic#djlife#livemix#livetapes#scratch
1 note
·
View note
Text
Getting stuff done - practical solutions for pulling off large projects
So this might be an unusual post for a site that I predominantly intended to be a collection of tech-articles, but over the recent years I've both been observing and noticing in conversations that while there's plenty of technical material online about how to learn to program, do graphics, engineer music, and so on, much of the writing about how to get projects done seem to veer over into either "life hacks" about how you should do stretches and open your window for fresh air, or escalate into the territory of motivational speeches and emotional, heart-to-heart peptalks; now, while I understand and appreciate their usefulness in certain scenarios, they seem to cultivate a misunderstanding that all you need to get a project done is a positive attitude and ab-crunches.
After having been in an industry for 10 years that has a relatively high throughput, and having had many relatively recent conversations with people who were in awe or disbelief about my ability to handle large projects, I was reinforced in my belief that most people are unaware how much of getting a large amount of work done is down to cold science, scheduling, professional planning, and the ability to retain control of a project even when unexpected events happen.
With that in mind I'd like to present a few random bits and bobs about what I learned about project management - not necessarily only in programming, but in any sort of creative activity - while hoping to keep the popular psychology element in them to the mininum.
A quick note before we dive right in: I'll be talking entirely about sparetime activity that you want to invest time in. While it can be useful to apply professional techniques to your sparetime activity, you should definitely not treat the two as they're one of the same. That's a good way to hate what you used to like. (Trust me.)
Who's producin'?
Before we start talking about actual work, it is important to introduce ourselves to an important term, namely production. Most people think "production" is the act of making something, and the "producer" is someone who makes things, while I would wager a large portion of the populace can't tell you what a "film producer" does aside from "making films"; on a day-to-day basis, that role seems to be an opaque cloud to most people, even if it's one of the most important.
The short version is that the producer's job is to make sure that the project is finished on time, and on budget. The slightly longer version is that the producer takes the amount of time available, the amount of resources available (budget, people, inventory, etc.), consults the respective heads of departments actually doing the work, and then comes up with the plan and schedule as to what happens when, when something finishes, who works on what, and what resources will it take; once production starts, they transition their role into making sure everything goes to plan and if something doesn't, what are the options to salvage things.
There is a reason why in most professional environments, there are entire departments for this: it is a tough job, often frustrating, sometimes disheartening, but at the same time a producer is always aware of the state of the project and can have a good idea of progress being done, and whether the whole thing will come together in the end. This will become extremely important later.
Weeks of coding can save you hours of thinking
Projects are usually broken up to three important segments: Pre-production, production, and post-production. These tend to vary from industry to industry as to what they mean, but pre-production generally consists of building a production plan out of the resources and time available. Pre-production is one of the most important parts of a project, because it will define how the rest of the project will be committed, and thus it's important that we first delve into the ins-and-outs of planning.
First thing first, decide if you have a deadline for your project. Deadlines are cruel, they're unforgiving, but that's why they work miracles on productivity; projects without deadlines don't put pressure on the authors and eventually they just get dropped down the chute of "maybe later". Pick a hard deadline, or pick a reason to have a hard deadline. (Sidenote: demoparties work wonders as deadlines.)
Secondly, once you picked a deadline, assess your project's needs: Assuming your project is in some way technically complex, what are the things that you don't have and need to create or acquire for this? If you're doing music, is there plugins or samples you need, or instruments to acquire, or musicians to talk to? If you're painting, do you have the paints and brushes, or is your tablet broken and need to get it fixed? If you're making a demo, do you have an engine, can it do what's needed? Think about every single thing you need.
Once that list is done, break down your project into elements, in detail - this is the most crucial part of production. If it's a song, roughly jot out the parts on paper and maybe the list of instruments you want in there. If it's a large 3D scene, write down the elements you want in it in detail. If it's a novel, jot out the chapter titles. If it's a demo, chart out the parts with rough ideas on how long each is and what's in it. If it's a game, map out all the mechanics, characters, levels, cutscenes, and so on. Break everything down to parts, and do it visibly so that if something is missing, you can spot it. Once that's done, take the parts and break them down further: What is needed for each part? Roughly how long is the duration of each part? What are the technical necessities of each part? What are the assets needed for each part? What is the process for creating each part?
There are many reasons why all of this is crucial. Firstly, this will serve as your gameplan for the rest of the production process. Secondly, and more importantly, the more you break a large project down to small parts, the less daunting it will seem: if you embark on a project that can take months to complete, you have to take it on one day at a time, and each day will need to end with some sort of progress. If you have a roadmap that tells you each day what that day needs to get ticked off at the end of it, you will no longer be fighting an endless battle; instead you'll focus on the task at hand, with a bigger roadmap to keep you in check.
This leads us into another important consideration, and one of the more murky ones: time estimates - for each of the broken down tasks, give a good guess as to how long it will take. Then multiply it by at least two, and that'll give you a good idea of the time you will need. See, the first thing you should learn about when producing is contingency: contingency is a multiplier for each task's estimate that adds extra headroom that accounts for anything the estimate doesn't account for. There are many things that can make a task take longer, and not all of them are relevant to the task: you might run into edge-cases that add extra complexity, but on a much more basic human level, you never know when you're going to break a leg, or your cat will get sick, or your apartment gets flooded - anything can happen, and it probably will, so make sure you account for that, and leave yourself plenty of headroom as contingency, and best case scenario you'll just have a more relaxed process.
Sometimes, however, even contingency isn't enough, and you'll find yourself running behind schedule. This is why this next step is important: Nail down your scope, and stick to it. There are many things you have listed in your above breakdown, but they all vary in importance, so make sure that next to the time needed, you also note down their importance. As the late great Randy Pausch said in his Time Management talk, it's important you distinguish between things that are important, and things that are urgent: there might be things that are urgent for a project, but ultimately not important, and it is up to your discretion to rank them upfront. [Update: I've recently found out that this is called the "Eisenhower Decision Matrix".] As for ranking, this is up to you; you can do it on a scale of 1 to 10, but I personally prefer what they call the MoSCoW method, where "MoSCoW" stands for "Must", "Should", "Could" and "Would"/"Won't", and they signify how important that specific thing is to the project: "Must"-s are the things that are the bare minimum to get a project off the ground, "Should"-s are important, but not necessary, "Could" are polish, and "Would" are just whatever there's time left for if you're ahead of schedule. Ranking by necessity is very important, because once you start running out of scheduled time, the only option you will have aside from having a project fail is to cut stuff. Ranking by importance also allows you to schedule accordingly, making sure that unimportant polish tasks are moved towards the end of the process instead of wasting time with them at the start.
One thing to note here is that it takes decades of experience to get all of this right, so much like your actual skills of making things, your production skills will get better with time - a good rule of thumb here is to just keep your eye on the ball: decide whether an item on the list fundamentally contributes to the production, or is it just something that you think it would be cool to do, or something you wanted to do anyway. It's tempting to get sidetracked by excessive detail like splurging on instrument recordings or adding engine features, but focus on the goal: If it doesn't contribute to your end goal, cut it.
I also want to remark that I actually did the same for this article: earlier I wrote down bullet points about what I want to mention and started arranging them into a flow.
Doin' the work
Once you've planned your stuff out, then it's just a matter of discipline of taking off the next item on your list, and working on it until it's done. This is of course both easier and harder than it sounds, but remember: you made this list with full knowledge and intention to follow through on it, so at this point this is your best bet to get to your goal. I usually reinforce my adherence to the plan by putting the physical (printed) schedule in a visible place in front of me somewhere in the room, to keep me focused on the goal; I also mark off items that I'm finished with, because I personally find the physical act of ticking off or crossing out an item very satisfying - it's the little things, really.

The production document for PILEDRIVER
There are a few things that can help with getting into a good workflow: One thing a lot of people underestimate are placeholders - when your final art isn't done, just stick something in there that only vaguely resembles what you want in there, and every day you work on it, not only will it remind you that it needs to be replaced, but on occasion it will reveal problems in the grand picture.
To bring a practical example, both with "Signal Lost" and especially with "PILEDRIVER" I went absolutely crazy with placeholders, essentially building both of those demos twice as what in the 3D industry they'd call "animatics": just rough boxy versions of the scenes with approximate camera/lighting, just to be able to get a feel for the pacing / length of the scenes, the camera speed, and so on. Making an animatic version of the scene and getting it in the engine usually took less than 15 minutes, but with the music done, I was able to immediately get a feel for whether I need to adjust my initial idea slightly, or perhaps I needed to find another camera angle, or break a section up to more parts.
youtube
The PILEDRIVER animatic
I actually went one step further earlier in the process; I knew I wanted the rap part in the middle, but the lyrics I wrote were fairly complex, and I knew Fantom would struggle with some of it (especially in pronounciation), I decided to take the lyrics and put them through my favourite speech synth, Daniel, and then chop it up so that it resembles the flow I thought sounded best for that particular part. This not only helped with the recording, but also reassured me that the idea would work.
youtube
Against all odds, I managed to coax Daniel out of retirement.
As you can see, my work methodology was often designed around one thing: quick feedback and iteration. I find myself having very clouded visions about art-related things most of the time, so for me it is very crucial to be able to try stuff as quick as I can and fail early, so especially with music, I do what the late Linds Redding coined as The Overnight Test: If something I make late at night doesn't sound great the next morning, I scrap it and start something new, maybe cannibalizing the good bits from the previous iteration. When on a timer, sometimes iteration means not getting stuck on something that would never work.
Note: I'm aware that Mr. Redding used his term in a more somber context later in his life, but I'm merely sticking to its original meaning here.
And speaking of overnight, let me stress one thing: always do nightly snapshots of what you're doing. If you're making a demo, build the whole demo every night and watch it, maybe run it on your work computer the next day during lunch. If you're making a song, render it out and put it on your portable player and listen to it on the bus the next day. Not only will you internalize the work and make a list of issues to fix over the course of the day, but it assures the integrity of the technical side of the project - I've watched way too many demogroups, as recent as last month, make an awesome prod that just doesn't compile or crashes before the deadline because they were too busy working on content and never tested the actual executable. If you do this every night, or maybe even every few nights (but always at least once a week), you're more likely to realize that your compile config hasn't been updated for a while and you really should do that before you're 5 hours before the deadline and you're drunk.
Sidenote: I'm aware that this is perhaps too specific of an advice to programmers, but probably worth mentioning, and I can imagine variations for other artforms as well, like importing/exporting problems with 3D.
Pushing on
So this is the bit in the text where we might be veering close to pretend version of popular psychology and talk about subjective things like motivation and dedication, so I'd like to make a disclaimer that I've never formally studied these things, and you should not take any of this as gospel or any level of scientific; these are just things I noticed about myself, and tried some simple methods to counter them, and they (mostly) worked fine.
One of the big things I've mentioned earlier is the daunting vision of the road ahead; with large projects, it's incredibly demoralizing to just sit at the start and be crushed by the amount of work that needs to be done, especially if you're doing something where it takes a large amount of work just to be able to have something basic; with music it perhaps only takes a ~10 second loop to feel like to be on the right track, with a full demo, the aforementioned placeholders do a great job, but with e.g. writing a larger engine, it can take weeks before you get to the point where you have anything on the screen simply because of all the modules you need to work on first. My mitigation for this was what I call the skeleton method: What's the least amount of work I need to do to get anything to get on screen? For that, what's the least amount of work I need to do to get something to just run? All of this ends up in the pre-production document as well, so when I start working, I can relatively quickly get to a stage where it's just a blank window, but it's built on an engine skeleton where replacing things is straightforward once I reach that point in the process. I myself noticed that my work morale improves once I'm able to send screenshots or chunks of the thing I'm working on to people, so I try to get there as fast as I can.
Another thing I noticed about my working style is that even with managable work chunks I have problems getting started simply because it takes a while to get into "the groove", so a little technique I've been using is that when I'm about to wrap up for the day, I make sure there's a glaring problem with what I just did, like an obvious bug or mix error that I could fix in a few minutes - and then I leave it like that until the next day. That way, the next day I'm able to jump in and start with something easy.
The final thing - which I kinda hesitate to mention because we're already way too deep into motivational speech territory to my taste - that I found extremely useful is regimen: making sure that there's a period of time either or daily or weekly that I get to work on the project. Perhaps the ultimate guru of regimen is the great Beeple, who has been releasing a piece of art every day for more than 10 years now, and has given expletive-laden talks on the subject of why regimen is important. Now, I think we can safely consider him an edge-case with 10 years of everydays, but at the same time, there's value in doing something in a regular manner, and there's also a consideration of the amount of work you need to do versus the amount of time you have.
One important aspect all of this is that while guilt can be a good force of motivation, you shouldn't beat yourself up if something doesn't work out. Failures are a part of life, and they're an even larger part of any artistic or techical process, and you should accept that sometimes best laid plans can go absolutely up in flames because of a variety of reasons - like, say, because there's a global pandemic going on, and that the existential pressure of it takes away your motivation to do things. All of that is okay. As Eisenhower once (supposedly) said, "Plans are worthless, but planning is invaluable."
In summary
I'm mentioning that failing is always part of the process, because I've been listing a lot of rules and constaints and limitations on what you should and shouldn't do, and I must again emphasize that all of this is meant as advice and observations with regards to spare-time activity, and that how much of this you use will depend on how bad do you want one thing over the other: Managing spare time can require a delicate balance especially if you have a healthy social life, and if you do, you have to decide how much to work on retaining that versus how much you work on your passion project, and in my eyes this ultimately all leads back to pre-production: if you know you can't spend time on something every day and the deadline is right around the corner, rein in your scope early so that you can deliver rather than giving up halfway, because no unfinished project is as impressive as a finished one.
27 notes
·
View notes
Text
Demomakers !!
Ahhh la scene des demomakers !! répandus depuis les nombreuses intro de jeux crackés surtout sur micro ST/Amiga, cela représente une partie de l’informatique ludique dit “underground” qui était encore à l’époque réservé aux passionnés et connaisseurs…et non des kékés plus dirigés sur geforce, trolls de forum, et autres compteurs d’images par seconde.
C’est en lançant les premiers jeux crackés qu’on pouvait voir des intros réalisées par ces fans du “déplombage” en apportant les vies infinies et trainers divers. J’aimais beaucoup ce côté de remerciements du travail fait par l’équipe.
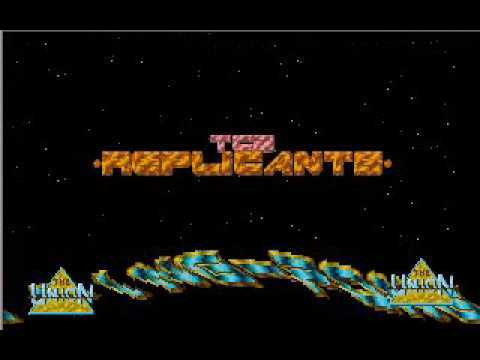
Les plus marquantes pour moi étaient les nombreuses intros réalisés par The Replicants dont celle ci.
youtube
Ces écrans de démarrage ont tellement pris de l’ampleur que des supports dédiés étaient désormais rependus toujours accompagnée de ces musiques bien synthétiques.
Voila la démomaker sur Atari ST Dark Side of the Spoon qui m’a le plus marquée avec des voix digitalisées où l’on pouvait diriger une sorte de lion volant l’amenant à des portes différentes et chacune proposant une démo. Je me drapelle surtout du “Please Wait!!”
youtube
Après c’est plus par l’Amiga que l’essort était à son maximum puis évidement le passage sous DOS, & Windows par la suite sans oublier les défis d’intro de ne pas dépasser 128k
Ah oui, mon meilleur ami de l’époque PRO-Amiga m’avait impressionné avec la demo suivante mettant mon ST…au placard !
youtube
Elles existent encore je reconnais d’ailleurs le niveau très haut mais moins répendus !!
Bon aller go vive les replicants !!!!
youtube
1 note
·
View note
Link
#skidrow#webdeff#codef#cracktro#remake#whitewolf#aftermath-creations.net#java#html5#demomaker#cracktromaker#introdesigner#demotool
0 notes
Text
2 notes
·
View notes
Text
thetapelessworld Interview with Blinksonic
thetapelessworld Interview with Blinksonic

thetapelessworld Interview with Blinksonic
Here is an Interview we did with Sylvain Stoppani of Blinksonic. Blinksonic make 3rd Party Device for Native Instruments Reaktor plugin. BlinkSonic currently have 4 Commercial Products Ruidoz Electrtonic Percussion Mangler, Aetonz Hybrid Polytonal Sampler, Substanz Beatmaking Station, and Voz Virtual Vocal Generator. Blinksonics Devices are great for all Modern Producers. First I love the Gui’s their modern and easy to use and understand. It’s also very easy to take a preset and turn it into something unique. All Blinksonic Devices are unique and can bring something special to your music productions. And thanks to Reaktor framework its easy to use your own Samples to further customize Blinksonic devices to make original content. These Devices belong in any Electronic Musicians or Sound Designers Toolbox. So be sure to Check out their Products.
https://www.blinksonic.com/
https://www.blinksonic.com/blog/
https://www.blinksonic.com/about/
So on to Blinksonic Interview
What got you interested in music?
Music is such essential and important for me since my youngest age, that I finally forgot what’s kept me interested at the early beginning. Probably the possibility to escape, to let off steam, to express oneself, to mentally visualize kind of images and representations through sounds ... In the auditory field of our perceptions, music and more precisely sounds, are a powerful vector for communication. Whatever the mother tongue, I tend to think that we should not look any further to find a form of audible universal language.
Do you remember the first piece of music that moved you? And how has that influenced you?
Very early, my parents gifted me a slot-in record player with a whole collection of 45 rpm vinyl disks for kids. I remember owning a lot of Japanese manga music (Captain Harlock, Grendizer, Captain Future ), French cartoon ( still have a strong remembering of the introduction of « The Mysterious Cities of Gold » anime ) and also some original soundtracks of children's movie like E.T.
It really took me out and it was a great time !
Much later as a teenager, I loved listening/dreaming with headphones to psychedelic rock of the 60s, 70s.
Like many young person who only had access to pop music (before internet), I was fascinated by the ability to play with sounds and turn noise into art as did guitarists like Jimi Hendrix.
I also loved the energy that emanate from some bands, more or less extreme, indie rock and metal of the 90s.
My attraction to the sound is certainly wrought through larsen/feedback screams’ and a lot of sound effects abuse. I always have been fascinated by sequences that suggest emotions not describable via a riff or melodies. The way Sonic Youth was creating chaotic guitar parts on some moments of their tracks, impressed me a lot.
Thanks to my discovery of hip hop, I also have been very quickly interested in the art of sampling.
It was much later that I came across electronic music.
Aphex Twin - Come to daddy is a EP that definitely brings me to this playground as a musician and music lover, as much this record brought together stylistic elements that I loved to hear together.
What are some of your favorite musicians, composers or sound Designers. and does that influence Blinksonic?
All the early and actual catalogue of Rephlex, Schematic, Skam, Planet Mu, Mego, Ghostly, Raster Noton and Warp Records… Really did my school days by listening to their releases.
I feel linked to Richard Devine which was the first to support me. I love the way he makes beats, this unique techno-organic rhythmical time signatures only him have the secret !
The sound designers who impresse me the most are also both good composers and live performers… I love the very versatile fantasy brings by Otto Von Schirach.
Today however I am a little less connected than before, there’s every month excellent stuff that comes out and it's not easy to be aware.
It takes time and I rather be focused on my own work.
However on artists more or less recent, I like VHS Head, Meat Bingo, Com Truise, Kelpe, Patten, Vaetxh (aka Rob Clouth), Freeform, Cristian Vogel, Baby Kruger and Freeka Tet.
There are many artists I admire for their talent of crafting their own sounds and merging the music with other artistic practices.
I like composer that can tell a story, not only with melodic structure but with the expressive power of sounds.
What made you decide to start making Reaktor Ensembles?
I mostly use Ableton Live until the beginning (from 2002) and I have always used Reaktor since version 3, to provide myself with sound contents, which I mount and arrange thereafter in Live.
I quickly realized that I had a tool as powerful as it was original. I have almost learned with it more about synthesis and sound processing than on any other platform or hardware instrument.
At first, modifying the existing ensembles, I ended up doing mine. I have always wanted to generate my music from a custom interpretation process .. and Reaktor is perfect for this.
After a lot of experiences and discographic projects more or less discreet and anonymous, I started to find that the diffusion of my creations did not meet the format of diffusion that I wished ..
It was not enough adapted to the way I work and the things I wanted to express in music production. I wished a more interactive diffusion which would include the process of creation itself, and not something locked/achieved in time as a classic EP or LP format. I wanted something that let the structural forms of the composition to be possibly autonomous or manipulable.
That's what led me to release the first version of RUIDOZ° with many presets included .. like pieces of an album that was not completely achieved… A sound material which aims to be eternally modified by end users.
What makes you stick out from other developers. What is Blinksonic doing that others are not?
Maybe precisely the singular character of this approach. I do not propose an algorithmic killer way to make music but rather an original playable sound environment.
According to the inspiration and the technical level, I think we can use these tools as something serious .. but also as an interactive trip that you open as a video game :D And it’s also a collection of ideas that only wait to be incorporated inside tracks..
Beyond that, I must remain humble, I am new in this field.. lots of things to learn yet..
But I think my main asset is to offer a successful and unique user experience.
Many Reaktor instruments have not been enough achieved at the graphic interface level to become really interesting.
A good instrument is not only an instrument that sounds good. It must be take in hands in the best way possible for taking advantage of it.
The GUI really did the difference even if it can be considered as secondary for a sound making tool. With screen technologies, this the interface which provides this feeling and helps being inspired.
In computer music and in term of algorithm, nothing is really new actually, apart the renewal of graphical interfaces and some new integrations of concepts related to spectrum analysis and processing, artificial intelligence and machine learning. I have the impression that developers are more focused to recycle algorithms on making them more tangible and improving the usability of applications, making them more convenient and easier, more immediate and fun.
Aside from the visual aspect of my instruments, I think it’s the stylistic orientation suggested and the non academic character that makes the difference and helps my work to meet an audience. I work alone so it's also a form of freedom, with no limit or drastic specifications to respect. I walk through inspiration .. and always with the intention to provide my own arsenal .. for a bit that one day I stop developing to try to use my tools to compose or interpret music again :-D
What direction do you see yourself taking Blinksonic?
It's pretty vague at the moment, because I have a lot of ideas and it still necessary to choose the good ones .. I would like for example to release album concepts or EP based on Reaktor.
I really like the idea of using Reaktor as a final format for broadcasting a musical work with a graphical interface which aims to manipulate it in real time, play and illustrate the universe described by the music ...
A similar trip to the Demomakers or, I do not know if you remember it, this R3-based application, called « Mewark - Stoderaft » by Lazyfish that NI released for free in the early 2000’s.
At that time, I was fascinated by this futuristic music diffusion concept !
I also dream to be able to produce an hardware effect in a close futur…
Also gotta say love the Interfaces of your devices. What influenced them and do you also like design?
Thanks!
I am generally influenced by any technological objects that are currently offered to us and I am directly influenced by current trends around what we can call "tablet design" and « industriel design ». I also love the work on HUD/GUI for sci fi movies.
Today, we all have in hands smartphones and all the user experiences that goes with it, with the most minimalist design possible, infographic that responds to information codes of representations. I am influenced by this and I completely abandon skeumorphic and realistic graphic models. It looks gorgeous but it tends to not be readable and practical as the original emulated hardware are.
Flat design is not just a trend. It really brings something more optimized and kind of technological elegance to applications and well suited for screens.
This said, I am not against bringing back some shadows as « Material Design » suggest it.
In all case, I am very focused on all the possible trends and field of development that can improve the User Experience of an application. So I watch a lot what happens in that domain.
Is there a designer, Art or Software developer that influenced your GUI's.
I am always amazed by the design work of Teenage Engineering. It must be felt on my own work that they influenced me. :)
To my eyes, it’s truly THE way to of designing. This vision of graphically illustrate technical sound parameters in a scalable way… I love the idea that the symbol or the icon to become the object of control.
In pure software design on audio, I love Sugar Bytes, Sinevibes, Audio Damage, iZotope, FAW, Unfiltered Audio and obviously many instruments edited by NI.
Last but not least, I can’t forget to mention Thomas Hennebert (Inear Display) and Ivo Ivanov (Glitchmachines). I feel also very close to their vision of sound design.
What are your 5 favorite Reaktor Ensembles (non Blinksonic) that you like or wish you made ?
RAZOR !! This the killer one !! it is timeless .. I dream that someday this synth will be replicated as an identical hardware! It would be crazy!
ROUNDS is an amazing instrument too !
NODE by Antonio Bianca.. it's so small and fine, beautiful, effective and inspiring at the same time ..
The FLOW by Tim exile.. also GRAINCUBE ..
There is plenty which I love and I certainly forget .. SPACEDRONE, METAPHYSICALL FUNCTION ...
Ah yes probably the one that I particularly like .. a very old one, TRAVELIZER from the original library of R4 ... I found it crazy to be able to manipulate a wave file that way when I discover it !
Do you have a favorite Reaktor Ensemble Developer (non Blinksonic)?
I think that Sasha Lazyfish is above any hierarchy. He invented a lot of things in the early beginning of Reaktor that still inspire me.
I also have a lot of respect for Twisted Tools. They were the first to release premium ensembles with the same quality of a AU/VST plugin. They injected on their instruments and effects such singular method to produce electronic music with always a both forward thinking GUI.
I can not forget to mention Tim Exile, but he’s out of any category… This guy is cracked of talent and naturally inspired !
I was going to forget Antonio Bianca. But it's people everybody knows ! :D
I love this artist called « Even Iter » whose sharing amazing generative ensembles on the User Library. All ensembles always contain geometrical visualizations of sounds, generated and drawn via Reaktor coding.
And since the Blocks framework advent, I am keep a lot of attention on COLUGO_ stuffs.
I also have been lucky enough to collaborate with Sandy Small, who has rebuilded in Core most of the structure off my block PROCESSORZ°.
Sandy is as accurate and logical as he’s brilliant.
Which BLinksonic Ensemble are you most proud of ?
I think VOZ brings something special, it looks a bit like OUTPUT EXHALE, but the concept is pushed a little further with the ability to randomly change samples from a limited range of incoming notes. This is not my most popular instrument, but it's the one I find the most achieved and powerful .
With this semi modular approach ported to a tone sampler, I regularly discover many new ways to use it and create textures. The sound bank compiles 15 years sound recordings of my voice, so it’s necessarily something special for me. It gives a strange second life to the provided vocal formants.
What's are some of your favorite hardware or Software gear to process samples?
As mentioned above, and beyond the design aspect, I am conquered by the OP-1 of TE. This kind of "soft" sampler never existed before on hardware , or in any case, not in this compact format . I’m waiting for the OP-Z with the same excitement as kid during Christmas.
As much as I am unconditional of Ableton, I recently put my fingers on MASCHINE, there is room for it to become a complete DAW, but besides that, I think it's the best software sampler on the market today. The functions to handle audio slices, the maneuverability + an app that comes with a controller. I really observe with a deep interest all the coming new features and improvements that will be implement to it.
Otherwise, I watch with attention also New Sonic Art, James Walker Hall is a pure developer and also SoundGuru « the Mangler » is extremely attractive concept ..
An also ! ... The impossible to forget sampler, but unfortunately only available on iOS: SAMPLR. I can spend hours on it, it's very intuitive and fun to play !
What are some of your most used plugins and what do you use them for?
I already mention some of them above. As much as I observe and test everything possible that exist on the market, but I keep the same habits, and come back very often to the same tools.
By cons, I also use some additional hardware, like my old subtractive synth CRUMAR BIT 99, a kind of JUNO, very typical eighty sounds and I recently acquired the 2 Nozoïd synthesizer. (nozoid.com) They are amazing !! By the way, for the sound quality but also for their modular design in a compact format. I will never have been able to mount an Eurorack with the equal features for the same price.
Are you working on something that you would like to tells us about?
I can’t say a lot about it but I hope to come back this next spring with a new concept of instrument. I am actually inside development days, and even if I have my idea, I don’t know myself what kind of sonic craziness it will be at the end ;)
Apart this I will participate to the next NATIVE SESSIONS called FUTURE TECHNIQUES, the 17th February, in Paris. I will perform with my instruments and give a short masterclass.
For Info on Native Session: https://www.native-instruments.com/fr/community/native-sessions/native-sessions-future-techniques-2018/

youtube
youtube
#news#blinksonic#reaktor#nativeinstruments#reaktor5#reaktor6#komplete#sounddesign#sounddesigner#musicprooducer#musicproduction#Soundfx#samples#musiccompostion#Gameaudio#filmmusic#electronicmusic
1 note
·
View note
Text
64k Rammstein
Du fragst warum? Warum eigentlich nicht: LOAD”Rammstein”,8,1
04.08.2019
😸
A tribute to Rammstein that I made on a real C64. The music comes from the bread box C64. I programmed the song parts in SID Wizard and then recorded them in Reason. I arranged these in the video editing program. The pictures are screenshots of the original video, which I further processed with the color palette of the C64 and downsized in the resolution. The voices come from the SAM Automatic Mouth Emulator. The lyrics are made with the Future Writer from the C64 emulator. Some other elements are made with demomaker and similar programs. I will still offer the SID file for download when I finish, because I’m still in the learning phase. It’s my first project and the incentive was for nostalgic reasons.
https://youtu.be/3VReIuv1GFo(via gagada)
+++ Belong to the cool Kids! It’s Easy: Follow ZWENTNER.com on Social Media like Twitter, Facebook, Snapchat or Instagram for more Content of this Blog & my Life +++
from ZWENTNER.com https://ift.tt/2YHKkUt
via IFTTT
0 notes
Text
Amiga - Demomaker the Amiga Years, à procura de crowdfunding!
Amiga – Demomaker the Amiga Years, à procura de crowdfunding!
Demomaker The Amiga years, é a mais recente obra à procura de crowdfunding no indiegogo.
Este promissor primeiro volume da Editions 64k, é dedicado à demoscene do Amiga, uma das imagens de marca do computador 16 bits da Commodore.
O livro cobrirá a história da demoscene mais underground entre 1984 até 1993, ao longo das mais de 450 páginas.
No seu interior podemos esperar grupos…
View On WordPress
0 notes
Text
In Vintage is the new old: Demomaker – The Amiga years – The making of the best demos for the Amiga from 1984 to 1993 https://t.co/y6U41rWgMh #repost
In Vintage is the new old: Demomaker – The Amiga years – The making of the best demos for the Amiga from 1984 to 1993 https://t.co/y6U41rWgMh #repost
0 notes
Link
0 notes
Text
Télécharger Livres PDF Gratuitement Demomaker The Amiga Years - le livre de la demoscene Amiga fait campagne #ebook #livrePDF #livret #coursesEnVrac
Les Editions 64K nous reviennent avec Demomaker The Amiga years, un livre qui vous fera revivre l'histoire des meilleures démos réalisées sur Amiga et à en savoir un peu plus sur la genèse des groupes ...
source https://kennelrealscoop.com#0ef6f44f9035560e1bb6c7034efd20a0
0 notes
Text
“Along For The Ride”, a reasonably complex demo
It's been a while since I've been anticipating people finally seeing one of my demos like I was anticipating people to see "Along For The Ride", not only because it ended up being a very personal project in terms of feel, but also because it was one of those situations where to me it felt like I was genuinely throwing it all the complexity I've ever did in a demo, and somehow keeping the whole thing from falling apart gloriously.
youtube
The final demo.
I'm quite happy with the end result, and I figured it'd be interesting to go through all the technology I threw at it to make it happen in a fairly in-depth manner, so here it goes.
(Note that I don't wanna go too much into the "artistic" side of things; I'd prefer if the demo would speak for itself on that front.)
The starting point
I've started work on what I currently consider my main workhorse for demomaking back in 2012, and have been doing incremental updates on it since. By design the system itself is relatively dumb and feature-bare: its main trick is the ability to load effects, evaluate animation splines, and then render everything - for a while this was more than enough.
Around the summer of 2014, Nagz, IR and myself started working on a demo that eventually became "Háromnegyed Tíz", by our newly formed moniker, "The Adjective". It was for this demo I started experimenting with something that I felt was necessary to be able to follow IR's very post-production heavy artstyle: I began looking into creating a node-based compositing system.
I was heavily influenced by the likes of Blackmagic Fusion: the workflow of being able to visually see where image data is coming and going felt very appealing to me, and since it was just graphs, it didn't feel very complicated to implement either. I had a basic system up and running in a week or two, and the ability to just quickly throw in effects when an idea came around eventually paid off tenfold when it came to the final stage of putting the demo together.

The initial node graph system for Háromnegyed Tíz.
The remainder of the toolset remained relatively consistent over the years: ASSIMP is still the core model loader of the engine, but I've tweaked a few things over time so that every incoming model that arrives gets automatically converted to its own ".assbin" (a name that never stops being funny) format, something that's usually considerably more compact and faster to load than formats like COLLADA or FBX. Features like skinned animation were supported starting with "Signal Lost", but were never spectacularly used - still, it was a good feeling to be able to work with an engine that had it in case we needed it.
Deferred rendering
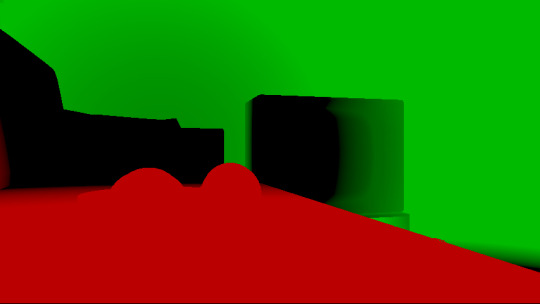
During the making of "Sosincs Vége" in 2016, IR came up with a bunch of scenes that felt like they needed to have an arbitrary number of lightsources to be effecive; to this end I looked into whether I was able to add deferred rendering to the toolset. This turned out to be a bit fiddly (still is) but ultimately I was able to create a node type called the "G-buffer", which was really just a chunk of textures together, and use that as the basis for two separate nodes: one that renders the scenegraph into the buffer, and another that uses the buffer contents to light the final image.
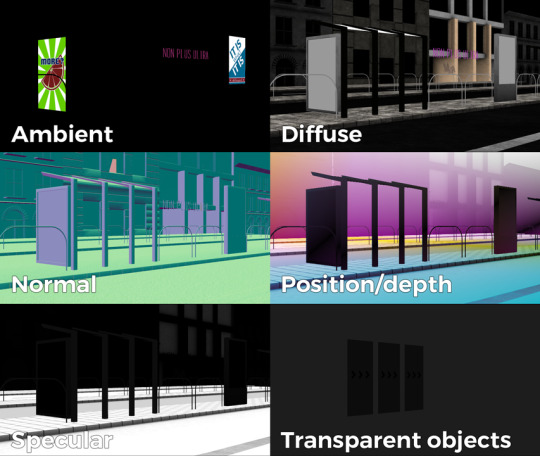
The contents of a G-buffer; there's also additional information in the alpha channels.
Normally, most deferred renderers go with the tile-based approach, where they divide the screen into 16x16 or 32x32 tiles and run the lights only on the tiles they need to run them on. I decided to go with a different approach, inspired by the spotlight rendering in Grand Theft Auto V: Because I was mostly using point- and spot-lights, I was able to control the "extent" of the lights and had a pretty good idea whether each pixel was lit or not based on its position relative to the light source. By this logic, e.g. for pointlights if I rendered a sphere into the light position, with the radius of what I considered to be the farthest extent of the light, the rendered sphere would cover all the pixels on screen covered by that light. This means if I ran a shader on each of those pixels, and used the contents of the G-buffer as input, I would be able to calculate independent lighting on each pixel for each light, since lights are additive anyway. The method needed some trickery (near plane clipping, sphere mesh resolution, camera being near the sphere edge or inside the sphere), but with some magic numbers and some careful technical artistry, none of this was a problem.
The downside of this method was that the 8-bit channel resolution of a normal render target was no longer enough, but this turned out to be a good thing: By using floating point render targets, I was able to adapt to a high-dynamic range, linear-space workflow that ultimately made the lighting much easier to control, with no noticable loss in speed. Notably, however, I skipped a few demos until I was able to add the shadow routines I had to the deferred pipeline - this was mostly just a question of data management inside the graph, and the current solution is still something I'm not very happy with, but for the time being I think it worked nicely; starting with "Elégtelen" I began using variance shadowmaps to get an extra softness to shadows when I need it, and I was able to repurpose that in the deferred renderer as well.
The art pipeline
After doing "The Void Stared Into Me Waiting To Be Paid Its Dues" I've began to re-examine my technical artist approach; it was pretty clear that while I knew how the theoreticals of a specular/glossiness-based rendering engine worked, I wasn't necessarily ready to be able to utilize the technology as an artist. Fortunately for me, times changed and I started working at a more advanced games studio where I was able to quietly pay closer attention to what the tenured, veteran artists were doing for work, what tools they use, how they approach things, and this introduced me to Substance Painter.
I've met Sebastien Deguy, the CEO of Allegorithmic, the company who make Painter, way back both at the FMX film festival and then in 2008 at NVScene, where we talked a bit about procedural textures, since they were working on a similar toolset at the time; at the time I obviously wasn't competent enough to deal with these kind of tools, but when earlier this year I watched a fairly thorough tutorial / walkthrough about Painter, I realized maybe my approach of trying to hand-paint textures was outdated: textures only ever fit correctly to a scene if you can make sure you can hide things like your UV seams, or your UV scaling fits the model - things that don't become apparent until you've saved the texture and it's on the mesh.
Painter, with its non-linear approach, goes ahead of all that and lets you texture meshes procedurally in triplanar space - that way, if you unwrapped your UVs correctly, your textures never really stretch or look off, especially because you can edit them in the tool already. Another upside is that you can tailor Painter to your own workflow - I was fairly quickly able to set up a preset to my engine that was able to produce diffuse, specular, normal and emissive maps with a click of a button (sometimes with AO baked in, if I wanted it!), and even though Painter uses an image-based lighting approach and doesn't allow you to adjust the material settings per-textureset (or I haven't yet found it where), the image in Painter was usually a fairly close representation to what I saw in-engine. Suddenly, texturing became fun again.

An early draft of the bus stop scene in Substance Painter.
Depth of field
DOF is one of those effects that is nowadays incredibly prevalent in modern rendering, and yet it's also something that's massively overused, simply because people who use it use it because it "looks cool" and not because they saw it in action or because they want to communicate something with it. Still, for a demo this style, I figured I should revamp my original approach.
The original DOF I wrote for Signal Lost worked decently well for most cases, but continued to produce artifacts in the near field; inspired by both the aforementioned GTAV writeup as well as Metal Gear Solid V, I decided to rewrite my DOF ground up, and split the rendering between the near and far planes of DOF; blur the far field with a smart mask that keeps the details behind the focal plane, blur the near plane "as is", and then simply alphablend both layers on top of the original image. This gave me a flexible enough effect that it even coaxed me to do a much-dreaded focal plane shift in the headphones scene, simply because it looked so nice I couldn't resist.
The near- and far-fields of the depth of field effect.
Screen-space reflections
Over the summer we did a fairly haphazard Adjective demo again called "Volna", and when IR delivered the visuals for it, it was very heavy on raytraced reflections he pulled out of (I think) 3ds max. Naturally, I had to put an axe to it very quickly, but I also started thinking if we can approximate "scene-wide" reflections in a fairly easy manner. BoyC discovered screen-space reflections a few years ago as a fairly cheap way to prettify scenes, and I figured with the engine being deferred (i.e. all data being at hand), it shouldn't be hard to add - and it wasn't, although for Volna, I considerably misconfigured the effect which resulted in massive framerate loss.
The idea behind SSR is that a lot of the time, reflections in demos or video games are reflecting something that's already on screen and quite visible, so instead of the usual methods (like rendering twice for planar reflections or using a cubemap), we could just take the normal at every pixel, and raymarch our way to the rendered image, and have a rough approximation as to what would reflect there.
The logic is, in essence to use the surface normal and camera position to calculate a reflection vector and then start a raymarch from that point and walk until you decide you've found something that may be reflecting on the object; this decision is mostly depth based, and can be often incorrect, but you can mitigate it by fading off the color depending on a number of factors like whether you are close to the edge of the image or whether the point is way too far from the reflecting surface. This is often still incorrect and glitchy, but since a lot of the time reflections are just "candy", a grainy enough normalmap will hide most of your mistakes quite well.

Screen-space reflections on and off - I opted for mostly just a subtle use, because I felt otherwise it would've been distracting.
One important thing that Smash pointed out to me while I was working on this and was having problems is that you should treat SSR not as a post-effect, but as lighting, and as such render it before the anti-aliasing pass; this will make sure that the reflections themselves get antialiased as well, and don't "pop off" the object.
Temporal antialiasing
Over the last 5 years I've been bearing the brunt of complaints that the aliasing in my demos is unbearable - I personally rarely ever minded the jaggy edges, since I got used to them, but I decided since it's a demo where every pixel counts, I'll look into solutions to mitigate this. In some previous work, I tried using FXAA, but it never quite gave me the results I wanted, so remembering a conversation I had with Abductee at one Revision, I decided to read up a bit on temporal antialiasing.
The most useful resource I found was Bart Wroński's post about their use of TAA/TSSAA (I'm still not sure what the difference is) in one of the Assassin's Creed games. At its most basic, the idea behind temporal antialiasing is that instead of scaling up your resolution to, say, twice or four times, you take those sub-pixels, and accumulate them over time: the way to do this would be shake the camera slightly each frame - not too much, less than a quarter-pixel is enough just to have the edges alias slightly differently each frame - and then average these frames together over time. This essentially gives you a supersampled image (since every frame is slightly different when it comes to the jagged edges) but with little to no rendering cost. I've opted to use 5 frames, with the jitter being in a quincunx pattern, with a random quarter-pixel shake added to each frame - this resulted in most edges being beautifully smoothed out, and I had to admit the reasonably little time investment was worth the hassle.
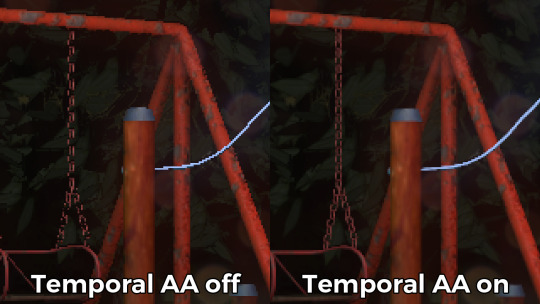
Anti-aliasing on and off.
The problem of course, is that this works fine for images that don't move all that much between frames (not a huge problem in our case since the demo was very stationary), but anything that moves significantly will leave a big motion trail behind it. The way to mitigate would be to do a reprojection and distort your sampling of the previous frame based on the motion vectors of the current one, but I had no capacity or need for this and decided to just not do it for now: the only scene that had any significant motion was the cat, and I simply turned off AA on that, although in hindsight I could've reverted back to FXAA in that particular scenario, I just simply forgot. [Update, January 2019: This has been bugging me so I fixed this in the latest version of the ZIP.]
There were a few other issues: for one, even motion vectors won't be able to notice e.g. an animated texture, and both the TV static and the rain outside the room were such cases. For the TV, the solution was simply to add an additional channel to the GBuffer which I decided to use as a "mask" where the TAA/TSSAA wouldn't be applied - this made the TV texture wiggle but since it was noisy anyway, it was impossible to notice. The rain was considerably harder to deal with and because of the prominent neon signs behind it, the wiggle was very noticable, so instead what I ended up doing is simply render the rain into a separate 2D matte texture but masked by the scene's depth buffer, do the temporal accumulation without it (i.e. have the antialiased scene without rain), and then composite the matte texture into the rendered image; this resulted in a slight aliasing around the edge of the windows, but since the rain was falling fast enough, again, it was easy to get away with it.

The node graph for hacking the rainfall to work with the AA code.
Transparency
Any render coder will tell you that transparency will continue to throw a wrench into any rendering pipeline, simply because it's something that has to respect depth for some things, but not for others, and the distinction where it should or shouldn't is completely arbitrary, especially when depth-effects like the above mentioned screen-space reflections or depth of field are involved.
I decided to, for the time being, sidestep the issue, and simply render the transparent objects as a last forward-rendering pass using a single light into a separate pass (like I did with the rain above) honoring the depth buffer, and then composite them into the frame. It wasn't a perfect solution, but most of the time transparent surfaces rarely pick up lighting anyway, so it worked for me.
Color-grading and image mastering
I was dreading this phase because this is where it started to cross over from programming to artistry; as a first step, I added a gamma ramp to the image to convert it from linear to sRGB. Over the years I've been experimenting with a lot of tonemap filters, but in this particular case a simple 2.2 ramp got me the result that felt had the most material to work with going into color grading.
I've been watching Zoom work with Conspiracy intros for a good 15 years now, and it wasn't really until I had to build the VR version of "Offscreen Colonies" when I realized what he really does to get his richer colors: most of his scenes are simply grayscale with a bit of lighting, and he blends a linear gradient over them to manually add colour to certain parts of the image. Out of curiousity I tried this method (partly out of desperation, I admit), and suddenly most of my scenes began coming vibrantly to life. Moving this method from a bitmap editor to in-engine was trivial and luckily enough my old friend Blackpawn has a collection of well known Photoshop/Krita/etc. blend mode algorithms that I was able to lift.
Once the image was coloured, I stayed in the bitmap editor and applied some basic colour curve / level adjustment to bring out some colours that I felt got lost when using the gradient; I then applied the same filters on a laid out RGB cube, and loaded that cube back into the engine as a colour look-up table for a final colour grade.
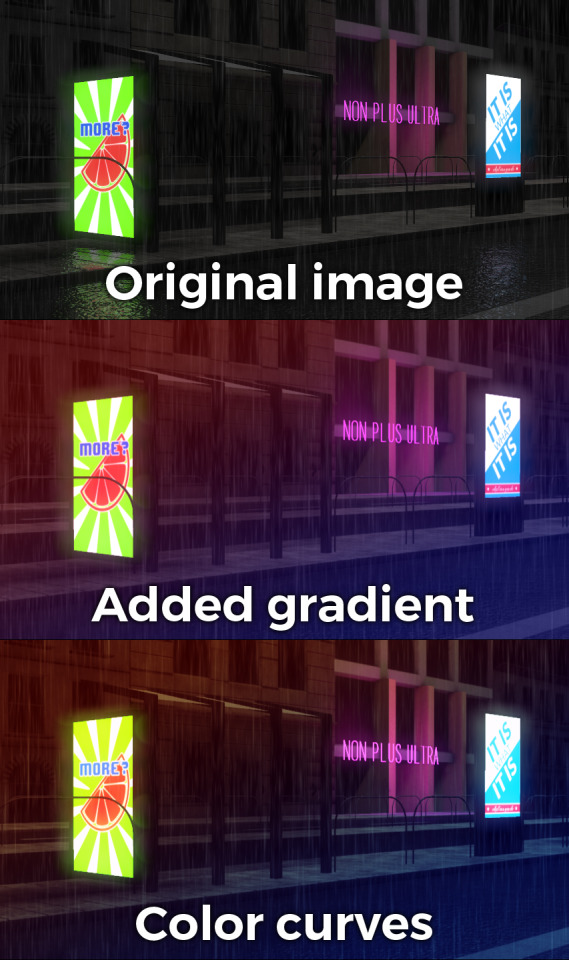
Color grading.
Optimizations
There were two points in the process where I started to notice problems with performance: After the first few scenes added, the demo ran relatively fine in 720p, but began to dramatically lose speed if I switched to 1080p. A quick look with GPU-Z and the tool's internal render target manager showed that the hefty use of GPU memory for render targets quickly exhausted 3GB of VRAM. I wasn't surprised by this: my initial design for render target management for the node graph was always meant to be temporary, as I was using the nodes as "value types" and allocating a target for each. To mitigate this I spent an afternoon designing what I could best describe as a dependency graph, to make sure that render targets that are not needed for a particular render are reused as the render goes on - this got my render target use down to about 6-7 targets in total for about a hundred nodes.

The final node graph for the demo: 355 nodes.
Later, as I was adding more scenes (and as such, more nodes), I realized the more nodes I kept adding, the more sluggish the demo (and the tool) got, regardless of performance - clearly, I had a CPU bottleneck somewhere. As it turned out after a bit of profiling, I added some code to save on CPU traversal time a few demos ago, but after a certain size this code itself became a problem, so I had to re-think a bit, and I ended up simply going for the "dirty node" technique where nodes that explicitly want to do something mark their succeeding nodes to render, and thus entire branches of nodes never get evaluated when they don't need to. This got me back up to the coveted 60 frames per second again.
A final optimization I genuinely wanted to do is crunch the demo down to what I felt to be a decent size, around 60-ish megabytes: The competition limit was raised to 128MB, but I felt my demo wasn't really worth that much size, and I felt I had a chance of going down to 60 without losing much of the quality - this was mostly achieved by just converting most diffuse/specular (and even some normal) textures down to fairly high quality JPG, which was still mostly smaller than PNG; aside from a few converter setting mishaps and a few cases where the conversion revealed some ugly artifacts, I was fairly happy with the final look, and I was under the 60MB limit I wanted to be.
Music
While this post mostly deals with graphics, I'd be remiss to ignore the audio which I also spent a considerable time on: because of the sparse nature of the track, I didn't need to put a lot of effort in to engineering the track, but I also needed to make sure the notes sounded natural enough - I myself don't actually play keyboards and my MIDI keyboard (a Commodore MK-10) is not pressure sensitive, so a lot of the phrases were recorded in parts, and I manually went through each note to humanize the velocities to how I played them. I didn't process the piano much; I lowered the highs a bit, and because the free instrument I was using, Spitfire Audio's Soft Piano, didn't have a lot of release, I also added a considerable amount of reverb to make it blend more into the background.
For ambient sounds, I used both Native Instruments' Absynth, as well as Sound Guru's Mangle, the latter of which I used to essentially take a chunk out of a piano note and just add infinite sustain to it. For the background rain sound, I recorded some sounds myself over the summer (usually at 2AM) using a Tascam DR-40 handheld recorder; on one occasion I stood under the plastic awning in front of our front door to record a more percussive sound of the rain knocking on something, which I then lowpass filtered to make it sound like it's rain on a window - this eventually became the background sound for the mid-section.
I've done almost no mixing and mastering on the song; aside from shaping the piano and synth tones a bit to make them sound the way I wanted, the raw sparse timbres to me felt very pleasing and I didn't feel the sounds were fighting each other in space, so I've done very little EQing; as for mastering, I've used a single, very conservatively configured instance of BuzMaxi just to catch and soft-limit any of the peaks coming from the piano dynamics and to raise the track volume to where all sounds were clearly audible.
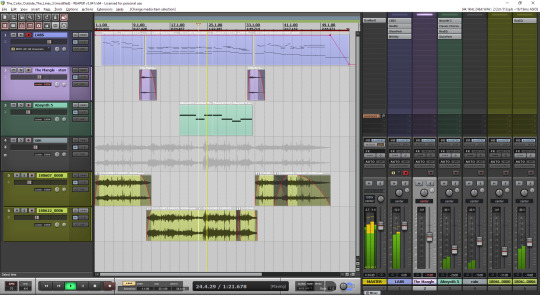
The final arrangement of the music in Reaper.
Minor tricks
Most of the demo was done fairly easily within the constraints of the engine, but there were a few fun things that I decided to hack around manually, mostly for effect.
The headlights in the opening scene are tiny 2D quads that I copied out of a photo and animated to give some motion to the scene.
The clouds in the final scene use a normal map and a hand-painted gradient; the whole scene interpolates between two lighting conditions, and two different color grading chains.
The rain layer - obviously - is just a multilayered 2D effect using a texture I created from a particle field in Fusion.
Stuff that didn't make it or went wrong
I've had a few things I had in mind and ended up having to bin along the way:
I still want to have a version of the temporal AA that properly deghosts animated objects; the robot vacuum cleaner moved slow enough to get away with it, but still.
The cat is obviously not furry; I have already rigged and animated the model by the time I realized that some fur cards would've helped greatly with the aliasing of the model, but by that time I didn't feel like redoing the whole thing all over again, and I was running out of time.
There's considerable amount of detail in the room scene that's not shown because of the lighting - I set the room up first, and then opted for a more dramatic lighting that ultimately hid a lot of the detail that I never bothered to arrange to more visible places.
In the first shot of the room scene, the back wall of the TV has a massive black spot on it that I have no idea where it's coming from, but I got away with it.
I spent an evening debugging why the demo was crashing on NVIDIA when I realized I was running out of the 2GB memory space; toggling the Large Address Aware flag always felt a bit like defeat, but it was easier than compiling a 64-bit version.
A really stupid problem materialized after the party, where both CPDT and Zoom reported that the demo didn't work on their ultrawide (21:9) monitors: this was simply due to the lack of pillarbox support because I genuinely didn't think that would ever be needed (at the time I started the engine I don't think I even had a 1080p monitor) - this was a quick fix and the currently distributed ZIP now features that fix.
Acknowledgements
While I've did the demo entirely myself, I've received some help from other places: The music was heavily inspired by the work of Exist Strategy, while the visuals were inspired by the work of Yaspes, IvoryBoy and the Europolis scenes in Dreamfall Chapters. While I did most of all graphics myself, one of the few things I got from online was a "lens dirt pack" from inScape Digital, and I think the dirt texture in the flowerpot I ended up just googling, because it was late and I didn't feel like going out for more photos. I'd also need to give credit to my audio director at work, Prof. Stephen Baysted, who pointed me at the piano plugin I ended up using for the music, and to Reid who provided me with ample amounts of cat-looking-out-of-window videos for animation reference.
Epilogue
Overall I'm quite happy with how everything worked out (final results and reaction notwithstanding), and I'm also quite happy that I managed to produce myself a toolset that "just works". (For the most part.)
One of the things that I've been talking to people about it is postmortem is how people were not expecting the mix of this particular style, which is generally represented in demos with 2D drawings or still images or photos slowly crossfading, instead using elaborate 3D and rendering. To me, it just felt like one of those interesting juxtapositions where the technology behind a demo can be super complex, but at the same time the demo isn't particularly showy or flashy; where the technology behind the demo does a ton of work but forcefully stays in the background to allow you to immerse in the demo itself. To me that felt very satisfactory both as someone trying to make a work of art that has something to say, but also as an engineer who tries to learn and do interesting things with all the technology around us.
What's next, I'm not sure yet.
3 notes
·
View notes
Text
Télécharger Livres PDF Gratuitement Demomaker The Amiga Years - le livre de la demoscene Amiga fait campagne #ebook #livrePDF #livret #coursesEnVrac
Les Editions 64K nous reviennent avec Demomaker The Amiga years, un livre qui vous fera revivre l'histoire des meilleures démos réalisées sur Amiga et à en savoir un peu plus sur la genèse des groupes ...
source https://ofriceandzen.org#0ef6f44f9035560e1bb6c7034efd20a0
0 notes
Link
CODEF Canvas Oldskool Demo EF-fects we are supporting it and creating a wonderful editor for it with this AtariST remake as sample thanx to mellow Man for the support..... hit the link on the bottom and register to download loads of other demomaking and designing tools
0 notes
Text
Télécharger Livres PDF Gratuitement Demomaker The Amiga Years - le livre de la demoscene Amiga fait campagne #ebook #livrePDF #livret #coursesEnVrac
Les Editions 64K nous reviennent avec Demomaker The Amiga years, un livre qui vous fera revivre l'histoire des meilleures démos réalisées sur Amiga et à en savoir un peu plus sur la genèse des groupes ...
source http://kesherscouting.org#0ef6f44f9035560e1bb6c7034efd20a0
0 notes
Last Seen Blogs

parkkeunseo
제목 없음

ppolppool
ppol

some-what-curious-33
Just Curious
parkkeunseo
제목 없음

feelingstoo
Art to make your heart soar