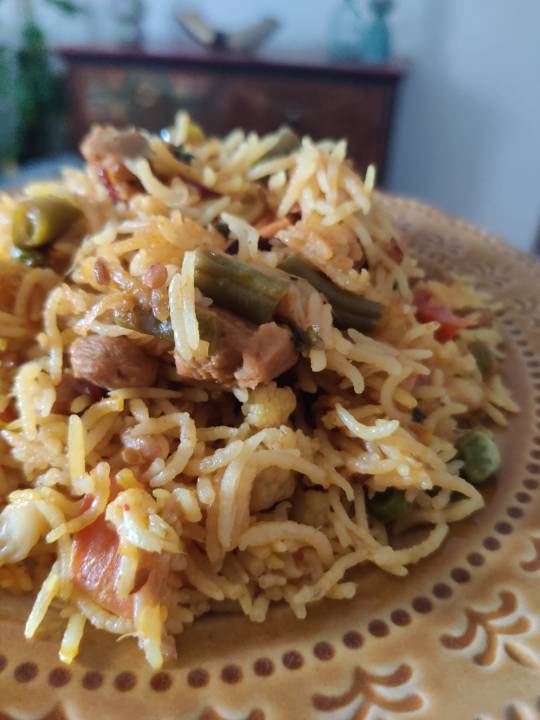
#biryani 5 minutes
Note
What do you think are the reactions of new princes when mc is sulking
I'm not really good at imagining reactions, but for you, I will try.
Matias
Matias: I hate to tell you this, but the law says you can only sulk for 30 minutes.
Matias: And you've been like this for about 15 minutes.
Matias: The punishment is 5 lashes from the cane.
Matias: But don't worry, I'm a good lawyer, I can probably get it down to 3.
Matias: Oh, you've got 10 minutes left.
Matias: So we're clear, as a member of the court, I am required to report it if you continue.
Azel
Azel: If you're like this, that means you won't be eating your goat curry, right?
Azel: Yoink!
Azel: Tomorrow is biryani, so try to keep it up through the evening meal.
Azel: Don't worry, I'm a generous god today, so I'll count the extra meals as the fee for putting up with you.
Kagari
Kagari: Feeling sulky today?
Kagari: It's okay, I didn't want to talk about my feelings either.
Kagari: Watch your back though, people who get sulky don't survive in this country.
21 notes
·
View notes
Text
closed starter for @masonxmahir
when: several days after the council meeting, early december
where: their apartment & atelier, above blush boutique
≽·≼
( memory loss, anxiety, and mentions of murder tw under the cut )
Meena's secretary was taking them back to Blush after their interview had concluded, and they went back to their life. But a few days later, Kui stirred and woke early, lamplight from the street outside was shading through the slats of their bedroom blinds, narrow lines of gold cast across their face and pillow. Reaching for their phone to check the time (around 5 am), they saw it was open to a conversation with Mason. When had they texted him? Yesterday? No, the day before... maybe? They scrolled back through the texts. They'd very plainly explained after the council meeting that they'd just relived the last time they were murdered, for an investigation, and it was "kinda a lot". It was all foggy. The messages they'd sent were sparse and without much identifiable emotion, though Mason's responses were much more obviously concerned. Gaps in the time stamps spanned several days.
Kui rose and pulled on a robe, removed their silk hair wrap, then wandered out in bare feet to the kitchen-slash-living room of their apartment. There were partially eaten tupperware with what looked like some biryani and pakora in their fridge that had a note brimming with comfort and generosity from the Mahir family taped on top. On the sofa was a tangle of blankets, and two mugs. When they picked them up for further inspection, remnants of the scent of hot cocoa rose to meet them. Of course, they'd shared a meal, they remembered Mason being here... of course. Right? Or was that... no, that was some other time, in the fall? What had they talked about? They washed the mugs quickly, and folded the blankets with a growing sense of unease.
Not bothering to get more dressed, they padded out into the main workspace of the atelier, barefoot against the polished wood of the floor. It was far too early for anyone to be downstairs, the shop's exterior shutters still closed and locked. Kui flicked on the overhead lights to survey the space.
To the untrained eye, it looked as it usually did. Mannequins lined against one wall, the large wrap-around desk with the sewing machine, space for material to be laid flat for cutting, and the drafting table next to it. Various racks of fabric and several movable clothing racks with finished and in-progress pieces off to one side. They approached the desk, and began to scan for details. From the sketches and the marks on their progress board in the atelier it was clear they'd done a lot in the last few days, careful columns of pieces in progress and 20% of their time dedicated to building their skills. It was just as it should be, only they couldn't recall marking it down. The serger with its tidy cones of matching thread had been swapped from black to green. The days had been X'd off the calendar, same as always. Routines were unbroken.
It was all... fine. Normal.
Kui took stock of everything that had changed around them with the same chilly detachment they remembered feeling after their Resurrection, when they'd been taken to the Fairy Ring to recover from it. Was this the same as then, or was it something more sinister? It was probably just their brain deciding to take a bit of a vacation when everything got too heavy. But a shiver ran down their spine, landing in their stomach. Would they feel it somehow, if the charm the Coven had made for them to protect their mind stopped working? They inspected it, wrapped around their wrist, but it didn't look broken or different from normal.
After a few minutes of fretful uncertainty, they made a decision, and reached for their phone. "Hey—sorry, if I woke you?" They pressed a thumb and forefinger on the bridge of their nose. Relying on someone was so inconvenient and… stressful. "I should've texted, sorry." The apology was clipped and hurried, their voice rough from sleep. "I know it's early, it's just—um—could you maybe come by sometime today, if you've got time?"

#( interactions. )#ft. mason mahir#( mason002 )#memory loss tw#trauma tw#anxiety tw#murder mention tw
4 notes
·
View notes
Text
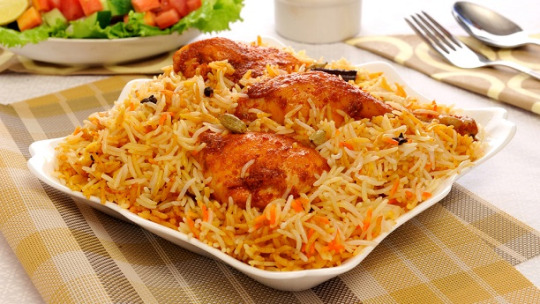
Keeping the Juma Biryani Ritual Alive. This time using @shanfoodsglobal Bombay Biryani Masala. Check my fool proof biryani and try my method❤️
Ingredients:
Chicken – 1Kg (I cut in 10 pcs)
Oil – ½ cup (increase if you want)
Ginger Garlic Paste – 2 tbsp
Onion – 1 Large (thinly sliced and golden fried)
Tomatoes – 500 grams
Potatoes – 400 grams
Yogurt – 1 Cup
Red Chili Flakes – 1 tsp
Red Chili powder – 1 tsp
Turmeric – ½ tsp
Whole spices mix – 1 tsp
Shan Bombay Biryani Masala – 1 Packet
For Rice:
Rice Basmati – 1 Kg
Cumin - 1 tsp
Cinnamon stick – 1-inch pcs
Star Anise – 2 flowers
Salt – as to taste (for Rice)
Vinegar – 1 tbs
For Layering:
Green Chilies – 6 to 8 pcs
Fresh coriander and mint - 1 bunch roughly chopped
Lemon – 1 (Juice), 1 sliced
Fried onions – ½ cup
Method:
Heat oil in the cooking pan and add chicken to the oil and fry with ginger and garlic paste till it changes the color, now add Bombay biryani packet along with, red chili, red chili flakes, turmeric and whole spice mix and cook on high flame. Now grind the tomatoes, fried onion, yogurt together and add to the chicken. After 10 min when the moisture is reduced to half add potatoes and cook till potatoes are tender and masala is on the dryer side and oil has been separated from the masala. Now heat water in a large vessel add the whole spices and salt as per your taste, 1 table spoon of vinegar and cook the rice half way through and strain them and set a site. Now take a pan with flat and large base, start layering by putting first layer of half qty of rice than sprinkle lemon juice, green chilies, mint and coriander, add the chicken and masala and cover with balance qty of rice again sprinkle the lemon juice add lemon slices, green chilies, mint and coriander. Add Saffron color add half glass of water and fried onions ½ cup and cover the pot with aluminum foil and seal it with cover. Now simmer this pot on high flame for 5-8 minutes and then slow down the flame and cook for another 20 – 25 minutes. Open the pot and mix with a rice spoon or plate. Serve hot and enjoy with salad and Raita

#reels #reelsinstagram #biryani #biryanilove #reelkarofeelkaro #reelsindia #reelitfeelit #reels #fyp #bhfyp
6 notes
·
View notes
Text
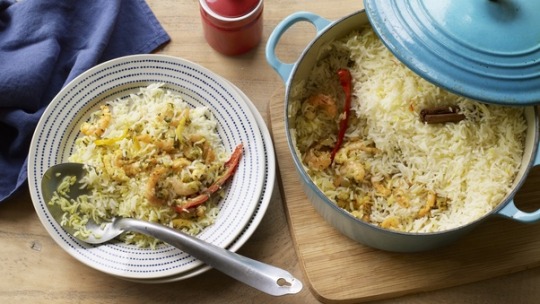
Soy Biryani (Instant and Vegan)
Soy Biryani (Instant and Vegan)
This popular crowd pleaser dish is not as tough as it is thought to be. If you have a heavy pot , you are good to go!
Ingredients
Basmati Rice - 2 cups
Salt - 2 teaspoon
Oil - 2 tablespoon
Green Cardamom - 5 to 6
Cloves - 5 to 6
Bay leaf - 2
Cinnamon stick - 2- 1 inch
Cumin seed - 1 teaspoon
Chili powder - 1 teaspoon
Coriander powder -1 teaspoon
Garam masala powder - 1 teaspoon
Ginger-garlic paste - 1 1/2 tablespoons
Rose water - 1/2 teaspoon
Fresh coriander leaves chopped - 2 tablespoons
Fresh mint leaves chopped - 2 tablespoons
Carrots - 2 medium
Carrots - 1/2 inch pieces 2 medium
French beans - 1/2 inch pieces 15
Cauliflower - 10-12 florets
Green peas shelled - 1 cup
Tomatoes - 1 chopped
Onions - 2 cups sliced
Lemon - 1
Vegan Yogurt or Coconut cream - 1/2 cup
Boiled Soy chunks - 1 cup
Method
Step 1
Make Brista and soak rice:
First thing first! Soak rice in 4 cups of water for 15 to 20 minutes.
Take the pot with lid and heat 2 table spoon of oil. Now add sliced onions and fry until brown.
switch off the gas and take out the onions in a separate dish. These brown onion slices are called “Brista”. It gives the whole dish a sweet caramelized flavor. Do not take off the pot as we are going to make our main dish in the same oil.
Step 2
Marinate Vegetables:
Take a bowl and add all your vegetables. Add Vegan yogurt or Coconut cream, lemon juice, Chili powder, coriander powder, half of the fresh coriander and mint leaves, 1 tea spoon salt and ginger- garlic paste. At this moment we will add 1 teaspoon of oil from the pot and half of Brista to this marinade. Keep it aside for 15 minutes.
Step 3
Prepare the main dish:
Start the gas and add Cardamom, cumin, cinnamon, cloves and bay leaf. let everything crackle and add your marinade to the pot. keep stirring and cook until vegetable are half cooked. Now add your presoaked rice (with water) and soy chunks to the pot. Stir well and add left over Brista, mint and coriander leaves, Garam masala, salt, saffron and rose water. close the lid and wait until rice is double the size and vegetables are cooked.
Some might argue that It’s not a Biryani but a Pulav if there’s no meat. But, no argument here :P
My tip for trying such dish is to prepare in advance. Also, make it when you have guests at home. If you think closely it’s all about having all the ingredients all at once. So shop in advance. I’m sure this aromatic rice dish will keep you asking for more :)
#vegan recipes#indianfood#veganbriyani#yummylicious#yummy food#veganism#vegan cooking#vegancommunity#govegan#foodgasm#foodie#food#partyfood#indiancooking#rice dishes#drooling
3 notes
·
View notes
Text
How To Prepare Biryani, Delicious Pakistani Food!
You must have heard the name Biryani, which is a very popular food in South Asia, especially in Pakistan as well as India. It is interesting to know that it is considered a regular food in most gatherings and circles in these countries.
Today, in this article, we are going to teach you how to cook this delicious dish. We suggest you cook Biryani in the way Pakistani people do, you will definitely enjoy its taste.:
How To Prepare Pakistani Biriyani
First Step
To cook a delicious biryani, you need to season the chicken the night before. For this, put the chicken in a suitable container, then add yogurt, gramsala spice, red pepper, cumin powder, oil, turmeric, nutmeg powder and salt to it and mix, then cover the container and refrigerate overnight. Keep.
Second Step
Soak the rice with warm water and a little salt.
Third Step
Choose a large pan, put it on the gas flame and put some butter and oil in it, then let it heat up.
When the mixture of butter and oil is hot, add the precious onion to the pan and fry.
When the onion turns golden, add 1/4 glass of water to the pan and wait until the pan water is absorbed, then add the crushed garlic and grated ginger to the pan along with the spices and fry for another 2 minutes.
Fourth Step
Add the chicken with all its ingredients to the pan, then fry the chicken until its color changes.
Fifth Step
Grate the tomato and add it to the pan along with plums and bell peppers and fry until the ingredients are well mixed.
Add 1/2 cup of boiling water to the pan, reduce the gas flame and let it simmer.
Cook the ingredients for 20 to 30 minutes on low flame.
Sixth Step
In this step, you have to drain the rice. For this, pour about 8 glasses of water into a pot.
Put the pot on the stove and wait for the water to boil.
When the water starts to boil, add salt, a little oil and lemon juice.
Pour the rice into the pot and let the rice boil for 5 minutes.
When the rice is half cooked, drain it.
Seventh Step
Choose a large pot. Pour some oil into the pot, then put a layer of rice on the bottom of the pot.
Put a layer of biryani stew on the rice, then sprinkle some of the spices (cardamom, cinnamon, gramsala spice and other spices) on the stew layer.
Repeat these steps. Add some brewed saffron to the last layer, which should be rice.
Final Step
Put some mint, cilantro, and lemon on the rice, then cover the pot and let the rice brew. After 30 minutes, your delicious Pakistani Biryani is ready; Put in a serving dish and enjoy!
Note: If you don't have much time for cooking or you are not used to it, but want to pass some wonderful moments with your friends or family members, then visit a Pakistani restaurant near you and order this delicious dish. Don’t miss it!
0 notes
Text
Fusion Holi Recipes
Introduction to Fusion Holi Recipes
Welcome to a culinary journey where tradition meets innovation! This Holi, elevate your festive spread with a tantalizing fusion of flavors from around the world. From starters to desserts, we've curated a collection of recipes that will delight your taste buds and add an extra dash of color to your celebrations.
1. Traditional Holi Dishes with a Twist
Give classic Holi recipes a modern makeover by infusing them with unexpected ingredients and creative presentations. Think stuffed gujiyas with international fillings, savory chaats with a twist, and refreshing thandai with unique flavor combinations.
How to: Experiment with traditional recipes by incorporating non-traditional ingredients such as cheese, nuts, or exotic fruits.
Why: Adding a twist to traditional dishes adds excitement and intrigue to your Holi menu, impressing guests with unexpected flavors.
2. Innovative Fusion Appetizers
Start your Holi feast with a bang by serving up innovative fusion appetizers that blend Indian and international flavors. From spicy samosa sliders to fusion-inspired bruschetta, these appetizers will set the tone for a memorable culinary experience.
How to: Combine familiar Indian snacks with elements from other cuisines, such as using naan bread as a base for Mediterranean toppings or stuffing spring rolls with Indo-Chinese fillings.
Why: Fusion appetizers offer a tantalizing preview of the diverse flavors to come, enticing guests and setting the stage for an unforgettable meal.
3. Fusion Main Course Delights
Dazzle your guests with a main course selection that marries traditional Indian dishes with global culinary influences. Whether it's fusion biryanis, curry-infused pasta, or tikka tacos, these main course delights promise to take your taste buds on a flavorful journey.
How to: Incorporate elements from different cuisines into classic Indian main courses, such as adding Thai curry paste to a traditional curry or serving up fusion-inspired rice bowls.
Why: Fusion's main courses offer a harmonious blend of familiar and exotic flavors, satisfying cravings for both comfort food and culinary adventure.
4. Colorful Desserts to Sweeten the Celebration
No Holi celebration is complete without a sweet treat! Impress your guests with vibrant desserts that not only look stunning but also taste divine. From fusion-inspired mithai to innovative desserts infused with seasonal fruits, these colorful delights are sure to be a hit.
How to: Experiment with traditional Indian sweets by incorporating unexpected flavors and ingredients, such as adding chocolate or exotic spices to classic mithai recipes.
Why: Colorful desserts add a festive touch to your Holi spread, serving as the perfect finale to a memorable meal.
5. Tips for Hosting a Fusion Holi Feast
Hosting a fusion Holi feast doesn't have to be daunting! Follow these simple tips to ensure your celebration goes off without a hitch:
Plan ahead: Create a menu and shopping list in advance to streamline your preparations.
Get creative with decor: Incorporate colorful elements and traditional Holi motifs into your table setting for a festive ambiance.
Offer variety: Cater to different dietary preferences by including a mix of vegetarian and non-vegetarian dishes on your menu.
Keep it simple: Choose recipes that can be prepared in advance or with minimal last-minute assembly to reduce stress on the day of the celebration.
Enjoy the moment: Take time to savor the flavors and enjoy the company of loved ones as you celebrate the spirit of Holi.
By following these steps, you'll be well on your way to hosting a fusion Holi feast that delights the senses and creates lasting memories for all who attend. So gather your loved ones, fire up the stove, and get ready to celebrate Holi in style with our tantalizing fusion recipes!
#cottage#cottagecore#landsccape#paradise#nature#adventure#explore#travel#travelling#photography#aesthetic#cottage garden#country cottage#cottage witch#flowercore#flowers#dark acadamia aesthetic#light academic aesthetic#photographers on tumblr#mountains#illustration#artists on tumblr#curators on tumblr#landscape#chaotic academia#cozycore#lovecore#inspiration#motivation#naturecore
0 notes
Text
How To Make Perfect Chicken Biryani- step by step

Aromatic, flavorful, and undeniably delicious, Chicken Biryani is a culinary masterpiece enjoyed across the globe. But have you tried it with the unique nuttiness of Anjali Sesame Oil? This twist adds a delightful depth of flavor that elevates the dish to a whole new level.
Ingredients:
1.5 kg Chicken, cut into pieces
1.5 kg Basmati rice, soaked for 30 minutes
600 gms Anjali Sesame Oil(nallennai)
300 gms Ginger Garlic Paste
50 gms Chilli Powder
15 Green Chillies (medium sized)
500 gms Ripe Tomatoes, chopped
1 small bunch Mint, chopped
2 small bunches Coriander, chopped
8 Cloves
1 medium Cinnamon stick
5 Cardamom pods
250 gms Onion, thinly sliced
2 Lemons, juiced
1 liter Curd
Salt to taste
Instructions:
Marinate the Magic: In a large bowl, combine chicken pieces with curd, lemon juice, and salt. Marinate for at least 30 minutes, allowing the flavors to meld.
Temper the Symphony: Heat Anjali Sesame Oil in a heavy-bottomed pot or pressure cooker. Add cloves, cinnamon, and cardamom, letting them splutter for a few seconds.
Sauté the Stars: Add half the sliced onions and cook until translucent. Then, introduce the ginger-garlic paste and cook until fragrant.
Spice Up the Story: Stir in the chilli powder and green chillies, releasing their fiery aroma.
Welcome the Hero: Add the marinated chicken pieces and cook on medium heat for 15 minutes, stirring occasionally.
Introduce the Supporting Cast: Add the remaining onions, tomatoes, mint, and coriander leaves. Cook until the tomatoes soften and release their juices.
Layer the Masterpiece: In a separate pot, cook the soaked basmati rice until half done. Drain and spread half the rice over the cooked chicken mixture.
Seal the Deal: Top with the remaining rice, drizzle with Anjali Sesame Oil, and season with salt to taste.
The Grand Finale: Close the pot tightly and cook on low heat for 20–25 minutes, or until the rice is fully cooked and fluffy.
Tips and Tricks:
For an extra layer of flavor, fry a few fried onions (golden brown) and sprinkle them on top of the biryani before serving.
Adjust the amount of chili powder according to your spice preference.
#Chicken Biryani, Anjali Sesame Oil, Sesame oil recipe, Biryani recipe, Indian recipe, Easy Biryani recipe
Enjoy this flavorful Chicken Biryani with Anjali Sesame Oil and impress your family and friends!
#Easy Biryani recipe#Biryani recipe#Anjali Sesame Oil#Chicken Biryani#cooking with sesame oil#sesame oil#best sesame oil mill in madurai#sesameoil#gingelly oil online#gingelly oil for cooking#gingelly oil benefits for hair#sesame oil benefits#sesame oil price#oil
1 note
·
View note
Text
Special chicken Biryani
Chicken Biryani isn’t just a dish; it’s a voyage through the kaleidoscope of flavors that define Indian cuisine. This culinary masterpiece, adorned with aromatic spices, succulent chicken, and fragrant Basmati rice, promises an unparalleled sensory ad venture. In this guide, we’ll unravel the art of crafting the perfect Chicken Biryani — a dish that promises an explosion of flavors in every bite.
Ingredients:
1. Chicken: Bone-in or boneless pieces, as per your preference.
2. Basmati Rice: Fragrant, long-grain Basmati rice.
3. Onions: Thinly sliced and caramelized for sweetness and flavor.
4. Tomatoes: Fresh tomatoes and tomato paste for a tangy balance.
5. Yogurt: To tenderize the chicken and add creaminess.
6. Ginger-Garlic Paste: The aromatic foundation of our Biryani.
7. Biryani Spice Mix: A fusion of cinnamon, cardamom, cloves, and bay leaves.
8. Saffron: Infused in warm milk for a regal touch.
9. Fresh Herbs: Mint leaves and cilantro for garnish.
10. Ghee or Clarified Butter: For richness and flavor.
11. Oil: For cooking chicken and onions.
12. Salt: The unifying seasoning.
I: Marinating the Chicken
Kick off your culinary odyssey by marinating the chicken in a blend of yogurt, ginger-garlic paste, a portion of the biryani spice mix, and salt. Allow it to rest for at least 30 minutes, or preferably longer in the refrigerator. This marination is the key to infusing the meat with incredible flavors.
With the chicken marinating, turn your attention to the Basmati rice. Rinse it thoroughly and soak it for 30 minutes. Parboil the rice until it reaches 70–80% doneness, then drain and set it aside. The partially cooked rice will finish its journey in the Biryani.
III: Caramelizing the Onions
Thinly slice the onions and embark on the art of caramelization. In a pan with oil, let the onions transform into a rich, deep golden hue. Half of these caramelized onions will become a dramatic garnish later in the performance.
IV: Cooking the Chicken
Return to the marinated chicken, now infused with flavors. Sauté it until it attains a partial golden hue, signifying its engagement with the spices and aromatics. Set the chicken aside, allowing it to rejoin the cast for the grand finale.
V: The Grand Performance — Layering the Biryani
Now, let’s create the heart of your Biryani. In a heavy-bottomed pot with a snug-fitting lid, start layering. Begin with a base of cooked rice, followed by the chicken, a sprinkle of the biryani spice mix, and a scattering of caramelized onions. Repeat this symphonic layering until all the rice and chicken are skillfully woven together.
VI: A Touch of Elegance — Saffron Infusion
Introduce a touch of opulence in Act VI. Blend saffron strands that have been steeped in warm milk, and drizzle this golden elixir over the final layer of your Biryani masterpiece, imparting a regal touch.
VII: Dum Cooking — Sealing the Fate
To seal the fate of your creation, enact a culinary tradition known as “dum” cooking. Secure the pot tightly with a lid or seal the edges with a soft dough boundary, ensuring a hermetic seal. Simmer the Biryani over low heat for 20–25 minutes. This slow and gentle cooking process allows the flavors to intermingle, with the rice absorbing the aromatic steam and the chicken tenderizing to perfection.
VIII: The Grand Finale — Garnish and Serve
The climax unfolds in Act VIII — the grand finale. Sprinkle your Chicken Biryani with fresh mint leaves, vibrant cilantro, and the reserved caramelized onions. This garnish elevates the dish to its zenith.
Curtains Fall: A Culinary Masterpiece
Chicken Biryani isn’t just a dish; it’s a culinary art form. Each mouthful narrates a story of patience, precision, and passion. As you embark on this gastronomic journey, remember that practice refines perfection. Feel free to experiment with spice levels, garnishes, or complementary accompaniments like raita or cucumber salad. Over time, you’ll sculpt your unique rendition of Chicken Biryani — a testament to your culinary prowess.
So, with sleeves rolled up and culinary dreams aflame, let Chicken Biryani claim the spotlight in your kitchen. With dedication and creativity, you’ll master this culinary masterpiece, forging unforgettable memories around your dining table. May your Chicken Biryani resonate as an enduring testament to the art of gastronomy. Enjoy!
0 notes
Text
How to make Restaurant style Chicken Biryani at Home
Masala Café The core of the dish
Biryani is one of the favorite dishes of Southeast Asian countries like India, Pakistan, Bangladesh, etc. This dish originally originated among the Muslims of the Indian subcontinent, especially during the Mughal dynasty. However, the biryani masala manufacturers in kolkata we are making today is slightly different from the original. This has changed over time depending on our priorities and our region.
You can find Hyderabadi Biryani, Lucknow Biryani, Kolkata Biryani, Chettinad Biryani etc.They are slightly different from each other, but the core is the same. So Masala Café Biryani and Pulao Masala are perfect for any kind of biryani.

Let's check out the delicious restaurant style chicken biryani recipe with sunrise biryani and pulav masala powder.
Wash the basmati rice and soak it in water for 30 minutes to 1 hour. Then chop the onion, ginger, garlic, tomato and chili and mix until smooth. Cook the rice until it is half cooked, then set it aside and let it cool.Now heat the pan and add oil or ghee or both as per your preference. Add the pasta and cook for a few minutes. Then add the protein of your choice and cook until the oil separates. If you use chicken, the cooking time will be shorter than red meat. Once the chicken or meat is ready, take a large pan and grease it with ghee. Add half of the rice, then sprinkle with Masala Café Biryani Masala Powder in Kolkata and Pulao Masala and season with salt.Then serve the chicken and sprinkle again with Sunrise Biryani and Pulao Masala. Add the final layer by adding the rest of the rice, kewra water, cafe biryani masala and pulao masala rose water, salt and ghee. Pour in some water, cover and cook over low heat for 5-10 minutes. Serve hot with raita or chaatni.
#masala cafe in kolkata#shop online masala in kolkata#biryani masala manufacturers in kolkata#Biryani Masala Powder in kolkata
0 notes
Text
Rose Water At Home
Rose Water At Home: Now an easy way to make rose water at home
Rose water, called “Rose Water” in English, is a type of water made from pink flowers. It is a well-known illuminator and stimulant and is used carefully so that it does not get into the eyes. Rose water is used in beauty and skincare products and is considered very effective in making the skin healthy and glowing. Apart from this, rose water is also used in food to add characteristic taste and smell to the diet.
How to prepare rose water at home?
To prepare rose water at home, follow the following steps:
Ingredients for rose water:
Roses (clean and fresh)
Water
If you do not have rose flowers then you can buy a bottle of refreshing rose water from the market.
Here are the preparation steps:
. Take clean water and boil it. When the water starts boiling, add rose flowers to the boiling water.
. After adding the rose flowers, slow down the gas and boil the water on medium flame for 10-15 minutes.
. After this, turn off the gas and let the water cool down.
. When the water cools down, strain the rose petals and transfer the water to a clean container.
. By adding rose flowers to boiling water and boiling it slowly, rose water extract will be released. Let it cool and it is ready.
Rose water can be used in foods, skincare products, color gulal and other uses. It is also useful for cooling, soothing and protecting the skin.
What is rose water used for?
Rose water is a type of flower oil made from rose flowers. It is a predominantly aromatic and naturally aromatic substance. Rose Water At Home is widely used in health and beauty sectors. Here are some of the main uses:
1. Beauty and Skincare: Rose water is considered a major natural tool for the skin. It is used to remove color, spots and other skin problems from the skin. Its regular use gives freshness, softness and glow to the skin.
2. Haircare: Rose water is also used for hair care. It is used by spraying it on the hair to strengthen the hair muscles and make the hair shiny.
3. Indian Gravy: Rose water is also used in cooking in Indian kitchen. It is used to enhance taste and aroma in biryani and some sweets.
4. Aromatherapy: Rose water is also used in aromatherapy. Its aroma provides peace and helps in reducing stress, calming the mind and fulfilling psychological needs.
What are the benefits of rose water?
Using rose water daily can provide many health and beauty benefits. This ginger is made from the flowers of the Kundal tree (Rosa damascena) and is rich in various elements and properties. Below are some of the main benefits of rose water:
1. Beneficial for skin: Rose water has natural properties which are very useful for the skin. It helps protect the skin from oral infections, makes the skin fresh and glowing, helps reduce skin spots and blemishes, and helps make the skin soft and beautiful.
2. Helpful in reducing stress: Use of rose water is helpful in reducing stress and calming the mind. Its aroma is considered peaceful and enhancing feminine power, which refreshes the mind and reduces stress.
3. Anti-Aging Effect of Rose Water: Its anti-oxidant properties help in protecting the skin from blemishes, wrinkles and age spots. Its regular use can help in keeping the skin healthy, young and glowing.
4. Natural Agni Pacifier: Use of rose water helps in improving the digestive system and calming the natural agni. It gives peace to the intestines and helps in maintaining proper digestion process.
5. Beneficial for hair healing: Rose water is used in hair massage technique so that it can increase hair healing. Apart from this, using it as a hair spray can improve the mental and physical health of the hair.
How can we use rose water?
Rose water is a natural ingredient obtained from pink flowers and is used for many uses. Here are some major ways in which you can useRose Water At Home:
1. Skin Care: Rose water is a major skin care and beauty product. You can use it as a toner to cleanse and refresh your face. It is also used for Kapalabhati or other natural main skin cleansers.
2. Bathing: Using rose water mixed with bathing water cools your skin and moisturizes it. This makes your skin soft, supple and glowing.
3. Massage Oil: You can use rose water by mixing it with massage oil. Using it for massage helps take care of your body and reduces stress.
4. Aromatherapy: Rose water is also used in aromatherapy. You can spread the scent in your home by putting it in a diffuser or create a relaxing atmosphere by burning incense.
5. Uses in food dishes: Rose water is also used in some food dishes, such as pink phirni, rose sherbet, pink chocolate etc.
When and how to apply rose water on face?
To apply rose water on your face, you can follow the below mentioned instructions:
1. First of all, wash the face with lukewarm water and soap so that it becomes clean. After washing, wipe the face with a thin cloth and leave it for some time to dry.
2. You can get rose water or make it at home. You can buy pure rose water in the market which can be available in your local medicine store.
3. Fill rose water in a spray bottle or you can also use it by mixing a few drops of rose water in a cup of water.
4. Now, spray some rose water on your face or take it on your hands and then gently apply it on the face. You can massage lightly with the help of fingers so that the rose water gets absorbed properly on the face.
5. You can apply it before sleeping at night so that it can build up properly on your face overnight. You can also apply it during the day, but avoid exposure to sunlight during golden hours, as it can burn the skin.
6. After applying rose water on your face, let it dry on its own or wipe it off gently with a thin cloth. There is no need to wash it, as rose water helps in providing moisture and freshness to the skin.
7. You can include rose water in your daily skincare routine. It will refresh your skin and enhance the complexion.
What are the effects of rose water?
Rose Water At Home (rose water) is presented for religious, ayurvedic and beauty related uses. It is produced by soaking rose flowers and benefits from its properties. Some of the main effects are described here:
1. Beneficial for beauty and skin: Vitamin C, flavonoids, tannins and other nutrients are found in rose water, which make the skin soft, clean and refreshing. It helps to irritate, soothe and protect the skin from seasonal influences. It is used to get rid of skin rashes, blemishes, temperature, itching and dust.
2. Useful for breasts: Rose water is used to reduce pain and swelling of breasts. It helps protect and promote breast health.
3. Soothing local environment: Rose water is used to calm the mind and meditate during Ayurvedic and yogic exercises. With its aromatic and calming effects, it can help stabilize the environment and reduce mental stress.
4. Beneficial for teeth: Rose water is mainly used to keep the mouth fresh. Its antibacterial properties and other nutrients can help in reducing mouth infections and getting rid of oral problems.
5. Helpful for sleep and stress: Rose water is used to reduce stress and improve sleep. With its aroma and relaxing properties it helps calm the mind and helps in getting good sleep.
For more information visit the link: https://cookingkhajana.in/rose-water-at-home/
0 notes
Text
Boda Kakarakaya Dum Biryani | Spiny Gourd Biryani
New Post has been published on https://www.hyderabadiruchulu.com/boda-kakarakaya-dum-biryani/
Boda Kakarakaya Dum Biryani | Spiny Gourd Biryani

Print
Boda Kakarakaya Dum Biryani
Prep Time
45 mins
Cook Time
30 mins
Let's explore the creation of a special dum biryani crafted with spiny gourd. We all recognize the incredible health benefits of spiny gourd, making it a must-eat when in season. Try preparing this vegetarian Boda Kakarakaya Dum Biryani for your family, and they are sure to request it every week!
Course: Dinner, Lunch
Cuisine: Indian
Keyword: Aa Kakarakaya Dum Biryani, Boda Kakarakaya Dum Biryani
Servings: 4 people
Ingredients
1/4 kg Spiny Gourd
2 cups Basmathi Rice
1 cup Brown Onions (fried)
1 cup Coriander Leaves
1 cup Mint Leaves
1/4 cup Curd
1 tbsp Coriander Seeds
6-7 Dried Chilies
1/4 tsp Pepper
2 tbsp Dried Coconut
1 tbsp Dried Fenugreek Leaves
2 tbsp Tamarind Pulp
1 tsp Chili Powder
1/2 tsp Garam Masala Powder
1 1/2 tsp Ginger Garlic Paste
1/2 tsp Turmerc Powder
1/2 cup Milk
1/8 tsp Saffron
Salt
3 tbsp Clarified Butter or Ghee
2 tbsp Oil
Garam Masala
2-3 Bay Leaves
1 tsp Shahjeera
2-3 Cinnamon Stick Pieces
5-6 Cloves
4 Cardamom
1 Star Anise
1 Black Stone Flower
Instructions
Begin by washing and soaking 2 cups of basmati rice for 30 minutes.
In this recipe, I've used 1/4 kg of spiny gourd. Make slits, and if the spiny gourd is too ripe, remove the seeds.
Now, let's prepare the masala for the biryani. Heat a pan and add 1 tbsp coriander seeds.
Add 1 tsp cumin seeds, 4-5 dried chilies, and fry until they change color.
Next, add 1/4 tsp peppercorns, 2 tbsp dried coconut pieces, and turn off the stove.
Now, add 1 tbsp dried fenugreek leaves and mix. Powder these ingredients in a mixer jar.
Next on the agenda is frying the spiny gourd. Heat 2 tbsp oil in a pan.
Add the slit spiny gourd.Fry for 4-5 minutes on low flame. If the spiny gourds are large, they need to be steamed or boiled before frying.
Cut off the stove after the color changes.
To a mixing bowl, add 1/4 cup curd.
Add 2 tbsp tamarind pulp, salt to taste, 1 tsp chili powder, prepared masala powder, 1/2 tsp garam masala powder, 1 1/2 tsp ginger-garlic paste, 2 dried chilies, and mix.
Next, add 1/2 tsp turmeric powder and mix.
Now, add the fried spiny gourd and mix.
Then, add brown onions, coriander leaves, and mint leaves. Let it sit for a while. In the meantime, let's cook the rice.
Fill more than half of the pan with water and heat it.
Add 1 tsp salt, 2-3 bay leaves, 1 tsp shahjeera, 2-3 cinnamon stick pieces, 5-6 cloves, 4 cardamom, 1 small star anise piece, 1 black stone flower, and let the water simmer.
As the water starts to simmer, add the soaked rice.
Let the rice simmer until it is about 70% cooked. The rest will be cooked in the dum. Strain off the water.
Now, let's prepare the dum layers.
Take a pan with a thick base and spread 2 tbsp clarified butter or ghee on the base.
Add the marinated spiny gourd mixture to the bottom.
Next, add a little water and then add the rice.
Sprinkle brown onions on top along with coriander leaves and mint leaves.
Also, add some clarified butter or ghee on top.
To 1/2 cup warm milk, add a pinch of saffron and mix. This step is optional.
Pour this milk on the rice.
Place a heavy lid on to ensure no vapor comes out of the pan.
Seal off the edges with dough.
Now, we have to cook the dum biryani for 5 minutes on high flame, then, 5 minutes on low flame. Afterward, place a thick flat pan between the flame and biryani pot and cook for an additional 8 minutes on high flame.
Cut off the stove and open the lid after 5 minutes. You'll notice that the leaves have also changed color.
Boda kakarakaya dum biryani or spiny gourd biryani is now ready to serve!
Enjoy it hot with gravy or raita!
#Aa kakarakaya dum biryani#boda kakarakaya biryani#boda kakarakaya dum biryani#Hyderabadi Ruchulu#indira ireni#rice recipe#Special Rice Recipe#special veg biryani#spine gourd biryani#spiny gourd biryani#spiny gourd dum biryani#veg biryani#vegetarian dum biryani#vegetarian recipes
0 notes
Text
Steps in Prawn Saffron Biryani:
Ingredients:
1 lb / 500g basmati rice
Large pinch of saffron spice
Small cinnamon stick
2 teaspoon salt
Sauce ingredients:
3oz / 80g unsalted butter
Chopped 5 garlic cloves
Finely chopped 2 medium-sized onions
2 teaspoon salt
½ lemons
2 quartered red chilies
Ground turmeric ½ teaspoon
I teaspoon Indian five spices
Roughly chopped fresh parsley
12oz / 350g peeled prawns
5 teaspoons olive oil
How To Make Prawn Saffron Biryani:
Take a large saucepan and put rice, cinnamon, salt, and saffron into it with a 1.5-liter pint of water. Place a saucepan over high heat, bring the water to a boil and cook for 10 minutes, stir the rice constantly to prevent the rice from sticking on the base of the pan. Drain via a sieve and set pan aside
Place saucepan over the hob and start making the sauce at high flame. Add butter, and melt it, add garlic chunks in it and till it gets a golden brown color about 4-5 minutes after garlic to add onion and salt and cook onions till it gets soft it will take 15 minutes
Take a half a lemon and squeeze its juice into the sauce, and cut the lemon peel into small slices and add it into the sauce
Add green chilies, five spices, and turmeric into a sauce and let it cook for five minutes. Add prawns and parsley stir well, so that prawns are coated, not fully cook prawn into sauce let it cook into biryani rice steam, overcooking of prawns makes it ruby and dry
Take a saucepan for serving and pour oil into the base of the pan, swirl oil into a pan so that oil will go up to sides of the pan
Pour half of the rice and spread evenly on pan base, then put all prawn mixture on top of the rice
Put the rest of rice on top of prawn sauce, cover it with lid and place it over a high flame for 5 minutes, and turn off the heat, leave for 20 minutes and then serve saffron prawn biryani.
Source: https://knowandask.com/steps-to-make-prawn-saffron-biryani/
0 notes
Text
Coconut Milk Pulao Recipe
An exotic and delicious pulao recipe made with rice and coconut milk. it is an ideal lunch box or tiffin box recipe that can be made quickly during the morning rush. Although it does not require any extravagant side dish as it contains all the flavours, yet it tastes wonderful when served with raita.
In India, Pulao made of rice is very common and one of the most sought after dishes. Perhaps in keeping with the simplicity of these dishes and the way that they are a one pot dinner. one such simple and famous south indian favorite is coconut milk pulao recipe which is known for its taste.
This recipe, which is probably one of my oldest recipe, was already posted. To be honest, my response was phenomenal, yet eventually I started getting comments for working on the video. Seriously, I'm going back to all my old recipes and giving it another twist. along with that, i am trying to work on the recipe as well. in this recipe, i have made it more spicy as i got a strong urge to do so. In my previous presentation, it was more velvety and rich. Despite the fact that it looked perfect, I got a few comments saying it felt bloated after a feast. Additionally, it doesn't quite satisfy the appetite, so I intend to increase the spice in this version.
Anyhow, i would like to include a share of my tips, ideas and variations for a perfect coconut milk pulao recipe. this recipe, first and foremost, tastes incredible when made with basmati rice or any long grain rice. It is being said that you can also make it with Sona Masoori, although do not crush or overcook it. in addition, i have made this recipe as one pot feast in strain cooker. It is much more simple along these lines, however you are not guaranteed to need to follow this technique. You can also include pre-cooked rice and mix it in the same spices. after all, this recipe goes great with any side dish, except it goes well with biryani sauce or a simple raita.
Ingredients for Coconut Milk Pulao Recipe:-
2 tbsp oil
1 tsp cumin
2 pods cardamom
1 small piece cinnamon
3-4 cloves
½ tsp aniseed
1 bay leaf
10-11 cashews
1 chopped onion
1 tsp ginger garlic paste
1 green chili slit
1 finely chopped carrot
5 finely chopped beans
2 tbsp peas
2 cups coconut milk
Soak 1 cup basmati rice for 20-25 minutes
½ tsp salt
coriander leaves finely chopped
How to make Coconut Milk Pulao Recipe:-
1. To make Coconut Milk Pulao, we have to collect all the given ingredients, after that we have to soak the rice for at least 20-25 minutes.
2. Now we have to take a cooker and put oil in the cooker and heat it.
3. When the oil becomes hot, add cumin, cardamom, cinnamon, cloves, fennel and bay leaves.
4. Now add cashew nuts to it and fry till it becomes golden.
5. When the cashews turn golden brown, add chopped onion, ginger garlic paste and one green chilli.
6. Now you have to roast them till the raw smell goes away.
7. Now add finely chopped carrots, beans and peas to it and cook all the vegetables for 1 minute. Vegetables should not be cooked completely.
8. Now instead of water, add 2 cups of coconut milk and stir after adding rice.
9. Now add salt to it and cover the lid of the cooker.
10. Now the flame of the cooker has to be reduced to medium and 2 whistles have to be applied on medium flame.
11. Now the flame has to be turned off and the cooker has to be removed from the flame.
12. Now we don't have to remove the pressure, we have to let the pressure come out on its own.
13. When the pressure is released, open the lid and then add finely chopped coriander to it.
14. Now it has to be mixed well while stirring it with a light hand. So that the rice does not break too much.
15. Now your Coconut Milk Pulao recipe is ready, eat it with salad and chutney.
For more information visit the link: https://cookingkhajana.in/coconut-milk-pulao/
0 notes
Text
Curepipe: A Blend of Culture

Welcome to Curepipe, a captivating city located within the beautiful country of Mauritius. Nestled amidst panoramic landscapes and adorned with a colonial charm, Curepipe offers an array of experiences that are bound to enthrall intrepid travellers. Known as the "City of Light," it serves as a melting pot of diverse cultures, tantalizing gastronomy and numerous activities that promise to ignite your sense of adventure. Let's embark on a virtual tour of this enchanting city, immersing ourselves in its rich heritage and vibrant atmosphere.
1. When to Go:
Curepipe, blessed with a subtropical climate, is a sought-after destination year-round. The months from May to November are especially accommodating, offering cooler temperatures, ranging from 20°C to 25°C (68°F to 77°F), making it a perfect time for outdoor activities and sightseeing. And if you want to witness the city's colourful traditional festivals and celebrations, schedule your visit between December to April.
2. How to Get There:
Reaching Curepipe is a breeze, with Sir Seewoosagur Ramgoolam International Airport serving as a major gateway to Mauritius. From the airport, you can hire a taxi or rent a car to Curepipe, which is approximately a 40-minute drive. Alternatively, public bus services are a viable and economical option for budget-conscious travellers.
3. Where to Stay:
The city of Curepipe caters to every traveller's taste with its wide range of accommodation options. You can choose from colonial-style guesthouses that exude an old-world charm, boutique hotels equipped with modern amenities, or luxury resorts with stunning views of the surrounding countryside. Some popular choices include Le Bamboo Guest House, La Corbeille Eco-tourism Resort, and Le Suffren Hotel & Marina.
4. What to Do:
4.1 Cultural Delights
Curepipe is steeped in history and boasts of a rich cultural heritage. Start your exploration with the enchanting Trou aux Cerfs, an extinct volcano offering breathtaking panoramic views of the city. Move on to the Domaine des Aubineaux, a colonial mansion transformed into a museum, to delve deeper into the city's colonial past. Moreover, don’t miss the opportunity to discover the captivating architecture of St. Therese Church and immerse yourself in its spiritual ambiance.
4.2 Gastronomic Adventures
Indulge in Curepipe's diverse culinary scene. Start your day with a traditional Mauritian breakfast at one of the local street food stalls, savoring warm gato pima (buttery coconut cakes) and freshly brewed tea. For lunch, make your way to a local restaurant to enjoy mouthwatering dishes like the famous dholl puri (lentil pancake served with various curries) or the flavourful biryani. As evening falls, explore the vibrant food markets where you can sample local delicacies and street food.
4.3 Adventure and Outdoor Activities
For a respite from the city's hustle and bustle, uncover the natural wonders that surround Curepipe. Lace up your hiking shoes and set off on an exhilarating trek to the Black River Gorges National Park, home to endemic species and awe-inspiring waterfalls. Thrill-seekers can visit the Casela Nature Park for a dose of high-adrenaline activities like ziplining, quad biking, and even walking with lions. The nearby beaches offer a plethora of water sports such as snorkelling, diving, and paddleboarding.
5. Where to Eat:
Curepipe is a food lover’s paradise with dining options that’ll leave you spoilt for choice. If you fancy upscale dining, Le Domaine Saint Aubin offers a fusion of French and Mauritian cuisine in the stunning setting of a colonial mansion. Seafood lovers must try The Old Mill, which serves freshly caught fish accompanied by mesmerising views of the river. For an authentic street food experience, visit the bustling food market on Royal Road and sample local delights like samosas and gateaux piments.
6. Sights and Tours:
For a full immersion in the vibrant sights of Curepipe, visit the iconic Curepipe Botanical Garden, renowned for its vast array of exotic flora and tranquil ambiance. Venture into the nearby town of Quatre Bornes, famous for its bustling market filled with handicrafts, textiles, and an assortment of vibrant textiles. Be sure to visit the famous Trou aux Cerfs crater for awe-inspiring views of the island. Lastly, a scenic drive to the charming village of Grand Bassin will lead you to the sacred Grand Bassin Lake and the beautifully adorned Mangal Mahadev Temple.
7. Tips:
- Respect the local customs and traditions, particularly when visiting religious sites.
- Due to the city's subtropical climate, always carry sun protection essentials such as sunscreen and a hat.
- Always stay hydrated, especially during outdoor activities. Carry a water bottle with you at all times.
- Embrace the spirit of exploration and remain open to new experiences and interactions with the locals.
8. Money and Nightlife:
The currency in Mauritius is Mauritian Rupee (MUR). Most hotels, restaurants, and tour agencies accept major credit cards, but it's always advisable to carry cash for small, local transactions. Curepipe lives up to its nickname as the “City of Light” with its vibrant nightlife scene. Enjoy live music, sip on locally brewed Phoenix beer, or dance the night away to the lively beats of Sega, Mauritius' traditional music genre.
9. Transport and Shopping:
Getting around in Curepipe is convenient thanks to a reliable network of taxis and buses.
Taxis can be hailed from the streets or booked through hotels. Buses, meanwhile, offer a cost-effective mode of transportation for exploring nearby towns and attractions. Shopaholics will indulge in Curepipe's bustling marketplaces. Explore the local shops and boutiques on Royal Road for handicrafts, textiles, souvenirs, locally produced tea and spices.
Curepipe is a city that encapsulates the true essence of adventure, discovery, and cultural immersion. Its fascinating history, delectable cuisine, and awe-inspiring landscapes promise an unforgettable experience. Whether you prefer exploring cultural sites, sampling gastronomic delights, or embarking on thrilling outdoor adventures, Curepipe has something in store for every traveller. So, pack your bags, embrace the spirit of adventure, and let Curepipe capture your heart with its infectious charm.
Read the full article
0 notes
Text
Veg Fried Rice Masala Recipe for Perfect Flavor with Ravika Spices
If you are looking for a quick and easy way to make delicious veg fried rice at home, then you need to try this veg fried rice masala recipe. This recipe uses Ravika Spices, a brand that offers authentic and quality spices for your kitchen. You can easily find them in any online store or supermarket. They are packed with flavor and aroma and can transform your veg fried rice into a feast.
Ravika Spices
Ravika Spices is a brand that offers a range of spices for your Indian and Indo-Chinese cooking. They have spice blends like biryani masala, chicken masala, mutton masala, fish masala, pav bhaji masala, chole masala and more. They also have pure spices like turmeric powder, red chilli powder, coriander powder, cumin powder and more. All their spices are made with natural ingredients and no artificial colors or flavors. They are also hygienically packed and sealed to retain their freshness and quality.
Veg Fried Rice Masala Recipe
Veg fried rice is a popular Indo-Chinese dish that is made with cooked rice, vegetables and sauces. It is a simple and easy dish that can be made in a jiffy with leftover rice and veggies. To make it more flavorful and aromatic, you can use Ravika Spices Veg Fried Rice Masala. This is a spice blend that contains spices like cumin seeds, fennel seeds, star anise, bay leaf, red chillies, coriander seeds and more. It adds a nice color, taste and aroma to your veg fried rice. Here is how to make it:
Ingredients
- 3 cups cooked basmati rice
- 2 tbsp oil
- 1 tsp cumin seeds
- 1/4 tsp asafoetida
- 1 onion, finely chopped
- 1/4 cup chopped spring onion whites
- 1 tbsp ginger garlic paste
- Salt to taste
- 1/4 tsp turmeric powder
- 2 tsp Ravika Spices Veg Fried Rice Masala
- 2 cups chopped mixed vegetables (carrot, beans, cabbage, capsicum etc.)
- 2 tbsp soy sauce
- 1 tbsp vinegar
- 2 tbsp chopped spring onion greens
Method
1. Heat oil in a large wok or kadai on high flame. Add cumin seeds and asafoetida. When they crackle, add onion and spring onion whites. Fry for 2 minutes or until golden.
2. Add ginger garlic paste and salt and fry for another minute.
3. Add turmeric powder and Ravika Spices Veg Fried Rice Masala and mix well.
4. Add the chopped vegetables and stir fry for 5 minutes or until crisp tender.
5. Add the cooked rice and toss well to coat with the spices and vegetables.
6. Add soy sauce and vinegar and mix well.
7. Garnish with spring onion greens and serve hot or warm.
Tips
- You can use any leftover cooked rice or cook fresh rice for this recipe. Make sure the rice is not mushy or sticky.
- You can use any vegetables of your choice or whatever you have in your fridge. You can also add tofu, paneer or mushrooms for some protein.
- You can adjust the amount of salt, soy sauce and vinegar according to your taste preference.
- You can also add some red chilli sauce or green chilli sauce for some extra spice if you like.
- You can serve veg fried rice as it is or with some manchurian gravy or chilli paneer gravy on the side.
0 notes
Last Seen Blogs

valyrfia
don't let me deceive you: this is a shitpost


h265-4k-mdvr-vehicle-camera-dvr
H.265 4K MDVR's System HD1080p Vehicle CCTV Camera


artofcarmen
The Art of Carmen