#backpacking guide for beginners
Text
Have you ever driven via White Sands National Park’s picturesque route? Which picturesque journeys in New Mexico are your favorites? Have you ever been to White Sands, NM?
White Sands National Park is one of the best-known locations in the Land of Enchantment. Encompassing 275 square miles of white gypsum sand dunes, this is the largest of its kind in the world. And while you can explore this white sandy desert on foot, you may also want to enjoy a scenic drive through White Sands National Park in New Mexico as well.
#backpacking guide for beginners#best travel blogs#destination guide carmel#adventure travel blogs#destination guide santa maria valley#california adventure tips#female travel bloggers#world travel guide#thailand travel guide#europe travel blog#White Sands National Park in New Mexico
2 notes
·
View notes
Text
A Beginner’s Guide to Backpacking: Tips and Essentials : Newsera21 :
Whether you’re venturing into the great outdoors or exploring vibrant cities, backpacking tips and tricks offers a unique experience that allows you to immerse yourself in different cultures, connect with locals, and create lasting memories. here’s a beginner’s guide -
https://www.newsera21.com/a-beginners-guide-to-backpacking-tips-and-essentials/
0 notes
Text

I just posted my first article to Midwestern Life. It is a beginner's guide to backpacking called Backpacking 101. Please give it a read and follow here for more posts from the blog and reblogs from other blogs I find inspirational!
0 notes
Text
Unleash Your Adventure Spirit: A Comprehensive Hiking Guide to Lake Tahoe
Welcome to the ultimate guide to hiking in Lake Tahoe! Whether you’re a seasoned trekker or lacing up your boots for the first time, Lake Tahoe’s scenic trails offer an invigorating blend of breathtaking views and challenging terrains. Discover hidden gems, encounter diverse wildlife, and bask in the natural beauty of this outdoor paradise. Get ready to embark on an awe-inspiring journey through…

View On WordPress
#Adventure Travel#backpacking Lake Tahoe#beginner&039;s guide to hiking#hiking gear#hiking guide#hiking in nature#hiking safety#hiking tips#hiking trails#Lake Tahoe exploration#Lake Tahoe hiking#Lake Tahoe wildlife#mountain hiking#nature walks#Outdoor Adventures#Scenic hikes#Tahoe adventure#Tahoe wildlife#trails in Lake Tahoe#wilderness adventure#wilderness exploration
0 notes
Text
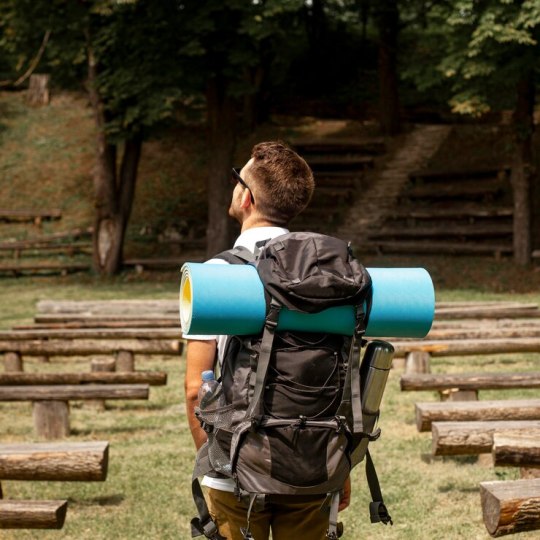
Beginner Hiking Guide:
Gear - What to Bring Hiking

What you want to bring with you on a hike will vary depending on what kind of hike you’re doing. If you’re going on a very short (under an hour) and easy hike on highly-trafficked and easily accessed trails for instance, you may not need to bring much at all -- though I always recommend a water bottle, sun protection and a hoodie or something. But if you’re doing a longer trek on backcountry trails out in the wilderness, you’ll want to bring quite a bit more with you, because the stakes are higher if things go wrong.
My general rule of thumb is: Pack for the Worst Case Scenario.
What is the worst that could happen if you get lost or injured? How long would it take for someone to find you if your phone died and you couldn’t call for help? If you get stuck out overnight, how cold is it going to get, and will you be able to survive it? How about if you have to wait several hours for a rescue party to carry you out if you can’t walk?
I carry a bunch of emergency items in my pack that, on an ideal hike, I never need. But if things don’t go ideally, given the places and conditions I hike in, they could save my life. In the list below, I’ve put an asterisk next to items I recommend packing even for short day hikes (2 hours or less)
So let’s start with the most important thing:
You Need a Backpack.
If you’re going to carry supplies, you need something to carry them in, and a backpack is the easiest, most comfortable way to do so that won’t compromise your balance or leave you unable to use your hands on a hike. (On short outings, fannypacks are great, but you’ll want a backpack if you’re going out into backcountry).
DON'T: use a drawstring backpack -- this will dig painfully into your shoulders pretty quickly.
DO: use a backpack with a waist/hip strap (and chest strap if possible). Having more of your pack’s weight on your hips than on your shoulders will cut down on back pain! The more adjustable, the better; you want to be comfortable.
There are really great hiking specific backpacks out there, but they are on the pricey side. It’s something where, if you plan on doing hiking more regularly, I would recommend investing in a good pack, but for your first time your old book bag will probably do okay.
The Ten Essentials
If you do any research on backcountry hiking, you will probably see “the ten essentials” mentioned somewhere. These are the things that you’re recommended to always bring on a hike with you if you’re going out into the wilderness. The list can seem a little daunting, but honestly a lot of the things on it are pretty small and easy to acquire.
1) Navigation / Map & Compass* -- Have a paper map in a ziploc bag and a compass in addition to any digital tools and GPS you may be using to navigate. Technology fails, and having a map that you’ve familiarized yourself with before you set out will help you to stay on your route and avoid getting lost. REI has useful articles on how to use a compass and how to read a topographic map.
2) Nutrition / Extra Food -- I always bring food hiking. You burn through a lot of energy while hiking, and snacking will help boost your energy levels and keep you moving. Calorie-dense foods with sugar and protein like trail mix, nuts, and granola bars give you the biggest boost while not taking up too much room in your pack. And if your hike runs over, you’ll be grateful for the extra rations.
3) Hydration / Extra Water* -- I typically bring a full liter of water (or gatorade!), minimum when I hike. Nalgene bottles are great because they’re lightweight and virtually indestructible. You’re going to be losing a lot of moisture through sweat and through the vapor your exhale while breathing heavily, so you are going to need to hydrate. Bring more than you think you’re going to need in case things go badly.
4) Insulation / Extra Layers* -- I talked about this in the post about clothes, but always have an extra layer. If the weather shifts, or you get injured and can’t move to keep warm, or you get lost and need to wait for a rescue, the last thing you need is for hypothermia to come along and make your day worse.
5) Illumination / Light -- There’s always a chance of something going wrong, be it a twisted ankle or just misjudging the length of a hike, that can lead to you being out for longer than you anticipated -- and if you’re stuck out in the wilderness when the sun goes down, you want to be able to see where the hell you’re going to find the trail and get home. On any longer hike (especially if you’re starting later in the day), bring a headlamp or flashlight with extra batteries (and test it before you leave!)
6) Emergency Shelter -- Is there any chance that on the hike you’re doing, you could potentially get lost enough that you have to spend hours and hours out here? In the theme of extra layers, if you get lost, injured, or otherwise caught out in bad conditions and can’t hike out on your own for any reason and rescue won’t be there anytime soon (search and rescue teams take time to assemble, deploy and then hike out to you), you want to have some means of shelter. Obviously, you don’t wanna drag an entire tent out into the woods if you’re just going on a day hike, but a there’s a few lightweight options that can make a difference when you’re improvising protection from the elements, such as:
A mylar space blanket / shock blanket
A bivvy sack (basically a lightweight plastic sleeping bag that keeps warmth in and water out!)
....And if you’re on a budget, a large plastic trash bag can do in a pinch!
7) Firestarter -- On the topic of shelter, especially if you’re stuck out in the cold overnight, a fire can be an emergency source of heat and light. Since most of us are not capable of starting a fire just by rubbing two sticks together like in the movies, we’ll want to make it easier on ourselves by bringing something to start a fire with: pack something to ignite it with, and something to use as tinder to catch the flame and sustain it long enough to ignite other fuel you’ve gathered. I personally carry a bic lighter that was like, .99c at the gas station, and a toilet paper tube stuffed with dryer lint for tinder. This is one of those “hopefully you never actually have to use it” things.
8) First Aid Kit* -- You want to be able to treat an injury if it happens, and to address smaller health concerns before they become bigger health concerns. With blisters especially, an ounce of prevention is worth a pound of cure -- putting blister pads on your feet when you’ve got hot spots before they turn into full on oozing blisters is going to make a world of difference. And as someone who has taken a nasty spill on the trail and hiked out injured, I always carry a solid first aid kit with me. You can buy a compact pre-made kit easily enough to carry with you, but you may find yourself customizing it to your needs. I recommend having the following:
Ibuprofen -- good for managing pain, swelling, and soreness
Tylenol/Acetaminophen -- pain reliever, fever reducer, better for head injuries than ibuprofen since it doesn’t thin blood (also, if you’ve hurt yourself and you’re in a LOT of pain, you can alternate Tylenol and Ibuprofen)
Benadryl or some other antihistamine for allergies
AfterBite -- good for stings and bug bites
Bandaids in assorted sizes
Blister pads
Disinfectant wipes x 2
Gauze
A triangular bandage
A lightweight SAM splint
Ace bandage - good for wrapping sprains
Tweezers - good for removing splinters!
Any important medications you personally need, such as an EpiPen or inhaler, or personal joint braces you require
9) Sun Protection* -- Even if you’re hiking under tree cover, or on a cloudy day, with hours spent outdoors, you’re getting a lot of UV exposure. Regardless of whether you’re someone who sunburns easily or not, it’s good to have sun protection. Bring sunglasses and sunscreen, and consider wearing a hat. Especially at higher elevations, where the air gets thinner and blocks less UV radiation! And don’t forget when hiking in winter, that you can get snowblindness and sunburn from light reflected off snow.
10) Repair Kit + Knife / All That McGuyver Shit -- A few lightweight and simple objects can make it much easier to jury-rig a shelter, replace a snapped bootlace, or hold together a torn pack until you can get back to the parking lot. I personally always have:
A pocket knife/multitool
Flat-wrapped duct tape
Several safety pins
A handful of zip ties
A spare shoelace
And other people may find other items useful depending on their gear and the kind of repairs they might need.
In addition to the stuff on this list, there may be weather-specific or trail-condition specific gear you might need, like microspikes for traction on ice, or rain gear for hiking in wet climates. You can use your best judgment and the recommendations of others who have hiked where you are hiking to figure out what the best packing list is for your specific hike. This list is a guideline and a starting point.
Other things you may want to bring:
Whistle -- if your phone is dead and you’re waiting for rescue, you can blow on a whistle a lot longer (and a lot louder) than you can yell. Three short bursts usually means ‘hiker in distress’ and will help other hikers or searchers find you.
Toilet Paper + plastic bag -- If you don’t think you’re going to be able to hold it, bring a means to go in the woods. But bring the plastic bag to carry out your used toilet paper so it doesn’t pollute nature (Leave No Trace!)
A ziploc bag big enough for your phone -- if you need to cross a river or if it starts pouring, have a means to bag your phone to keep it dry. If there’s a risk of rain, bring a trash bag as well that you can use as an improvised pack cover to keep your stuff dry.
Insect Repellant -- even if you don’t bring it with you and just put it on in the parking lot, if you’re hiking in spring or summer especially, you’ll want some bug spray.
Keeping It Light
You want to pack smart, which means maximizing the usefulness of what you pack while keeping things as light as possible. Try using a lightweight plastic water bottle instead of a heavy steel one, and packing spare layers that are warm without being too bulky. Put sunblock in a small tube or bottle instead of packing the huge family-size one. The weight adds up, and the final weight of your pack is what you’re going to have to be carrying along with you. Though the good news is, your pack will get lighter as you consume the food and water you’ve packed!
If you are hiking with friends in a group, there’s some things you don’t really need multiple redundancies for -- if one person has a well-stocked first aid kit and another person carries enough sunblock for the group, you don’t need three of each and every item. Communicate with your group to make sure all your bases are covered, but also be sure you stay close together while hiking. Your friend having the group’s utility knife isn’t going to help you if you go off on your own and get separated. And you will all still want your own food, water, clothing, and light.
Organize Your Bag
Having the right gear is helpful. Knowing where it is is even better!
I try to organize my pack so the weight is evenly distributed (with the heaviest objects at the center near my spine to avoid throwing off my center of gravity), but also so I can find stuff easily enough. If your backpack has different pockets and compartments, think about using those to organize your supplies. Put stuff you’re more likely to need to use in easy to reach places. I usually keep my water bottle in a side pocket that I can reach from the outside of my bag, and my snacks in the topmost compartment so they’re easy to get to and not squished.
I also have a couple of lightweight smaller bags inside my pack I organize things in -- a mesh bag I keep all my first aid supplies in so I can pull out the splint, main kit, extra bandage, AfterBite, etc. all together, and a waterproof stuff sack that I keep all my “emergency” supplies (bivvy sack, shock blanket, headlamp, lighter, knife, etc.) inside so they aren’t all rattling around loose at the bottom of my pack where I will never find them.
-
Using your knowledge about the hike you’re doing, the duration, the conditions, and your own body and needs will help you make smart choices about what you need to bring in order to keep yourself safe, both during your hike, and in the hypothetical scenario where something goes awry. Be informed, be prepared, and have fun out there!
<< Previous Part: What to Wear Hiking
114 notes
·
View notes
Text
Libraries and Adult Lonliness
As we all know, making friends as adults is hard. And while the internet has made it easier to make friends with people around the world, actually meeting people you can meet with on a regular basis and just hang out with us tough. The common answer to meeting new people is to find people who are interested in the same stuff as you. As such, finding places to meet new people who may have similar interests to you is important. And that’s why I think the library is a great resource!
As a children’s librarian, one of the things I try to point out to parents when they come in to sign their kids up for the library is that we offer adult programs too. Obviously we have book clubs - my library has 4 different book clubs for people who read different types of books. I’ve posted about it before with knitting/crochet circles. But for people who have or want to explore different interests, and meet new people via that new interest, you may want to check your local library to see their programming. For example:
Hiking: Many libraries offer things like hiking kits. These can be things such as maps for local trails, hiking sticks, a water resistant backpack, binoculars, bird guides, and the like. But some libraries having hiking clubs, such as the Poughkeepsie Public Library Distruct in NY.

Language Learning: Many libraries have access to language learning platforms such as Rosetta Stone or Mango Languages. But many other have dedicated classes where adults can come and learn languages. If you’re in L.A. county, the public library offers classes in beginner Russian, Chinese, Korean, Italian, Armenian, etc!
Music: there are many libraries that have maker spaces where you can go and record music. There’s one in the Newark Library and at a branch of the Brooklyn library. There are also ones that allow you to check out instruments. But there are also ones where you can receive free music lessons, such as the Dallas Public Library (this program was online during the pandemic but is now also offered in person!)
youtube
I could keep going.
Singing, dancing, theater, yoga, sketch comedy, creative writing, RC Cars, foraging, cemetery tour groups, jewelry making, baking, woodworking, painting, etc. If you have a niche interest or would like to get into a niche interest, there is a chance your library has had or will have a program about it. And if you’re looking to meet new people, it is a great place to start.
33 notes
·
View notes
Text
“He will Never touch you again”
Eddie Munson x Reader
Wanted to write an Eddie Fanfic for awhile. However, It’s been YEARS since I wrote anything. Be kind. I know it’s rough. I’ve been way out of practice. I don’t know what i’m doing, but I wanted to write something for Eddie since I am obsessed and in love with him. He’s basically the one thing that has made me happy through a difficult time in my life right now.
Also I will note TW for Physical Abuse. There’s no sex, as I wanted to write a protective Eddie scene first. I hope it’s good enough. I had fun writing it, though as I stated, I’m WAY out of practice. This is the first thing I’ve written in 10+ years. Just be kind. lol
*********
You have been dating Eddie Munson for a couple of months now in secret. You knew your parents would disapprove of you hanging out with the town’s declared freak and from their view, outside looking in, they would view Eddie as a Satanic cult leader. Your family wasn’t overly strict or religious per se, but they did eat up any overblown propaganda they saw on the news. You had intended to avoid Eddie yourself at all costs, but One day when you had to sit next to him in English class and had a group Book project to do with him, that’s when you started actually getting to know the real Eddie.
He may have looked Scary and intimidating on the outside, but you quickly warmed up to him as he constantly made you laugh. You then started to sit next to him and his other nerd friends during lunch. You never heard of Dungeons and Dragons before, but you couldn’t help but loving every second of Eddie and his friends talk about their campaigns. It wasn’t soon after that that the two of you had started dating. You started going over to Eddie’s trailer under the guise of tutoring or Group projects as your excuse to anyone who may ask.
Needless to say, you were surprised when you walked home one day to find that your parents were both waiting for you in the living room and they didn’t look happy. “Hey, mom. Hey, Dad.....uh, Is something wrong?” You asked, nervously. You saw your mom nervously shift around in her seat. She wasn’t very confrontational. Your dad, However......
“We have heard very disturbing rumors going on about you hanging out with that Munson boy!” You father roared, standing up from his chair. “What? No! No! I only tutor him occasionally. It’s purely...” “DON’T YOU START!” Your dad shouted, cutting off your prepared lie. “We didn’t want to believe it either, but then we found this in your room!” He then pulled out a bag that you had stored under your bed. You knew it wasn’t the perfect hiding spot for it, but it was better than nothing. He threw the bag on the coffee table and opened it and inside were DnD books that Eddie had let you borrow. They were beginner guides to help you understand the game more. “Can you please explain to me why my daughter has these Satanic cult books?! Did he give him to you?! Are you joining his little cult?!” Your dad was furiously.
“They aren’t C-cult books, dad! It’s just a G-game!” You stuttered out, frozen in fear. Your dad often had really bad tempers and you knew back-talking him and trying to correct him would only make him more angry, but you had to try to defend Eddie. “No! You listen here! These books, This “Game” is Sinful and I will not have my daughter partake in it. I won’t have you be learning how to summon demons for the Devil” He said. You then tried to lunge for the bag and it’s contents off the table, but your dad was quicker and grabbed it out of your reach. “Didn’t you hear me?! I said NO!” He shouted. In one quick motion, he threw the bag and the books in the fireplace, a roaring fire already burning. “DAD, NO! Those were Eddie’s! He let me borrow them!” You cried, reaching out towards the fire.
In another surprising motion, your father struck you across the face. You fell from the force to the floor, landing on your backpack you still had strapped over your back. “Richard!” Your mother cried, finally speaking up during this whole shitshow. “Richard, you said you were just going to speak with her. Now you have gone too far!” She continued. “Too far?! I’m trying to save our daughter’s soul from this heathen. I will do whatever it takes” He said, turning to face your mother. “Y/n, Go upstairs to your room. I’m very sorry that everything has led to this. Go upstairs and I will talk to your father” Your mom said. You stood up, hand covering your reddened cheek. You quickly ran upstairs to your room and you shut the door behind you. You heard your parents resume talking to each other, your dad still very loud.
You rushed over to the window and pulled it open, frantically. There was no chance in Hell that you were going to standby and wait for your parents to return. You had never gone out the window before, but you were desperate to get to Eddie’s. He was your safe haven in this moment. You carefully put your legs through the window first, tried to steady yourself, and then jumped out. Your fall was a bit clumsy, but you didn’t injure yourself any further. Then you started running towards the Trailer park with only your boyfriend in mind.
------
You were panting heavily as you reached Eddie’s trailer. You knocked several times before Eddie’s uncle, Wayne, answered the door. You had only met him on some occasions due to the fact that he always worked late, but he always treated you kindly. “I’m sorry, but Eddie’s still out right now, Miss Y/n” He said, noting some concern in his tone. In your haste, you failed to notice that Eddie’s van wasn’t in front. He was still at School. ‘It’s hellfire night tonight’ You remembered. The tears had rushed in before you had a chance to stifle them. Startled, Wayne helped you inside. “Is everything alright? What’s wrong, Miss” He said. You shook your head. “Can I just wait until Eddie comes home please?” You asked through your sobs. “Yes, that’s quite alright. I’m going to have to leave for work soon though, so help yourself with whatever you need while you wait.” He said, kindly. “T-thank you” You cried, trying to give him a small smile before you turned and walked down the hall to Eddie’s room.
You laid on Eddie’s bed and held his pillow close to your chest. It smelled just like him and it began to comfort you as you just cried into it. You were going through everything that had just happened. Trying to process all of it. Your dad was never physically violent with you. Ever. Sure, He got mad, a little hotheaded even. But it never....The memory of the slap just kept haunting you. You falling to the floor. Eddie’s books burning. You felt awful about everything. ‘How am I going to tell him when he gets home?’ You thought.
********
Meanwhile, Eddie was playing a Campaign of DnD with Dustin, Mike, Lucas, and the others. “11! That’s a....MISS!” Eddie jeered, smiling freakishly at Dustin’s failed attempted to fireball a monster. “GODDAMN IT!” Dustin shouted. Eddie laughed maniacally on his throne. The game continued on for another couple of hours, the campaign having to be continued another night as it was already getting quite late. Eddie got in his van along with the freshmen and he decided to drop them off home at each of their houses.
By the time he got home himself, It was almost 9:00. He knew his uncle would be gone by then, already at work. Eddie walked in his home and noticed a note on the table.
“I don’t know what’s going on, but you need to check on your girl. She came over and seemed really upset by something. It seems like something must have startled or hurt her. She should be waiting for you in your room. -- W”.
Eddie scanned the note twice over, but as the information actually hit his brain, He rushed toward his bedroom. Sure, enough as he opened the door his girlfriend was there, tucked in his bed holding on tightly to his pillow. She fast asleep. He cursed himself that his campaign took so long. If he had known that you needed him urgently, for whatever the reason, he would have been here. Come Hell or High water. He didn’t want to have to wake you. You looked so peaceful right now, but he was worried about what had happened to have you come all the way here. Your relationship was a secret he knew and it didn’t make any sense for you to come here tonight. He gently sat down on the bed next to you. He looked you over. You didn’t seemed injured to him. He carefully reached out a hand and shook you awake. “Y/N. Y/N, Wake up, princess.” He said sweetly.
*******
You shuttered awake and recoiled away from the sudden sensation of touch. You were frightened. “Whoa! hey, hey, now Princess. It’s only me. It’s Eddie. Your safe.” Eddie said, responding to your sudden movement as you awoke. You relaxed as you remembered where you were and as your eyes focused on Eddie sitting across from you. “Eddie!” You cried as you tackled him down hugging him. The tears began again, all messy and snotty. You backed off of Eddie. “Oh, I’m sorry. Your shirt” You said, as you tried patting the area where your tears and snot had made a wet patch in his Hellfire shirt. His most prized Possession. “Hey now, No. It’s just a shirt, babe. What’s wrong? What happened? What is that on your face?!” Eddie asked, now suddenly noticing the bruise that was forming on your cheek from where your father hit you. All the memories of your welcome home flooded back in. You didn’t know how to begin.
“I-i went home right after school and my parents....well, they know about us, kind of....” You started. Eddie just stayed there, patiently listening and waiting for you to continue whenever you took a pause. You saw the concern and worry in his eyes though. That’s what you loved about him. “My dad found your DnD books. The ones you let me borrow.” You said. Eddie’s eyes slightly widened at that shock. “Did he hurt you?! over a couple of books!” He exclaimed. You nodded your head and began crying. “He threw your books in the fire! I tried to save them but then he slapped me! Eddie, it was awful! I’ve never seen my dad so angry before!” You sobbed. Your breathing became uncontrollable. You were heaving as Eddie grabbed you and held you close to him. “Shh, it’s ok, Y/n. It’s ok” He said, quietly in your ear. “I’m sorry about your books” You cried out. “Forget the books! I don’t care about them. I only care about you. What else did he do?” He said, still holding you close. “Mom sent me to my room after that. I don’t know what happened. I left.” You said. “Wait, how?” Eddie asked, leaning away to look into your eyes. “I went through the window” You said, looking back at him. Eddie burst out laughing. “I’m sorry, Babe. Did you just say you jumped out the window? Oh my god.....Maybe I am becoming a bad influence on you” He laughed, a wide grin forming on his pretty face. “Shut up!” You said, playfully hitting him in the shoulder. “I had to leave. I couldn’t stay there. I wanted you.” You said, tearing up again.
Eddie stopped laughing and gently held your face. He wiped the tears forming in your eyes away. “It’s alright, princess. I’m right here” He said. You went back to hugging him close to you. He was warm and soft. He petted your head, his fingers brushing through your hair. “Everything’s going to be ok” Eddie promised. He kissed the top of your head. He made you feel completely safe as your eyes started to fell heavy once again with sleep. “I feel like kicking the shit out of your father. I’ll refrain, though if he ever touches you again....” He trailed off as he noticed that you had fallen asleep again right there on his chest. “He will never touch you again. I’ll make sure of that” He said to himself, holding on to you tightly.
#eddie munson#eddie x reader#stranger things#eddie#eddie munson x reader#stranger things season four#joseph quinn
398 notes
·
View notes
Text
Guide: Tips for getting started ❄️⁺₊❅
Straight out of the gate, Disney Dreamlight Valley provides you with countless quests and tasks to keep you busy, and starting out it can be a little overwhelming to know exactly what to do.
This Beginner's Guide will cover all the essentials and will help ensure you know the most important things to focus on as you begin your magical journey!
❄️Here are 7 things I wish I knew before starting Disney Dreamlight Valley:
⟡ Always open clothing packs, furniture packs, and recipes:
These are not automatically redeemed and take up a valuable slot in your backpack, so any time you collect one, be sure to go immediately to your inventory and use it to receive the item.
⟡ Work on upgrading your backpack straight away:
At the beginning of the game, you don't have many inventory slots, or external places for storage, so it can be difficult choosing what to hold onto and what to discard.
⟡ Talk to everyone:
These always increase your Friendship Level with that character and can be done once per day. Check-in every 24 hours with everyone to ensure your relationships with them progress in the right direction, and earn you unique rewards as you do so!
⟡ Hang out with friends often:
Once you reach Friendship Level 2 with a character, you can assign them one of a few specific roles. Whichever role you decide to assign to a given character, whenever you decide to do that activity (mining, harvesting, digging, fishing, etc.), be sure to go find that character and request to hang out. This means the character will follow you, partaking in activities will automatically begin raising your Friendship Level with them, and you can even receive additional materials from those activities, simply by having a friend with you.
⟡ Check for Favorite gifts:
Whilst you have the option to give a character any item that you have in your inventory, you'll spot that there is a small bar at the bottom of the gifting menu that displays specific items that the character would LOVE to receive. Should you gift them one or more of these items, you receive a sizeable boost to your Friendship Level.
⟡ Avoid selling, start hoarding:
Many quests in the game require a diverse range of materials. By hoarding items in advance, you'll be well-prepared to tackle quests without the need for frantic resource-gathering sessions. Efficiency is the key to success!
⟡ Build storage rooms:
One secret to success lies in the strategic construction of themed storage rooms. With themed storage rooms, locating and retrieving resources becomes a breeze. No more endless scrolling or searching for that one elusive item! Each room becomes a treasure trove of materials, ensuring swift access to the precise components needed for your themed creations.

Embrace the adventure, relish the surprises, and let your imagination soar! Disney Dreamlight Valley awaits your touch, and your kingdom is destined to become a beacon of enchantment for all who visit.
In the valley, there's no wrong way to play! Whether you're building kingdoms, exploring themes, or simply enjoying the magic, the coziness of this game lies in the joy you find. So, relax, have fun, and let the warmth of Disney's magic guide your whimsical journey!
Wishing you a magical journey filled with dreams come true!
4 notes
·
View notes
Text


Nonfiction Thursday: Drawing Picks
100 Buildings & Architectural Forms by David Drazil
Featuring more than 600 sketches depicting a vast array of architecturally and culturally significant buildings, bridges, towers, monuments, and more, Draw Like an 100 Buildings and Architectural Forms is a must-have visual reference for student and aspiring architects, artists, illustrators, and urban sketchers.
This contemporary step-by-step guidebook demonstrates fundamental art and architectural concepts like proportion, perspective, and spatial relationships as you learn to draw a wide range of important residential, commercial, historic, and cultural buildings, bridges, towers, and other structures from all over the world and from ancient to modern - all shown from a variety of perspectives and scales. Each set of illustrations takes you from beginning sketch lines to a finished drawing. Author David Drazil’s classic drawing style will make this a go-to sourcebook for years to come.
How to Draw Bold Manga Characters by Ebimo
Elevate your manga drawings to the next level with help from a Japanese professional!
Manga drawing expert and author Ebimo is an action film junkie who taught herself to draw by studying martial arts films. In this book, she brings those techniques, tips, and tricks to you! Learn how to draw every detail of exciting action characters - from the muscles used in fight scenes to the 3-D arc of a flying frontal kick.
What sets Ebimo apart is her fusion of the basics of figure drawing and proper posing with cutting-edge digital-age illustration and coloration techniques. Artists working on paper or a screen will learn to bring greater depth and complexity to their characters with these expert tutorials.
Modern Fashion Illustration by Holly Nichols
After graduating from college with a BFA in Studio Art, Holly Nichols sought a way to merge her love of fashion with art. Her sketchbook and napkin doodles of designer duds became refined drawings that she now creates with her beloved artist markers. She uses her fashion-inspired illustrations to engage her audience of more than 1 MILLION Instagram followers in both the fashion and art communities.
Modern Fashion Illustration is a how-to book that offers the art of fashion illustration step-by-step, and how to promote it in today’s world of social media. It also includes a collection of whimsical fashion illustrations by the author, featuring illustrations waiting to be colored in by novices and practiced illustrators alike.
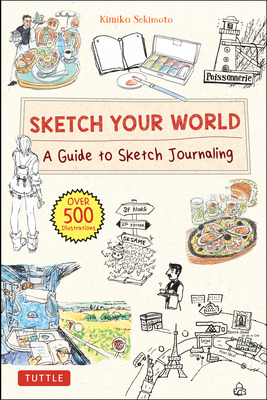
Sketch Your World by Kimiko Sekimoto
An inspiring, interactive guide for drawing people, places, food, and things you come across in your travels.
This book offers aspiring urban sketchers a series of 40 step-by-step lessons showing you how to draw everything from the meal you ordered at a café to a map of highlights from your latest road trip. You'll get all the tips and advice you need for drawing what you see during your day and while out and about. This beginner's guide is the perfect companion to toss into your backpack, artist's tote, or portfolio along with your sketch journal and pens!
#art books#art#drawing#nonfiction books#nonfiction#reading recs#reading recommendations#book recommendations#book recs#library books#tbr#tbr pile#to read#booklr#book tumblr#book blog#library blog#readers advisory
3 notes
·
View notes
Text
OH HEY. GUESS WHAT DAY IT IS. WIP WEDNESDAY.
If you don't know the rules, here they are: give you guys the names of my wip files. you guys send me an ask with the name of the file you're interested in (you can send several, just make them different asks pls). i write 3 sentences of that wip and share them here. also, i add a snippet of a fic i've worked on sometime in the past 7 days to the bottom.
WIP LIST:
random text conversations
Ivy & Yunie
garages prequel
parker iii/wyatt mason meeting(?)
Parker Sim
Untitled Document
mills fic exchange
how (not?) to raise an egg
local man overjoyed to see another person for the first time in 50+ years
Crabs road trip, take 2
a beginner's guide to being normal
parker & megan in da vault
Yunie/A-Z prompt bingo
piii/wyatt snippet
Parker meets Tiara
lenji's kids
lenji's new house
the rake gets adopted
yunie and reese
parker & the Monitor
ivy nightmare
Caroline & Reader
uhh megan/parker
Text note 06/08
Untitled document
we can't keep meeting like this
and a snippet of ivy nightmare (that i may have shared before):
The feeling of his phone buzzing in his pocket made Yuniesky jump.
"Goddamnit," he whispered to himself and pulled his phone out.
Yuniesky didn't normally get messages this late-- well, he typically didn't get messages at all. Why would anyone pick three in the morning to message him?
Ivy: are you still at HQ?
Yuniesky chewed on her lip. Whatever Ivy wanted, she didn't want to do it. He could lie, and say no. But, again, people typically only texted him when they need something. And someone needing something in the middle of the night is usually not a great sign.
Yeah.
Ivy: can you coem to my room
Ivy: i had a really bad nightmare
Ivy: ik it's dumb im just scared lol
I'll be right there.
Yuniesky shoved the phone back in her pocket and packed up her things in her backpack. He could always finish later. It probably wouldn't take very long to comfort them, anyway. Did they need comfort? How do you comfort someone? Is there a general difference between comforting a teen and comforting someone his own age? He hadn't done either.
For the first time in his life, Yuniesky decided not to overthink it, and left the office.
3 notes
·
View notes
Text
So there’s a woc outdoors group for the pnw and I signed up for the backpacking trip and it’s a beginner one bc I haven’t done that before and I got in and I’m sooo excited that was one of my goals for my 30th birthday lmao
Also nervous bc it’s all strangers and guides and all that but at same time what an adventure haha
#a group of beginners make me less nervous bc I’m always self conscious about how slow I hike#I fractured an ankle a couple years ago and so I’m avoiding injuries and evan just zooms
3 notes
·
View notes
Link
Scouring the internet for the ultimate Thailand travel guide? Asia is among the top holiday destinations and possibilities for weekend getaways when it comes to enjoying life. Whatever your travel objectives, Asia offers a variety of locales, endeavors, cultures, and treasures to explore. If you are seeking a family vacation in Asia, you must visit Temple Sanctuary in Thailand to see exotic creatures, primarily tigers. Check out our blog at www.theeagertraveler.com to learn more!
#california adventure tips#northernmost coastal California#best travel blogs#europe travel blog#world travel guide#adventure travel blogs#thailand travel guide#backpacking southeast asia#Backpacking In Europe#backpacking Southeast Asia#Backpacking guide for beginners
2 notes
·
View notes
Text
Har Ki Dun Trek: A Beginner's Guide to Trekking in the Himalayas
If you're looking for a trekking adventure that offers breathtaking views of the Himalayas, the Har Ki Dun trek is a great option. This trek takes you through lush forests, picturesque villages, and stunning mountain landscapes. To make the most of your trekking experience, it's important to prepare properly. This guide will provide you with all the information you need to get ready for your Har Ki Dun trek.
Understand the Difficulty Level
Before embarking on the Har Ki Dun trek, it's important to understand the difficulty level. This trek is considered moderate, descents, rocky terrain, and high altitude. It's recommended that trekkers have some prior trekking experience and are in good physical condition. It's also important to acclimatize properly to the high altitude to avoid altitude sickness. Make sure to consult with a doctor before embarking on this trek.
Choose the Right Time to Trek
The best time to trek the Har Ki Dun trail is from April to June and September to November. During these months, the weather is pleasant and the skies are clear, providing stunning views of the surrounding mountains. However, it's important to avoid trekking during the monsoon season (July to August) as the trail can become slippery and dangerous. Additionally, during the winter months (December to March), the trail is covered in snow and is not recommended for beginners.
Get Your Free Trekking Gear with Trekkaro
Trekkaro is a popular trekking company that offers a wide range of trekking packages, including the Har Ki Dun trek. They also offer a unique service where they provide free trekking gear to their customers. This includes a backpack, trekking shoes, a jacket, and other essential items. This is a great option for beginners who may not have all the necessary gear for a trekking adventure. Contact Trekkaro to learn more about their packages and free gear offer.
Train Your Body and Mind.
Trekking in the Himalayas requires both physical and mental preparation. It’s important to start training your body at least a few months before your trek. This can include cardio exercises like running or cycling, as well as strength training to build endurance. Additionally, practicing mindfulness and meditation can help prepare your mind for the challenges of trekking at high altitudes. Remember to listen to your body and take breaks when needed during your trek.
Respect the Environment and Local Culture.
When trekking in the Himalayas, it’s important to remember that you are a guest in the environment and culture of the local communities. Respect the natural surroundings by not littering or damaging the flora and fauna. Additionally, respect the local culture by dressing modestly and asking for permission before taking photos of people or their homes. Engage with the local community by learning about their customs and traditions, and supporting local businesses. By respecting the environment and local culture, you can help preserve the beauty and integrity of the Himalayas for future generations.

3 notes
·
View notes
Text
The Best Meals in a Jar Recipes
The Best Meals in a Jar Recipes

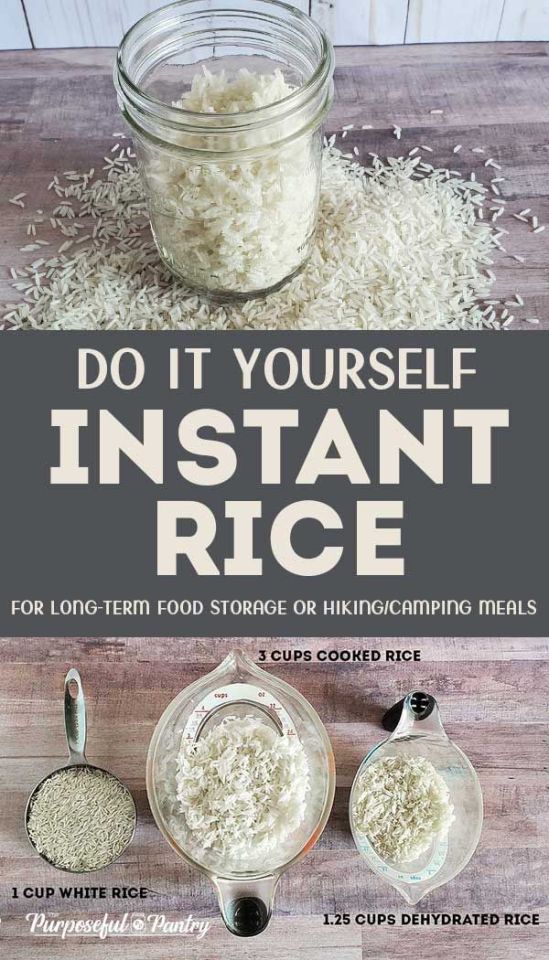
DIY Instant Rice
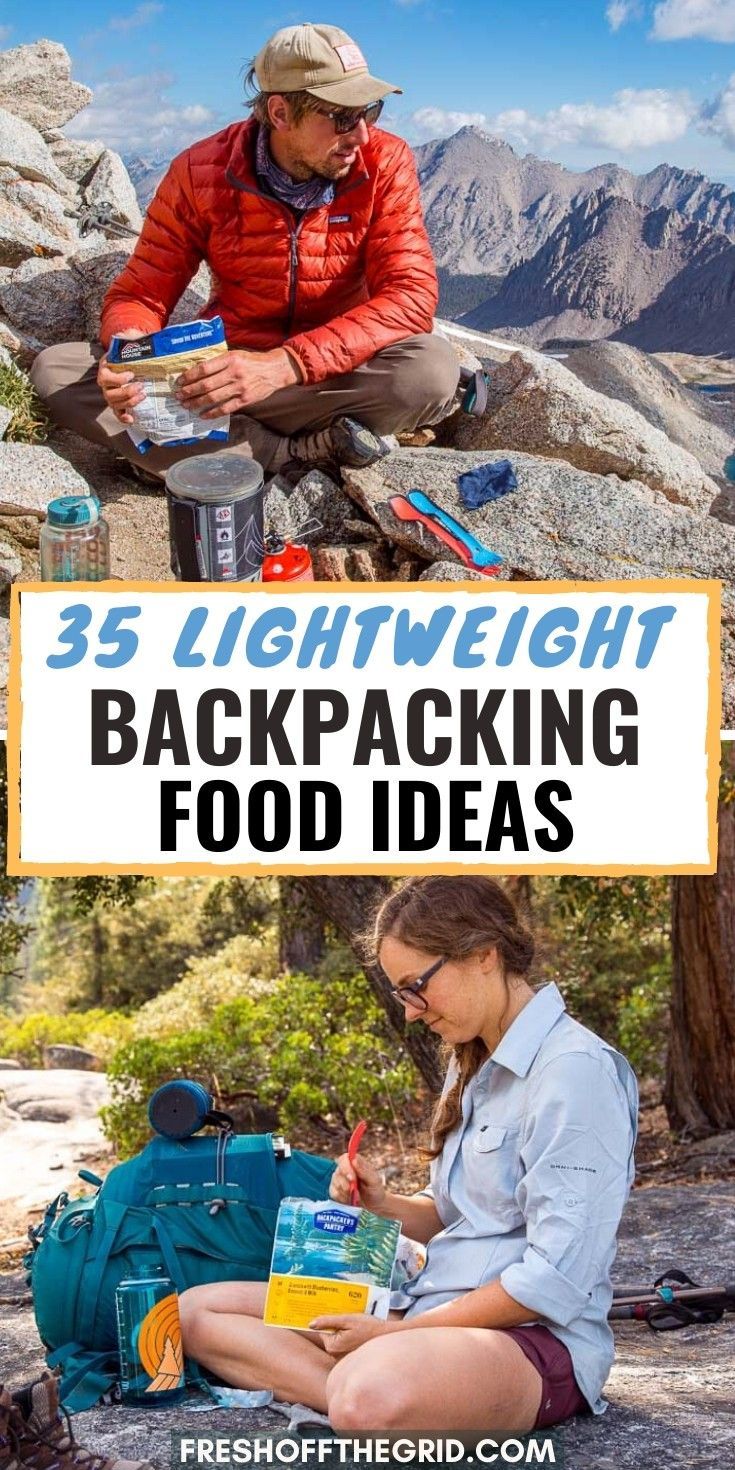
48 Ultralight Backpacking Recipe Ideas for Your Next Adventure | Backcountry Foodie
It's crunch time for the Foodie! T-minus 37 days until go time. In this post, I share quick tips for speeding up the meal prep process.

17 Simple Backpacking Meal Recipes with 4 Ingredients or Less
A full list of 17 simple backpacking meal recipes. Fast and easy meals requiring only 4 ingredients or less. Some non-cook meals, others just need to add hot water. You can find most ingredients at your average grocery store on the Appalachian Trail. Feel free to mix and match any ingredients and flavors as well.

What to eat when on a thru hike!

Backpacking Sweet Potato and Peanut Stew
This dehydrated sweet potato peanut stew is loaded with a hearty mix of sweet potato, chickpeas, and kale.

Backpacking Food Ideas | Tasty, easy, and lightweight!
Planning your backpacking menu? Here are the best lightweight backpacking food ideas to help you enjoy simple and tasty backpacking meals on the trail!
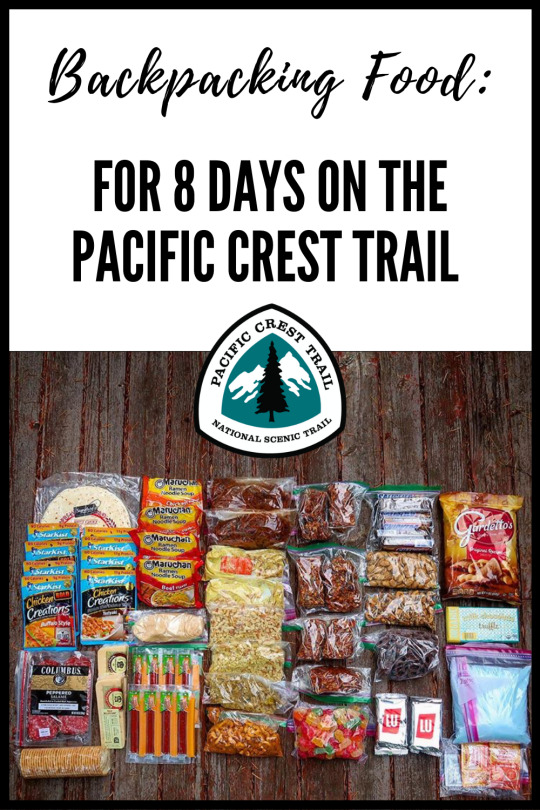
Backpacking Food For 8 Days on the Pacific Crest Trail
Here's a complete list of all the backpacking food I brought with me for 8 days while section hiking the Pacific Crest Trail.
A Week of Lightweight, Nutritious Backpacking Food

8.5 lb Ultralight Backpacking Gear List for Thru-Hiking
An ultralight backpacking gear list and FAQs for the gram counters. 5 pound full comfort base weight and a 9.5 pound consumables for thru-hiking the Appalachian Trail, Pacific Crest Trail, Continental Divide Trail. Regular backpacking, lightweight backpacking, ultralight backpacking, hyperlight backpacking compared.

Backpacking Food Ideas: The Complete Guide on How to Plan Hiking Meals
What should I eat when hiking? This is one of the most common questions that rookie backpackers have. And it's warranted. Hiking is an energy intensive activity that requires you to be properly nourished. You don’t want to run out of food, neither do you want to carry too much. Hence this article. In this article we provide answers to the question of what to eat during a backpacking trip.

25 Best Backpacking Meals
Meal planning can make or break a backpacking trip. Here are the best backpacking meals, broken down by stove type, to ensure you eat well.

Beginner's Guide to Homemade Backpacking Meals
We’ve all been there, wandering through the dehydrated meal aisle in an outdoors store searching for something we’d actually want to eat on the trail. Why not try dehydrating your own backpacking meals? It might
33 DIY Backpacking Recipes
Learn how to make your own backpacking meals with these great recipes!

Alabama Style BBQ Spaghetti – Backpacking Meal or Tonight's Dinner
I'm getting ready guys. I'm just waiting for the weather to ease up a bit (it was 92 here yesterday and hot as the devil's balls), so I can head out in the woods for a week. While I'm waiting, I'm getting my food situation together. Nothing against store bought dehydrated meals. I'm a big fan of Heather's Choice for her delicious, nutritious meals. I love PackitGourmet - the chicken and dumplings and gumbo are seriously delicious. I'll even throw in a Mountain House meal every now and then. But it gets old. And unless it's Heather's Choice, after a few

Backpacking Fried Rice
Craving takeout on the trail? This easy Backpacking Fried Rice should do the trick!

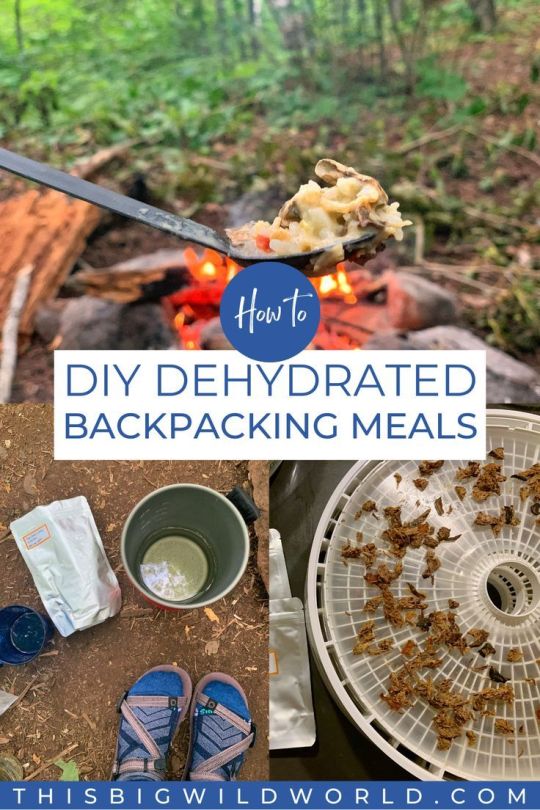
How to Dehydrate Your Own Backpacking Food [Step-by-Step Guide] - Amanda Outside
Learn how to make your own backpacking food at home with a dehydrator! This is the complete guide to diy backpacking meals that are low cost, delicious, and fun to make.

11 One Pot Backpacking Meals to Make Trailside Cooking Easy
Planning your next backpacking trip? You need these EASY and delicious one pot backpacking meals ideas! These recipes are easy to prep and clean up.

Meals in Jar recipes are the perfect way to use your dehydrated foods, along with pantry staples, to create long-term food storage meals for your family. They also make great kits for easy meals for those weeknights when you don't have time to prep.Those nights when you are on a tight schedule from kids' school activities or you've had a really rough day are the nights when you tend to reach for the phone for take-out pizza or a drive-thru.Like creating freezer meals, meals in a jar are handy prepared meals you have in your pantry that can be thrown into a pot of water to cook, and save you a ton of time from meal prep.Benefits of Meals in a JarQuick easy meals that are ready for camping or busy weeknight meals. Easy way to store meals for long-term food storage without the need to constantly prep a meal. Create 'instant' meals to your tastes and nutritional levels and philosophies. Many of the instant meals from long-term food storage companies are high in salt and carbs - you can adjust any of these to meet your needs. Make use of your long-term food storage. Whether you've invested in freeze-dried products, or dehydrate your own, or stock dry goods, you can put them to use in ready-made meals. Perfect for emergencies. Whether natural disasters, power outages, earthquakes, or personal situations where health situations prohibit you from meal prep, these meals require less water and energy to prepare as opposed to many traditional recipes. Help friends and family. Give the gift of food storage to those who may be in need. Elderly friends and relatives who can't prep foods, those suffering from illnesses, neighbors in need, new and expectant parents, and families suffering loss are all prime examples of those who may need quick meals that need little prepping for comfort and nutrition. If you would like an ad-free, e-version of this post to keep on your desktop, phone, tablet, etc., you can purchase it in my shop.Best Meals in a Jar RecipesFor these recipes, we're going to be sticking to meals in a jar and side accompaniments that are primarily self-contained. There will be a few that need a couple of extra ingredients to finish.We will be staying away from meals in a jar that require a ton of dairy or other fresh ingredients that cannot be replicated with freeze-dried or dehydrated alternatives. We'll also stay away from dessert or salad in a jar things that should stay fresh.We also want to keep these mixes shelf-stable for long-term as much as possible, so things like granola won't be included.My hope is to give you viable, good, shelf-stable options for meals in a jar recipes at every one of these vetted links to help you build your pantry with long-term pantry storage.TIPS FOR SUBSTITUTION:Many of these recipes may contain products that are from a specific freeze-dried company. You do not have to use that ingredient from that company. You can use your own dehydrated foods, or a freeze-dried company of your choice. Quantities are equal, but some dehydrated foods take up more volume or space. But quantities aren't written in stone. You can change the mixes up easily to your preference. Give yourself a little extra time in rehydrating/cooking when using dehydrated vs freeze dried. It may take a little longer. Use a thermos to rehydrate/cook in if you are on the go If you need a truly instant-meal, precook all of your ingredients before dehydrating. LEARN MORE: 200+ Dehydrating RecipesWhile I do promote both Augason Farms and Thrive Life Foods, there are quite a few other companies that do sell freeze-dried foods that you can use if you don't want to use your own dehydrated or freeze-dried foods you make.Also, some of these jars will make enough to fill a quart sized mason jar. Some will be enough to fill a pint or pint and a half-sized jar. The latter can be doubled or tripled to go into a larger jar if desired. The smaller recipes are great for backpacking or individual meal sizes.For some of the recipes, you may have to scroll down the page to get to it.Breakfast Meals in a JarBreakfast OmeletCamper's Eggy DelightCaryn's Cheesy Sausage FritattaCherry Chocolate PancakesCinnamon PancakesCranberry Buttermilk Pancake MixHashbrowns and EggsHearty Pancake MixOatmealSweet and Savory CrepesMain Course Meals in a JarABC Sloppy JoesBaked ZitiBeans and Rice CasseroleBeefy Philly CheesesteakBeefy Spanish RiceBurrito Bowl Meal in a JarCheesy Sloppy Joe HotdishChicken AlfredoChicken and RiceChicken Broccoli CheeseChicken Broccoli Stir FryChicken ChiliChicken Noodle Skillet MealChicken Salad in a JarChiliChili MacCous Cous with Chicken and Vegetables (serves 1 - pint jar)Creamy Chicken Veggie CasseroleCreamy Tomato Pasta PrimaveraCurry Rice with Chicken and Cashews (for long-term storage, omit cashews or add at the last minute since nuts are best stored in the freezer for long-term) (serves 1 - pint jar)Double Cheeseburger Sauce MixFiesta Rice with Corn (serves 1 - pint jar)Francesca's Unstuffed PeppersHamburger StewHawaiin Style Teriyaki BeefHearty Beef and Bean ChiliHearty ChiliInstant Chicken SaladJambalayaKansas City Chicken BBQKicked Up Mac n CheeseMac and CheesePotato Cheese Sausage CasseroleQuicheRosemary Chicken and RiceSausage FrittataSausage LasagnaSloppy JoesSpaghetti Sauce with MeatStroganoff SkilletStuffed Chicken and GravyTaco Beef and Cheese Thai Chicken in Spicy Peanut SauceThree Bean ChiliTurkey Noodle CasseroleSoup Meals in a JarAsparagus SoupBean SoupBeef Barley SoupBeefy Bean SoupBeef StewBeef and Bean StewBeef and Zucchini QuicheBuffalo Chicken and RiceCaryn's Chicken Noodle SoupChicken and Rice SoupChicken Noodle Soup in a Jar (add freeze-dried chicken to make a complete shelf-stable meal)Chipotle Corn ChowderCream Soup MixCreamy Tomato SoupCreamy Wild Rice Mushroom SoupCurried Lentil SoupFriendship SoupGood Luck SoupHam Sausage and Bean SoupInstant Cheese Soup Instant Creamy Asparagus SoupItalian Wedding SoupLentil and Rice SoupLoaded Baked Potato Soup (recipe is in the description box of the video)Love SoupMinestrone Soup Nancy's Chicken Noodle SoupNoodle Soup in a JarPainted Desert Chili in a JarPalouse SoupPotato Sausage SoupPotato SoupPrairie Garden Vegetable SoupSoup StartersSplit Pea SoupTaco Soup Texas Two-Step SoupTortilla SoupTurkey and StuffingVegetable Quinoa Soup with LentilsZombie Soup MixThe following recipe for Sauce or Soup mix is used with permission from the Utah State University Extension List. Typically it is against copyright laws to take someone else's recipe and share it in full like this, but they have given permission to publish widely. To see more uses for this recipe, alternatives, etc., you can find the information in this handy guide.Anything Cream Soup Mix:Ingredients2 cups powdered non-fat dry milk ¾ cup cornstarch (I prefer to use arrowroot powder) ¼ cup instant chicken bouillon (regular or low sodium) 2 tablespoon dried onion flakes 2 teaspoon Italian seasoning (optional) DirectionsCombine all ingredients, mixing well. Store in an airtight container for a year+ YieldEqual to 9 (10.5 oz) cans of cream soup.To substitute for 1 can of cream soupCombine ⅓ cup of dry mix with 1 ¼ cups of cold water. Whisk untilwell blended. Cook and stir on stove top or in microwave until thickened. Add thickened mixture to casseroles as you would a can of soup. (This is used with permission from the USU Extension office) Sides in a JarCurried Rice MixCranberry Orange RiceCreamy Herbed Rice MixHerbed Rice MixLemon Dill RiceMac and Cheese (add a little freeze-dried beef or sausage and taco seasoning, and you've got a cheesy chili mac)Pot Roast Gravy over Mashed PotatoesRefried Beans (this is basically just dehydrated refried beans, but when all you have to do is add water, it makes a quick and easy side or protein replacement!)Chicken Flavored Rice MixScalloped Potatoes Spanish RiceYellow Rice MixMeals in a Jar Recipe BooksThere are so many free meals in a jar recipes all over the internet apart from the ones listed above. But I know it's so convenient to have something handy to have that isn't attached to your computer or tablet!So here are some recommended recipe books for making your own meals in a jar for your long-term storage.Meals in a Jar: Quick and easy, Just-Add-Water, Homemade Recipes by Julie Languille The Meals in a Jar Handbook: Gourmet Food Storage Made Easy by Stephanie Petersen Dinner is in the Jar: Quick and Easy Dinner Mixes in Mason Jars or Mylar Bags by Kathy Clark Quick and Easy Dehydrated Meals in a Bag by Tammy Gangloff (of The Ultimate Dehydrator Cookbook fame, which also has some meals in a bag options.) Ultimate Dehydrator Cookbook by Tammy Gangloff Not only is this a great technique book on how to dehdyrate those products that can build your meals in a jar, she includes a lot of "just add water" meals, too! Do It Yourself Prep N Store by Janice Paveglio Gunther (I have not read this one or cooked from it, but I looked through the beginning information that was available and it looked like she had solid information) Look to Backpacking Recipe books for other meals that you can also put into your storage. They may not be 'in the jar' and are usually geared more towards single or double serving meals in a bag, but they can be used easily translated to your family serving size.A caveat to these kinds of recipes is that they may often use oils/fats while cooking and meats. For long-term storage, omit the oils and fats (they aren't usually needed), and look to freeze-dried meats for more optimal storage.The Dehydrator Cookbook for Outdoor Adventurers: Healthy, Delicious Recipes for Backpacking and Beyond by Julie Mosier Recipes for Adventure: Healthy, Hearty and Homemade Backpacking Recipes by Chef Glenn McAllister Cooking a Meal in a Jar in a Solar Oven Cook your "Meal in a Thermos" while you hike How to Store Meals in a JarYou can store meals in a jar mixes in variety of ways:Canning jars (also known as mason jars) Any airtight container - spaghetti jars, queso jars, or other glass containers that are airtight. Hard sided plastic containers (not the more pliable) will also work Mylar bags - these are reusable and great for camping and can be sealed with a simple heat seal with an iron or vacuum sealer, or vacuum sealed with an O2 absorber Vacuum-sealed plastic storage bags as is used with many vacuum sealers Zip-top bags for short-term storage (less than a week). LEARN MORE: Quick Guide to Vacuum SealingMeals in a jar recipes will last easily last a year or two, and you may get even longer - 5+ years, but the quality and texture may begin to decline at that point.Certain foods like tomatoes don't have as long of a shelf-life as other foods, and meats are better used freeze-dried than dehydrated for longer shelf-life goals.Proper storage is also necessary. Cool, dark, dry places are best for storage. If you have proteins, storing them in the freezer is optimal, and they can be pulled out at any time for a backpacking/hiking trip with no issues.Using Oxygen AbsorbersThese can be used in your jars to help control the shelf life of your meal in a jar recipe. They are not necessary but can be helpful. You can learn all about how they work and if you really need them (you really don't) with this handy guide on storing dehydrated foodsHelpful Tips for Creating Meals in a JarUse Instant Rice or Instant Beans. For those ingredients that take longer to prepare, using dehydrated rice or dehydrated beans can cut your time down. Mark your packages: Mark your bags or attach a recipe sheet to your jars. Having the correct directions on how to prepare or what more needs to be added. Mylar can be written on with sharpie markers. You can write on the lid of a jar, tape a recipe card to the outside, etc. Never assume you'll remember! Interchange recipes. You'll often find recipes online that are built from freeze-dried foods only. While a little adjustment in the time to rehydrate may be different, you can easily replace freeze-dried with dehydrated foods. Using dehydrated foods - consider cooking your vegetables fully then dehydrating to make the end product a little quicker to reconstitute. Preparing Meals in a Jar RecipesUsually simmering in enough water to replace the original water is enough, though I suggest a little extra to make up for loss in simmering and the extra sometimes needed to rehydrate. But follow the above recipe suggestions for best results as all will vary.Tools for rehydrating meals in a jarSaucepans Fondue pots -surprisingly, these are excellent in emergency situations as they require nothing but a candle or other fuel source that is easy to store, and can be used to simmer smaller meal portions during power outages. Look for older non-electric fondue pots in thrift stores for less expensive options. Thermoses Other Helpful Resources for Meals in a Jar RecipesRainy Day Food StorageTips to convert recipes:Many recipes you already cooked can be made into a meal in a jar recipe. Some helpful tips to covert recipes you already love are:Stock: Replace 1 quart of stock with 1 ½ tablespoons bouillion. Then use 1 quart water to make soup Vegetables: Use ⅓ cup of dehydrated or freeze dried vegetables to replace 1 cup of fresh. Remember that dehydrated vegetables may need a little extra time to rehydrate and cook, so meals that allow simmering work best. Milk: Use ⅓ cup milk powder to replace 1 cup milk (and ⅔ cup water) Ground Beef: 2 Cups freeze-dried ground beef for 1 pound of beef Chicken: 2 ½ Cups freeze-dried chicken for 1 pound of beef Meals in a Jar Frequently Asked Questions:How long do meals in a jar last?Typically, most meals in a jar will last a year to three years by the safest standards of the National Center for Home Food Preservation.However, using the proper storage standards listed above, you may get 5 or more years out of them. Just remember, things like tomatoes have a shorter long-term life and may begin to degrade a little faster than the rest of your dehydrated goods, so be sure to rotate often!Meats should also be freeze-dried as opposed to dehydrated for best storage results.Can I use freeze-dried foods?Yes! In fact, I recommend using freeze-dried meats for all of my long-term storage of dried foods. They are prepared in a different way than dehydrating and can be shelf-stable for up to 25 years (unopened) and then longer than typical dehydrated meats on the shelf opened.My favorite places to purchase freeze-dried foods are Thrive Life and Augason Farms, depending on who is running the better sale.However, if you are concerned about storing meats long-term from a dehydrated or already opened, freeze-dried state, you can always keep your meat in the freezer and just add it as you put the meal on the stovetop to cook.Can I replace freeze-dried with dehydrated food?Yes, they are usually interchangeable in any meal. Just remember dehydrated foods may take a little longer to reconstitute. And if they were not dehydrated from a fully cooked state, they will also need time to cook.Can I store salads in a jar on the shelf?Unfortunately, salads in a jar type recipes are still meant for safe refrigerated storage but can help extend the life of your greens when vacuum sealed. They are not safe for shelf-stable storage, which is why they are not included in this list.Do I have to use a mason jar to store meals in a jar recipes?Use mylar bags with or without oxygen absorbers, food storage bags, airtight containers, and commercial glass jars with airtight seals. Zip top bags are to be used for very short-term storage only (think a week or so).Can I do any meal and put into a jar?Unfortunately, just any meal doesn't dry and qualify for shelf-stable meal in a jar storage. Many foods are high in fats/oils, or aren't considered shelf-stable.So while you can do a bulk load of spaghetti sauce and noodles with meat, drying it once cooked is easy, but the meat may not be shelf-stable because of the fat content, and any oil used in the sauce can also create an issue.This is why freeze-dried proteins and non-fat dairy are suggested for storage.However, these meals would be fine for short-term backcountry/hiking meals, or can be stored in the freezer until needed.Do items need to be kept separate?With some mixes, the soups need different cooking times. A vegetable quinoa soup might need the quinoa cooked separately. Or in the case of a mac and cheese meal, the sauce components are bagged separately, then inserted into the top of the jar. Each recipe should notate if this might be necessary.Can I make my own freeze-dried foods?Yes! You can freeze-dry single ingredients or whole meals using a freeze-dryer. They usually have a longer shelf-life than dehydrated foods making your meals in a jar last much longer.The Harvest Right Freeze Dryer is the premiere home freeze-dryer on the market (much like Excalibur was 15 years ago). It is an investment, but for those serious about long-term food storage and control of your own food, it might be an investment worth making rather than purchasing from various companies.Conclusion:There are so many resources for meals in a jar on the internet. Some are great for long-term storage, and some are made more for the effect of storing in a jar but might be better used for short-term gift giving.Either way - play, explore, make up your own recipes! You'll love the benefit of having shelf-stable meals ready for your family for easy meals, emergency meals, and opportunities to serve other people who may be in need of a hot meal that you can help them store.Do you have a favorite you'd love to share with us?▢ 2 ½ cups quick cook elbow macaroni ▢ ½ cup freeze dried protein (beef crumbles, sausage or diced chicken) ▢ ⅔ cup cheese powder ▢ 3 tablespoons instant non-fat dry milk ▢ ¼ cup taco seasoning mix ▢ 1.5 tablespoons butter powder ▢ ½ teaspoon salt ▢ ¼ teaspoon white pepper ▢ ½ cup vegetable powder (optional) ▢ 2 ½ cups water Use only 2 cups if omitting vegetable powder ▢ 3 cups water Store Place pasta and protein into the bottom of a quart jar or mylar bag Place dry ingredients into a zip top bag and place on top of pasta mix Close the jar or bag as desired (vacuum seal, use an O2 absorber or simply close) Store for 2 years easily, up to 5 years in most cases Vacuum seal or use an O2 absorber for best results See Notes To Prepare Heat 3 cups of water to rehydrate the pasta and protein. Allow pasta to soak while preparing the sauce Add 2.5 cups of water to dry ingredients Mix thoroughly and allow to sit an rehydrate while pasta rehydrates Mix with pasta and serve. Notes: If using regular pasta, cook it first (you can rehydrate the protein in the same water), drain, then go into the next steps. You can use some of that pasta water to mix the dry ingredients to form your sauce. For ease, you can cook all the ingredients together. The sauce may clump and it may take more time to mix together, but given time, the ingredients will mix properly. Storage: Store in an airtight container for up to two years in a dark, cool, dry place.Calories: 373kcal | Carbohydrates: 62g | Protein: 14g | Fat: 4g | Saturated Fat: 1g | Polyunsaturated Fat: 0.5g | Monounsaturated Fat: 1g | Trans Fat: 0.2g | Cholesterol: 15mg | Sodium: 1034mg | Potassium: 433mg | Fiber: 4g | Sugar: 15g | Vitamin A: 1802IU | Vitamin C: 16mg | Calcium: 90mg | Iron: 2mgNutritional information is an estimation only. Nutrient information for dehydrated foods is based on fresh. Use ¼ of the servicing size for the same nutrient information. Thus 1 Cup of fresh fruit has the same sugars as ¼ dried. Tried this recipe?Mention @thepurposefulpantry or tag #thepurposefulpantry!©ThePurposefulPantry. Photographs and content are copyright protected. Sharing of this recipe's link is both encouraged and appreciated. Copying and/or pasting full recipes to any social media is strictly prohibited.
2 notes
·
View notes
Text
hyuk...time to meet the platonic love of ur life ( ft. @jeoseungsaja )
Just do it. It’s not that big of a deal. Just go up to him and say it.
Or at least that’s how Patrick has been trying to justify it as he spies on his SEATMATE from across the steps. They’re the only ones who are sitting there, in comparison to the rest of the people who have taken up seats at the tables. Patrick looks back down at his book: a beginner’s guide to the Korean language. There’s no way he’s going to say it right and what if his seatmate thinks he’s trying too hard?
It’s already a miracle in and of itself that his seatmate, Lee Hyuk, an international student from Seoul, at the very least tolerates him, in comparison to their other classmates. What if this ruins that?
Patrick swallows the lump in his throat. But then again, Hyuk probably already sees him as a fraud, Patrick being Korean, but also not knowing a single word of Korean. He steels his resolve, finally gathering his backpack and taking the spot next to his churlish seatmate.

"Uh...” He looks down at the guidebook in his lap. “Do you want to get lunch with me?” He cringes. Oh god, that can’t be the correct pronunciation.
#jeoseungsaja#jeoseungsaja ( ft. lee hyuk )#( threads: patrick. )#worlds that are drawn to each other ( interactions. )#( verse: sand in the hourglass. )#ALEX!! i believe i....owe u a starter with younger patrick!!#time to see what hyurick was like at the very beginning :D#starting with patrick dying on the inside 🥲#bc he doesnt know korean and he most definitely fucked up the pronounciation#don't be too harsh hyuk.... :'D#but also if this doesn't work for you do let me know!! i can write something else for sure!!#also pls have a wonderful day as well alex <3#under the same sky ( queue. )
3 notes
·
View notes
Text
Small Wonder: Pocket-Sized Sewing Devices Explored
In today's fast-paced world, convenience is key. From smartphones to wearable tech, we're accustomed to having powerful tools right at our fingertips. But what about sewing devices? Traditionally bulky and cumbersome, sewing machines have undergone a transformation in recent years. Enter pocket-sized sewing devices – compact, portable, and perfect for on-the-go fixes. In this comprehensive guide, we'll explore the world of small sewing wonders, with a special focus on handheld sewing machines.
The Rise of Pocket-Sized Sewing Devices
Gone are the days when sewing meant dragging out a heavy, clunky machine from the depths of the closet. With advancements in technology, sewing devices have undergone a remarkable evolution, shrinking in size without compromising on functionality. These pocket-sized wonders are designed to tackle minor repairs and alterations with ease, making them indispensable tools for busy individuals and crafting enthusiasts alike.
Benefits of Pocket-Sized Sewing Devices
Portability: Perhaps the most obvious advantage of pocket-sized sewing devices is their portability. Compact and lightweight, they can easily slip into a purse, backpack, or travel bag, ensuring you're always prepared for wardrobe emergencies, whether at home or on the go.
Convenience: No need to set up a bulky sewing machine or hunt down a power outlet – pocket-sized sewing devices are ready to use whenever and wherever you need them. Whether you're hemming a skirt, repairing a torn seam, or attaching a button, these handy tools offer quick and hassle-free solutions.
Versatility: Despite their small size, pocket-sized sewing devices pack a punch in terms of versatility. From basic stitches to more advanced techniques, they're capable of handling a variety of sewing tasks, making them suitable for both beginners and experienced sewers.
Cost-Effective: Investing in a pocket-sized sewing device is a budget-friendly alternative to purchasing a full-sized sewing machine. With prices ranging from affordable to moderately priced, they offer excellent value for money, especially for occasional use or small projects.
Introducing Handheld Sewing Machines
Among the array of pocket-sized sewing devices, handheld sewing machines stand out as versatile and user-friendly tools. These pint-sized powerhouses allow you to sew with precision and control, all while fitting comfortably in the palm of your hand. Here's why handheld sewing machines are worth considering:
Compact Design: Handheld sewing machines are designed for maximum portability, featuring a compact and ergonomic design that fits comfortably in your hand. They're lightweight and easy to maneuver, making them ideal for intricate stitching and delicate fabrics.
Simple Operation: Don't let their small size fool you – handheld sewing machines are remarkably easy to use. With intuitive controls and straightforward threading mechanisms, even beginners can quickly master the basics and start sewing with confidence.
Battery-Powered Convenience: Most handheld sewing machines operate on batteries, eliminating the need for cords or power outlets. This makes them perfect for on-the-spot repairs, whether you're traveling, attending events, or simply moving from room to room in your home.
Versatile Stitching Options: Despite their compact size, handheld sewing machines offer a range of stitching options to suit your needs. From straight stitches to zigzag stitches and everything in between, you'll have the flexibility to tackle a variety of sewing projects with ease.
Tips for Using Handheld Sewing Machines
To make the most of your handheld sewing machine, consider these helpful tips:
Practice on Scrap Fabric: Before diving into your project, take some time to familiarize yourself with the machine by practicing on scrap fabric. This will help you get a feel for the controls and adjust your stitching technique as needed.
Secure Fabrics Properly: To prevent slipping and ensure neat, even stitches, always secure your fabrics properly before sewing. Use pins or fabric clips to hold the layers together and maintain alignment throughout the stitching process.
Take Your Time: While handheld sewing machines are designed for speed and convenience, it's important to take your time and sew at a steady pace. Rushing through stitches can lead to uneven tension and mistakes, so proceed carefully and methodically.
Maintain Your Machine: Like any tool, handheld sewing machines require regular maintenance to ensure optimal performance. Clean the machine after each use, lubricate moving parts as needed, and store it in a protective case or pouch to prevent damage.
Conclusion
Pocket-sized sewing devices, including handheld sewing machines, offer a convenient and practical solution for quick repairs and on-the-go sewing projects. With their compact design, portability, and versatility, these small wonders have earned a permanent place in the toolkit of sewers and DIY enthusiasts everywhere. Whether you're hemming a garment, fixing a tear, or adding decorative stitches to a craft project, a handheld sewing machine is sure to become your new favorite tool for creative expression.
0 notes
Last Seen Blogs

gaspardos
Gaspar Dos

andrejatonc
Andreja Tonč

spanishguide07
75 real estate egypt

sohibnature
Sohib Nature

tomoyamada
tomoyamada on tumblr