#baby tittibhasana
Photo

(via Warrior 1 Variation | Yoga photos, Yoga photography, Yoga photoshoot || Curated with love by yogadaily)
#baby tittibhasana#tittibhasana#seaside yoga#seaside#yoga#yogi#yogini#yoga daily#asana#asanas#yoga pose#yoga poses#manifestation#manifesting#manifest#inspiration#inspire#yoga inspiration#motivation#yoga motivation#aesthetic#yoga aesthetic#fitness#fit#health and fitness
58 notes
·
View notes
Photo

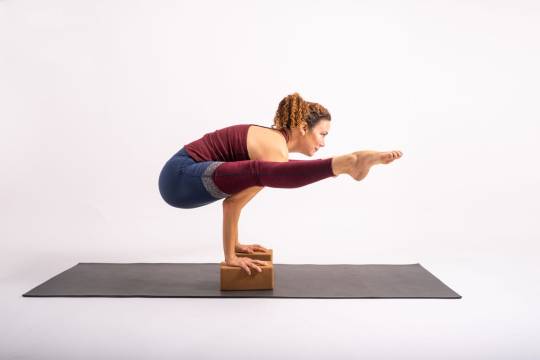
DETAIL + DEPTH | The peak pose of this series is Firefly Pose, an arm balance that involves shoulder protraction, spinal flexion, and knee extension, as well as immense strength in the shoulders and core. As always, begin practice in an accessible pose that allows the body to transition from normal daily activity to intentional body movement and awareness. While I tend to take Child's Pose with the knees wide and arms forward (Adho Mukha Virasana), this version of Child's Pose more closely resembles that of an infant or baby before they start walking and develop a lumbar curve - with the back rounded and shoulderblades apart (protracted/abducted). One reason I don't take this as often is the dramatic rounding of the upper back, which closes the chest and "shortens" the collarbones, a position most of us would benefit from avoiding. This version, however, is perfect as a preparation for Firefly Pose. I show two versions of Balasana using 2 and 3 blocks. The block under the shoulder prevents the shoulders from dropping without support, and thus excessive rounding of the upper back. The block under the wrists and forearms keep the weight of the arms evenly distributed. The third block under the elbow, which if you look carefully will notice is one height higher than the shoulder and wrist blocks, brings the shoulder position into external rotation. This helps to broaden the chest. Connect the head to the ground and release all body weight into the support below. Close the eyes, relax and breathe. © 2018 Ellen Huang Saltarelli Props by @shophalfmoon #detailanddepth #alignmentyoga#yogaalignment #Yoga #yogaprops #propyourpose #yogapractice#yogaeverydamnday#practiceandalliscoming #iyengaryoga #fireflypose #tittibhasana #balasana #adhomukhavirasana #childspose #yogaforeverybody (at Highland Park, Los Angeles) https://www.instagram.com/p/BnY0B1OgEzf/?utm_source=ig_tumblr_share&igshid=v4fam4f6wfxf
#detailanddepth#alignmentyoga#yogaalignment#yoga#yogaprops#propyourpose#yogapractice#yogaeverydamnday#practiceandalliscoming#iyengaryoga#fireflypose#tittibhasana#balasana#adhomukhavirasana#childspose#yogaforeverybody
7 notes
·
View notes
Video
Day 🔟 of #ElementsOfFirefly ✨ #firefly #Tittibhasana - so I still have some work to do on this but the last 10 days worth of drills has definitely made a difference!! I think a bit more work on lengthening the hamstrings to get those legs straight, then I'll be ready to work on baby firefly!! 💪🏽 Wearing my amazing #pranayamadise leggings from @blossomyogawear Thanks to the Inspirational Hosts: ✨@susanbishopyoga ✨ @inspiremyyoga ✨ @shiziks And Generous Sponsors: 🚀 @blossomyogawear 🚀 @blissmalajewels 🚀 @gym.attitude 🚀 @infinitystrap 🚀 @yogaleggs 🚀 @dontmesswithganesh Day 1 -Wrist Strengthening ☑️ Day 2 -Hip openers and hamstring stretches ☑️ Day 3 -More hips & hamstrings ☑️ Day 4 -Spinal mobilisation ☑️ Day 5 -Stages towards Compass pose☑️ Day 6 -Abdominal strength ☑️ Day 7 -Stages towards Elephant trunk pose☑️ Day 8 -Lunges ☑️ Day 9 -Stages towards half fire fly half crow ☑️ Day 10 -Stages towards Fire fly pose ☑️ #yogafitness #yogastrong #yogapractice #yogaalignment #yogaeverydamnday #dothework #yoga #asana #igfitness #yogapose #strength #yogainspiration #fitness #yogachallenge #benddontbreak #yogateacher #igyogachallenge @igyogachallenges #stepbystep #onebreathatatime #onthemat #yogigoals #achievement #lift #armbalance
#yogachallenge#strength#lift#tittibhasana#asana#onebreathatatime#yogapose#yogapractice#fitness#achievement#igyogachallenge#firefly#armbalance#yogainspiration#stepbystep#igfitness#yoga#elementsoffirefly#yogafitness#dothework#yogigoals#yogastrong#pranayamadise#yogaalignment#benddontbreak#yogaeverydamnday#yogateacher#onthemat
2 notes
·
View notes
Photo

Half Supine Happy Baby (with knee touching floor): This is a posture to open two opposing muscle groups. The leg that looks like a half-happy baby (right leg) posture is opening the gluteal muscles. These muscles help us extend the leg, bring the legs together, abduct, externally and internally rotate at the hip joint, and extend the knee though the iliotibial tract. The knee is taken to the floor because the opposite hip is lifting away from the floor. One hip is flexed while the other hip is extended. Due to this, it will lessen the over-tensing of the flexed hip, which is often done. Many of us experience anterior hip pain because of how often we are flexing the front of the hip joint (see left leg). On the other side, we are activating the gluteal muscles by pushing the heel of the foot down to lift the left cheek away from the floor while tilting that side of the pelvis posteriorly. This movement will allow release and will stretch the hip flexors. Since one side of the hips are anteriorly tilted and the other are posteriorly tilted, this will also add a twisting element to the shape. It's important to do both sides. Only take this shape to the depth where you won't feel a strong stretch, but rather a gentle opening so the nervous system will stay calm. This posture can be a preparatory posture for #kurmasana (tortoise posture) as well as #tittibhasana (firefly posture). #hipopeners #hipstretch #yogaposes #restorativeyoga #yoga #yogainpdx #pdxyoga #pnwyoga #laurenjfields #yogateacher #eryt500 #continuingeducation #yogapdx #yogaforeverybody #yogaforeveryone #yogaforbeginners #yogastudio #yogawithdogs #frenchbulldog #ginothefrenchie #welovedogs #supine #supinetwist #twistbraids #happybaby #yogamascot #gino #alamedayogapdx #yogatoyoupdx (at Yoga to You PDX) https://www.instagram.com/p/BwNVxX8BYsm/?utm_source=ig_tumblr_share&igshid=yxazrh8dmwsq
#kurmasana#tittibhasana#hipopeners#hipstretch#yogaposes#restorativeyoga#yoga#yogainpdx#pdxyoga#pnwyoga#laurenjfields#yogateacher#eryt500#continuingeducation#yogapdx#yogaforeverybody#yogaforeveryone#yogaforbeginners#yogastudio#yogawithdogs#frenchbulldog#ginothefrenchie#welovedogs#supine#supinetwist#twistbraids#happybaby#yogamascot#gino#alamedayogapdx
0 notes
Text
10 Ways to Get Real About Your Body’s Limitations & Avoid Yoga Injuries
YJ Influencer Laura Burkhart offers the story of her own chronic pain and hip injury as a caution to yogis and encourages you to get honest about your own practice.
Yogis, it’s time to get honest with yourselves and start respecting your body's limitations. We’ve all heard success stories of people who have healed their body, mind, and emotions through yoga. But lately, I’ve been hearing about more and more students and teachers (including myself) who’ve been hurt by their asana practice.
Why is everyone talking about yoga injuries all of a sudden? For one thing, there are more people practicing yoga now and so likely more injuries. But getting injured by yoga, which most of us start doing for its healing benefits, can also be confusing, embarrassing, and counterintuitive. All of that can make it hard to talk about.
My Yoga Injury Story
I started practicing yoga during a time when I was dealing with chronic health problems and a lot of stress. I was originally attracted to it, because it reminded me of the moving meditative quality I used to find in dance. But unlike dance, where I was taught to push past pain and difficulty with a smile on my face, yoga, ironically, encouraged me to respect my body and its limits.
While I thought I was working within my limitations, years into my yoga practice, I made the decision to stop lifting leg weights in order to increase my flexibility to get into Visvamitrasana, which would eventually be photographed for this Master Class article in Yoga Journal. I was happy when my consistent practice “paid off” and I was able to work into “advanced” poses that required a lot of flexibility and arm strength. What I didn’t know was that 14 years of dance, followed by 16 years of yoga, plus 7 years of not counteracting all the stretching with strength training, had led to overuse of my hip joints and strain on my tendons and muscle fibers.
A couple of years ago, my body started telling me it was exhausted and didn’t want to do long practices or extreme poses. Did I listen? No. I had big plans, work to do, classes to film, and bills to pay. One day, while demonstrating Compass Pose, I pulled my left knee into my armpit and immediately felt a deep pain in my left groin. My initial reaction was frustration with my body for not keeping up with me. I pushed past the pain and continued doing everything I’d been doing. A week later, while teaching I demonstrated Side Plank with my top (injured) leg in Tree Pose and heard a “pop.” That was the straw that broke the camel’s back. I was in so much pain that I could barely sleep or walk for 5 months. During that time, to teach I either sat in a chair or hobbled around in pain.
Today, 19 months later, after three x-rays, two MRIs, six doctors, six physical therapists, two acupuncturists, and multiple injections, I’m still walking on eggshells. It’s painful to stretch, strengthen, and externally rotate my left leg or pull my left thigh toward my chest. I've slowly progressed from 14 to 43 simple yoga poses, but basics like Happy Baby, Child’s Pose, Crescent Lunge, Warrior II, Triangle, or a simple cross-legged position are difficult for me. After a year of being misdiagnosed, I found out I had labrum tears, a strained psoas, multiple hamstring and gluteal tears, tendonitis, and tendonosis. According to my orthopedic doctor, the labrum tears were caused by repetitive deep hip flexion—the head of the femur bone hitting the hip socket. (Think poses like Visvamitrasana, Tittibhasana, deep forward bends, and even Child's Pose.) Unfortunately, my labrum and gluteal tears might have to be fixed surgically, which will also come with a bonus package of 5–12 months of rehab.
I haven’t talked much about my injury, not so much out of embarrassment or secrecy, but because I made a decision a couple of months into the healing process to focus on the positive and what I could do, rather than what I couldn't. I find talking about the injury, and focusing on the physical and emotional pain it's caused, is a depressing road that leads nowhere.
See also Prevent Yoga Injuries: 3 Risky Poses You Can Make Safer
Unfortunately, I’m not the only yogi dealing with serious injury.
It didn't take long to reach out to a handful of other highly skilled teachers who have been injured by yoga. Like myself, Jill Miller and Melanie Salvatore August have suffered from major hip injuries due, in our opinion, to overuse. Jill recently had a hip replacement. Sarah Ezrin recently had shoulder surgery for an injury that she believes too many Chaturangas and binds contributed to. Similarly, Kathryn Budig assumes years of repetitive movement, vinyasas, and emotional stress led to the shoulder labrum tear she recently recovered from. Jason Bowman had surgery for a knee injury that he attributes partially to the regular practice of poses requiring external rotation paired with deep knee flexion like Lotus Pose. Meagan McCrary thinks it was 10 years of hyperextension and nerve entrapment around her joints in practice that short-circuited her nervous system and caused her severe chronic pain. I also know many teachers who have had to reduce the intensity of their practice or focus more on strength training due to non-yoga-related injuries.
In the classroom, I see shoulder injuries most often. They tend to happen to ambitious newer students who skip learning the basics and push hard the first 6–18 months trying to “advance” their practice. Normally I find students experience shoulder pain when they practice too often, do too many Chaturangas (incorrectly), or try to get into arm balances when their alignment is off. Luckily, most students are grateful for any tips and corrections when it comes to injury prevention while other students don’t think the adjustments or warnings are for them until it’s too late.
See also Study Finds Yoga Injuries Are on the Rise (Plus, 4 Ways to Avoid Them)
What do you do after a yoga injury?
On a brighter note, if you are injured, your life is not over by any means. I have actually “accomplished” more since I’ve been injured by thinking outside the box and stepping beyond the lines of the path I had created. I discovered that I love writing articles and blogs, mentoring teachers, experimenting with yoga props, swimming, and having a simple, yet satisfying yoga practice. I still take yoga photos (some of which have been published in Yoga Journal Italy and Singapore). And I’m currently creating a co-led teacher training with Jason Crandell. My injury has given me an opportunity to step back and create a different life for myself.
That being said, I would do anything to go back in time, to have listened to my body, and to not have pushed so hard in my practice. I wish I would have avoided ending up in my current limited state, having to constantly monitor and be cautious with my body. I wish I didn't experience pain in my left hip, lower back, and hamstrings on a daily basis. It would also be amazing not to worry about how I’m going to get well or my healing timeline. I’ve accepted the fact that I will no longer do crazy yoga poses, but I would love to one day do simple poses such as Triangle on my left side or move through a vinyasa without pain or fear of reinjuring my body.
These stories are not to scare you, but to encourage you to be careful, listen to your body, and not to push past your God-given limitations! You can have a healthy practice that is extremely beneficial to your body if you can get real with yourself about it. The following questions are a good place to start.
10 Questions to Ask Yourself About Your Yoga Practice
1. Does your practice balance the rest of your life?
If you are already performing high-intensity activities such as running, swimming, cycling, etc., I recommend choosing an asana practice that is less intense in nature, such as Iyengar or restorative practice. That way you can reap the benefits of yoga and avoid overusing your joints, tendons, and muscles. On the flipside, if you lead a sedentary life, then a vinyasa practice might bring your body into balance.
2. Do you practice too much?
As practitioners get serious about asana, some feel the need to do an intense 90-plus-minute practice, 5–7 days a week. Many yogis try to keep up with this “expectation” because they believe it's what a “true yogi” would do. Unfortunately, for many of us, too intense of a practice too often can also lead to overuse of joints and unnecessary repetitive stress on tendons and muscle fibers. I personally don’t recommend doing long, high-intensity yoga practices more than 3–4 days a week.
3. What motivates you to practice?
Your teacher? Your ego? Social media? Your body? Some of us want to “master” complex asana to win favor and praise from our teachers, fellow practitioners, or social media followers.
This need for approval and recognition can be exacerbated when teachers encourage students to push deeper into poses, or praise students who have the ability to get into difficult asana, rather than applauding students with mastery of alignment and stability. If you always want to go deeper or make a pose “more advanced,” where is that coming from and why?
4. Does what you’re doing hurt?
If it hurts, don’t do it. Period. Regardless of whether your teacher is pushing you to go further, or you see other people going deeper.
We come from culture of “no pain, no gain” and pushing past our limits. Hard work, sacrifice, and going the extra mile get us good grades, promotions, and wins in sports. While this mindset can lead to advancement, it can also lead to imbalance. Your internal drive may be high, but your anatomical structure can only take so much. Too much pushing can lead to impingement, strain, and tears in the joints, tendons, and muscles. Honor your body’s limitations.
If you have existing injuries, tell your teacher. Your teacher should be able to show you how to modify poses, which poses to avoid, and maybe even guide you toward poses to heal what ails you. You might also need to back off your intensity with the practice to avoid making the injury worse.
5. Are you protecting your shoulders?
In Chaturanga, do your shoulders dip below the level of your elbows? Do you jump back every time you vinyasa? Do you land in Chaturanga or Plank? I recommend limiting jumpbacks and landing in Chaturanga when you do. For most of your vinyasas, I recommend lowering your knees to your mat or skipping Chaturanga all together to prevent repetitive stress injuries, such as labrum tears and rotator cuff issues. If you have a pre-existing shoulder issue, avoid Chaturanga and arm balances.
See also 7 Steps to Master Chaturanga Dandasana
6. Are you protecting your hips?
Are you listening to your body? In poses where you externally rotate your legs and/or go into deep hip flexion (like Compass Pose, Tittibhasana, Visvamitrasana, Krounchasana), observe how far your body naturally wants to go without pushing further. Also consider balancing out hip flexibility with abduction, adduction, and gluteal strength training.
7. Are you protecting your knees?
A few pointers: In standing poses, don't let your bent knee go past your ankle. In standing poses that require external rotation like Warrior II, rotate the front leg from the hip socket rather than the front foot. Be sure your body is well warmed up for poses that require deep external rotation with knee flexion like Full Lotus Pose before attempting them. If you already have issues with your knees, avoid Pigeon Pose and practice Thread the Needle on your back instead.
8. Are you protecting your lower back?
Do you warm up before going into deep twists? Recently, many senior teachers and physical therapists alike have begun recommending not squaring your hips in twists, especially if you’re hypermobile, to protect the lower back and SI joints. If you already have lower back issues or have tight hip and hamstrings, be careful with forward bends, particularly seated forward bends. In seated forward bends elevate yourself on a block or folded blanket to avoid rounding your lower back.
9. Are you working on mastering alignment and increasing stability?
I view an advanced student as one who knows how to align their body and use appropriate props when needed. Better alignment will also help you avoid injuries.
10. Can you be happy with where you are?
Be in the present moment; focus on what you can do now, not what you used to do, or what you think you should be doing a month from now. Your practice will change over the years. Don’t get too attached to the current season. This doesn’t mean you can’t have goals, but be realistic and see where your goals are coming from, and if it honors your body.
Shift your goals from intensity, strength, flexibility, and complex asana to digging below the physical. Our yoga culture has drifted away from the purpose of asana. The practice was originally intended to prepare the mind and body for meditation, not a career as a contortionist.
See also 4 Poses to Prevent + Heal Shoulder Injuries
My Practice Then & Now
from Yoga Journal http://ift.tt/2FlyXt5
0 notes
Text
This Yoga Sequence Is the Perfect Prep for Firefly...
A commonly asked question is how the intense arm balance known as Titibasana (Firefly Pose) came to be named after a tiny insect. The enchantment of the firefly, which is believed to be a good omen, comes entirely from its ability to generate its own light from within. Noting this helps to explain why the magical creature seems a fitting inspiration for a pose that demands deep core energy, an ability to draw one’s energy toward the center, and a tremendous amount of practice to appear so effortless.
Although rightly classified as an arm balance, Firefly is also part of a family of deep forward folds—including Squat, Lizard, Tortoise, and standing Firefly—in which the spine is flexed. In some folds, including Firefly, the legs are in straddle position, which challenges the abductors. These muscle groups tend to be neglected in our everyday movements. In this sequence, that lengthening is repeated throughout the sequence in various shapes, including Parivrtta Surya Yantrasana (Compass Pose), modified Hanumanasana (Monkey or Splits) or Ardha Hanumanasana (Half Splits), and more.
Now for that inner fire: To add the balance of Firefly to the shapes above, the practitioner must press down into their hands, engage the core to resist gravity, and hug the legs to the arms in hip adduction while at the same time bracing the arms against this pressure. All the things! In this sequence, you practice them progressively, one at a time. And, like dancing at dusk, playfulness is an ideal frame of mind to use when learning this posture.
See also: Our Guide to How to Do Tittibhasana (Firefly Pose)
How to come into Firefly Pose
You’ve got to be game to sit your butt back and use your arms like a shelf to enter the pose. Sound a little fearsome? Kids do this kind of thing every day! Staying playful relieves us of the onus to get it right straight away. Stay playful, stay flexible, and stay with your practice.

(Photo: Renee Choi)
Ananda Balasana (Happy Baby) flow to straddle
How it prepares you: Inexact circular movements in your hips when you are not bearing weight are great for increasing joint mobility.
How to: Begin your warmup in play by lying on your back in Ananda Balasana (Happy Baby). Gently ground your low back to the mat and rock to the left and right a few times. Come back to center and press your feet up toward the ceiling into your hands, as if you were resisting the pose, which can help your sacrum release into the mat. On an inhale, start to straighten one leg out to the side in a half straddle, then bend that knee again and start to straighten the other. Feel free to slide your hand from your foot to your leg or to rock side to side or to open both legs at the same time.
Take a Reclining Supta Matsyendrasana (Supine Spinal Twist) on each side, then make your way to hands and knees. Circle your upper body to warm up the wrists and hands, then flip your hands so fingers point toward your knees. Take some time in Marjaryasana (Cat Pose) and Bitilasana (Cow Pose) and then turn your hands to face the front of the mat and come into Adho Mukha Svanasana (Downward-Facing Dog Pose).

(Photo: Renee Choi)
Chaturanga Dandasana with blocks
How it prepares you: Notice those right angles in the arms? That’s a valuable prerequisite skill for almost all arm balances, including Firefly. Blocks help in this pose not to support you but as a reminder to take your shoulders no lower than your elbows. Less is definitely more.
Your elbows do not need to touch your sides—there’s too much variation in the angle of the elbows to the wrists (this is what’s referred to as your “carrying angle”) among all of us to mandate that. Just practice a muscular drawing in of your arms, whether your elbows touch your sides or not.
How to: From Downward-Facing Dog, move forward to Plank Pose, lower your knees, and place blocks on their medium or highest level toward the front of the mat. Angle the inner edges of the blocks toward the front of the mat so they look like surprised eyebrows. Place your fingertips behind each block and lower your shoulders to the blocks. Keep your elbows drawn in toward your sides as you straighten your legs to come into Chaturanga Dandsasana.

(Photo: Renee Choi)
How to deepen the pose: If you want a core challenge, consider bringing one arm alongside your body like a ski jumper. When you feel stable on the blocks, add the second arm. Keep breathing! This is a powerful practice I like to call a Chaturanga Cleanup. It trains the abs to recruit in the pose instead of relying on the hips to lift or the shoulders to take a nosedive. Start with 3 breaths and build up to 5. Repeat up to 3 times. Return your hand to the mat.
From Chaturanga Dandasana, flow through Surya Namaskar A (Sun Salutation A) 3 times, paying special care not to dip your shoulders lower the elbows in Chaturanga or to let that angle slip past 90 degrees. Come to Downward-Facing Dog.

(Photo: Renee Choi)
How it prepares you: This position stretches your hamstrings. If it’s comfortable for you, it can also be a shoulder stretch and preparation for the arm balance if you bend your elbows and bring your forearms toward the mat, approaching another right angle in the arms.
How to: From Downward-Facing Dog, step your right foot outside of your right hand, and then slide your hands a little closer to the back of the mat. Inhale, start to straighten your front leg, and let your upper body surrender toward the earth. Keep as much of a bend in your front knee as needed but keep your back heel lifted. Release and repeat, rocking back and forth between bent and extended front knee, at least 5 times, straightening your leg a touch more every time. Come back to a bent front knee.
(Photo: Renee Choi)
Prasarita Padottanasana A (Wide-Legged Forward Bend)
How it prepares you: Similar to the last pose, this position stretches your hamstrings and creates the same shape in your arms as Firefly. It comes close to mimicking the entire pose of Firefly.
How to: From Low Lunge, on an exhale, walk your hands around to the left long edge of your mat, and lengthen the legs in a straddle fold. Bring your feet parallel to one another and line up your wrists with your heels in Prasarita Padottanasana A. Squeeze your elbows in, making another right angle with your arms. At the same time, isometrically squeeze the feet in toward one another, as if to bunch up your mat. Practice this feeling of hugging inward for at least 5 breaths.

(Photo: Renee Choi)
Utthita Parsvakonasana (Extended Side Angle)
How it prepares you: The action of bracing your arm into your leg and vice versa also shows up in Firefly Pose.
How to: From Prasarita Padottanasana, on an inhale, lengthen your spine and lift your head, then exhale and pivot back to a Low Lunge facing the front of the mat. Ground your back heel down and brace your right arm against your inner right calf with your hand on the floor or on a block. Inhale and lift your left arm, opening your chest toward the long side of the mat in Extended Side Angle Pose.
Now that your left arm is free from weight-bearing, play with making circles with it and eventually reaching the arm alongside your ear toward the front of the mat. Take about 5 breaths of exploration, gazing anywhere that makes your neck feel free and comfortable.
From Extended Side Angle, plant your hands on the mat, step back to Plank Pose, and flow through a vinyasa. Come to Downward-Facing Dog.

(Photo: Renee Choi)
Utthan Pristhasana (Lizard Pose)
How it prepares you: This stretch demands intense hip adduction in the form of a “hugging in” action, which is needed in Firefly Pose.
How to: From Downward-Facing Dog, lift your right leg and step your right foot to the outside of your right hand—as much as 2–4 inches in front of it if you have the space. Move your hands back a touch and lower the back knee to the mat. Begin to bend and soften the elbows down toward the mat or a block. Let gravity do the work of relaxing your upper body toward the earth—all the while squeezing your right knee toward your right shoulder.

(Photo: Renee Choi)
How to deepen the pose: Consider angling your elbows out to the sides and allow your head and chest to release further toward the ground.

(Photo: Renee Choi)
Hanumanasana (Monkey or Splits), variation
How it prepares you: You do not have to come into the full expression of this variation of splits, as it definitely varies from the norm! So go slowly, and certainly without force. Some practitioners find this variation with legs wider apart easier, but I’d still strongly suggest going slowly to listen to the body’s messages. Take your time and give the pose your attention and breath.
This variation of Hanumanasana expresses much of the same shape in the hips and legs that is required by Firefly.
How to: From Lizard, press into your hands to lift your upper body, and shift your hips toward the wall behind you so your left hip stacks over your left knee. Instead of bringing your right heel in line with your right hip, keep it slightly out to the side. On an exhale, straighten your front leg and lower your upper body to the inside of your leg. Your front leg will extend out to the side as if pointing at 1 pm. on your personal clock. Remain here for 5–8 breaths.
How to deepen the pose: On an exhale, slide your front heel forward and slightly to the right so your leg straightens. Use blocks under your hands so you can control your descent. If your body is responsive, you can forward fold with your chest to the mat. Breathe for 5–8 breaths. When you exit the shape, use your hands and core to slowly slide your front heel back.
Take a few easy shakes of your leg and flow through a vinyasa. Hop or step to the front of the mat and step your right foot back to Low Lunge. Begin the second side with Low Lunge flow, and move through Hanumanasana on the second side. Repeat the vinyasa and end in Downward-Facing Dog. Lower your knees to the mat and take several breaths in Balasana (Child’s Pose). Feel your low back lengthen in this introspective pose. When you’re ready, come to Downward-Facing Dog, make your way to the front of the mat, and bend your knees deeply to slowly roll to standing in Tadasana (Mountain Pose).
(Photo: Renee Choi)
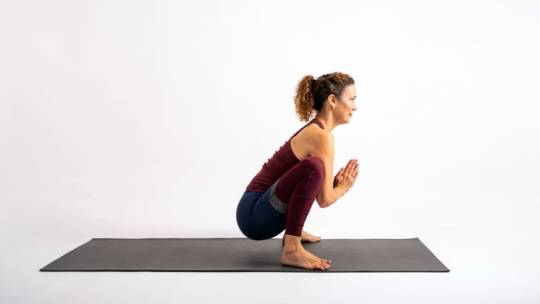
How it prepares you: This pose is yet another way to practice hip abduction and creating right angles in your elbows, both of which are demanded by Firefly.
How to: From Mountain Pose, find a gaze point—or drishti—that is grounded and steady on the floor several feet ahead of you. Inhale and lift your arms, then exhale and wrap your arms with the right arm underneath the left, as if you’re giving yourself a hug. You can practice with your arms wrapped and the fingertips on the shoulder blades, or you can play with lifting your hands to prayer and bringing your pinky fingers toward the wall in front of you. Personally, I spent a year or so just holding onto a pinkie finger before my hands wanted to eventually come into prayer mudra.
Sit back as if into a chair and lift your right leg to wrap it around the left leg, squeezing the thighs together. You might be able to sneak your toes around the back of the calf. On an inhale, lift your elbows and then hinge at the hips to fold over the legs. Often, with practice, the armpits can fit over the knees, a potentially calming expression of the Sacred Geometry of body. Breathe deeply and slowly here, hugging toward your center for 5 or so breaths.
To transition out of Eagle Pose, slowly lift yourself upright. Then unwind all your limbs and come to standing in Mountain Pose. Take a few breaths. Repeat on the other side.
(Photo: Renee Choi)
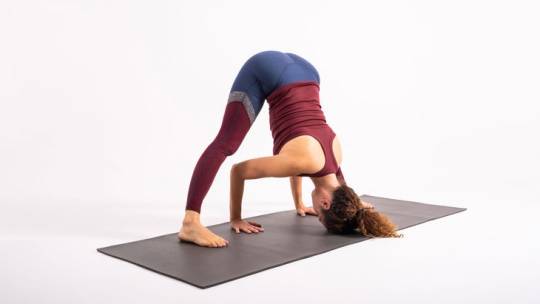
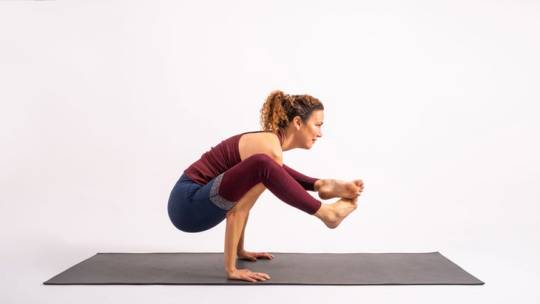
Malasana (Garland or Squat)
How it prepares you: This pose is an intense hip opener and again reinforces the squeezing of the thighs and legs into each other.
How to: Parallel your feet as wide as the mat. With your hands in prayer, sit your seat back to a half squat. If your knees allow, completely bend them and bring your seat toward the earth in Malasana (Garland or Squat). Press your upper arms into your thighs and your thighs into your upper arms, feeling the secure connection. Lengthen the spine long, lifting the crown of your head energetically towards the sky for 5–8 breaths. Then exhale and lift your hips to hinge into a Wide-Legged Forward Bend. Play with swaying the upper body, bringing length and ease to your low back.

(Photo: Renee Choi)
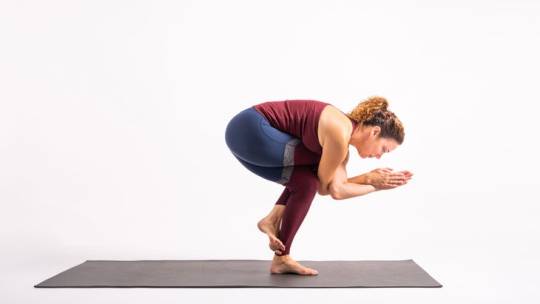
Utthita Tittibhasana (Standing Firefly Pose)
How it prepares you: Now here’s where that playful spirit comes in handy! Once again, a different iteration of the same Firefly shape.
How to: From Malasana, bend your knees a bit and hook your hands to the back of your shins. Play with looking through your legs by potentially nudging your shoulders between your thighs or near the inner knees—just about to where they were in Malasana Pose. You can seesaw forward and backward, working the shoulders into the inner legs for this standing variation of Firefly. Remain here for 5–8 breaths that only a yoga practitioner could love.
Step back to Plank Pose and flow through a vinyasa.
(Photo: Renee Choi)
Parivrtta Surya Yantrāsana (Compass Pose)
How it prepares you: This pose brings you the benefits of a more flexible lower back and hamstrings.
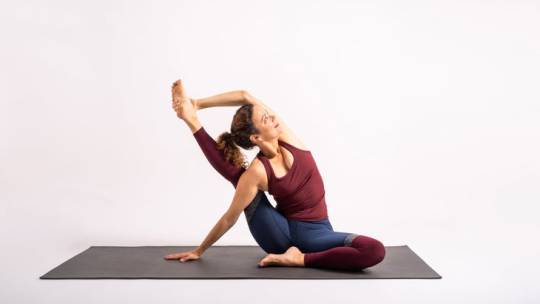
How to: From Downward-Facing Dog, make your way to a seat on the mat. Bend your left knee and literally pick up your right calf with both hands. Round your back as if you were in Cat Pose and try to sneak your right shoulder under your knee. Use your hands to hook the right leg over the right shoulder like the strap of a backpack. With your right knee bent, loop your left hand over the shoelace side of your right foot. Place your right hand out to the side like a kickstand, and brace your right arm against the leg once more. Begin to straighten your right leg and play with peaking under your left arm. Even if your leg never fully straightens, you are still gaining benefits. Remain here for 5 breaths. Repeat on the opposite side.
See also: Think You Can’t Come Into Compass Pose? This 45-Minute Sequence Will Get You There

(Photo: Renee Choi)
Vikasita Kamalāsana (Blossoming Lotus), variation
How it prepares you: This intense hip opener expands on the previous stretches.
How to: From seated on the mat, lean back slightly to shift the weight toward your tailbone and lift your legs as if to practice Navasana (Boat Pose). Scoop your arms underneath your thighs First flare your toes with your heels together, then cross the feet at the ankles and hook the feet. Practice for 5 breaths or so, then place the hands down with your arms still under the legs.
How to deepen the pose: Take the jnana mudra, which is known as a gesture of consciousness, by bringing the tips of your first fingers and your thumbs together.

(Photo: Renee Choi)
How it prepares you: This gives you different experience of bracing your arms against your legs.
How to: From Blossoming Lotus, unhook your ankles and begin to extend your legs forward and out on the ground in a V. Slide your hands out and slide them toward the back of your mat as you go in a V facing the opposite direction. As you lower, you can slow your roll by resisting the slide of the heels forward with your legs, and can certainly add a bolster or pillow underneath your chest and head as you learn this pose. Remain in the shape for 5–8 breaths.
Full disclosure: There is not an elegant way to exit Tortoise Pose! Keep breathing as you press your hands against the earth, bend your knees, and start to slither one arm out from beneath your legs, and then the other. As a counter pose, place your hands behind you, plant your feet hip-distance apart, and lift your hips for 3–5 breaths to release the front of your hips in Reverse Tabletop. Then take a seat, swing your feet back, and come to Plank before you take a vinyasa.
(Photo: Renee Choi)
How it prepares you: You’re almost there! This pose incorporates many of the most critical elements of previous poses, including the hip-opening and the bracing of the arms and the legs against one another, which are critical to coming into and maintaining Firefly Pose.
Read the full article
1 note
·
View note
Last Seen Blogs

d92-i
Abdulrhman

newservicenetwork-blog1
New Service NetWork

onlahuana1973
Insurance

shieldmaiden19
Bombshell Bi

desipalace
Untitled