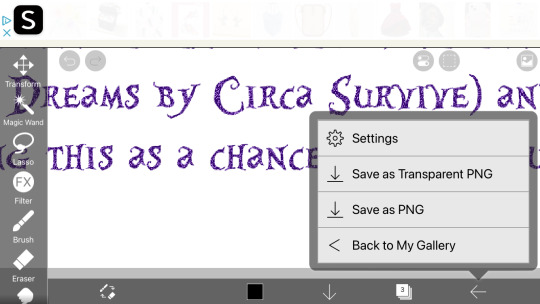
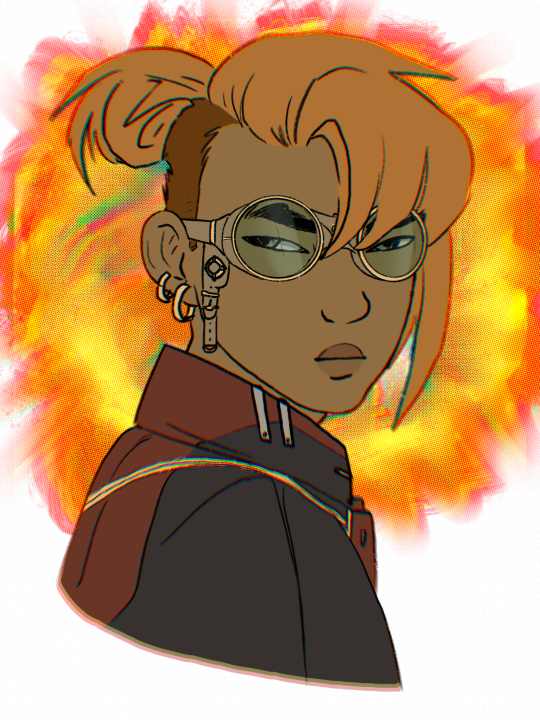
#and accidentally saved a transparent png
Text
Looking through my image gallery and found this abomination
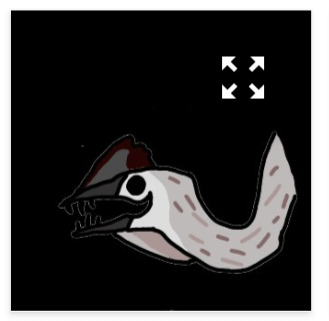
#I cropped out my sona from that one shitpost to use as a pfp because it looks like he said an unfunny joke so it accurately describes me#and accidentally saved a transparent png
2 notes
·
View notes
Text

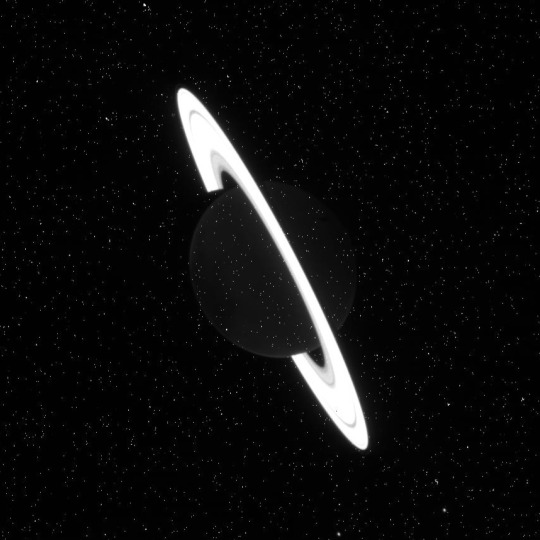

JWST recently released a raw image of Saturn, which looks incredible. But it also means that its gas giant collection is complete!!
Bask in their gaseous glory and Webb's stellar performance!
#GOD the Webbster just never fails to disappoint <33#Saturn lookin like it was accidentally saved as a transparent PNG#Gotta love it#spacecraft#jwst#jwst images#james webb space telescope#space#space telescope
112 notes
·
View notes
Text
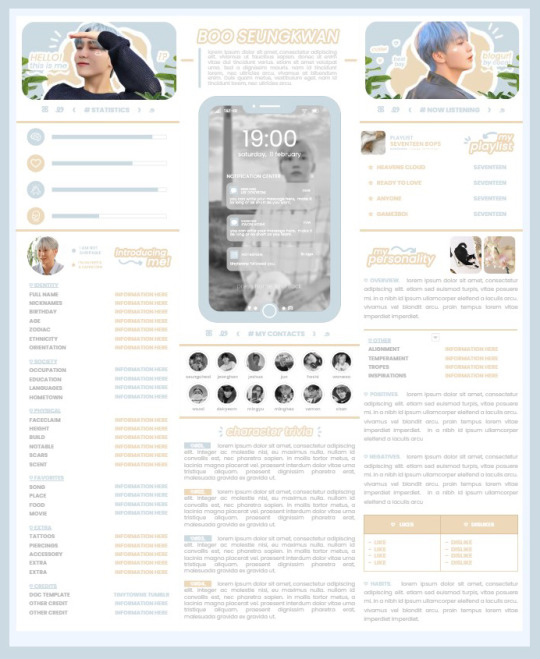
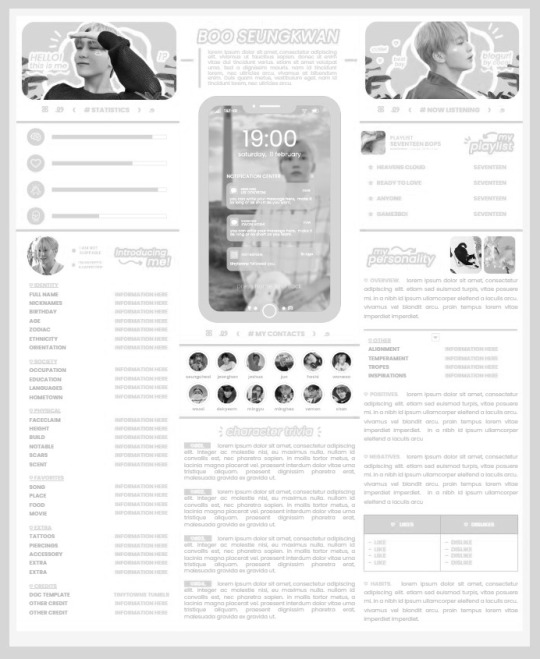
* ( ❀ ˆ꒳ˆ˵ ) ♡ Ꮺ 𝗧𝗜𝗡𝗬𝗧𝗢𝗪𝗡𝗦 — 𝟩𝖯𝖬 ੭

— introducing 7pm , the latest original google doc from tinytowns ! this document is designed to display the basics of a single - muse in one page &. captures a fun & youthful vibe with the inclusion of simplistic yet busy design , bright colours &. doodles ! features statistics , a playlist , basic info section along with character trivia & personality info ❀ the contacts section can be used as an exclusives section if desired ! space is left at the end of the doc so you can adjust easily & not have any of those annoying blank pages but it would be wise to take note of image positions as they are prone to moving. this doc can be considered moderate to difficult to edit due to the amount of edits that you will need to make in photoshop or photopea - but if you don't mind that then the document should be relatively simple to edit ❀ you can find the document link in the source code or under the cut , along with a known position issue + how to fix it , psd temps provided for this document , a video tutorial for adding your gif into a circle &. icon credits ! ( ˘͈ ᵕ ˘͈ ♡) ~
❀ PSD DOWNLOADS ( REQUIRED ! )
GIF CIRCLE - HERE
PHONE TEMPLATE - HERE
TOP IMAGES - HERE
♡ note : you will need to download the title cards to change the color , but if you don't mind the color then you don't need to - also , for full transparency on my end , i did need to touch up a few of the pngs after saving because the top text overlapped with the bottom text. be aware of that ! fonts used are poppins &. sant joan despi !
NAME TITLE - HERE
TRIVIA TITLE - HERE
INTRO TITLE - HERE
PLAYLIST TITLE - HERE
PERSONALITY TITLE - HERE
♡ note : you must change the color via layer style -> stroke for the title cards &. then save as png after deleting the background layer .
❀ KNOWN ISSUES
01. as a gdocs creator i use an external add-on called page resizer which is helpful for customizing the sizing of my canvas , as docs limits us with pre - set sizes. while this is nice to use , i'm aware that it can specifically cause an issue when you change the color of your background page. to fix this you must actually download the page resizer add-on through extensions -> add-ons -> get add-ons &. you should search for page sizer & download the one by nat burns. then you can access the sizer through extensions -> page sizer -> set page size &. what should be set for this document is a width of 9 &. a height of 12 !
this should fix the document , but i also know that sometimes , for what ever reason , the height &. width will flip. if that happens just make the height &. width opposite; so instead of a width of 9 , put 12 & for height , put 9 instead of 12.
02. i cropped the title cards in the document so that you wouldn't be trying to click something &. accidentally click on the titles ! however this means that when you replace image on the title cards they might go off center &. crop halfway through the word. just double click the title card that's bugging out & drag it to about the center of the black box. then it's fixed !
❀ DOCUMENT DOWNLOAD
7PM - HERE !
do not remove the credit , redistribute or profit off of my work.
❀ TUTORIAL
#01. go to file -> make a copy , in order to edit .
#02. to change the top two images double click on them &. a window should appear - in there you're going to click on it once &. hit replace image. the psd for this has been provided so it should be sized correctly !
#03. to change the title cards ( ex. boo seungkwan , my playlist , introducing me etc. ) you just need to click on them once &. hit replace image - please refer to #2 in the known issues section above this if you're going to do this though !! many thanks.
#04. to change the phone you're going to download the psd provided above &. when you've finished editing it you will click on the phone in the doc one time &. hit replace image !
#05. to change the thin color lines around seungkwan's name card you will press them once &. click edit - from there a window should open up &. you will click on it again & find the bucket tool which has a small yellow ( or blue if you clicked the long one ) line under it. that is where you change the color !
#06. the statistics represent intelligence , empathy , friendliness &. fighting skill ; to adjust the levels or colour you're going to double click &. a window will appear. from there you can either change colors with the bucket &. pencil tool ( pencil = outline color ) or you can shift the bars by clicking on the coloured parts of them and literally just dragging them.
#07. to change the playlist cover &. title you'll double click &. adjust inside the window by replacing image &. renaming things. the actual songs on the playlist can be typed normally !
#08. to change the gif circle , personality , &. contact images you again just double click &. replace image inside those windows. for the gif circle you must use the psd.
#09. to change the little bulletpoints beside the gif circle you will double click &. edit the text inside the window.
❀ VIDEO TUTORIAL 4 GIF CIRCLE
watch the tutorial right HERE !
make sure your timeline is checked ( the first thing i showed )
ignore the mistake i made while trying to show you where to end your gif LMFAOOO . . . im clumsy <3
to highlight all of your layers / frames click on the first one , then press shift + click on the last layer.
to bring up the list of options ( when i click convert into smart object ) you just right click.
❀ CREDITS
brain icon - Brain icons created by Vitaly Gorbachev - Flaticon
heart icon - Heart icons created by Chanut - Flaticon
support icon - Sport team icons created by Freepik - Flaticon
boxing icon - Boxing icons created by Freepik - Flaticon
plant png - josh ca.la.brese on unsplash
battery icon - Battery icons created by Stockio - Flaticon
wifi icon - Wifi icons created by Uniconlabs - Flaticon
signal icon - Signal icons created by Freepik - Flaticon
speech icon - Comment icons created by Freepik - Flaticon
close icon - Close icons created by ariefstudio - Flaticon
instagram icon - Instagram icons created by Prosymbols Premium - Flaticon
camera icon - Photo camera icons created by Kiranshastry - Flaticon
torch icon - Ui icons created by yaicon - Flaticon
#google docs#template#supportcontentcreators#gdocs#rph#google docs template#oc template#rpc#free rph#free rpc#docs#roleplay template#oc sheet#rp template#free#muse template#tinytowns#m: gdocs#m: original
1K notes
·
View notes
Text
Guys..... I made another accidental oc.. also, idk how to name him. (Halp)
Our little dude got his face destroyed, so he uses a mask to keep it together, well to keep together what's left of it at least.
He can't talk anymore, so he uses sign and extreme body language to convey his thoughts and emotions, making him look overly dramatic over the smallest of things.
He lives in isolation in trashy areas, well.. collecting scraps and stuff since he doesn't have anything better to do.

Also, a sertain someone kinda likes him...

Lol ahh I'm sorry for 1. I accidentally saved the first pic as non transparent png and can't go back now to fix it, 2. Hella messy art oof 3. For making another couple, but like these two are kinda perfect for each other idk. A calm, shy person who sees beaty in everything and a dramatic and energetic trash man.
302 notes
·
View notes
Text
So uh, hey.
Long time no see. Been a while since I posted anything.
Well, I've got a new phone and I decided to try out digital art again. With my finger because I haven't gotten a stylus.
So, my first art in some time is my Transformers Oc, Cengkadak. An Orchid Mantis Insecticon.
Here are a few color variants I tried.
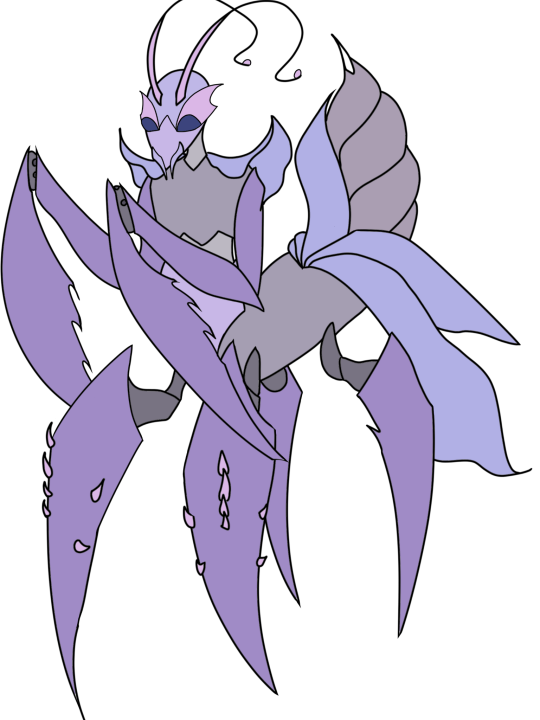

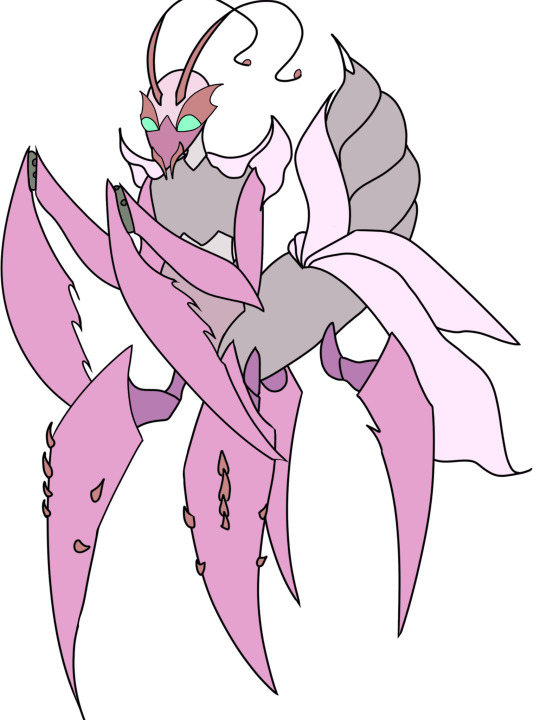

Accidentally saved the first one as a transparent PNG. But like, I kinda stuck to the first one. Maybe I'll try the fourth one out. Oh, there's a bonus color scheme I did last minute.
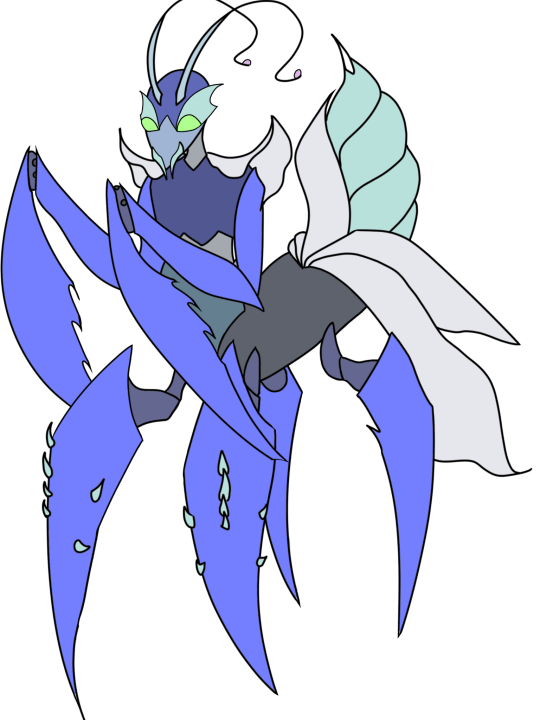
This one's nice too.
But I'll see which of these fit the orchid mantis image. It should be the third one sure, but I just really like purple.
8 notes
·
View notes
Note
Hiiii I was wondering if you might have access to transparent/clean enemy sprites from the first game, or know where they might be found? Thank you !
Hi hi, most of the game's sprites can be found on the fandom wiki under their respective enemy page! Only downside to it is that when you try to save the files, they save as webp. I've uploaded in the wiki gifs for all the enemies' combat animations, if you want easy access to them, you can download them from my dropbox here!
Now for the static pngs, if you don't want to go through the whole wiki and you have the game, you can try and look in the files themselves (copying the next paragraphs from a previous ask) it's probably a similar process for GoG and Epic versions in PCs, Macs are different, can't help you there.
Go to where you installed Steam in your PC (usually the disk C: on your computer, unless you installed in another drive) and open the “Steam” folder, then find the “steamapps” folder, then the “common” folder and finally “DarkestDungeon”, like so:
C:\Programs\Steam\steamapps\common\DarkestDungeon
Now in the search bar, type .png and press enter! And there you have it, after a few moments you should find all the images used in game! If you want to look at it better, I recommend copying all of it in to a folder someplace else, just so you won’t risk accidentally messing with the game files.
So yeah, you can sift from there! Have Vvulf as a freebie, just because I already had those saved and because I still find this mean old man gorgeous:
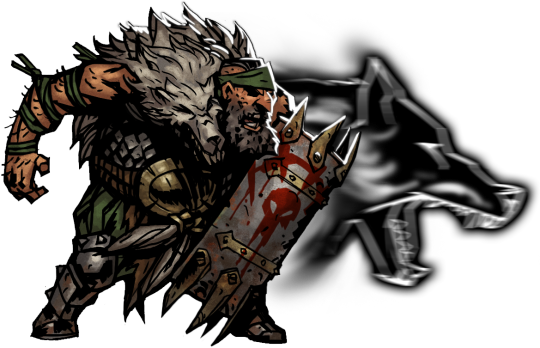
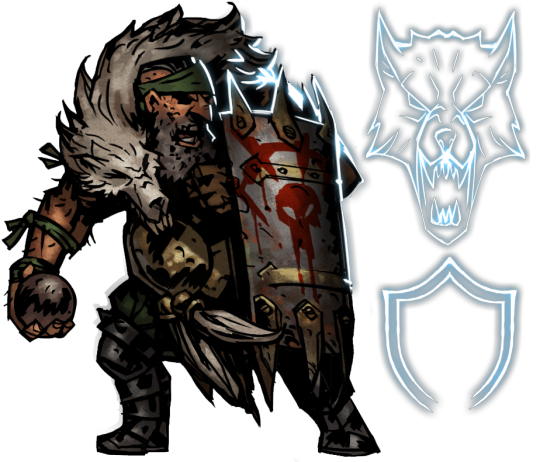
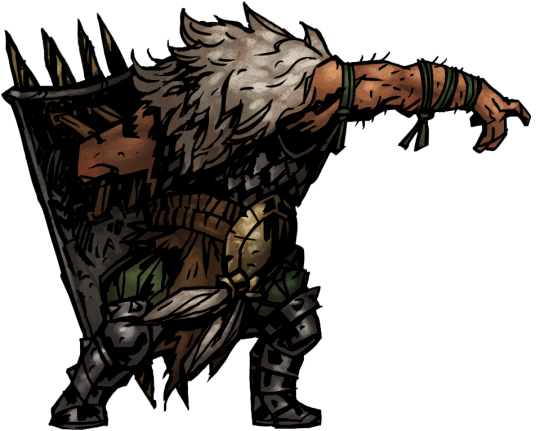
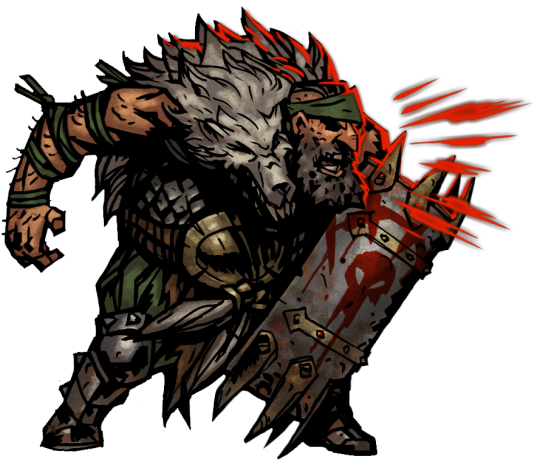
#darnest answers#I looove his big broad shoulders and strong hairy arms#nasty and cruel old man <3#(can you tell I miss drawing him?)#if I weren't broke AND Brazilian I'd commission so much vvulf fanart... :(
25 notes
·
View notes
Note
Hay Gwen!
I've drawn you a comic book based on your recent fan art ("cannibalism yuri"). I had the idea that Chip might have at least the tendencies of a yandere, if not a full-fledged yandere. Well, or it's just the plot of some songs from Masa, he also had cannibalism and lesbians in his songs...
(Don't pay attention to the first picture, I just accidentally saved the PNG on a transparent background)
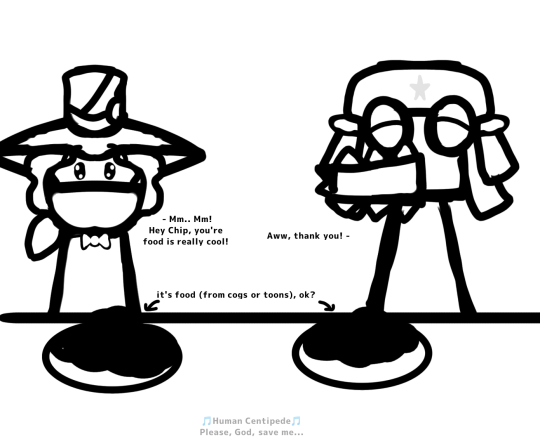
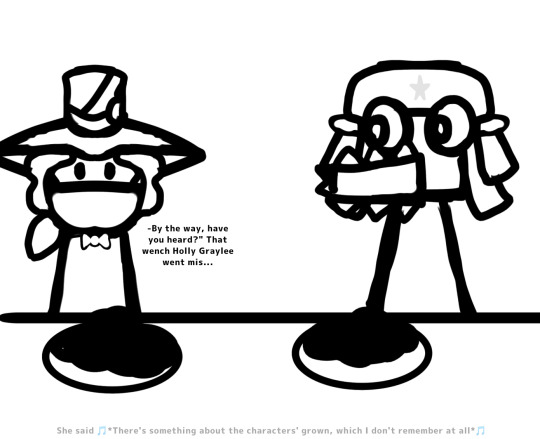
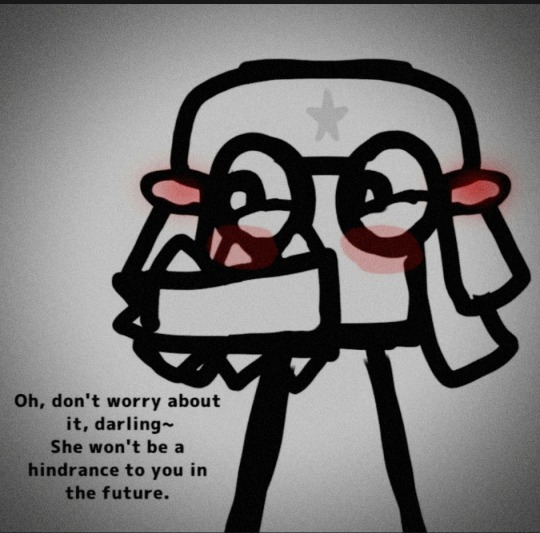
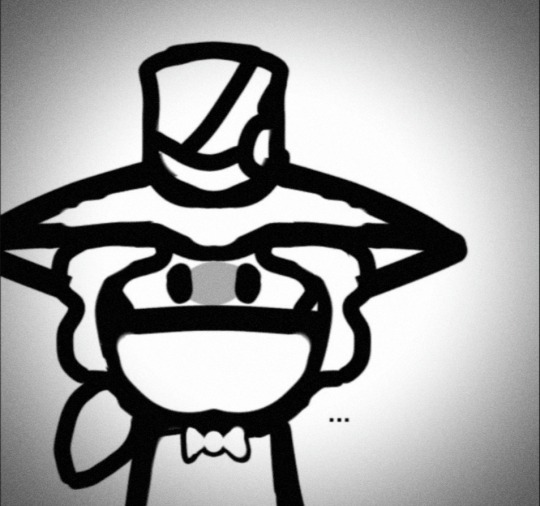

HAVE A GOOD DAY <3
ty for the comic i appreciate it but you misunderstood my art... chip feeds from cogs that arent important, since managers are important in my story... the point of chip eating cogs is that he feels guilty and he makes prester eat cogs to show how much he loves him.. as a metaphor of love but in a less romantic way... hope u understand,,,,
3 notes
·
View notes
Text
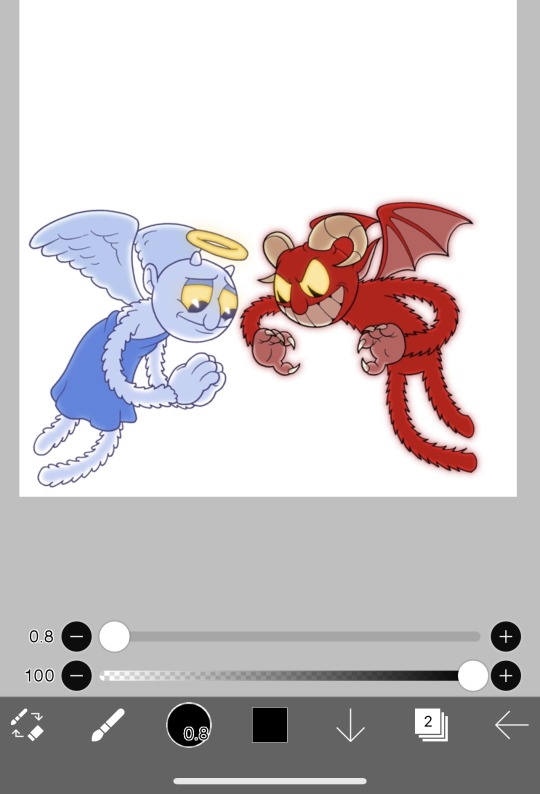
Oh boy. Buckle up. I discovered something about the Cuphead DLC by accident.
So my dumbass was like “Man, I haven’t done a lot of Cuphead related art in a while. I might as well.” And for the longest time I’ve been wanting to draw the angel but just haven’t for whatever reason.
So without further ado I grab the official PNG‘s of the angel and demon from google. pictured below ((I separated the images so I could look at one character at a time))
so in the middle of messing with that I accidentally discovered something about this PNG which apparently I just haven’t seen talked about ever. This probably has very little relevance to anything but I just thought it was kind of interesting ??
So here’s the angel. Watch as I color in the layer below it
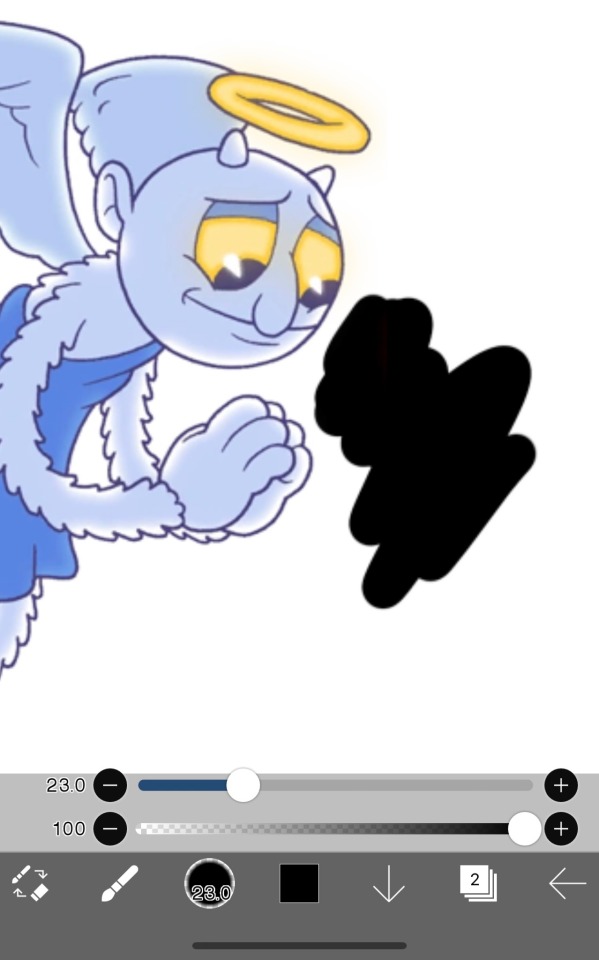
w.
Look I knew they were transparent PNG‘s but goddamn I didn’t know the angel was transparent themself as well !?
Why am I able to look through this blue boo-boo bear angel character’s skin ?????
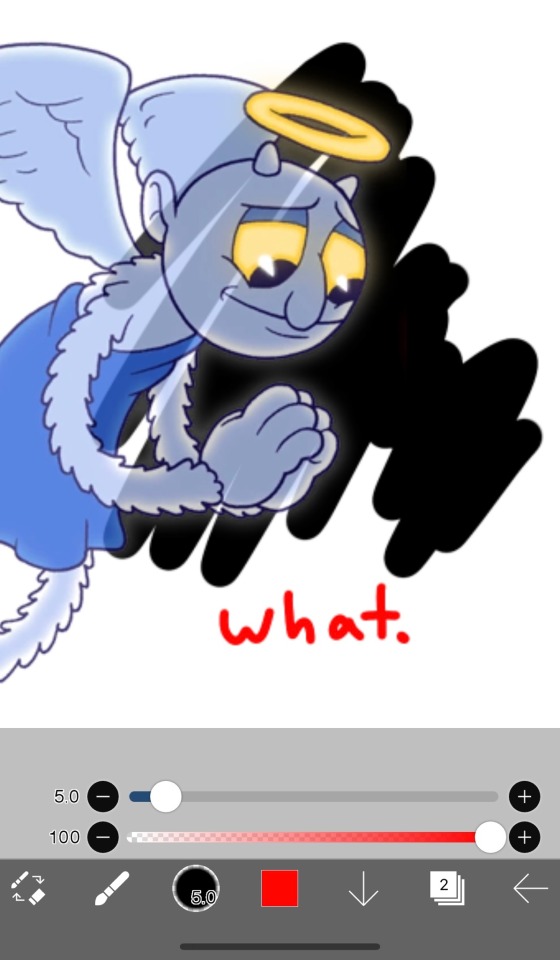
Okay okay wait. let me test this with the de—

EXCUSE ME??????
Before you try to de-confirm this, look at the opacity on my layers????? They’re at max opacity !!!?!!??
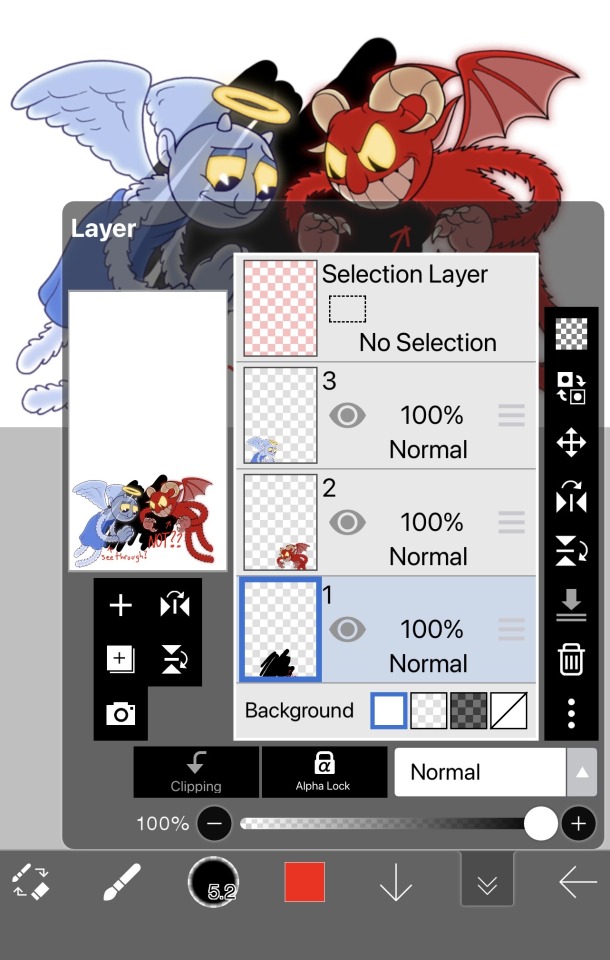
What’s so coincidental and interesting about this is that in the actual boss fight, you only ever face the demon?? Like the gimmick is every time you change directions, the angel and demon switch places and the demon is always in front of you all the angel is behind.
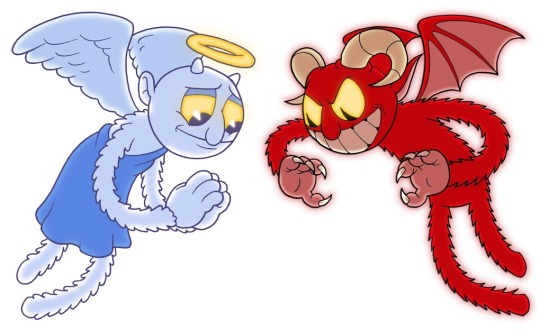
You can very vaguely tell in the original PNG as well !!??? ((EDIT: it doesn’t seem like they want to be saved as actual transparent PNGs??? Just go on Google and search for this exact image and it should be transparent and then place it on top of something that isn’t a white background))
I swear y’all, Studio MDHR just does not miss.
#Cuphead dlc#cuphead#Cuphead angel#Cuphead demon#Cuphead angel and demon#cuphead delicious last course#the delicious last course#Cuphead Easter egg???? idek??????
28 notes
·
View notes
Text
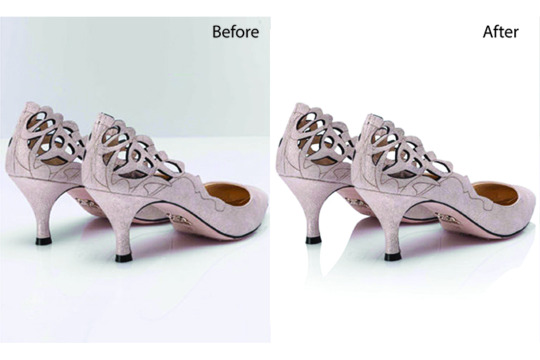
How to Remove Image background Remove
Open Adobe Photoshop and import the image you want to edit.
Make sure the Layers panel is visible (if not, go to "Window" > "Layers" to open it).
Duplicate the original image layer by dragging it to the "New Layer" icon at the bottom of the Layers panel. This step is important for non-destructive editing.
Select the duplicate layer.
Choose the "Quick Selection Tool" from the toolbar on the left side (or press "W" on your keyboard to activate it). It's represented by a brush with a dotted circle around it.
Adjust the brush size in the options bar at the top according to your image's details.
Click and drag over the foreground area you want to keep. The tool will automatically select the area based on color and texture.
If you accidentally select areas you want to remove, hold the Alt/Option key and drag over those areas to deselect them.
Refine the selection using the "Select and Mask" feature. You can access it by right-clicking on the selection and choosing "Select and Mask" from the context menu. This step helps to fine-tune the selection edges for better results.
In the "Select and Mask" dialog box, experiment with the available tools like "Refine Edge Brush," "Brush Tool," and "Smart Radius" to adjust the selection. Use the preview options to see how it looks against different backgrounds.
Once you're satisfied with the selection, click "OK" to exit the "Select and Mask" dialog box.
With the selection still active, click on the "Layer Mask" button at the bottom of the Layers panel. It looks like a white rectangle with a gray circle in the center.
The background should now be transparent, and you can add a new background layer or leave it as is.
Save your image in a format that supports transparency, such as PNG, to preserve the background removal.
Remember, this method works best for images with clear foreground/background separation. For more complex images, you may need to explore additional tools and techniques, such as the Pen Tool or the Background Eraser Tool, to achieve better results.
if you more information www.clippingpath360.com or [email protected]
#photography#photoshop#photoshoot#image description in alt#editor#photo editing#clipping path service#background
1 note
·
View note
Note
HOW ARE YOU DOING/WHAT ARE YOU UP TO?
[^PRETEND IT'S SPARKLY AND FUN BECAUSE I DON'T KNOW HOW TO MAKE THE COOL THINGS]
below the cut ~~
So the sparkle things are gifs, which means we need to
1.) make the frames and
2.) turn the frames into a gif
Step 1: Making the frames
I use ibispaint bc its free and has great versatility, it doesnt matter what photo editing app you use it will just change how you add the glitter. To keep this super simple im just going to show you how to glitter
In ibispaint, open whatever size canvas you want/open the image youre glittering. Choose the text tool and add your chosen text
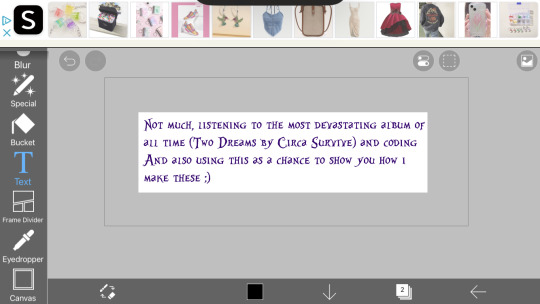
On the bottom row here ^^ you can see a little button with a number two, its where you can open the layer/canvas menu. Click that
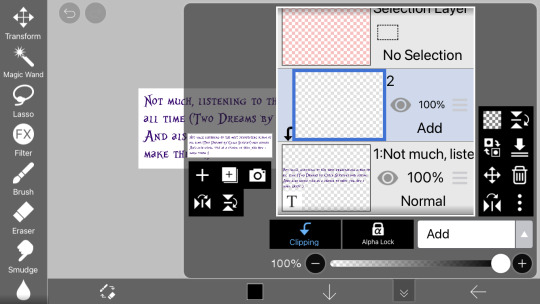
Click the "+" on the left hand side, click clipping, and click the dropdown that says "normal" and choose "add" (this is the blending mode). Your screen should now look the same as above.
in the menu on the righthand side (the "tools" menu), click the fx filter icon
Scroll to "artistic"

Fix the settings until they look like the ones above
Type: color
Strength: 75
Amount: 25
And blending mode normal
Click the green check
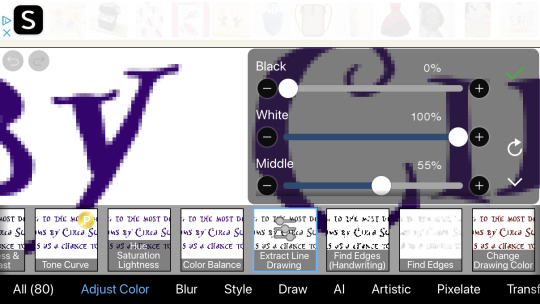
Now go to the adjust color section and click "exact line drawing" and match it to the settings above
Black: 0
White: 100
And middle: 55
Click the check
The layer is now going to be black rather than the colors it was before, that means youre on the right track
Click the x to leave the filter menu, go back to the layers/canvas menu
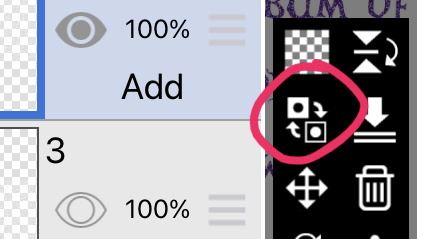
Click this little flippy button, "invert layer color" now you should have a glitter layer!! This glitter layer is going to be part of one of our frames
Now repeat the steps of making a new layer, clipping it and changing the blending mode, adding the filters, and inverting the layer color 1-2 more times to have two or three glitter layers (yes theyll be stacked on one another but that is okay for now)
Saving the frames to make a gif:
Now we have several layer, descending they should be:
2-3 glitter layers
A text layer
(And an empty base layer, just ignore it lols its just chillin, u can delete it if you want it doesnt matter)
All these layers have eye images on them. If the eye is dark the layer is visible. If its not its invisible. We are going to save every glitter layer over the text layer individually to get the frames for our gif
The text layer needs to be visible at all times during these next steps.
Turn off the visibility of all the glitter layers except the bottom one (by clicking the eye icon on the layer)
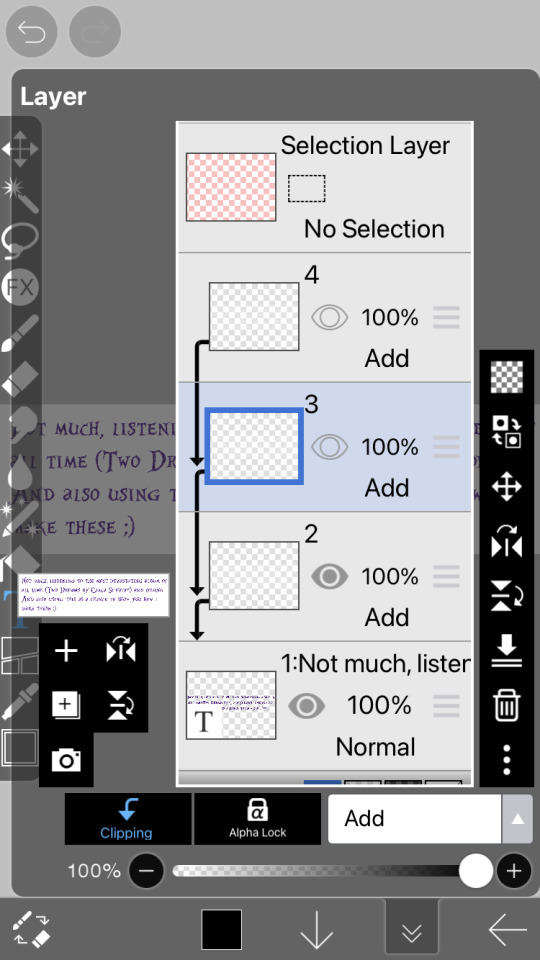
Only one should be visible while we're saving the frames
There is an arrow on the bottom bar all the way at the right
Saving as transparent png makes the background see through like the gif above, save as png makes the background white. Pick whichever, but choose the same one for all of them (if you choose transparent choose transparent for all frames)
Go back to the layer canvas menu, make the glitter layer that is currently visible invisible. Click the eye on the layer above that one to make it visible (the second glitter layer)
Repeat the saving process. If you have a third glitter frame, make glitter frame 2 invisible, glitter layer 3 visible, and save.
Part 2: making the gif itself
go to ezgif dot com. ezgif dot com is the best simple gif maker. ezgif dot com is now your best friend. hashtag not sponsored
Click gif maker
Click "choose files", "photo library", add the glitter frames you made and click add or choose whatever is at the top idr
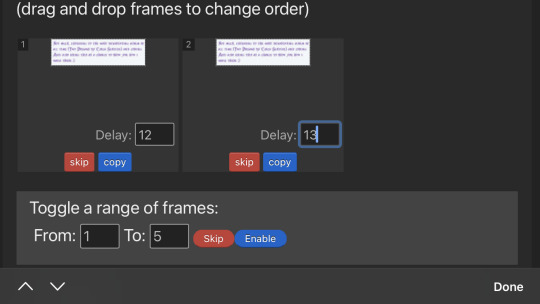
(I wound up using 3 frames not 2) where it says delay under each gif, delete the "20" and add 12 to one and 13 to the rest (the delay is how much time each frame will take in the gif, using one number thats different keeps tumblr from screwing up and accidentally converting them into videos. Idk why that happens but sometimes it does.)
Ignore all the rest of the settings, you dont need to mess with them just for lil glitter gifs and click the create button at the bottom
Now you can either click download when your gif pops up or you can long press to save it directly to your camera roll
Extra notes:
If you want your glitters to be rainbow, skip the "exact line drawing" and "invert layer color" steps
Ezgif isnt good for high quality gifs. For the gifs on my website i make the frames in ibispaint and use photopea (a free online photoshop) to make the gifs themselves. But thats more difficult to do as you cant really use photopea on mobile without a mouse and its much more complicated (so thats a separate tutorial if you ever need high quality gifs)
#If any part of this was confusing or if you need help lmk on discord im more than happy to help you ^w^#gifs#crimson answers#crimson explains#kaikaikaikaikai
3 notes
·
View notes
Photo
So as I might have mentioned I’ve been reading Homestuck for the first time
(Rant under the cut, you know the drill)
So! A lot has happened since I last uploaded art. Including, but not limited to:
- My computer deciding not to open any website that isn’t owned by Google
- I bought myself Clip Studio when they did their December holidays sale
- Taught myself to draw in a chibi/chibi-adjecent art style and now I can’t stop. It’s so simplified compared to how I used to draw look at it. Its so soft and untextured and I can just make blobby hands and feet and it works??
- After an entire week, finally fixed my computer (it just wanted an upgrade to Windows 11)
So, yeah, been a while. I’m actually working on a project for my MCYT sideblog wherein I draw all the Hermits as per my AU, the Sunbringer. I’m currently.. halfway through. It’s been a week.
Hhh.
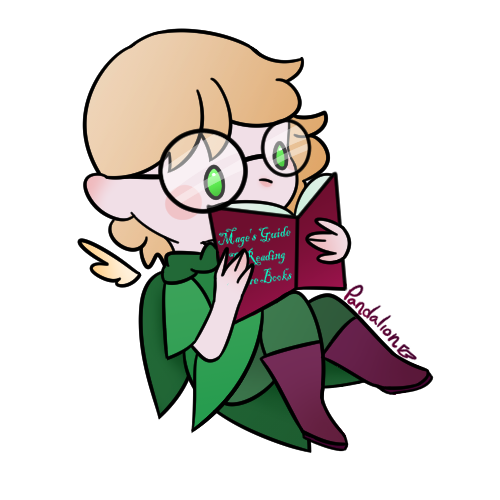
Well, now onto actual details, starting with the fact that CSP makes it much easier to save transparent PNGs (Krita was fine, too, but it was slightly less intuitive, at least for me- I figured out how to do it on the first try- though maybe that also has to do with the fact I now have actual art experience meanwhile Krita was my second ever program, and while I’m certain the first one was fine it did not have that feature specifically... or at least I wasn’t aware I could look for it. Idk, it’s been like 4-5 years since I last used that program, I can’t even recall its name). What I’m saying is that the version above is transparent, while my new profile picture is the one with a background! And it’s space!
Anyways, figured out I really like giving characters with large, round glasses small, simple eyes, that are just colorful eggs.
So, as I mentioned, this is Homestuck stuff- apparently my last try was the wrong class, but not the wrong aspect; I’m actually a Mage of Mind. The one server I’m on where I talk Homestuck had me accidentally rant for paragraphs upon paragraphs (like I’m doing now... haha) about another person’s classpect and why their explanation for why it won’t fit them is actually the entire reason it should fit, actually.
It was a discussion on why classpects are infuriatingly confusing, so of course that “short” explanation I provided immediately cleared the issue for me, since a Mage of Mind is one who understands choice, consequence, and thoughts. So, understanding the minds of fictional characters to the point where I mimic mannerisms subconsciously, as well as understanding someone I had at most two conversations with prior... Yeah, fair enough.
That’s my invitation to anyone who’s interested to ask me to explain the personalities for various classpects, if you’re willing to read this much text (and, let’s face it, if you’re reading this, you’re probably fine with the length I write in).
Ok, final notes!
I almost gave the boots little wings- sorta like Hermes’ shoes? Because flight is my theme. I literally have never drawn myself without my signature wings- except when I was 3 and my “self portrait” was a bright-crayon drawing of a luna moth (well, it was bright pink, but it was a butterfly with crescent-patterned wings), and even then it was all about the flight. Always. It’s a part of who I am more than pretty much any other part of me.
... Now onto lighter stuff, the title of the book Mini-me is reading is “Mage’s Guide to Reading More Books”. Specifically because I thought a book on reading books is a silly (yet loveable) concept.
1 note
·
View note
Note
I’m trying to save one of your transparent icon edits, but they won’t save as transparent 😭 is there a specific way they should be saved?
Howdy! Apologies for the delay in reply but i’m not sure why it’s not working :0c
It might be accidentally saving as a JPEG or something other than PNG to your device and losing the transparency somehow? But if it continues to not work feel free to tell me which one you’re trying to save and i can share a drive or something of the likes instead :D!
2 notes
·
View notes
Text
#i bought a galaxy note 8 phone months ago thinking it would motivate me to draw more#this is the only thing i drew#edit: woaaaa wtf dont click on it#it look all fucked up?! i saved this accidentally in png format with the white transparent?!#im a lazy bastard so i wont bother fixing it lol#at least it look fucked up on mobile...
7 notes
·
View notes
Text

New impulse purchase! I bought, gened, dressed, and made a sketchy gijinka for her all in one sitting. She’s kind of a steampunk pirate, but I’m not sure whether or not to add her to my pirate tab? Even within my pirate and cowboy tabs, which you’d think would have a more unified aesthetic, the vibes are all over the place...
I’d liquidated three months of coli loot to recover some of my savings after Jupiter, and now Solarwind has eaten it all. Playing FR this way is pretty fun though, and luckily there were no other gene projects I was neglecting now that my equinox hatch is all gened up!
#flight rising#dragon share#d: solarwind#my art#also the person I bought her from commented on my userpage when I was literally in the middle of gening and dressing her#which was mildly awk like no please come back in 2 minutes when she’s actually done!!#ALSO i accidentally made her look like me. like I gave her my face and hair and just colored her differently#i didn’t realize until after it was done#i saved the art as a transparent png so idk why it’s getting a white background like this on imgur and tumblr#hypothesis: one of those filters made the image size too big and every website keeps compressing it?
5 notes
·
View notes
Photo

While talking to @yourimaginarycupcake the other day, they mentioned that Stan and Héctor were really similar with all their schemes and tricks they played just to try and see their family again? (plus the whole deleted scenes with Héctor as a tour guide lol)
And so we both got drawing Héctor in Stan’s suit just for fun :)
#hector rivera#héctor rivera#coco#pixar coco#gravity falls#......kindaaa#archie art#more of a little doodle really#cause I wanted to make this better#but I accidentally only saved the png#and so had to work with only that layer that had all the colors and edit from there whoops#anyway have a transparent hector in stan's outfit#dude this was fun thanks for bringing it up!
172 notes
·
View notes
Text
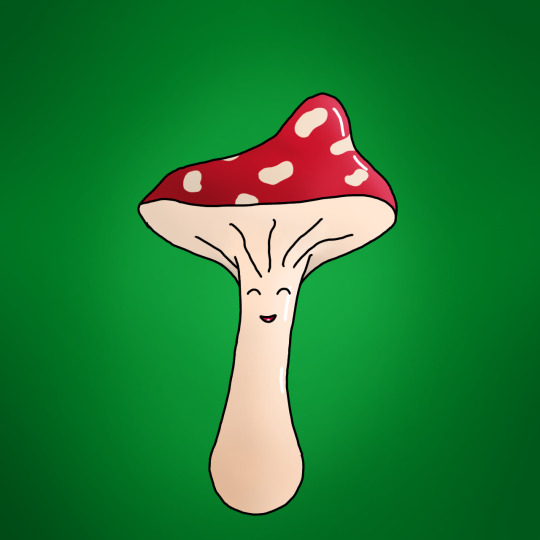
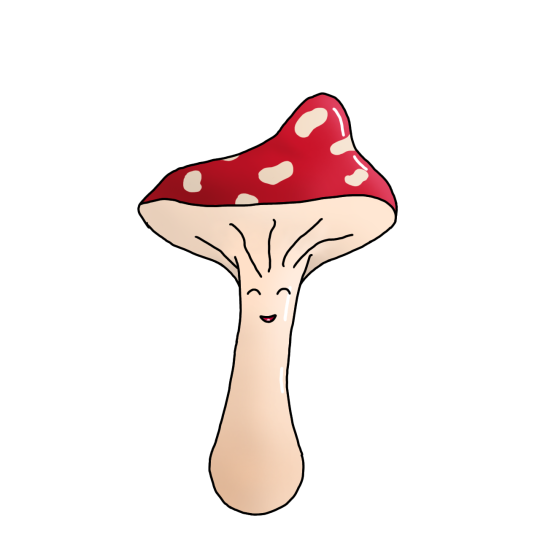
Gomba - 20/4/2022
The hundred and fifty eighth friend. A mushroom. She lives in the woods surrounded by trees and wild animals. It's a big world and she is pretty small. That can make it scary at times but it also means she gets to appreciate the smaller things more deeply. She chats with the fireflies and the moths at night. She rests surrounded by soft moss and pretty flowers. She wakes up to the sound of birdsong all around her. Her life may seem to be of little importance to the world but she is happy. She lives a peaceful life which is filled with joy and that's all she could ever want.
#art#mushroom#toadstool#she's actually alright#this is the third mushroom I have drawn for this blog and it will not be the last#I feel like her head (I'm not sure what the proper scientific term is) could have been bigger#she doesn't look quite how I wanted#she is still good though#I like her#the shading is nice#so is the overall shape#a pretty decent drawing#her name is Hungarian for 'mushroom' by the way#also I accidentally saved a version of the image with just a transparent PNG of her mouth and almost put it on the post instead of her#I noticed though
1 note
·
View note
Last Seen Blogs

trashcan-to-end-all-trashcans
Sailing The Seven Seas
trashcan-to-end-all-trashcans
Sailing The Seven Seas

nero-cavallone
Cavallone Primo
writerownstory
let your colors blind their eyes✨
writerownstory
let your colors blind their eyes✨