#Split 0.5 Section 1
Text
CD wanted to join in

#oc#oc's#gacha#gacha design#gacha designs#Split 0.3 Section2#Split 0.5 Section 1#Mundy The Minister#CD The Conducter#Non-Count. Asmodeus
0 notes
Text
a persona 3 reload review
uuuuuuh so i was meant to post this like... two weeks ago, but then real life hit me in the head like a frying pan. now that i've had the time to edit this though, here are my thoughts on p3re! this is also a minato route review, as i played kotone's in P3P (i know it's not his canon name, but i don't want to use makoto due to P5 confusion).
on the whole, reload is a fantastic game. the gameplay easily rivals P5R, and surpasses it in some aspects. the new content is typically great. i also enjoyed minato as a character (well, as much of a character as persona protagonists are anyway), though that leads me to the main gripe i had with reload...
... and that's the lack of kotone's social links. to be precise, two of her social links, the absence of which greatly hurts the overall story.
don't get me wrong, i'd still rank reload a solid 8/10, but it could have been a 10/10 with the addition of those two links (plus one other spoiler thing), and I think that's a shame.
my in depth analysis is under the cut - note, it's very much not spoiler free.
okay, so, i'm gonna split this into 3.5 segments - the good, the mixed, and the bad (you'll find out what the 0.5 is later).
1. the good:
minato - while i'm still a kotone girlie at heart, he's not a bad protagonist at all! his dialogue options have a very distinct personality to them unlike joker and yu, and his character arc is one of the best of all of the persona main leads. an aloof, apathetic boy who learns to love the world/his friends so much he's willing to die for them... it's good!
koromaru - minor, but worth mentioning. you can pat him, and it's so cute. in fact, everything about him is perfect. from his all-out attack screen, to his animations, to... well, everything. no joke, if I needed to sell this game to a non-persona fan, i'd use him as the main draw.
hangout events - while I think being able to chat to everyone in the dorm already made SEES one of the more developed casts, having additional scenes really helped flesh out the party members who are less prominent in the plot (fuuka, pre-january aigis, ken). more things to do at night is also great, given there was nothing to do in the evening after maxing your social stats in the older versions. the perks they give you are great too, but i'll talk about that more later.
voice acting - not gonna lie, i generally don't like the persona dubs, and normally always play with the JP audio. given reload features some of my favourite voice actors though and was basically fully voiced, i decided to give it a chance this time. and i don't regret it! while some actors are definitely stronger than others, none of them were actively jarring, and quite frankly, they hard carried a lot of the social links. kudos to the cast!
strega - while they could have gone a bit further with it (jin needed a linked episode for sure), takaya finally got the development he sorely needed, and his and jin's final battles were actually interesting, instead of being annoying distractions from nyx. in fact, i'd say takaya's new content is easily the best of the new reload exclusive material. in portable, he made no impression on me whatsoever, but now, he finally gets to be the anti!minato he deserves to be.
1.5. the tartarus (aka good part 2, electric boogaloo):
i have so many things to gush about in terms of the new combat/exploration system, i decided it needed its own section! the glow-up tartarus got was massive. i was pretty disappointed when i heard they were keeping it randomly generated, but somehow, atlus pulled it off! i'll talk about individual things below.
collectables/monad doors - one issue with OG tartarus is that it's monotonous. breakable collectables make it much more entertaining to romp through though, as smashing things is Fun. the monad doors interspersed throughout are another good addition - if you want a break from roaming, you can challenge them, but if not, that's fine!
floor layout - another thing that makes tartatus more fresh to explore is that the HD graphics really make the differences between the blocks pop out. the generally smaller floors with more unique layouts really helps too.
shifting - it's baton pass, though without the ridiculous power/sp bonuses that made baton pass a little bit too gamebreaking in persona 5. in other words, perfect!
theurgy - out of all the battle-specific improvements, theurgy and the personality traits have got to be my favourites. showtimes were fun, but too random/gimmicky to be that useful, and ultimate skills tended to fluctuate between being absolutely gamebreaking or too SP intensive to be worth using. blending them into one feature with a content-specific gauge fixes all the problems with them while keeping everything that made showtimes/ultimate skills good.
ambush mechanics - this was one of the things i was most worried about before playing reload. ambushing in P5 is fun, but ambushing in the other persona games...? not so much. reload manages to fix this though by making the shadows less sensitive, which makes the early game a lot better, and but introducing dash-ambushes once the floors get bigger. if the persona 6 ambush system works like this, i'll be happy.
navigator skills - fuuka being retooled to work more like a playable character was an A+++ decision. making her skills player-activated but with an SP cost is so much more immersive than randomly getting a stat boost/enemy info.
unfortunately, while i think most of the tartarus additions were great, there were a few new mechanics which weren't... dreadful, per say, but could have been implemented better.
great clocks - they're better than nothing, but quite frankly, i would have preferred it if benched units got 50% exp instead. they incentivise you to drop two units for a period of time, which is annoying, given i want to use everyone on my first playthrough. late game, great clocks are also a pain to summon, for reasons i'll talk about below.
twilight fragments - i think they're a neat idea in theory, but they need to be easier/more reliable to farm. once you finish off the bulk of your social links/elizabeth's requests, replenishing them becomes a nightmare, which is annoying because you need them for great clocks.
2. the mixed:
while reload did a lot of things right, as per above, there were some things that didn't quite hit the mark.
linked episodes - i'm gonna be blunt. anyone who thinks these are better than social links is smoking something. one thing i like about party member social links is that it gives them a subplot outside of the main story, focusing more on their mundane struggles as opposed to their supernatural ones. half of the linked episodes just develop the main plot more though (and really should have just been included in it), meaning the linked episode exclusive subplots are underbaked.
another problem is that some of the linked episodes are just... kinda badly written. ryoji's completely lacks his existential dread, akihiko's comes off as a poor attempt to make his arena behaviour less OOC, while shinjiro's... it feels like persona 5 writing, in the worst way possible. it's like atlus completely forgot that subtext is a thing that's Good, actually.
while I have been fairly critical of them so far though, there are a couple of linked episodes i liked. koromaru's actually worked with the format, given he's a dog, but the real winner here was takaya. i loved all of his. if linked episodes appear again, i'd rather they be locked to antagonists like him.
art direction- i'll say right now - the UI is fabulous, the model shaders are great, and tartarus looks fantastic. the environmental design on the whole though is a bit iffy - a lot of the environments didn't translate to the super HD very well, and the lighting sucks in general. i needed to turn down the brightness it was so eye-searing. the animation of the 2D cutscenes is also pretty mediocre, and while the 3D cutscenes tend to look better, they're held back by some of the character models looking a bit goofy (mitsuru's is probably the biggest offender). i also think they were too scared of making the sprites 'ugly', and therefore on the whole they're slightly less emotive than the ones in the older versions of the game, which is a pity.
3. the bad:
minato's social links - the vast majority of the minato-exclusive social links are just flat-out not great. serious props to the voice actors here, since they hard carried them. quite frankly, they're just... bland, except for maya's and suemitsu's, which. uh. have problems. on the topic of social links, while i'm happy the romance isn't mandatory anymore, i don't like how half the girls explicitly confess to you. i much prefer the more subtle vibes of the P5/P4 romantic options, as yeah, most of them can lead naturally into romance, but they don't make the MC feel like a harem anime protagonist (derogatory). it kinda brings to mind this twitter post; sometimes, subtlety is simply better.
the absence of shinji and ryoji's social links - i can live without saori, rio, and most of the new and improved SEES member social links, but this is where i draw the line. while shinji dying is better storytelling, just like with chidori, having the option to save him is also important. lock it behind new game plus, yes... but keep it. also, him priming kotone to support akihiko one he's gone is far better than him just flat-out telling minato that he's dying. ryoji's missing social link though is infinitely worse. where is his slowly mounting horror as he starts poking holes in his backstory? his desperation to validate that he's actually real? that he exists?! like yeah, it's nice that the linked episode doubled down on his bisexuality, but i'd rather keep the psychological breakdown aspects of it, y'know?
the difficulty - i started playing reload normal - the level i'd typically use for a blind run of a persona game - aaaaand swapped to hard the second i unlocked theurgy. even then though, the game was a cakewalk until january hit. while i love theurgy, the game is absolutely not scaled around it, especially since you can charge/concentrate them. doing that, you can easily rack up thousands of damage without even going ham with fusion. unfortunately, reload is just... really easy.
the plot's too faithful to the original - while reload added new content, it pretty much left the story untouched outside of the beach scene. that's... not good, as persona 3's narrative had some pretty big problems. the biggest issue is the unchanged pacing - the strega storyline really needed to start a month earlier, and ryoji needed an extra month to integrate with the characters due to his lack of social link. this is one of the things i'm explicitly docking a point for - reload still doesn't kick off until the yakushima arc, which is well over a third into the game.
despite my criticisms, i do want to note that my experience with reload was predominately positive. it's (extremely) sad that you still need to play portable to experience the full persona 3 story, but p3re is still a fantastic game, and has a lot of gameplay features i'd be delighted to see in persona 6.
that's all i've got to say for now - until next time!
7 notes
·
View notes
Note
> Use Attract command to attract structure towards yourself- or, more accurately, drag yourself toward the structure thanks to how mass works. Where we're going, we don't need feet.
Attract charge spent.
John Hazzlebun looks at the wreckage of the vessel quizzically, then performs something resembling a nod. They reach out and begin to glow, not only with the peculiar non-light from before, but with ACTUAL, pure white light that radiates outwards and feels like it pulls you inwards towards them.
The vessel winks out of existence.
And less than a second reappears.
About 20 feet over John Hazzlebun's head.
John doesn't even have time to react before the ship comes crashing down atop of them, a hole punched through the hull of it centered just perfectly to leave John comically untouched as the entire structure slams into the grey sand and shatters what's left of the once mighty vessel.
The creaking, crashing, and shattering goes on for several minutes, punctuated by something that sounds a bit like a muffled explosion and is finally concluded by the entire section that John Hazzlebun has been left standing inside splitting in half outwards, and several walls collapsing to let the dying light of the outside world in once more.
John drifts up through the shattered pieces of decks until they're out of their hole, and in what seems to have been a reinforced center hall of the ship. While clearly not enough to keep it unscathed, this one part of the vessel seems to retain most of its color, only a few splotches faded.
This inner section of the ship seems to be carved of turquoise, and at places where the crystal was recently cracked open by John pulling it closer a thin trickle of muddy water leaks out, dripping further down into the structure or to the grey sands below.
From where John currently surveys the scene, there are three obvious ways to go. The hallway into the center of whatever this teal crystal hold was built around is the first, it ends in a vault locked door which has snapped its hinges and could likely be pulled out without touching the lock now. The second is the other direction, back into the more shattered parts of the ship where it would be easy to either find a way up to the top of the wreck or just try and learn more about the vessel. Finally, the largest split in the side of the crystal hall is plenty large enough for John to fit through and could be used to return down to the sand.
What should John do?
-
Inventory:
Strange stone capsule
Action Charges:
Attract: 0/1
Break: 0.5/1
.
First / Back / About / Next
#ElementaryAwakening#text adventure#Attract used#Unclaimed Realm 1#I hope your insurance covers teleportation accidents
2 notes
·
View notes
Text
<!--
ludovic v.1 by ellie
// RULES
-> Do NOT remove any credits!
-> Do NOT use this as a base code.
-> Do NOT take parts of this code an claim it as your own.
-> You are free to edit however you want.
// CREDITS
-> Fonts by https://fonts.google.com
-> Helpful website: https://www.w3schools.com/
// COMMENTS
-> The pictures resize themselves to 160 x 210. However, it can happen that the proportions get messed up if the proportions aren't similar. #
-> The size of the container adjusts according to your screen resolution!
-> The Bullet point section in the muse profiles keep scrolling if you add more.
-> The expand box for more information keeps scrolling if you add more text.
-->
<!DOCTYPE html>
<html>
<head>
<link rel="icon" type="image/png" href="{Favicon}">
<link rel="alternate" type="application/rss+xml" href="{RSS}" />
<title>MUSES</title>
<link rel="preconnect" href="https://fonts.googleapis.com"> <link rel="preconnect" href="https://fonts.gstatic.com" crossorigin>
<link href="https://fonts.googleapis.com/css2?family=Cabin" rel="stylesheet"> <link href="https://fonts.googleapis.com/css2?family=Yeseva+One" rel="stylesheet">
<style>
/*-- CHANGE THE DETAILS HERE ONLY!!! --*/
:root {
--body-font: 'Cabin', sans-serif;
--accent-font:'Yeseva One';
--font-size:12px;
--dark-mode:0; /*CHANGE TO 1 FOR DARK TUMBLR TOOLS*/
--pic-filter:0%; /*CHANGE TO 0% FOR COLORFUL PICTURES*/
--split:.4; /*CHANGE TO .0 TO REMOVE THE SPLIT-COLOR ON THE PICTURES*/
--text: #ccc;
--background: #121212;
--border:#8c918e;
--accent:#45966e;
}
/** CREDIT DO NOT DELETE **/
#credit { font-family:var(--body-font), sans-serif; position:fixed; bottom:10px; right:10px; width:10px; height:13px; word-wrap:break-word; overflow:hidden; -webkit-transition:all 1s ease; -moz-transition:all 1s ease; -o-transition:all 1s ease; transition:all 1s ease-in-out; z-index:9999999999999999; }
#credit a { font-family:var(--body-font), sans-serif; color: var(--text); text-transform:uppercase; font-size:10px; z-index:9999999999999999999; } #credit:hover {width:100px;} #credit span { font-family:var(--body-font), sans-serif; color:var(--accent); margin-right:5px; font-weight:700; font-size:13px; }
/** BODY **/
* { scrollbar-width: thin; scrollbar-color: var(--border) var(--background);}
::-webkit-scrollbar {width: 4px; height: 2px; background: transparent;}
::-webkit-scrollbar-button {width: 0px; height: 0px;} ::-webkit-scrollbar-thumb {background: var(--border);}
iframe.tmblr-iframe { position:fixed; z-index:14!important; top:5px!important; right:10px!important; opacity:0.5; padding-right:0px; transform:scale(0.6); transform-origin:100% 0; -webkit-transform:scale(0.6); -webkit-transform-origin:100% 0; -o-transform:scale(0.6); -o-transform-origin:100% 0; -moz-transform:scale(0.6); -moz-transform-origin:100% 0; -ms-transform:scale(0.6); -ms-transform-origin:100% 0; transition:.2s ease-in-out; -webkit-transition:.2s ease-in-out; -moz-transition:.2s ease-in-out; filter:invert(var(--dark-mode)); -webkit-filter:invert(var(--dark-mode)); -o-filter:invert(var(--dark-mode)); -moz-filter:invert(var(--dark-mode)); -ms-filter:invert(var(--dark-mode));}
body {margin:0; font-family:var(--body-font); padding: 0; color:var(--text); font-size:var(--font-size); background:var(--background); overflow:hidden;}
hr { border: 1px solid transparent;} a {text-decoration:none; font-weight:800; color:var(--border); text-decoration:underline; text-transform:uppercase; letter-spacing:1px;} b, strong {color:var(--accent); font-weight:800; font-size:calc(var(--font-size) + 4px); font-family:var(--accent-font); } i {color:var(--border); font-weight:600; font-size:calc(var(--font-size) + 1px);} u {color:var(--text); font-size:var(--font-size); background:var(--accent); padding:1px 5px; text-decoration:none;}
/** CONTAINER & NAVIGATION **/
.container { width:90%; height:90%; position: absolute; top:0; bottom:0; left:0; right:0; margin:auto; overflow:visible; padding:10px; text-align:center;}
.blob { position:fixed; width:400px; height:400px; border-radius:50%; background:var(--accent); filter: blur(70px); opacity:.3; bottom:-100px; right:-170px;} .blob2 { position:fixed; width:450px; height:450px; border-radius:50%; background:var(--border); filter: blur(70px); opacity:.2; top:-100px; left:-170px;}
.musecontainer { position:absolute; overflow:auto; width:96%; height:90%; margin-left:0px; margin-top:22px; display:flex; justify-content:center; flex-wrap:wrap; border-top: 10px solid var(--border); border-bottom: 10px solid var(--border); padding:10px 0px;}
.navigation { position:absolute; margin-left:2px; margin-top:0px;} .navigation a { display:inline-block; background:var(--border); color:var(--text); font-size:var(--font-size); padding:3px 20px; margin-right:5px; font-weight:normal; transform: skew(-8deg); -webkit-transform: skew(-8deg); -moz-transform: skew(-8deg); text-decoration:none; text-transform:lowercase; letter-spacing:0px;} .navigation a:hover { background:var(--background); color:var(--accent);transition:.5s; font-weight:bold;}
/** MUSE BOXES **/
.box { width:321px; min-height:240px; margin: 10px 35px 0px 0px; padding:0px; border: 0px solid var(--border); }
.title { position:absolute; margin-left:0px; margin-top:0px; border-bottom:1px solid var(--border); width:321px; height:30px;} .title h1 { position:absolute; margin-left:10px; margin-top:0px; text-transform:uppercase; font-size:18px; color:var(--border); letter-spacing:1px; font-family:var(--accent-font); text-align:left; font-weight:900;} .title h1::first-letter { color:var(--accent); font-size:30px; margin-right:3px; font-style:italic; font-weight:900;}
.stats { position:absolute; margin-left:0px; margin-top:30px; width:160px; height:200px; border-right:1px solid var(--border); overflow:auto; text-align:left; border-bottom:1px solid var(--border); padding:5px 0px; color:var(--text); text-transform:lowercase;} hr.stats1 { border-top:1px solid var(--border);padding-bottom:2px;} .stats span { margin-left:10px; margin-top:8px; margin-bottom:8px; display:inline-block; width:10px; line-height:10px; background:var(--accent); border-radius:50%; text-align:center; margin-right:7px; color:var(--accent);} .stats span:before {content:'.';}
.picture { width:160px; height:209px; position:absolute; margin-left:161px;margin-top:31px; overflow:hidden; border-bottom:1px solid var(--border);}
.split { transform: scale(3) skew(37deg) translate(-27px); -webkit-transform: scale(3) skew(37deg) translate(-27px); -moz-transform: scale(3) skew(37deg) translate(-27px); top: 0px; left: 0px; width: 50%; height: 100%; opacity:var(--split); background-color: var(--accent); z-index: 1;} .picture img { width:160px; height:210px; position:absolute; margin-left:-80px; margin-top:0px; overflow:hidden; filter: grayscale(var(--pic-filter)) brightness(70%); -webkit-filter: grayscale(var(--pic-filter)) brightness(70%); -moz-filter: grayscale(var(--pic-filter)) brightness(70%);}
/** EXPAND BOX **/
.expandlink { z-index:99999; margin-top:200px; margin-left:300px; position:absolute; text-align:center; line-height:30px; font-size:10px; opacity:90%;}
.expandlink label { margin-left:5px; margin-bottom:5px; display:block; width:32px; background:var(--border); color:var(--text); border-radius:50%; font-weight:400; text-align:center;transition: background-color 300ms ease-in; backdrop-filter:blur(4px); cursor:pointer; } .expandlink label::after { margin-left:0px; margin-top:241px; width:301px; height:0px; display:none; overflow:auto; text-align:left; padding:10px; border-bottom:1px solid var(--border); } input { display: none; visibility: hidden;} .box input[type=checkbox]:checked ~ .expand { height: 100px; display:block; animation: myAnim 1s linear 0s 1 normal forwards;} .box input[type=checkbox]:checked ~ .expandlink label::after { content:'-'; font-size:20px;}
@keyframes myAnim { 0% { opacity: 0; transform: translateY(-20px);} 100% { opacity: 1; transform: translateY(0); } }
</style>
</head>
<body>
<div class="container">
<div class="blob"></div><div class="blob2"></div>
<div class="navigation">
<a href="https://kwritemeastory.tumblr.com/">home</a>
<a href="https://kwritemeastory.tumblr.com/ask">message</a>
<a href="https://kwritemeastory.tumblr.com/rules">rules</a>
<!-- Add as many links as you like -->
</div>
<div class="musecontainer">
<!--MUSE BOX WITH EXPAND STARTS HERE-->
<div class="box"><input id="muse1" type="checkbox"> <!--The input ID must be the same as the for="" in the label-->
<div class="title"><h1>LUCY CHEN</h1></div>
<div class="picture">
<img src="https://pbs.twimg.com/media/FF5KGQCXIAwfLDp?format=jpg&name=4096x4096">
<div class="split"></div></div>
<div class="expandlink"><label for="muse1" title="more"></label></div>
<div class="stats"><div style="margin-bottom:2px"></div>
<span></span> the rookie<br>
<hr class="stats1">
<span></span> police offier in the LAPD<br> <hr class="stats1">
<center> <i> "I knew you would find me, no matter what it took" </i></center>
<hr class="stats1">
<!--You can add more it keeps scrolling-->
</div>
<div class="expand">
</div>
</div>
<!--MUSE BOX WITH EXPAND ENDS HERE-->
<!--MUSE BOX WITH EXPAND STARTS HERE-->
<div class="box"><input id="muse1" type="checkbox"> <!--The input ID must be the same as the for="" in the label-->
<div class="title"><h1>angela lopz</h1></div>
<div class="picture">
<img src="https://tv-fanatic-res.cloudinary.com/iu/s--W2bwUWoc--/t_full/cs_srgb,f_auto,fl_strip_profile.lossy,q_auto:420/v1666575220/smiling-lopez-the-rookie-s5e5.jpg">
<div class="split"></div></div>
<div class="expandlink"><label for="muse1" title="more"></label></div>
<div class="stats"><div style="margin-bottom:2px"></div>
<span></span> the rookie<br>
<hr class="stats1">
<span></span> detective in the LAPD<br> <hr class="stats1">
<center> <i> “Must be the ghosts of all the <br> <center> con artists I put in jail" </i></center>
<hr class="stats1">
<!--You can add more it keeps scrolling-->
</div>
<div class="expand">
</div>
</div>
<!--MUSE BOX WITH EXPAND ENDS HERE-->
<!--MUSE BOX WITH EXPAND STARTS HERE-->
<div class="box"><input id="muse1" type="checkbox"> <!--The input ID must be the same as the for="" in the label-->
<div class="title"><h1>nyla harper</h1></h1></div>
<div class="picture">
<img src="https://tv-fanatic-res.cloudinary.com/iu/s--5TiKRDro--/t_full/cs_srgb,f_auto,fl_strip_profile.lossy,q_auto:420/v1613277918/nyla-looks-worried-the-rookie-s3e5.png">
<div class="split"></div></div>
<div class="expandlink"><label for="muse1" title="more"></label></div>
<div class="stats"><div style="margin-bottom:2px"></div>
<span></span> the rookie <br>
<hr class="stats1">
<span></span> detective in the lapd <hr class="stats1">
<center> <i>"Must be nice to be a criminal and just sleep in every morning"</center>
</i></center>
<hr class="stats1">
<!--You can add more it keeps scrolling-->
</div>
<div class="expand">
</div>
</div>
<!--MUSE BOX WITH EXPAND ENDS HERE-->
<!--MUSE BOX WITH EXPAND STARTS HERE-->
<div class="box"><input id="muse1" type="checkbox"> <!--The input ID must be the same as the for="" in the label-->
<div class="title"><h1>aaron thorsen</h1></h1></div>
<div class="picture">
<img src="https://i0.wp.com/fangirlish.com/wp-content/uploads/2022/11/164246_2902.jpg?resize=684%2C1024&ssl=1">
<div class="split"></div></div>
<div class="expandlink"><label for="muse1" title="more"></label></div>
<div class="stats"><div style="margin-bottom:2px"></div>
<span></span> the rookie <br>
<hr class="stats1">
<span></span> police offier in the lapd <br> <hr class="stats1">
<center> <i> "I can't believe this is happening to me again."
</i></center>
<hr class="stats1">
<!--You can add more it keeps scrolling-->
</div>
<div class="expand">
</div>
</div>
<!--MUSE BOX WITH EXPAND ENDS HERE-->
<!--MUSE BOX WITH EXPAND STARTS HERE-->
<div class="box"><input id="muse1" type="checkbox"> <!--The input ID must be the same as the for="" in the label-->
<div class="title"><h1>javier esposito</h1></div>
<div class="picture">
<img src="https://i.pinimg.com/originals/98/62/b8/9862b8dbbaf41dcd0552dcca62575fe4.jpg">
<div class="split"></div></div>
<div class="expandlink"><label for="muse1" title="more"></label></div>
<div class="stats"><div style="margin-bottom:2px"></div>
<span></span> castle<br>
<hr class="stats1">
<span></span> detective in the nypd <br> <hr class="stats1">
<center> <i> "At some point, when you choose wrong over right that's on you."
</i></center>
<hr class="stats1">
<!--You can add more it keeps scrolling-->
</div>
<div class="expand">
</div>
</div>
<!--MUSE BOX WITH EXPAND ENDS HERE-->
<!--MUSE BOX WITH EXPAND STARTS HERE-->
<div class="box"><input id="muse1" type="checkbox"> <!--The input ID must be the same as the for="" in the label-->
<div class="title"><h1>kate beckett</h1></div>
<div class="picture">
<img src="https://tv-fanatic-res.cloudinary.com/iu/s--jej1NusL--/t_full/cs_srgb,f_auto,fl_strip_profile.lossy,q_auto:420/v1371241830/kate-beckett-is-beautiful.png">
<div class="split"></div></div>
<div class="expandlink"><label for="muse1" title="more"></label></div>
<div class="stats"><div style="margin-bottom:2px"></div>
<span></span> castle<br>
<hr class="stats1">
<span></span> detective in the nypd <br> <hr class="stats1">
<center> <i> "I don't look. I hunt."
</i></center>
<hr class="stats1">
<!--You can add more it keeps scrolling-->
</div>
<div class="expand">
</div>
</div>
<!--MUSE BOX WITH EXPAND ENDS HERE-->
<!--MUSE BOX WITH EXPAND STARTS HERE-->
<div class="box"><input id="muse1" type="checkbox"> <!--The input ID must be the same as the for="" in the label-->
<div class="title"><h1>Bucky Barnes</h1></div>
<div class="picture">
<img src="https://i.pinimg.com/originals/51/89/83/5189835c282832b39662e07a51874715.jpg">
<div class="split"></div></div>
<div class="expandlink"><label for="muse1" title="more"></label></div>
<div class="stats"><div style="margin-bottom:2px"></div>
<span></span> marvel<br>
<hr class="stats1">
<span></span> living life <br> <hr class="stats1">
<center> <i> "I am no longer the Winter Soldier. I am James 'Bucky' Barnes, and you're part of my efforts to make amends."
</i></center>
<hr class="stats1">
<!--You can add more it keeps scrolling-->
</div>
<div class="expand">
</div>
</div>
<!--MUSE BOX WITH EXPAND ENDS HERE-->
<!--MUSE BOX WITH EXPAND STARTS HERE-->
<div class="box"><input id="muse1" type="checkbox"> <!--The input ID must be the same as the for="" in the label-->
<div class="title"><h1>kate bishop</h1></div>
<div class="picture">
<img src="https://encrypted-tbn0.gstatic.com/images?q=tbn:ANd9GcQJVRiRxWP7o1OnIRxKufuUhF77ZvYEEjkD2w&usqp=CAU">
<div class="split"></div></div>
<div class="expandlink"><label for="muse1" title="more"></label></div>
<div class="stats"><div style="margin-bottom:2px"></div>
<span></span> marvel<br>
<hr class="stats1">
<span></span> detective in the ccpd <br> <hr class="stats1">
<center> <i> "Look, I know this may sound weird. But I’ve dreamed of this for as long as I can remember."
</i></center>
<hr class="stats1">
<!--You can add more it keeps scrolling-->
</div>
<div class="expand">
</div>
</div>
<!--MUSE BOX WITH EXPAND ENDS HERE-->
<!--MUSE BOX WITH EXPAND STARTS HERE-->
<div class="box"><input id="muse1" type="checkbox"> <!--The input ID must be the same as the for="" in the label-->
<div class="title"><h1>Yelena Belova</h1></h1></div>
<div class="picture">
<img src="https://thegenuineleather.com/wp-content/uploads/2021/07/Yelena-Belova-Black-Widow-2021-Blazer-Jacket.jpg">
<div class="split"></div></div>
<div class="expandlink"><label for="muse1" title="more"></label></div>
<div class="stats"><div style="margin-bottom:2px"></div>
<span></span> marvel<br>
<hr class="stats1">
<span></span> n/a <br> <hr class="stats1">
<center> <i> "this would be a cool way to die"
</i></center>
<hr class="stats1">
<!--You can add more it keeps scrolling-->
</div>
<div class="expand">
</div>
</div>
<!--MUSE BOX WITH EXPAND ENDS HERE-->
<!--MUSE BOX WITH EXPAND STARTS HERE-->
<div class="box"><input id="muse1" type="checkbox"> <!--The input ID must be the same as the for="" in the label-->
<div class="title"><h1>natasha romanoff</h1></div>
<div class="picture">
<img src="https://i.pinimg.com/736x/83/1e/2f/831e2f363abb081ec68bc1cb32098b5f.jpg">
<div class="split"></div></div>
<div class="expandlink"><label for="muse1" title="more"></label></div>
<div class="stats"><div style="margin-bottom:2px"></div>
<span></span> marvel<br>
<hr class="stats1">
<span></span> avenger <br> <hr class="stats1">
<center> <i> "i dont judge people on their wost mistkes"
</i></center>
<hr class="stats1">
<!--You can add more it keeps scrolling-->
</div>
<div class="expand">
</div>
</div>
<!--MUSE BOX WITH EXPAND ENDS HERE-->
<!--MUSE BOX WITH EXPAND STARTS HERE-->
<div class="box"><input id="muse1" type="checkbox"> <!--The input ID must be the same as the for="" in the label-->
<div class="title"><h1>sam wilson</h1></h1></div>
<div class="picture">
<img src="https://www.williamjacket.com/wp-content/uploads/2021/04/Sam-Wilson-The-Falcon-and-the-Winter-Soldier-Jacket.jpg">
<div class="split"></div></div>
<div class="expandlink"><label for="muse1" title="more"></label></div>
<div class="stats"><div style="margin-bottom:2px"></div>
<span></span> marvel <br>
<hr class="stats1">
<span></span> falcon <br> <hr class="stats1">
<center> <i> "you wanna climb out of the hell you're in, do the work"
</i></center>
<hr class="stats1">
<!--You can add more it keeps scrolling-->
</div>
<div class="expand">
</div>
</div>
<!--MUSE BOX WITH EXPAND ENDS HERE-->
<!--MUSE BOX WITH EXPAND STARTS HERE-->
<div class="box"><input id="muse1" type="checkbox"> <!--The input ID must be the same as the for="" in the label-->
<div class="title"><h1>rachel berry</h1></h1></div>
<div class="picture">
<img src="https://i.pinimg.com/550x/76/69/37/766937284b67067d3699a3b56455f569.jpg">
<div class="split"></div></div>
<div class="expandlink"><label for="muse1" title="more"></label></div>
<div class="stats"><div style="margin-bottom:2px"></div>
<span></span> glee <br>
<hr class="stats1">
<span></span> broadway actress <br> <hr class="stats1">
<center> <i> "being good isn't good enough."
</i></center>
<hr class="stats1">
<!--You can add more it keeps scrolling-->
</div>
<div class="expand">
</div>
</div>
<!--MUSE BOX WITH EXPAND ENDS HERE-->
<!--MUSE BOX WITH EXPAND STARTS HERE-->
<div class="box"><input id="muse1" type="checkbox"> <!--The input ID must be the same as the for="" in the label-->
<div class="title"><h1>marley rose</h1></h1></div>
<div class="picture">
<img src="https://i.pinimg.com/236x/fe/00/03/fe0003a5c8b5e38976c0647d3b6808ff--mellisa-benoist-marley-rose.jpg">
<div class="split"></div></div>
<div class="expandlink"><label for="muse1" title="more"></label></div>
<div class="stats"><div style="margin-bottom:2px"></div>
<span></span> glee <br>
<hr class="stats1">
<span></span> student <br> <hr class="stats1">
<center> <i> "i have this problem, i always assume the best in people"
</i></center>
<hr class="stats1">
<!--You can add more it keeps scrolling-->
</div>
<div class="expand">
</div>
</div>
<!--MUSE BOX WITH EXPAND ENDS HERE-->
</div>
</div>
<div id="credit"><div style="width:115px;margin-right:5px;margin-bottom:15"><a href="https://retrcmoon.tumblr.com/" target="blank"><span>E.</span>MADE BY ELLIE.</a></div></div> <!--DO NOT DELETE-->
</body>
</html>
0 notes
Text
What is a Psychrometric Laboratory and How Does it Work?
In India, the use of air conditioners as residential appliances has grown dramatically. Almost every household today has air conditioners. Now, imagine you are looking up the specifications for your summer air conditioner.
You observe that your system weighs three tons and know the cargo indicates the cooling system's power. But how effective is your air conditioner & what does it do with all that power?
It’s impossible to know by yourself whether it’s the air conditioner at your home or in industries. And that’s where the Psychrometric lab comes in! But what is it?
Let’s walk you through what it is and the importance of Psychometric Testing for air conditioners and heat pumps!
What is a Psychrometric Laboratory?
The main objective of the Psychrometric Test Chamber is to assess the efficiency of air conditioners and heat pumps. It is a two-chamber laboratory with controlled testing on air conditioners and heat pumps' performance, reliability, and safety.
The rooms, designated for indoor and outdoor circumstances, simulate real-world situations, many of which have very strict temperature and humidity tolerances. Manufacturers of air conditioners use psychrometric rooms to measure the thermal efficiency of split and standalone units.
According to the specifications of the clients and any applicable requirements, the test rooms are created. The Test Chamber is built to stabilize temperatures within 0.1° Celsius.
Measuring humidity and temperature via a test chamber has several compliance standards, such as ASHRAE and AHRI.
How Does a Psychrometric Laboratory Work?
The psychrometric labs work in pairs. Psychrometric chambers are paired. The compressor and heat exchanger outside your home is simulated in an "outdoor" section. Then, an "indoor" room replicates the room-temperature environment inside your house.
In this manner, companies may simulate summer circumstances for testing air conditioning systems or winter conditions for determining the most effective heating system. The chambers are accurate. They can maintain a consistent atmosphere within 0.5° C of their intended aim and 1% of their humidity target.
Additionally, they can reproduce high temperatures ranging from -20°C (-4°F) to 55°C (130°F) and humidity levels ranging from 15% to 100%. This uniformity is crucial since scientists also track the refrigerants used to chill the air and the air's temperature.
Each chamber may have an air enthalpy measuring device to assess the capacity and efficiency of air conditioners and heat pumps using the air enthalpy method.
The Air Enthalpy Measuring Device will calculate thermal capacities, airflow, and air enthalpy values. In addition, the tunnels evaluate the draw-through cooling or heating capacity of room air conditioners & the airflow capacities of fans and blowers.
The sensors required to automatically get the airside enthalpy measurements, which are essential to the precision of the capacity measurement, are provided by the Air Enthalpy Measuring Device.
How can Delta Stark Help?
If you can already feel the excessive heat and humidity this summer, it's clear that your air conditioner isn't working as it should. Delta Stark can offer the facility to test your AC system application if necessary.
Our psychrometric lab can use the air enthalpy-based difference test method to evaluate the thermal efficiency of your various air conditioners. Our dual-room, indoor/outdoor approach, and air enthalpy methods can monitor the performance of air conditioning systems.
Our careful adherence to Indian norms is as follows:
Non-ducted air conditioners and heat pumps -- Performance testing and rating (ISO 5151:2017)
Non-ducted air conditioners and heat pumps -- Performance testing and rating (ISO 13253-2017)
Non-ducted air conditioners and heat pumps -- Testing and rating for performance (SASO 2681-2013)
Our air conditioner test lab has indoor and outdoor rooms, computerized control systems, refrigerators, airflow and handling meters, and other amenities.
The Bottom Line
To experience comfort in the summer, knowing the importance of Psychrometric Testing is necessary. A Psychrometric performance laboratory is a trustworthy and effective facility for measuring Humidity and Temperature effectively.
At Delta Stark, we can build the device to match your demands and industry standards to help your air conditioners operate at their best. Get in touch with us to have the most pleasant summer ever!
0 notes
Text
5 Advantages of Luoyang Judian Rolling Mill Machine
The development trend of modern rolling mill machines is continuous, automated, professional, high product quality, and low consumption. In recent years, some rolling machines suitable for new rolling methods such as continuous casting and rolling, as well as rolling machines that meet the quality requirements of new product quality have also appeared. Luoyang Giant Power Rolling Machine is a product that emerged in this environment. So, what are the advantages of Luoyang Judian rolling mill machine?

The Main Advantages of Luoyang Judian Rolling Mill Machine
Can Be Dual or Multi-Line Rolled
Realizing dual or multi-line rolling, which greatly increases the output of small rolling machines, which is especially important when producing small specifications.
Less Rolling Passes
To produce products of the same specifications with the same size, only 1/2 section of the 1/2 of the ingredients can be used, so it can reduce rolling roads.
Improve Product Accuracy
The product accuracy can be increased by 5%-6% compared with ordinary rolling. The reason is that the two lines bite at the same time after the division. In addition, the cutting split rolling is only performed in the last three racks, and the rest are microspheres and non-tension rolling.
Save Energy Consumption
When the conditions are the same, the use of cutting and rolling can reduce the heating temperature of the billet by about 40 ° C, the fuel decreases by 20%, the power consumption can be reduced by 15%, and the total production cost can be reduced by 10-15%. Cost -easy and effective measures.
The disadvantage of cutting and rolling is that the amount of cutting should increase by about 0.5%.
Real-Time Detection of Product Parameters
The one-way and anti-interference of laser is better than any other light wave. The laser diameter designed as the principle is used to measure the size of the rolling parts online. The size in the 450 direction can be displayed and stored in the computer system. The operator can timely understand the size accuracy of the rolling parts in the production process based on the results of the display, and adjust the small rolling machine promptly in time when it is close to the specified accuracy to reduce the waste products and easily adjust the operation.
Precautions before Running the Rolling Mill Machine
Before the rolling machine is turned on, it is necessary to verify the power, rolling speed, product specifications, and holes of the equipment, to ensure that the reprint of the blank is not more than the tolerance of the rolling equipment. Otherwise, the equipment startup speed will be slowed down, and there is a check to check the bearing of the rolling machine to see if the lubrication of the bearings is sufficient. If the lubrication is not enough, the start of the rolling machine will also slow down and even fail. Luoyang Judian actively explores new technologies and is applied them to rolling machine products. This not only reduces the energy consumption of the equipment, rationally optimizes the cost of making the equipment festival, but also improves the productivity of the equipment.
0 notes
Text
Roulette 3d

#Roulette 3d for free
#Roulette 3d how to
#Roulette 3d password
With 3D European Roulette online, Iron Dog has taken the design to a new level with clean visuals and a unique game set-up, while the design is intuitive it is definitely best to play a few spins in demo mode to make sure you understand this new layout properly before playing for real money.ģD European Roulette online also offers several special features which can be explored while playing a demo game. It’s always a good idea to take advantage of a free demo game when you can as this gives players the opportunity to learn the basics of the game as well as getting to grips with the game’s layout. Lucky for you reader we’ve also found for you a way that you can play 3D European Roulette for free. As the saying goes you should always ‘try before you buy’ and the same is true with playing roulette online.
#Roulette 3d how to
Read this 3D European Roulette review and learn some insider tips on how to make the most of your gameplay. Deposit bonus & Free Spins wins are forfeited 30 days after bonus is credited if the wagering is not met. Free Spins winnings credited as bonus money with 45x wagering & 3 days expiry. 100 Free Spins are given out 20 per day on Book of Dead for 5 days in a row. Wagering required 100% match bonus: 30x deposit + bonus. Although no bonus is available, you would definitely like to play this slot if you like European classic roulette.Full T&Cs apply. The straight bet offers the odds of 35 to 1, and the split bets offer the odds of 17 to 1. It is possible to place outside and inside bets. The wager starts from 0.50$, and you can bet as high as 150$.
There is a “My Bets” section which gives you a detailed view of your whole betting industry in this slot.ģD Roulette mobile provides various chips which range from 0.5, 1, 5, 10, and 25 with each one categorized by different colours.
The statistics table helps you to get the track of your progress in the slot.
There is a Racetrack View which assists you in placing your bets in particular areas on the wheel.
We would like to tell you about these additional options one by one: These additions would help you to customize your game and play the way you want to. It is based upon classic European game rules, but as discussed above there are different special features involved in this game.
#Roulette 3d password
Once you have created your account after providing your name, email, and password you will have to deposit money in your account and then start wagering real money. In order to play 3D Roulette for real money, you need to find an online casino that offers this game, and you need to create an account. You can play free 3D Roulette at casino online, but it is not possible to win real money if you are playing for free. If you are a new player, it will be great if you can read all the rules and regulations of the game before hitting the start button.
#Roulette 3d for free
You can also play 3D Roulette for free on your mobile phone or a tablet as it is compatible with any kind of smartphone or tablet device. You can play it online, and you don’t need any kind of download. The soundtrack is also amusing, and you can turn on or turn off the soundtrack. There are chips available which will help you to place your bets. The design of the slot is amazing, and you can see the betting table on the screen the moment you start playing. Not only there are classic features available you can also enjoy different additional features put together in the game by the developers. 3D Roulette by Iron Dog is a high-quality online slot which contains multiple winning chances for every player.
0 notes
Text
Rating fantasy maps
As you may know, I love books and I love maps and I love books that have maps. But not all maps are created equal, and it is time that I stop admiring books simply for having a map and start holding them to some sort of standard. All maps are from queer adult fantasy books.
Therefore, I will judge them by the following criteria:
1 point for Is it legible? Simple. Do I understand what the map is showing
2 points for Is it pretty? It's not just informative, it's also a piece of art
3 points for Is it realistic? I know what you're thinking: this is fantasy. But if apples fall down from trees in your story, rivers should not flow up mountains. Unless this special river has an in-universe reason for going up a mountain, that's cool. It's about internal consistency.
4 points for Is it useful? How helpful is the map while reading the book? Does it enhance the experience?
We now have a total of 10 possible points. Mild spoilers may be ahead.
Let’s start with the most well known one.
The Priory of the Orange Tree
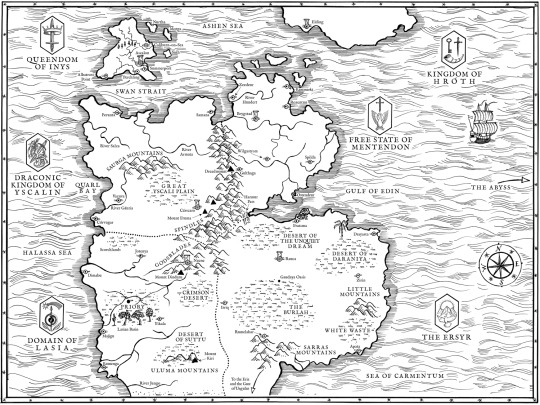

Is it legible? Very much so. Sovereign states are clearly marked, cities and capitals have different symbols, etc etc. 1/1 points.
2 points for Is it pretty? Hell yeah. There are many details in the landscape so nothing looks empty, and it even has coats of arms! 2/2 pretty points.
3 points for Is it realistic? The good first: the coastlines are diverse and broken up in interesting ways. No mountain is standing alone, and the most important ones are part of ranges. However, the rivers are a definite downside. Why are they so smooth? And why are they splitting? And why is the main continent divided so geometrically, countries don’t work like that. Then again, at least the book addresses why the maps end where they end. 1.5/3 points.
4 points for Is it useful? What I really appreciate about this map is how it contains every major city and place, but also just about every location ever mentioned. So you can always check. The characters travel around a bit, and it’s useful to reference the map for that, although the geography isn’t so complex that you’d be lost otherwise. 3/4 points.
I’ll give it a bonus point for having two maps for the price of one, which brings us to a final score of 8.5/10 points! Not bad!
This is getting long, more under the cut
The Worldbreaker Saga
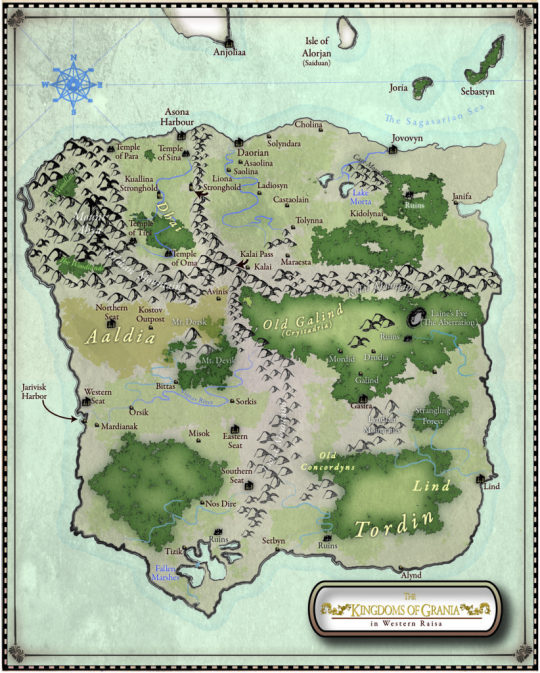
I’ll only consider the map from the second and third book since it’s an extended version of the first.
Is it legible? pretty much. The black and white versions in the books too. 1/1
Is it pretty? I’d say so! terrain is included so that’s good, the mountains have a nice ink-drawn feel to them. Not a fan of the square continent, but that is better judged in the next section. 2/2
Is it realistic? This map and the western Priory map are remarkably similar, my least favourite part of which is that the countries on the main continent are basically divided by a cross shape. cmon. that’s neither realistic nor imaginative. on top of that this one is just. a square. mountains and rivers are fine tho 1/3 points
Is it useful? while the scope of the story really makes a map necessary, some odd decisions were made. Why, for instance, include all of southern Tordin and Aaldia where I don’t think we spend any time at all, but only the southern tip of Saiduan, where several main characters travel around and an invasoin takes place? The choice to include vegetation in some of the valley Dhai’s land but not other parts is also confusing and not supported in the story. A sad 1/4 points.
I’ll be nice and add 0.5 points for the colour version of the map that is easy to find on the author’s website, which brings us to a mediocre 5.5/10.
The Traitor Baru Cormorant

Unlike the Worldbreaker Saga, Masquerade series maps really have to be judged individually.
Is it legible? very much so 1/1
Is it pretty? well. no. this map’s simplicity is an asset in some areas and a hindrance in others and prettiness is evidently not its primary concern. 0/2
Is it realistic? hard to judge since it clearly intends to be simplified. The duchy borders are rough, but I do appreciate that they have different sizes and shapes. There are a scant few physical features so again, what can I say? It does lose points for being so rectangular and having a lonely mountain. 1.5/3
Is it useful? This is where Traitor’s map excels. With all the names and alliances we have to consider while reading Traitor, I checked the map all the time to understand who is who and how they relate. It also contains all places that are relevant to the story and not much else so we can really focus on them. The additional notes give us context for the duchies and dukes as well as insight into Baru’s mind. This map exists in-universe and even plays a role in the story. 4.5/4 for going above and beyond in this regard.
That brings us to a total of a respectable 7/10 for this map.
Will the final contender beat the high score set by Priory?
The Monster Baru Cormorant

Disclaimer, I am only halfway through monster so forgive me if there’s anything I missed (I couldn’t find a nice digital version of this one)
Is it legible? borders could be clearer but it’s fine. 1/1
Is it pretty? what an upgrade! look at those ships, that kraken, the sea monster! the little banner! 2/2
Is it realistic? the shapes and distribution of islands and landmasses feels more organic than with any map before.There are very few other physical features and none that break my suspense of disbelief. The effects of the circular trade winds are often explored within the story. 3/3 points
Is it useful? it might not be as integral to the story as Traitor’s map, but it makes up for it in multiple ways. We can directly see the journey the action takes, right there on the map. In Monster, Baru’s view of the world expands and we get more POVs from characters far away, so it’s only natural that the reader’s view and the map expand with it. As it says on the banner, this map once again exists in-universe and belongs to Baru, who has annotated it. Again we get more context for the places as well as insights into Baru’s mind. As if all of that wasn’t enough, “hers my home” alone pushes this to a 4/4 because now a goddamn map feels bittersweet
Which means we have a 10/10! Damn! It didn’t get any bonus points but it didn’t need to to be a pretty damn awesome and well-rounded map.
Feel free to add and rate any maps from books you have read! I’d love to see more maps!
#the priory of the orange tree#the worldbreaker saga#the traitor baru cormorant#the monster baru cormorant#baru cormorant#fantasy maps#tpotot#worldbreaker saga
23 notes
·
View notes
Photo

my long overview/review of ‘Star Wars: Journey to Batuu’ after forcing myself to play it almost nonstop
so i said i was going to amend what i said in response to this ask after playing to min/max shit so here is a tldr version of my opinion after playing:
I consider this pack to be a 2/10; It's enough to kill time as a temporary distraction, but not for long. There’s absolutely no replay value after going through all those missions as each outcome is ultimately the same by faction. There also doesn’t seem to be any negative outcomes for each prompt in the little “choose your adventure” pop ups--And if there is, it is extremely low since I have never gotten a negative outcome.
The aspirations are fair, and are the only things I found in this pack that’s anyway redeemable since I believe the rewards can be used well in conjunction with general solo/super-sim gameplay.
kinda sat on this for a while bc i wasn’t sure if i should post something so lengthy but then i remembered this is my blog n i can post my left toe if i wanted to
even tho i would never post a pic of my left toe anyway
.......at least for free. With the right price, however....
anyway more details under the cut if you’re interested bc i like to ramble :))
I decided to split this into 5 sections to organize my thoughts a little better. I’ll be separating my thoughts on each faction, the ships as a rabbit hole, the faction missions, the star wars aspirations, and then the breakdown of my 2/10 rating.
1. Factions
When you travel to Batuu, the game gives you a starting “mission” or quest to get you acclimated to the areas, and each area has a specific Faction associated with it.
And yes, you cannot live anywhere, nor are there any lots, as was already stated.
Every area has a similar makeup which has:
Control Panels
Supply Crates
1 non-rabbit hole area
1 interactable ship
The Black Spire Outpost is the biggest area and has:
Two places to grab food, three if you count the Cantina
Aside from the Cantina, the other areas are rabbit holes
The two eateries are:
Docking Bay 7
this one has the most food options
you’ll never go hungry in batuu because the cheapest items on the menu are Outpost Popcorn Mix and Water at 0 credits lmao
the other two foods not shown in the screenshot above are Yobshrimp Noodle Salad and Braised Shaak Roast
Ronto Roasters
This food place has two of the same options Docking Bay 7 has as well as two additional food items
Oga’s Cantina
The only area that you see the inside of
yea the bar serves batuu-only drinks too
also where you find the guy who would give you Scoundrel missions, Hondo Ohnaka.

You can essentially max your Scoundrel reputation without it hindering whichever side you wanna take, and you can keep it when you essentially max out your rep on either the Resistance or the First Order.
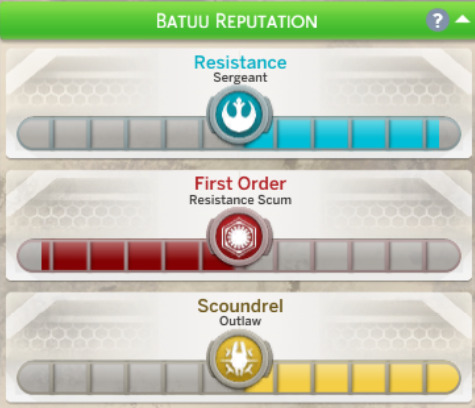
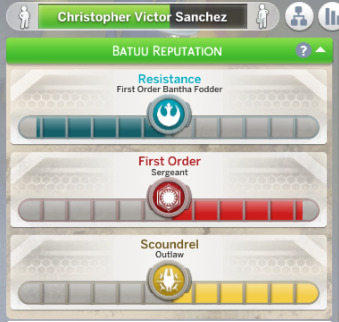
There aren’t any real pros to being a Scoundrel aside from some socialization interactions. It doesn’t do anything for initial Batuu gameplay aside from unlocking Scoundrel outfits in CAS and some upgrades for your droids, but this goes for all of your options (Resistance, First Order, & Scoundrel).
The Dwelling
This is a rabbit hole where your sim goes to sleep, pee, or shower… If not the closest bench.
It’s located opposite to the Cantina.
If you’re ever lost, there’s a spire you can sit/nap on right in front of it–or you can just wait till your sim wants to pee.
they’ll automatically run there
that’s… how i found it, tbh

Dok Ondar’s Den of Antiquities
Another rabbithole
This place sells items you can use to complete missions, like Dataspikes and a couple of Lightsaber parts
Majority of the inventory are decorative stuff to bring back with you
Savi’s Workshop
Right behind the antique shop is the lightsaber place where you can find more hilts, kyber crystals, and display cases for your lightsabers.
You can also click on the shop to start a lightsaber challenge.
Outside this area, you have the First Order District which has more supply crates and control panels than the other two neighborhoods, and a lot more activity–Makes sense since this is basically the hub for the First Order in general.
There’s only the Droid Depot in this area, and the only real shop that has use for credits. Food wise, there’s a food stall, and if your sim is stinky or tired, they’d basically disappear for a few minutes to recharge and come back.
Droid Depot
Each faction has specific Droid personality traits
Aside from “voices,” these personalities don’t do much
I guess the First Order one is a lot more zap-happy though
The Resistance Camp is even smaller. Like the other areas, it’s littered with supply crates, but only has one control panel and no shops. However, there’s a rabbit hole toward the back in the Caves.

This doesn’t lead you to anywhere interesting, and it’s just another ‘choose your own adventure’ kind of thing.
2. Ships
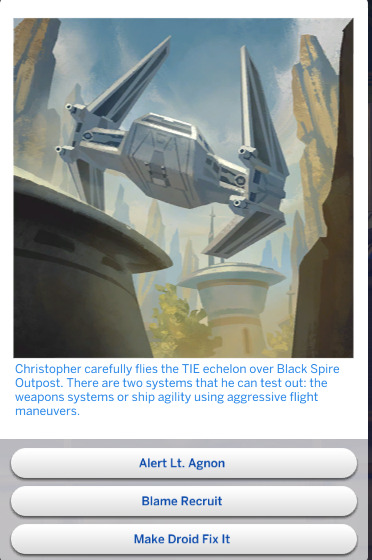
In the Black Spire Outpost, you’ll find the iconic Millennium Falcon. You can do kessel runs and explore in the Millennium Falcon with Chewbacca if you have a high Scoundrel reputation.
However, although I said you get to ride with Chewbacca, you don’t ever see him come out
He just kinda……………..stays there
and the prompts tell u he’s there
n ur gonna have to go with it and use the power of your imagination to believe he really do be there

In the First Order District, there’s the TIE Echelon, which functions the same way as the Millennium Falcon… But, you can’t do anything outside of exploring or using it for missions. This is how the X-Wing Starfighter in the Resistance Camp functions as well.
It’s all pretty copy and paste, but w/e, that’s how EA does it
¯\_(ツ)_/¯
3. Missions
There may be several different missions per faction, but to no one’s surprise, they’re all literally the same one but worded differently.
Regular missions only have one plus (+) and one negative (-) icon
Regular Scoundrel missions only have one plus icon and no negatives since they don’t impact other factions
Each faction has a regular mission that pertains to:
Obtaining information
Exploring with the faction’s designated ship
Stealing from Supply Crates
Hacking a Control Panel
Yes………………….They’re very repetitive
You don’t have to do all of them though
You can spam the same one over and over as long as it fits the time slot
For example, the Resistance’s ship exploration mission is limited to only the day time and seems to disappear when it gets late in game
also there’s an error with the TIE Echelon where it’s missing a whole ass prompt
……As you can see, the options make no sense because the prompt is the same one that came before it 🥴
anyway…
Story Missions are the only missions that seem to differentiate from each faction.
All missions that pertain to the “story” are indicated with prerequisites of higher ranks within the faction
All of them give a double boost toward your faction
If it’s a Resistance story quest, it’ll always increase hostility from First Order members
Vice versa for the First Order faction
The Scoundrels are neutral, and do not impact any faction
It’s only the Resistance and First Order factions that have very similar plot lines
but I’m guessing it’s only like that since they’re supposed to follow the vague cause/effect the two of them have?
4. Aspirations
The initial Aspiration you get when you pick the Star Wars umbrella in CAS (or in game) is “Hope VS Order.” After completing this one aspiration, you unlock the 3 that pertain to each faction.
Paragon of Hope
Resistance aspiration
Reward trait gives a boost to Charisma skill building
This is probably nice for those careers that need Charisma to be high, like the Political and Business branches
Enforcer of Order
First Order aspiration
Lowers chances of “Death from Anger”
Since I like killing my sims, I think this aspiration is pointless lmao
Galactic Privateer
Scoundrel aspiration
“Sleight of Hand” reward trait
Unlocks pickpocketing outside of Criminal branch usage
Best one here tbh
Works outside of Batuu, you’ll steal simoleons instead of credits
Also you can cheat whenever u play Sabaac and no one will notice
5. Reevaluation of Initial Opinions
I’ll be going through my initial list from my Response to the Ask I got before. I originally stated that it seemed promising and it was a 3.5~4/10.
Aesthetics/Visual: my opinion is unchanged, it still made me sad i can’t have a little shanty house out there or rent a garbo lot, 0.5/5
The longer I played, the more I didn’t find any new animations
The lightsaber sparring slowly began to look like a mash between GF and RoM duels after a while
I still hate that the areas were beautiful (+0.5) but the interactive places forced cutaway
why do you wanna ruin my screenshots like this, man
CAS/BB still is hard to integrate–Unless your sim is a geek with figurines, the ship models might be nice to add to their collections
Otherwise……
….
I don’t have a follow up for that, sry
Gameplay: uhhh at least i found something i could use outside of Batuu, 1.5/5
I think that playing 3984729847 repetitive missions for a long period time really orientated me to the whole map
…but the fact that i had trouble the first time around still makes it not-user friendly
the issue I had with the resistance members not having an icon? It’s a thing, I guess
The resistance quests take you on a weird trip to “prove” yourself so i guess the icons are supposed to show that they’re “not” resistance members or something idk
they’re supposed to be the sneaky underdogs who wanna do good or w/e
I guess that’s immersive…….. +0.5
sry im first order trash
they also have “Ignite the Spark” and “Ask about Missions” both leading to the same mission screen……………….
convenience?? i guess??
missions are still confusing, made worse when the game itself glitches up a storm
there was one mission where i had to go to the cantina to find someone
and they wouldn’t spawn within the time frame………….
i had to go in and out for like 3 days until they actually spawned
i only knew this bc i arrested half the people in the cantina while i was bored
so anyone without a red bar was probably them lmfaoo
also, as i stated above……. there’s some mission errors in the prompts
Currency is still worthless.
Everything can be done by purely stealing from supply crates
Credits are only worth to blow it off on sabaac!
The only real need for credits is to have 1,000 so u can buy a droid
Then slam the rest of those credits on the table to bet bajillions on a game of sabaac!
Aspirations………. Useful +1
Despite them being sorta niche, they’re pretty decent
Can abuse the rewards for optimal gameplay for a super sim
Honestly i just love the pickpocketing reward off the Scoundrel aspiration, just because it works outside of Batuu (and that he didn’t have to be in the Criminal career for it either)

In total, my personal rating for this pack is 2/10.
It was nice, but I don’t really see this pack being replayable, considering that i did everything there was to do on Batuu in a single trip. Sure I could’ve taken my time, but since everything would end up the same anyway, it felt like it was set up to be a one-time gig.
At least with JA you’re moderately forced to return so you can collect treasures that are RNG–In JtB, you can snatch up all that you need on Batuu from grinding everything like a nutcase. There’s also chances of failure in JA, but on Batuu that percentage is almost little to none. The most you’ll ever get is a dazed moodlet that barely lasts, a negative relationship, and being escorted to a loading screen.
I feel like this pack could be a little better if there were more risks involved, but there are barely any that I encountered. It’s just another weird, rehashed cash grab by EA.
#star wars: journey to batuu#star wars#journey to batuu#SW: JtB#sims expansion review#i could just say its a disappointment#but tbh the whole game is a disappointment#if you're gonna ask why i still play ts4 if i find it disappointing#i'll have to answer that w:#the games i play are a reflection of me#and I'M a disappointment#😎
18 notes
·
View notes
Text
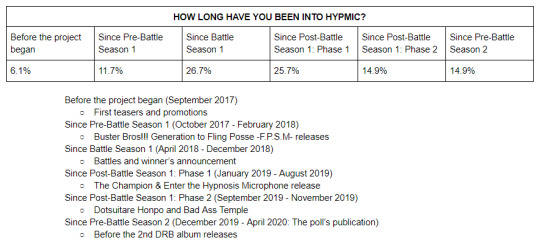
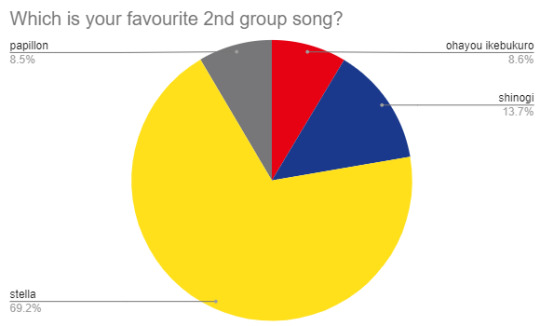
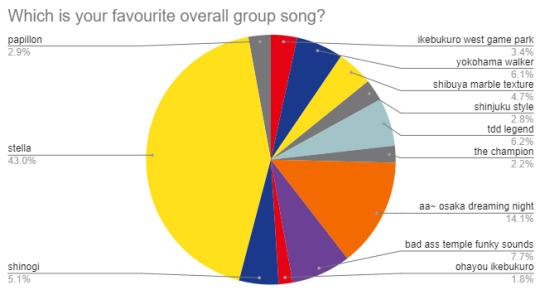
HypMic 3rd Western Poll May 2020

Thank you for your participation! These are the final results for the 3rd HypMic unofficial Western fandom poll. After a month of work on this, we’ve got some estimates for general fandom opinions. Do you agree with the general opinions, or disagree? Let us know!
Please click the read more to view our results!
The sample size was limited to 1000 votes, giving a rough indication of the demographic of consumers outside of Japan as well as opinions. The word ‘Western’ has been used, but we have opened this poll to those who were able to read enough English to understand this poll. As such, it is considerably Euro/American-centric.
This poll received the most activity through Twitter, given that the series is most active on that platform. The poll was also posted on Tumblr, Facebook and the HypMic wiki. Commentary has been given on sections of the poll.
Results will be posted on Twitter and Tumblr.
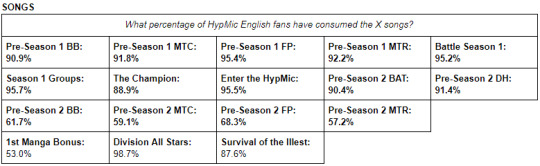
THE CONSUMPTION OF HYPMIC
This section is to be read as ‘What percentage of HypMic English fans have consumed x media?’ The drama tracks and songs have been split by album. Manga bonuses have not been included in the first two questions as at the time of this poll the 2nd Manga songs/dramas were being released so it would be unfair to add them to the poll.
BAT and DH order is written as such due to later stats in the poll where Doppo and Sasara were next to each other but their official colours were too similar so I used the order in Division All Stars songs rather than release order.
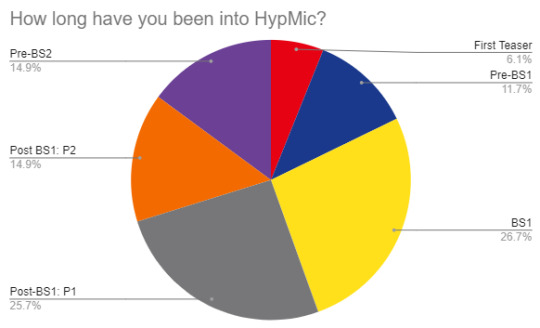
Pre-Season: Referring to the start of a battle season.
Battle Season: Referring to the battle/versus songs or dramatracks
1st Manga Bonus Songs: Songs that were included with the manga
DAS Songs: Division All Stars songs - songs that include the whole cast
Merch: Anything that is official HypMic merchandise or has content of HypMic. Plushies, nendoroids, magazines, stickers etc.


Shibuya Division: Fling Posse Drama Tracks and The Loneliness, Tears, and Hope of a Puppet are the most listened to drama tracks of their respective pre-season. Both belong to Fling Posse.
The debut drama tracks of Dotsuitare Honpo (Back Again, Partner) and Bad Ass Temple (The Heart’s Conviction Can’t Be Broken) were listened to less than the other debut drama tracks.
Yokohama Division: MAD TRIGGER CREW Drama Tracks and Chaser from the Past (Matenrou: Before the 2nd DRB) were the least listened to dramatracks of their respective phases of the pre-seasons.
The Champion album has the least listened to drama tracks (Testimony and Me Against the World).
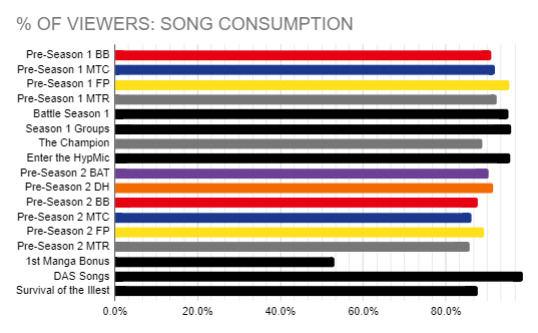
In all cases, the songs have all been listened to more than the respective drama tracks for their album.
The 1st Manga Bonus songs have not been listened as much as the other songs.
This can be due to the fact that these songs cannot be accessed for free legally.
The most listened to songs are the Division All Stars songs with the full cast.
This can be due to the fact that these are the only songs that are available in their entirety on YouTube.
Fling Posse has the most listened to songs of both pre-seasons.
Buster Bros!!! has the least listened to songs of the 1st pre-season and Matenrou has the least listened to songs of the 2nd pre-season.


The Hypnosis Mic -Division Rap Battle- side D.H & B.A.T manga was released as the poll was being conducted, so was not included in this poll.
-Before the Battle- The Dirty Dawg is the most read manga. -Division Rap Battle- side B.B & M.T.C is the least read manga.
By the numbers given for listening to the Spotify radio show, Hypnosis Radio, 80.4% of this sample size has listened to the radio - 19.6% have not listened to Hypnosis Radio.
Around half of the fandom has bought merch - this poll has included plushies, magazines etc. and all from official sources.
DEMOGRAPHICS
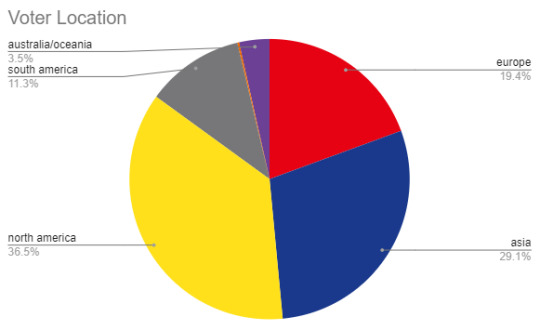

Due to the limitations of Google sheets, Africa does not show up on the chart for location as the voter percentage is too small.
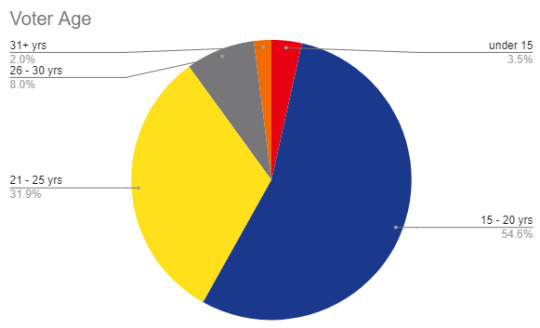
The age ranges used are of a similar range to those of Japanese polls. [ARB’s recent survey and the age demographics of Comic ZERO-SUM, publisher of the FP/M manga]
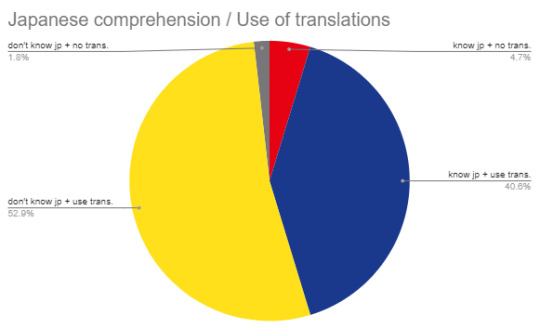
93.5% of voters use translations regardless of Japanese comprehension.
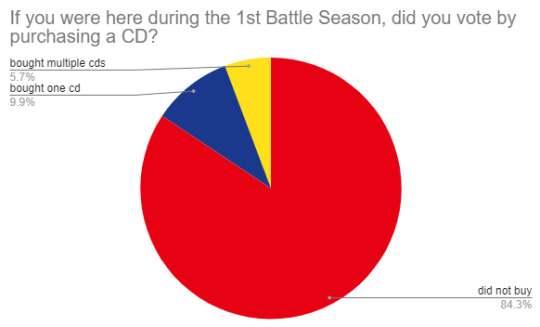

The option for ‘I bought multiple CDs’ refers to both different CDs and multiple of the same CD during the battle season.
Of those who were around for the Battle Season, 15.66% of this group did purchase a battle CD.
CHARACTER VOTING
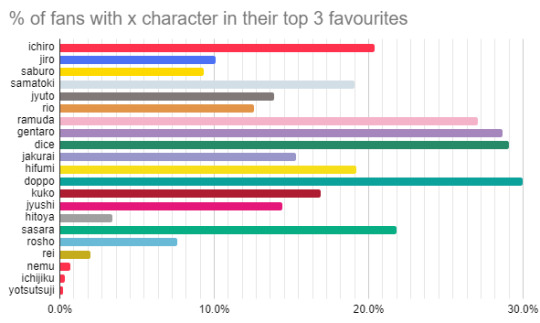
For comparison, here are the rankings from the previous poll (January 2020), From Japan (October 2018) and the Yumejoshi poll (December 2019)

Names marked in GREEN show an increase in vote percentage. Names in RED show a decrease in vote percentage. Names in BLACK show that their popularity rank has not changed. Names in BLUE show the character has been added to the polls through voter suggestion.
The arrow besides the names show if their rankings went up▲ or down▼. No markings are set if the character’s position has not changed.
1.2% of votes had a minor character as one of their favourite characters (Ichijiku, Nemu and Yotsutsuji - No other minor characters were suggested).
These polls vary in selection method as our polls looked at the top 3 votes of each character.
From Japan’s method has been stated as a poll but we were unable to find the original. Rio and Jiro’s reason for being unranked is unknown.
The Yumejoshi poll was done by people suggesting their favourite characters for rankings, meaning that it was not entirely based upon HypMic. What is shown here are those who ranked. The ranking in their picking of a 100 is listed against them.
These three polls have varying demographics. From Japan’s spread seems to be more broad, while the Yumejoshi poll is specifically yumejoshi/female. Our polls were taken only for English speakers. In addition to this, there is some bias based on who the poll was spread through followers.
For example, the poll was created by a Gentaro stan and main supporters of this poll are Dotsuitare Honpo stans.
Doppo dominates the polls in both English-speaking and the Japanese fandom.

Characters who received less than 1% of the votes are listed as other: Jiro (0.8%), Rio (0.9%), Rosho (0.2%), Rei (0.4%), Hitoya (0.5%)
Names marked in GREEN show an increase in their vote percentage. Names in RED show a decrease in vote percentage. Names in BLACK show that their popularity rank has not changed.
The arrow besides the names show if their rankings went up ▲ or down▼. No markings are set if the character’s position has not changed.

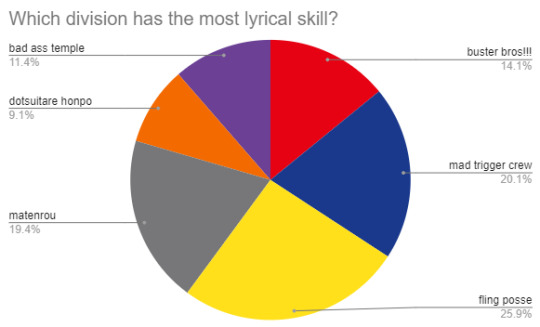
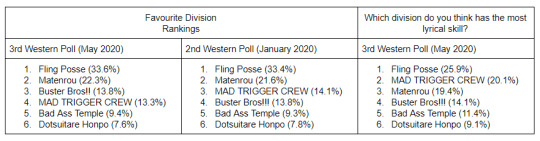
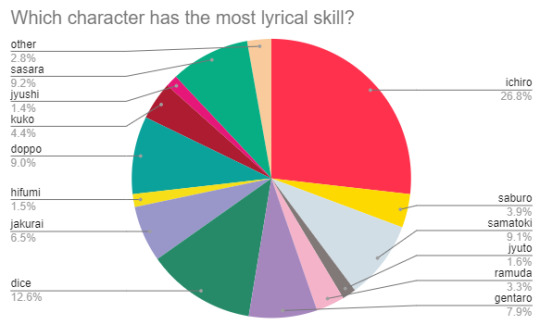
The only significant change in division rankings shows that Buster Bros!!! are now more popular than MAD TRIGGER CREW.
Dotsuitare Honpo is the lowest in both the favourite division rankings and perceived lyrical skill.
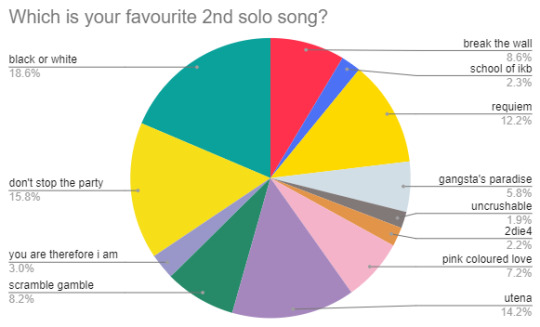
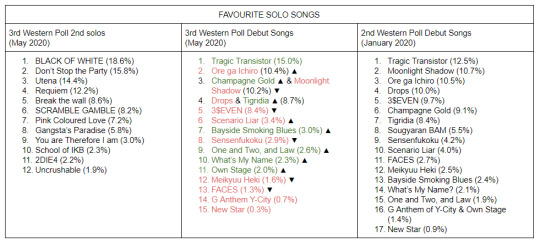
SONG VOTING

Songs marked in GREEN show an increase in vote percentage. Names in RED show a decrease in vote percentage. Names in BLACK show that their popularity rank has not changed. The arrow besides the names show if their rankings went up▲ or down▼. No markings are set if the character’s position has not changed.
Debut Songs: Songs that received less than 2% of the votes: New Star (0.3%), G Anthem Y-CITY (0.7%), Meikyuu Heki (1.6%), FACES (1.3%). These songs collectively had 3.9% of the vote.
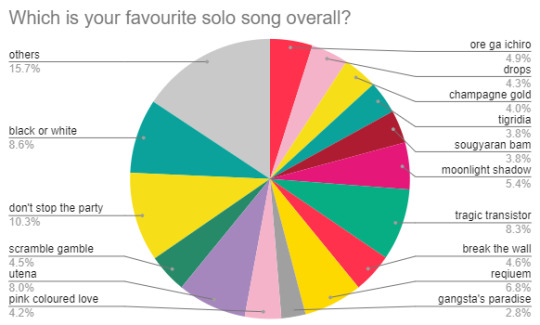
Songs that received less than 2% of the votes: Sensenfukoku (1.1%), New Star (0.1%), G Anthem of Y-City (0.8%), Bayside Smoking Blues (1.0%), What’s My Name (0.6%), Scenario Liar (1.3%), 3$EVEN (1.9%), Meikyuu Heki (0.5%), Own Stage (1.2%), FACES (0.6%), One and Two, and Law (1.1%), School of IKB (1.2%), Uncrushable (1.4%), 2Die4 (1.0%), You Are Therefore I am (1.9%)

Songs marked in GREEN show an increase in vote percentage. Names in RED show a decrease in vote percentage. Names in BLUE show that this song has been added for the poll.
The arrow besides the names show if their rankings went up ▲ or down ▼. No markings are set if the character’s position has not changed
BATTLE SEASON OPINIONS


BATTLE SEASON HOPES
For our final question, we asked “What are your hopes for this battle season? Any plot points, theories etc. that you want to mention.” This question was not required, but we received around 300 answers to this. We condensed the material into basic categories so you don’t have to sort through all 300.


Here are some choice points made about the plot:
What does Samatoki actually think Ichiro did to Nemu?
Could Saburo hack Ramuda?
How will Fling Posse react when they realise what Ramuda’s done to everyone else?
How do the other Ramuda clones interact with each other and everyone else
What if this is all Gentaro’s book?
What if Gentaro’s brother is the original Ramuda clone?
How are Chuo seen by other women?
Would Chuo rig the matches? Especially against Matenrou since their victory
What if they cloned someone else?
What if they reshuffled the divisions? Or added more divisions?
And here are a few funny comments before we go... just cause there were a few silly things added in that made us laugh. Yes, these are all as written.
Yo when is it gonna be confirmed that Ramuda has big top energy?
A song named "ALTERCATION ALTERCATION ALTERCATION"
I hope Rei gets his shit checked.
I'm a fictional doctor's wh o re so I'm rly in this for MTR at the moment sjfjskfkd I hope we get to hear how much the seiyuus have improved too compared to the first season!! :D
Doppo and Hifumi's wedding. Dice finally got some money. Everyone go on a hunt for emus. The 6 divisions go fishing. Rio making proper and digestible food. No more drama protecc ramuda.
I just kinda want them to kiss ngl
CHUUOKU DOWN! JUSTICE FOR ALL!!
i jokingly headcanon that gentaro cant read but i kinda hope its true. also i want sasara and ramuda to interact i think itd be kinda epic
I want Ramuda reduced to scrap metal
- - - - - - - - - - -
And that is it! After a month of work on this, we’ve got some estimates for general fandom opinions. Do you agree with the general opinions, or disagree? Let us know!
Here are the links to the aforementioned polls from before:
2nd Western Fandom Poll: https://twitter.com/DevsPallas/status/1213842101605150721
From Japan: https://blog.fromjapan.co.jp/en/anime/hypnosis-mic-division-ranking-result.html
Yumejo: https://note.com/yumejo/n/nca7de3e94d91
Comic ZERO-SUM readership: https://www.comipress.com/article/2008/06/25/3603.html
#hypnosis mic#hypmic#hypmic western fandom poll#doppo kannonzaka#dice arisugawa#gentaro yumeno#ramuda amemura#sasara nurude#ichiro yamada#hifumi izanami#samatoki aohitsugi#kuko harai#jakurai jinguji#jyushi aimono#jyuto iruma#rio mason busujima#jiro yamada#saburo yamada#rosho tsutsujimori#hitoya amaguni#rei amayado#nemu aohitsugi#ichijiku kadenokouji#yotsutsuji kannabi#mod thia#mod kori
49 notes
·
View notes
Text
BEAMSCORING’S CODE OF POINTS - BEAM
And here is the final piece of my changes to the code of points, my current namesake - the balance beam. Reminder that I am always open to questions, both about this changes I made and about the code in general - I never considered myself that knowledgeable but I am always willing to share what I do know if you feel like I could help! I am saying this now because beam is the longest section in my file, which I just noticed lol, so if it seems hard to follow (because I ramble and also assume people are smarter than me), let me know!
FLOOR / VAULT / BARS
CV:
all CV can include mount (except holds) and dismount
Flight Acro: 0.1 for C+C, forward B+C, and D+B in this order, 0.2 for forward B+D (dismount ineligible) and C+D, 0.3 for C+F and D+D (both elements must be salto or aerial for 0.3)
all connections must be rebounding in one direction
examples: side aerial + back handspring = D+B in order = 0.1 CV / front handspring + front 2/1 dismount = forward B+D, dismount = 0.1 CV (ineligible for 0.2) / layout stepout + tucked arabian = C+F, both saltos = 0.3
Dance: 0.1 for C+C and 0.2 for D+D
Turns: 0.1 for A+C
Mixed Connections: non-flight acro elements are eligible for mixed connections with both dance and flight acro elements
0.1 for B+D and C+C, 0.2 for C+E and D+D
example = valdez + sheep jump = non-flight acro B + dance D = 0.1 CV
Series Bonus: SB can include mount and dismount; 0.1 for B+B+C and 0.2 for B+B+F, C+C+D and B+B+C+C
only two series per routine can be awarded SB; series are awarded SB in order of performance even if not in the gymnast's best interest
CR and Routine Composition:
Routines count the 8 most difficult elements for the D-score and must fulfill composition requirements, which are worth 0.5 D each
CR 1: one full turn element
CR 2: one backward flight acro element and one forward/sideward flight acro element, at least one of which without hand support (salto or aerial)
CR 3: one connection of two flight acro elements, with rebounding action in one direction, one of which of at least C value (hand support allowed) [Commentary: yes, this means the acro series does not require a salto anymore. I don’t mind conceding that as long as acro series are always rebounding instead of, like, the two side aerials crap we still get even from beloved angels like Sanne.]
CR 4: one connection of two leap or jump elements
not showing a cross split and one other different leap or jump shape is a 0.3 D penalty
the dismount is always one of the eight counting elements in routine composition regardless of its value
at least three counting elements must be acro, and at least three counting elements must be dance
Rules and Observations:
no element can be repeated in different connections for CV, including round-offs and handsprings; however, any element can be repeated up to three times in the same connection for CV
examples: a back handspring can only be used in one connection for CV; three layout stepouts can be connected to each other and each connection will receive CV
Mount restriction: an element cannot be performed twice, once as the mount and once on the beam, for DV, CR and CV/SB, except the back handspring mount; does not apply to mounts with no clear on-beam counterpart
example: front tuck mount is performed; a front tuck cannot be performed on beam for value / side aerial over beam to front support mount is performed; a side aerial can still be performed on beam for value, as the mount is not a true counterpart
Shapes in Leaps/Jumps: any element that fulfills more than one shape only counts as one shape for the requirement, but either shape presented can be counted for the benefit of the gymnast
example: switch ring + split jump 1/2 = ring + cross split = requirement fulfilled; switch ring + straddle jump = cross split + side split = requirement fulfilled
Leaps and jumps with cross or side split and/or ring are now only allowed to have twists before the split and/or the ring shape is achieved
Leaps and jumps with the same shape are no longer distinct elements and cannot both be performed in the same routine for DV, CR and CV
example: split leap and split jump are now the same element
Removal of the E cap on the DV of dance elements
Element Upgrades, Downgrades, Removals and (Re)introductions:
Leaps and Jumps
arch jump added as A [Commentary: I added this one back solely so there is something to downgrade the sheep jump to. Currently, judges are supposed to not recognize it as an element when it's bad, but that never happens, so they just made it a C. Why be like that when you can reasonably threaten bad sheeps with an A?]
split leap/jump from B to A [Commentary: I was convinced by @cut-catches to put the split leap/jump below the switch leap on beam basically one hour before posting this. I actually don’t know how routines would be composed without the split jump as a B, since that was so convenient and I didn’t try to actually compose a routine without it . But I am sure it’s manageable. There are 9 other B dance elements, not even counting the switch leap itself lol]
switch wolf hop/jump from A to B
switch leap from C to B
double stag jump added as B
stag ring jump from B to C
L hop 1/2 from B to C
straddle jump in side position to front support added as C [Commentary: You know this one! It’s the one Ekaterina Lobaznyuk fell on in the Sydney TF!! We need it back]
sheep jump from C to D
switch ring from E to D
straddle jump 1/2 in side position to front support added as D
yang bo from D to E
split jump 1/1 from D to E (same element as split leap 1/1)
straddle jump 1/1 from D to E
straddle jump 1/1 in side position to front support added as E
Turns
wolf turn from B to A
1.5 wolf turn from C to B
prone turn from B to C
double wolf turn from D to C
1.5 prone turn from B to D
triple turn from E to F
wolf and tuck turns now considered the same element
Non-Flight Acrobatic
scales can be performed in balance stand for a one letter increase; this is not a different element (but all different scales - needle scale, scale forward and scale with leg upward - are now each a different element rather than the same element)
rise up body wave to toe balance stand from A to B
standing body waves added, to both legs as A and to one leg as B
one-arm cartwheel from A to B
scale backward with leg extended added as C
side split sit to side split roll from C to D
front walkover in side position from C to D
back walkover in side position from C to D
Flight Acro
front handspring stepout, one arm front handspring and one arm front handspring stepout added as B (differentiated from front handspring)
one arm round-off added as B (differentiated from round-off)
one arm back handspring added as B (differentiated from back handspring)
one arm back handspring stepout added as B (differentiated from back handspring stepout)
one arm gainer back handspring added as B (differentiated from gainer back handspring)
[Commentary: All of this handspring differentation has to do with the whole “you can’t use an element in more than one connection rule” I made up. If people need back handsprings so much, they can do them with one arm now. But really, I could have not done this and just let them manage just having three bhs options. I am open to suggestions here. I just want to do something about people tacking back handsprings after like every element lol.]
back pike (and gainer) from C to D
back handspring with 1/2 twist after flight from C to D
yurchenko loop from C to D
tucked aerial round-off removed from code
one-arm onodi from D to E
rulfova (and gainer) from D to E
back handspring 1/1 (and gainer) from D to E (twisting must be fully completed before hand support)
back handspring in side position from D to E
kolesnikova (back handspring 1/2 to handstand in side position) from D to E
back layout from E to F
teza loop from E to F
front tuck 1/2 added as F
front pike 1/2 added as G
side aerial in side position from E to G
back layout 1/1 from G to H
all acro elements that have the same amount of twists in the same shape (example: front tuck 1/2 and 1/2 twist to back tuck) are now merged in the same element
Mounts
All mount versions of of elements on the beam are valued one letter above the on-beam counterpart; some of the changes below follow the changes to the elements above
front handspring over beam to rear support from B to C
switch leap from D to C
rear jump to candle from D to C
back handspring from D to C
baitova mount (two flanks one flare) from C to D
neck stand 1.5 to chest stand from C to D
press handstand 1.5 from C to D
pike handstand to front handspring from C to D
reverse planche from C to D
front/side aerial over beam to rear/front support from C to D
layout stepout from E to D
back tuck from E to D
onodi from F to E
phillips (side handstand to front walkover) from D to E
front tuck from D to E
front pike from E to F
zamolodchikova (round-off, back handspring 1/1 to hip circle backward) from E to F
back handspring 1/1 from E to F (twisting must be fully completed before hand support)
rulfova from D to F
back tuck 1/1 from F to G
back layout from F to G
front tuck 1/2 from F to G
front pike 1/2 from F to H
back layout 1/1 from G to I
Dismounts
cartwheel to stand (and 1/2) added as A
cartwheel to 1/1 and 1.5 twist added as B
front aerial (and 1/2) from A to B
back tuck 1.5 from C to B
front aerial 1/1 from B to C
cartwheel to back tuck added as C
cartwheel to back pike added as D
front aerial 1.5 from C to D
gainer back 2/1 to side of beam from C to D
gainer pike 1/1 to end of beam added as D [Commentary: Currently, the code explicitly tells judges to recognize piked attempts at the layout 1/1 as a layout and deduct for shape, which... no. That was a pike 1/1, the end]
front 1.5 from C to D
front 2/1 from D to E
back 2.5 from D to E
gainer layout 1/1 to end of beam from D to E
side aerial to back tuck from E to F
double tuck 1/1 from G to F
gainer back 3/1 to side of beam from F to G
tucked double front from F to G [Commentary: Maybe an H?]
gainer layout 2/1 to end of beam from E to G
13 notes
·
View notes
Text
Decision Tree
data source: the example used in the class :
The National Longitudinal Study of Adolescent Health (AddHealth) is a representative school-based survey of adolescents in grades 7-12 in the United States. The Wave 1 survey focuses on factors that may influence adolescents’ health and risk behaviors, including personal traits, families, friendships, romantic relationships, peer groups, schools, neighborhoods, and communities. Check out the AddHealth Code Book Index to see a list of the topics addressed in each codebook section.
I use IPython to run a decision tree and my codes are as follows:
# from pandas import Series, DataFrame
import pandas as pd
import numpy as np
import os
import matplotlib.pylab as plt
from sklearn.model_selection import train_test_split
from sklearn.tree import DecisionTreeClassifier
from sklearn.metrics import classification_report
import sklearn.metrics
#we first import all the packages that are necessary for the tree
#Load the dataset
AH_data = pd.read_csv("tree_addhealth.csv")
data_clean = AH_data.dropna() #clean all the None values in the data set
#type ‘data_clean.dtypes’ to see the data types of the variables like float or int
"""
Modeling and Prediction
"""
#Split into training and testing sets
predictors = data_clean[['BIO_SEX','WHITE']] #here I am only interested in the relation between the target variable, sex and Skin colour
targets = data_clean.TREG1 # TREG1=0 for non-regular smoker and 1 for regular smoker
pred_train, pred_test, tar_train, tar_test = train_test_split(predictors, targets, test_size=.5) #size = 0.5 implies I will use half of the data set for training and another half for testing
print(pred_train.shape)
print(pred_test.shape)
print(tar_train.shape)
print(tar_test.shape) #print out the dimensions of the training and testing data sets
output:
(2287, 2) (2288, 2) (2287,) (2288,)
#Build model on training data
classifier=DecisionTreeClassifier()
classifier=classifier.fit(pred_train,tar_train)
predictions=classifier.predict(pred_test)
print(sklearn.metrics.confusion_matrix(tar_test,predictions)) #print out the array to show the numbers of correct and incorrect prediction
sklearn.metrics.accuracy_score(tar_test, predictions) #accuracy rate (the correct prediction number divided by total number of prediction)
output:
[[1889 0] [ 399 0]]
0.8256118881118881
#Displaying the decision tree
from sklearn import tree
from io import StringIO
from IPython.display import Image
out = StringIO()
tree.export_graphviz(classifier, out_file=out)
import pydotplus
graph=pydotplus.graph_from_dot_data(out.getvalue())
Image(graph.create_png())
output:
The accuracy rate is 82.56% which means out of 100 prediction case, about 82 of them are predicted correctly.
Skin colour is the first variable to separate the sample into two groups. 734 of them are non-white people (X[1]=0) and 1553 of them are white people (X[1]=1).
Among the non-white people, 669 of them are non-regular smokers and 65 of them are regular smokers. About 65/734=8.855% of them smoke frequently. Then sex(X[0]) further separates this subgroup into two smaller subgroup. We can see that 30/345=8.7% of non-white girls(X[0]=1) and 35/389=9.88% of non-white boys(X[0]=2) are regular smokers.
Among the white people, about 336/1553=21.64% of them are regular smokers. Then sex(X[0]) further separates this subgroup into two smaller subgroup. We can see that 177/766=23.1% of white girls(X[0]=1) and 159/787=20.2% of white boys(X[0]=2) are regular smokers.
we may conclude that the students with white skin have a higher rate to be regular smokers. Boys and girls have very close rates to smoke frequently.
1 note
·
View note
Text
CSGO RANKED ACCOUNT CORSAIR
CSGO Ranked Accounts Corsair Settings:
Weapons are one of the most critical in-game elements for shooter players. CSGO Ranked Accounts is no exception, because players use different weapons in various situations to achieve success. But it is not enough to choose the right rifle; you also need to set your crosshair correctly, doing this will be a great advantage over your competitors.
In CSGO Ranked Accounts, you can customize your crosshair in several different ways:
Settings
Console / Configuration
Plus sign replacement maps
All options have their advantages and disadvantages. In this article, we will consider the pros and cons of each option.
Changing Your Plus Sign via Settings
The easiest way to customize your crosshair is to do it using the settings. Developers can make your image in a variety of colors, sizes, dynamic styles, etc. Allows you to replace it with. Follow this path to find out:
Open the CS: GO app
Choose Game Settings
Choose the plus sign
Change the Plus Sign via Settings
You can upgrade your crosshair with different features and see the result in the preview window above the settings. You can change the preview map and share or import your new crosshair. Easy to customize through settings:
Plus Style: - choose from five different plus sign presets with options predefined by the developers.
Central Point: the small dot in the center of vision helps someone aim.
Length: the indicator of the length of your crosshair, from 0.1 (small) to 10 (large).
Thickness: index of how wide the vision will be from 0.1 (thin) to 6 (very wide).
Space: thanks to this feature, you can choose how close the lines of sight will be to each other. The score is -5 (very close) and 5 (very far).
Outline: black outline around the plus sign. You can turn it on or off and choose from an index between 0 (thin) and 3 (wide).
Red / Green / Blue: color indexes, play with these features to find the best color for you. Change from 0 to 250.
Alpha: this is the index of the transparency of the plus sign, you can turn it on and off. Change the alpha value from 0 (invisible) to 255 (clearly visible).
Split Distance: you can adjust the dynamic viewing magnification with this indicator. It starts from 0 (minimum) to 16 (too large).
Internal Split Alpha: with this parameter you can change the transparency of the interior of your dynamic crosshair. It starts from 0 (invisible) to 1 (clearly visible).
Outer Split Alpha - with this parameter you can change the transparency of the outer part of your dynamic crosshair. It starts from 0 (invisible) to 1 (clearly visible)
Split Aspect Ratio - options that allow you to change the partition size between the inner and outer parts of your dynamic crosshair. It starts with 0 (undivided) and 1 (maximum value of the split dimension).
T Style: select the terrorist style of the crosshair, it will delete the top line of the sight.
Weapon Spacebar displayed: with this feature your crosshair will be dynamic according to the weapon you are currently using.
You can customize your crosshair in many different ways to enjoy various results, but there is only one way to upgrade your CS: GO inventory. Find the most popular CS: GO skins at the best prices on the DMarket Marketplace.
Replace Crosshair with Console and CFG
For those who want to deeply customize their in-game settings, CS: GO has a developer console and cfg files. The console offers the possibility to change a large number of settings, including vision adjustment. To use the console, open it by pressing ~; If nothing happens after pressing the button, enable the console in the game settings.
Select Game Settings and select yes in the Enable Developer Console section.
We have prepared a few commands to help you understand the basic idea of this option. If you want to find all CS: GO plus console commands, visit our powerful guide Full CS: GO Console Commands List.
Crosshair Console Commands:
cl_crosshairstyle 1 - static default style
cl_crosshairstyle 3 - classic plus with dynamic features
cl_crosshaircolor 0 - red
cl_crosshairsize 0.5 - the size of the plus sign
cl_crosshairgap 1 - the size of the central cavity. Add your own value to make it bigger or smaller
cl_crosshairdot 1 - for the middle of the plus sign. With this command and cl_crosshairsize 0, there will be a plus sign on the screen
plus console commands
Another way to change the view is to add specific commands to the game file configuration. The instruction is here:
CREATE A TXT FILE
Add console commands to your txt file
Save your txt file as autoexec.cfg
Save .cfg files to your folder
Program Files\Steam\userdata[your Steam ID]\730\local\cfg\
or in some cases -
Program Files\Steam\steamapps\common\Counter-Strike Global Offensive\csgo\cfg
Find out more information about config files and autoexe.cfg in our simple guide How to create CFG in CS:GO.
Here’s an example of the difference between console and cfg commands:
Console command cl_crosshairstyle 1
CFG command cl_crosshairstyle “1”
Config of a Professional Player (Astralis - Xyp9x):
cl_crosshairalpha “200”;
cl_crosshaircolor “1”;
cl_crosshaircolor_b “50”;
cl_crosshaircolor_r “250”;
cl_crosshaircolor_g “250”;
cl_crosshairdot “0”;
cl_crosshair_t “0”;
cl_crosshairgap “-1”;
We collected the cfg and console commands of the most PRO CS:GO players.
Crosshair Changer Maps
The last way to change the opinion is done with plus signs. There are maps that allow you to try lots of different sights directly in the game.
This is the most popular map to change views - crashz ‘Crosshair Generator v3
Here you can download Crashz ‘Crosshair Generator v3.
The player is equipped with an extensive list of professional cyber athletes. Any settings can be checked immediately in any game, on any map, against any opponent.
To choose any scope or change its settings, you must first arm your virtual hero. After choosing a weapon, shoot with the desired sight or modification.
Your vision will change immediately. Try to shoot targets at any map and determine if this scope is right for you. After leaving the map, the last used opinion remains the board.
Default CS: GO Plus Indicator
The standard CS: GO viewing angle has a big cross with a dot in the middle. When shooting, the image changes dynamically and shows the estimated projectile spread area. There are two ways to load a default CS: GO plus sign
Default Crosshair Style via Settings
defauld csgo crosshair
CS:GO Default Settings Crosshair via CFG/Console
cl_crosshairalpha “200”
cl_crosshaircolor “5”
cl_crosshaircolor_b “50”
cl_crosshaircolor_r “50”
cl_crosshaircolor_g “250”
cl_crosshairdot “0”
cl_crosshairgap “0”
cl_crosshairsize “5”
cl_crosshairstyle “4”
cl_crosshairusealpha “1”
cl_crosshairthickness “0.5”
cl_fixedcrosshairgap “0”
cl_crosshair_outlinethickness “0”
cl_crosshair_drawoutline “0”
2 notes
·
View notes
Photo

Pomegranate Martini Prep Time 5 mins Total Time 5 mins Ingredients 250 ml (1 cup) fresh pomegranate juice 125 ml (0.5 cup) vodka 125 ml (0.5 cup) orange liqueur Juice of half a lime For garnish - Sugar Seeds from half a pomegranate, chilled Instructions Mix together the pomegranate juice, vodka, orange liqueur lime juice in a small pitcher and chill in a refrigerator till needed. Dip gals rim in water and dip wet rim in sugar to decorate glasses (optional) Pour into prepared martini glasses, garnish with pomegranate and serve. *Tips For The Perfect Pomegranate Martini Recipe Choose a good vodka to make your Pomegranate Martini. For something a little different use a flavoured vodka e.g. orange vodka or raspberry vodka. This recipe used Cointreau but you can easily use Triple Sec instead. Depending on your taste buds you can use gin instead of vodka in your Martini. The Pomegranate Martini is best served cold, If you don’t have enough time to chill it properly, then try freezing it for 5-10 mins before serving. Chill your garnishes so that the drink stays cold when you add them in. *How To Juice A Pomegranate You might want to start your Martini Cocktail with your very own homemade pomegranate juice, in which case you need to know how to juice a pomegranate. Step 1. Split the pomegranate into quarters and add these to a bowl of water. Step 2. The using your fingers remove the seeds from each section (and the pith) into the water. The seeds will sink to the bottom and the pith will float to the top. Discard the pith and the pomegranate peel. Step 3. Drain the pomegranate seeds using a sieve and remove any remaining pith. Step 4. Add the pomegranate seeds to a blender and pulse for a few goes so that the seeds release their juices. Step 5. Decant the pomegranate seeds into a sieve set over a bowl and using the back of a spoon squeeze the seeds to extract the juice. Step 6. Discard the pomegranate seed pulp and use the juice as desired.
2 notes
·
View notes
Text
how work percentages calculator
how work percentages calculator
Hello dear friends, thank you for choosing us. In this post on the solsarin site, we will talk about “ how work percentages calculator “.
Stay with us.
Thank you for your choice.
Percentage Calculator in Common Phrases
In mathematics, a percentage is a number or ratio that represents a fraction of 100. It is often denoted by the symbol “%” or simply as “percent” or “pct.” For example, 35% is equivalent to the decimal 0.35, or the fraction
35
100
.
Percentage Formula
Although the percentage formula can be written in different forms, it is essentially an algebraic equation involving three values.
P × V1 = V2
P is the percentage, V1 is the first value that the percentage will modify, and V2 is the result of the percentage operating on V1. The calculator provided automatically converts the input percentage into a decimal to compute the solution. However, if solving for the percentage, the value returned will be the actual percentage, not its decimal representation.
EX: P × 30 = 1.5
P =1.5
30
= 0.05 × 100 = 5%
If solving manually, the formula requires the percentage in decimal form, so the solution for P needs to be multiplied by 100 in order to convert it to a percent. This is essentially what the calculator above does, except that it accepts inputs in percent rather than decimal form.
Percentage Difference Formula
The percentage difference between two values is calculated by dividing the absolute value of the difference between two numbers by the average of those two numbers. Multiplying the result by 100 will yield the solution in percent, rather than decimal form. Refer to the equation below for clarification.
Percentage Difference =|V
1
– V
2
|
(V
1
+ V
2
)/2
× 100
EX:|10 – 6|
(10 + 6)/2
=4
8
= 0.5 = 50%
Percentage Change Formula
Percentage increase and decrease are calculated by computing the difference between two values and comparing that difference to the initial value. Mathematically, this involves using the absolute value of the difference between two values, and dividing the result by the initial value, essentially calculating how much the initial value has changed.
The percentage increase calculator above computes an increase or decrease of a specific percentage of the input number. It basically involves converting a percent into its decimal equivalent, and either subtracting (decrease) or adding (increase) the decimal equivalent from and to 1, respectively. Multiplying the original number by this value will result in either an increase or decrease of the number by the given percent. Refer to the example below for clarification.
EX: 500 increased by 10% (0.1)
500 × (1 + 0.1) = 550
500 decreased by 10%
500 × (1 – 0.1) = 450
How to Calculate Percentages
By Ashley Watters, Abshier House
Calculating percentages can be an easy task. There are numerous percentage calculators online that can help with task by simply searching for “percentage calculator.” However, there may be a time when (however, unlikely it sounds) you may need to be able to calculate percentages without any digital assistance.
Before you can calculate a percentage, you should first understand exactly what a percentage is.
The word percentage comes from the word percent. If you split the word percent into its root words, you see “per” and “cent.” Cent is an old European word with French, Latin, and Italian origins meaning “hundred”. So, percent is translated directly to “per hundred.” If you have 87 percent, you literally have 87 per 100. If it snowed 13 times in the last 100 days, it snowed 13 percent of the time.
The numbers that you will be converting into percentages can be given to you in 2 different formats, decimal and fraction. Decimal format is easier to calculate into a percentage. Converting a decimal to a percentage is as simple as multiplying it by 100. To convert .87 to a percent, simply multiple .87 by 100.
.87 × 100=87
Thus, resulting in 87 percent.
Percent is often abbreviated with the % symbol. Presenting your answer as 87% or 87 percent is acceptable.
given a fraction
If you are given a fraction, convert it to a percentage by dividing the top number by the bottom number. If you are given 13/100, you would divide 13 by 100.
13 ÷ 100 = .13
Then, follow the steps above for converting a decimal to a percent.
.13 × 100 = 13
Thus getting 13%.
The more difficult task comes when you need to know a percentage when you are given numbers that don’t fit so neatly into 100.
Most of the time, you will be given a percentage of a given number. For example, you may know that 40 percent of your paycheck will go to taxes and you want to find out how much money that is. To calculate the percentage of a specific number, you first convert the percentage number to a decimal.
This process is the reverse of what you did earlier. You divide your percentage by 100. So, 40% would be 40 divided by 100 or .40.
40 ÷ 100 = .40
Once you have the decimal version of your percentage, simply multiply it by the given number. In this case, the amount of your paycheck. If your paycheck is $750, you would multiply 750 by .40.
750 × .40 = 300
Your answer would be 300. You are paying $300 in taxes.
Let’s try another example. You need to save 25 percent of your paycheck for the next 6 months to pay for an upcoming vacation. If your paycheck is $1500, how much should you save?
Start by converting 25 percent to a decimal.
25 ÷ 100 = .25
Now, multiply the decimal by the amount of your paycheck, or 1500.
1500 × .25 = 375
You need to save $375 from each paycheck.
How To Calculate Percentage, Percentage Change and Percentage Difference
Knowing how to calculate the percentage of a number is a fundamental component of many aspects of life. For example, you may need to know how to calculate percentage to make a car payment or determine the down payment for a home.
Percentage calculations are also important in business and are used in various professional settings, such as when calculating taxes or employee raises. In this article, we explore what a percentage is, how to calculate different components of a percentage and the types of percentages.
What is percentage?
Percentage, which may also be referred to as percent, is a fraction of a number out of 100%. Percentage means “per one hundred” and denotes a piece of a total amount.
For example, 45% represents 45 out of 100, or 45 percent of the total amount.
Percentage may also be referred to as “out of 100” or “for every 100.”
For example, you could say either “it snowed 20 days out of every 100 days” or you could say “it snowed 20% of the time.”
A percentage may be written in a few different ways. One way to write or denote a percentage is to portray it as a decimal.
For example, 24% could also be written as .24. You can find the decimal version of a percent by dividing the percentage by 100. A percent can also be depicted by using a percent sign or “%.”
How to calculate percentage
There are a few different ways that a percentage can be calculated. The following formula is a common strategy used to calculate the percentage of something:
1. Determine the whole or total amount of what you want to find a percentage for
For example, if you want to calculate the percentage of how many days it rained in a month, you would use the number of days in that month as the total amount. So, let’s say we are evaluating the amount of rain during the month of April, which has 30 days.
2. Divide the number that you wish to determine the percentage for
Using the example above, let’s say that it rained 15 days out of the 30 days in April. You would divide 15 by 30, which equals 0.5.
3. Multiply the value from step two by 100
Continuing with the above example, you would multiply 0.5 by 100. This equals 50, which would give you the answer of 50%. So, in April, it rained 50% of the time.
Types of percentage problems
There are three main types of percentage problems you might encounter in both personal and professional settings. These include:
Finding the ending number
Finding the percentage
Finding the starting number
1. Finding the ending number
The following is an example of a question that would require you to use a percentage calculation to find the ending number in a problem: “What is 50% of 25?” For this problem, you already have both the percentage and the whole amount that you want to find a percentage of.
So, you would move to the second step as listed in the previous section. However, since you already have the percentage, instead of dividing you will want to multiply the percentage by the whole number. For this equation, you would multiple 50%, or 0.5, by 25. This gives you an answer of 12.5. Thus, the answer to this percentage problem would be “12.5 is 50% of 25.”
2. Finding the percentage
For a percentage problem in which you need to find the percentage, a question may be posed as the following: “What percent of 5 is 2?” In this example, you will need to determine in a percentage how much of 2 is part of the whole of 5. For this type of problem, you can simply divide the number that you want to turn into a percentage by the whole. So, using this example, you would divide 2 by 5. This equation would give you 0.4. You would then multiply 0.4 by 100 to get 40, or 40%. Thus, 2 is equal to 40% of 5.
3. Finding the starting number
A percentage problem that asks you to find the starting number may look like the following: “45% of what is 2?” This is typically a more difficult equation but can easily be solved using the previously mentioned formula. For this type of percentage problem, you would want to divide the whole by the percentage given. Using the example of “45% of what is 2?”, you would divide 2 by 45% or .45. This would give you 4.4, which means that 2 is 45% of 4.4.
Random Posts
what percent of alcohol is in heineken beer
how to work out percentages on scientific calculator
how many percentage of pure water is on earth
how much alcohol is in budweiser chelada
how to find percentage decrease calculator
Calculator
An electronic calculator is typically a portable electronic device used to perform calculations, ranging from basic arithmetic to complex mathematics.
resource: wikipedia
0 notes
Text
Assignment, Week4
# Code:
import pandas
import numpy
import seaborn
import matplotlib.pyplot as plt
nesarc = pandas.read_csv ('nesarc_pds.csv' , low_memory=False) # load NESARC dataset
#Set PANDAS to show all columns in DataFrame
pandas.set_option('display.max_columns', None)
#Set PANDAS to show all rows in DataFrame
pandas.set_option('display.max_rows', None)
nesarc.columns = map(str.upper , nesarc.columns)
pandas.set_option('display.float_format' , lambda x:'%f'%x)
# Change my variables to numeric
nesarc['AGE'] = nesarc['AGE'].convert_objects(convert_numeric=True)
nesarc['S3BQ4'] = nesarc['S3BQ4'].convert_objects(convert_numeric=True)
nesarc['S3BQ1A5'] = nesarc['S3BQ1A5'].convert_objects(convert_numeric=True)
nesarc['S3BD5Q2B'] = nesarc['S3BD5Q2B'].convert_objects(convert_numeric=True)
nesarc['S3BD5Q2E'] = nesarc['S3BD5Q2E'].convert_objects(convert_numeric=True)
nesarc['MAJORDEP12'] = nesarc['MAJORDEP12'].convert_objects(convert_numeric=True)
nesarc['GENAXDX12'] = nesarc['GENAXDX12'].convert_objects(convert_numeric=True)
subset1 = nesarc[(nesarc['AGE']>=18) & (nesarc['AGE']<=30) & (nesarc['S3BD5Q2B']==3) & (nesarc['S3BQ1A5']==1)] # Cannabis users both last 12 months and prior, ages 18-30
subsetc1 = subset1.copy()
subset2 = nesarc[(nesarc['AGE']>=18) & (nesarc['AGE']<=30) & (nesarc['S3BQ1A5']==2)] # Non-users, ages 18-30
subsetc2 = subset2.copy()
subset3 = nesarc[(nesarc['AGE']>=18) & (nesarc['AGE']<=30)] # Ages 18-30
subsetc3 = subset3.copy()
subset5 = nesarc[(nesarc['AGE']>=18) & (nesarc['AGE']<=30) & (nesarc['S3BQ1A5']==1)] # Cannabis users, ages 18-30
subsetc5 = subset5.copy()
# Frequency distributions of variables (groupby function) of the entire sample
print("Counts for cannabis use, variable S3BQ1A5 - Section 3B")
cu1 = nesarc.groupby('S3BQ1A5').size() # Cannabis use counts
print(cu1)
print("Percentages for cannabis use, variable S3BQ1A5 - Section 3B")
cu2 = nesarc.groupby('S3BQ1A5').size() * 100 / len(nesarc) # Cannabis use percentages
print(cu2)
print("Counts for used cannabis in the last 12 months/prior to last 12 months/both time periods, variable S3BD5Q2B - Section 3B")
uc1 = nesarc.groupby('S3BD5Q2B').size() # Used cannabis time periods counts
print(uc1)
print("Percentages for used cannabis in the last 12 months/prior to last 12 months/both time periods, S3BD5Q2B - Section 3B")
uc2 = nesarc.groupby('S3BD5Q2B').size() * 100 / len(nesarc) # Used cannabis time periods percentages
print(uc2)
nesarc.loc[(nesarc['S3BQ1A5']!=1) & (nesarc['S3BD5Q2E'].isnull()), 'S3BD5Q2E'] = 11
print("Counts for frequency of used cannabis when using the most, variable S3BD5Q2E - Section 3B")
fuc1 = nesarc.groupby('S3BD5Q2E').size() # Frequency of used cannabis counts
print(fuc1)
print("Percentages for frequency of used cannabis when using the most, variable S3BD5Q2E - Section 3B")
fuc2 = nesarc.groupby('S3BD5Q2E').size() * 100 / len(nesarc) # Frequency of used cannabis percentages
print(fuc2)
print("Counts for non-hierarchical major depression diagnoses in last 12 months, variable MAJORDEP12 - Section 14")
md1 = nesarc.groupby('MAJORDEP12').size() # Major depression diagnoses counts
print(md1)
print("Percentages for non-hierarchical major depression diagnoses in last 12 months, variable MAJORDEP12 - Section 14")
md2 = nesarc.groupby('MAJORDEP12').size() * 100 / len(nesarc) # Major depression diagnoses percentages
print(md2)
print("Counts for non-hierarchical generalized anxiety diagnoses in last 12 months, variable GENAXDX12 - Section 14")
ga1 = nesarc.groupby('GENAXDX12').size() # Generalized anxiety diagnoses counts
print(ga1)
print("Percentages for non-hierarchical generalized anxiety diagnoses in last 12 months, variable GENAXDX12 - Section 14")
ga2 = nesarc.groupby('GENAXDX12').size() * 100 / len(nesarc) # Generalized anxiety diagnoses percentages
print(ga2)
# Frequency distributions of major depression and general anxiety diagnoses variables for both last 12 months and prior cannabis users, ages 18-30 (subset1)
print("Counts for non-hierarchical major depression diagnoses in last 12 months (both last 12 months and prior cannabis users, ages 18-30), variable MAJORDEP12 - Section 14")
mdu1 = subsetc1.groupby('MAJORDEP12').size() # Major depression diagnoses counts (subset1)
print(mdu1)
print("Percentages for non-hierarchical major depression diagnoses in last 12 months (both last 12 months and prior cannabis users, ages 18-30), variable MAJORDEP12 - Section 14")
mdu2 = subsetc1.groupby('MAJORDEP12').size() * 100 / len(subsetc1) # Major depression diagnoses percentages (subset1)
print(mdu2)
print("Counts for non-hierarchical generalized anxiety diagnoses in last 12 months (both last 12 months and prior cannabis users, ages 18-30), variable GENAXDX12 - Section 14")
gau1 = subsetc1.groupby('GENAXDX12').size() # Generalized anxiety diagnoses counts (subset1)
print(gau1)
print("Percentages for non-hierarchical generalized anxiety diagnoses in last 12 months (both last 12 months and prior cannabis users, ages 18-30), variable GENAXDX12 - Section 14")
gau2 = subsetc1.groupby('GENAXDX12').size() * 100 / len(subsetc1) # Generalized anxiety diagnoses percentages (subset1)
print(gau2)
# Frequency distributions of major depression and general anxiety diagnoses variables of non-users, ages 18-30 (subset2)
print("Counts for non-hierarchical major depression diagnoses in last 12 months (non-users, ages 18-30), variable MAJORDEP12 - Section 14")
mdn1 = subsetc2.groupby('MAJORDEP12').size() # Major depression diagnoses counts (subset2)
print(mdn1)
print("Percentages for non-hierarchical major depression diagnoses in last 12 months (non-users, ages 18-30), variable MAJORDEP12 - Section 14")
mdn2 = subsetc2.groupby('MAJORDEP12').size() * 100 / len(subsetc2) # Major depression diagnoses percentages (subset2)
print(mdn2)
print("Counts for non-hierarchical generalized anxiety diagnoses in last 12 months (non-users, ages 18-30), variable GENAXDX12 - Section 14")
gan1 = subsetc2.groupby('GENAXDX12').size() # Generalized anxiety diagnoses counts (subset2)
print(gan1)
print("Percentages for non-hierarchical generalized anxiety diagnoses in last 12 months (non-users, ages 18-30), variable GENAXDX12 - Section 14")
gan2 = subsetc2.groupby('GENAXDX12').size() * 100 / len(subsetc2) # Generalized anxiety diagnoses percentages (subset2)
print(gan2)
###################################################################################################################################
# Quartile age split, cut function, 4 groups (18-21, 21-24, 24-27, 27-30)
subsetc3['AGE4GROUPS'] = pandas.qcut(subsetc3.AGE, 4, labels=["1=17-21","2=21-24","3=24-27","4=27-30"])
print("Counts for age splitted in 4 groups: 18-21, 21-24, 24-27, 27-30")
age4g1 = subsetc3.groupby('AGE4GROUPS').size()
print(age4g1)
print("Percentages for age splitted in 4 groups: 18-21, 21-24, 24-27, 27-30")
age4g2 = subsetc3.groupby('AGE4GROUPS').size() * 100 / len(subsetc3)
print(age4g2)
print("Counts of observations within each of the age group four categories")
subsetc3['AGE4GROUPS'] = pandas.cut(subsetc3.AGE, [17, 21, 24, 27, 30])
print (pandas.crosstab(subsetc3['AGE4GROUPS'], subsetc3['AGE']))
# Frequency distribution of cannabis use variable for ages 18-30 (subset3) with 9 set to NaN, number of missing data
subsetc5['S3BD5Q2E'] = subsetc5['S3BD5Q2E'].replace(99, numpy.nan)
recode = {1: 1, 2: 2, 9: "NaN"}
subsetc3['CUMD'] = subsetc3['S3BQ1A5'].map(recode)
print("Counts for cannabis use ages 18-30 with missing data set to NaN, variable S3BQ1A5 - Section 3B")
cuy1 = subsetc3.groupby('CUMD').size() # Cannabis use counts (subset3)
print(cuy1)
print("Percentages for cannabis use age 18-30 with missing data set to NaN, variable S3BQ1A5 - Section 3B")
cuy2 = subsetc3.groupby('CUMD').size() * 100 / len(subsetc3) # Cannabis use percentages (subset3)
print(cuy2)
# Frequency distribution of monthly average cannabis used (when using the most) variable for ages 18-30 (subset5)
recode1 = {1: 10, 2: 9, 3: 8, 4: 7, 5: 6, 6: 5, 7: 4, 8: 3, 9: 2, 10: 1} # Dictionary with details of frequency variable reverse-recode
subsetc5['CUFREQ'] = subsetc5['S3BD5Q2E'].map(recode1) # Change variable name from S3BD5Q2E to CUFREQ
recode2 = {1: 30, 2: 25, 3: 14, 4: 6, 5: 3, 6: 1, 7: 0.8, 8: 0.5, 9: 0.3, 10: 0.1} # Monthly average cannabis used
subsetc5['CUFREQMO'] = subsetc5['S3BD5Q2E'].map(recode2) # Change variable name from S3BD5Q2E to CUFREQMO
print("Counts for average cannabis used per month when using the most, variable CUFREQMO")
fucy1 = subsetc5.groupby('CUFREQMO').size() # Frequency of used cannabis counts (subset5)
print(fucy1)
print("Percentages for average cannabis used per month when using the most, variable CUFREQMO")
fucy2 = subsetc5.groupby('CUFREQMO').size() * 100 / len(subsetc5) # Frequency of used cannabis percentages (subset5)
print(fucy2)
# Secondary variable creation, NUMJOPMOTH_EST, number of joints per month
subsetc5['NUMJOPMOTH_EST'] = subsetc5['CUFREQMO'] * subsetc5['S3BQ4']
subsetc4 = subsetc5[['IDNUM' , 'S3BQ4' , 'CUFREQMO' , 'NUMJOPMOTH_EST']]
head30 = subsetc4.head(30)
print("Number of cannabis joints smoked per month when using the most, first 30 observations, new variable NUMJOPMOTH_EST")
print(head30)
# Frequency distribution for both major depression and general anxiety diagnoses, new variable cration NUMMDGENANX
subsetc1['NUMMDGENANX'] = subsetc1['MAJORDEP12'] + subsetc1['GENAXDX12']
print("Counts for major depression and general anxiety diagnoses in cannabis users, ages 18-30, variable NUMMDGENANX")
ndg1 = subsetc1.groupby('NUMMDGENANX').size()
print(ndg1)
print("Percentages for major depression and general anxiety diagnoses in cannabis users, ages 18-30, variable NUMMDGENANX")
ndg2 = subsetc1.groupby('NUMMDGENANX').size() * 100 / len(subsetc1)
print(ndg2)
# Newly managed depression and anxiety variables, in cannabis users ages 18-30, both last 12 months and prior (subset1), define function
def DEPRESSIONANXIETY (row):
if row['NUMMDGENANX'] == 0 :
return 0
if row['NUMMDGENANX'] > 1 :
return 1
if row['MAJORDEP12'] == 1 :
return 2
if row['GENAXDX12'] == 1 :
return 3
subsetc1['DEPRESSIONANXIETY'] = subsetc1.apply (lambda row: DEPRESSIONANXIETY (row), axis=1)
subsetc6 = subsetc1[['IDNUM' , 'MAJORDEP12' , 'GENAXDX12' , 'NUMMDGENANX' , 'DEPRESSIONANXIETY']].copy()
first30 = subsetc6.head(30)
print("Depression and anxiety diagnoses counts for cannabis users in last 12 months and prior, ages 18-30, new variable DEPRESSIONANXIETY")
print(first30)
####################################################################################################################################
print("Counts for average number of joints smoked per month, ages 18-30, variable NUMJOPMOTH_EST")
njpm1 = subsetc5.groupby('NUMJOPMOTH_EST').size()
print(njpm1)
print("Percentages for average number of joints smoked per month, ages 18-30, variable NUMJOPMOTH_EST")
njpm2 = subsetc5.groupby('NUMJOPMOTH_EST').size() * 100 / len(subsetc5)
print(njpm2)
# Change format of S3BQ1A5, S3BD5Q2E, MAJORDEP12, GENAXDX12 to categorical
subsetc3['S3BQ1A5'] = subsetc3['S3BQ1A5'].astype('category')
subsetc5['S3BD5Q2E'] = subsetc5['S3BD5Q2E'].astype('category')
subsetc1['MAJORDEP12'] = subsetc1['MAJORDEP12'].astype('category')
subsetc1['GENAXDX12'] = subsetc1['GENAXDX12'].astype('category')
# Change the numbers with strings, rename x-axis categories
subsetc1['MAJORDEP12'] = subsetc1['MAJORDEP12'].cat.rename_categories(["No","Yes"])
subsetc1['GENAXDX12'] = subsetc1['GENAXDX12'].cat.rename_categories(["No","Yes"])
subsetc3['S3BQ1A5'] = subsetc3['S3BQ1A5'].cat.rename_categories(["Yes","No","Unknown"])
subsetc5['S3BD5Q2E'] = subsetc5['S3BD5Q2E'].cat.rename_categories(["Every day","Nearly every day","3-4 times/week","1-2 times/week","2-3 times/month","Once a month","7-11 times/year","3-6 times/year","2 times/year","Once a year"])
# Univariate bar chart for categorical variables, S3BQ1A5, S3BD5Q2E, MAJORDEP12, GENAXDX12, which stand for cannabis use, frequency of use, major depression and general anxiety
seaborn.countplot(x='S3BQ1A5', data=subsetc3)
plt.xlabel('Cannabis use in ages 18-30')
plt.title('Cannabis use, ages 18-30')
plt.show()
print ('Describe cannabis use variable')
djpm2 = subsetc3['S3BQ1A5'].describe()
print (djpm2)
plt.figure(figsize=(12,4)) # Change plot size
ax5 = seaborn.countplot(x='S3BD5Q2E', data=subsetc5)
ax5.set_xticklabels(ax5.get_xticklabels(), rotation=40, ha="right") # X-axis labels rotation
plt.xlabel('Frequency of cannabis use in ages 18-30')
plt.title('Frequency of cannabis use, ages 18-30')
plt.show()
print ('Describe frequency of cannabis use variable')
djpm5 = subsetc5['S3BD5Q2E'].describe()
print (djpm5)
seaborn.countplot(x='MAJORDEP12', data=subsetc1)
plt.xlabel('Major depression diagnoses in last 12 months')
plt.title('Major depression diagnosed in cannabis users (both last 12 months and prior), ages 18-30')
plt.show()
print ('Describe major depression variable')
djpm3 = subsetc1['MAJORDEP12'].describe()
print (djpm3)
seaborn.countplot(x='GENAXDX12', data=subsetc1)
plt.xlabel('General anxiety diagnoses in last 12 months')
plt.title('General anxiety diagnosed in cannabis users (both last 12 months and prior), ages 18-30')
plt.show()
print ('Describe general anxiety variable')
djpm4 = subsetc1['GENAXDX12'].describe()
print (djpm4)
# Univariate bar chart for quantitative variable, NUMJOPMOTH_EST, that stands for the number of joints smoked per month when using the most, ages 18-30
plt.figure(figsize=(10,4)) # Change plot size
seaborn.distplot(subsetc5["NUMJOPMOTH_EST"].dropna(), kde=False)
plt.xlabel('Number of joints smoked per month')
plt.title('Estimated number of joints smoked per month by cannabis users, ages 18-30')
plt.show()
# Center and spread measurements
print ('Spread')
std1 = subsetc5['NUMJOPMOTH_EST'].std()
print (std1)
print ('Mode')
mode1 = subsetc5['NUMJOPMOTH_EST'].mode()
print (mode1)
print ('Mean')
mean1 = subsetc5['NUMJOPMOTH_EST'].mean()
print (mean1)
print ('Median')
median1 = subsetc5['NUMJOPMOTH_EST'].median()
print (median1)
# Plot for groups of total number of joints smoked per month, variable NUMJOPMOTH_EST
subsetc5['NUMJOPMOTH_EST'] = pandas.cut(subsetc5.NUMJOPMOTH_EST, [0, 1, 10, 20, 30, 50, 70, 90, 110, 130, 150, 200, 250, 300, 2970]) # Split the number into groups
subsetc5['NUMJOPMOTH_EST'] = subsetc5['NUMJOPMOTH_EST'].astype('category')
# Rename x-axis categories of the plot
subsetc5['NUMJOPMOTH_EST'] = subsetc5['NUMJOPMOTH_EST'].cat.rename_categories(["<1","1-10","11-20","21-30","31-50","51-70","71-90","90-110","111-130","131-150","151-200","201-250","251-300",">300"])
plt.figure(figsize=(10,4)) # Change plot size
ax = seaborn.countplot(x='NUMJOPMOTH_EST', data=subsetc5)
ax.set_xticklabels(ax.get_xticklabels(), rotation=40, ha="right") # X-axis labels rotation
plt.xlabel('Number of joints smoked per month')
plt.title('Estimated number of joints smoked per month by cannabis users, ages 18-30')
plt.show()
print ('Describe number of joints smoked per month')
djpm1 = subsetc5['NUMJOPMOTH_EST'].describe()
print (djpm1)
# Bivariate bar graph C->Q, major depression as response variable and number of joints smoked per month as explanatory variable
nesarc['MAJORDEP12'] = nesarc['MAJORDEP12'].convert_objects(convert_numeric=True)
plt.figure(figsize=(10,4)) # Change plot size
ax1 = seaborn.factorplot(x="NUMJOPMOTH_EST", y="MAJORDEP12", data=subsetc5, kind="bar", ci=None)
ax1.set_xticklabels(ax.get_xticklabels(), rotation=40, ha="right") # X-axis labels rotation
plt.xlabel('Joints smoked per Month')
plt.ylabel('Proportion of major depression')
plt.show()
# Bivariate bar graph C->Q, general anxiety as response variable and number of joints smoked per month as explanatory variable
nesarc['GENAXDX12'] = nesarc['GENAXDX12'].convert_objects(convert_numeric=True)
plt.figure(figsize=(10,4)) # Change plot size
ax2 = seaborn.factorplot(x="NUMJOPMOTH_EST", y="GENAXDX12", data=subsetc5, kind="bar", ci=None)
ax2.set_xticklabels(ax.get_xticklabels(), rotation=40, ha="right") # X-axis labels rotation
plt.xlabel('Joints smoked per Month')
plt.ylabel('Proportion of general anxiety')
plt.show()
nesarc['S3BQ1A5'] = nesarc['S3BQ1A5'].convert_objects(convert_numeric=True)
subsetc3['S3BQ1A5']=subsetc3['S3BQ1A5'].replace(9, numpy.nan)
# Bivariate bar graph C->C, major depression as response variable and cannabis use in ages 18 to 30 as explanatory variable
plt.figure(figsize=(10,4)) # Change plot size
seaborn.factorplot(x="S3BQ1A5", y="MAJORDEP12", data=subsetc3, kind="bar", ci=None)
plt.xlabel('Cannabis use ages 18-30')
plt.ylabel('Proportion of major depression')
plt.show()
# Bivariate bar graph C->C, general anxiety as response variable and cannabis use in ages 18 to 30 as explanatory variable
plt.figure(figsize=(10,4)) # Change plot size
seaborn.factorplot(x="S3BQ1A5", y="GENAXDX12", data=subsetc3, kind="bar", ci=None)
plt.xlabel('Cannabis use ages 18-30')
plt.ylabel('Proportion of general anxiety')
plt.show()
# Change frequency variable type to categorical
subsetc5['S3BD5Q2E'] = subsetc5['S3BD5Q2E'].astype('category')
# Bivariate bar graph C->C, major depression as response variable and frequency of cannabis use in ages 18 to 30 as explanatory variable
plt.figure(figsize=(12,4)) # Change plot size
ax3 = seaborn.factorplot(x="S3BD5Q2E", y="MAJORDEP12", data=subsetc5, kind="bar", ci=None)
ax3.set_xticklabels(rotation=40, ha="right") # X-axis labels rotation
plt.xlabel('Frequency of cannabis use ages 18-30')
plt.ylabel('Proportion of major depression')
plt.show()
# Bivariate bar graph C->C, general anxiety as response variable and frequency of cannabis use in ages 18 to 30 as explanatory variable
plt.figure(figsize=(12,4)) # Change plot size
ax4 = seaborn.factorplot(x="S3BD5Q2E", y="GENAXDX12", data=subsetc5, kind="bar", ci=None)
ax4.set_xticklabels(rotation=40, ha="right") # X-axis labels rotation
plt.xlabel('Frequency of cannabis use ages 18-30')
plt.ylabel('Proportion of general anxiety')
plt.show()
# Output Discussion with Github Links for output images
# Visualizing Data
## Preview
In the final assignment are presented visualized data, taken from NESARC codebook, in order to examine the correlation between cannabis use and mental disorders such as major depression and general anxiety diagnosed in the last 12 months in a sample of 9535 U.S. young adults, aged from 18 to 30 years old. I used Spyder IDE to create both univariate and bivariate bar charts for the selected variables. More specifically, with variable ‘AGE’ between 18 and 30, I built unvariate graphs for categorical variables **‘S3BQ1A5’** which represents cannabis use, **‘S3BD5Q2E’** which is frequency of this use, **‘MAJORDEP12’** that stands for major depression diagnosis in the last 12 months and **‘GENAXDX12’** that indicates general anxiety diagnosis in the same period. In addition, you will find another univariate graph for the quantitative variable **‘NUMJOPMOTH_EST’**, which I created in my previous assignment by multiplying frequency of cannabis use and average quantity of joints smoked, in order to estimate the total number of joints smoked per month by the individuals. As far as the bivariate graphs are concerned, I chose to examine visualized the association between cannabis use (C->C) and both mentioned disorders and additionally the relationship between frequency (C->C) and quantity (Q->C) of this use with both depression and anxiety. Thus, bar charts were created combining variables **‘S3BQ1A5’** (cannabis use), ‘S3BD5Q2E’ (frequency of use) and **‘NUMJOPMOTH_EST’** (quantity of joints) with variables **‘MAJORDEP12’** (major depression) and **‘GENAXDX12’** (general anxiety). Concluding, for the quantitative variable both center and spread were measured and describe function was used in order to examine useful information, about the selected categorical variables.
## Output
### Univariate graphs:

A random sample of 9535 U.S. young adults, aged 18-30, were asked, as a part of NESARC survey, the following question: “Have you ever used cannabis?” A percentage of 25.29% (or 7042 individuals) answered “Yes”, whereas 73.85% (or about 2500 individuals) answered “No” which was the most frequent answer. Also a significantly small percentage of 0.84%, fell into category 9 (“Unknown“) which is our missing data.

To the question of “How often did you use cannabis when using the most?”, the top answer was “Every day”, since 534 individuals fell into this category, followed by “Once a year” category with approximately 400 individuals. Less than 100 people chose “7-11 times per year” category, which was the least frequent answer.

Of the total number of participants (18-30) who answered “Yes” to the question of cannabis use, only those who were smoking marijuana in last 12 months and prior were taken into consideration for the next two questions.
To the question of “Have you been diagnosed with non-hierarchical major depression in the last 12 months?”, about 660 participants or 79.04% answered “No” which was the most frequent answer, whereas 175 or 20.95% fell into “Yes”.
For the question, ”Have you been diagnosed with non-hierarchical generalized anxiety in the last 12 months?”, 802 individuals or 96.04% answered “No“ that was our top answer, while only 33 or 3.95% chose “Yes“.

For the estimated number of joints smoked per month by cannabis users, ages 18-30, it noticeable from the graph that there was a skewed-right distribution. The spread or the standard deviation of the variable is extremely large which indicates a large variety of answers among the participants. The three main numerical measures of the center of the distribution are the mode, the median, and the mean. Here we can see that mode is equal to 0.1 and it was the most common occurring value in the distribution, which means that most of participants smoked less than 1 joint per month. The mean is equal to 70.1 which indicates that cannabis users smoked about 70 joints per month on average and the median or the middle value is 6.

Estimated number of joints smoked per month binned to groups as illustrated above. Another way of visualizing the distribution of variable **‘NUMJOPMOTH_EST’**. We can see that most individuals, about 990, smoked less than one joint per month and the shape of the distribution is right-skewed.
### Bivariate graphs:


In the bar charts above we can see the relationship between quantity of joints smoked per month by cannabis user, aged 18 to 30 years old, and both major depression (first) and general anxiety (second) diagnoses in the last 12 months (Q->C). The explanatory variable is quantity of joints (quantitative), while the response variables are depression and anxiety diagnoses (categorical). There is a slightly increasing trend in the first graph, but not in the second.


In the graphs presented above we can see the correlation between frequency of cannabis use and both major depression and general anxiety (C->C). The explanatory variable is frequency of cannabis use (categorical), while the response variables are depression and anxiety diagnoses (categorical). Again, for the first graph we have a right-skewed distribution, which indicates that the more an individual smoked cannabis, the better were the chances to get diagnosed with depression. However, we cannot support the same as far as anxiety is concerned, which appears to have a more raffle and abnormal distribution.


The graphs presented above illustrate the association between cannabis use and both major depression and general anxiety diagnoses in young adults, aged from 18 to 30 years old, in the last 12 months (C->C). The explanatory variable is cannabis use (categorical) and the response variables are depression and anxiety diagnoses (categorical).
## Summary
To sum up, looking through the the last graphs, it can be noticed that there are some slight differences between the percentages of cannabis users compared to non-users. Major depression cases in cannabis users young adults (20.95%) seem to be slightly more than double compared to those of non-users (8.42%).In addition, general anxiety diagnoses in cannabis users (3.95%) appear to be also marginally more than double in comparison to the non-users (1.63%). It could be supported that there is a relative association between cannabis and such mental disorders, thus cannabis use increases the likelihood of meeting criteria for depression or general anxiety in the future. However, the sample is extremely small and it is unclear how representative it is, making the findings less reliable, since a large amount of error may be involved.
0 notes
Last Seen Blogs

guansuo
关索

sarlanbaadia
ALLAN BUTON

studybud-blog1
kind of motivated

leo748
4season.su

acetictears
isa isa