#Gaianotes
Text
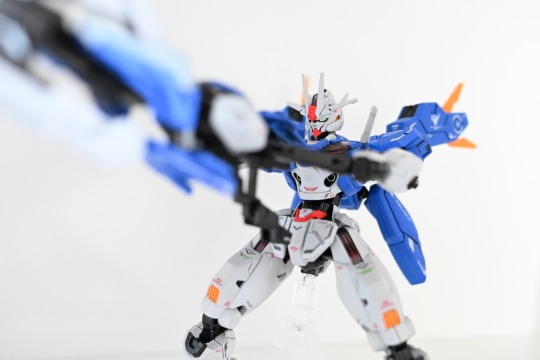
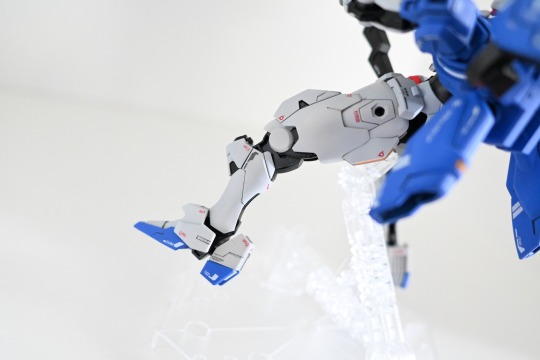
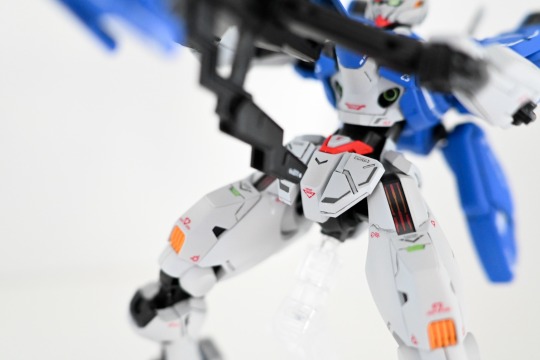
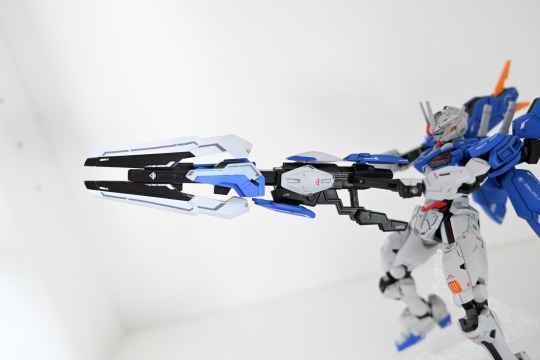


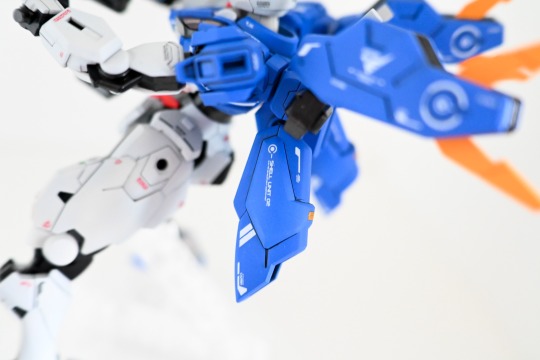

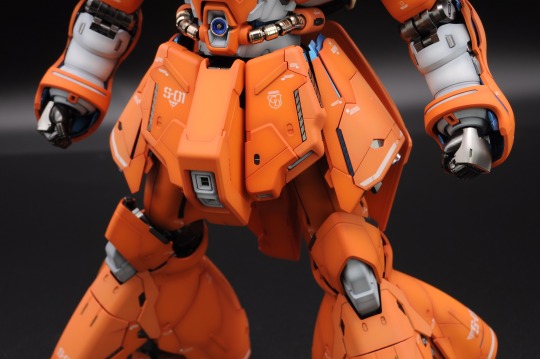
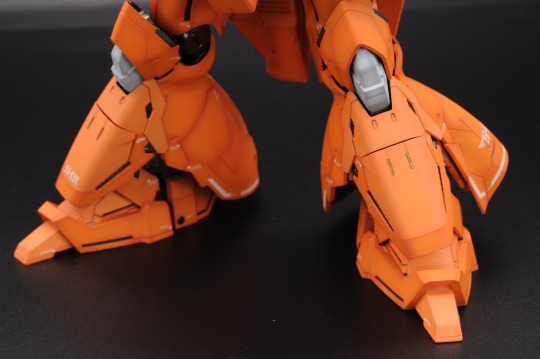
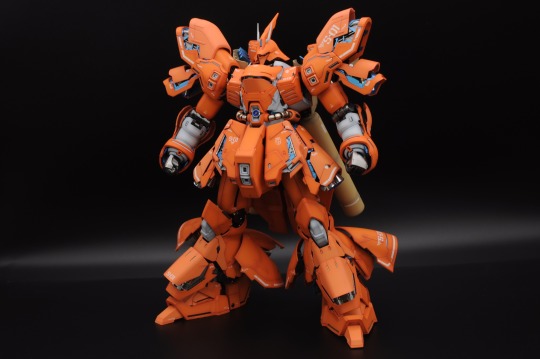
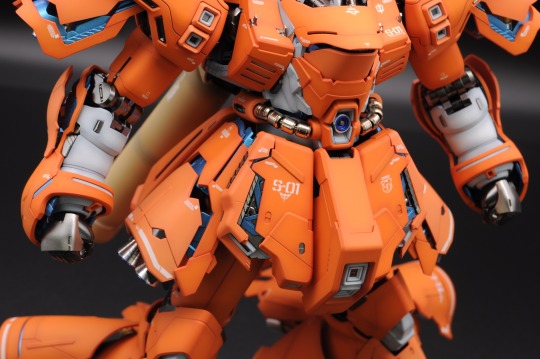
Aerial Rebuild HG 1/144
My first fully painted kit! She’s not perfect, but I’m still happy with how she came out. I keep making scribing mistakes that end up causing big scratches on a piece. I’m sure if you zoom in you can probably find the scratches.
I didn’t intend for the inner frame/joints to be so dark. Now I know to not use a black base coat go with a grey color next time. I also realized I’m not a fan of glossy metallic so I want to matte coat them next time to go for a satin finish.
Materials used below ↓
Paints
NAZCA Pink Surfacer
Gaianotes Grey Surfacer
Gaianotes White Surfacer
NAZCA Flame Red
NAZCA Steel White
Gaianotes Orange Yellow
Gaianotes Cobalt Blue
Gaianotes Ultimate Black (base coat for inner frame and weapon)
Gaianotes Star Bright Duralumin (inner frame/joints)
Gaianotes Gun Metal (weapon)
Mr. Color GX100 (gloss top coat)
Mr. Color GX114 (matte top coat)
Panel Lines
Tamiya Panel Line Accent Color BLACK (blue and black parts)
Tamiya Panel Line Accent Color DARK GRAY (white parts)
Tamiya Panel Line Accent Color BROWN (yellow parts)
Small Metallic Details
Arrtx Metallic Paint Pen Green (eyes, chest holes, thigh panel)
#gundam#gunpla#g witch#gundam witch from mercury#the witch from mercury#gundam witch#witch from mercury#model kit#plamo#plamodel#plastic model#aerial rebuild#gundam aerial#gundam aerial rebuild#機動戦士ガンダム 水星の魔女#水星の魔女#ガンプラ#ガンダムシリーズ#Gaianotes#Mr. Hobby#Tamiya#Arrtx#NAZCA
45 notes
·
View notes
Text
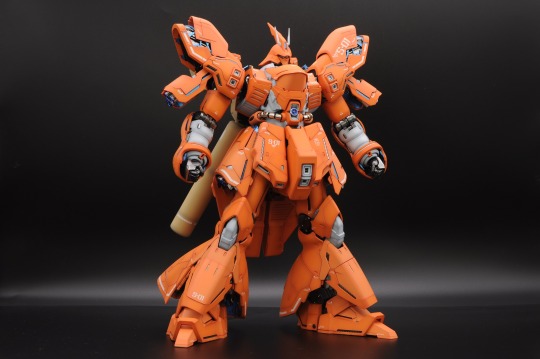
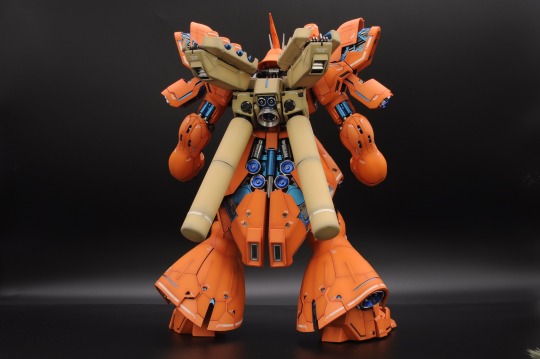


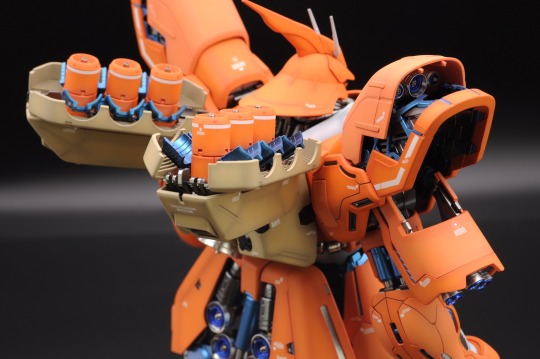


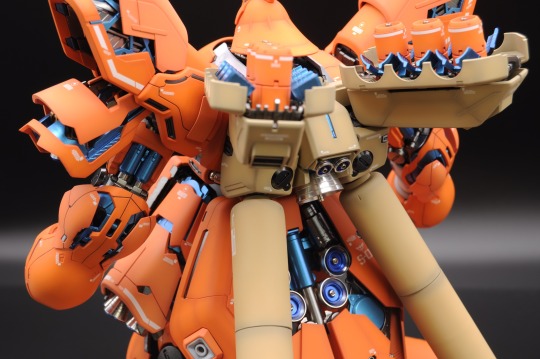

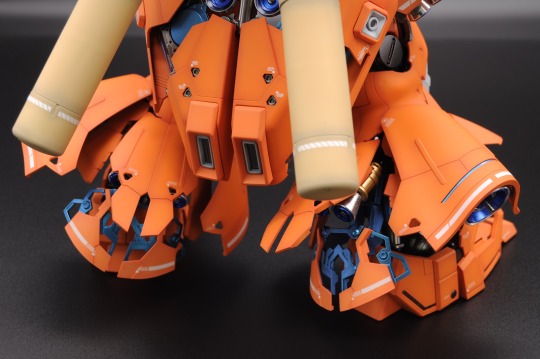

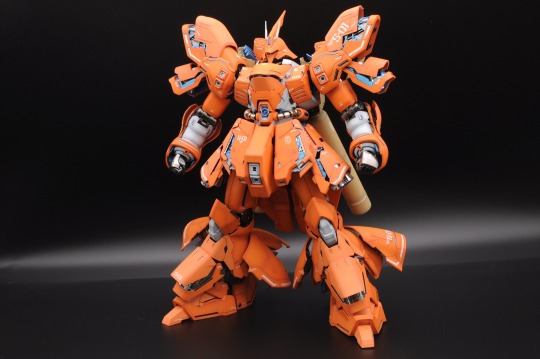


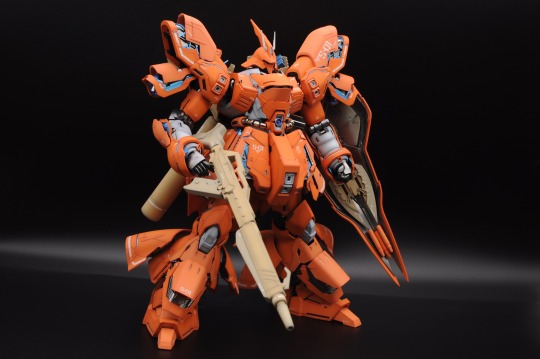

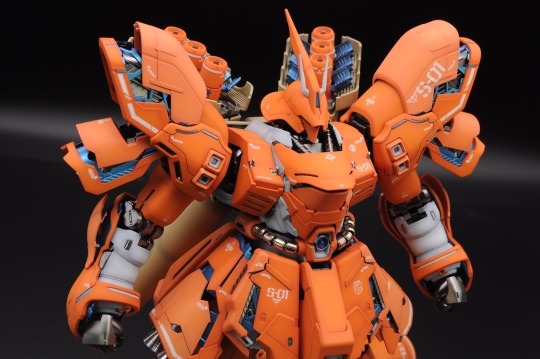
MG Sazabi ver. Ka pictures
This one was my first really serious attempt to build and paint a model post-parenthood and honestly? A 5 month turnaround time (let's call it three months to build, two months to paint) for a fully painted build like this is *pretty fuckin good* for a no support parent who works full time on top of it.
So, the colors: The main orange is a custom mixed orange, and the lighter shade is simply GaiaNotes VO-14 Coral Orange. Preshade colors for both were mixed by adding in some brown. Any orange parts got pink primer to up the saturation and the results are sooooo nice IRL. The blue is actually a colorchanging paint, which is GaiaNotes polarized? prism? pearl? series, mint blue green over a black base.
The original idea for this kit that I had was to mimic bandai's gorgeous titanium finish by putting clear black over gold but I eventually moved on from that idea because the end result would have been too similar to my 2013 Sazabi so I thought and thought until I came up with a better idea...which landed in the from of a creamsicle inspired Sazabi. The final product landed a bit away from that idea but whatever, I'm really happy with how this thing looks. The metal aftermarket parts are icing on the cake, for an MG like this it felt appropriate to go all out and use them on it and I'm glad I did.
My lighting and photography is a bit all over the place on this one but eh, whatcha gonna do 'cept keep practicing.
Not sure if I'm going to tackle my MG SInanju ver Ka. next, or take on one of my PG Unicorns. Either way, my ass is taking a break from building/painting stuff for the next month or so so I can recharge my hobby batteries.
12 notes
·
View notes
Text


I got a few dolls from Amzn once again. I still haven't lost all hope of getting Paula Purrfect from Nanana Surprise Minis series 2, despite having had zero luck so far. I haven't seen these being restocked at all in stores near me. I unfortunately didn't get her once again, from the one box I got from Amzn from series 2. I did get one of the four I am after from series 3, so that's at least some progress! Lol! I sadly haven't seen series 3 in stores near me yet. I'll probably have to go through hoops and loops once again, to get the other three I really want... such is my luck with these trading things! Sucks to live in the middle of nowhere sometimes! DX
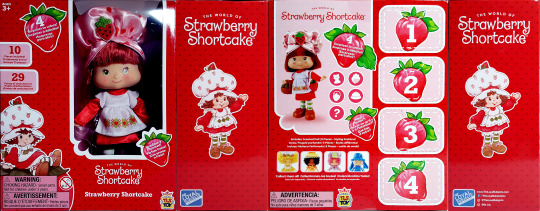
I also got Strawberry Shortcake from the Loyal Subjects line of 5-inch action-dolls. She's adorable, I wish they had Rainbow Brite in stock as well, so I could have gotten her as well. Now I'm going to have to search for her everywhere else. *sigh*
I aslo got some acrylic resin Vallejo Plastic Putty, to see if I can manage to mod my 3D-artist PU-resin-cast RE4 Leon S. Kennedy head sculpt's eyes, to be more accurate, to the OG-game version. It's supposed to be used for filling in gaps in scaled models, but I just need a tiny amount of material to mod the upper eyelid. I am hopping this will work perfect for that. Since, I am not sure I could do so with Apoxie Sculpt, it's just too tiny of an area for my humongous human fingers to fit in there, and I'm pretty tiny for an old-fart-adult-human-female (barely 5-3" and scrawny as the dickens!). I'm hoping since this is a liquid that can be sanded after curing, I won't have to do much sculpting/sanding in such a tiny area. I wanted to get the Gaianotes putty, but I've lost all hope of ever finding that in-stock, since it is so popular with toy/model customizers everywhere, it seems. And not that many places carry it or export/import it. T___T;; I'll settle for whichever putty I can get my hands on, for now.
I got my Japan toy haul as well, as another VC head sculpt, so I'll be photobombing for a while longer! (;
#StrawberryShortcake#TheLoyalSubjects#Doll#ToyHaul#Toy#ToyPhotography#DollPhotography#Collectibles#NananaSurpriseMinis#Series3#ActionFigure#Photography
1 note
·
View note
Photo

メカサフヘヴィ塗ってみた😎 #フレームアームズガール #フレズヴェルクアーテル #メカサフへヴィ #nazca #ガイアノーツ #gaianotes #コトブキヤ #kotobukiya #kotobukiyabishoujo #プラモデル #プラモデル塗装 https://www.instagram.com/p/CamsPK9vXX9/?utm_medium=tumblr
#フレームアームズガール#フレズヴェルクアーテル#メカサフへヴィ#nazca#ガイアノーツ#gaianotes#コトブキヤ#kotobukiya#kotobukiyabishoujo#プラモデル#プラモデル塗装
0 notes
Photo
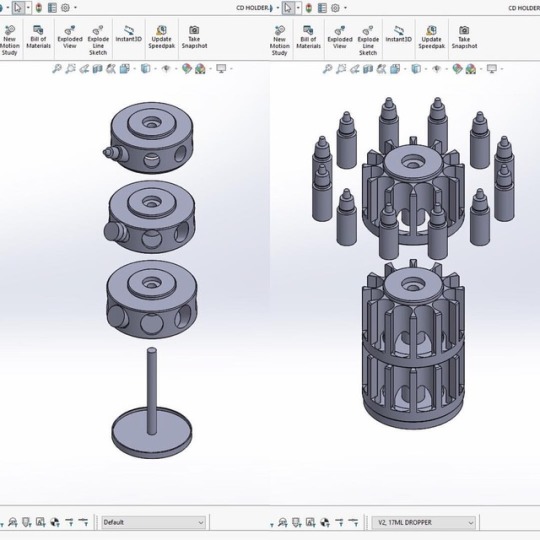
So while I’m printing up xwing boxes for orders I’ve been designing new things that I want to try and sell on my shop. Here are two versions of paint holders than I’m going to be printing up and offering. V1 is a 3 tier setup that uses those CD holders you get in those 100 packs. (Trying to repurpose things if I can) but I’m also designing it so that you won’t actually need the CD holder cuz I’m designing a base for it too. Anyways. The paints V1 will be able to hold the 17 mL droppers, 15 mL Gaia and Tamiya type bottles. V1 can hold 8 of each paint bottle on each tier. V2 on the right shows just the droppers in 3 tiers and each tier can hold 12 bottles. So that’s 36 paints. @0@! I plan on doing this same design for the other bottles as well. So we’ll see how well these do. Lucky for me I have a variety of those paints so I can use them myself if need be. Lol #3ddesign #3dprint #3dprinted #vallejopaints #gaianotes #tamiyapaint #gamecolor #gameair #akinteractive #ammopaint #warcolourspaints
#3ddesign#3dprint#3dprinted#vallejopaints#gaianotes#tamiyapaint#gamecolor#gameair#akinteractive#ammopaint#warcolourspaints
1 note
·
View note
Photo

又影完相,又打完卡,又可以收返埋佢lou🤣 #Evangelion #EVA00 #gunpla #RGEvangelion #RGEVA00DX #gaianotes #evacolor #modopaint #魔光黃 https://www.instagram.com/p/CBqYcZNBj-L/?igshid=1kjlt0hm2rzaj
0 notes
Photo
Bandai Superminipla Combattler V - Battle Jet done... #wip #madworks #mech #superrobot #plasticmodel #plamo #modelkit #paintedbuild #mecha #ammomig #ammomigjimenez #scalemodels #plasticmodelkit #colle21 #gaiacolors #gaianotes #mrcolor #iwata https://www.instagram.com/p/B9APu1zIFHh/?igshid=1bvpr64os5fmq
#wip#madworks#mech#superrobot#plasticmodel#plamo#modelkit#paintedbuild#mecha#ammomig#ammomigjimenez#scalemodels#plasticmodelkit#colle21#gaiacolors#gaianotes#mrcolor#iwata
0 notes
Text

ASW-G-08 Gundam Barbatos HG 1/144 "Barbatrix"
custom painted with a shit ton of gaianotes metallic lacquer (rip wallet) and alclad 2
I know it's not a clean paintjob, but it's better than Baal.
》Belial
2 notes
·
View notes
Photo

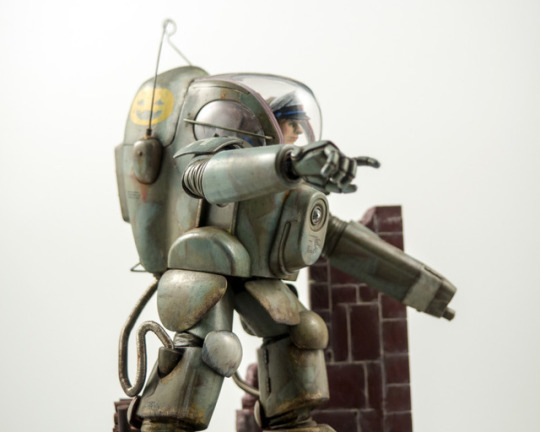


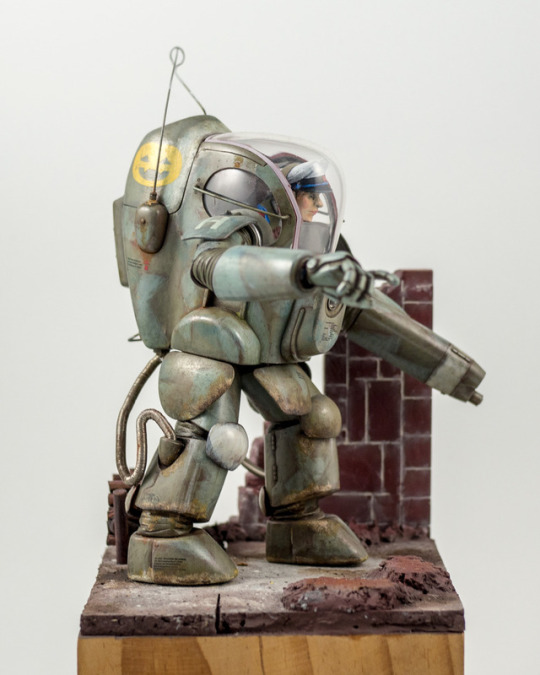
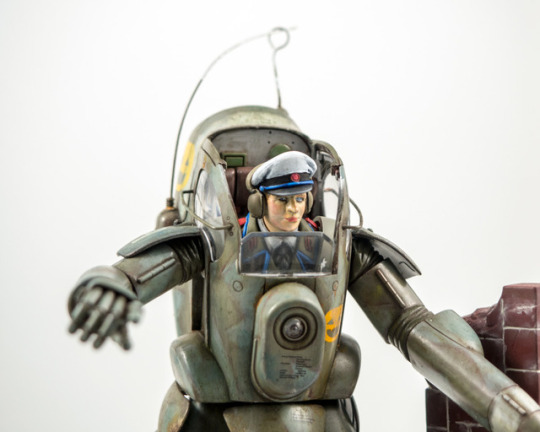
Finished! Maschinen Krieger Wave 1/20 Konrad
I actually finished this kit in 2018, but did not get a chance to photograph it until now. I really like how the Wave kit adds the bulbous windshield instead of the normal sloping one like the Nitto kit had - it really accentuates the added bulk from the “hump” on the engine cover.
Painted with Gaianotes paints, and the small vignette base is made from cork, some model railroad scenery, and a resin cast section of wall from a local miniatures shop.
Thanks for looking and please look for some tutorial-style content soon!
#maschinen krieger#Ma.K#Kow Yokoyama#plastic model#scale model#plamo#plamodel#vignette#diorama#miniatures#model making#model building#weathering#powered armor#powered suit#mecha#sci fi
53 notes
·
View notes
Link
Tutorial on zoikino for wrap painting to achieve this finish:

Instructions translated:
1. Base coat with black primer (used: GaiaNotes GS-03 Black Surfacer), flat black, or gloss black (most recommended)

2. Use cling wrap to stamp on silver paint (used: silver enamel paint)
Dip the cling wrap into the silver paint and immediately stamp it on the Zoid. Practice on cardboard or junk parts first to get a feeling for it.
3. Coat with a clear color of your choice (used: GaiaNotes Clear Red). Add more layers for stronger vibrance but less contrast

4. Topcoat with a thick gloss clear coat

7 notes
·
View notes
Text
i wanna gab about preshading and how ive been doing it lately. trying to type longer guides on patreon and HV but let's try a quick and dirty version here and see if that helps me get those posts together better. as far as tools used for this, i use an iwata hp-cs and hp-ch (which are .3 and .2mm nozzle airbrushes respectively) along with gaianotes paints for painting gunpla. proper ppe (nitrile gloves, a well fitting respirator and a spraybooth that moves enough air) are a must when working with lacquers. dont give yourself lung or liver cancer for plamo plskthx. pics are from a mixture of the mg sazabi's WIP and some test junk i was doing with the hguc sinanju.
step 1: primer yer part
i like to use colored primers cause it really ups the saturation on the paint you use on it. pink for reds/oranges/yellows, blue for purple/blues, grey or white for whites/greys
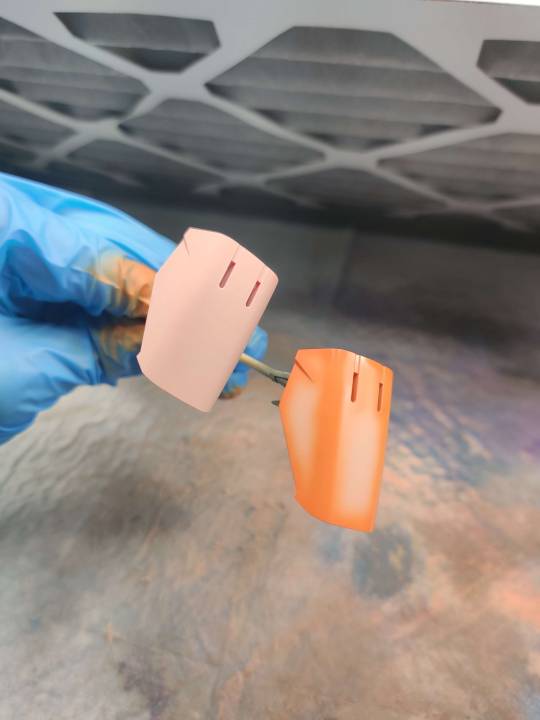
step 2: mix your preshade color
ymmv on these but personally i like using a darker shade of the main color to do the shading by adding a complimentary color to it. for example, for these parts i mixed brown in to the custom orange color i made. you can use whatever you want though. some folks like using black as a preshade and that's ok! i preshade my orange-yellow paints with pure orange, and blues with either a darker blue or blue with some purple/black mixed in. to goal is to compliment/blend a bit with the color that's going on top.
step 3: go around the edges and panel lines with your dark color, leaving room to fill in with your main paint.
hope your hand is steady and your paints are mixed/thinned well! very carefully, go around the part and darken up the edges/panel lines/underside of your parts. i shade anywhere where the "light" might darken up on a real world object but i can't speak to how accurate of a sentiment that is, if that makes sense? it's just what looks 'right' to my eye to do it this way. but the part that's shaded above should serve as a good indicator. here are a few other parts pre-filling in:

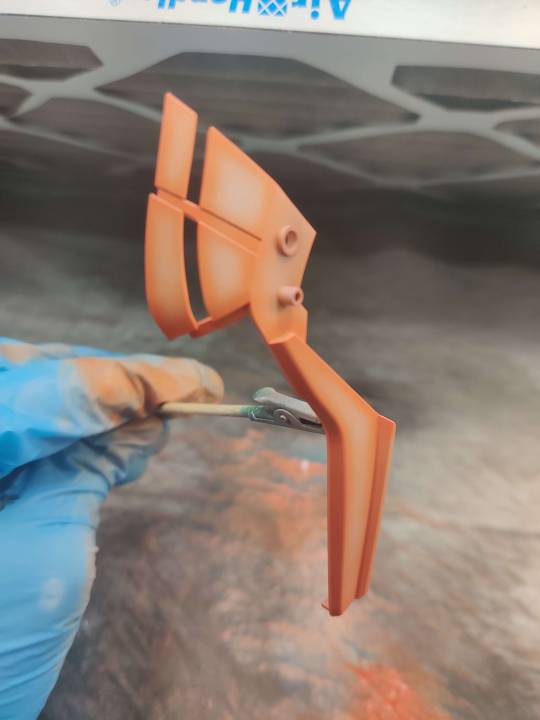
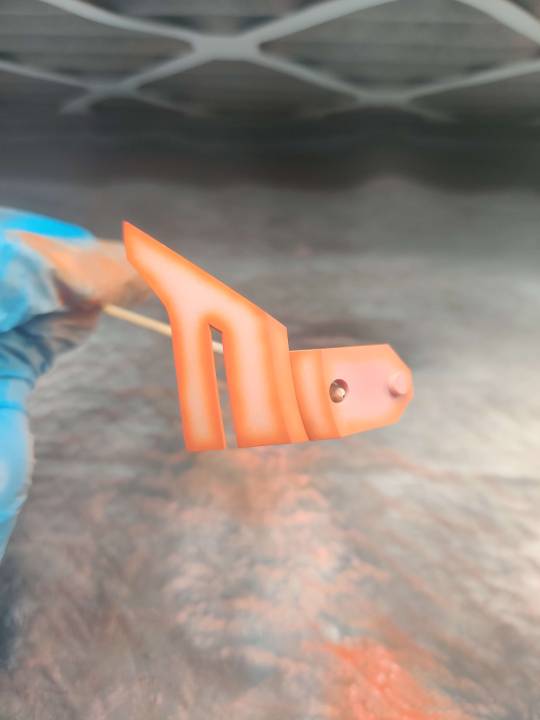
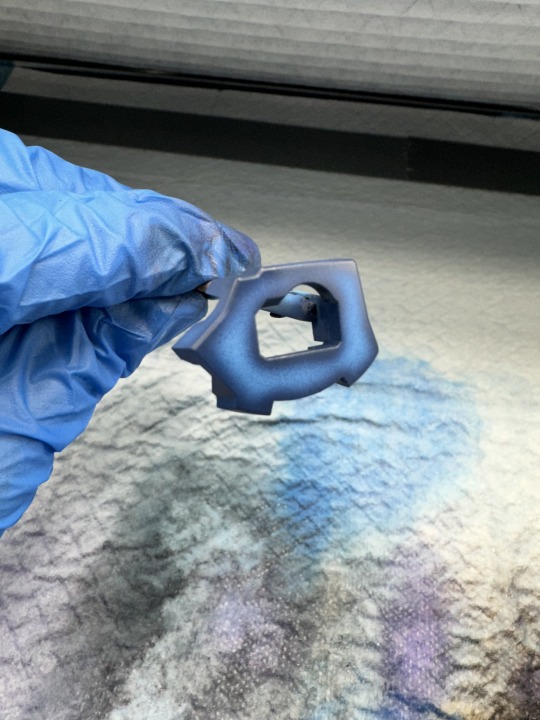
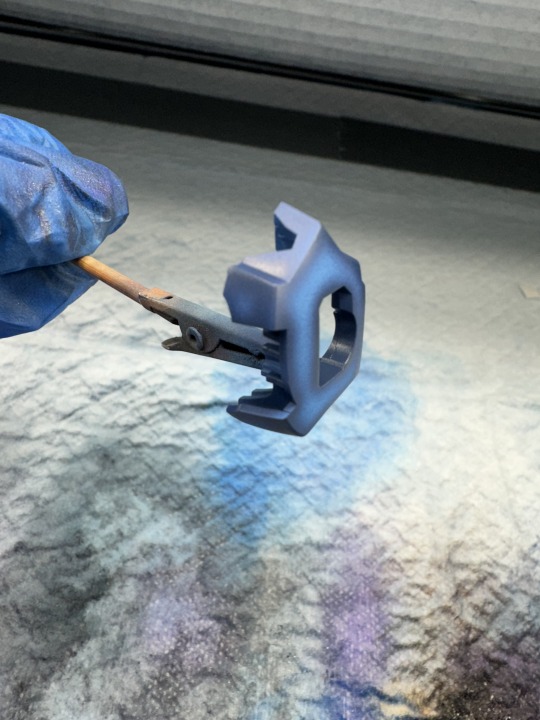
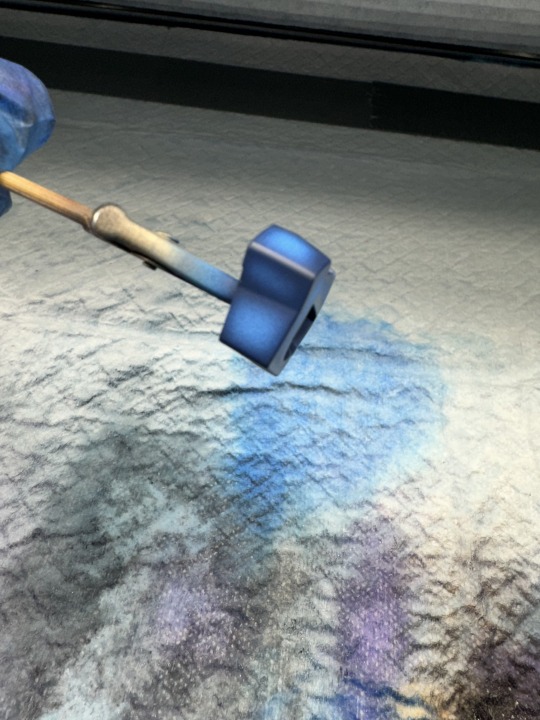
i do this this way for three reasons: first and second, im lazy and cheap. i don't want to waste time and paint coating the entire part when i'm just gonna cover it up anyway. third, if i coat the entire part in the preshade color that's going to have an effect on the main color that's going on top. mainly, it's going to make it darker. i don't want that so i landed on shading stuff this way.
step 4: fill in your main color
okay so i always do a shitty job taking pictures of this step (that's why there are no sazabi pictures here) but once you have the edges and stuff painted now it's time to take your main color and fill in the primer-spaces. don't go over your preshade lines, just get as close as you can to that line. it's fine if you hit the edge a little, after all this is the topmost layer of color. even if it doesn't turn out perfect, just work with the wabisabi of the whole thing. embrace the shading not being perfectly uniform. after all, things in real life have degrees of variance.
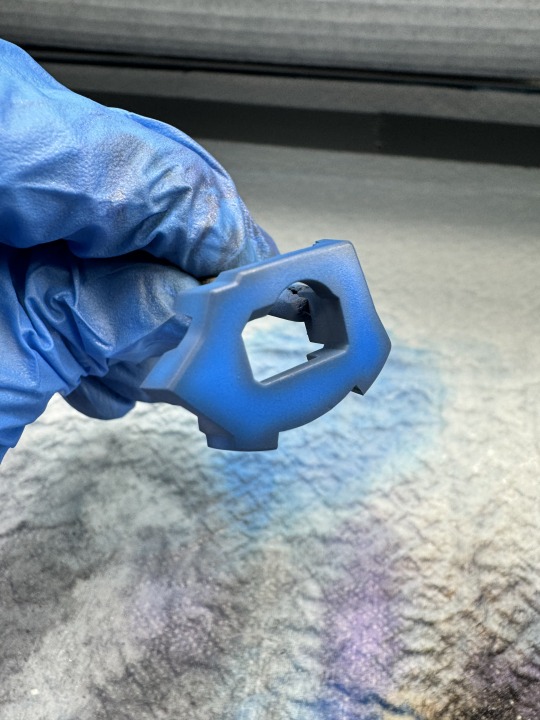
take your time, work with a psi around ~12-15, thin your paints well, and be very gentle on the trigger. i work really really close to the part for this step and have to be very careful to avoid splattering or overspraying. this is probably???? one of the trickier parts of this??? i don't know. when you've been doing this for so long your definition of that sorta changes. if you need extra help, look in to something to help steady your arm/hand while doing this part.
step 5: blending
okay, so you've got your shading down, you filled in the rest of the space with the main color and it's feelin pretty good. but. there's one more step. get a little distance from your part and give the whole thing the lightest coat you can manage. the goal is to blend the primary color and shading layer together with one or two very light coats of paint. i'm not trying to cover up the preshading, i just want a very thin layer of the main color to harmonize everything.

see how the preshading isn't so stark now that we've given it those final two coats? i think this is the key to bringing the shading and main layers together. everything feels nice and "finished" now. from here, gloss coat the parts for panel lining and decals or flat coat (or whatever finish you wanna use) it if it's not getting any of those.
and...that's pretty much it. as an aside, glossy finishes tend to make the colors appear darker and flatcoats tend to look lighter but that could just be my eyes being weird.
and uhh....yeah. thanks for coming to my gunpla talk.
15 notes
·
View notes
Photo

【WF2019冬】gaianotes发售1/6尺寸究极的绫波丽 将有EVANGELION展区登场
2月10日于千叶幕张展览中心举行的活动「WonderFestival2019冬」的EVANGELION相关信息公布了。 gaianotes展区中将发售绫波丽完全新作GK件。
http://www.evangelionall.info/news/9722/wonder-festival-2019-winter-of-1-6-size-ultimate-in-gaia-notes-ayanami-rei-released-evangelion-of-the-booth-also-appeared/
0 notes
Photo

影完相,打完卡,可以收返埋佢lou🤣 #Evangelion #EVA01 #gunpla #RGEvangelion #RGEVA01DX #gaianotes #evacolor #modopaint #魔光紫 #E7paints https://www.instagram.com/p/B-SO4Ysh5cK/?igshid=yijff11t81wi
0 notes
Photo

Bandai Superminipla Combattler V - Ready for customization #wip #madworks #mech #superrobot #plasticmodel #plamo #modelkit #paintedbuild #mecha #ammomig #ammomigjimenez #scalemodels #plasticmodelkit #colle21 #gaiacolors #gaianotes #mrcolor #iwata https://www.instagram.com/p/B88nzhzom5h/?igshid=1tzqzqmb5fhoc
#wip#madworks#mech#superrobot#plasticmodel#plamo#modelkit#paintedbuild#mecha#ammomig#ammomigjimenez#scalemodels#plasticmodelkit#colle21#gaiacolors#gaianotes#mrcolor#iwata
0 notes
Text
9 Things About Finish Master You Have To Experience It Yourself | Finish Master
9 Things About Finish Master You Have To Experience It Yourself | Finish Master – finish master
| Allowed to be able to my own weblog, on this occasion I will show you regarding keyword. And now, this is actually the primary graphic:
Paths, paths… – finish master | finish master
Why not consider graphic over? can be of which awesome???. if you’re more dedicated therefore, I’l l teach you some image again down below:
So, if you’d like to have these great shots related to (9 Things About Finish Master You Have To Experience It Yourself | Finish Master), press save button to store the pics to your pc. They’re all set for down load, if you’d rather and wish to have it, simply click save symbol in the post, and it will be instantly downloaded in your notebook computer.} At last if you’d like to secure unique and recent photo related with (9 Things About Finish Master You Have To Experience It Yourself | Finish Master), please follow us on google plus or bookmark this blog, we try our best to present you daily up grade with fresh and new images. Hope you like staying here. For most updates and recent news about (9 Things About Finish Master You Have To Experience It Yourself | Finish Master) shots, please kindly follow us on twitter, path, Instagram and google plus, or you mark this page on book mark section, We attempt to offer you up grade regularly with all new and fresh photos, love your browsing, and find the ideal for you.
Here you are at our site, articleabove (9 Things About Finish Master You Have To Experience It Yourself | Finish Master) published . At this time we are delighted to declare that we have found a veryinteresting topicto be reviewed, namely (9 Things About Finish Master You Have To Experience It Yourself | Finish Master) Many individuals attempting to find specifics of(9 Things About Finish Master You Have To Experience It Yourself | Finish Master) and of course one of them is you, is not it?
The Dragon – finish master | finish master
FinishMaster Inc. – Wholesale and Distribution International – finish master | finish master
FinishMaster | Automotive and Industrial Paint Refinishing … – finish master | finish master
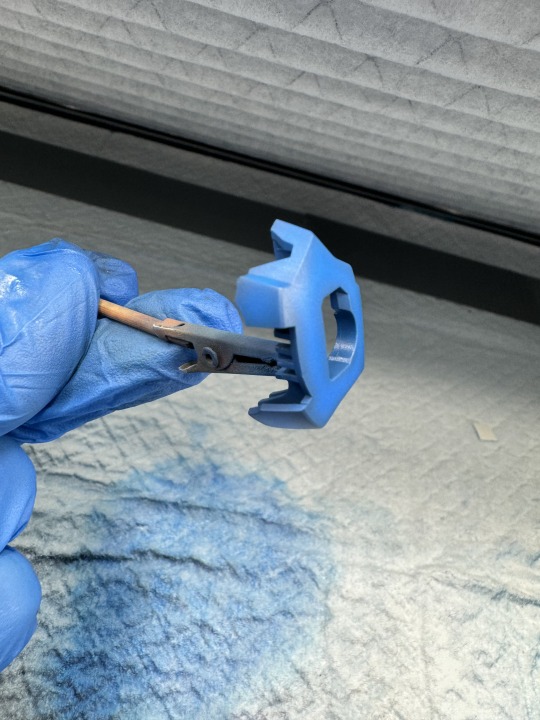
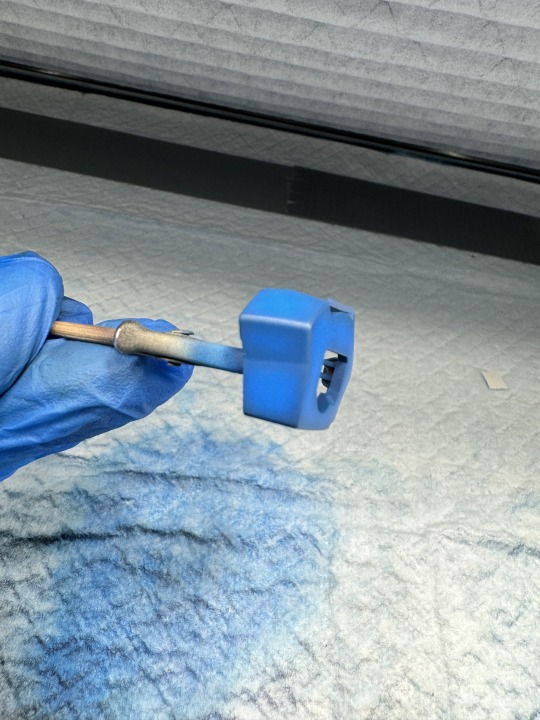
HD Reusable Finish Master G9 | Panel Line | Tools & Materials – finish master | finish master
G-9 Finish Master Gaianotes – HM Hobbies – finish master | finish master
Finished Master – finish master | finish master
HD Reusable Finish Master G9 | Panel Line | Tools & Materials – finish master | finish master
MDC-Max Dätwyler AG Finishmaster Type FM-J27CREKR80 … – finish master | finish master
from WordPress https://flyinghamster2.com/9-things-about-finish-master-you-have-to-experience-it-yourself-finish-master/
0 notes
Text
【ガンプラ】 「RE/100ザクⅡ改」「ハイレゾ アストレイノワール」「HGサンドロック」など試作品展示!
349 : 2019/02/22(金) 14:57:07.65
目玉! pic.twitter.com/Q1mZq02f3g
— ガイアノーツ (@gaianotes) 2019年2月22日
REか~
続きを読む
Source: GUNDAM.LOG|ガンダム2chまとめブログ
View On WordPress
0 notes
Last Seen Blogs

kongerixetnorge
shattered

understandsnone
you who watch and understand none;

selfcestmovies
Selfcest Movie Wishlist
tuzuza
tu zuza

ghoodles
Ink/Sparrow