#model building
Text
I built a Cyberpunk City out of GARBAGE
(AKA: What you do when you’re stuck at home and bored to tears)
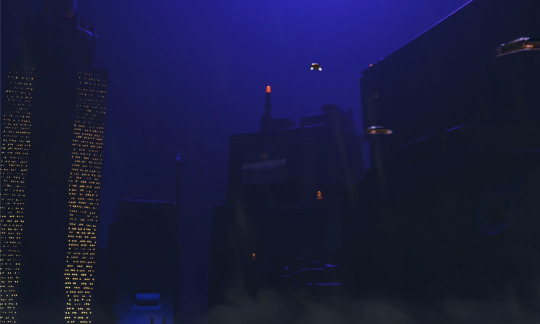
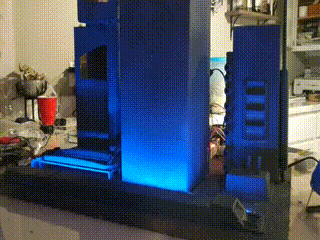
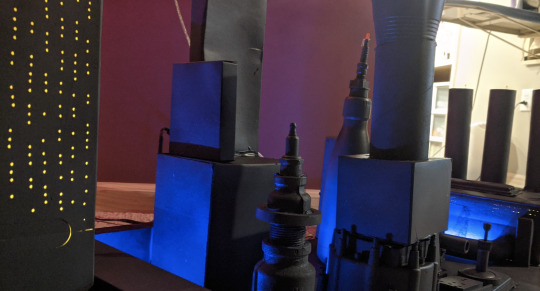
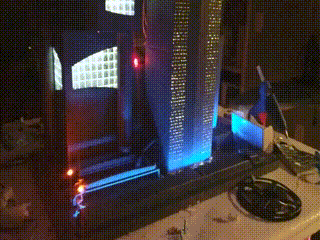
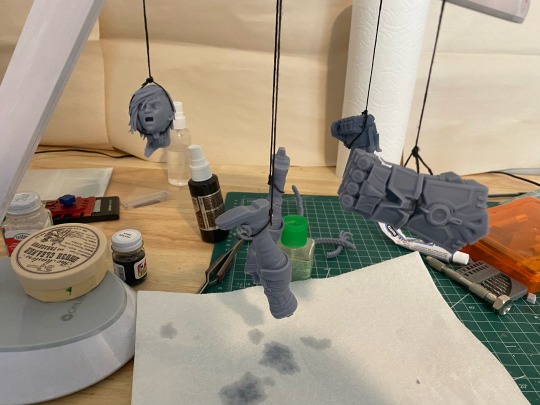
So, one of the wilder things I did during the pandemic was build my own cyberpunk city to use for a music video shoot.
The bones of the project just uses completely randomly pieces of cardboard and other crap from my garage, randomly glued together into shapes that looked vaguely building-like, and spray-painted gray and black to look somewhat on-purpose.
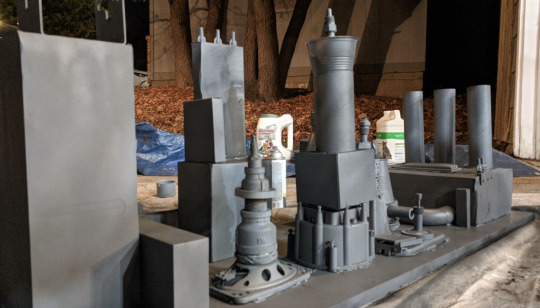
(Party cups and left over toilet paper tubes just add to the aesthetic)
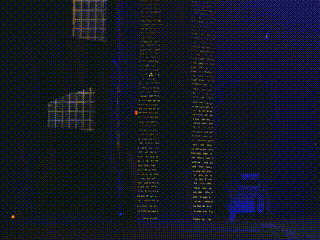
The next thing I did was add dramatic uplighting, because let’s face it... everything looks cooler and bigger and more intense if it’s uplit. Chunks of leftover LED strips work really well, and it’s really easy to isolate just the blue circuits. It creates the illusion of scale which is important for any model to look large.
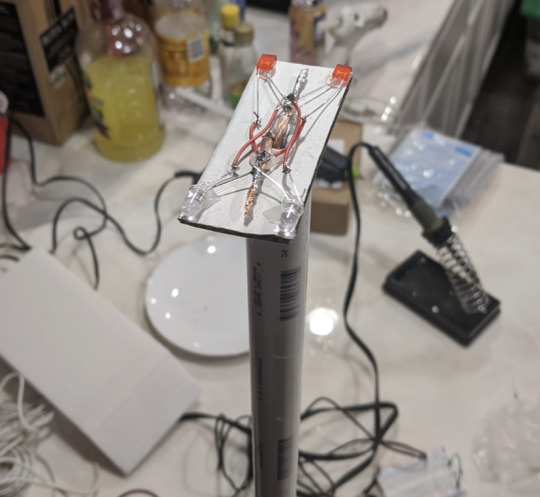
Of course, no city is complete without BLINKY LIGHTS (and I’m sure you noted already there’s some blinky action on top of the towers here) so I spent a bunch of time googling blinking light circuits and experimenting with them on a breadboard before ultimately extending the wires to glue them to the buildings themselves.

(I got a basic electronics kit on Amazon for most of the components)
Then, I put white LED strips inside of the bigger buildings (a little trickier to isolate the W circuits but not impossible!) and poked holes to simulate lit windows for ultimate sci-fi street cred.
At this stage, things were looking pretty legit.
The “final” touch was to create a virtual billboard to go in one of the sections. I had an old first gen ipod touch that I made a little slot for and cobbled together a video loop for. (Don’t worry it’s not permanently installed or anything -- it just slides in and out.)

... and of course what dystopian future is complete without flying cars...?
A little platform for a hotwheels car to go on (after it’s all painted green of course for the greenscreen.)
Insert some practical effects, some video-editing magic, and VOILA! ... it’s CYBERPUNK TIME BAYBEE.
I was inspired by a post on here from literally years ago about making a city out of garbage and LED’s and decided to take it to the next level. I’m sure at some point I could save myself the trouble by learning how to 3D model but this was so much more fun.
I probably spent too much time on this but if you’re in any way curious about what the final result turned out to be, the video I built all of this for premieres on October 15th.
4K notes
·
View notes
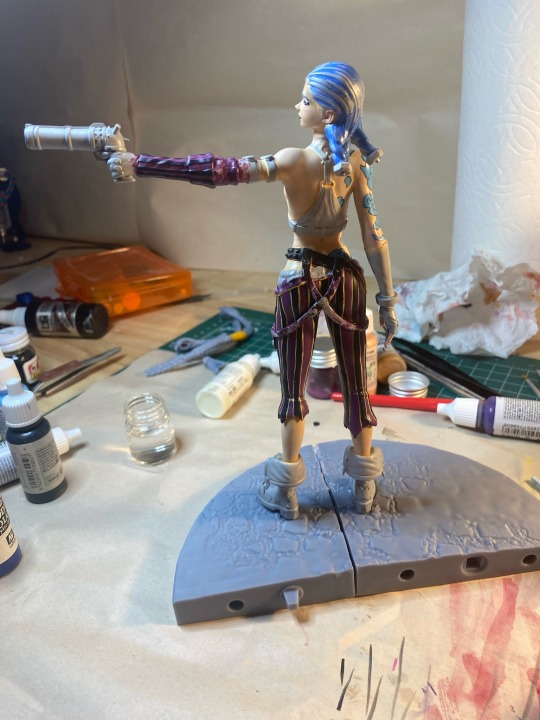
Text
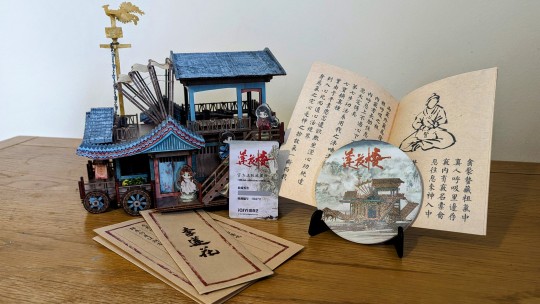
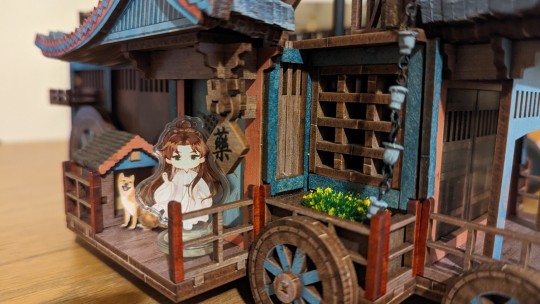

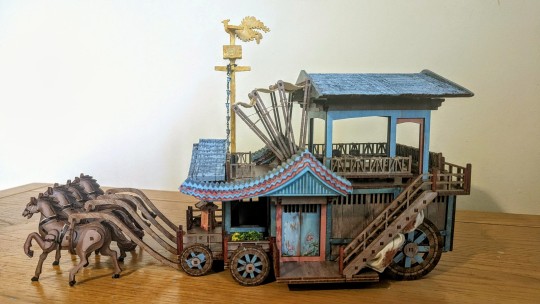
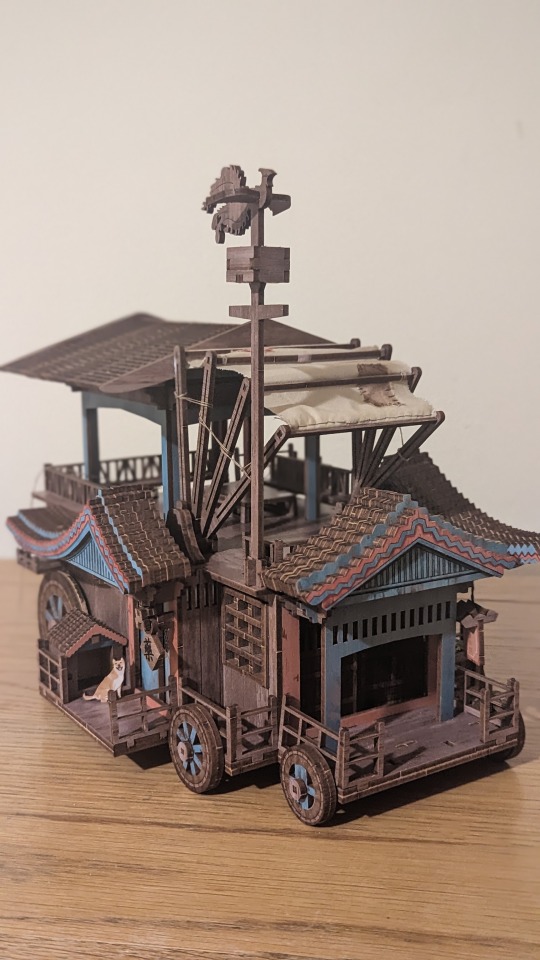
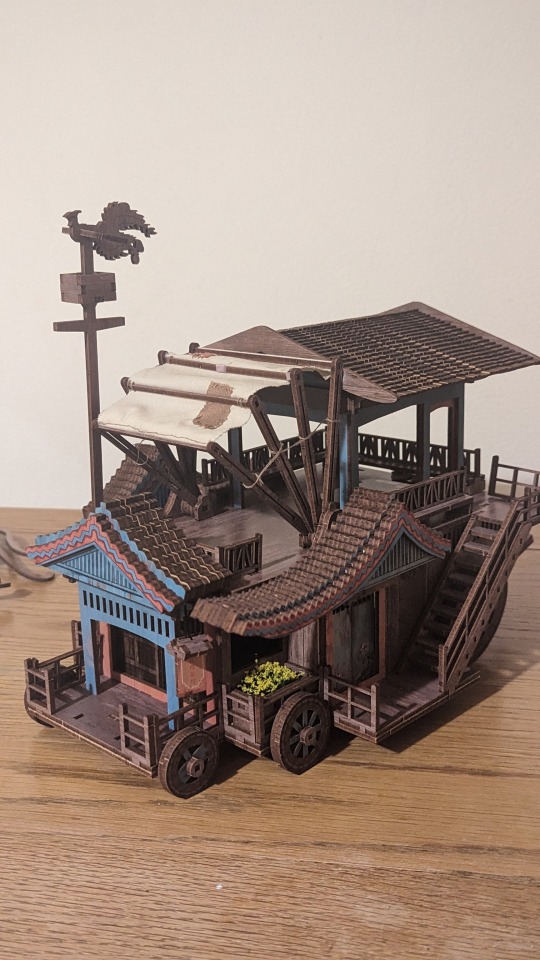
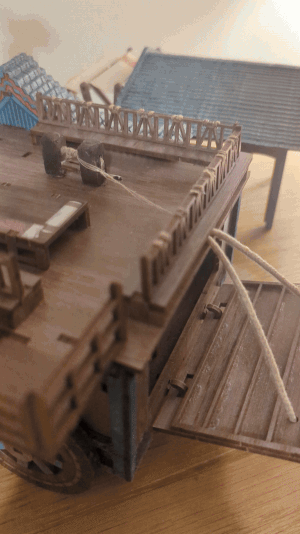
Sooo, I bought the Lotus Tower model kit and, of course, I went overboard making it as accurate as possible to the show. To no one's surprise, I'm guessing? 😅
For reference, this is what the completed model (sans horses) looks like without most* of my alterations:

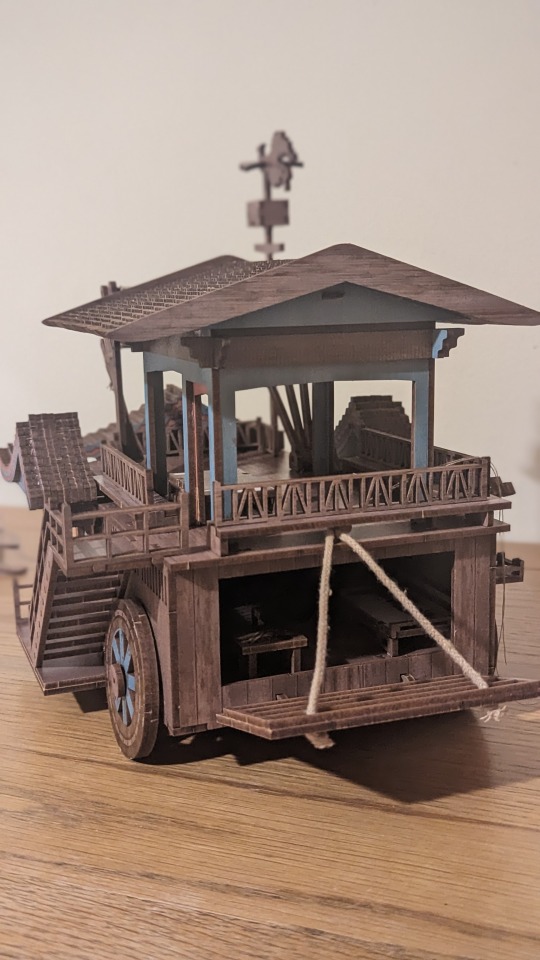
*The awning material and decoration is my only alteration at this point, as I didn't like the fabric they included with the kit.
I had so much fun with this model! It is well-made, has moving parts, and is actually fairly easy to put together, with most parts just clicking into place. It even has furniture details inside!
Let me know what you think! Have you got the kit? How are you finding the building process to be?
If you want to hear a more detailed review of it and see my progress shots and details of my own creative additions, click below:
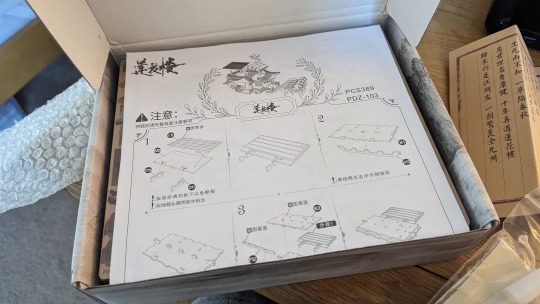
First, unboxing!
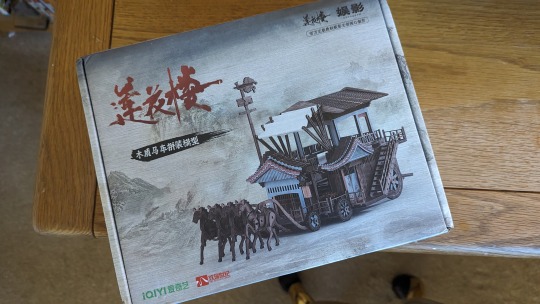
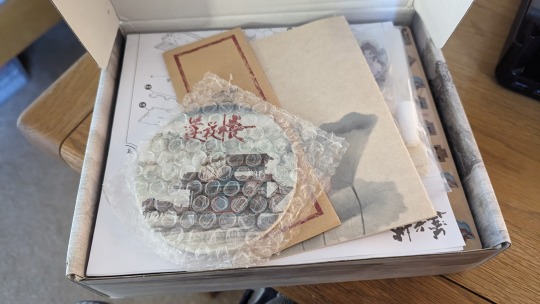
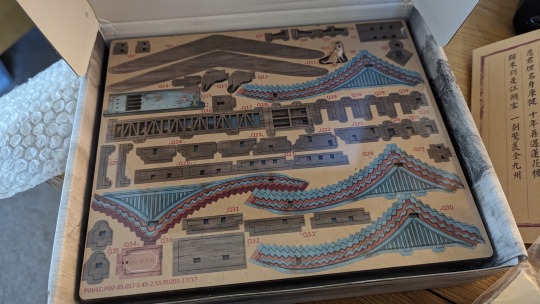
This is how the box arrives. I ordered it from CPOP Universe and it arrived well-packaged and undamaged within a matter of weeks.
Along with the kit itself - which as you can see consists of a stack of laser-cut sheets coded from A-Q, and numbers detailing the specific parts - you receive a coaster (ceramic, backed with cork, and very pretty), little standees of difanghua, a letter styled after the ones difang recieve from Li Lianhua, and a replica of the booklet of yangzhouman techniques.
The process:
The first floor came together pretty quickly:
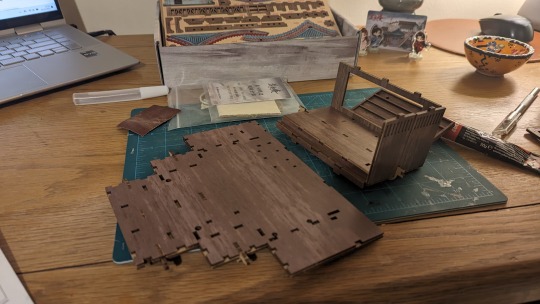

Glue is provided, but isn't necessary for a lot of the pieces, as I found the measurements for a lot of the joints to be pretty snug and able to hold together themselves. Glue is necessary for some parts, though, particularly for areas such as the step up to the rear sleeping area. Strong glue.
Here is what the fist floor looks like:

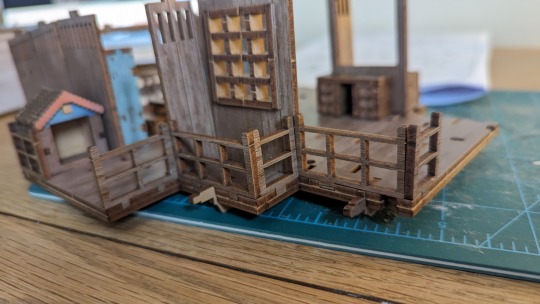
Fitting on the ceiling turned out to be the hardest part of most of the build. All of the holes on the second floor had to line up with every joint on top of the walls and doors.
The next big step I encountered was a curiosity. How to make the rear wall work? There was a curious piece clearly meant to anchor the rope, and a round hole that - much like the doors - meant that this piece was supposed to rotate - and even lock. But I received no instructions on how to achieve that. I found this puzzle (which I like to think was an intentional challenge, given the gadget-orientated FDB) to be a fun challenge. So I won't show you the inner workings and spoil it, but I'll show you the working product:
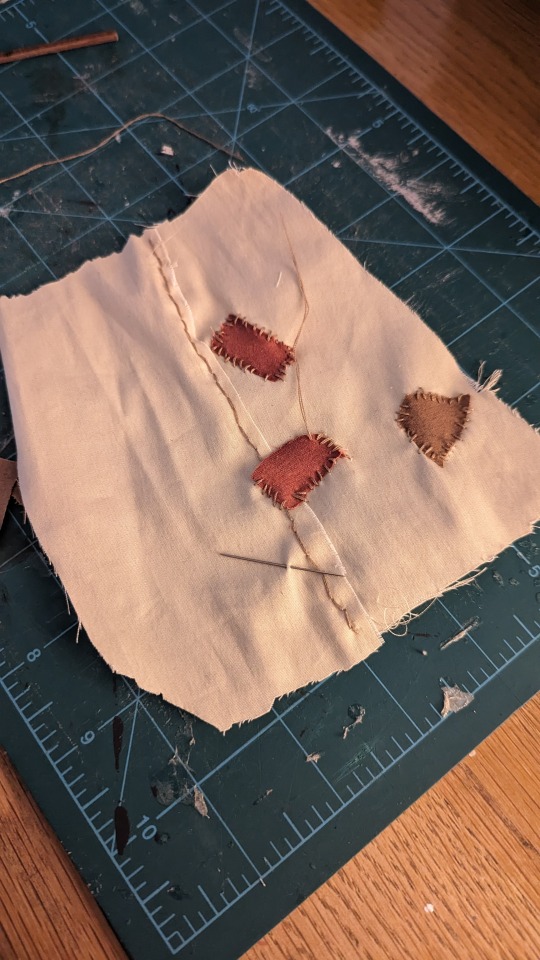
Next was the rather fiddly job of creating the sail awning. I imagine this will be quite difficult for some as there's no clear indication of how to fix the material in place.
My instinct was to sew it as that is also a craft I have practice in, though granted not everyone who buys this kit will be as comfortable with a sewing needle. The two swatches of fabric provided is also quite prone to fraying, and is quite thick and canvas-like. So, knowing that the awning is a big feature of Lotus Tower, I decided I could do better:
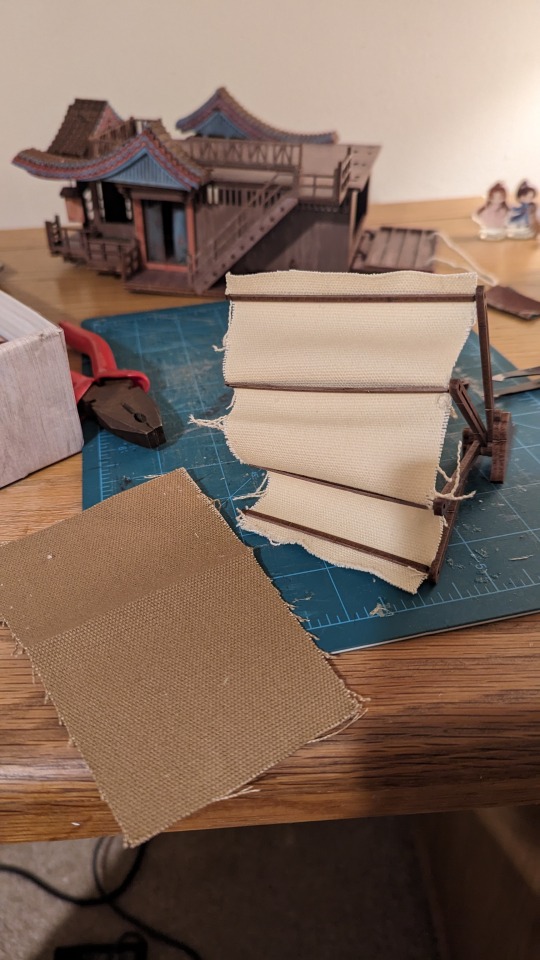
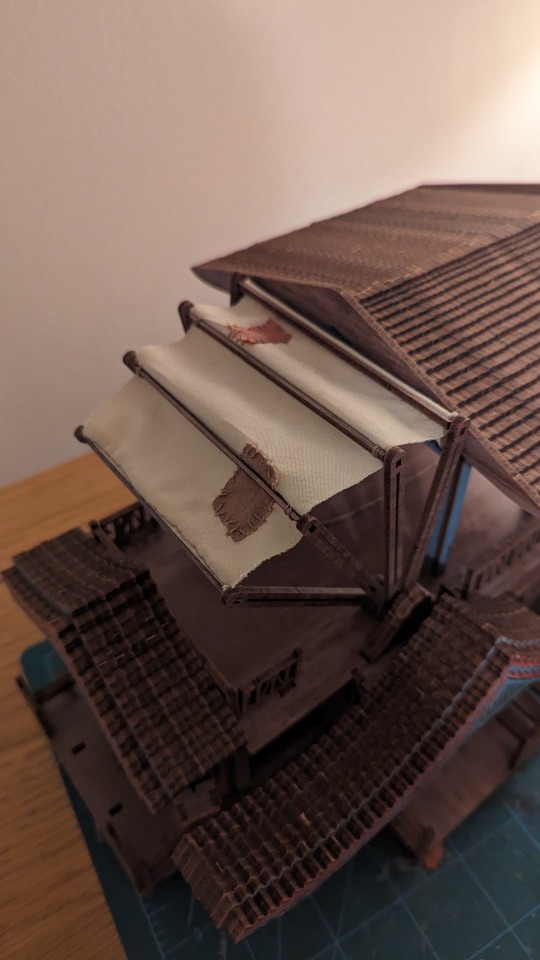
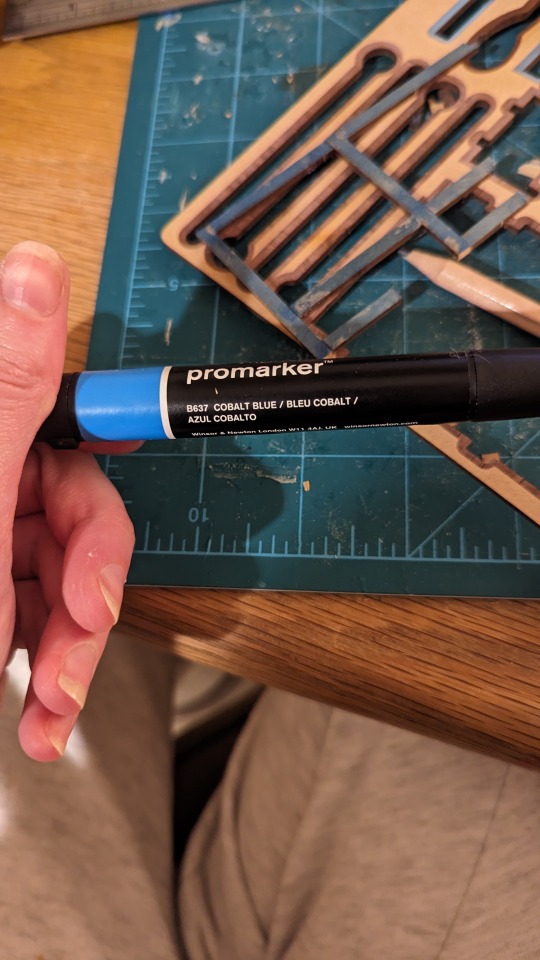
On the left is the provided fabric, and on the right is my own material (an old blouse that I never wore, with patches dyed with my promarker pens).
After that, things should've been an easy home run, as all I had to do was affix the wheels to their axis points and put the horses together. However, quite unfortunately, one of the wheels hadn't been cut out in my kit. I had to cut it out myself with a coping saw, a Stanley knife and much patience😅

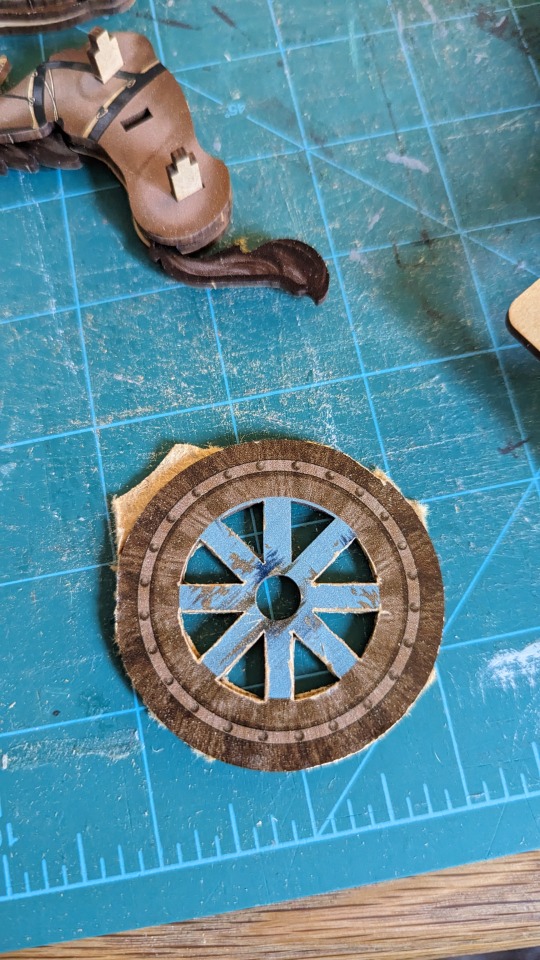
It came out looking rough, but nothing a little sanding and a touch up with my promarkers couldn't fix. I also eventually glued the wheel caps to the axis to prevent the wheels popping off every time I touched it, and they all still spin fine (minus the one I had to cut myself, that one's a little sticky😅). Then came the horses, and I was done!
Or so I thought. "Don't you think it looks a little too brown?" said my detail-obsessed brain. "We could do... more...."
And so I did.
My additions:
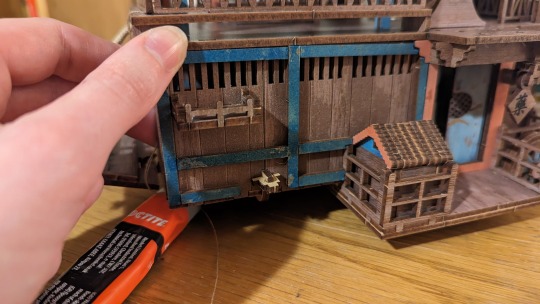
I used scraps coloured by my blue marker to create the beams of the house, and later coloured the fence posts red.
I made a second sail to hand under the stairs.

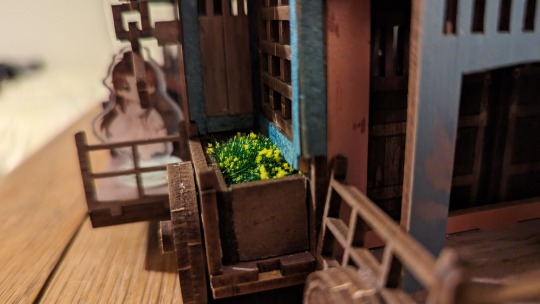
I created a second planter box (again, from the scraps and coloured with promarkers - two sets of flowers were included in the kit, so I could put one in each planter.)

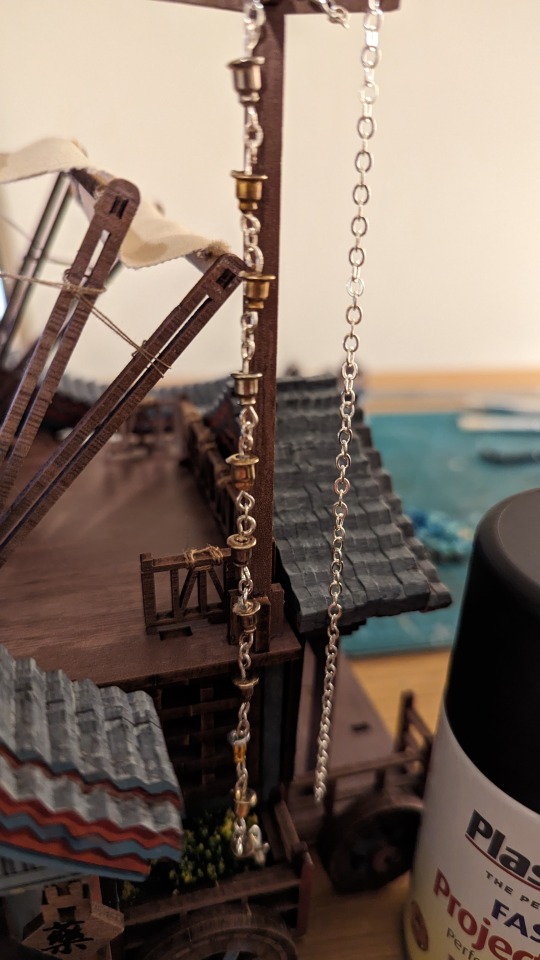
And I even created a rain chain using old earring backs, jewellery findings and a chain, spray painted matte black and then painted blue-grey.

To colour the roofs, I likewise painted them a light blue-grey (/brown for Hulijing's kennel), then used a darker blue promarker to roughly add in texture.
I painted the weather vane, and used scraps to add in its missing two cardinal points.
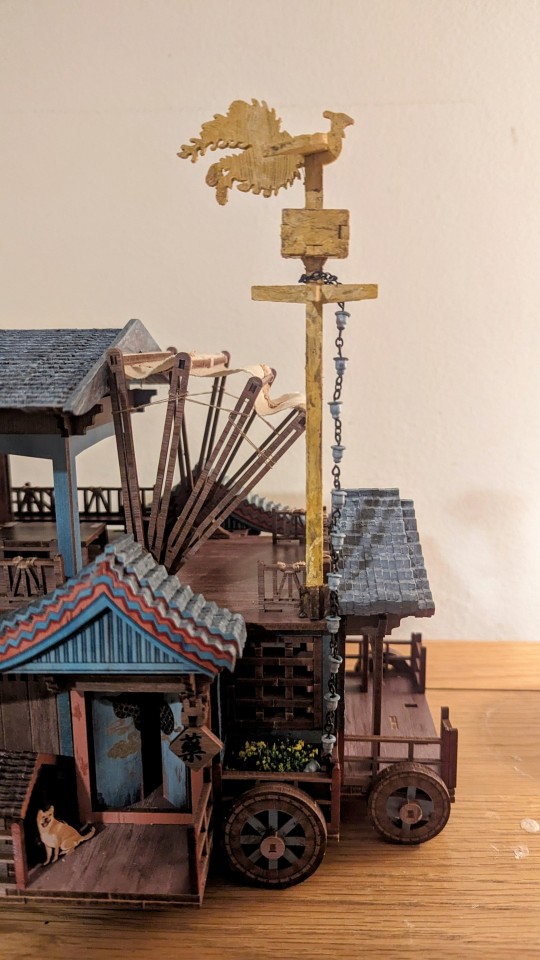
And then finally, I made a winch for the rear wall! It's also easy to turn with the roof on, so I'm very pleased even though it's a little rough looking 😅
Had to gif my video clip because tumblr said boo no to more than one :(
And that's it, that's my latest build! I found this kit very fun, loved the process and seeing Lotus Tower come to life. I also loved adding in all the details to make it just that bit more accurate to the show.
My only true criticisms are 1) small design oversights with the base wood colour being a tad too dark imo; the missing arms on the weather vane; and no second flowerbed (although I may be being a tad too pedantic about it 😅). 2) The fact that one of the wheels in my kit didn't get cut out properly (a quality check issue).
Obviously, I made the choice to use a different material than the fabric included so I can't speak to how satisfactory it is. However, if I were ever in the position to give IQiYi direct feedback, I'd suggest they include thinner fabric, and paint (or paint suggestions, as I know model paints aren't usually allowed through customs in these kinds of kits) for the roofs, because (by way of how they're constructed) they're just raw edges of the reinforced card parts - completely uncoloured, despite being a very visual element of the piece.
Thank you for reading this far lol Keep an eye out for more art and craft posts! (I have a Siji Manor set update coming shortly 👀)
#mysterious lotus casebook#lotus tower#莲花楼#lian hua lou#model kit#model building#my builds#nikkidraws#iqiyi merch#mlc merch#mysterious lotus casebook merch#arts and crafts#li lianhua#li xiangyi#lian hua lou merch#lhl merch#now where do i keep this thing
222 notes
·
View notes
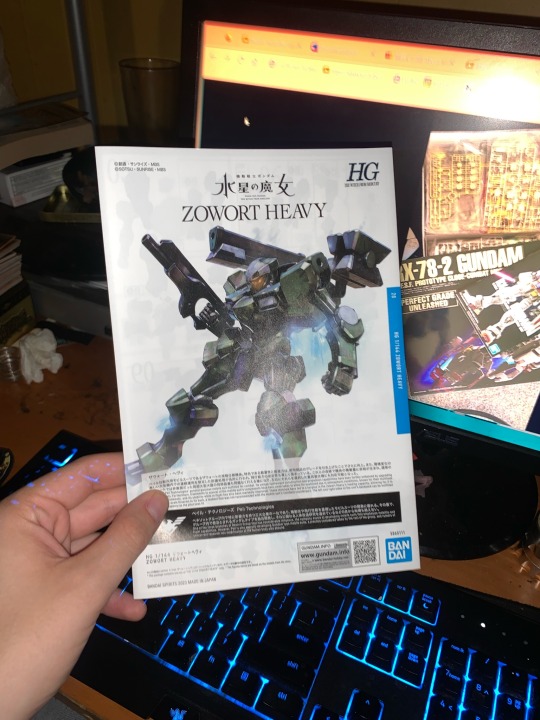
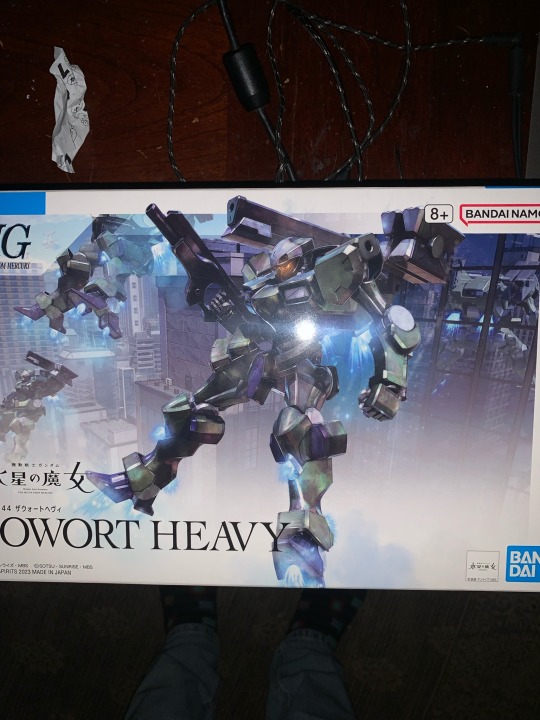
Text
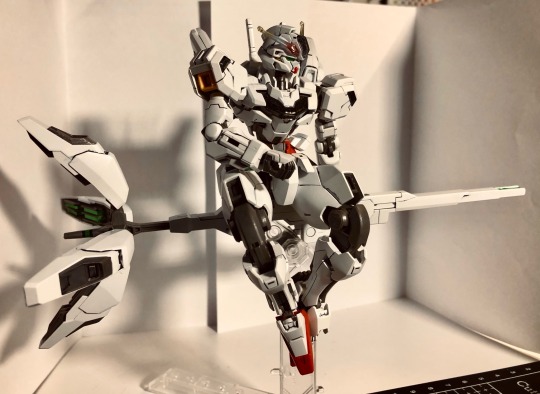
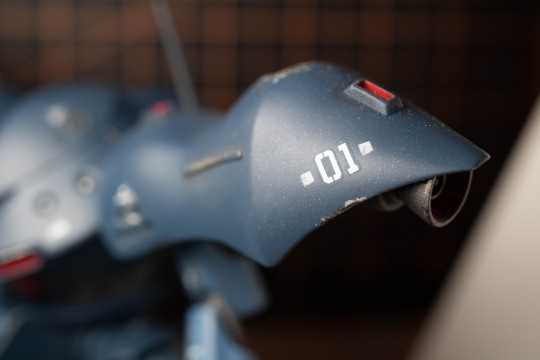
witch on her broom
#gunpla#gundam#mobile suit gundam#hg gunpla#model building#mobile suit gundam the witch from mercury#g witch#gundam calibarn#calibarn#my gunpla
218 notes
·
View notes
Text
Building Wh40k minis is so great. Not only do you get a respite from worrying about the world around you, you also get a neat little dude.
Can confirm, men will do anything but therapy.
#warhammer 40k#warhammer 40000#warhammercommunity#warhammer minis#miniature#model building#relatable
126 notes
·
View notes
Photo

Model ship builder Victor Carlsson in his workshop, 1934, Sweden.
178 notes
·
View notes
Text


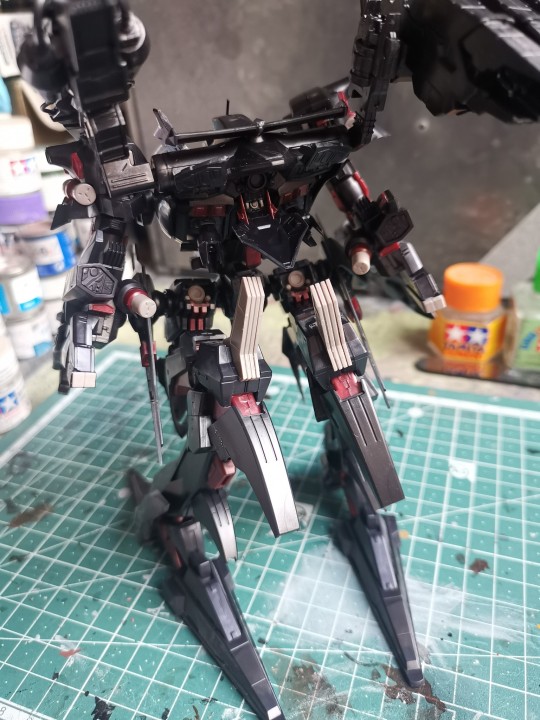
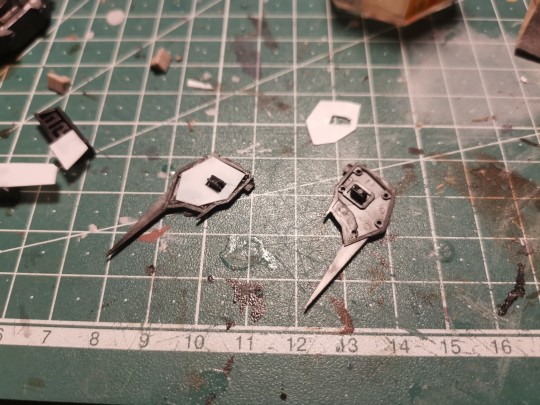


What I'm currently working on.
#armored core#model building#model kit#kotobukiya#armored core for answer#unsung#04 alicia#maximilian thermidor#gunpla#fromsoftware
63 notes
·
View notes
Text
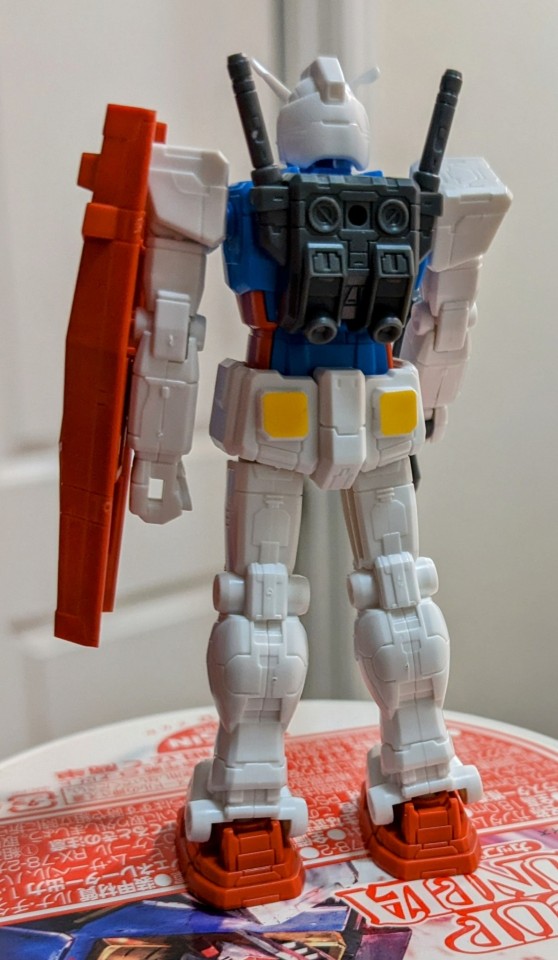
Model Kit Build: "Cup Gunpla RX-78-2" by Bandai and Cup Noodle
It's time to get... noodly?


Yup, it's an actual, officially licensed Cup Noodle container with a tiny Gunpla inside to build!
These were special Gundam 40th anniversary promos.

Oh my god. This is everything! The sprues, the instructions, and the stickers.
It's so goddamn adorable!

Everything is miniature up in here. Please notice how small the eye sticker is. Thankfully, I've got these razor-sharp tweezers in my kit!

Torso shot! It only took about 10 minutes to get this far, and I was taking my time. :P
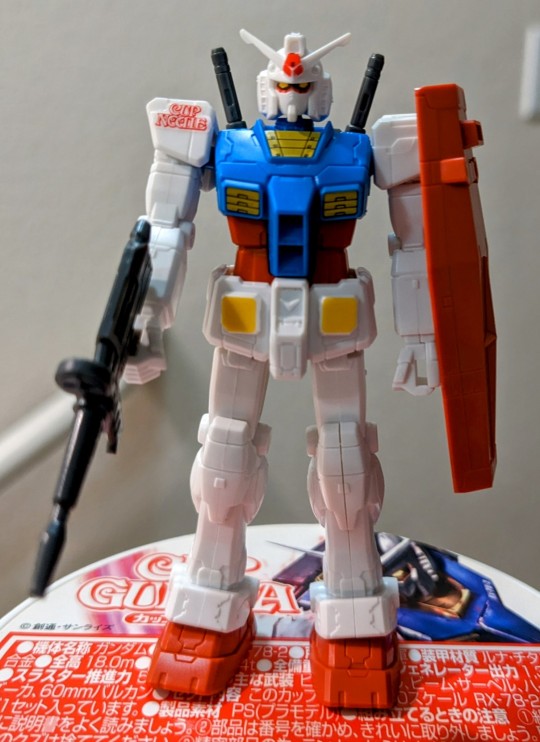
And here it is in its full, itty-bitty glory, complete with Cup Noodle logo on the shoulder armor. :)

This was definitely a fun little kit to snap together. An entry grade entry grade, if that was a thing. One step above a gacha toy.
I just imagine a cool little kid in Japan getting a surprise with dinner one night and getting to put together a Gunpla before bed.
Or maybe it was some grown-ass otaku like me instead who went out and bought every possible variation and spent a night putting them all together in a row while eating multiple cups of noodles.

Posing it on top of the cup here so I can show the size comparison.
Super neato. :)
For more of my model kit builds on Tumblr, click here:
#cup noodle#cup gunpla#gunpla#gundam kits#gundam build#gundam#model kit#model kits#model build#rare#japanese#hattersmodelbuilds#model building
238 notes
·
View notes
Text
Been working on a new project.
Jinx and Vi figures from the show Arcane. Starting off with Jinx.
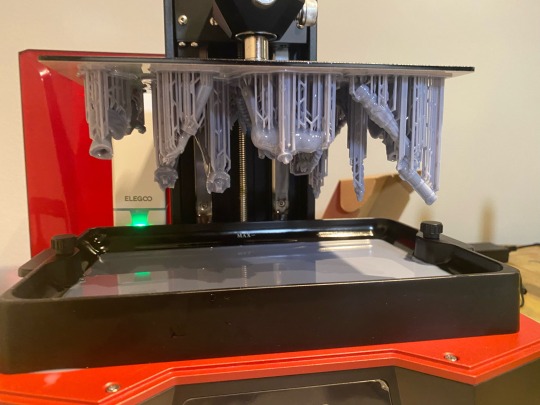

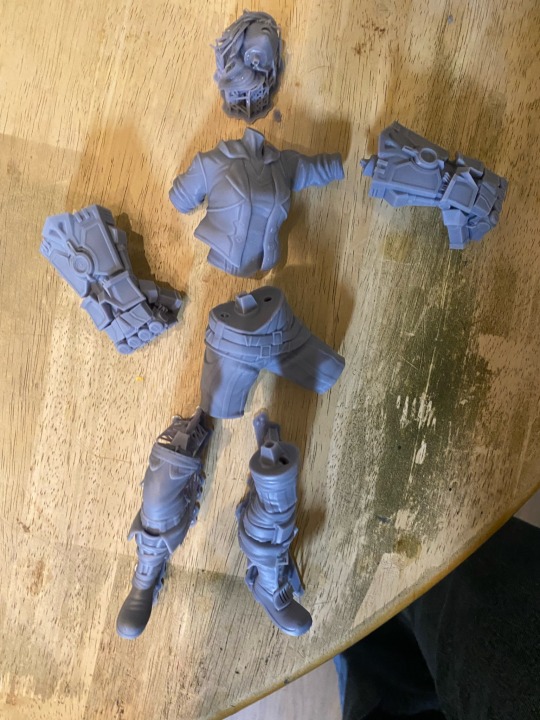


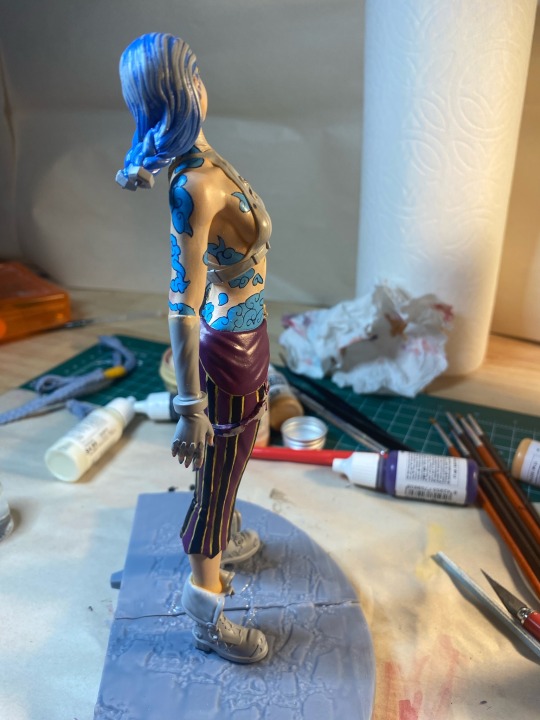
It been pretty fun. A lot different from what I am used to, and I haven’t figured a good method for work holding yet. So I’m going to have to clear coat often to protect the paint job from my handling.
#jinx#jinx arcane#vi arcane#arcane#arcane fanart#model building#3d printing#the prints are not my own
47 notes
·
View notes
Text
They put a lil sticker in the box for me 💖🥺
#gunpla#gundam#mech#model building#plamodel#legit saved me from having a bad day lol#what a sweet lil guy
61 notes
·
View notes
Text
Back when bionicles were a thing I wouldn't put the head on until the very end because I didn't want the guy to be "alive" for the rest of the assembly process, and I realized I don't do it for my Warhammer minis (because they aren't "alive" until they've been based and painted, obviously). I don't have any gunpla/gundam so I don't know if I'd do it for them or not, but I've been meaning to get some.
So I pose the question to the rest of you:
29 notes
·
View notes
Text
WIFE TIME
Finally got around to finishing my Figurerise Standard Suletta and Miorine! I love them!

#gundam#wfm#witch from mercury#the witch from mercury#gundam witch from mercury#g witch#suletta mercury#miorine rembram#sulemio#plamo#model building#gunpla#mobile suit gundam the witch from mercury#gundam the witch from mercury
55 notes
·
View notes
Text
Wendy did a double take after she finally parsed what her friend Galmuss was telling her. "What? What chemical warning?"
Galmuss held up the printed memo to her. "Everyone - not Human that is - who is in the Affinity Groups got one. Looks like they are tailored to their Affinity.
Wendy took the memo and looked at it. Her translator helpfully started to read it to her as her eyes passed over the printout.
Reminder for those beings in regular contact with Humanity:
Humans can process C3H6O (known as acetone) naturally.
Their bodies make it. For most of us, protective gear (and in some cases breathing apparatus) is required when handling it. Due to the sensitivity some sapients have towards it, the station's gas sensors will be activated even with very small concentrations.
As for the Humans the best warning we were able to get from one of their doctors is “humans probably shouldn’t drink a lot of it” Caution is advised. Refer to your local Station Authority if you have further questions.
"Acetone?" Recognition dawned. "Oh! You mean the paint thinner we use when we're cleaning up and, well, thinning paint!"
Galmuss took a step back without realizing it "It's here? I thought it was just a generic warning"
"I mean, it's not bad, it's just acetone. It's useful and cheap and so long as you're not stupid it's fine. Here." She turned around and rummaged in her case and brought out a clear plastic bottle with a handwritten labels that said THINNER on it. As she opened the bottle, a strong odor wafted from it.
As soon as she opened the bottle, Galmuss took off and dove through the rapidly closing pressure door just as the sound of the gas alarms got to Wendy's ears.
"Shit." she muttered. "There goes my Scale Model Club."
#humans are deathworlders#humans are space orcs#model building#sci fi writing#acetone is useful I don't care who you are
347 notes
·
View notes
Text
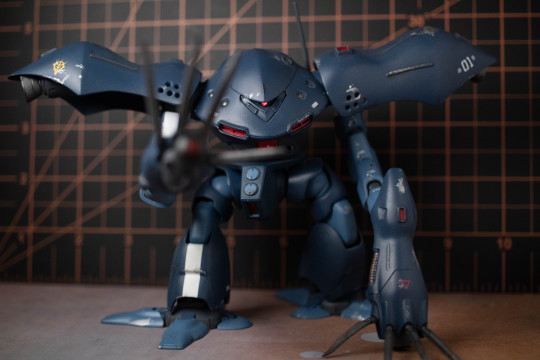


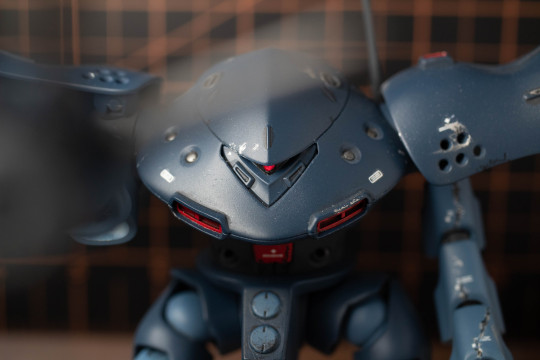


Finished HGUC MSM-03C Hygogg custom build, finally took some decent photos of it. First custom, first fully painted/airbrushed build, first led mod, etc. etc. Lots of firsts.
So many mistakes, all the left arm armor pieces cracked for example, but I tried to make it kind of look like intentional damage/weathering. For anyone out there, make sure you have a good barrier layer before using too much enamel panel wash...
There's a lot I would do differently but I learned so much and ultimately I'm sort of proud of it.
Hygogg is DEFINITELY one of my favorite mobile suits now though this guy is really fun looking.
202 notes
·
View notes
Text
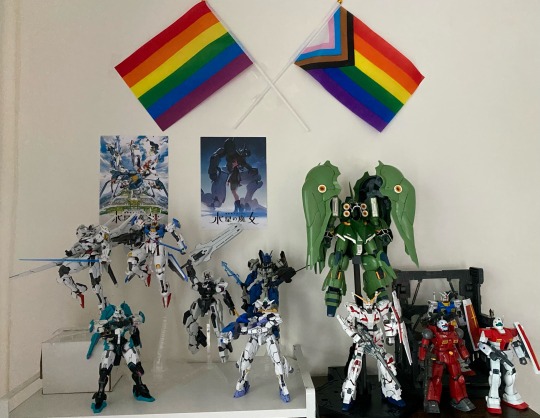


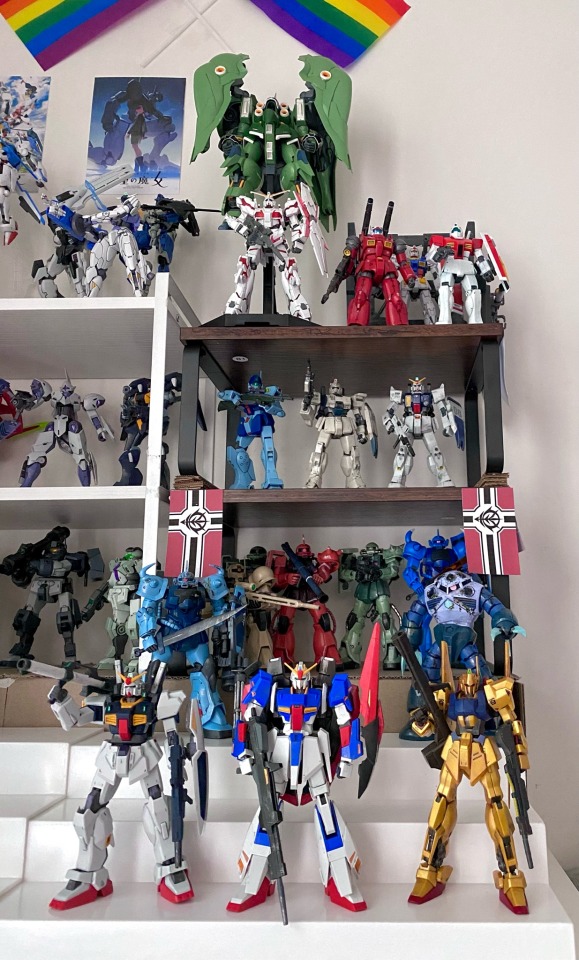
constantly tinkering with my new gunpla display to get it looking as good as possible
#gunpla#gundam#mobile suit gundam#hg gunpla#rg gunpla#model building#my gunpla#mobile suit gundam the witch from mercury#witch from mercury#mobile suit zeta gundam#mobile suit gundam the 08th ms team#mobile suit gundam vanadis heart#mobile suit gundam war in the pocket#mobile suit gundam: the origin#mobile suit gundam iron blooded orphans#iron blooded orphans
54 notes
·
View notes
Text

Revell’s Bug Bomb and the rest of the Deal’s Wheels line-up.
#vintage illustration#vintage advertising#revell#model building#revell hobby kits#revell models#dave deal#deal’s wheels#bug bomb#glitter bug#stink ray#zzzzzzzz-28#model kits#model cars#the 70s#automotive art
23 notes
·
View notes
Text
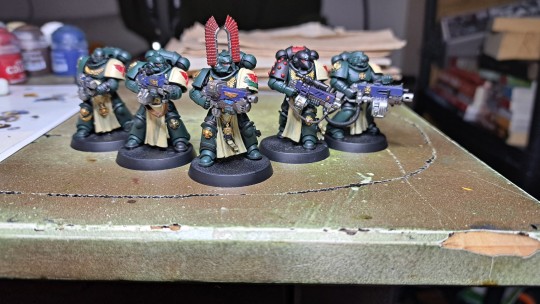
Sternguard Fire Team Arakis, lead by Sergeant Tamlin Horril, wielding the Combi-plasma "Hearthfire", a veteran of 207 years im noble service to the first
Bearing the legions red and black is Brother Ariel, the squads primary marksman and former Risen.
The squads heavy gunner, Brother Garrow is an expert in heavy weapons, from laser weapons fired with pinpoint accuracy to suppressive fire from heavy bolters
Brother Harkos, wielding a bolt rifle, not the Marksman Ariel is they are an accomplished CQB and CQC specialist.
Brother Zahra wields a powerfull combi-melta, an anti-tank and demolitions specialist with special sabatoge training
#warhammer 40k#dark angel#miniature#modeling#painting#space marines#wargaming#model building#model painting
26 notes
·
View notes
Last Seen Blogs

monsterhighfansite
Monster High

ludrians
Ludrians

uwussandro
Intra-Moenia

strangegirl-flungoutofspace
Carol (2015)

zell-dincht
I'm Your Villain