musecentral
screaming into the pillow.
chey's theme blog.
6 posts
Don't wanna be here? Send us removal request.
Last Seen Blogs

wifisetupguide-blog
WiFiSetupGuide

kylemichael876
Untitled

goddamnadamellis
Bananas and Cigarettes

nagaqqcom
nagaqq.com agen judi bandarq

tj-guerrero
Tenacious ™
Note
hi chey! i'm sorry if you've already answered this question (i skimmed through your theme faq tag) but i was wondering you knew how to keep a reblogged post with a screenshot inside the container? usually if it's a text post with a picture attached it always stretches outside my theme ): i hope this made sense, i'm terrible at explaining but thanks in advance!
it’s all good babe!!!
find out what the div/class is for your posts. usually mine is “#posts” so then i would add this:
#posts .img { max-width: 100%; height: auto;}
that will take care of your problem.
1 note
·
View note
Note
hi hi can you add a 'move everything' feature to coco?? pls and thnx
update: theme #4 coco now has a move everything feature.
when editing, remember to use “px” after the margin number.
[ code ]
6 notes
·
View notes
Note
I'm really sorry if this question has already been asked! How did you make your tags appear when you hover over the entire post?
there’s a tutorial here
0 notes
Note
prominencehq is a rec !!!
@prominencehq
cries these graphics tho this is why i sleep soundly at night. looks good!
0 notes
Note
Do you think you'll release your current theme?
maybe.
0 notes
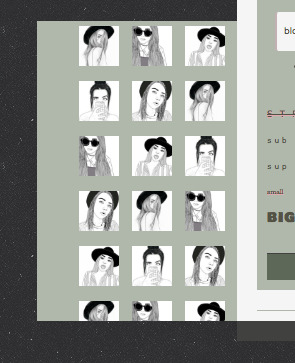
Photo
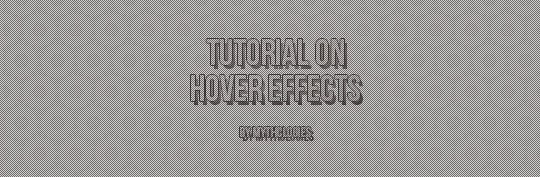
in this tutorial, you’ll learn how to do this:

let’s being!
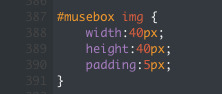
to start, you’re going to go into your html and begin with writing out the code for your muse box. now to make your life easier, you’re going to code in an image div for your muse box. what this does is resize the images without you uploading them after cropping them. it honestly makes everything much easier. this is the basics. now you’re going to code in some colours and all together you’re end result for the whole css part should look something similar to this:

now you’ll have to adjust the margins according to your screen, but this is what worked for me. time to add the html. scroll down to the <body> part of the html and add in the musebox div. you’re going to start with something that looks like this:
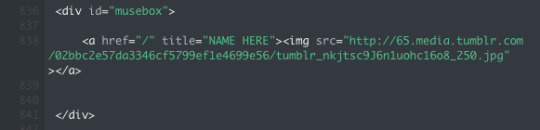
and then add as many image links as you need to according to the amount of muses you have.
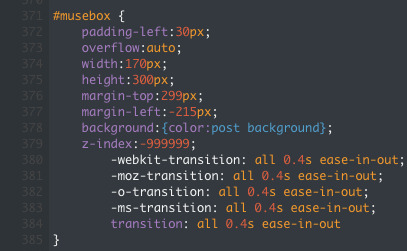
go back up to your css part for the muse box. you’re going to now start the hover effect. on your muse box css, adjust the margins so that you’re muse box looks like this:

that’s the padding that we added earlier. you’re going to want to make sure you add a z-index of at least -999999. you can do so by typing in z-index:-999999; under the last line before the bracket in #musebox.
if you need to, add a z-index of 999999 to the container div of the theme you’re using. whatever you do, just make sure your muse box is under the posts.
now it’s time to learn about the hove property. you probably already have some in your theme for your links to get them to change colour when you hover over them. or maybe you have a letter spacing property for your links. but the hover margin shift is really fun to play with. so type up something like this:
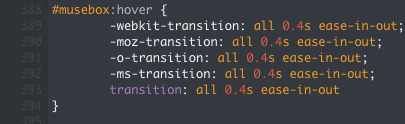
with the ease in and out part, there’s different properties in there. they’re different browsers (webkit = chrome, moz = firefox, o = opera, etc.) and it just ensures that your transition looks good on all browsers. the ease in and out part is VERY important to make sure your transition is smooth and looks nice. now you’re going to add “ margin-left:0px; “ RIGHT ABOVE the first line in the brackets.
because my original left margin is in the negative, i’m going to continue going further into the negatives until i get this:
you’ll notice when you hover away from the muse box it doesn’t slide back in, instead it just plops back to place. the easy way to fix that is add the in and out transition code to the muse box. so all three of your divs should look like this by the time you finish:

Alright!! You’re done! This is a simple muse box hover effect that you can easily achieve. play with the code and style your hover div as much as you’d like!
with love,
- chey x.
272 notes
·
View notes