thiswolficorn
Nobi this is so sad, play Despacito
Side blog to ThatWolficorn, dedicated to Glitch Techs! Creator of the Fragmented Core AU!
12 posts
Last active 60 minutes ago
Don't wanna be here? Send us removal request.
Last Seen Blogs


Text
@critterfrits Seems like the exact kind of post you'd love
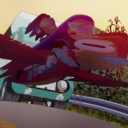
Thought this would be funny.

19 notes
·
View notes
Text
Click for better quality!
Back with more Fragmented Core AU art finally! I tried some semi-realism this time! :D
This took me 15hrs to draw and has over 100 layers
#Damn I haven't posted art since last year#Fragmented Core#FragCore Mitch#FragCore Widget#Glitch Techs OC#Glitch Techs#Wolfi's Art#<- art tag#Mitch Williams#Glitch Techs AU
27 notes
·
View notes
Note
On anon because I feel like this compliment is too.... weird?
I think Rose-Tinted would be beautiful as a bound book
-Sincerely, a person that loves binding books
Nonny one day I would love to have a bound version of Rose-Tinted once it’s fully complete.
I just have to finish the silly thing first - even if I’m doing it one paragraph at a time, I will finish it.
When it’s done I’ll post my bound copy haha
#Hell yeah!#bound book <3#I would love to make cover art for Rose Tinted chapters but unfortunately I have college portfolios to do rip#I want to make art for each FragCore chapter when I actually start posting them#I have two chapters started so far and almost all the rest planned but like#the motivating to write is not there </3#anyway I'm rambling in the tags oopsie#just realised I've made multiple spelling errors mb#I am so tired#forgive the spelling errors please
2 notes
·
View notes
Text
Pictures of Chomp Kitty!!


Here's what he looks like finished! (Apologies for the poor pictures, my usual photo backdrop has disappeared so I've resorted to the good ol' blanket + chair combo)

Bonus pic of Chomp Kitty with Mitch :D
Happy 4th Anniversary to Glitch Techs!
As a little gift to the fandom, here's a free crochet pattern so you can make your own Chomp Kitty plushie!!
Materials used:
-----------------
•4mm crochet hook (any will do, 4mm was the only size I had. KEEP IN MIND that hook size plays a role in determining the size of your plushie)
•Vibrant green wool/yarn (I got a 100g ball from Woolcraft, but I don't know the exact colour name.)
•Purple wool/yarn (Same as above) *
•Baby blue wool/yarn (Brand unknown)
•White wool/yarn (Brand unknown) *
•Black wool/yarn (Brand unknown) *
•Darning needle
*If you want to do less crocheting, you can use felt instead!! Just skip the parts where you crochet the stripes (purple), the teeth (white), the eyes (white and black) and the whiskers (black)
Note: Try your best to keep the thickness of your wool/yarn consistent. Having chunky wool in one part and then thin wool in a later part can look a bit weird sometimes. ALSO!! MAKE SURE YOU GET ENOUGH WOOL. That being said, a ball of each colour should be plenty! :D
If you want to make Horn, just swap out the colours! :D
Pattern Key:
--------------
•MC = Magic Circle (A technique used for starting pieces)
•Sc = Single Crochet (A single stitch)
•Inc = Increase (Two stitches into one)
•Dec = Decrease (Crochet two together. Use invisible decrease for better, more uniform result)
•2(sc, inc) (This is an example of format. This means that you single and then increase twice)
If you don't know how to do these, I suggest looking up a tutorial on YouTube!
Alright, with all of that out of the way, here's the pattern:
Legs (Make 4)
----------------
The legs are done in green.
R1: Magic Circle - 6 (6)
R2: Inc 6 (12)
R3: 4(2sc, inc) (16)
R4-6: 16sc (48)
R7: 2(6sc, dec) (14)
R8: 14sc (14)
R9: 2(5sc, dec) (12)
R10-12: (12) (36)
R13: dec, 10sc (11)
R14-16: 11sc (33)
Stuff the legs firmly, especially at the paws, so they keep their shape properly. If you have beans, you can put them in the paws to weight them!
Body (Sorry but the rounds are really messy here in terms of formatting, apologies for any pattern mistakes)
------
Start with baby blue
R1: Chain 5 (5)
R2: sc into current stitch, 4sc, inc (7)
Rotate piece. Into the other side of the chain: 4sc, 3inc, 3sc, 3inc (19)
R3: sc, 2inc, 3(sc, inc), sc, 2inc, 2(sc, inc) (25)
R4: 3sc, 3(inc, 2sc), 6sc, 3(inc, 2sc), inc (35)
R5: 11(2sc, inc) (44)
R6: 14sc, 3(dec, 2sc), 5sc, 3(dec, 2sc) (37)
R7: 2[inc, 2sc, inc, 3(sc, inc), 2sc, inc, 6sc] (50)
R8: 52sc (52)
We will now crochet rounds around the outside of the leg, skipping the stitches on the inside (the ones that are attached to the body). Still crochet into the "corners"
Switch to green
We're going to attach the legs this round, without sewing. Push the hook through the next stitch, and then into one of the stitches of one of the legs. Pull the green through and sc.
R9: another 3 sc, same as before, go through the body and the leg. 8sc, Attach another leg by crocheting 4sc into the body and the next next leg, 10sc, another leg with 4sc, 8sc, another leg with 4sc, 10sc
R10: 3sc, 2dec, 14sc, 2dec, 16sc, 2dec, 14sc, 2dec, 16sc
R11: Full round of sc (When I said messy, this is what I meant lmao, I didn't count the stitches in each round for the body so I'm doing it in post and it might be wrong, my bad y'all)
Unfortunately, the next round might be hard to follow because I got lazy with my notes.
Sorry </3
R12: Another round of sc BUT in each leg "corner" (the first and last stitch that joins the leg to the body), dc. There should be 8dc total
R13: sc around the leg, sc, dec, 2sc, dec, sc, sc around the leg, sc until next leg, sc around leg, sc, dec, 2sc, dec, sc, sc to finish round
R14: 2[dec, 4(2sc, dec)]
R14: 2(3sc, dec), 3sc, dec, 4sc, dec, 14sc, dec, 4sc, dec, 10sc
R15-16: all sc
R17: sc, dec, 2(4sc, dec), 5sc, dec, 4sc, dec, 4sc, dec, 5sc
R18: 3(dec, sc), 9sc, 3(dec, sc), 5sc
R19: all sc
Start stuffing if you haven't already. Stuff after each round after this if needed. Firmly stuffing keeps the pose better but less firm means more cuddly. Your choice!
R20: 2dec, sc, 2dec, 5sc, 2dec, sc, 2dec, 3sc
R21: 4dec, 2sc, 4dec, 2sc, 6dec
Leave a generous tail to sew up the body. Use the darning needle to sew, then snip the excess and hide the rest by either pushing it into the body with the hook or using the needle to pull it through the side.
Head
------
Start with baby blue. The Dark Ages are over and I started writing down the pattern properly again lol. (Sorry once again for the nightmare of the body)
R1: MC - 6 (6)
R2: Inc 6 (12)
R3: 6(sc, inc) (18)
R4: sc, inc, 5(2sc, inc), sc (24)
R5: 6(3sc, inc) (30)
R6: 2sc, inc, 5(4sc, inc), 2sc (36)
R7: 6(5sc, inc) (42)
R8: 3sc, inc, 5(6sc, inc), 3sc (48)
R9: 6(7sc, inc) (54)
R10: 4sc, inc, 5(8sc, inc), 4sc (60)
R11: 6(9sc, inc) (66)
R12: 5sc, inc, 5(10sc, inc), 5sc (72)
R13-25 (13 rows): 72sc (936) Good luck, soldier. Switch to green at row 14.
R26: 5sc, dec, 5(10sc, dec), 5sc (66)
R27: 6(9sc, dec) (60)
R28: 4sc, dec, 5(8sc, dec) 4sc (54)
R29: 6(7sc, dec) (48)
R30: 3sc, dec, 5(6sc, dec), 3sc (42)
R31: 6(5sc, dec) (36)
R32: 2sc, dec, 5(4sc, dec), 2sc (30)
Start stuffing if you haven't already. Stuff well to ensure your Chomp Kitty's head keeps the spherical shape. Continue to stuff after each round if needed.
R33: 6(3sc, dec) (24)
R34: sc, dec, 5(2sc, dec), sc (18)
R35: 6(sc, dec) (12)
R36: 6(dec) (6)
Leave generous tail, sew, snip, hide tail.
Tail
----
The tail is done in green.
R1: MC - 6 (6)
R2: Inc 6 (12)
R3-5: 12sc (36)
R6: 3(3sc, inc) (15)
R7: 15sc
R8: 3(3sc, dec) (12)
R9-11: 12sc (36)
R12: 3(2sc, dec) (9)
R13-16: 9sc (36)
R17: 4sc, dec, 3sc (8)
R18-20: 8sc (32)
Stuff firmly so it sticks up! Leave tail for sewing. Sew onto body, snip, hide. You know the drill by now :)
Ears (Make 2)
----------------
The ears are done in green.
R1: MC - 6 (6)
R2: Inc 6 (12)
R3: 6(sc, inc) (18)
R4: sc, inc, 5(2sc, inc), sc (24)
6(3sc, inc) (30)
Fold the ears over in half, then in half again. Unfold the second fold (this should crease it a little to make it pointy). Leave tail for sewing. When sewing, sew the side with the crochet stitches down so the clean edge is up top.
Eye whites (Make 2)
-----------------------
The eye whites are done in white.
R1: MC - 6 (6)
R2: Inc 6 (12)
R3: 6(sc, inc) (18)
R4: sc, inc, 5(2sc, inc), sc (24)
R5: 6(3sc, inc) (30)
R6: 15(sc, inc) (45)
Leave tail. Sew on.
Pupils (Make 2)
-------
The pupils are done in black.
R1: MC - 6 (6)
R2: Inc 6 (12)
R3: 6(sc, inc) (18)
R4: sc, inc, 5(2sc, inc), sc (24)
Leave tail. Sew on.
Mouth
--------
The mouth is done in white.
R1: MC - 3 (3)
R2: Chain 1 to turn, inc until end of round (6)
R3: Turning chain, (sc, inc) until end of round (9)
R4: Chain, (2sc, inc) until end (12)
R5: Chain, (3sc, inc) until end (15)
R6: Chain, (4sc, inc) until end (18)
R7: Chain, (5sc, inc) until end (21)
R8: Chain, (6sc, inc) until end (24)
R9: Chain, (7sc, inc) until end (27)
R10: Chain, (8sc, inc) until end (30)
Leave tail for sewing. Sew on. Use black wool to embroider the teeth.
Nose
------
The nose is done in purple.
R1: MC - 6 (6)
R2: sc, triple inc (three stitches into one), 5sc, tripinc, 4sc
Leave tail. Sew.
Head Stripe
--------------
The head stripe is done in purple.
R1: Chain 2
R2: sc into the first chain (2nd chain from the hook)
R3: Chain to turn, sc into current stitch, sc into each stitch (3)
R4: Chain to turn, sc into current, sc into each (4)
R5-10: Continue this process of building up until you have 10 stitches across
R11-13: 10sc (30) Chain before the start of each row, but don't sc into the chain
Now just sc until the end of each round, skipping the current stitch. This decreases the rows by one each time. Continue until you only have one stitch left. Leave tail for sewing, sew on.
Tail Stripes
-------------
The tail stripes are done in purple.
Small one:
R1: Chain 3
R2: 2sc, inc
R3: 3sc, inc (into other side of chain)
Leave tail, sew
Big one:
R1: Chain 5
R2: 4sc, inc
R3: 5sc, inc (into other side of chain)
Leave tail, sew
Body Stripes (Make 2)
--------------------------
The body stripes are done in purple.
R1: Chain 15
R2: 15sc
R3: inc, dec, 13sc, dec, inc, dec, 13sc, dec
Leave tail, sew.
Whiskers (Make 4)
---------------------
The whiskers are done in black.
R1: MC - 9 (9)
R2: 3(2sc, inc) (12)
R3: 3sc
R4-6: Chain 1 to turn, 3sc
R7: Chain, dec, sc
R8-9: Chain, 2sc
CONGRATULATIONS!! YOU ARE NOW THE PROUD OWNER OF A CHOMP KITTY CROCHET PLUSHIE!!!
Feel free to tweak the pattern for yourself if you want! However, please do not release my pattern elsewhere, repost it, or sell it. This pattern is free!! It should not be gatekept!! (Also, it's a little unfair if you get to make money off of my design rip) If you want to share, reblog or share a link :)
Apologies for any typos or confusion due to formatting!! This is my first pattern! I tried very hard to make him accurate, but simplified some areas to make it easier. I hope you enjoy!!!
#happy 4 years to my canon event#glitch techs#This took me days#I really hope you guys like it#chomp kitty#<- my previous tags#mitch williams
25 notes
·
View notes
Text
Happy 4th Anniversary to Glitch Techs!
As a little gift to the fandom, here's a free crochet pattern so you can make your own Chomp Kitty plushie!!
Materials used:
-----------------
•4mm crochet hook (any will do, 4mm was the only size I had. KEEP IN MIND that hook size plays a role in determining the size of your plushie)
•Vibrant green wool/yarn (I got a 100g ball from Woolcraft, but I don't know the exact colour name.)
•Purple wool/yarn (Same as above) *
•Baby blue wool/yarn (Brand unknown)
•White wool/yarn (Brand unknown) *
•Black wool/yarn (Brand unknown) *
•Darning needle
*If you want to do less crocheting, you can use felt instead!! Just skip the parts where you crochet the stripes (purple), the teeth (white), the eyes (white and black) and the whiskers (black)
Note: Try your best to keep the thickness of your wool/yarn consistent. Having chunky wool in one part and then thin wool in a later part can look a bit weird sometimes. ALSO!! MAKE SURE YOU GET ENOUGH WOOL. That being said, a ball of each colour should be plenty! :D
If you want to make Horn, just swap out the colours! :D
Pattern Key:
--------------
•MC = Magic Circle (A technique used for starting pieces)
•Sc = Single Crochet (A single stitch)
•Inc = Increase (Two stitches into one)
•Dec = Decrease (Crochet two together. Use invisible decrease for better, more uniform result)
•2(sc, inc) (This is an example of format. This means that you single and then increase twice)
If you don't know how to do these, I suggest looking up a tutorial on YouTube!
Alright, with all of that out of the way, here's the pattern:
Legs (Make 4)
----------------
The legs are done in green.
R1: Magic Circle - 6 (6)
R2: Inc 6 (12)
R3: 4(2sc, inc) (16)
R4-6: 16sc (48)
R7: 2(6sc, dec) (14)
R8: 14sc (14)
R9: 2(5sc, dec) (12)
R10-12: (12) (36)
R13: dec, 10sc (11)
R14-16: 11sc (33)
Stuff the legs firmly, especially at the paws, so they keep their shape properly. If you have beans, you can put them in the paws to weight them!
Body (Sorry but the rounds are really messy here in terms of formatting, apologies for any pattern mistakes)
------
Start with baby blue
R1: Chain 5 (5)
R2: sc into current stitch, 4sc, inc (7)
Rotate piece. Into the other side of the chain: 4sc, 3inc, 3sc, 3inc (19)
R3: sc, 2inc, 3(sc, inc), sc, 2inc, 2(sc, inc) (25)
R4: 3sc, 3(inc, 2sc), 6sc, 3(inc, 2sc), inc (35)
R5: 11(2sc, inc) (44)
R6: 14sc, 3(dec, 2sc), 5sc, 3(dec, 2sc) (37)
R7: 2[inc, 2sc, inc, 3(sc, inc), 2sc, inc, 6sc] (50)
R8: 52sc (52)
We will now crochet rounds around the outside of the leg, skipping the stitches on the inside (the ones that are attached to the body). Still crochet into the "corners"
Switch to green
We're going to attach the legs this round, without sewing. Push the hook through the next stitch, and then into one of the stitches of one of the legs. Pull the green through and sc.
R9: another 3 sc, same as before, go through the body and the leg. 8sc, Attach another leg by crocheting 4sc into the body and the next next leg, 10sc, another leg with 4sc, 8sc, another leg with 4sc, 10sc
R10: 3sc, 2dec, 14sc, 2dec, 16sc, 2dec, 14sc, 2dec, 16sc
R11: Full round of sc (When I said messy, this is what I meant lmao, I didn't count the stitches in each round for the body so I'm doing it in post and it might be wrong, my bad y'all)
Unfortunately, the next round might be hard to follow because I got lazy with my notes.
Sorry </3
R12: Another round of sc BUT in each leg "corner" (the first and last stitch that joins the leg to the body), dc. There should be 8dc total
R13: sc around the leg, sc, dec, 2sc, dec, sc, sc around the leg, sc until next leg, sc around leg, sc, dec, 2sc, dec, sc, sc to finish round
R14: 2[dec, 4(2sc, dec)]
R14: 2(3sc, dec), 3sc, dec, 4sc, dec, 14sc, dec, 4sc, dec, 10sc
R15-16: all sc
R17: sc, dec, 2(4sc, dec), 5sc, dec, 4sc, dec, 4sc, dec, 5sc
R18: 3(dec, sc), 9sc, 3(dec, sc), 5sc
R19: all sc
Start stuffing if you haven't already. Stuff after each round after this if needed. Firmly stuffing keeps the pose better but less firm means more cuddly. Your choice!
R20: 2dec, sc, 2dec, 5sc, 2dec, sc, 2dec, 3sc
R21: 4dec, 2sc, 4dec, 2sc, 6dec
Leave a generous tail to sew up the body. Use the darning needle to sew, then snip the excess and hide the rest by either pushing it into the body with the hook or using the needle to pull it through the side.
Head
------
Start with baby blue. The Dark Ages are over and I started writing down the pattern properly again lol. (Sorry once again for the nightmare of the body)
R1: MC - 6 (6)
R2: Inc 6 (12)
R3: 6(sc, inc) (18)
R4: sc, inc, 5(2sc, inc), sc (24)
R5: 6(3sc, inc) (30)
R6: 2sc, inc, 5(4sc, inc), 2sc (36)
R7: 6(5sc, inc) (42)
R8: 3sc, inc, 5(6sc, inc), 3sc (48)
R9: 6(7sc, inc) (54)
R10: 4sc, inc, 5(8sc, inc), 4sc (60)
R11: 6(9sc, inc) (66)
R12: 5sc, inc, 5(10sc, inc), 5sc (72)
R13-25 (13 rows): 72sc (936) Good luck, soldier. Switch to green at row 14.
R26: 5sc, dec, 5(10sc, dec), 5sc (66)
R27: 6(9sc, dec) (60)
R28: 4sc, dec, 5(8sc, dec) 4sc (54)
R29: 6(7sc, dec) (48)
R30: 3sc, dec, 5(6sc, dec), 3sc (42)
R31: 6(5sc, dec) (36)
R32: 2sc, dec, 5(4sc, dec), 2sc (30)
Start stuffing if you haven't already. Stuff well to ensure your Chomp Kitty's head keeps the spherical shape. Continue to stuff after each round if needed.
R33: 6(3sc, dec) (24)
R34: sc, dec, 5(2sc, dec), sc (18)
R35: 6(sc, dec) (12)
R36: 6(dec) (6)
Leave generous tail, sew, snip, hide tail.
Tail
----
The tail is done in green.
R1: MC - 6 (6)
R2: Inc 6 (12)
R3-5: 12sc (36)
R6: 3(3sc, inc) (15)
R7: 15sc
R8: 3(3sc, dec) (12)
R9-11: 12sc (36)
R12: 3(2sc, dec) (9)
R13-16: 9sc (36)
R17: 4sc, dec, 3sc (8)
R18-20: 8sc (32)
Stuff firmly so it sticks up! Leave tail for sewing. Sew onto body, snip, hide. You know the drill by now :)
Ears (Make 2)
----------------
The ears are done in green.
R1: MC - 6 (6)
R2: Inc 6 (12)
R3: 6(sc, inc) (18)
R4: sc, inc, 5(2sc, inc), sc (24)
6(3sc, inc) (30)
Fold the ears over in half, then in half again. Unfold the second fold (this should crease it a little to make it pointy). Leave tail for sewing. When sewing, sew the side with the crochet stitches down so the clean edge is up top.
Eye whites (Make 2)
-----------------------
The eye whites are done in white.
R1: MC - 6 (6)
R2: Inc 6 (12)
R3: 6(sc, inc) (18)
R4: sc, inc, 5(2sc, inc), sc (24)
R5: 6(3sc, inc) (30)
R6: 15(sc, inc) (45)
Leave tail. Sew on.
Pupils (Make 2)
-------
The pupils are done in black.
R1: MC - 6 (6)
R2: Inc 6 (12)
R3: 6(sc, inc) (18)
R4: sc, inc, 5(2sc, inc), sc (24)
Leave tail. Sew on.
Mouth
--------
The mouth is done in white.
R1: MC - 3 (3)
R2: Chain 1 to turn, inc until end of round (6)
R3: Turning chain, (sc, inc) until end of round (9)
R4: Chain, (2sc, inc) until end (12)
R5: Chain, (3sc, inc) until end (15)
R6: Chain, (4sc, inc) until end (18)
R7: Chain, (5sc, inc) until end (21)
R8: Chain, (6sc, inc) until end (24)
R9: Chain, (7sc, inc) until end (27)
R10: Chain, (8sc, inc) until end (30)
Leave tail for sewing. Sew on. Use black wool to embroider the teeth.
Nose
------
The nose is done in purple.
R1: MC - 6 (6)
R2: sc, triple inc (three stitches into one), 5sc, tripinc, 4sc
Leave tail. Sew.
Head Stripe
--------------
The head stripe is done in purple.
R1: Chain 2
R2: sc into the first chain (2nd chain from the hook)
R3: Chain to turn, sc into current stitch, sc into each stitch (3)
R4: Chain to turn, sc into current, sc into each (4)
R5-10: Continue this process of building up until you have 10 stitches across
R11-13: 10sc (30) Chain before the start of each row, but don't sc into the chain
Now just sc until the end of each round, skipping the current stitch. This decreases the rows by one each time. Continue until you only have one stitch left. Leave tail for sewing, sew on.
Tail Stripes
-------------
The tail stripes are done in purple.
Small one:
R1: Chain 3
R2: 2sc, inc
R3: 3sc, inc (into other side of chain)
Leave tail, sew
Big one:
R1: Chain 5
R2: 4sc, inc
R3: 5sc, inc (into other side of chain)
Leave tail, sew
Body Stripes (Make 2)
--------------------------
The body stripes are done in purple.
R1: Chain 15
R2: 15sc
R3: inc, dec, 13sc, dec, inc, dec, 13sc, dec
Leave tail, sew.
Whiskers (Make 4)
---------------------
The whiskers are done in black.
R1: MC - 9 (9)
R2: 3(2sc, inc) (12)
R3: 3sc
R4-6: Chain 1 to turn, 3sc
R7: Chain, dec, sc
R8-9: Chain, 2sc
CONGRATULATIONS!! YOU ARE NOW THE PROUD OWNER OF A CHOMP KITTY CROCHET PLUSHIE!!!
Feel free to tweak the pattern for yourself if you want! However, please do not release my pattern elsewhere, repost it, or sell it. This pattern is free!! It should not be gatekept!! (Also, it's a little unfair if you get to make money off of my design rip) If you want to share, reblog or share a link :)
Apologies for any typos or confusion due to formatting!! This is my first pattern! I tried very hard to make him accurate, but simplified some areas to make it easier. I hope you enjoy!!!
#happy 4 years to my canon event#glitch techs#This took me days#I really hope you guys like it#I will post pics#I just want to take some nice ones first#chomp kitty
25 notes
·
View notes
Text
Ah yes!! I have this one too but I couldn't find the image (I've got a very large gallery of GT behind-the-scenes stuff to sort through lol)
If you're interested in any concept art, I'll see if I have it! :D
I’m connecting the dots.
#glitch techs#glitch techs official art#I have turn around refs for more main characters#useful for artists!#loads of other stuff too
26 notes
·
View notes
Text
Just in case you're interested, here are the official Bolypius designs that were set to be featured in S3!:

Regular ^ (Apologies for low image quality)
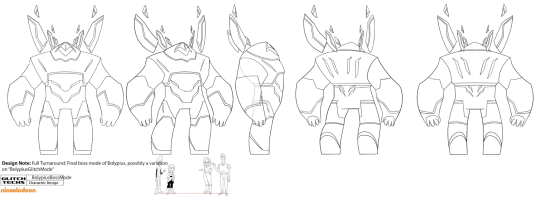
Boss form! ^ (Official turn-around ref)
I’m connecting the dots.
#Glitch Techs#Glitch Techs official art#<- tag to be used in future if I post more of the concepts and official refs I have access to#I am not a leaker but I've been around long enough to accumulate BTS stuff#ask and ye shall receive#(if I have the thing you want)
26 notes
·
View notes
Text
I tapped out another like 2/3k of Rose Tinted last night and it’s so weird how this fic just will not leave my brain alone.
I promise there’s more coming!
#WOOOOOOOOOO#HELL YEAH#still take your time and stuff tho!#take care of yourself#thank you for the content <3#Rose Tinted is so good!!!
20 notes
·
View notes
Text
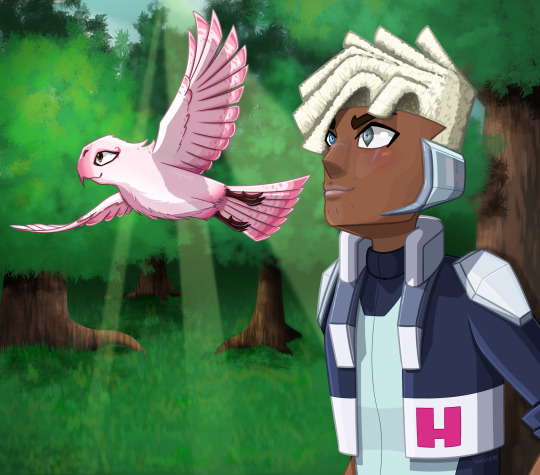
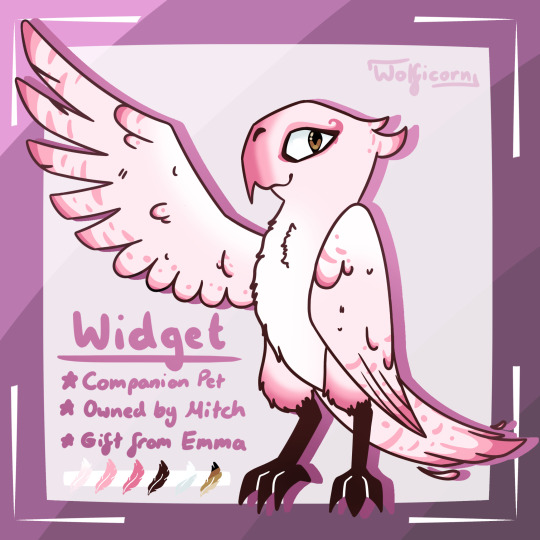
FragCore Mitch has a companion pet named Widget!
Slightly old art but here she is:
Since FragCore Mitch is blind on his left side, he has Widget to watch his blindspot! :D
Shortly after the injury, Zahra and Haneesh joined glitch techs and were assigned to Mitch so he'd have backup. He naturally wasn't too pleased about it so he kept pushing to be allowed to take solo missions again. Eventually Phil caved and let him do so, under the condition that he get a companion pet to assist him in the field.
Widget was chosen for Mitch because of her docile nature! She's a passive mob and isn't built for fighting so she can't really deal much damage. She is, however, used for recon and helps Mitch by keeping an eye on his left side!
#Fragmented Core#FragCore Mitch#FragCore Widget#<- Widget's tag!#glitch techs OC#kinda#glitch techs#am I allowed to tag this as Mitch Williams?#Widget is friends with Ally btw!! Bird buddies!!#she also doubles as a therapy animal but Mitch doesn't talk about that#emotional support bird <3
11 notes
·
View notes
Text
I tapped out another like 2/3k of Rose Tinted last night and it’s so weird how this fic just will not leave my brain alone.
I promise there’s more coming!
#WOOOOOOOO#HELL YEAHHHH#take your time though obviously <3#and take care of yourself#BUT YEAHHHHH#also I am hiding in the tags lmao#Rose Tinted had a hand in inspiring me to create FragCore#I was just kinda like#damn this hyperfixation won't leave me alone#I should do a massive project#hey Rose Tinted exists and that was awesome#I'm gonna do a big AU too!#and then I ended up with Fragmented Core after a year or so lol#Rose Tinted is so good <33333
20 notes
·
View notes
Text
Fragmented Core Mitch!! I'll probably add a background to this later
(Click for better quality)

I tried a new shading style this time around :)
#blue eyed Mitch supremacy#the fandom agrees#a lot of art posted will be older art that is important to FragCore but predates this blog#glitch techs#mitch williams#Fragmented Core#FragCore Mitch#he is the author's favourite so expect a lot of Mitch art lol
17 notes
·
View notes
Text
New blog!! Figured I'd start one for GT :D
I'll mainly post art and sometimes writing here!
I currently have a massive Glitch Techs AU called Fragmented Core that I've been working on for months, if not years by now and the majority of the art here will either be about FragCore or use the FragCore designs
There will occasionally be OC content too!
#blog intro!#Welcome to my blog!!#hello!!!#Fragmented Core#<- FragCore tag!#regular GT stuff will not have that tag
1 note
·
View note