#ts4tuts
Text
Retopologizing MD Meshes (old)
EDIT-
tutorial is deprecated, update to the newest MD version and use the remesh function, or just put your mesh straight into zbrush, do zremesh and then re-do the UV in blender.
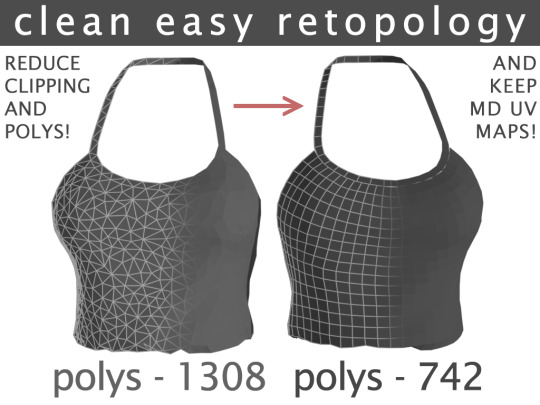
Hey! Here’s a long tutorial on how to get great low-poly topology on meshes from Marvelous Designer WHILE keeping the original UV (the UV you get if you just use the mesh straight from MD).
For this workflow, you’ll need:
Marvelous Designer (paid)
ZBrush (paid)
Maya 2016 Extension 2 or newer (student version is free!)
Blender (free)
Before I get started with the steps, I want to make sure I give full credit to this tutorial here by Alex Mann, which is where I found the workflow. You can watch that if you prefer a video tutorial and if you’re also more proficient with Maya.
Also, this guide assumes you know how to use blender. Knowledge in Maya+ZBrush isn’t really needed, but you need to have them installed and maybe be able to use basic functions in the programs. In this tutorial, I’ve cut down on the steps in Maya, just because I find it easier to use Blender for things (personal preference).
STEP ONE
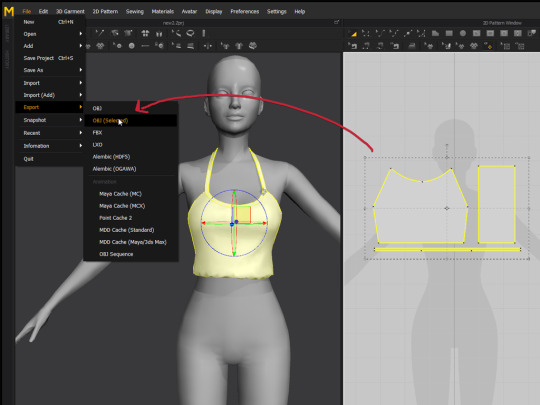
First, export your normal Marvelous Designer mesh, and name it ‘drapedMesh’. When exporting, Unified UV coordinates should be checked, and scale ‘m’ should be used. Make sure you export as tris (the default setting), exporting as quads won’t give as good as results (I think).
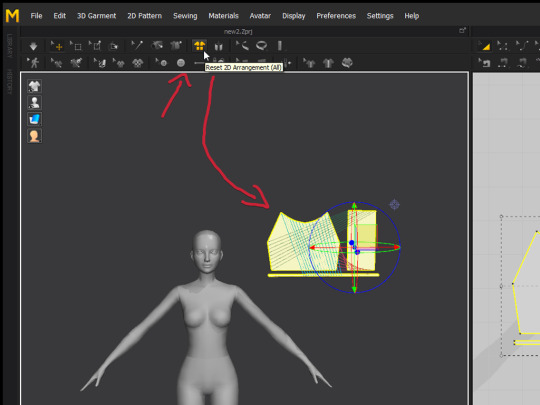
Then reset 2d arrangement of your clothing, so it’s flat. You can also move it to the right so it’s not in the way of the avatar but this may cause issues (or it may work). Then, export in the same way (export selected), and name it ‘flatMeshOriginal’.
STEP TWO
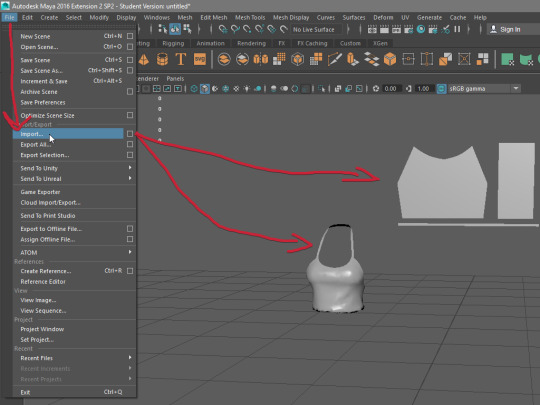
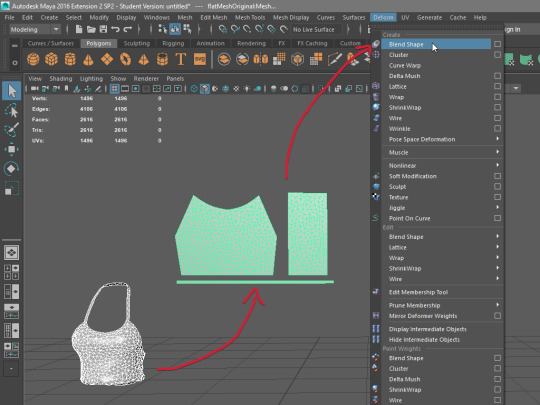
Next, open up Maya- I use Maya 2016. And after, import the draped and flat meshes you just exported from MD. The camera controls if you don’t know them, you have to hold alt and then use the buttons on your mouse.
With the two imported, select the ‘draped’ mesh and then the flat mesh, go to ‘Deform’ at the top, and click ‘Blend Shape’. This will pop up in the attribute editor to the right.
STEP THREE
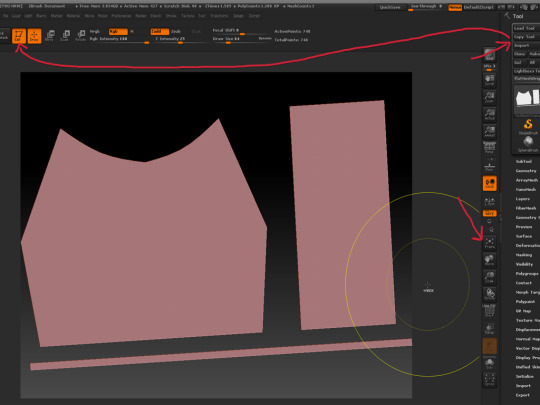
It’s time to retopologize! Open ZBrush, and import your flat mesh, and then drag your mouse in the 3d window to place the model into view (only drag it out once). Immediately after, click edit mode (or press T), and then click the ‘scale’ button to zoom in on the mesh.
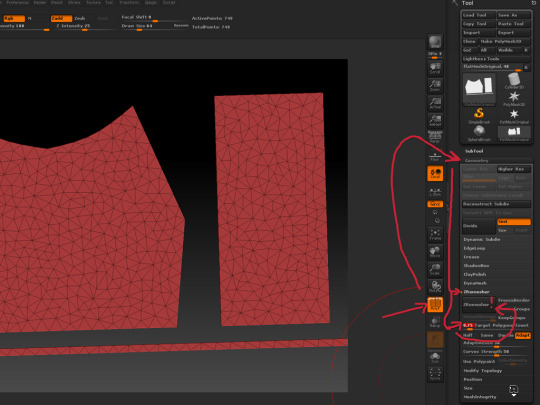
Turn polygon view on, then go to the geometry tab on the right, and click ‘ZRemesher’. Then, change the ‘Target Polygon Count’, the default is on 5, which is too high, so we need to change it.
This number is in THOUSANDS, so 1 = 1 thousand. It’s suggested to change it to 0.75, which works most of the time for tops, but sometimes you may need to set it higher (1, 1.25, 1.5 etc) for full body outfits or more detailed clothing.
This value affects how many polygons in thousands it will have, 0.75 is 750 polygons (which will be roughly the final polygon count for the top). Anyway, once you’ve picked a value, hit the ZRemesher button.
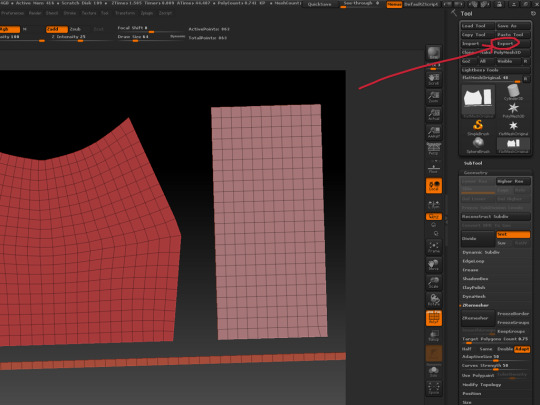
As you can see, ZRemesher produces a really nice topology on the meshes. Finally, you want to export it and name it as ‘flatMeshRetopo’. Now, you’re done with ZBrush!
STEP FOUR (conditional/optional)
If there’s a problem in topology, you’ll have to fix it before you carry on. This may happen on more complex meshes. I don’t have any examples of this, but just keep it in mind. You might also want to clean up any tris if there are still some left over.
STEP FIVE
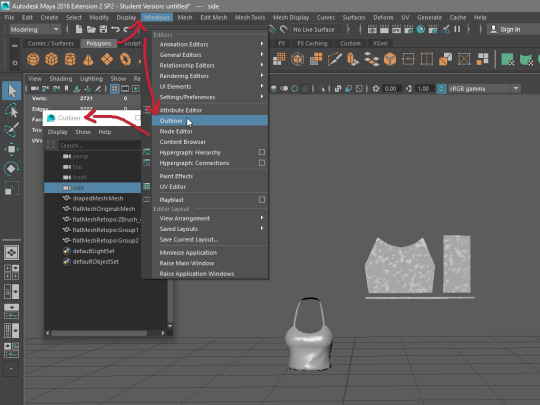
We have to get our new low-poly mesh set up in Maya. Import your retopo’d flat mesh, and ignore any error if one pops up. Then, go to ‘Windows’ on the top bar, and open the ‘Outliner’ window. To hide this, you can just minimise and then later open it back up/maximise it from the bottom of the screen.
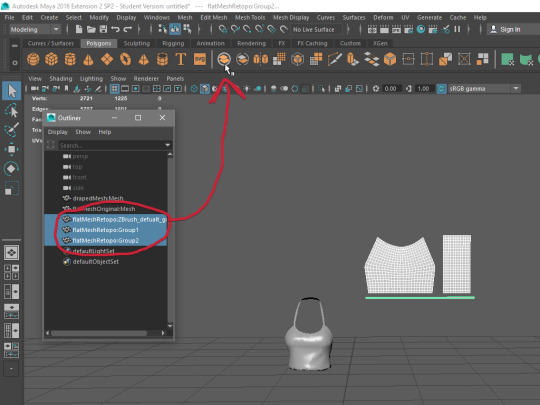
Then, in the outliner, select all the meshes that were imported from ZBrush, for me there were only 3 as there are only 3 pattern pieces in my MD mesh. If you have 8 pieces, there’ll be 8 meshes. With these selected, hit the merge button at the top.
STEP SIX
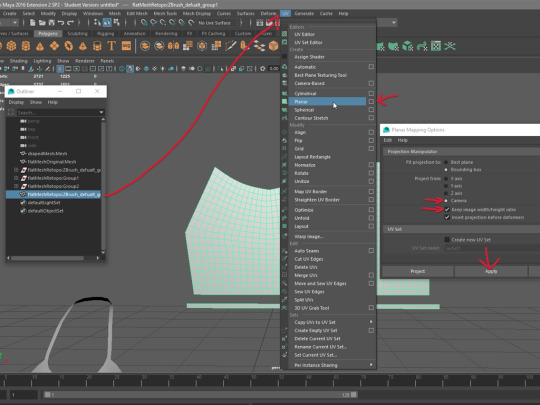
Next, we have to get that clean UV layout. Select your combined mesh, then go to ‘UV’ at the top and then SHIFT-click the ‘Planar’ option. Make sure you have ‘Project from:’ on ‘Camera’ and that you have ‘Keep image width/height ratio’ checked. Next, hit apply.
Also, when you do this step, try to have your camera looking at the mesh straight-on, as I believe this part just captures the mesh from the camera’s perspective and makes that the UV.
STEP SEVEN
Now, we will make our low poly mesh fit around the draped mesh. Select your low-poly ZBrush flat mesh, and then the high-poly MD flat mesh, go to deform and then wrap.
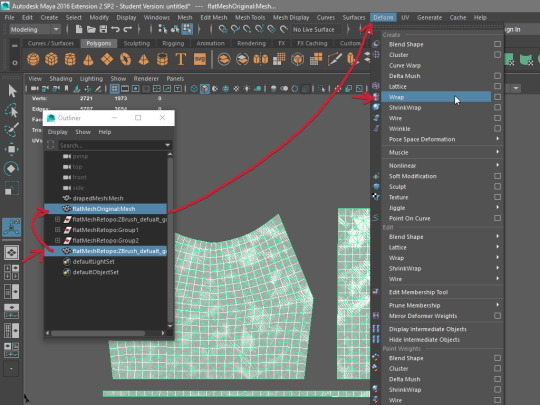
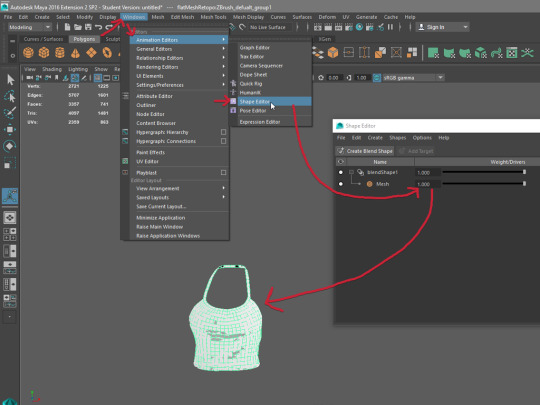
To make it wrap around now, go to ‘Windows’ at the top, ‘Animation Editors’ and then open the ‘Shape Editor’. Afterwards, set the Mesh Weight to ‘1’ (or move the 2nd slider all the way to the right). This will make your lowpoly (and high poly) mesh wrap around the draped mesh.
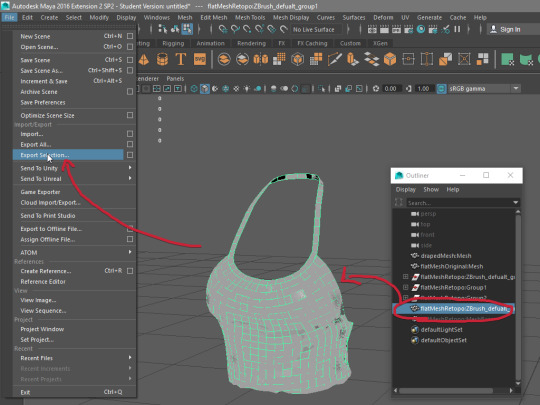
Lastly, select your low-poly ZBrush mesh that is now wrapped around, and export selection to a .obj- and save that on your desktop or somewhere (ready to be imported into blender!!). Once you’ve done this, you are done with Maya (woo!).
STEP EIGHT (conditional/optional)
If you import your new mesh into blender (which you’ve just exported), and it shows up as flat and one weird solid changing colour, you may need to put the mesh back into maya, select it and go to ‘Mesh Display’ at the top, then try unlocking the normals (‘Unlock Normals’) and then importing to blender again. If that doesn’t work, try locking the normal and importing into blender.
I’m only saying this because it’s happened to me once (not sure how), so it could happen to someone else.
STEP NINE
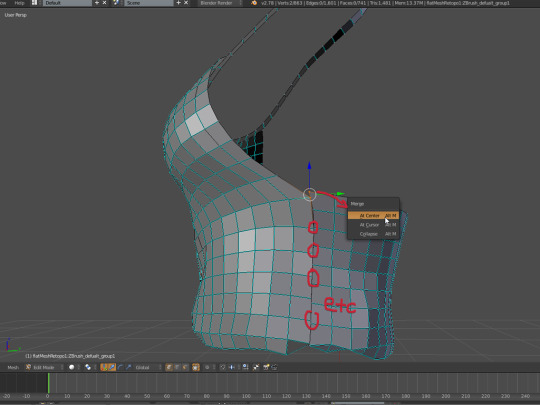
Lastly, you have to do the final touches. Import your new low-poly mesh into blender, and merge the vertices where the patterns meet up. Select two vertices and press alt+m to merge.
Sometimes, you may need to merge 2 vertices on one side to one vertex on the other, this will create a tri but that’s okay.
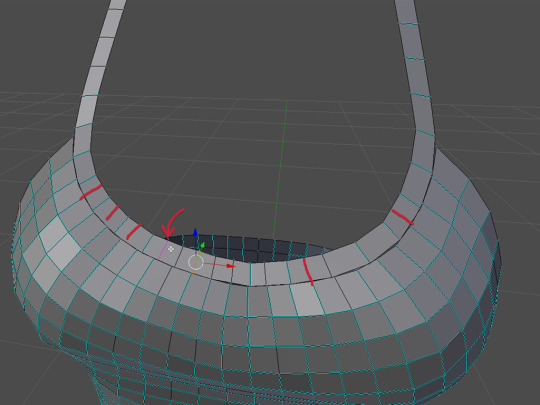
If there is a part you need to join that obviously doesn’t have enough verticies (such as this neck strap for my top), you may need to add edge loops. You can do this by pressing ctrl+R, and then clicking in the middle of the quads. This will add another edge (and increase polys) so that you can move without losing as much detail.
Also, you may want to go to the ‘tools’ tab on the left, and change the shading to smooth, to get a better idea of what your mesh will look like ingame.
STEP TEN
Now it’s up to you to finish your clothing!
FOR SIMS 4 -
I recommend @owl-plumbob’s tutorial for instructions on weight transferring, UV1 transferring and vertex painting (getting your mesh ready for ingame).
And I also recommend any of @theslyd‘s tutorials if you want to make your cc more high quality.
EXTRA
Feel free to contact me on tumblr, or go to my ask page if you have a problem. I’m welcome to help anybody with any issues (if I know how to fix them ;p).
If you need a video tutorial of this, because you prefer that, then as I linked earlier, use this video. This is where I got the original steps from but I changed them slightly so I suggest if you follow the video, to have this tutorial opened as well.
An alternative way to this method is this. I literally found this today and I haven’t tried it, but it looks like it might be quicker, however it still requires Maya. Just keep in mind, in the video they retopologize it by hand in Maya where you may want to retopo it in ZBrush (I would). Anyway, I’m thinking of trying this and if it’s good, I may make another tutorial on that.
If you don’t like this method/it’s not working for you, you can try -
This free alternative using a program called ‘Instant Meshes’ linked by @theslyd
This ZBrush-only workflow (however the UV maps produced aren’t perfect).
Also this thread talks about both these other methods in some more detail.
Just do anything other than exporting from MD in quads (as this is super high poly and the topology isn’t even perfect) or decimating the mesh a lot (this RUINS the topology).
Anyway, that’s the tutorial. Sorry it’s so long, I’m sure you could compress it into 100 words but I get carried away easily, and I wanted to make it totally noob-proof, for people who have no clue how to use maya or zbrush- I wanted to make the tutorial I wanted a couple months ago ;)
#sims 4#ts4#sims 4 tutorials#ts4tuts#ts4tutorials#ts4 tutorials#sims 4 tuts#tutorials#modelling#zbrush#maya#second life#SL#creators#sims-4-tutorial#the-sims-4-tutorial
779 notes
·
View notes
Text
Welcome on my Tumblr Page!
Hello everybody,
Good to see you found your way to my Tumbr page.
For the people that don’t know me, I’m Bakie from the BakieGaming YouTube channel on which I post videos about all TS4 mods I made, but also a large number of TS4 Tutorials in which I will teach you how to make your own mods with my easy to follow, step by step video guides.
You will also find some tutorials about how to make certain things in-game among those. For example: How to make a realistic pond + waterfall!
Another thing you will find is my TS4 Effect Player series in which I will show you what is possible with this mod which is made by Andrew from The Sims 4 Studio.
To make finding the videos you like more easy, click the links in the side bar, or go to my playlists on my YouTube Channel. (Don’t forget to Subscribe to my channel either! ;) )
Hope you will like my stuff!
21 notes
·
View notes
Last Seen Blogs

luvnotes4u
lily

krimhue
🔞 Krim tf art 🔞

cholvoq
the bat king‼️🦇

yccnseok-archive
www.living-room-furniture.co.uk