#ts4 tutorials
Text
Express Tutorial: How to fix some weird Dirty Blonde textures made by EA or making Dirty Blonde from any texture ever (for recolors)
Hello, so I was asked questions about how to gradient the 13th swatch of the EAXIS palette for hairs to make the recoloring process easier. Therefore here I am with one more specific-ass thing for you to learn.
This tutorial will teach you: Photoshop Gradients Maping and how to disrespect EA color choices properly
Tutorial under the cut ♥
Ok lesgo
Step 1: Get your weird texture. Mine is this one, from the Island Living EP:
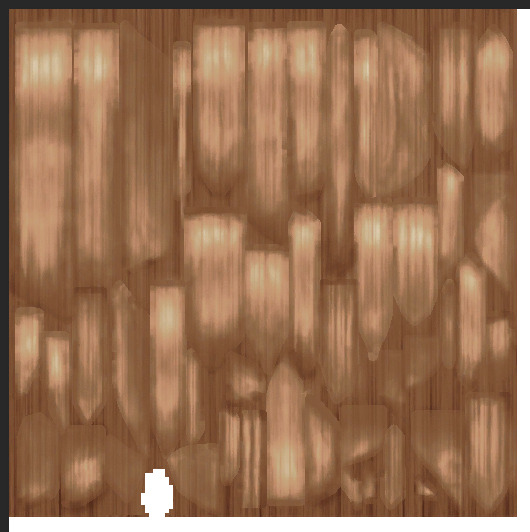
I despise it. ANYWAY, as you can see, the colors are a bit off, the highlights are white and there’s a kind of a “halo” around them that is pretty saturated for no reason. This can make your recolor look weird. So let’s fix that.
Step 2: Open it in Photoshop. Mine is Photoshop CC with a .dds plugin (which makes it easier to work with gradients and not care about the white backgrounds. But if you’re used to the .png files and not flattening your layers, it will work normally.)
Step 3: GRADIENT MAP TIME, BABE. Find it here:
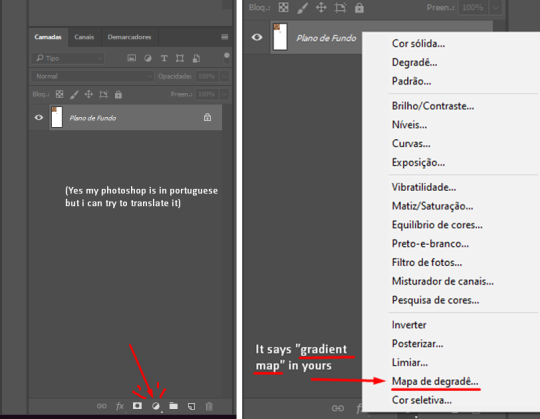
So this nice cute layer will be created for you in some color (will vary depending on what color you have selected at the moment, don’t panic):

Step 4: The Gradient messing up step. So now you have this big window open in your photoshop because you clicked the gradient in the previous step. What now?

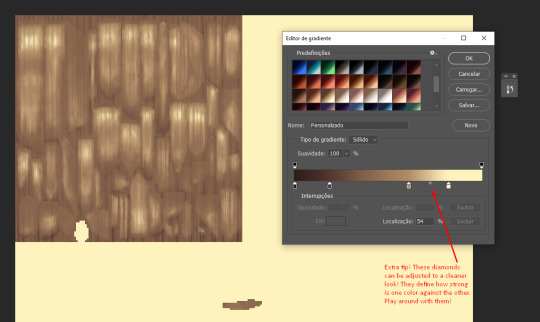
Well, now is when the fun begins. You have two sliders there: far left and far right. Far left is your darkest color, the shadows of your hair texture. Far right is the lightest point, the highlights. We still have only two shades, but we will need FOUR. To insert more color shades into your gradient map, simply click somewhere in the map, like this:
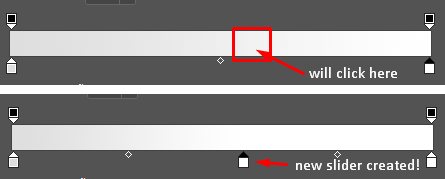
Ok, make it to four and you will have this nonsense here:

You can mess up with the slider positions as you please!
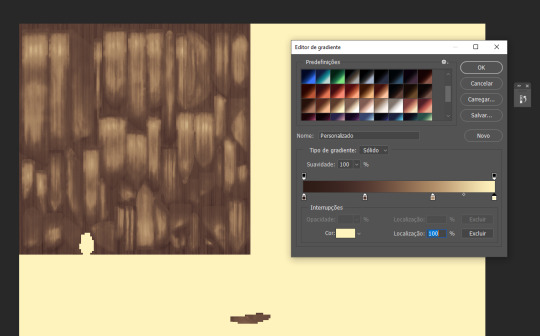
Step 5: Colors! So now you have a gradient map ready to use, all you have to do is to change it’s colors to your preferred tones. To change a slider color, you click it’s little box twice and the color selector will open for you. It’s this easy. Keep in mind that left is darker and right is brighter.
I have my values ready so you can copy and paste in the # section to the color selection:
Deep shadows (far left - value 1): 2e1b15
Shadows (left - value 2): 523830
Base color (middle - value 3): b08d68
Highlights (right - value 4): fff3bd
After you put in your values, you will get this:
“But Ellen!!! This is dark as hell and not even close to dirty blonde!!” I know dear, that’s why the sliders are for! You can change their positions so if you bring the lighter colors more to the left, the shadows will get lighter! (Notice the extra tip)
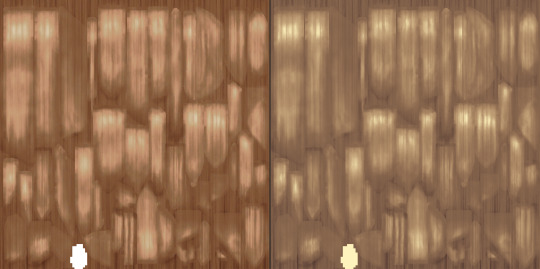
Cleaner dirty blonde!!! Look how soft and pretty it is compared to the EA one:
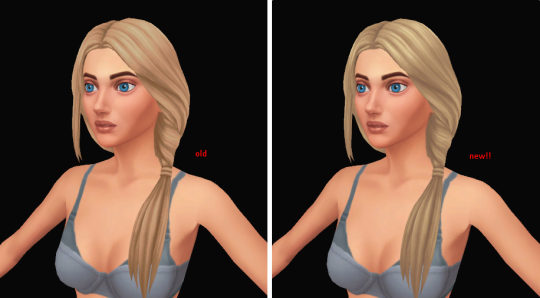
Step 6: Save it. No for real that’s all! Join the layers for png or flatten for dds (don’t forget the mipmap check) and save it as “base” of you’re here because you use my actions. Here’s a sims4studio comparison:
See how it looks easier on the eye? It’s because now the colors are a perfect gradient of each other and they mix up well!
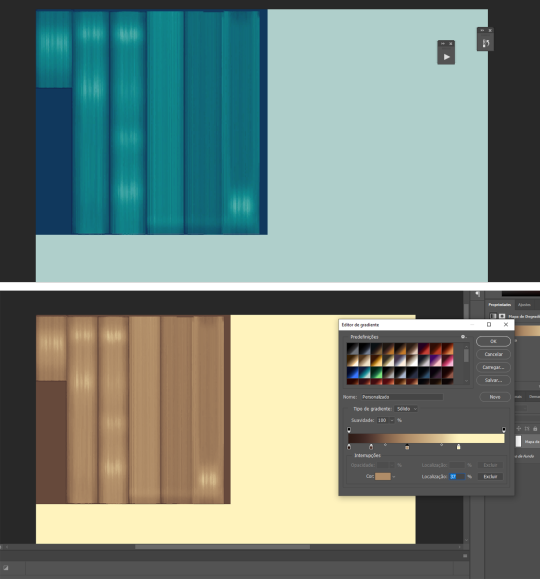
The best part if this, is that now you can grab any texture and turn it to dirty blonde by messing up with the gradient sliders! This makes everything easier, even recoloring clothes or build mode stuff if you want your favorite hair color palette in other parts of the game, assuming they all use dirty blonde as a base. Here’s an example using the teal hair swatch:
Another tip: Don’t forget to save your new gradient for when you need it again!
♥
That’s about it! Now go on with your recolors! See you in the next tutorial, xoxo
#the sims 4#ts4#sims 4#the sims 4 tutorial#ts4 tutorials#sims 4 tutorials#tutorial#tutorials#photoshop#photoshop tutorial#the sims 4 resources#resources
106 notes
·
View notes
Text
how to take screenshots using nvidia geforce experience
first off I wanna apologize for the image quality lol I had to use my phone to take a photo of my computer screen because taking screenshots would disable the GeForce Experience overlay. secondly, I’m gonna shorten it to GXP because I am Lazy.
anyways, here we go, all details under the cut so I don’t clutter anyone’s dashboard.
also I’m gonna assume you know how to pose your sim, use gshade, all that good stuff, cuz that’s not what I’m here for, there are plenty of other tutorials for those, love you tho.
so we wanna start off with pulling up the overlay with Alt + Z, and it’s gonna look like this:

so these are all the things you can go with GXP, take screenshots, record, etc. the overlay is mostly useful for pulling up the settings bc you can set keyboard shortcuts for other stuff. so that’s what we’re gonna do now, open the settings.

bam, settings. there’s tons of stuff you can do in here, notably change the shortcuts (I keep the defaults). what I’m gonna show you how to do real quick is change where you save your captures, because it can be a little weird since screenshots are saved in the same place as the recordings (not sure if you can change that, I haven’t found a way to do so).
so just click on recordings, and click the 3 little dots shown below to set it to a different file path if you want to.

ok, now to actually TAKE the HQ screenshots.
Alt + F2 is the default shortcut for pulling up the “photo mode” overlay, and it’ll look like this, on the side of your screen.
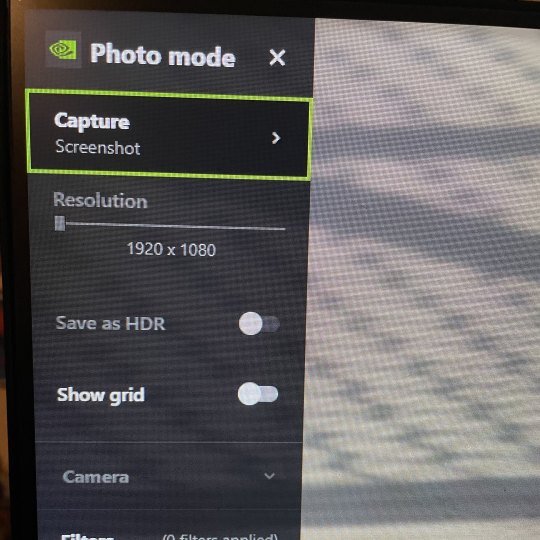
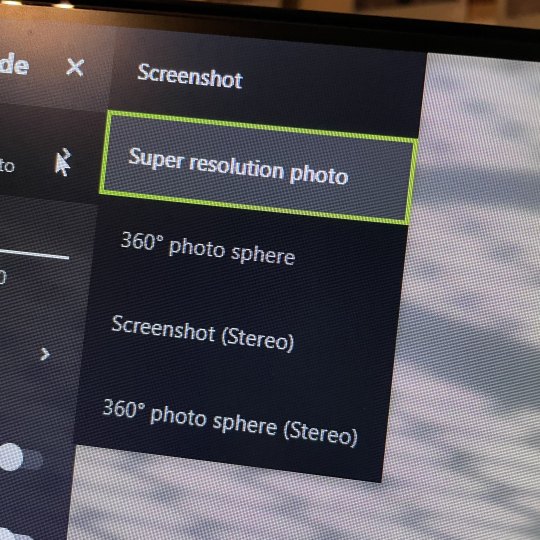
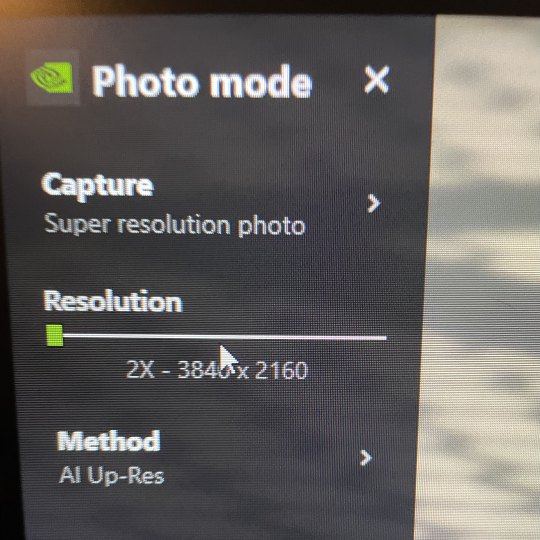
the settings above will take a normal screenshot with your native resolution, but that’s not what we want, so we’re gonna click on capture > screenshot (as shown above) and select super resolution (as shown below):
with super resolution enabled, you’ll be able to scale up the image render resolution to either 2x or 4x (maybe you have other options depending on your specs, idk, just know that the higher you go the longer it’s going to take).
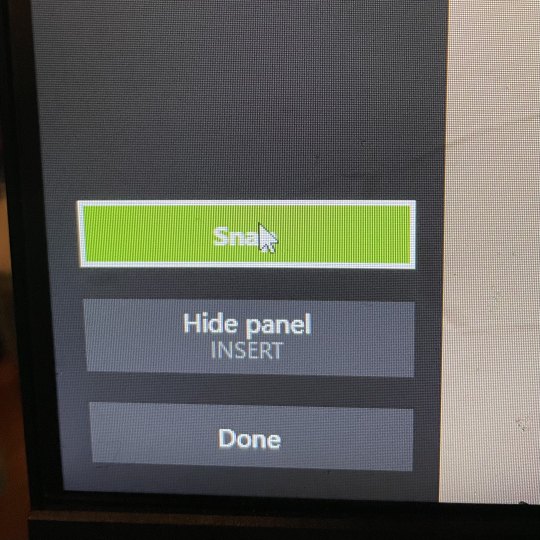
and then bam, just click snap (unless you want to mess with the filters, that’s an option, I find it unnecessary bc I already use gshade but hey, do whatever ur little heart desires)
once you snippity snap that pic, you’re gonna get a lil load thingy:

it might take a few seconds (again, depends on your pc specs) and like i said earlier, the higher the resolution, the longer this part is gonna take. ultimately, it is a slightly slower process than using SRWE but it’s one that has less issues, more official support, and you don’t need an external app for it since it comes with your PC and is just an overlay. also it doesn’t crash your game lol.
recording is easier though you just click record (or the keyboard shortcut, default is Alt + F9), click again to stop recording, and bam you’ve got yourself a lil video of whatever you want.
ok love you guys hope you enjoyed this tutorial hope it helps u etc mwah
(OH IF YOU’RE NOT SEEING THE SUPER RES OPTION YOU MIGHT HAVE TO ENABLE NVIDIA ANSEL IN SETTINGS, JUST GO TO PHOTO MODE / GAME FILTER AND CLICK ON. IT’LL LOOK LIKE THIS:)

#s4 tutorials#sims 4 tutorials#ts4 tutorials#the sims 4 tutorials#ts4 tutorial#s4 tutorial#sims 4 tutorial#the sims 4 tutorial#my tutorial
317 notes
·
View notes
Text
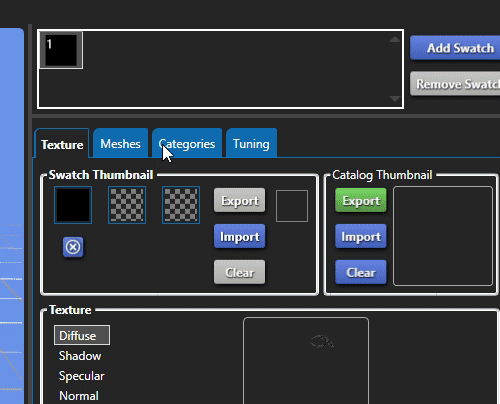
SIMS 4 - CHANGING INFORMATION IN SIMS 4 STUDIO FOR MULTIPLE SWATCHES SIMPLIFIED
This tutorial can also be viewed on GOOGLE DOCS.
WHY I MADE THIS TUTORIAL
The purpose of this tutorial is to help creators and simmers alike simplify and speed up how to change information in the Warehouse tab in Sims 4 Studio for multiple swatches, especially if you have more than one section that needs adjusting.
So, let’s say you’ve created an entire package with 15 swatches and have saved your package. Then you realize, OMG I forgot to change something in Warehouse mode and now have to go in and change each swatch separately. (cue dramatic music)
I don’t recommend this for only a few swatches, though, because, while helpful, this is not a one shot process, but it will save time for those packages with several swatches that require fixing/changing in the Warehouse tab.
For the purposes of this tutorial, I am using the example of changing the Composition Method in a lipstick with 31 swatches from 4 to 0. It is entirely possible to make multiple changes using this process. Literally anything in the Warehouse tab that you need to change and have applied to multiple swatches can be done.
Note: Sims 4 Studio already allows for changing information in the Studio tab on multiple swatches. This is only helpful for Warehouse mode.
I have also used this method to change the diffuse ratio on a set of walls that were supposed to be three panels wide for a wallpaper mural, and forgot until after all of my swatches were in and the package was saved. This would normally have to be done 3 times for every swatch, so the work is tripled! Multiply that by 20 swatches and you can see it’s just too much. I could have started over with a new package, but then I would have to change the catalog name, price, any categories like color and whether it’s paint or wallpaper, ambience effects, if it reduces bills, bring in all the diffuse (texture) files (there’s a trick for bringing in new diffuse files as well, all in one shot btw), and possibly more! With makeup and clothes, or buy mode objects, there are even more categories to be sure match your project.
To simplify, you’ll be saving your color palette, exporting your texture files, changing whatever is necessary in the Warehouse tab, and re-importing your textures. There are a few more steps involved, but everything is explained here in detail with pictures.
Rest assured, it takes a while to read this tutorial, but once you do it a few times, you will complete the entire process very quickly!
----------------------------------------------------
You can view the entire tutorial on Patreon, Google Docs, or the Sims 4 Studio website in the tutorials section. It is currently still in the Creator Help section on S4S, but will be moved shortly.
5 notes
·
View notes
Text
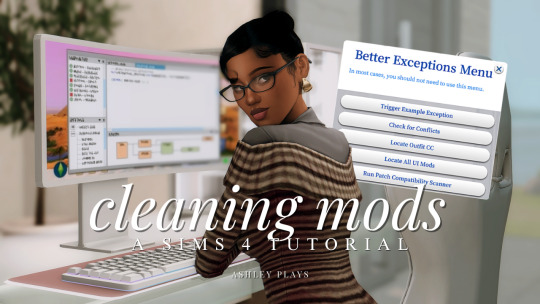
how to clean & organize your mods folder + update broken/outdated mods
by ashley plays
this video goes over the following:
how to organize your mods folder
how to update your mods folder after a patch update
how to find broken/outdated mods
how to clean out custom content & find duplicate files
↓ mods, programs & helpful websites mentioned below
mods:
better exceptions
mc command center
programs:
sims 4 tray importer
sims 4 mod manager
helpful websites:
sims 4 news & updates
scarlet's realm: the mod list
bienchen's mods
littlemssam's mods
kiarasims4mods's spreadsheet
mizoreyukii's spreadsheet
672 notes
·
View notes
Video
tutorial for how to update default eyes to be enabled for infants
you can use this same method to enable makeup & skin details** for infants, too.
the code i’m placing in the value box is 000030FE which was found by @fivesims (thank you, ur a GENIUS), & this code will enable something to be applied to all ages, infants included.
if you want to take eyes/makeup/a skin detail and enable it for just infants & toddlers, but keep it unavailable for all other life stages, the code you would need to use is 00003082 which was also found by fivesims!
if you want to make it so that something is available for only infants, i’m pretty sure the code you should put in is 00003080 (which i was proud of myself for being able to find myself haha)
** (i wouldn’t be surprised if it worked for other things that don’t have meshes, too—maybe eyebrows, teeth, etc, especially if they’re already able to be applied to toddlers—but i haven’t tested that for myself, so i can’t confirm or deny.)
3K notes
·
View notes
Text
Oh hey! How about another pro-tip?
Are you tired of your sims' 3D, skin detail eyelashes conflicting with their rings and other accessories? Are you fed up with downloading certain rings and other accessories only to find out you can't wear them with some skin details?
If you answered yes to either of these questions, this trick is for you! One of my dear OCs just got engaged and I found a beautiful ring for her! But when I put it on her, her eyelashes turned silver which made me want to throw large objects but then I remembered that Sims 4 Studio is our friend!
Take your eyelashes (we're probably all if not most of us, using Kijiko's skin detail version or the MM skin detail eyelashes but I only did this with Kijiko's) and switch them to a new category! I hardly ever use Occult Details so that's where we're going:
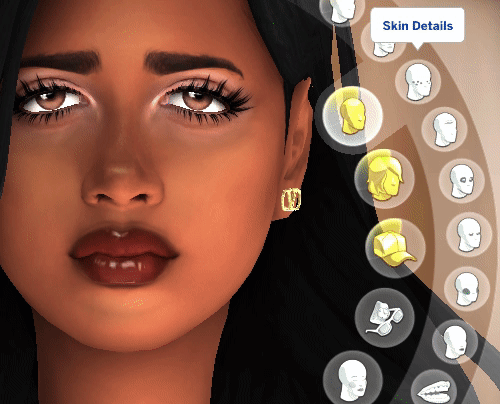
There's plenty of options to choose from here, it just depends on what you use and don't use.
Copy the file you want to relocate into your S4S mods folder and open it up:
Click on categories, find your Occult options, apply to all swatches, save the package, and BOOM!
*Note: The reason I used Kijiko's sunglasses version rather than the skin detail version is because for whatever reason, the skin detail version is tied to rings so even when I moved it, I got silver eyelashes with the ring she was wearing.
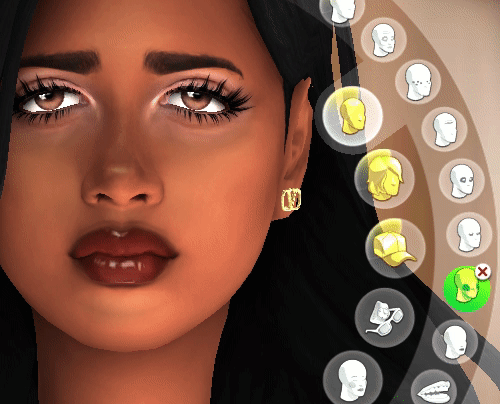
I used vampire cheeks because again, i'm not using anything in there that would conflict!
I did this same method with her engagement ring because Occult features stay on no matter what outfit you're in. So it saves time rather than adding the engagement ring to every outfit (unless you don't want them sleeping in it, makes sense).
Anyway, some of you may be on to changing categories in S4S to fit your gameplay, and some of you may not be. I hope this helps someone! Its super easy and will save you the headaches!
2K notes
·
View notes
Text
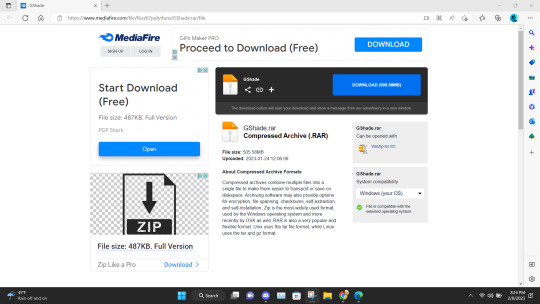
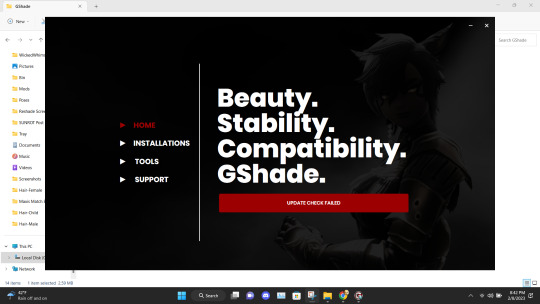
GSHADE 3.5.0 Cracked Tutorial Feb.2023
‼️Update:3/2023‼️ Due to gshade somehow being online again! You can still install the program with this tutorial but to avoid the update to version 4.2 notification keeping you from proceeding-Download the program from mediafire and then turn your pc to airplane mode and continue the process below! Note that when you turn your internet back on that your going to get the notification still ignore it. That what I’m doing.
Alright with the recent events regarding the development team of GShade figuratively going under and the current version of this program available being far from perfect. It would be lovely to back to a version of GShade that doesn't have malware, the changes that disabled the depth of field effects, and the removal of some older shaders. So here's a tutorial on how to install 3.5.0 of GShade. It's the version that we as a collective switched to all those months back, when GShade popped off in the community. Also the version I used to take this picture and got from @toskasimz who sent me the files. She's the reason why I have my pretty pictures back. It took a long time to get my preset to look like this and the modern versions of Gshade and Reshade don't have the shaders for this anymore. The suggested skill level for this is basic knowledge of how to install Reshade/Gshade and knowledge of where to find the game Bin file and Program Files on your pc.
Note: This version is before the code that shut down your PC, if you manipulated the code of the program, was introduced. Use at your own risk. I personally have no issue with using it. I'm using my laptop I do school work on and I have no money to buy a new one so that's my assessment on how safe it is.
To start download this media fire file. It's a Rar file. Unzip it.
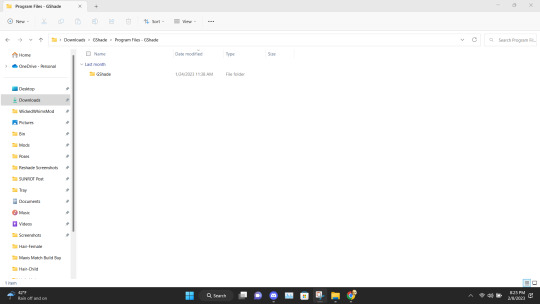
In the unzipped version of this file, you should have a folder that's highlighted below called GShade.
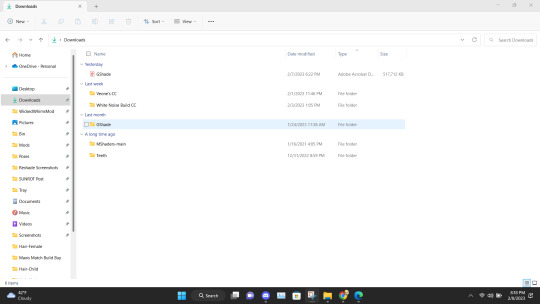
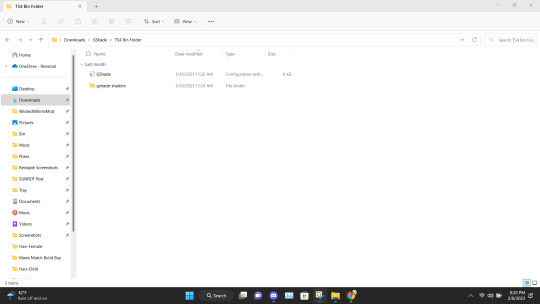
Inside that file are two folders. Program Files-G-Shade and TS4 Bin Folder. These folder names correspond with where the contents of these will go on your pc.
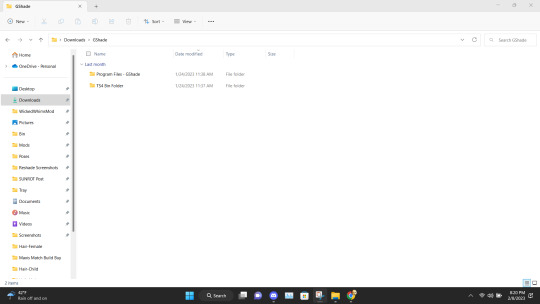
Alright inside the folders you should have the following content in the Program Files-G-Shade
Inside the TS4 Bin Folder, you should have the following contents inside it.
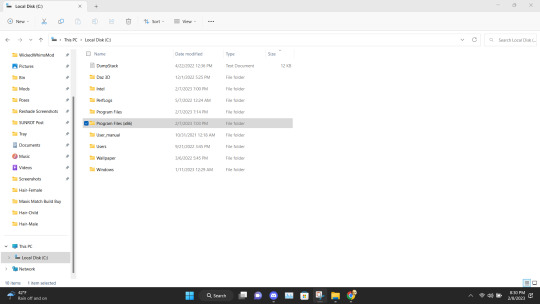
Place the GShade folder from the Program Files-G-Shade into your computer's Program(x86) file. This may have a different name based on your computer.
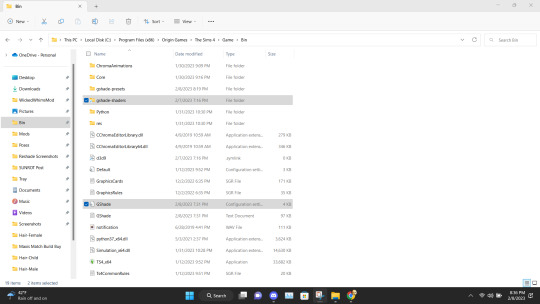
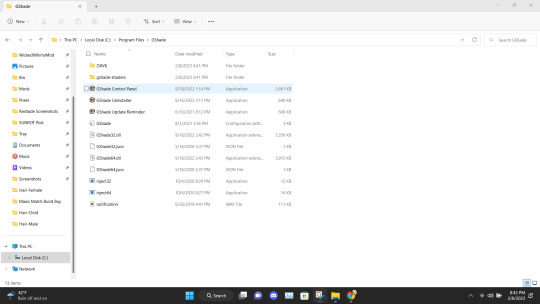
Next Place the contents of the TS4 Bin Folder which should be the G-Shade configuration file and the folder of GShade-Shaders into your Bin folder. (note I have gshade installed already so you won't have the extra files before installation.)
Now go back to the Program(x86) file on your PC and go into the G-shade folder.
Double Click to run the program.
This is where you gonna need to pull your Reshade/Gshade knowledge. You just install the program as normal to the game. I will say I don't know if this will work with other games.
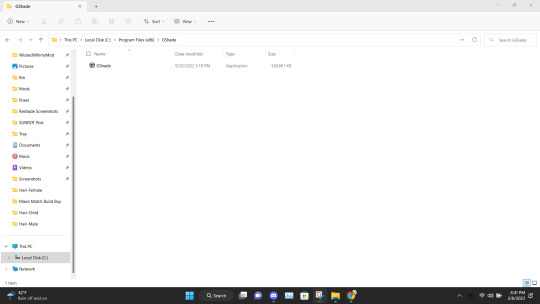
Alright, this is what you should be left with after installing G-Shade. Everything transferred to the Program Files with the exception of this folder. Leave it be and go to the Program Files file on your pc.
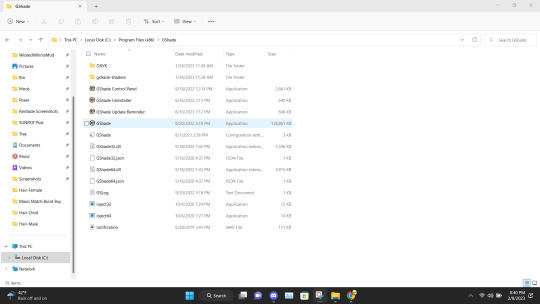
Once in the Program Files folder double click the GShade Control Panel.
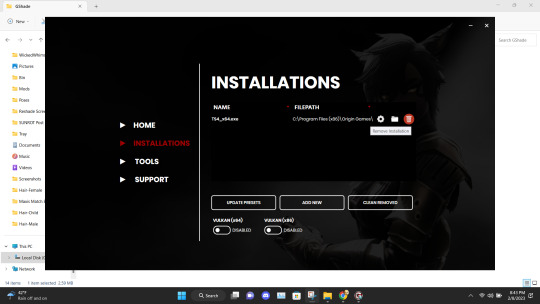
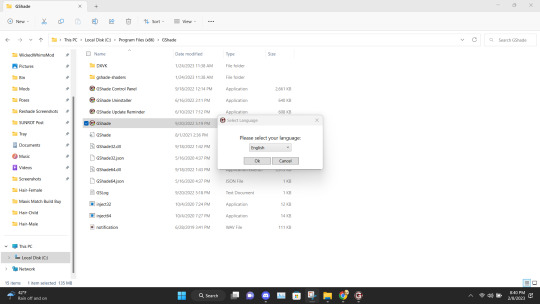
You should get the following screen Go to the Installations tab. Delete this file path. This is a very important step. It's not gonna work if you don't reinstall the program. Delete it and click Add New.
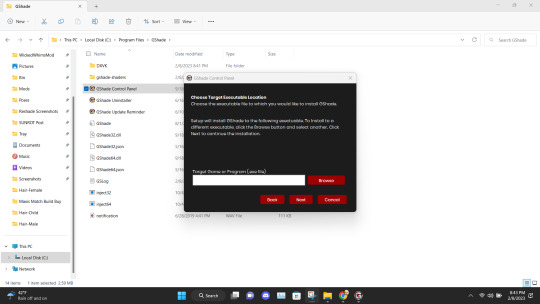
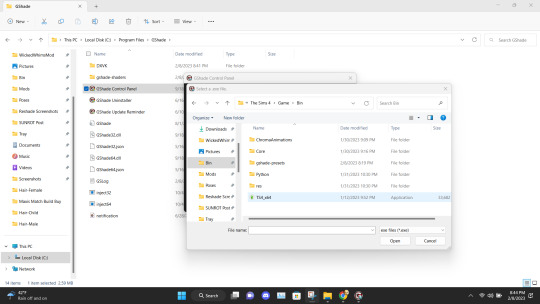
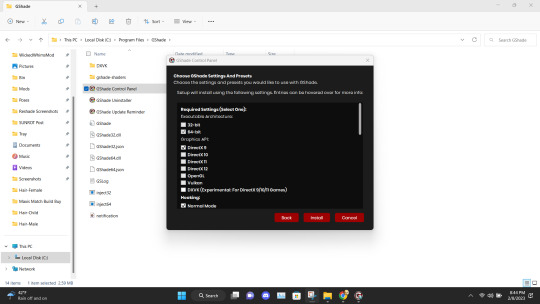
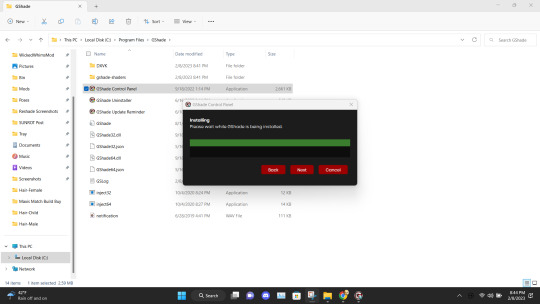
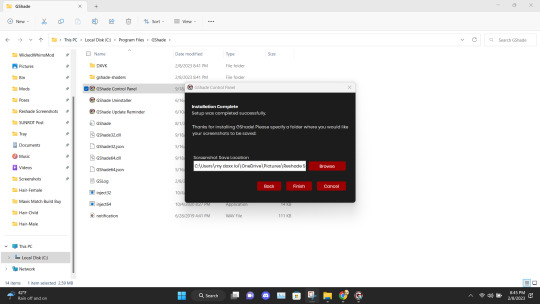
Install the program as viewed above. Click Next and set up your screenshot folder.
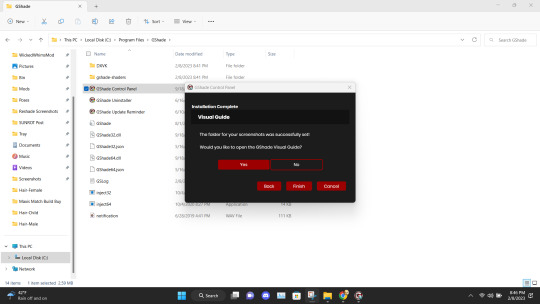
Click No on viewing the guild. You should have a control panel on your desktop. You can go in a convert you reshade presets if needed.
Alright if everything was done correctly open your game. It'll take a moment to load and when it does you greeted with the following screen on start-up.
Ignore the yellow text on the top. It says that your effects are disabled because it's not online. It works I could be misinterpreting what "effect" means but my shader work so I'm not complaining.
And there you go. Installed, and works perfectly. Don't update it. I don't know what it'll do. I have not tried. I will upload an edited version of my preset later this week or tonight. I have to tweak the color of the fog and make a decent post. Enjoy! I am open to helping under this post and in dms!
#if something you download thats for cosmetic reasons can shut down your PC that's not a normal function the program is free and basically#reshade it one of the same developers#gshade#sims 4#gshade help#ts4#simblr#tutorials
2K notes
·
View notes
Photo
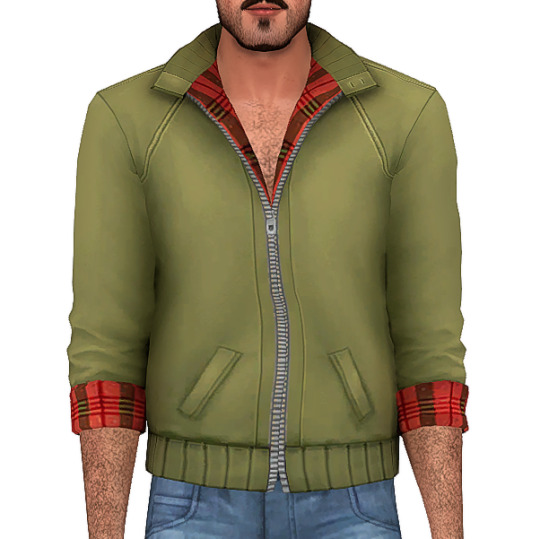
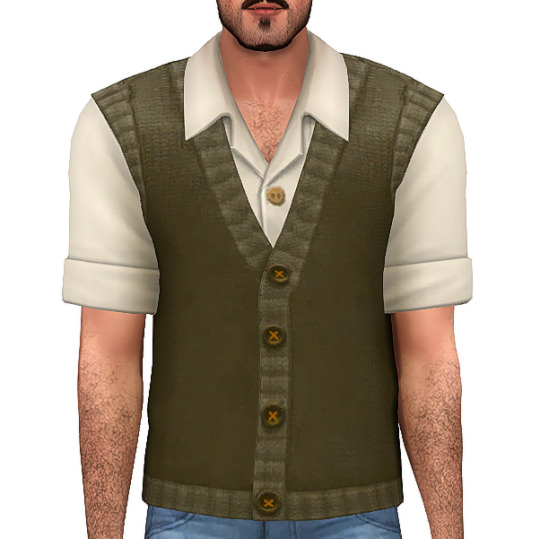


cillian set
harrington jacket: 3 swatches, 4.1k polys
sweater vest: 3 swatches, 4k polys
vest and jacket: 5 swatches, 4.6k polys
flat cap: 16 swatches (credit to fableroot), 2.6k polys
tou: no paywalls or ads, do whatever you want :) if you find issues shoot me an ask on my main blog @buglaur, not this one!!
download simsfileshare (merged or separated)
#ts4#sims 4#ts4cc#please take these off my hands#the more i see them the more i don't wanna post them#and idk why because they turned out pretty good for a first try!!#if there is clipping i'm so sorry 🙏#these were made with no tutorials and a lot of blindly clicking buttons in blender#thanks to everyone who helped me sort out the issues!!#and my testers#sorry for the boring name too i had no idea so i just named it after my guy here
1K notes
·
View notes
Text
How To: Auto Height for Shoes
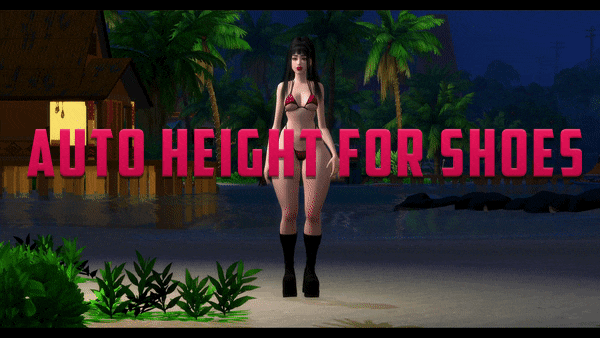
Haiii! As promised, here is the tutorial to make it so your custom shoes no longer require a shoe slider!
Thank you to the bestie who took the time to pick through Madlen's package file to figure out how it worked. And of course, thank you to Madlen who did the majority of the work figuring out how to make this possible in the first place!
♥ Tut below cut ♥
~~~
Set Up Your Blend File:
We're going to add a plane that will act as the mesh for the SlotRay which will allow for you to adjust the height of your shoes!
Open your blend file that contains the shoes your wish to adjust.
In the 3D View, press Shift + S and in the menu, select “Cursor to Center” In the 3D View, press Shift + A and in the menu, hover over “Mesh” then add a plane.
Now size this plane down as small as you can get it. You don’t want this plane visible in game.
Double check to make sure the plane has not moved from the center!! Your sim won't be centered in game if it has! If you see that it's moved:
Press "Shift + S" and click "Cursor to Center".
Then Select your plane and press "Ctrl + Shift + Alt + C", click "Origin to 3D Cursor".
Press "Ctrl + Shift + Alt + C" again and click "Geometry to Origin".
Navigate to the “Object data” tab and under “UV Maps” add a new one then name it “uv_0”.
Next, navigate to the “Scene” tab and under “S4Studio CAS Tools” set the cut number.
Depending on how many cuts your shoes have, you’ll want to adjust this number. For example, if your shoe has 3 cuts (0000, 0001, 0002) then this plane would have a cut number of 0003.
Since my boots only have one cut, I will put the number as 0001.
Now select your shoes and enter Edit mode. Select a face/vertice/edge on the very bottom of your shoes. Look to the panel on the left side of the screen (if it’s not open, press “N”). Under “Transform”, note down the number next to “Z”
After that, save your blend file under another name so you can distinguish which is which. I’ll name mine “Boots_3_Height Cut”
youtube
~~~
Add a New Cut to your Package File:
We're going to add an additional cut in your package file for the new plane!
Open Sims 4 Studio, make a new package file for your shoes and import them.
Go to the Warehouse tab and select your LOD 0, it will be the geometry with the largest file size. Sometimes you have to close then reopen the package to see the geometry.
Duplicate this geometry and in the box that pops up, change the last character of the “Group”. It can be any number or letter as long as it’s not the same as the duplicated geometry. On the duplicated geometry, note down the Group, Instance & Type values.
Find the “Region Map” and next to “Entries” click “Edit Items”. Add a new entry and in the “Layer” box, type the number you used for your cut. Since I used the cut number 0001, I will type 1.
Keep the “Region Type” as “Base” and move to “Models” then click “Edit Items”. Add a new Model entry and paste the Group, Instance & Type values you noted down before. Save and close each box.
Find your “CAS Part”, this is your swatch.
If you have additional swatches, it is a good idea to remove them and add them back once you are finished with this process.
Scroll down until you find the “Lods”.
Click “Level: 0” and next to "LOD Models", click “Edit Items”. Add a new entry and paste the Group, Instance & Type values again.
Save & close each window and return to the Warehouse.
youtube
~~~
Adjusting SlotRays:
We are now going to edit the SlotRays for the new cut which will adjust the height of the sim for your shoes!
Return to the new duplicated Geometry and in the “Data” tab, find the “SlotRay Intersections” and click “Edit Items”. Add a new entry and find the “OffsetFromIntersectionsOs” box.
You'll want to change ONLY the middle coordinate number. That will be the height of the sim.
You want to take the “Z” coordinate that you noted down from blender and replace middle coordinate number. If the number you wrote down is negative (i.e -0.01234) make it positive (i.e 0.01234).
In the “SlotHash” box, change the value from “00000000” to “FEAE6981”. This is the hash for the b__ROOT__ bone in the Sim's Rig.
Save and close the dialogs then return to the warehouse. Next, reimport your mesh and save your package file. You can now test your shoes in game!
youtube
Please keep in mind:
You have to do this for every LOD of your mesh
You can freely replace the mesh of your shoes and adjust the height since the cut with the plane has the SlotRay data
Animations may be off since EA hasn't made the game to support taller sims
CAS windows may move slightly if your sim is using poses/animations where they are leaning to the side. This won't affect gameplay
I recommend using Helgatisha's Stand Still in CAS mod to make sure your sim is absolutely centered
Hope this helped :)
1K notes
·
View notes
Text
~business casual CAS background room~ (with mirror!) + tutorial!
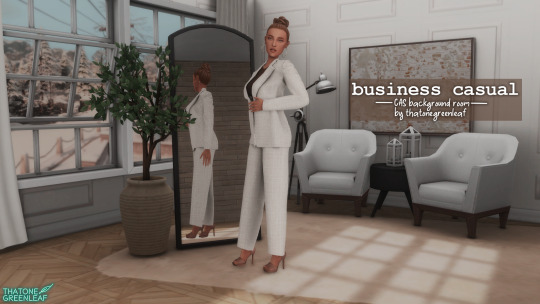
-
A bunch of you have asked, so here it is! You can watch my tutorial on how to make your very own CAS background room with a mirror right here!
(and you can also download the room I made while filming this tutorial below!)
♥ Download the package file and put it right in your Mods folder! (up to 5 folders deep)
♥ You can only have one CAS background/room in your game at once, remove any other before putting this one in!
♥ Reflections need to be set to low, medium, or high but not OFF in your game's graphics settings for the mirror to be functional.
♥ Base Game Compatible!
-
Follow me on twitch!
Support me on patreon!
DOWNLOAD "BUSINESS CASUAL" CAS BACKROUND ROOM ON SIM FILE SHARE!
WATCH THE TUTORIAL ON HOW TO MAKE YOUR OWN HERE!
-
TOU: do not redistribute, reupload, or claim my cc/CAS rooms/presets as your own! recolour/convert/otherwise alter for personal use OR upload with credit. (no paywalls)
♥ built using littledica's original CAS room files ♥
stuff I'm using here: reshade | cas lighting | (send an wcif if you want anything on the sim!)
#sims 4#ts4#sims4#thesims4#maxis match#maxis mix#s4cc#sims 4 cc#sims 4 custom content#cas background#sims 4 cas#cas room#ts4 cas background#sims 4 cc tutorial#cas background tutorial#cas background with mirror
237 notes
·
View notes
Text
Making dynamic poses/animations that adjust to a sims body with Animation Tools by thepancake1
Made this short guide after talking to thepancake1. I haven't seen many people use this feature yet and felt like it might be worth sharing? There are some limitations to be aware of, but I think it's a useful option (for poses as well as animations) 😊
Many thanks to thepancake1 for the tools and for the helpful explanations he provided for this guide.
1. Background and in-game mechanics
The way TS4 handles different body shapes and clothes in animations (for example, in order to avoid clipping) is basically by putting markers (“slots”) on the surface of a sims body that can be then used as (IK) targets with the in-game IK system.
As you probably know, IK (Inverse Kinematics) – as opposed to the default FK (Forward Kinematics) – is a set-up where bones in a chain are influenced backwards. So, for example, when you move a hand, the arm will follow.
In a similar way, what in-game IK does, is assigning a bone or slot to animate relative to. For example, if your sim is posed with hands on the hips, you can assign the hands to the hips slot and the game will then process the pose/animation and perform IK in real time to change the position of the arms and hands relative to the hips.
Note that there are limitations to this system, though, as only hands, feet and the root bind can procedurally target other bones/slots.
Hereby, feet targets and root target are mainly used in interactions with objects, in particular in sitting animations (where, for example, the root is targeting a chair slot).
Hand targets are mainly used for adjusting a pose/animation to a sims body shape and clothes.
The in-game IK always influences the complete arm/leg (chain: foot-calf-thigh/hand-forearm-upperarm).
You can find an article that provides some background information here: https://simsvip.com/2014/08/20/community-blog-the-sims-4-animations/
2. Using the feature in custom poses/animations
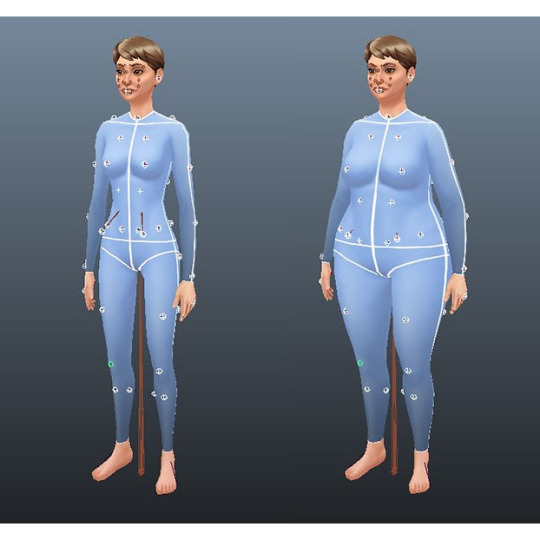
Per default, when you make custom poses/animations with Blender and S4S, the relevant information that the game requires to apply in-game IK is not included. And so, you will notice that while a pose might look good with the base rig in Blender, it might not fit other sims with a different shape in game, in particular causing clipping.
You can use TS4 SimRipper to fine-tune a pose for a certain sim, but this might not be the solution you’re looking for, if you share your poses and/or want them to be compatible with different kinds of sims.
The animation tools now include a feature that makes it possible to use in-game IK with custom poses/animation as described in part 1.
Disclaimer:
The animation tools are in development and subject to change.
Currently TS4 SimRipper sims are not properly supported. (Although, imo for the purpose of the task, it doesn't make much sense to use them as models.)
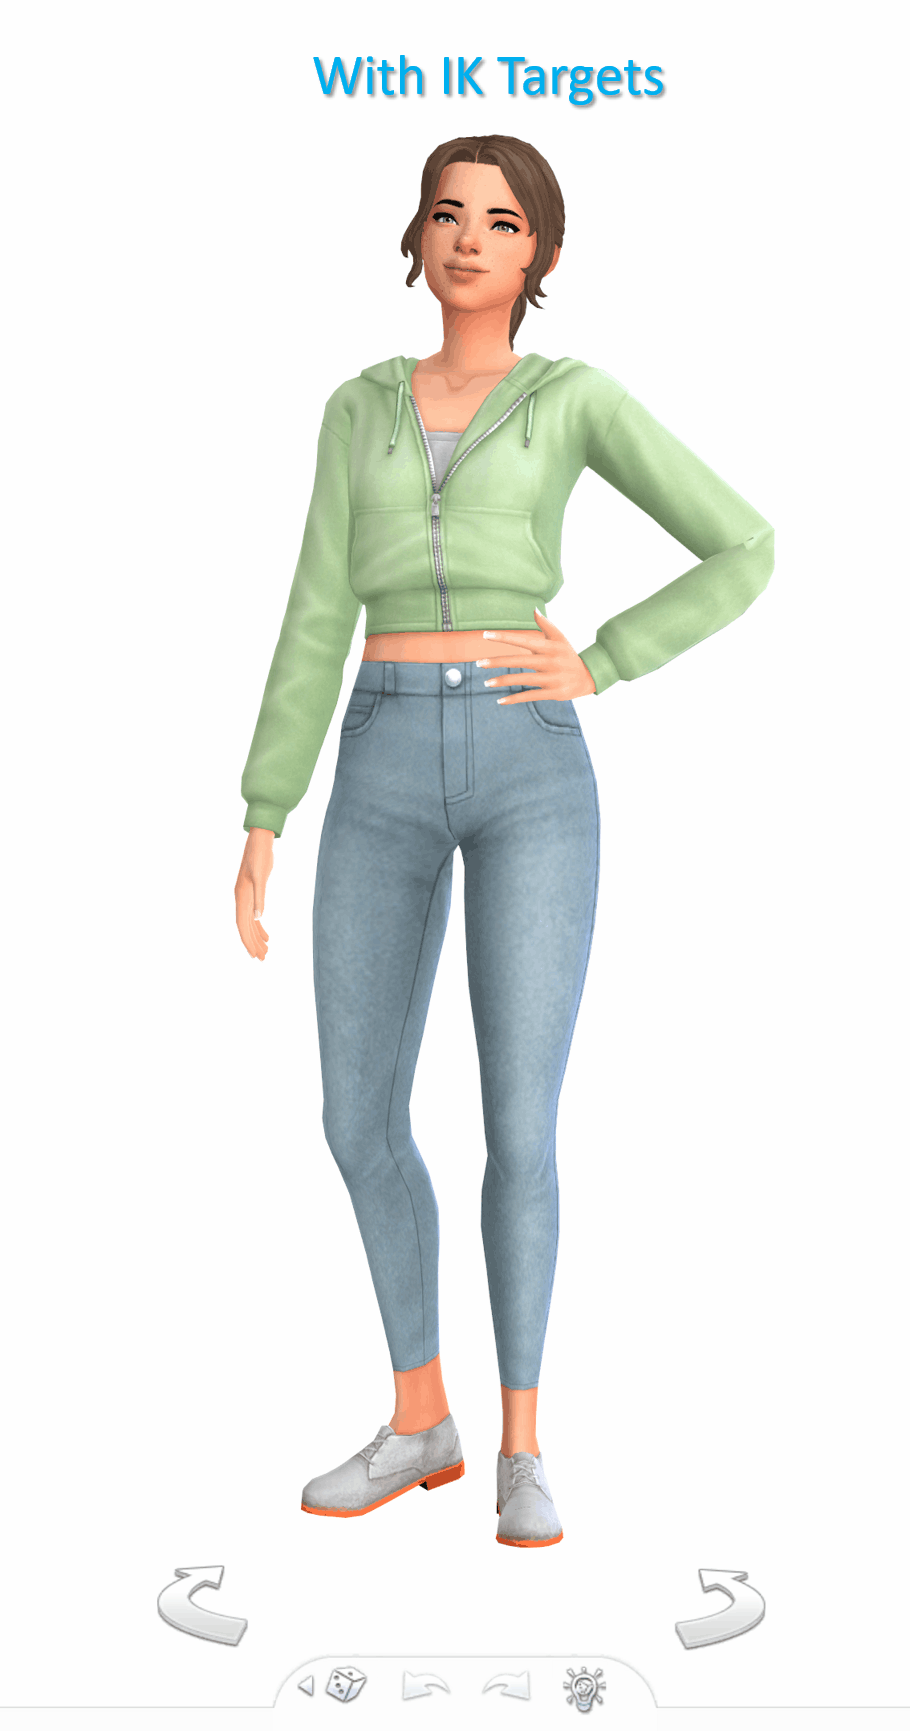
As you can see in the comparison below, there might be some accuracy loss for the flexibility gained. (The position of the arms in the version without IK targets matches exactly the pose I made in Blender but doesn't work at all for the heavier sim causing extreme clipping. At the same time, the version with IK targets deviates a bit from the pose I made, but works for any sim.)

Below a short guide on how to set it up with the example pose I made.
1) You can download the tools HERE. Make sure to check the installation guide and tutorials in the wiki tab for the basics. (Note: The tools were originally made for Blender 3.0 but also support newer versions, in particular Blender 3.3.)
Some additional tips for poses in another post of mine HERE.
After you set up the tools in Blender and have made your pose:
2) Go to the S4AnimTools panel. Fill out rig name, clip splits and clip name as described in the tutorials linked above (also make sure to select “Allow Jaw Animation”).
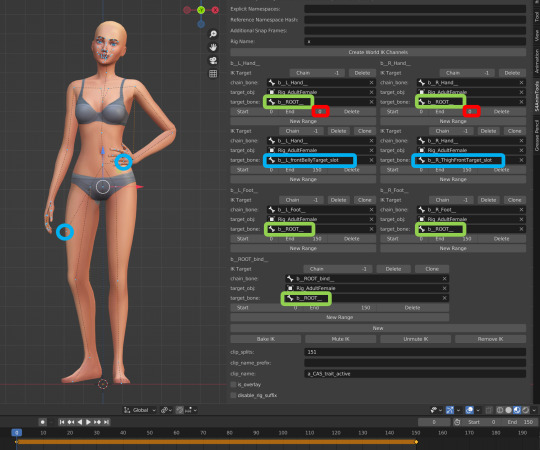
3) Find & click “Create World IK channels”.

This will create 5 IK channels for the afore mentioned hands, feet and b_ROOT_bind bone. You can also add channels either by cloning the existing ones or clicking “Create World IK channels” again. To get rid of unwanted channels click “Delete”.
4) Set up the targeted bones/slots based on the type of pose you made.
In my example, I created a pose where a sim has the left hand on the hip, and the right hand close to the thigh. Therefore, I added IK channels targeting the “b__L_frontBellyTarget_slot” and “b__R_ThighFrontTarget_slot”.
The slots are marked blue in the picture below. Some notes:
The slots are hidden by default, I made them visible for the picture. You can unhide all bones/slots available by pressing Alt+H. But I recommend doing this on a separate rig/in another blend file or undo it directly afterwards if you don't want all the (unneccessary) bones/slots blocking your view.
The selected slots worked well enough for my example, but you should figure out what is suitable for you. (Fo example, the HandDangle slots seem to be commonly used when the arms are hanging near the body.)
As orientation you can also look up clip files for EA poses/animations via the S4S Game File Cruiser and see what bones/slots are used as targets ("Warehouse" tab -> "SlotAssignments"; IKChainIndex: 0 - left hand / 1 - right hand / 2 - left foot / 3 - right foot /4 - root bind). On that note: The Clip Pack export loses/resets the slot data, but you can use it to find an animation and check its Instance ID to then search for in the Game File Cruiser. (If you know the name of an animation you can also determine its Instance ID by converting the name with the S4S Hash Generator.)
5) To ensure an animation works properly and, in particular, blends with other animations in game, each IK channel should (also) target b_ROOT of the rig.
The bones are marked green in the picture below. This set up was recommened to me by pancake. Another experienced creator mentioned though that it's only necessary to target b_ROOT at the start and end of an animation, in his experience.
Also note that this seems to be a restriction for animations that are made as in-game interactions and might not be necessary for poses or animations used with Andrews Pose player.
6) The start and end frame is set according to the length of the pose/animation (I want to use the pose as a CAS trait pose and set the duration to 150 frames = 5 seconds), except for the b_ROOT target for hands where the end frame is set to 0 in my example, since they are also targeting the slots “b__L_frontBellyTarget_slot” and “b__R_ThighFrontTarget_slot” during the animation.
Note: My example is a static pose. In animations, however, you can also target different slots at different times by setting up multiple IK channels and specifying the start frame and end frame respectively.
7) Bake the animation by pressing “Bake IK”.
8) Export the clip and create a package with your pose/animation as described in the linked tutorials above.
@ts4-poses @thefoxburyinstitute
656 notes
·
View notes
Photo
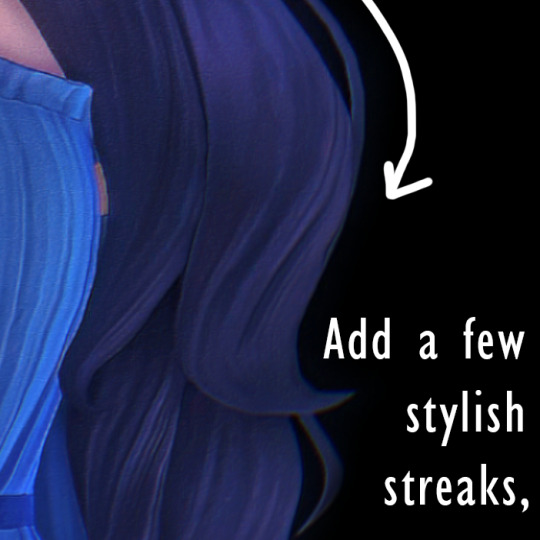
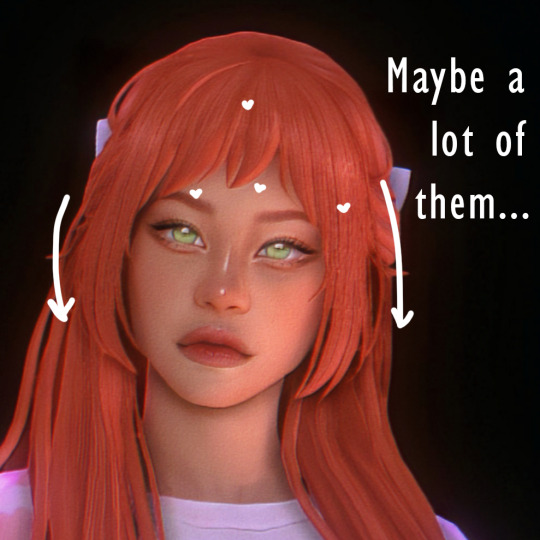
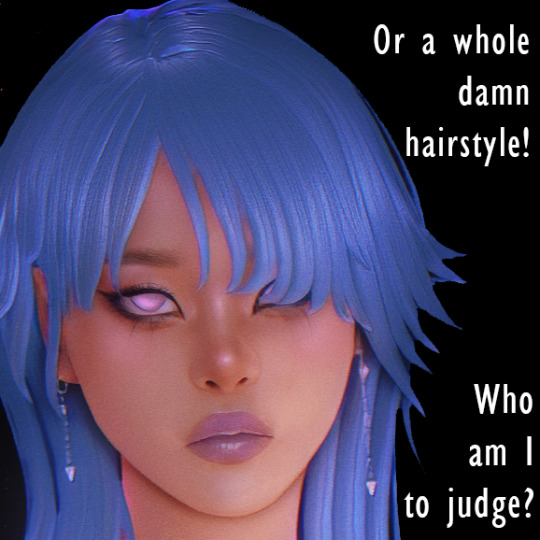


SOLUTIONS! CAUSE WE’RE ALL TIRED!
So today @isjao asked me if I could post a blender file containing a basic streak mesh to make everybody’s job easier, so I thought: “why not” and decided I would post a whole zip file instead, containing the mesh + all my base textures I use when I have no patience to scroll the whole sims4studio catalog looking for the perfect texture.
The .zip file contains:
The streak mesh (modifier on);
My hand-painted base texture (EA dirty blonde, 13th swatch);
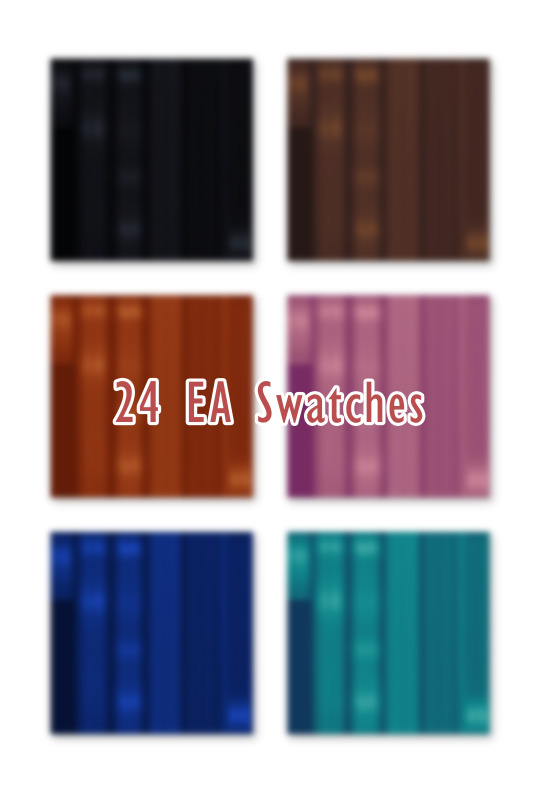
The other 23 EA swatches (if you like my version. If you have your own actions, you can recolor the base again);
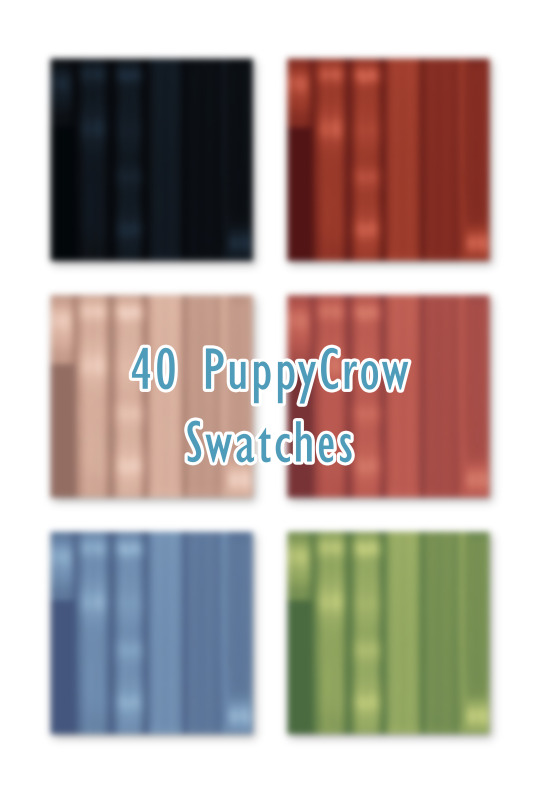
My 40 PuppyCrow swatches;
A hand-painted scalp texture, if you want it. (png and dds);
Bump map and Specular map ready to go!
A text file for troubleshooting and TOU.
💕 DOWNLOAD 💕
PLEASE CONSIDER DONATING ON KO-FI OR BECOMING A PATRON. I’m trying to pay for my new ADHD meds, antidepressants and therapy, also college. Please, consider sharing too, if you can’t pay. Thank you for the support :)
#the sims 4#ts4#sims 4#the sims 4 custom content#ts4cc#s4cc#sims 4 cc#the sims 4 maxis match#ts4mm#s4mm#blender tutorial#blender#photoshop#the sims 4 resources#ts4 resources#sims 4 resources#resources#tutorial#tutorials#the sims 4 tutorial
1K notes
·
View notes
Text
mutt's guide to using dsr on ts4, with pictures!!!
ok so, dsr is a thing available for nvidia gpus that allows you to take veeery high resolution screenshots of games without much trouble, like this
it's an alternative to srwe, as it plays nicer with a lot of reshade shaders and is just, generally more nice to use! let me teach you how to use it - full tutorial with pictures for every step under the cut (im sorry its too long without the cut)
step 1: right click your desktop and open the nvidia control panel
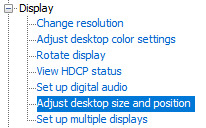
step 2: go here (adjust desktop size and position)
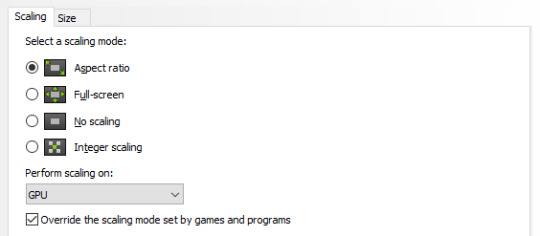
step 3: make sure your settings are set as follows! this is important
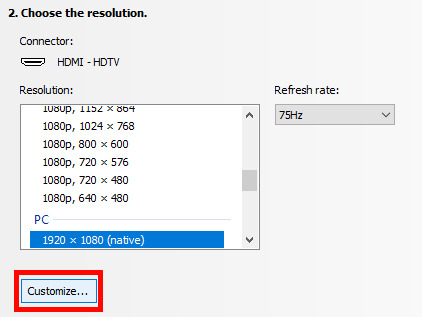
step 4: now, go here (change resolution)

step 5: under change resolution, click on this button (highlighted with a red square)
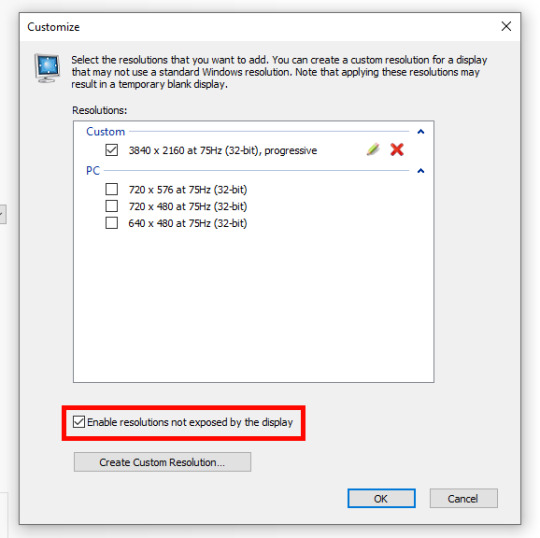
step 6: in the windows that appears, make sure that "enable resolutions not exposed by display" is ticked! this is very important! (again, highlighted in red - it should look like this)
step 7: now, click on "create custom resolution"
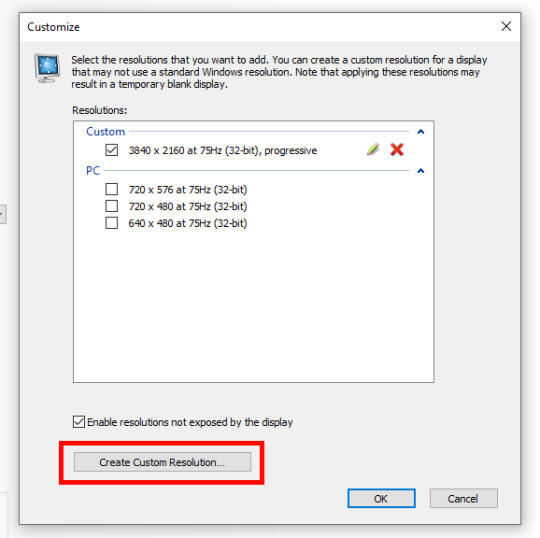
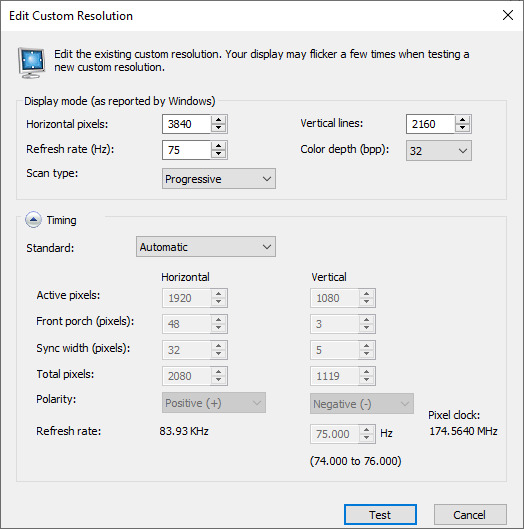
step 8: this is where you set your desired resolution, and where i get a bit rambly; so, in my opinion, there is ZERO reason to go above normal 4K for TS4, as it's generally not a really high-poly game and it has rather simple graphics. you can fuck around a lot here, but if you don't feel like it, here are my settings - this will give you 4K screenshots. NOTE: THE REFRESH RATE DOESN'T NEED TO BE 75! SET IT TO WHATEVER THE REFRESH RATE OF YOUR MONITOR IS!
step 9: now, click on test
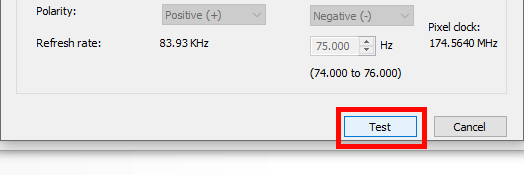
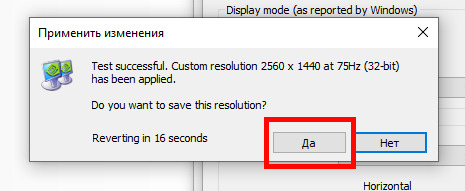
step 10: let the thing load, and after it's done, a window like this should pop up.. but yknow, in your language. click on "yes" (or accept or ok!! idk mine's in russian; basically, the button highlighted here!)
step 11: click "ok" in the window that pops up! like this! afterwards, close the nvidia panel

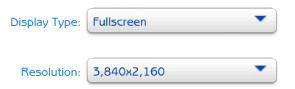
step 12: open the sims 4 and go into game options, then into graphics
step 13: set your "display type" as "fullscreen", like this

step 14: under "resolution", select whatever resolution you setup earlier; in my case it's 4K, so if you used the same resolution, your settings should look like this
step 15: click on apply changes!
AND UR DONEE!! WAHOOIEE!! now, take your screenshot using reshade, and then go back into sims settings and set it back to what you usually play at, then apply changes!
every time you need to take an HD screenshot, simply open game settings and use your custom resolution! that's it, have fun :3
#sims 4 tutorial#ts4 tutorial#sims 4 screenshots#ts4 screenshots#sims 4 screenshot tutorial#ts4 screenshot tutorial#sims 4 hotsampling#ts4 hotsampling#srwe#nvidia#dsr#tutorials
604 notes
·
View notes
Text

how to use wicked whims: installation tutorial, realistic gameplay settings & more
by ashley plays
this video goes over the following:
how to install wicked whims & animations
adjusting the settings for realistic & age-appropriate gameplay
how to use custom animations & poses
my favorite wicked whims gameplay features
mods mentioned:
wicked whims (18+)
ui cheats extension
mc command center
streamer mode/censorship mode add-on
smaller mosaic
body hair v5+ redux
height slider
missing plumbob
teleport any sim
favorite animators:
error404phillips
greynaya
kiki chain
favorite pose creators (masterpost):
afrosimtric sims
mel bennett
katverse
sciophobis
simsulani
972 notes
·
View notes
Text

Tutorial
'Fenceless' goat/sheep enclosure
Use the 'Hazard Tape', the goats/sheep won't cross it.
Then decorate to your liking to cover up the tape :3
EDIT: Chicken stay inside too!
#ts4 tutorial#the sims 4 tutorial#simblr#sims 4 horse ranch#sims 4#ts4#goats#chestnut ridge#rider's glen
458 notes
·
View notes
Text
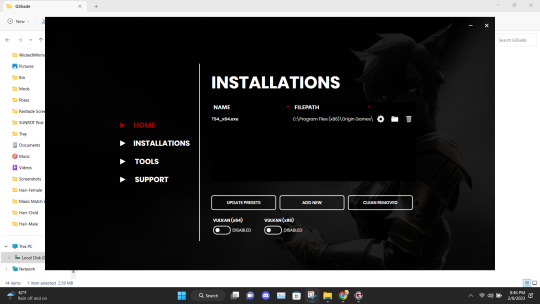
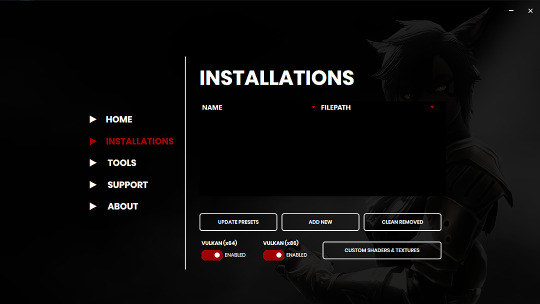
INSTALLING// GShade + ReLight for The Sims 4
I've been getting a lotta asks about how I got the up to date GShade working with ReLight ( ALPHA ), so here's a mostly quick tutorial, that will hopefully get it working properly for you too!
Firstly, download and install GShade, unless you've already got it installed, then just be sure it's up to date.
Click, or right click pics below and open in a new window to see them in more detail.
Now I don't currently have it installed into any of my games, bc I mainly use Reshade 2, so if you need to know how to do that, you're in luck!
I'll walk you through it.
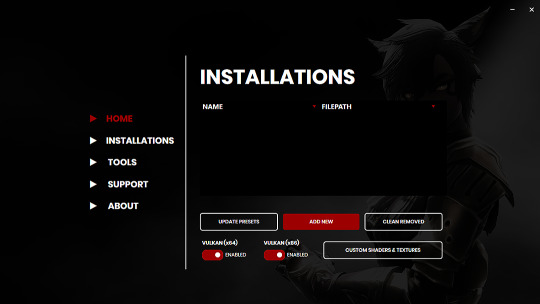
Click Add New.
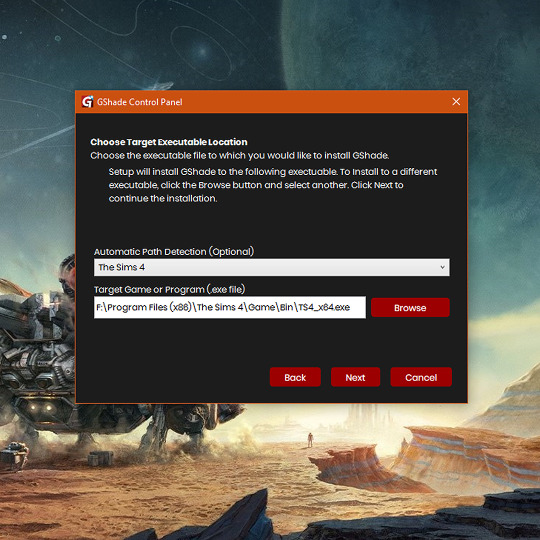
Then locate your TS4_x64.exe, and click Next.
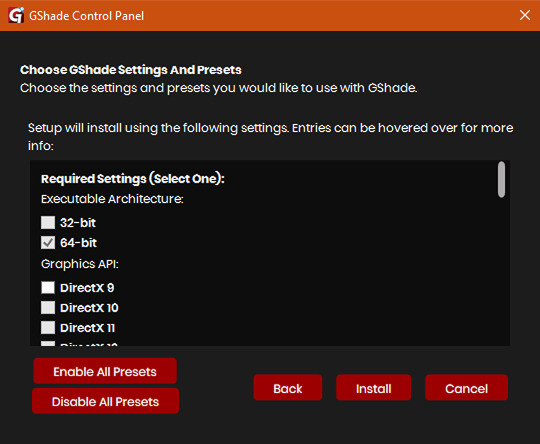
This will open another window with a bunch of ticked boxes, and tbh I didn't mess with any of these. Many them are greyed out anyway, and it all works fine for me.
So if yours look like this, then you should be fine too.
Lastly, at the bottom you can preload some presets if you like, but it's purely up to you. They aren't required.
When done, click Install.
There will be another window that asks you where you'd like to save your pictures. Once again, this is purely up to you, click Browse to locate your preferred folder, or if you use programs like Nvidia for screenshots, just ignore it, and click Finish.
Then when it asks if you're okay with the chosen location, click Yes.
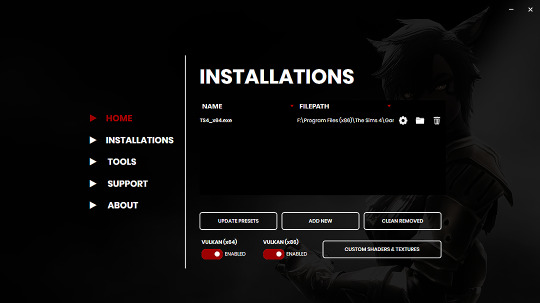
Once you've finished, TS4_x64.exe should show up in the Installations tab of your GShade installer, which means you're part way there!
Now, click on the Custom Shaders & Textures button at the bottom, this will open the folder where you need to install ReLight.
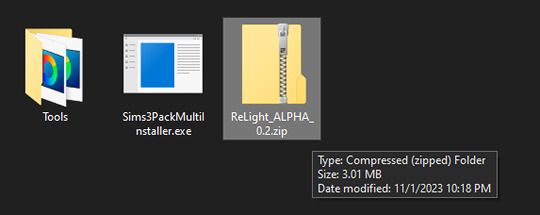
Locate your ReLight_ALPHA_0.2 download. Mine was in my Downloads folder.
Double click it, or unzip it, and you'll find a couple folders inside it.
Click or right click pics below and open in a new tab for more detail.
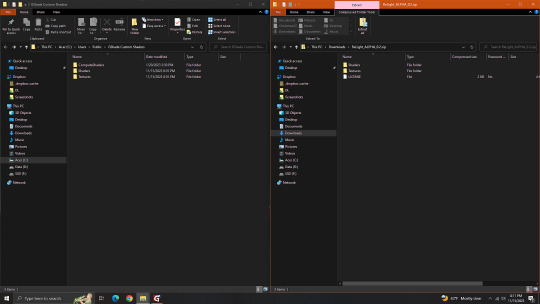
Here's a side by side comparison of the GShade Custom Shaders folder we just opened, and the ReLight_ALPHA_0.2 folder we unzipped and opened, so you can see how there are two identically named folders.
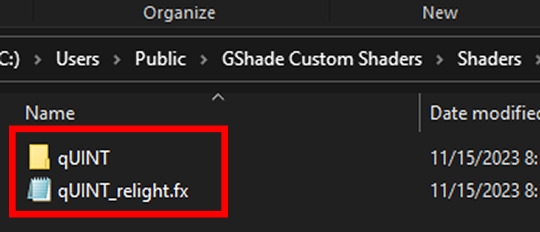
The goal is to put whatever is in the Shaders folder of the ReLight folder, into the Shaders folder of the Custom Shaders folder, and then repeat this process again for both Textures folders, until they end up looking like this...
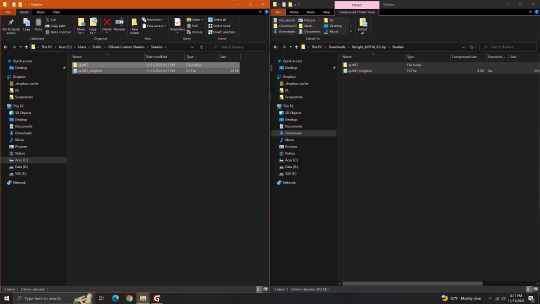
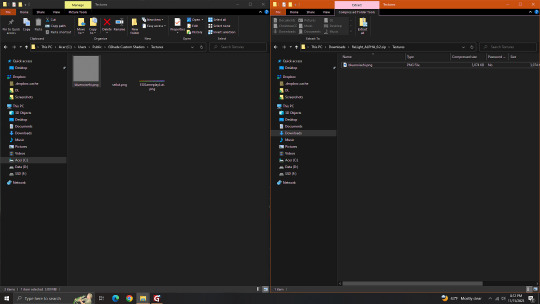
In conclusion, your GShade Custom Shaders > SHADERS folder should have these two files in it...
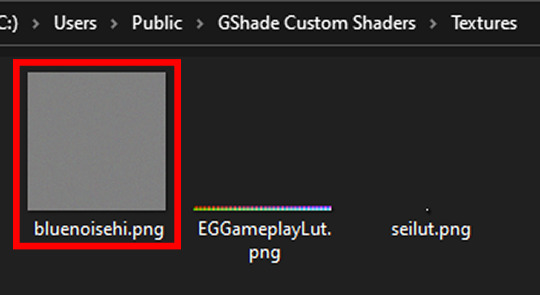
While your GShade Custom Shaders > TEXTURES folder should have this .png in it...
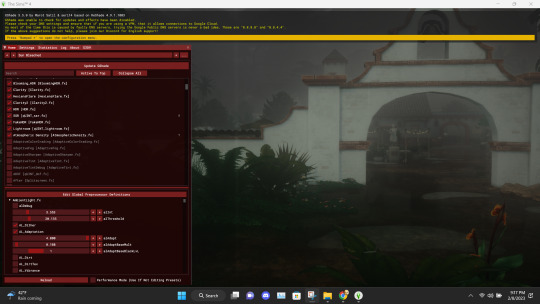
Good? Now let's turn on The Sims 4.
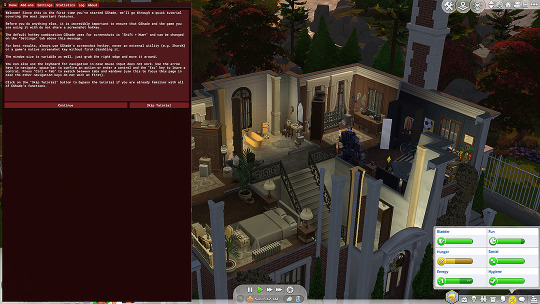
When you've opened you game, load your save ( idkw, but the GShade UI won't open in the menu screen ), then hit Shift + Backspace on your keyboard to open up the GShade UI.
You can choose to go through the tutorial, or skip it. Either way just keep clicking continue or OK until you get to the Home panel.
Now, I've got a preset already, if you've got one too, good, activate it, if you don't there should be like a default one you can use until you create one or get one.
Main goal at this moment is to find ReLight in the list of shaders, and activate it so we know it works.
Tick the Performance Mode box at the bottom, and scroll down 'til you find this...

This list should be alphabetized so just scroll down to the Q's, then tick the box beside it.
Then click Active to Top, and scroll back to it.
One thing I would suggest is binding it to a key ( right click while hovering over it ), this will make it easier to find if you lose it again, since clicking Active to Top also recalls any shaders that are bound, even if their box isn't ticked ( isn't active ).

I've bound mine to F8, but it's up to you what you wanna use, I only suggest it be F6 or above, since The Sims 4 already uses F1-F5 I believe.
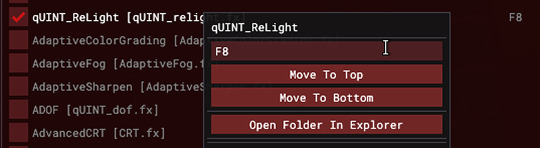
Oh, and whenever you're done messing around with it, be sure to untick Performance Mode, so your computer won't beat your ass.
271 notes
·
View notes
Last Seen Blogs

claudinekiddz
Untitled

cxsmic-hxrrxrs
NO MINORS

teashopcrafts
Tea Shop Crafts

kramaku
Nitty

pastureblog-blog
Pastureblog