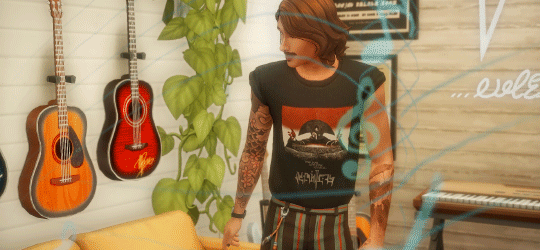
#sims 4 tuts
Text
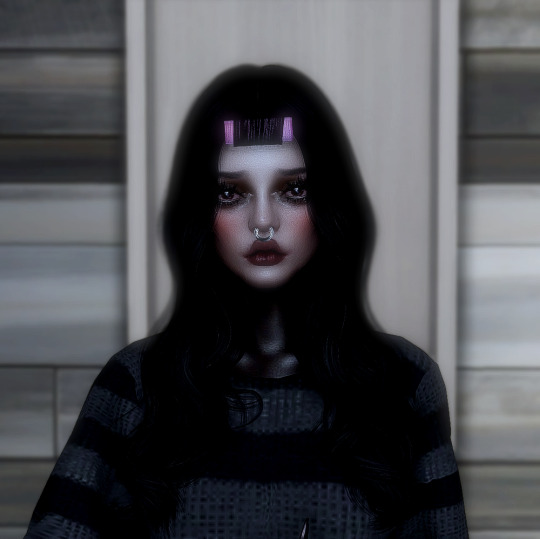
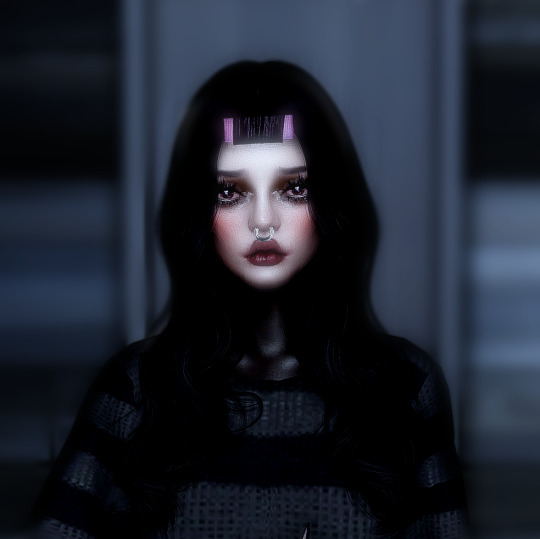
Updated: How I edit my sims 4 screenshots (night-time edition)
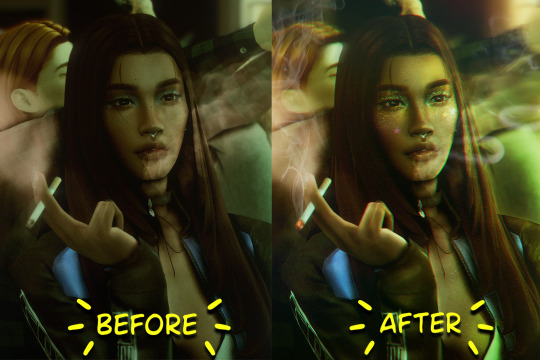
A more detailed editing tut so you can understand my process as it may help you, i edited this relatively quickly and usually spend about 1-2hrs editing something...so let's goo.....
Before taking screenshots:
Help yourself as much as you can in-game, I always make sure there is some sort of light source in my pictures or something interesting that I can add to enhance something already there
Understand good/bad composition and add variety by using different angles
I take LOTS of photos just to end up with 1 or 2 good ones

I'll just be using photoshop for this, but i also like to use the procreate app as i'm more confident w it.
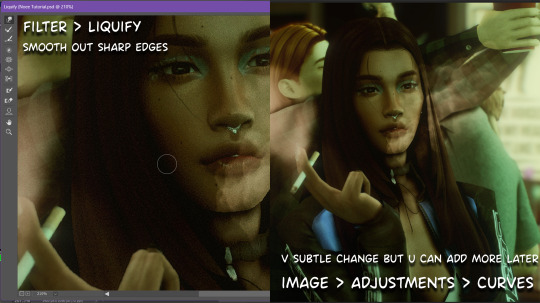
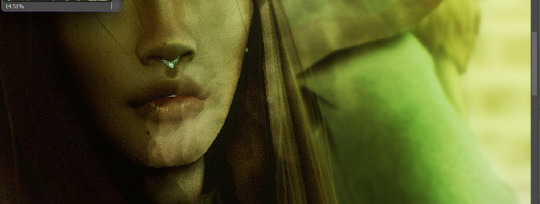
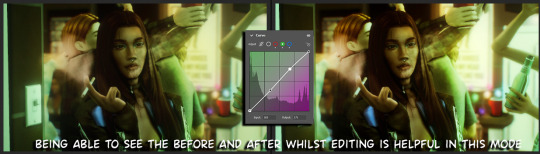
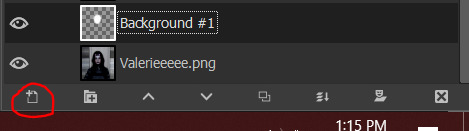
step1: I check if there are any major glitches or hard areas e.g, fingers elbows etc.. that have sharp points and pull them in liquify so they are smooth. Then use curves to change the contrast.
step2: *duplicates image* using the dodge and burn tools (keyboard shortcut: o ) i'll add emphasis to highlights and shadows (be careful with these as the dodge tool can ruin the image if used in excess) *merges image* (i duplicate and merge as i go, utilise using lots of layers so you can go back if you mess up/ want to change the opacity of an effect.)
step3: making light sources POP. *new layer* change blending mode to overlay or soft light and choose a colour you like.

step4: *new layer* draw hair strands. i just use a basic round brush in photoshop and change the hardness or i'll use a sharp caligraphy type brush depending on my sims hair type. (i try not to overdo it as i like maxis hair and don't want it to look too realistic)
step5: i would then add a new layer and set the blending mode to multiply to add more shadows, but i don't feel like i need to at this point.
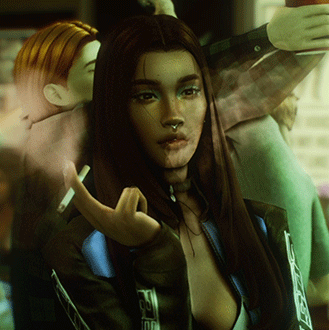
step6: *duplicates image* go to filter > camera raw filter, i change the "light" and "curve" panels, i like green tints in my screenshots especially the night ones. (this is where all the magic happens really so just adjust all the channels to your liking, lightroom is also really good to use)
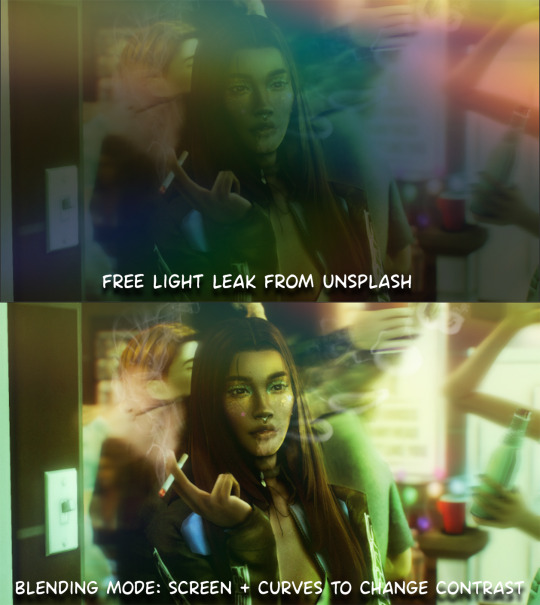
step7: *create new layer* blending mode: screen or linear dodge (add) / makeup and finishing touches! - for this look i'll get stars and glitter pngs off google or unsplash same for the smoke, though if i'm using procreate they have free brushes for that :')

step8: add light leaks as they add some fun dynamic lighting and textures to your screenshots. (i also flip my image horizantally [image > image rotation > flip canvas horizontally] whilst editing as it's like a "fresh pair of eyes" when you've been editing for a while so you can see what looks off)
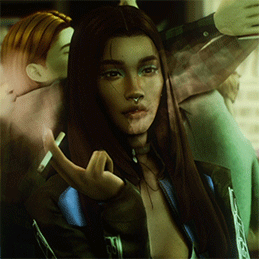
final step: merge all the layers (though i do merge along the way once i'm happy with something) go to filter > sharpen > smart sharpen. I leave it as the default setting.
extra step if u want: for party pics i might add chromic abberation here is a 60 second tutorial on youtube it makes the pic look cool and trippy.
And you're done!! congrats on surviving. if you have any questions please send them in my ask box so others can see and get help too.
126 notes
·
View notes
Text
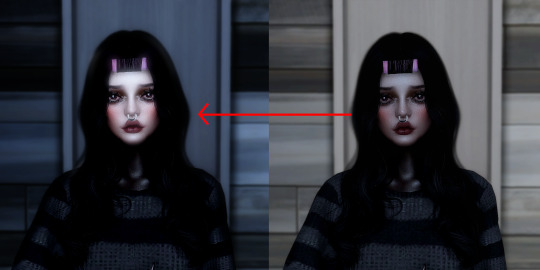
So I recently found a way to lighten up my sims whenever I take a screenie or do a render and it’s SUPER simple. I had to share! All you need is either gimp, photoshop, etc.
Here’s my original pic:
now we gonna enter gimp!
add a new layer (make sure it’s an alpha layer)
make sure the new layer is set to “soft light”

now go into paint

select a fuzzy brush and the color of your light. I chose white.
now paint over your sim’s face and/or body then go under filters -> blur -> gaussian blur (to your liking, I tend to go pretty high) and you’re done!
final pic is doing soft light on the background (color black and another layer is blue) and also gaussian blur on the background as well with erasing my sim so she’s unaffected.
#tutorial#gimp tutorial#ts4 tutorial#sims 4 tutorial#ts4 edit#ts4 screenshot#ts4 screenshots#sims 4 gimp#sims 4 tut#sims tutorial
136 notes
·
View notes
Text

Sims 4 | Hair Meshing Tutorial From Scratch | A step-by-step guide to make hair in TS4
okay so this is the meshing tutorial i was talking about!! In this video, I will be creating a hair from scratch (finished product) and bookmarks will be in the desc for the different sections of the video if you want to skip. This tutorial is mainly recommended for people who know their way around blender but I absolutely encourage beginners to do it aswell :D
Things you will need:
Blender 2.79
Sims 4 Studio
A photo-editing software (optional, if you want to edit textures)
CMAR's CAS tools (optional but good for checking the hair without going into the game yet)
Keep in mind that this tutorial focuses on Maxis Match-style/Clay hair.
It took me a few weeks to make this video, so I hope that I thoroughly explained! If you have any questions, send me an ask or a message.
Below the cut will be additional sources of info for cc making that helped me understand the workflow. Thank you all for the constant support!!
Consider donating to my ko-fi if you liked this tut!
Tekri's Guides
what is uv_1?
what are weight paints?
what is the bump/normal map?
what is the spec map?
what is vertex paint?
the foxbury institute
#sims4#sims tutorial#ts4#blender tutorial#sims#thesims4#the sims 4#thesims#sims 4 tutorial#simblr#tutorial#blender#tut#sims 4 cc tutorial#sims 4 cc hair tutorial#resources#my tuts
826 notes
·
View notes
Text
Viewing Your Giant CAS Closet by ANY Theme/Style
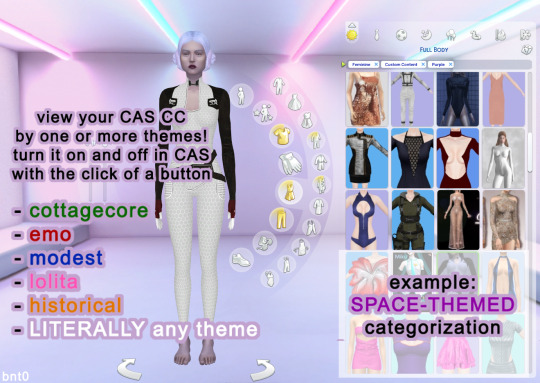
do you want to be able to switch between viewing your grunge and lolita cc in CAS? maybe you made a fairy and you want to limit their closet to your cottagecore and plant themed cc? or maybe you just really want to track down that specific victorian era dress you downloaded...
i figured out an easy way to view cc in CAS by ANY themes or styles you choose and i wanted to share bc i haven’t heard of anyone else who does this! i have 40gb of CAS cc of all styles and this helps me find the cc i need for any style of sim.
the simple explanation is below the cut and requires a basic understanding of how to change tags for an item in sims4studio, as well as viewing items in CAS by tag. if you don’t know how to do either of these, i am linking an in-depth beginner’s tutorial here and i’m always open for questions :3
ps this doesn’t work for certain categories (skin details, tattoos, body hair, scars)
basically, in sims4studio, instead of tagging individual swatches by their actual color, i use the color tags to sort items based on theme(s). each color corresponds to a theme or style, or even multiple styles.
the colors available in CAS are red, orange, white, black, blue, yellow, pink, brown, green, purple, and gray. i have a sticky note on my computer that lists the colors and the themes/styles i organize by and i actually assign multiple themes to some colors. for example, i color tag space-themed cc as purple, or emo and vampy cc as black and apply to all swatches for that item. in CAS, when i want to view space cc, i check purple and custom content and i can see all my space cc. even better, swatches can be tagged as multiple colors and you can view multiple color categories in CAS at once. the result is a quick and easy customizable CAS closet
some categories you can organize by: historical, goth, y2k, fairy, fantasy, grunge, island, kfashion, basics, lolita, modest, western/cowboy, etc. literally whatever categories help you the most!
#this is long-winded but i didn't want to confuse people :)#i swear it's so helpful#sims 4 tutorial#sims 4 studio#sims 4 studio tutorial#s4 tutorial#sims 4 tut#ts4 tutorial#sims 4 cc#sims 4#long post#s4s tutorial#zzz#bnt0resources
157 notes
·
View notes
Text
dear every sims creator that makes text and image tutorials instead of videos:
i will give you a kiss on the mouth or $50 whichever you prefer
#this is not legally binding#sims 4#sims 4 cc#i (autistically) hate video tuts so much theyre so hard to follow#obviously im not complaining that people make them just that theres not more variation sometimes#cuz everyone learns different
8 notes
·
View notes
Text
Sims 4 CC Slideshow Tutorial
Hey guys, just posting this here for those who like written instructions on how to make CC and for those who may need a refresher. This tutorial was made by a beginners FOR beginners

https://docs.google.com/presentation/d/e/2PACX-1vRbny2e3AJSFfb4I_T-3JtLeDPIbvrKmmC_ib2gIKy8ifIGgHbd4Nb42hgCK-KowvDPjJVxz1DZQBFJ/pub?start=false&loop=false&delayms=60000
#the sims 4#the sims 4 cc#the sims 4 cc tut#tutorial#ts4#alpha cc#marvelous designer#blender#gimp#the sims 4 custom content#the sims 4 custom clothes#sims 4 alpha#sims alpha cc
70 notes
·
View notes
Photo
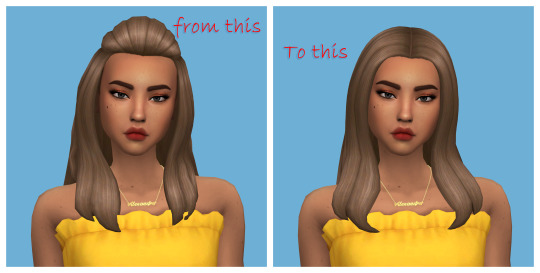
Hair Tutorial
Some people asked me how I removed the poof part of this hair, so I decided to make this simple tutorial
(remember i’s my first tut and my English is bad so...)
Under the cut...

Step 1 : Go to edit mode and select the poof part with " L " Key


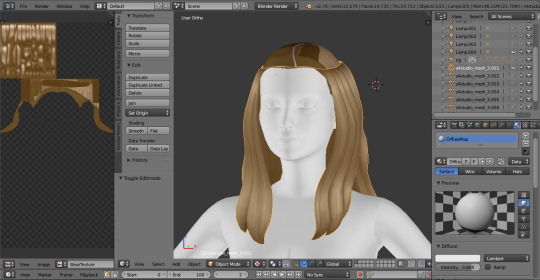
Step 2 : Click the key " X " -> vertices to delete it
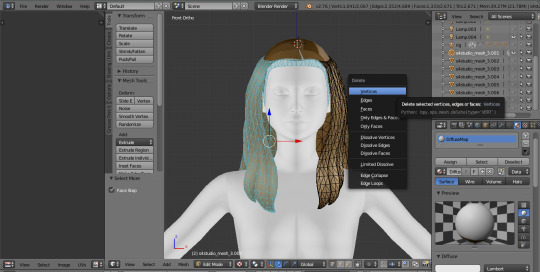
Step 3 : Delete any half you want, keep the one you like more (If you are lazy)
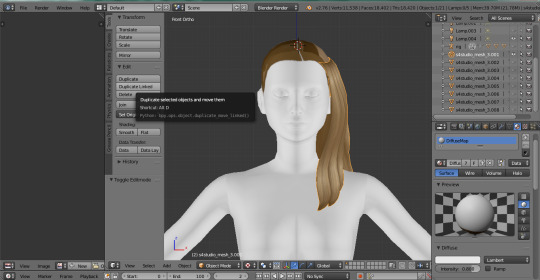


Step 4 : Now Go back to object mode and click Duplicate Linked, then click Mirror then " X " (so whatever you edit on the right/left one the other one/side will automatically change)

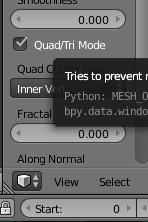

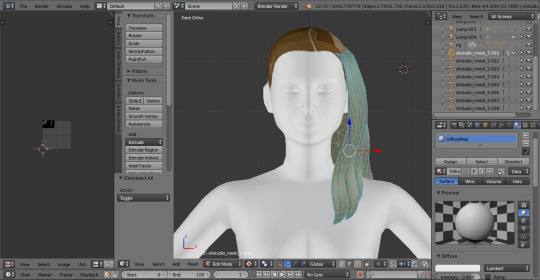
Step 5 : Now we are ready to edit but before we start editing I would subdivide this part that I’m going to raise to make it look smoother. Click “ W “ -> subdivide and don’t forget to click “Quad/Tri Mode”
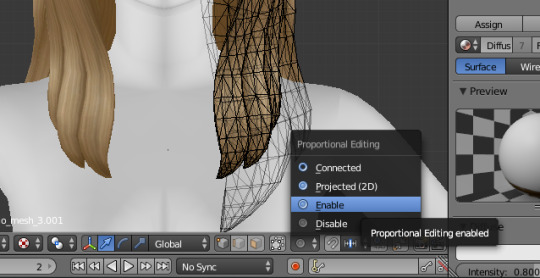
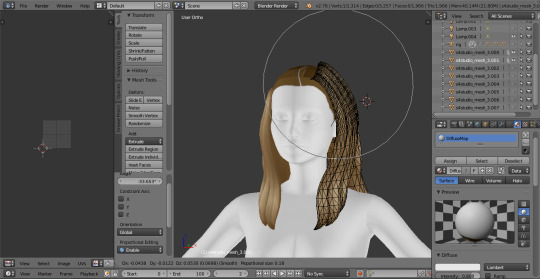

Step 6 : Enable Proportional Editing (it’s a mixture between dynamic sculpting and traditional vertex modeling) and edit the hair till you like it :D
so that’s it! I really hope this help you guys and pls if you want any help feel free to DM me
#tutorial#tut#thesims#thesims4#thesimstutorial#the sims tutorial#sims 4 tutorial#cc tutorial#sims 4 cc hair tutorial#the sims 4 tutorial#the sims 4 cc tutorial#maxis match#blender#blender tutorial#Aladdin-The-Simmer#sims 4 maxis match hair tutorial#maxis match hair tutorial
357 notes
·
View notes
Text
this took me forever to do
#i have to update my gif tut or make a video#dante#the sims 4#sims 4#sims gif#ts4#sims#the sims community
35 notes
·
View notes
Text


Matteo: I know it's a lot of changes. The hair color, the beard. Please tell me if you hate it.
Phineas: No way! I love it! This is gonna be great Matteo. You and me, cleaning up Evergreen Harbor! We'll be the talk of the town.
Matteo: [Awed by Phineas' dorky good looks]
#postcard legacy#postcard legacy challenge#freegan#sims 4#s4#matteo is in love with Phineas already TuT
6 notes
·
View notes
Photo

𝔲𝔰𝔢 𝔪𝔢
#the sims 4#ts4#ts4 blender render#sims render#ts4 edit#Magnolia#Trouble#Drowning In Monochrome#part two extras#MY FIRST RENDER GUYSSSSS#my bf is pretty familiar with blender and taught me SO MUCH COOL SHIT#so shoutout to him for being the loml#and watching a tut so he could motivate me to finally try this shit#and shoutout to all my friends for all the beautiful things they've created that inspired me to#i honestly never wanna shoot in game again lmfaooooo
138 notes
·
View notes
Text
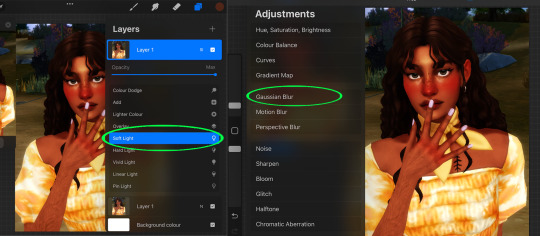
Tiny editing tips (no reshade used)
I share random editing tips on my simstagram highlights so wanted to make a tumblr post about the handy features on the Procreate app. It could be especially useful for those that don't use reshade. (:
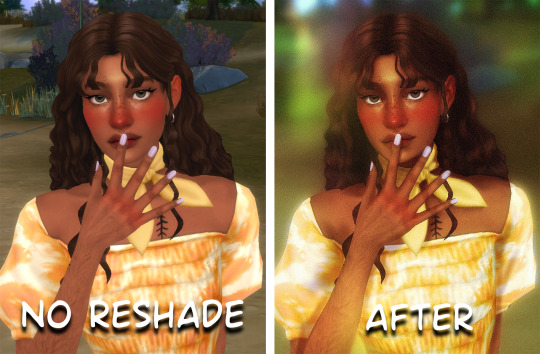
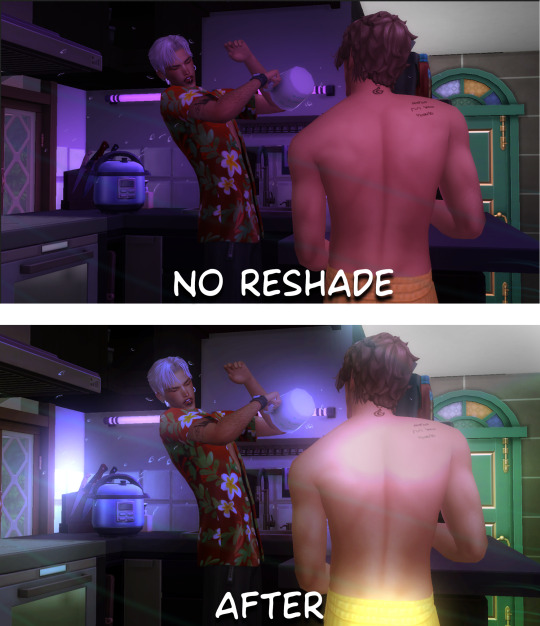
Similar to my other tutorials I used a new layer + multiply blending mode for adding shadows. Altenatively, you can use the dodge and burn tools in Photoshop you can check out my other tutorial here. Just wanted to share some cool things I've found since i use reshade i don't often use these features as it does these for me.
For softer looking photos: *duplicate layer* change the blending mode to 'soft light' then add 'gaussian blur' and change the blur amount and layer opacity to your liking.

For the rest of this photo edited it in my usual way (but didn't draw hair or add highlights) I blurred the background, added "noise/grain" and added a light leak to acheieve the final result.
To enhance the lighting: (bloom feature in procreate)

i did use the curves layer to adapt the lighting to my liking then *duplicate layer* go to 'bloom' and adjust the strength of it with the sliders then change the opacity. it's good to do this on another layer as it can enhance some lighting too intensely so you can just erase these parts.
If you have any questions please direct them to my ask box so others can see too and i can help further :)
24 notes
·
View notes
Text
Updated No Seams Tutorial

I found a much easier way to get rid of seams on your sims in blender that won’t make your sims look weird afterwards. I know sometimes subdivide + increase smoothness can make sims rip at the seams. Plus if you’re like me, you’ll notice in solid mode your sim will look weird and bumpy and have to smooth that out in sculpt mode. I found a much easier solution!
First:

when ripping your sim, select Clean DAE mesh. This will get rid of the leg seams. The neck is still somewhat noticeable so that is where I’m be focusing on today.
After this, you still need to do steps 1 to 7 from this tutorial.
Once you’ve done step 1 through 7, you will remain in edit mode. Press a to select all vertices, press F3 and type in “Shade smooth”!

and you’re done! if anything, it looks more like a shadow. If it bothers you, you can go into sculpt mode and gently smooth it out which will take you less than 5 seconds to do (in the preview pic of this tut is what it looks like slightly smoothed out with sculpt)!
As always, lemme know if you have any questions. I’m happy to help!
#blender tutorial#tutorial#ts4 blender#ts4 render#ts4 edit#ts4 tutorial#sims tutorial#the sims tutorial#sims 4 blender#sims tut
239 notes
·
View notes
Text
i just did my first ever sim render and i think it turned out p good :DDD
#it took like 3 mins to render#i was very happy about that#but the overal process has taken me licherally all day#i tried following a text tut but i cant read so#thank you to peachy.exhale on yt#i fucked up on the pose#that makes me sad#but like whatever#should i tag this??...#sims 4 render#sims render#mysims
1 note
·
View note
Text
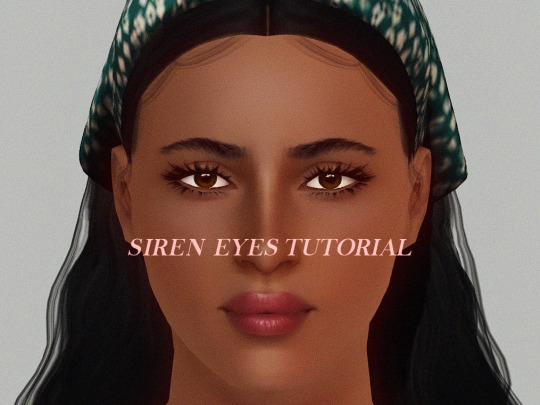
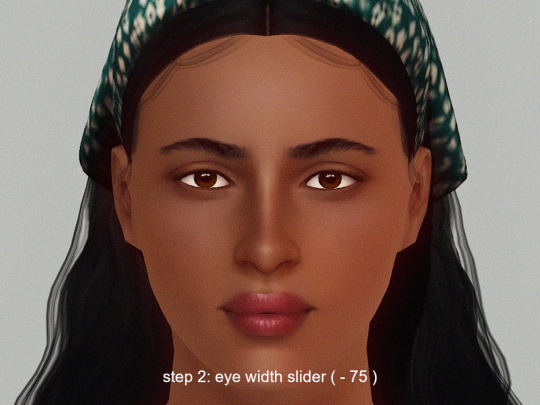
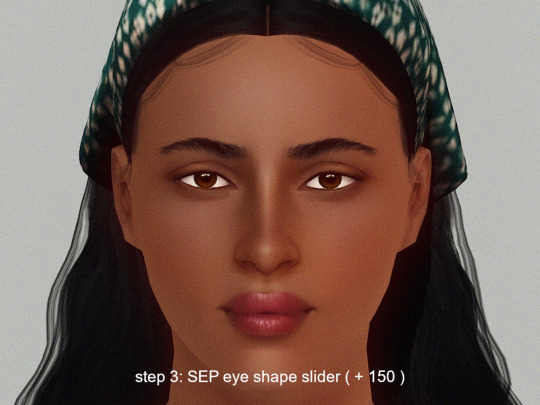
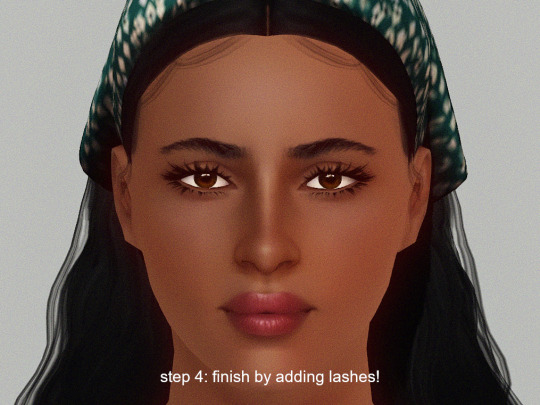
Siren Eyes Tutorial - TS3
Trying something new on the blog!
I wanted to share a mini tutorial + slider recommendations about how to create a sultry "siren eye" shape in CAS. This is my go-to method for shaping my sims' eyes. It's really quick and simple.
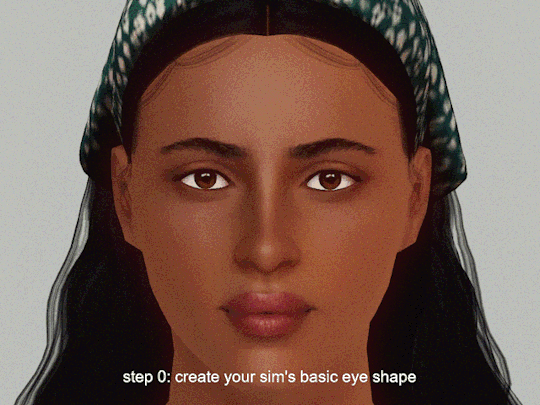
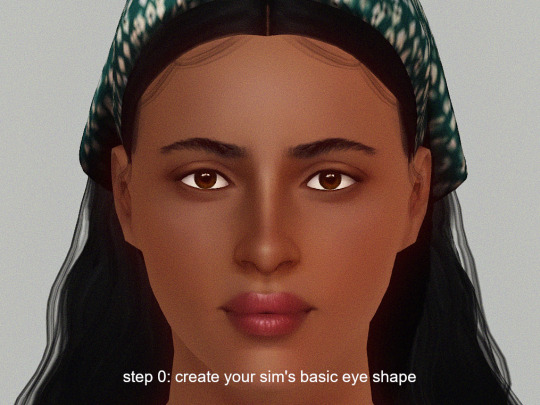
Step 0: Create the basic shape of the eye like the rotation, eye depth, eye corner height, scale, etc.
Step 1: Use the Eye Stretch slider to elongate the eyes a bit. I like to use around 50 to 100.
download it here
with NRAAS Master Controller, you can shift + click on sliders to edit the number values.
Step 2: Use the Eye Width slider to make the eyes narrower. I like to use both sliders below, at around -25 to -50 for each.
download them here: eye width / eyelids width
Step 3: Use the SEP Eye Shape slider to shape the eyes. I like to use around 100 to 200.
download it here
in CAS, it's located in the head section, not the eyes section
Step 4: Add eyelashes and makeup to complete the look.
That's it! I hope you enjoyed reading my mini tut. I feel like CAS tutorials for TS3 are rare so I wanted to try writing a short one. 🤍
Step by step pics and CC list:
Eyebrows: not sure which set but it's by @sourlemonsimblr
Contacts: Anva Anette by brntwaffles
Lashes: S-Club and w0esies
Lipstick: Angels Kiss lipstick by Pralinesims
Skin: Gardenia by me
Hair: Simpliciaty Ruby, by ifcasims
CAS Lighting Mod: Pure V1 by Criisolate

256 notes
·
View notes
Text
How To: Auto Height for Shoes
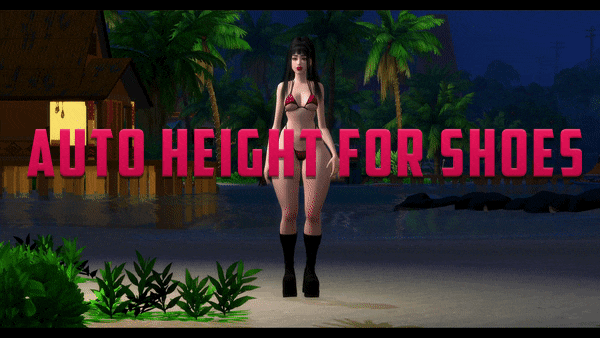
Haiii! As promised, here is the tutorial to make it so your custom shoes no longer require a shoe slider!
Thank you to the bestie who took the time to pick through Madlen's package file to figure out how it worked. And of course, thank you to Madlen who did the majority of the work figuring out how to make this possible in the first place!
♥ Tut below cut ♥
~~~
Set Up Your Blend File:
We're going to add a plane that will act as the mesh for the SlotRay which will allow for you to adjust the height of your shoes!
Open your blend file that contains the shoes your wish to adjust.
In the 3D View, press Shift + S and in the menu, select “Cursor to Center” In the 3D View, press Shift + A and in the menu, hover over “Mesh” then add a plane.
Now size this plane down as small as you can get it. You don’t want this plane visible in game.
Double check to make sure the plane has not moved from the center!! Your sim won't be centered in game if it has! If you see that it's moved:
Press "Shift + S" and click "Cursor to Center".
Then Select your plane and press "Ctrl + Shift + Alt + C", click "Origin to 3D Cursor".
Press "Ctrl + Shift + Alt + C" again and click "Geometry to Origin".
Navigate to the “Object data” tab and under “UV Maps” add a new one then name it “uv_0”.
Next, navigate to the “Scene” tab and under “S4Studio CAS Tools” set the cut number.
Depending on how many cuts your shoes have, you’ll want to adjust this number. For example, if your shoe has 3 cuts (0000, 0001, 0002) then this plane would have a cut number of 0003.
Since my boots only have one cut, I will put the number as 0001.
Now select your shoes and enter Edit mode. Select a face/vertice/edge on the very bottom of your shoes. Look to the panel on the left side of the screen (if it’s not open, press “N”). Under “Transform”, note down the number next to “Z”
After that, save your blend file under another name so you can distinguish which is which. I’ll name mine “Boots_3_Height Cut”
youtube
~~~
Add a New Cut to your Package File:
We're going to add an additional cut in your package file for the new plane!
Open Sims 4 Studio, make a new package file for your shoes and import them.
Go to the Warehouse tab and select your LOD 0, it will be the geometry with the largest file size. Sometimes you have to close then reopen the package to see the geometry.
Duplicate this geometry and in the box that pops up, change the last character of the “Group”. It can be any number or letter as long as it’s not the same as the duplicated geometry. On the duplicated geometry, note down the Group, Instance & Type values.
Find the “Region Map” and next to “Entries” click “Edit Items”. Add a new entry and in the “Layer” box, type the number you used for your cut. Since I used the cut number 0001, I will type 1.
Keep the “Region Type” as “Base” and move to “Models” then click “Edit Items”. Add a new Model entry and paste the Group, Instance & Type values you noted down before. Save and close each box.
Find your “CAS Part”, this is your swatch.
If you have additional swatches, it is a good idea to remove them and add them back once you are finished with this process.
Scroll down until you find the “Lods”.
Click “Level: 0” and next to "LOD Models", click “Edit Items”. Add a new entry and paste the Group, Instance & Type values again.
Save & close each window and return to the Warehouse.
youtube
~~~
Adjusting SlotRays:
We are now going to edit the SlotRays for the new cut which will adjust the height of the sim for your shoes!
Return to the new duplicated Geometry and in the “Data” tab, find the “SlotRay Intersections” and click “Edit Items”. Add a new entry and find the “OffsetFromIntersectionsOs” box.
You'll want to change ONLY the middle coordinate number. That will be the height of the sim.
You want to take the “Z” coordinate that you noted down from blender and replace middle coordinate number. If the number you wrote down is negative (i.e -0.01234) make it positive (i.e 0.01234).
In the “SlotHash” box, change the value from “00000000” to “FEAE6981”. This is the hash for the b__ROOT__ bone in the Sim's Rig.
Save and close the dialogs then return to the warehouse. Next, reimport your mesh and save your package file. You can now test your shoes in game!
youtube
Please keep in mind:
You have to do this for every LOD of your mesh
You can freely replace the mesh of your shoes and adjust the height since the cut with the plane has the SlotRay data
Animations may be off since EA hasn't made the game to support taller sims
CAS windows may move slightly if your sim is using poses/animations where they are leaning to the side. This won't affect gameplay
I recommend using Helgatisha's Stand Still in CAS mod to make sure your sim is absolutely centered
Hope this helped :)
1K notes
·
View notes
Text
Hello guys!
First of all happy new year ! Hope you had a great time out there :) 🎆
Today I'm writing this to explain why decimation of Sims 4 meshes is paramount while converting stuff.
You know me, I don't like to make statements as english isn't my first language and I find it difficult sometimes to actually write things down - even in italian I struggle sometimes lol. BUT I think this would be useful to all the cc converters and creators out there. So please, take this as an advice, for the sake of our oldie and beloved Sims 3.
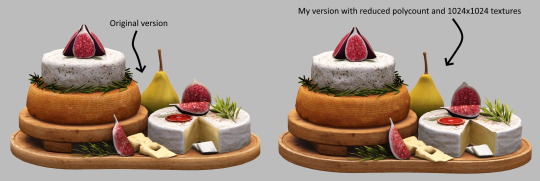
Little backstory: I was casually browsing tumblr the other day and stumbled across a beautiful food set converted from Sims 4 - which I immediately saw was high quality. Just for curiosity I downloaded it, checked the polycount of a random object (if you're new here it's the total number of polygons found in a three-dimensional model) and it had way too many polys: 28k vertices - 34k faces + 4096x4096 textures.
Sims 3 is quite an old game now. Every player had experienced lag and glitches at some point so it's very, very important to make the stuff you create/convert from other games suitable for it!
Here comes to the rescue a super useful tool in blender called decimation. It basically "allows you to reduce the vertex/face count of a mesh with minimal shape changes", as said on blender website.
In just 2 minutes and with not so much effort I was able to reduce those polygons down to 8,4k vertices - 7,4k faces. Do you see any difference? I don't honestly.
Optimization is the key. Converting from sims 4 is not just taking the mesh and textures and putting them all in Sims 3. I wish it was tho!
You're free to put whatever you want in your game but you have to think about the game performance as well. There are people who still play the game and as an ex player I got really upset when I had laggy gaming sessions.
Having said that, here's a tut about blender and the decimation tool, done by @simaddix and which I think covers every important aspect of that useful tool.
If you read this all, thank you! Now I can go back to convert new stuff :D
-Marta
231 notes
·
View notes
Last Seen Blogs
einsteinwilliams-blog
Ask the Googly Boys

mahadmahasiswa
Haraka Institute Mahad Mahasiswa di Malang, Hub 0812-1737-7398

nittroy
Nate
melorzo
me.melorzo

advant-travel-blog
Путешествия с Advant travel