#trying to fix the visible seams and the texture issues
Photo
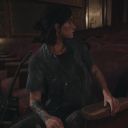
Raiden’s lil top lip snarls will always have me weak~
still don’t have new art so quick render while I’m trying to fix some things with this model 💛
#trying to fix the visible seams and the texture issues#but its kinda trial by fire cause im not well versed in this stuff at all#once i find out which model I am using and trace it back to the source I'll link credit#but it's fun to learn new things <3#raiden#mgr#mgrr#raiden mgr#mgr raiden#metal gear rising#my art
76 notes
·
View notes
Text
Download all mesh replacements: SFS / Mega
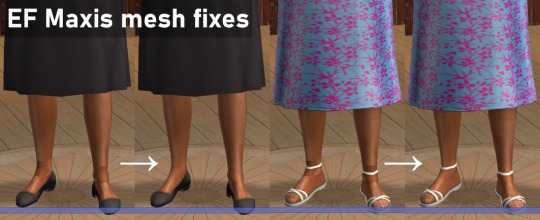
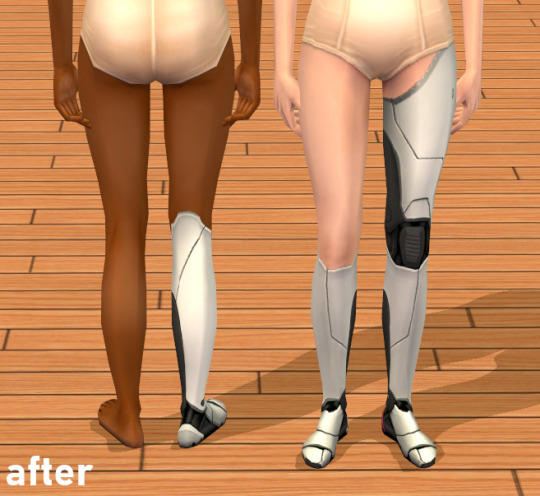
Some Maxis EF meshes have unusual texture mapping of the ankles, which can cause some custom skins to look weird on them in that area. I don't usually notice it much with my usual skins - if you use Maxis-match skins, chances are you had no idea and you don't need this fix. But yesterday @celestialspritz (formerly polygonbeach) released a very nice new set of skins that I immediately wanted to try, and unfortunately it appears that they make that mapping issue very apparent (see all pictures on this post). Skins by @whysim also show ankle seams although it's not nearly as visible.
If you want to use those skins and this issue bothers you, fret not, for I bring mesh replacements for the 10 offending meshes (if there are more that I missed, please let me know).
Just put them in your download folder as you would any default replacement (remember you can only have one mesh default replacement per outfit). These meshes can be used alongside default replacement textures.
Note: efbodydressspring required creating an additional group for the ankles. This means that if you use my efbodydressspring mesh with a texture default that adds tights, or any extra texture on the ankles, it's gonna look weird. But in that case, chances are the tights hide the weird skin texture anyway, at least if they're solid and somewhat opaque, so you may not need this specific mesh fix in the first place.
Addendum: These fixes also apply to @themeasureofasim's awesome Cyborg overlay (and any other overlay that applies to the ankles I would assume). Before-after on the cyborg overlay:

~
List of the 10 original Maxis meshes with links to the ts2 default database below.
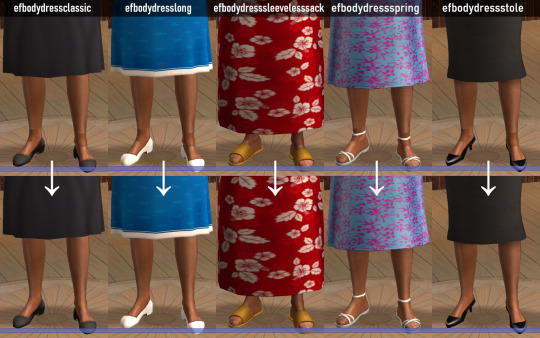
efbodydressclassic
efbodydresslong
efbodydresssleevelesssack
efbodydressspring
efbodydressstole
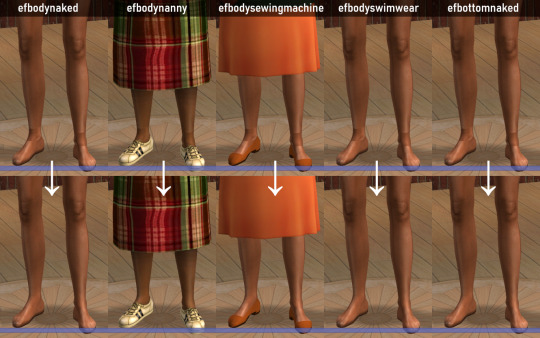
efbodynaked (will also replace efbodynaked_fried)
efbodynanny
efbodysewingmachine
efbodyswimwear (will also replace efbodyswimwear_ep7)
efbottomnaked (used when the sim is naked)
80 notes
·
View notes
Photo
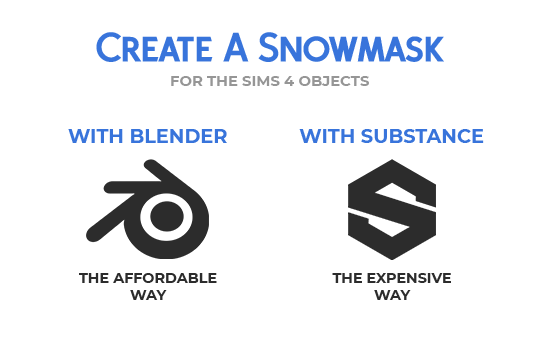
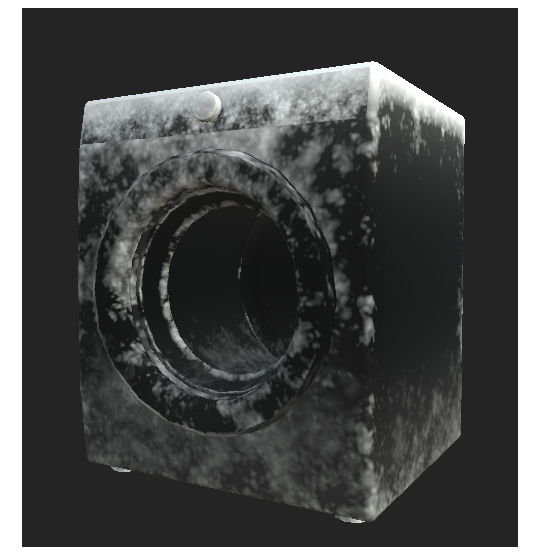
Click on Continue Reading to learn how to create Snow Masks for
The Sims 4 objects.
After The Sims 4 Seasons came out, some object were provided with a Snow Mask. It’s a black and white mask with pretty high contrast, used for objects that, in real life, would have more complex snow accumulation than what the automatic accumulation can achieve. Some objects have a void snow mask, which is pretty annoying. If there is a snow mask for an object, i always use it, and these are my methods.
This tutorial teaches you some methods to make this map easily and quickly.
Hopefully, the GIFs work 🤣

Requirements:
- Your mesh has to have a UV Map;
- You must decide a texture size and stick to it, you can always size down but never up;
- You must switch to the Cycles rendering engine.
Procedure:
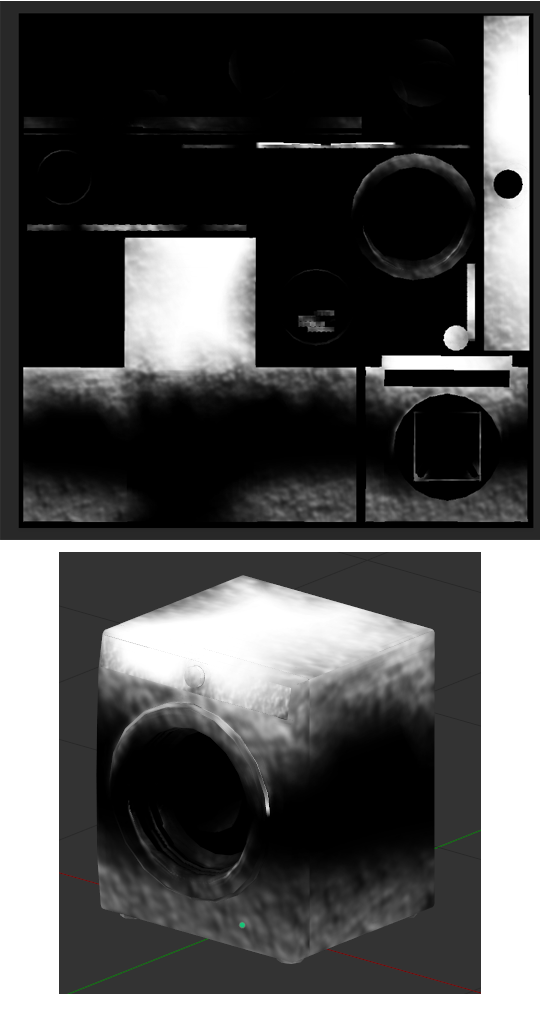
Open your Blender file with the object we’re going to design the snow mask for. Once you’ve opened the file, open yourself a UV editor tab and create a new texture with the size of your diffuse texture. The texture we’re going to create is going to be black:
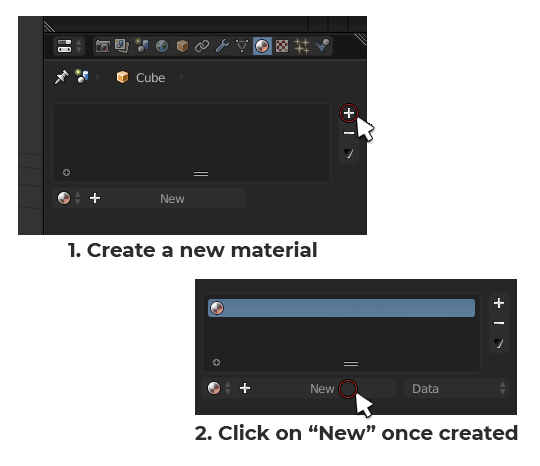
Once you have your texture, we can start painting. Let’s create a new material for your mesh. Click on your mesh and reach the materials panel:
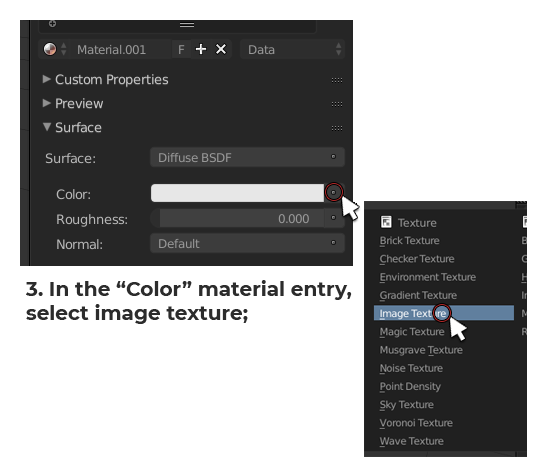
Now that the texture is inserted into the material, we can paint on it.
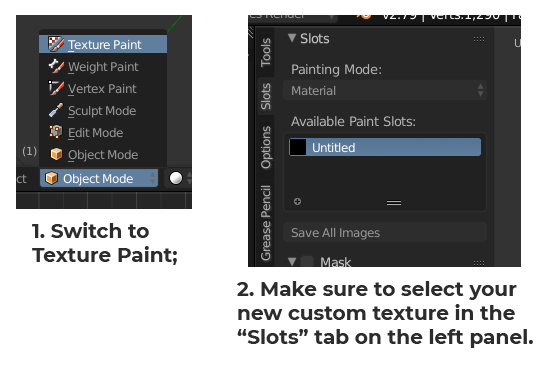
Let’s switch to Texture Painting. Select your mesh and press [DEL] on your keyboard Numpad to center the view on it. Once you’re done doing that, this is how to enter Texturing painting mode:
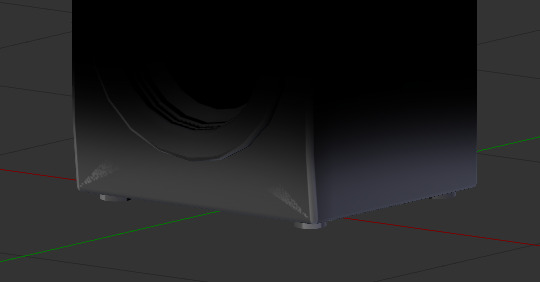
We’re ready to paint. To create a snow mask, you want to cover the base of the mesh a bit to simulate the frosting of the surface caused by the freezing snow on the ground but also the top surface to simulate the snow that has fallen onto the object from the sky. The best way to do so is, first of all, by going into Orthographic view. Having no perspective in the scene will help you minimize the bleeding of your painting. To switch to Ortho, press [5] on your keyboard Numpad.
Let’s paint the front first. Press [1] on your keyboard Numpad to switch to front view. Let’s adjust our brush before painting. Adjust your brush size and strength according to what are you’re trying to cover.
For the bottom portion of the object you want to have a big brush and a lower strenght (around 50% the original default strenght) in order to use just the feathered out end of it for a softer stroke.
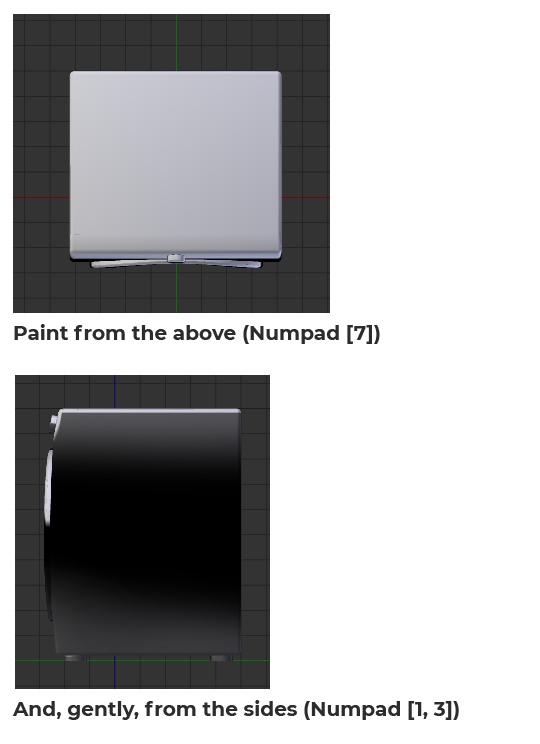
Repeat this for all sides! Don’t worry too much about being too even with the height of your strokes, we’re gonna blend them together after we’re done painting them.
Once you’re done, it should look something like this:
Let’s even out these harsh edges and, occasionally, painting artifacts. Grab the “Smear” brush in the brushes toolbox:
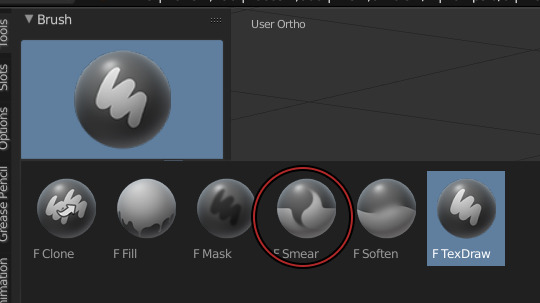
Smear the edges until completely smooth. Do this for all sides.
Once you’re done with the ground snow, paint the sky snow. To do that, grab your Texdraw brush back and follow these steps:
And then, smear it all!
Once you’re done doing that, save the texture and open it in Photoshop. I’m assuming you know how to export a texture from Blender as a PNG and then opening it in Photoshop.
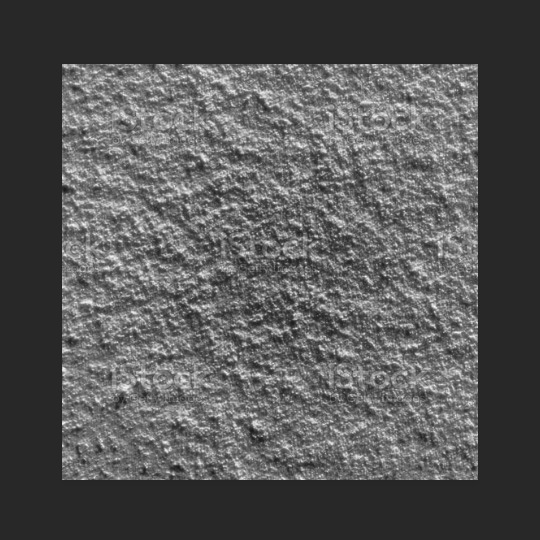
Once you have your texture open in Photoshop, i want you to google a Snow texture, fairly big (big enough to fit the size of your texture).
Insert it in your PS document as a new layer and put it over the snow texture you painted earlier. Now turn that snow texture black and white (even if it seems to be already, there’s probably some colored pixels due to compression here and there).
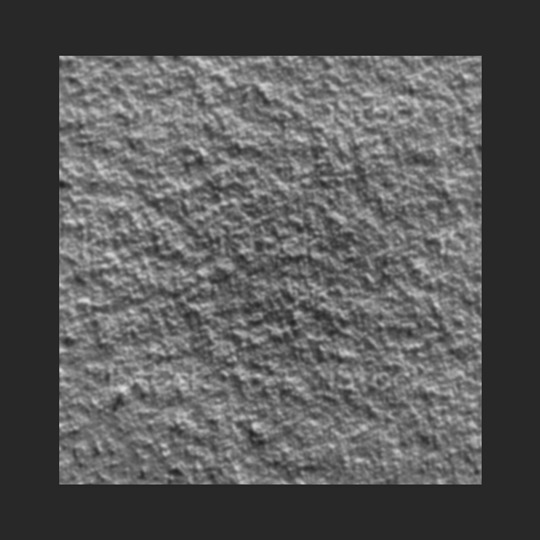
Now open the Levels sliders and achieve this look by sliding the middle slider on the right or left (depending on your picture):
Now, use gaussian blur to feather it out a bit and make it less harsh and Alpha like, we’re going for a maxis match look. If you want an alpha look, skip this step. This is how it looks after blurring it:
Now, go to the blend mode of this layer and set it to Overlay. I’m assuming you know what this means.
If it needs further smearing, go ahead and do that to remove visible seams. If it needs opacity adjusting, you can do that as well. Add a pitch black layer over everything in photoshop and adjust it’s opacity to make the snow more or less visible.

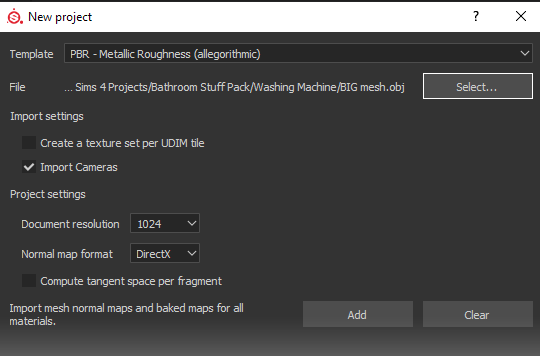
Substance Painter is a product under paid license by Adobe. My university provided me with a license, however, you can use the trial version to experiment with it.
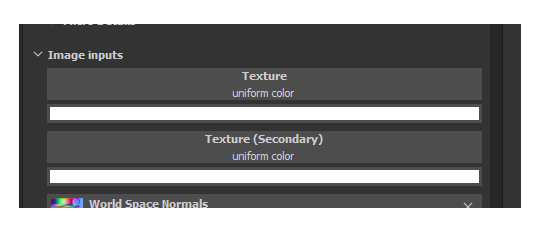
Import your mesh into substance painter, without any additional texture (don’t click on ADD):
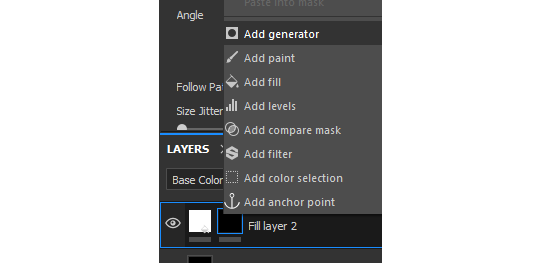
Add two fill layers and uncheck every single material property except for “Color” and “Roughness”. The top material will be white, the bottom one will be black. Turn the roughness of both material to 100%:
You can rename your fill layers if it makes it easier for you to keep track of what you’re doing. I suggest renaming the white one “Snow” and the black one “Background”.
Now, let’s add a few a masks to make it look like what we’re trying to achieve. Right click on the snow material and select “Add Black Mask”. Now, right click on the mask and select “Add Generator”:
Generators are dynamic masks that can be fully controlled by the user to achieve multiple types of dirt.
For our snow, we’ll begin with the ground generator, for the frosted surface starting from the bottom. Click on the generator entry that was created and assign it a “Mask Editor”:

If you scroll all the way down inside the Mask Editor options, you will notice our mesh has absolutely NO baked texture:
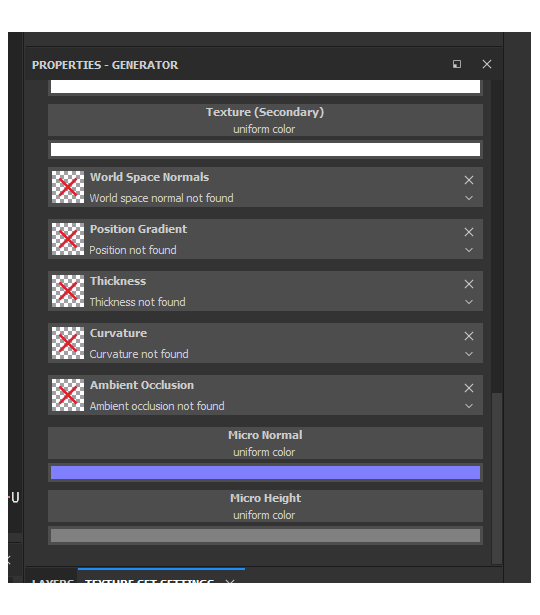
To operate, the Mask Editor needs these textures, so we’re gonna bake them.
In order to do so, switch over to the “Textures” tab:

This is what your Baker window should look like:
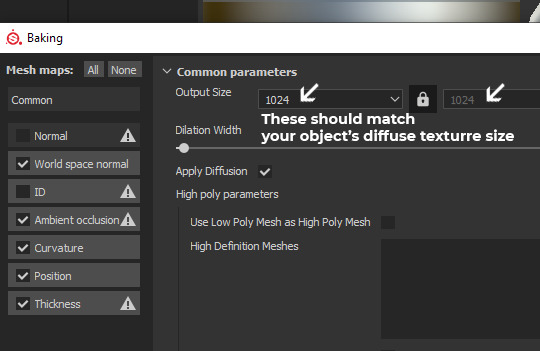
You can now click on [Bake DefaultMaterial Mesh Maps]!
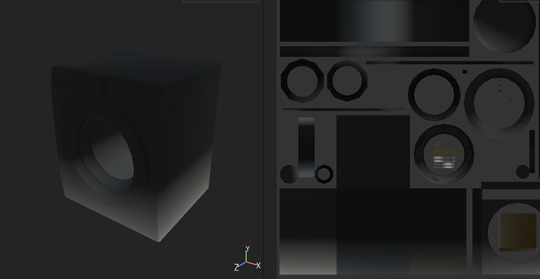
Once the bake is finished, your Snow fill layer should look a little different, cause the Mask Editor received the recently baked textures. Now we can edito the Mask Editor properties. We are starting by creating the bottom frost layer, so let’s get to it.
By default, in the Mask Editor settings, the Curvature value is turned on all the way. Slide the slider to 0. Instead, activate the Position Gradient value. By default, the position gradient goes from top to bottom. To invert this flow, the handy Invert button is there for us. Switch Invert from off to on. Since we inverted the mask property, the Brightness slider will still do its job, but the other way around. Increasing the brightness will decrease the opacity of the snow mask. Now, play around with the Balance and Contrast sliders until you achieve a similar look:
Balance: 0.09; Contrast: 0.22; Brightness: 0.57;
We now have the perfect base to work on some details, a nice linear bottom to top gradient. Now, scroll down to the texture area of your Mask Editor. You’ll notice there’s two empty slots, called just “Texture”:
You can fill these in with “Grunge maps” (detail textures in black and white) to add variation to anything in the Mask Editor. Let’s fine one that suits our project the most.
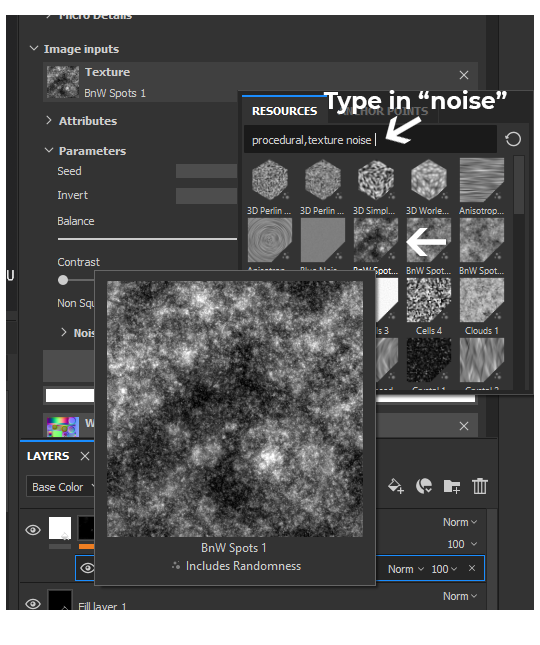
This randomizable texture called “BnW Spots 1″ seems to be a good starting point, it looks like it could be interpreted as a frosty snow, let’s click on it and add it to our “Texture” slot.
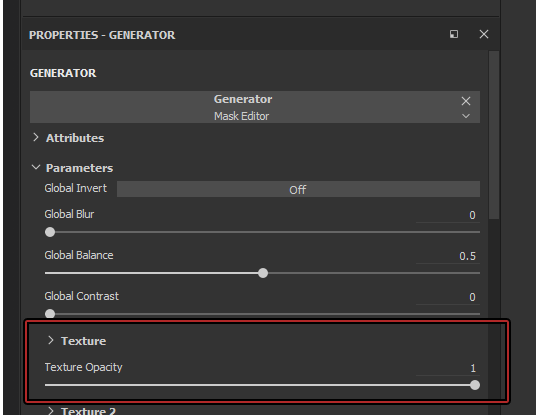
To make our “Position Gradient” influenced by the newly added texture, you’ll need to turn up the “Texture Opacity” slider in the Mask Editor global settings at the top:
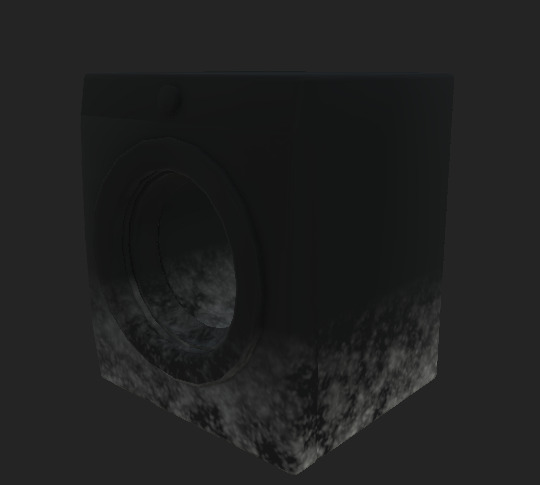
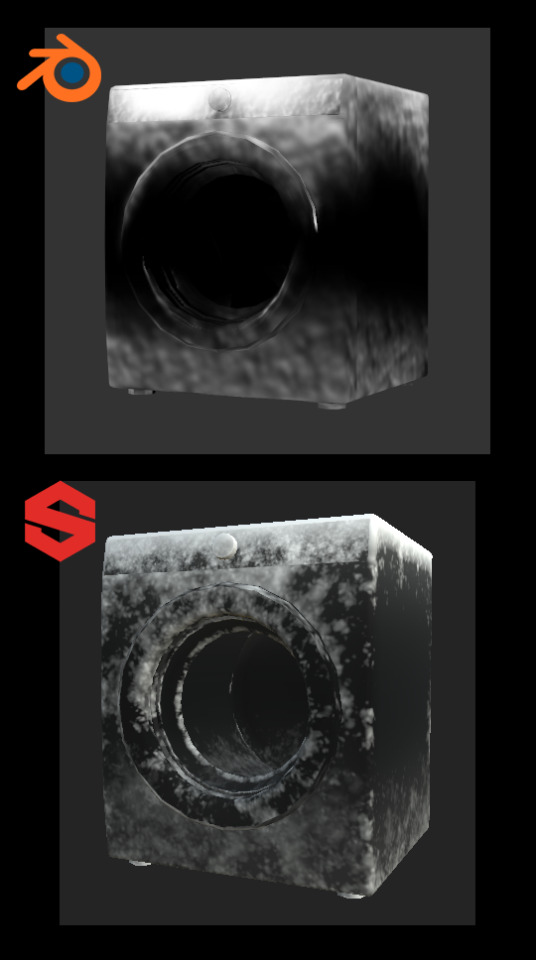
The result is now undeniably better:
Looking good so far! Now, you can play around with the Texture’s Balance and Contrast in the Texture Slot and see changes happen live:
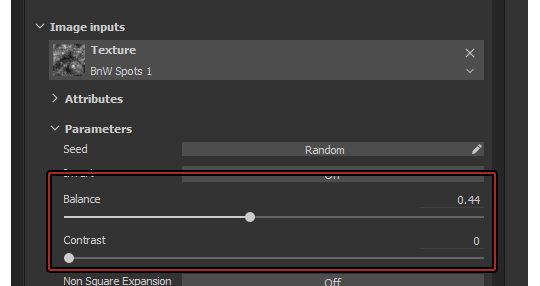
Decide what looks good to your eyes, this is 100% subjective!
It’s looking really good, but you can still see a clear ending point of the gradient!

To fix this issue, you’re gonna have to play around with the Balance and Contrast of the entire Mask Editor, which are located at the top of the Mask Editor options:

Repeat the same process for the top portion of the snow (the fallen down from the sky type), just without turning on Invert obviously. You can right-click on the mask and add another Generator. Just make sure to set your second Generator to Add onto previous layers!
You can also turn on some “Curvature” (the one we previously disabled) on the top snow Generator to make it even frostier:
In my final product, i added another two generators, with no texture, to add some more gradienty frostiness to the whole texture.
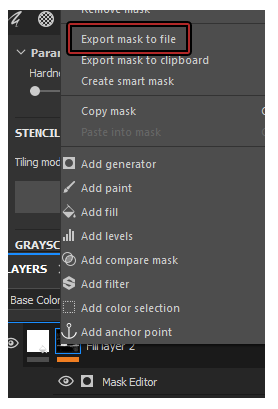
Once you’re done, export your mask and save it as a file. Put “.png” at the end of the file name!
And you’re done!
#the sims 4#sims 4#ts4#s4#the sims 4 tutorial#sims 4 tutorial#ts4 tutorial#s4 tutorial#the sims 4 snow#the sims 4 snow mask#sims 4 snow#sims 4 snow mask#ts4 snow#ts4 snow mask#s4 snow#s4 snow mask#the sims 4 seasons#sims 4 seasons#ts4 seasons#s4 seasons#tutorial
67 notes
·
View notes
Text
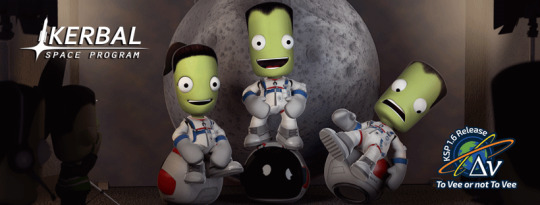
Kerbal Space Program 1.6: “To Vee or not To Vee” is now available!
Hello everyone!
Kerbal Space Program 1.6: To Vee or not To Vee has launched and unlike Hamlet we know the answer - it is definitely to ΔVee...
This update has a great deal of awesome things for you, including new features, beautiful revamps, a number of navigation tools, and a whole lot of bug fixes. We also have added some fun new idle animations for Kerbals, dynamic cube maps that will make shiny parts reflect their environment. We rebalanced and fined tuned various Making History parts, and much more!
With Kerbal Space Program 1.6: To Vee or not To Vee we continue the endeavor of optimizing resources, improving performance, and making KSP the best game it can be through continuous support and meaningful updates.
Let’s go through some of this update’s highlights:
Delta-v per Stage and Delta-v Tool App
Plan missions better and find flaws in your ship staging setup with this long requested feature that will let you visualize the Delta-v values along with a range of other technical data for each stage and the vessel overall. Plus, a Delta-v App that will allow you to see a vessels Delta-v information while you’re building it in different situations. No Kerbal will be left stranded now… or so we hope.
youtube
Part revamps
To Vee or not to Vee includes 20 fully revamped parts that have been optimized, re-shaped and re-textured, plus more than 40 color variants to make your craft look sleek and beautiful!

Navigation Icons to Launch Sites
A quality of life feature that will help stray pilots find their way back to any Launch Site or Runway. From the Map View players will now be able to activate navigation waypoints to get direction towards the KSC or any other launch sites.

Click here to see an animated gif showcasing this feature.
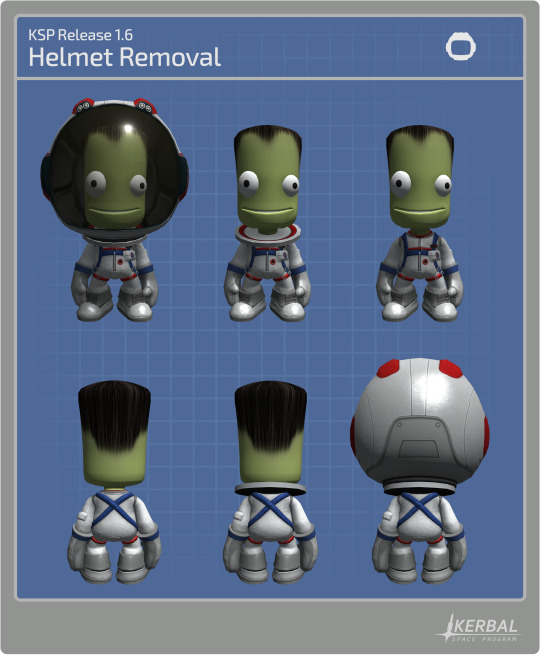
Helmets Off!
You can now remove Kerbals’ Helmets, as well as their neck rings! But be careful, there is a reason why Astronauts wear Helmets for space travel…
Click here to see an animated gif showcasing this feature.
And much more!
To learn more you can read the full Changelog here:
========================= v1.6.0 ===========================
1.6 Changelog - BaseGame ONLY (see below for MH changelog)
+++ Improvements
* DeltaV Readouts added to Stage Icons/Groups as well as DeltaV App. DeltaV available in Editor (VAB/SPH) and Flight scenes as well as a more detailed Debug menu option.
* Stock and mobile launch sites are now navigable in all game modes.
* Performance improvements for DV calculations that are used by Burn Indicator.
* Recommended UI Scale for the current resolution is now checked on the Settings Screen, working the same as the mini settings where a not recommended UI scale will turn the text red.
* Performance improvements for craft browser menus.
* Craft browser menus now check for craft compatibility.
* Added keyboard arrows navigation for main dialogs and menus. Highlight items with the directional arrows, Accept with the Enter and Space keys, and Cancel is Escape key.
* Generate reflections of the environment to be displayed on shiny parts.
* Improved part search in the editors to give more relevant results with short search terms.
* Adjusted shadows from The Sun to be more precise.
* Add new idle animations when the kerbal is standing in the ground.
* The command parts now have an option to change their 'forward' direction in the PAW.
* Kerbals helmet and neck ring can now be removed by right clicking the Kerbal while on EVA if it’s in a breathable atmosphere.
* Automatic warp to next maneuver node now takes the player to a margin before the start burn time rather than the node itself. Said margin can now be overridden from the default 1 minute via GameSettings.WARP_TO_MANNODE_MARGIN.
* Allow wheel spring and damper advanced tweakables to be set up to a value of 3.
+++ Localization
* Localize the phrase “Advanced Message App:” in the Mini-Settings dialog.
* Some Community feedback for localization strings applied.
+++ Parts
Updated Parts (reskinned):
* Mk2 Lander Can
* 48-7S Spark
* RE-L10 Poodle
* LV-909 Terrier
* FL-A10
* FL-A5
* ADTP-2-3
* Rockomax Brand Adapter
* Rockomax Brand Adapter 02
* TVR-200 Stack Bi-Coupler
* TVR-1180C MK1 Stack Tri-Coupler
* TVR-2160C Mk2 Stack Quad-Coupler
* TVR-200L Stack Bi-Adapter
* TVR-300L Stack Tri-Adapter
* TVR-400L Stack Quad-Adapter
* Small Nose Cone
* Aerodynamic Nose Cone
* Advanced Nose Cone - Type B
* Advanced Nose Cone - Type A
* Protective Rocket Nose Cone MK7
Color Variants:
* Mk2 Lander Can (New “Lander” and “Rover” color variants)
* 48-7S Spark (New “Shroud”, “Truss Mount” and “Bare” color variants)
* LV-909 Terrier (New “Shroud”, “Truss Mount” and “Bare” color variants)
* FL-A10 (New “White” and “Orange” color variants)
* FL-A5 (New “White” and “Orange” color variants)
* ADTP-2-3 (New “White”, “Black and White” and “Orange” color variants)
* Rockomax Brand Adapter (New “Black and White” and “Orange” color variants)
* Rockomax Brand Adapter 02 (New “Black and White” and “Orange” color variants)
* TVR-200 Stack Bi-Coupler (New “Black and White” and “Orange” color variants)
* TVR-1180C MK1 Stack Tri-Coupler (New “White”, “Dark” and “Orange” color variants)
* TVR-2160C Mk2 Stack Quad-Coupler (New “Black and White” and “Orange” color variants)
* TVR-200L Stack Bi-Adapter (New “Black and White” and “Orange” color variants)
* TVR-300L Stack Tri-Adapter (New “Black and White” and “Orange” color variants)
* TVR-400L Stack Quad-Adapter (New “Black and White” and “Orange” color variants)
* Aerodynamic Nose Cone (New “Black and White”, “Dark” and “White” color variants)
* Advanced Nose Cone - Type B (New “Black and White” and “White” and “Orange” color variants)
* Advanced Nose Cone - Type A (New “Black and White” and “White” and “Orange” color variants)
* Protective Rocket Nose Cone MK7 (New “Black and White”, “Orange” and “White” color variants)
Other Part changes:
* Fixed the normals maps on the Stayputnik.
* Fixed the normals maps on the Okto.
* Fixed the visible texture seams on the Rockomax X series fuel tanks orange variant.
+++ Bugfixes
* Fix SAS on all probes in Sandbox and Science game modes to operate as per their config files. Game setting allows player to toggle SAS functionality on probes in these game modes.
* Fix handling of docking ports and multiple nuclear or ion engines for DV calculation used in Burn Indicator.
* Fix handling of stages with multiple engines and asparagus staging for DV calculation used in Burn Indicator.
* Fix flashing Burn Indicator and display of DV when vessel are prelaunch.
* Fix Vernor Engines now correctly use Liquid Fuel and Oxidizer on the Engineering report.
* Fix all engines now say "Engine stops under: xx%", instead of "Flameout under: xx%" on their part extended info tooltips.
* Fix Tutorials unable to proceed when the player has a part selected (attached to the mouse) in the editor scenes (VAB/SPH).
* Fix fuel being drained from tanks when fuel availability icon is double-clicked.
* Fix partially executed maneuver nodes gets the closest approach to the same orbit parameters.
* Fix double quotes in stock craft descriptions.
* Fix Contract/Parameters not updating for vessel ownership (such as rescue kerbal) when not in flight mode.
* Fix Drills can operate and generate ore only when deployed and proper surface contact.
* Fix Kerbal IVA crew mass calculation on crewable parts where user/mods have changed IVA crew mass to be > 0 (the default).
* Kerbal IVA crew mass now reported in DV and Engineers report mass totals in editor (VAB/SPH).
* Fix TVR-300, TVR-300L, Moving parts in symmetry works correctly.
* Removed unnecessary horizontal slider in the mini settings UI.
* Fix Summary window no longer appears empty when recovering a vessel with the UI scale at more than 150%, when in a non recommended UI Scale range.
* Fix flickering of fairings in editor scene.
* Further tweaked the sun behavior to stop it from dimming unnecessarily in the Jool Airbreak scenario.
* Fix Intermediate Construction tutorial does not require confirmation when loading the required vessel.
* Fix NRE is no longer generated when rockets crash on the Launchpad.
* Fixed a shader issue that caused the Mk16 parachute to become transparent when within Aero FX.
* Fix cost of fairings shells now is included with initial vessel load.
* Landing gear LY-01, LY-05, LY-10, LY-35, LY-60 and LY-99 can no longer be the first part when you are building a ship.
* Fix last part of interstage fairings not having correct variant applied when vessel is loaded.
* Assigned the correct category to the cfg of all engines.
* Limited the amount of undo/redo steps in the editors to prevent excessive use of memory while building large, complex vehicles. The amount of steps can be adjusted via GameSettings.EDITOR_UNDO_REDO_LIMIT
* Fix Vessel without name cannot be saved in the editor and no longer generates an error.
* Fix part hover highlighting no longers shows from inside IVA or Internal camera.
* Fix inverted interstage fairings not being able to activate when a decoupler below them has activated.
* Fix KSC building upgrade text padding on KSC Building marker UI for scroll bars.
* Fix potential NRE when completing an orbital survey.
* Fix Words no longer duplicate on contracts.
* Fix Burn Bar and Orbit stays the same when a new target is selected.
* Fix An NRE is no longer generated when trying to select the last save game in the save game menu after deleting previous saves.
+++ Mods
* Call OnWillBeCopied and OnWasCopied for children parts when their parent is copied in the editor scene.
* Variants can now disable animations and events.
* Alternative control point orientations can be configured on ModuleCommand.
* Kerbal Helmet check values are controllable via cfg using stock rules or an extra step by overriding code methods: CanSafelyRemoveHelmet, WillDieWithoutHelmet, CanEVAWithoutHelmet
* Kerbals now EVA with a set initial temperature equal to “room temperature” - I mean they were inside with no helmets - can be reverted via GameSettings.EVA_INHERIT_PART_TEMPERATURE
+++Miscellaneous
* Personal parachute kerbal unlock level requirement is accessible for modders in the traits.cfg file and the requirements have been updated to: 0xp for pilots, and 1 xp point for Engineers and Scientists.
* Stock craft have been revised so that they no longer use deprecated parts. The revised vessels are: Aeroequus , ComSat LX , Dynawing , GDLV3 , Ion-Powered Space Probe , Jumping Flea , Kerbal 1 , Kerbal 1.5 , Kerbal 2 , Kerbal X , Learstar A1 , Orbiter 1A , Orbiter One , PT Series Munsplorer , Rover + Skycrane , Science Jr , Slim Shuttle , Space Station Core , Super-Heavy Lander , Two-Stage Lander , Z-MAP Satellite Launch Kit ,Rocket-power VTOL , Satellite Launcher , Stratolauncher.
* Kerbals who board a command seat will make the command seat the vessel reference point only when no other part has control of the vessel.
* The flight camera near clip pane is automatically adjusted when in IVA to correctly display external visuals.
1.6 Changelog - Making History DLC ONLY
+++ Improvements
* Open mission menus now check for craft file compatibility.
+++ Localization
+++ Parts
* The following LFO engines were rebalanced : Wolfhound, Cheetah, Kodiak, Mastodon, Cub, Skiff, Bobcat.
* The following Engine Thrust Plates were rebalanced: EP-25, EP-37, EP-50
* The following Structural Tubes were rebalanced: T-25, T-37, T-50
+++ Bugfixes
* Removed the text “Not played yet” from the tutorial missions buttons in play missions dialog.
* Fix to remove the add button in the Modify Score and Change Score nodes if there are no more options left.
* Fix Kerbals now appear swimming in the correct position on the water when spawning.
* Fix undo function will no longer ignore copied nodes in mission builder.
* Fix handling of engine plates and self-decoupling parts for DV calculation used in Burn Indicator.
* Fix NRE in Mission builder : Changing the "Location" settings in the "Spawn Vessel" node with the described procedure does not generate an NRE.
* Fix Localization description of craft Valkshod 2 on trouble in the Void mission.
* Fix Localization name and description of craft Soy-Ooze 10 on Sally-Hut 1 mission.
* Fix Localization name and description of craft SWM-94 Communications Satellite on Trouble in the void mission.
* Fix Copying Spawn vessel nodes with specific crew creates nodes without crew so they are not cloned.
+++ Missions
+++Miscellaneous
==========================================================
Kerbal Space Program 1.6: To Vee or not To Vee is now available on Steam and will soon be available on GOG and other third party resellers. You will also be able to download it from the KSP Store if you already own the game.
Click here to enter the Grand Discussion Thread for this release.
Happy launchings!
PS: Ask and you shall receive xD
Oh... and if you like, you can download wallpapers of the To Vee or not To Vee art here:
1080x1920p (Most Phones)
1080x2220p (Galaxy S9)
1125x2436p (iPhone X)
Desktop 1920x1080p
Desktop 2048x1080p
Desktop 2560x1440p
27 notes
·
View notes
Note
What mods do you recommend for someone who's just getting their Morrowind modding feet wet?
The first thing I recommend to people is to try Morrowind with a bare minimum of mods first to experience the world and gameplay in its original form - this way you have a sense of how various mods come in and shake things up and can make an informed decision if you like it or not. I will purposely steer away from most graphics and content mods here since they are each a whole ‘nother ball of wax for another time, but if you’re ready to look at adding mods to the game, the starter pack which I recommend would include:
Essential Utilities
Wrye Mash Standalone - if you’re planning on installing a bunch of mods or want to swap out different graphical replacers, then Mash is a must. It’s the best mod manager for TES3. The Morrowind Modding Wiki has a fairly comprehensive article on using Mash and it may seem daunting, so I would say the two most important features for players are Installers (you can put mod packages into a folder to install/uninstall using Mash rather than cluttering your Data Files folder if you then decide to try removing a mod) and Repairing a Save Game.
mlox - this program should be used in tandem with Mash to organize your mods. This program uses an extensive database of mods to set a load order with the best chance of eliminating conflicts and errors.
Morrowind Code Patch - still actively being supported by our resident wizard, Hrnchamd, MCP was just updated to 2.3. The effect the patches included in the MCP have on the quality of life when playing cannot be overstated.
4GB Patch and Exe Optimizer - these two programs combined significantly reduce the number of CTDs you will experience while playing. Even if you don’t want to use mods, use these. Install MCP first, then 4GB Patch, then EXE Optimizer - the order is important.
Morrowind Graphics Extender XE - major graphical enhancement to the game without even updating any models or textures. I would recommend limiting your distant land to under 7 cells. Removing the artificial “veil” by being able to look across the entire island is great for screenshots, but removes some of the mystery which lends to this old game’s charm. I personally use the beta version from Hrnchamd which can be found here and have found it to be relatively stable.
tes3cmd ( - To get to the download page yourself, follow the MW Modding Wiki instructions. I recommend this insanely powerful program to players for one primary reason: Multipatch. tes3cmd can create a patch from your entire load order to fix a number of common issues. The MW Modding Wiki has instructions for creating a batch file to help make the multipatch creation easier since tes3cmd is a command line program with no GUI.
Plugins
Morrowind Acoustic Overhaul - this mod overhauls the environmental, music, and effect sounds in the game. Even having the option to have a player voice. This mod is an impressive technical feat which will truly help immerse you in the world of Morrowind.
Morrowind Patch Project - like the unofficial patches you may be familiar with from later Bethesda titles, the MPP is an extensive bug squasher. Version 1.6.6 is the latest, but you will need to install 1.6.5b first.
Landscape and Object Fixes (assorted) - complementing the MPP, this series of fixes address a lot of visual errors such as floating objects, bad texture mapping, and visible seams.
Boats and Silt Striders - makes the “fast travel” services of boats and silt striders have a “scenic” option where you can actually ride the ship or giant flea. Excellent, must have mods. If you’re wanting another excellent transportation mod by abot, check out Guars.
Fatigue and Magicka Overhaul - managing fatigue and magicka burn in TES3 is fairly challenging. Not that it’s wrong, but this mod - along with other alternatives like it - make the systems function a bit more like TES4 and TES5 while still remaining balanced for TES3. Note: if you’re playing a magic character, you might be interested in Mastering Magicka which is a gameplay mod focused on magic users. You’ll just want to turn off its magicka regen feature if using it with this mod.
Go To Jail - instead of just getting warped outside of an Imperial Fort, you will actually serve your time if you commit a crime. This mod may be geared more towards thievish players, but it’s still a great addition to the game.
Graphic Herbalism - geared more towards magic characters, this mod makes it so if you pick from a plant, it will change visually as a helpful queue not to bother with it.
Morrowind Containers Animated - this mod makes containers open when you activate them like in the later Bethesda titles. A relatively simple mod, but to great effect.
There are so, so many more amazing mods out there. I myself keep a very full mod list when I am actually playing and not modding. Get in there on MMH and Nexus and find your own diamonds in the gold! Or feel free to ask me if you’re looking for something in particular. if you think I missed some crucial mods, feel free to let me know.
41 notes
·
View notes
Text
Mythical Creature Update
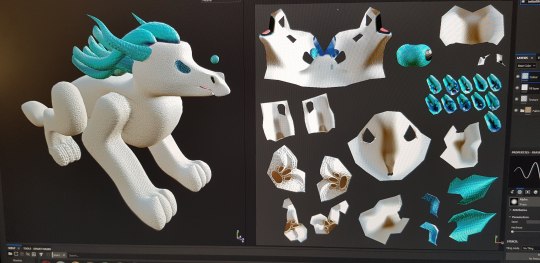
Now I have all of my creature UV’d, I could then import my model into Substance Painter to add colour and texture to it. Adding colour was one of my favourite parts of the process as I really enjoy being creative, and I feel this stage was where I could be the most creative with my choice of colours, textures, patterns etc... The only bad aspect which made painting my creature time consuming was that if I wanted to paint only one UV, the brush would end up automatically painting others as well, and unfortunately, at this point, I hadn't worked out you could change a setting so it wouldn't do that. I got there eventually though, and I feel the time and effort I put into it has really paid off.
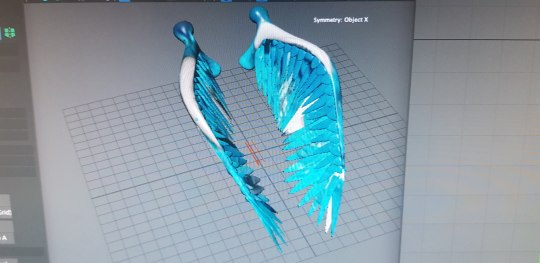
The wings of my creature were the next things on my list to add texture to. I had to do them separately though as the UV’s of both my creature model and wings wouldn't fit into the same UV square (there were too many of them). I started by taking a different approach to adding texture, by importing one which I liked from the internet to see what it would look like UV’d. The outcome wasn't too great as I had not yet separated/laid them out nicely in the UV editor window, so they were still all muddled up together in a clump. It was then that I decided it would be easier for me to just separate them to export into substance painter than it would be for me to separate and lay them out nicely in a way that would suit the texture being projected. This way was also more unprofessional, as the seam lines on each UV were visible on the actual wings where the texture didn't properly wrap around the object.
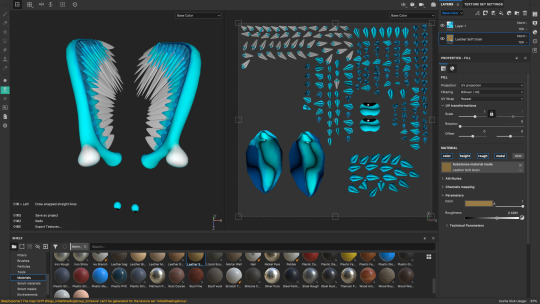
After importing them into Substance painter I then was able to add colour and texture to them. I definitely feel this was the best route to take as it meant I had more control as to what the finished result would turn out like. It also meant I could paint the wings in a way that matched my own design. The wings, fortunately, took a lot less time to complete as I was shown the way to switch a setting to ‘UV mode’ which meant when you painted on the actual UV’s, the colour would only be added to the one you were painting and none others. This was so helpful and I wished I had found that out beforehand, but at least now I know for next time.
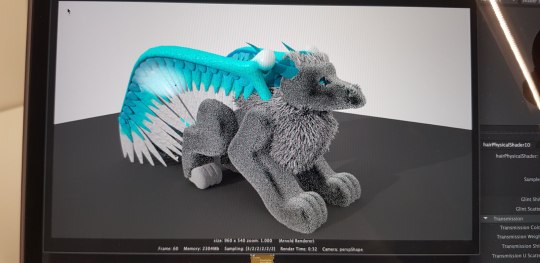
Once the wings were finished I then imported the textures of both the wings and my creatures body back into Maya so I could apply them to the UV’s. This was the easiest part and I am very pleased with how they turned out. My next stage was adding the fur. I definitely feel this was the hardest part for me as I came across a lot of problems which I knew could be fixed but I didn't know how to fix them myself, and research wasn't helping either. The problem I faced, was even though I was adding white fur to my model, no matter how light I tried to make it with the ambience lighting, it always turned out grey in the render view. After spending what felt like 4 hours trying to fix the problem, I then decided to give up and wait till I could go into Uni and ask for help.
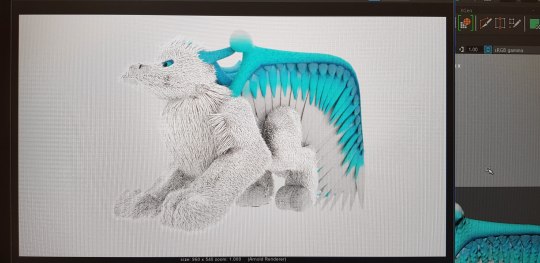
Once I was in Uni, I managed to acquire the help I so deeply needed to fix my issue and the results were amazing. I’m so glad I asked for help otherwise I would never have worked out how to do it. My problem was that I had used xgen fur splines instead of interactive grooming ones, so for some reason, they don't go white and you can't lighten them. To fix this I was shown how to switch them to the interactive groom editor, as well as how to apply an ‘AI Standard Hair shader’ to them, which allows you change the lightness of the colour. It also means the render turns out that colour too.
After I had got the colour sorted out, I then applied the finishing touches by sorting out the final lengths that I wanted the sections of fur on my creature to be, as well as the directions I wanted them to be brushed in.
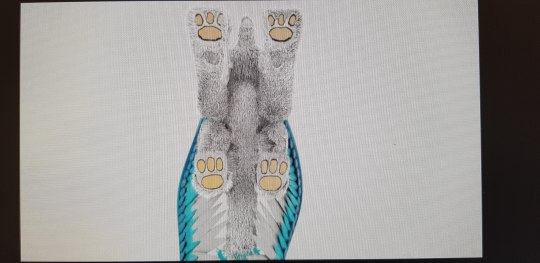
When painting my UV’s in substance I also applied gold plated pads to my creature which have some height to them. Even though they won’t be seen in the actual render for my turntable, I feel they still worked out really well with my creature and I’m proud of how they turned out.

Once I was happy with my creature’s fur it was then finally time to render its turnaround. My tutors had very helpfully already prepared a 250 frame turntable sequence for us, so all we needed to do was import our creature into that project and pair it with the rotating floor, so they would turn together. Once I was happy with the camera view of the scene and the lighting, I was then ready to click ‘Render Sequence’. (Side note: Rendering took 2 and a half hours)
0 notes
Link
The Most Common Underwear Mistakes You Didn't Know You Were Making & How To Fix Them!
Underwear is probably the last thing on your mind while getting dressed in the morning! It seems unnecessary to consider what panties to put on, nobody is going to see them anyway! But ignoring a few key necessities of wearing proper underwear can have serious consequences. Remember that unpleasant yeast infection? It was probably your underwear! From wearing the incorrect size to failing in the art of a seamless behind, these are the underwear mistakes you are committing and how you can fix them!
1. It’s All About The Fit
Whether it's a size too big or too small, ill-fitted underwear can give you a lot of grief. Apart from being uncomfortable, tight underwear can also lead to chafing and redness in the areas where the skin is most sensitive. As for loose fittings, they can lead to saggy boobs and itchy bums!
How do you fix it? Start by knowing your correct size. Get professionally fitted for a bra and undies or give yourself a fitting. Most stores will even let you try out different sizes and styles to figure out which one will be most comfortable for you for long hours.
2. The Fabric Matters
Your daily underwear plays a major role in personal hygiene. Fabrics like silk, spandex and polyester don’t let your skin breathe and can cause irritation. We recommend them for special occasions. Some women might even be allergic to these fabrics without knowledge.
How do you fix it? One of the best fabrics to opt for daily use will be cotton, a lot of brands are coming up with cute designs so you don’t have to settle for granny panties. Also, make it a point to buy alternative fabrics with a cotton lined crotch.
3. Wearing Underwear 24/7
Just like everything else your private parts need a break as well! Bras tend to permanently pull on your shoulders and breasts, no wonder taking them off is such a great feeling! Wearing panties for really long hours can lead to moisture being retained and may lead to issues like bacteria and inflammation due to infections.
How do you fix it? Skip the underwear while you are sleeping or when you are staying in, wearing baggy pyjamas will be enough to pull through the day! Also, switch to breathable fabrics like cotton and blend if you tend to pull long work hours.
4. Too Many Coloured Underwear
Coloured fabrics have a number of synthetic dyes in them. This becomes an issue if you tend to sweat more and have sensitive skin. Wearing coloured underwear all the time can thus become a cause of skin rashes and irritation.
How do you fix it? The simplest option will be to alternate with white and lighter coloured lingerie. You can also opt for brands that use natural or hypoallergenic dyes in their fabrics.
5. Improper Workout Underwear
It is a common practice to wear active lingerie while working out, it is the type. And fitting of the underwear where women go wrong. Underwear too snug will restrict your movements in the gym, the wrong fabric will be uncomfortable when you are sweating and a poor fitting can cause embarrassing accidents.
How do you fix it? Stick to fabrics that can wick away the moisture and is the proper size to ensure your skin can breathe during the workout. Also, It is important to change out of your sweaty underwear after every workout. Carry a clean and dry pair with you everytime you go to the gym.
6. Wash And Dry
Throwing in your delicates with the rest of the laundry is one of the greatest lingerie sins. The heat from the dryer and excess detergent in a machine wash can lead to quicker wear and tear of the material. Also, using perfumed or harsh detergent to wash your intimates can cause allergies and drying out the skin.
How do you fix it? Stick to hand washing your delicates and air drying them on a clothing rack to avoid the harsh environment of the machine dryer. It is recommended to switch to fabric friendly and hypoallergenic detergents to fulfil your washing needs.
7. “Showing” Your Underwear
The occasionally visible bra strap through your shirt is no biggie. But showing your white bra through sheer clothing or having the panty waistband sticking out of your jeans is so not cool.
How do you fix it? Pick the right underwear, be it low rise panties with low waisted jeans or steering clear of textured fabrics like lace and mesh under tight thin clothing. In case of sheer clothing, match the undies with your skin tone if you do not wish them to be visible.
8. The Dreaded Visible Underwear Line
Outfits that are tightly fitted or made of thin material can show the outline of your underwear. Broad seams of your panties can be visible through even stretchable jeans and people can make out lacy bras underneath a thin silk shirt. This underwear faux pas is not only embarrassing but also ruins the aesthetic of your outfit.
How do you fix it? For the outfits that present risk of the visible panty line, stick to panties that have flat seams or are completely seamless. There are many options for seamless full fabric bras available for all your satin dresses!
9. Wearing Shapewear Too Often
Sliding into a pair of Spanx when you have to wear a bodycon is one thing but putting one on every day are an alarming sign! The way shapewear works is to compress your body so that it can tuck in any flab, but all that squeezing can actually cause issues like acid reflux and general discomfort.
How do you fix it? Stick to putting on shapewear only when it's absolutely necessary and you can't do without one. For daily use, you can reach for a pair simple panelled tummy tucker or well-fitted boyshorts with wide elasticated waistbands to give you a few superficial tucks!
0 notes
Last Seen Blogs
imliterallyellie
torlex 🌿
arichgirlsluxuryworld
A Rich Girls World of Fashion & Luxury

darlalawson
Darla Lawson

ksuleaderclub
京都産業大学
全学応援団
リーダー部

mico844
Tanpa judul