
izzystitchlover2
Isabel Raymond's Animation Blog
Unit BA1B: Project Blog for BA Hons Animation
184 posts
Don't wanna be here? Send us removal request.
Last Seen Blogs


Video
My Final First Year Showreel
This is my finished showreel and I am super pleased with how it all turned out. It’s definitely a good reflection of everything I have achieved this year, and I’m so happy with how well I managed to get it to fit with the beat of the music. I really like the text transitions which I included in some of the clips, but I didn't want to use the dissolving transition on the texts for clips or images that were only a couple of seconds long, because that wouldn't have given the viewer enough time to properly read it before it moved on to the next image or clip. I am also really pleased with the panning effects I used on all my images, as it meant it gave them a bit of life so they weren't just still images randomly popping up throughout the showreel.
Overall, I am very pleased with the outcome, and I especially like the transition at the very end where the final image fades into the outro card whilst the music also fades away. I feel it all just flows really well and I am very proud of the final result.
0 notes
Text
Weekly Summary: 13/05/2019 - 17/05/2019
Mythical Creatures:
This week I managed to finally finish my Mythical creature project by making a turnaround which showcases the character in a full 360-degree view, as well as also rendering the character into different real-life environments using photoshop to help make the images seem more realistic and believable as if my Creature was actually there. I also made an iteration of my turnaround where I added a background, compositing it in a way that made the creature look like it was actually there by using After Effects. I also feel the theme of the background suits my creature extremely well.
Overall, I am really pleased with how everything has turned out, and I am so glad I have finally completed all my projects for my first year. I am also looking forward to what is to come in my Second year.
Showreel:
This is the last week of my showreel project, I have successfully completed my showreel by finding music for it which suits my style, and compositing all my best work into it. I am very proud of how my showreel turned out due to dedicating a whole day to just focus on getting it done. I also managed to get lucky with the lengths of my animations as most of them fit really well with the beat of the soundtrack which was really helpful.
Overall, I am very proud of how my showreel turned out, and I am so glad the year is finally over so I can just relax.
0 notes
Text
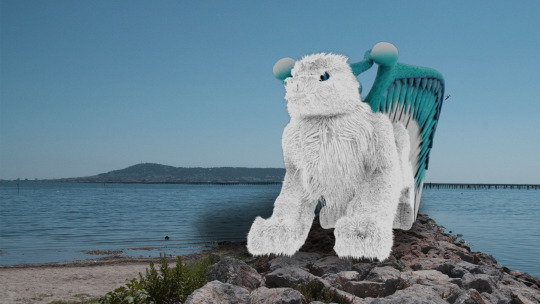
My Mythical Creature in Real-Life Environments
After I had completely finished with my model, I then moved on to placing it into real-life backgrounds using After Effects. Each of these background photos had been taken by one of the Animation staff members (apart from the very first one which I had taken myself). The one bad thing about only being able to use photos that had been taken by either me or the staff member was that my creature's habitat is supposed to be a snowy/arctic environment, and none of the photos we were given to choose from were photos of snow, which was quite annoying.

I really like how I fit this one in with the coastal environment, how my creature is just standing there, enjoying the sunlight and the view looking out onto the sea. I took care when adding the shadow to this one, trying to make sure I was including it in all the right places, by working out where I thought the direction of the sunlight was coming from. Since my creature was already quite bright on one side due to how it rendered, I decided to go along with that to use as my point of contact with light. Knowing this, I could then add the shadow of my actual creature onto the opposite side.
This one I feel wasn't the best composition out of the three images I chose, but due to me wanting my character to be quite large, I couldn’t put it in a lot of backgrounds we were given, only ones with massive open spaces, so there weren't really many photos with that option. Going with what I had to work with, I edited the saturation of my creature, so the brightness of it fitted nicely with the surroundings, and I also applied some shadow onto the side of my creature where I felt the light wouldn't be hitting. I feel it turned out ok but even I agree it wasn't one of my best ones.
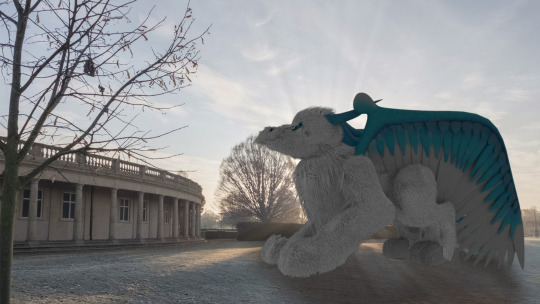
This composition is definitely my overall favourite, due to it being my third and final one I feel I put the most effort into it. It showcases my creature’s silhouette really well and I'm very proud of how the shadow of my creature turned out, as I feel that part took the longest to composite. Before Importing my creature into the scene I looked for the direction of light, as the photo was quite dark. I noticed how the shadows of the trees in the distance were very long which told me the sun would have been very low in the sky, and since the trees had shadows coming into the foreground, the point of light was going to have been right at the back behind them. Bearing this in mind, I could then incorporate the shadow into the scene as well as lowering the brightness and saturation of my creature itself to fit in more nicely, as the side facing the camera would all be in shadow due to the light coming from the back, thus it would be darker.
Finally, I decided to be a little more adventurous with this last composition by adding a ‘light ray’ effect to make it look a little more authentic, which I feel worked out really well. I especially like how I managed to get some of the rays of light to shine through the gaps where my creature isn't blocking the light, as well as around the rim of its head, as this added a nice glow further helping to show my creatures ‘god-like’ status.
Overall, I am very pleased with the turnouts of my three final composited images, and I feel that they all work really well together.
0 notes
Text
Showreel Preparation
Now I have finally finished all of my projects for the year, it has now come upon the time in which I need to look back and find all the images, videos and animations containing my best work which I want to include in my first-year showreel.
Today I worked on creating a ‘Showreel’ folder so that each time I came across work I liked and wanted to include, I could just add it to the folder so that It would be easy to find and I wouldn't lose it again. I then organised my work into separate folders so that my media, still images, music and photoshop documents all had a folder each so as not to complicate things, which meant they didn't get mixed up.
I then began to look on the ‘bensound’ website where you can find loads of different music tracks which are all Royalty Free for a background song to show my work to the beat to. I came across 6 different ones, all which I really liked the sound of, so I ended up listening to each of them numerous times until I could eventually narrow my choices down to the one final song which I decided was my absolute favourite, and suited my style and the type of person I am the best. These were the 6 songs I chose to start with:
https://www.bensound.com/royalty-free-music/track/summer-chill-relaxed-tropical
https://www.bensound.com/royalty-free-music/track/little-idea
https://www.bensound.com/royalty-free-music/track/ukulele
https://www.bensound.com/royalty-free-music/track/smile
https://www.bensound.com/royalty-free-music/track/fun-day
https://www.bensound.com/royalty-free-music/track/hey-happy-cheerful
I eventually decided to go with the last song on the list ‘Hey’, as I felt the beat would fit really nice with all the work I was wanting to show. It wasn't too fast, but it also wasn't too slow either which was really useful as there was quite a lot of work I wanted to include, and if the beat was slow, each clip or image may need to be shown for a longer period of time in order for them to fit with the beat, but that may mean I run out of duration time, so wouldn't be able to fit everything I wanted to in. I also feel the tune suits my style of work as well as the type of person I am really well, which is also a good aspect when it comes to picking the perfect song.
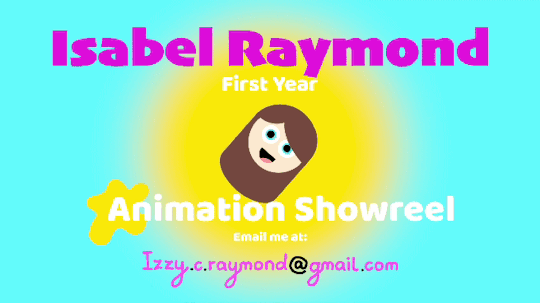
Since making my intro card a couple of months back, I decided I wanted to add a bit of animation to it when it came to putting it into my showreel to give it some life, as well as a little more appeal. I found out you could import photoshop documents into premier pro which was really useful as it meant each layer was separate (so you could do something with one layer and it wouldn't affect the others). With this in mind, I decided to incorporate a ‘pulsing in-and-out’ movement to the glow in the centre to give it some motion, as well as making the animated ‘Me’ spin onto the screen whilst enlarging, and then slowly shrinking back to its original size.
Overall, I feel the slight animation works really well as it isn't too complicated, and due to nothing else going on, it doesn't make the intro card look too busy. The card is also shown for long enough after the animation has stopped, for people to be able to focus on and read the information which is also on screen.

Here is a photo I took showing the progression of the making of my showreel. At this point, I felt I was progressing well, as I had finished adding all of my work into the timeline, and I had managed to get each image or clip to transition to the next with the beat of the music. I then was going back through everything to add the titles of each project, and what each different piece of work was to give the audience information on what was being shown.
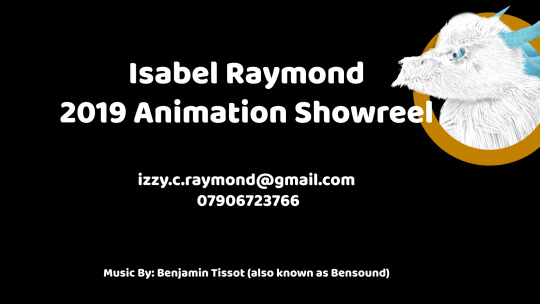
Once I had gotten to the end of my showreel and was happy with how the rest of it looked, I realised I still had some space left to fill right at the end just before the music finished, so I decided it would be a good idea to also include an outro card, and since I hadn't mentioned who the music was by on my intro card, this was the best option as it also meant I could include my mobile number as an option for contact, as well as including the fact it was made in 2019, which I had completely forgotten to add onto my intro card. I didn't want to make the outro card too fancy as it’s mainly just to give the audience a little more information about myself and the showreel, though I couldn't help not including my mythical creature onto it, as I felt it was possibly my best work which I am very proud of.
Overall, it didn't take too long to put together and then include, and I feel it also works really well with the flow of the ending of my showreel.
0 notes
Text
Griffagon Turnaround (Composited)
vimeo
Following on from the turnaround I finished, I then decided it would look a lot nicer if it had a background which was my creature’s ideal habitat. Since I was already using After Effects to put the images together and create the sequence, I decided to just use after effects to incorporate the background into the animation. I first needed to use photoshop to edit the background though, so that it looked like my creature was actually there and turning around on snow, instead of just an empty and boring white plane.
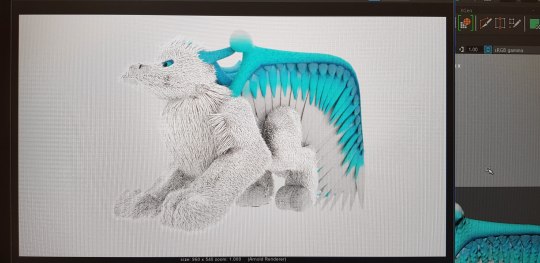
Overall, I feel it turned out amazingly well, and I am so pleased with the final outcome of my creature’s turnaround. The reason my Griffagon is just above the surface and not actually touching the floor is that the tips of the wings go below the level the feet are at. So if the feet were making contact with the surface, the wings would be cut off at the bottom, and I preferred that everything was in full view as I feel this looks so much nicer and more appealing.
0 notes
Text
CG and Concept Art Character Casts

This is the finished cast line up that I made with Tyra Iton, Tan Kimber, Layth Rose and Jam Jam. I feel the creatures were similar within the type of environment they could survive in, which were arctic conditions, so it was fitting to put them all together.
I feel the communication wasn’t as good as I had hoped, because I ended up taking charge and nagging people to send me their creatures so I could put them all together. Unfortunately, not all of us had our final CG creatures finished and ready at the time, so instead, I made the cast up using everyone’s concept art designs, which was also allowed, so it was ok and there was no need to panic.
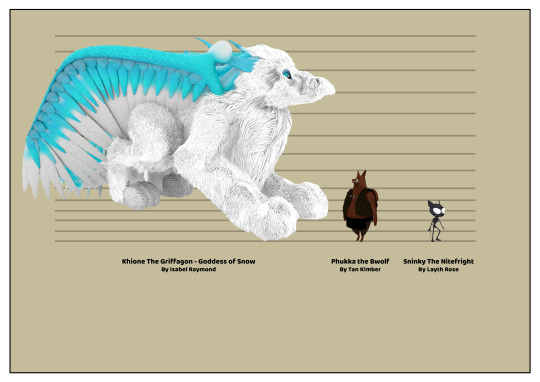
Once I had finally finished my own creature model which I managed to complete in the extra week I was given, I decided I wanted a CG version for my own character cast which I was submitting. So I sent a message out to everyone who’s creatures were in the first cast I made asking for their final models. Unfortunately, some of the people hadn't managed to get their creatures fully finished on time for submission, so weren't able to send them to me. Luckily, two of my friends (Tan Kimber and Layth Rose) had gotten their models completed, so were able to send me images of them. Above is a more ‘to scale’ version of the cast line up, as all the creatures apart from some looked similar sizes in the first one I did.
Overall, I’m really pleased with how the CG version turned out, as it gives you a much better visual idea of the size comparisons between my creature and everyone else’s. My creature is supposed to be a huge ‘God-like’ animal, and in the first cast line up which I made, she doesn't look that much bigger than the warthog-like creature.
0 notes
Video
Turnaround Sequence for My Griffagon
Once my Griffagon was finally finished and I was 100% happy with how it looked in a rendered view, it was then finally time to do a 360-degree turnaround, so you could see it from all angles. I hadn’t realised the amount of time it would take to render all 250 frames, as it ended up taking around 2 and a half hours. Once the rendering had eventually finished, I then imported the image sequence into After Effects where I was able to turn them into a video.
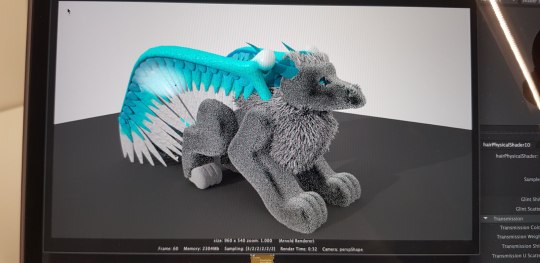
Here is the final outcome of the full turnaround. I feel the lighting was perfect for my creature so I didn't need to alter that in any way. Overall, I am really pleased with the turnout of it and I feel the fur turned out particularly well. If I have time, I may even add a scene to it to make the background look nicer and more appealing.
0 notes
Text
Weekly Summary: 06/05/2019 - 10/05/2019
Digital 3D:
Though I had already finished my digital 3D project, I decided to give my UFO Animation a Black background to make it look as if the scene was happening at night. I feel this makes it look a lot better and more presentable for my showreel. Overall, I like how it turned out as it was my very first Animation created using Maya.
Mystery Box:
Similarly to my UFO animation for my Digital 3D, I had also completed my Mystery Box project but decided to lengthen the duration of my Animatic so it would fit with the time of my actual Stop Motion Animation in my final Showreel.
Experimentation Reel
This week I also made my experimentation reel for my mystery box which included my storyboards (original and digital), Video Reference, Animatic, trial and error videos, and my final outcome. Thankfully, I managed to recover some of my old videos which I deleted, thinking I wouldn't need them anymore. I added the walk-on from my very first take on the mystery box, as I then made it better in take 2 of my first pass, when I was also given enough time to complete the rest of the animation. It took a little longer than expected to make because I wanted to try and edit the videos in a way that each iteration transitioned onto the next nicely. Although I lengthened my Animatic for my showreel, I felt the faster version was better for my experimentation reel as it moved onto the next frame more quickly, so fit better with the beat of the music playing.
Overall, I am really proud of how it turned out. It’s a good indication of how far I’ve come and how much my stop motion skills have improved. Though It took a long time to make as I wanted to get everything as perfect as I could, I actually found the process quite satisfying and fun.
Lip Sync:
This week I focussed mostly on getting my lip sync completely finished. Each day I managed to update my lip sync making it better each time whilst also getting closer to finishing it. I am very proud of how the final animation turned out, especially with how well I feel the mouth (shapes) fit with the audio to create the ‘lip sync’ effect. I am also really pleased with how smoothly it all flows, and I definitely feel it has a lot more appeal. I managed to copy the hair movement sequence from previous frames, saving me so much more time which was good, it also meant the animation looked a lot neater and more precise, which is how I like things. I feel the hair movement shows some good secondary action too, as I have it move upwards as the shoulders are shrugging as if there is air being made from the ‘shrug’ pushing the hair upwards. Secondary action is also prominent within the hair. Since hair is quite light when there isn’t too much of it, it tends to ‘float’ whilst it falls, this means it would fall slower than it would rise if it were to be pushed upwards or blown.
Overall, I am now finally, completely finished with this project and I am so pleased with how far I've come, and how much I’ve developed my digital 2D animation skills. I feel I made my lip sync the best it possibly could be, but If I were to make any changes/alterations, I would add eyebrows to my character and have his head move up and down when he shrugs, though your head doesn't potentially move at all when you shrug, so in fact that may not be necessary. I could also argue that not including these features was beneficial, as not only does it already have a smooth look, but including these extra features would also add busyness to what is already going, so would draw attention even more away from the mouth.
Mythical Creatures:
This week I have definitely made progress on my Mythical Creature project, as I finished the UV and textures for the body and wings, I used substance painter again to paint the UV’s of the wings and eyes, and with help, I managed to eventually whiten my fur, which I then groomed so the fur would all flow in the right directions I wanted it to, until I was happy with how the rendered result looked. I am really happy with how my final creature turned out and I am so glad that I eventually learned how to create UV’s and import them into Substance painter, even though it took me longer than the rest of my course mates to learn this skill. I also managed to overcome quite a few problems, and even though I required help, I feel it was extremely beneficial as it means I learn for next time how to do these things on my own with more practice.
We also had to make a character line-up sheet which included other peoples creatures who could all live in the same eco-system to our own. I took control in putting together the character cast sheet for my group which was fairly easy because my peers also did creatures who could survive in cold, snowy climates, like myself. I had 4 people join me on my cast sheet; Tan with her Bwolf, Tyra with her Calathea Felis, Layth with his Sninky, and James with his woolly goat-like creature who he couldn't think of a name for, so I gave it the title of ‘Unknown Species’. Due to some of my group members, myself included, not having the 3D model completed in time, I was only able to make a concept art version of the cast line up for them, which fortunately was also acceptable so it was all well and good. Though due to my extension, once my friends had submitted all their work I managed to create my own 3D character cast with the creatures from my concept version which I was able to acquire.
Overall, I am super happy with how my final design turned out, and now all I have left to do is the Turnaround, and composite my creature into 3 different real-life environments.
0 notes
Text
Lip Sync Final
vimeo
Here is my finished animation for the lip sync project. I feel I have definitely improved the hair from my last iteration, as well as the shading aspect of the animation. I decided in the end not to add any head movement, as even though it may have given a more natural flow to the movement of my character, I think the mouth and chin shapes, along with the hair, eyes and shoulders do it justice, without having to overcomplicate things. I also didn’t want to lead too much of the audience’s attention away from the movements of the mouth, as that is the main focus.
Overall, I'm really pleased with how my animation turned out. The shading is a lot better and there isn’t too much detail, but that means the animation is a lot less complicated. I am very pleased with it all in total, but one thing I would do if I had had more time, would have been to add eyebrows, as being truthful, I had completely forgotten about them and I feel they would do a good job in expressing things too.
0 notes
Video
Mystery Box Experimentation Reel
Since I have now finished my Mystery Box animation, I then used Premiere Pro to create an experimentation reel of the whole animation process. I feel It turned out rather well and I was very relieved that I still had all of my old video takes, and I hadn’t deleted any thinking I wouldn’t need them anymore, so I could show my progression through this project.
The people who I’ve shown this to have also enjoyed it, though I don't think I will be including this in my final showreel, as that should only be focussed on the final outcomes of my work, rather than my trial and errors.
0 notes
Text
Lip Sync Iteration Updates
This week I did some more work on my Lip Sync project getting me closer to the final outcome.
vimeo
Update 3
Following on from my last update, I then went on to finalising the eye shapes in each scene which I then added colour to. I’m quite happy with how everything is turning out so far, but I feel I will need to alter the shadowing on the eyelids when I start adding more features such as hair. I also felt the timing of the actual audio syncing with the mouth shapes was a little off, and just slightly out of time, so I also spent time on altering the timings each mouth shape was on screen for, adjusting them until I felt they synced perfectly. Overall, I’m happy with the progress I'm making as I think it’s coming along quite nicely.
vimeo
Update 4
At this point in my animation process, I am very close to being finished. I have the eyes and shoulders sorted out and animated. I have also added in the nose of my person as well as some shading to the visible ear and face so he now looks a lot more 3D. I decided to give my character a side parting with long wavy hair on one side which I animated to give it some movement and life, and shorter hair on the other. Due to the hair on the left being so short, It wasn't going to move so I could add colour and shading to it almost straight away. I also feel the hair movement gives a really nice sense of secondary action.
Overall, my progress on this project is going really well, and now I have a rough version of the hair drawn with the desired movement which I am planning on giving it, I can now move onto adding colour, which will be my next steps, and then hopefully finishing my animation altogether.
0 notes
Video
Today I did another iteration for my mystery box animatic, also in preparation for my Showreel. I didn't need to add any more frames or make any physical changes, as I already had the main keyframes included which I needed and they looked really good. What I did change, however, was the duration of the animation. Previously, it had only been 7 seconds long, whereas my live-action reference and actual Mystery box animation were about 12 seconds long. Due to this, I increased the duration of my animatic to being 12 seconds, so it would run at the same speed whilst also staying in sync with the other videos, as my hope is to have these developmental stages on the same screen as the final outcome in the showreel itself.
0 notes
Text
Creating My Experimentation Reel for the Mystery Box Project
Today I have been busy going back and looking through all my folders to find the older takes I did on the stop motion mystery box project, as they are the most important aspects needed in my experimentation reel, otherwise, I would have had nothing to show I was making actual progress.
I then looked on Bensound, a Royalty Free music website to look for a song to showcase my progression to. I picked out this tune which I felt fitted really nicely with what was being shown during the Experimentation Reel:
https://www.bensound.com/royalty-free-music/track/groovy-hip-hop
I really liked this piece of music as I felt it wasn’t too intrusive, and the beat could also be cut really nicely to the length which I was wanting to make my Reel.
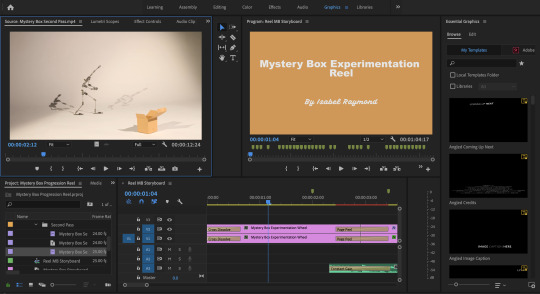
Above is just a photo I took showing my Reel progress. Since the induction I had to Premiere Pro, I feel my video and image editing skills have definitely come along nicely since first using the software, and I am thinking the area of video editing in Animation is definitely going to become a strength of mine.
0 notes
Video
Today I decided to go back to some of my previous projects to do some final iterations to them, in preparation for my showreel so they looked as presentable as possible. One of the ones I went back to was the short UFO animation I made of it abducting a dog. I decided to add a black background so it looked as if it was happening at night. I feel this worked really well as it also gives the animation a more ‘space-like’ atmosphere and feel to it, instead of the standard grey workspace which Maya provides for you.
0 notes
Text
Mythical Creature Update
Now I have all of my creature UV’d, I could then import my model into Substance Painter to add colour and texture to it. Adding colour was one of my favourite parts of the process as I really enjoy being creative, and I feel this stage was where I could be the most creative with my choice of colours, textures, patterns etc... The only bad aspect which made painting my creature time consuming was that if I wanted to paint only one UV, the brush would end up automatically painting others as well, and unfortunately, at this point, I hadn't worked out you could change a setting so it wouldn't do that. I got there eventually though, and I feel the time and effort I put into it has really paid off.
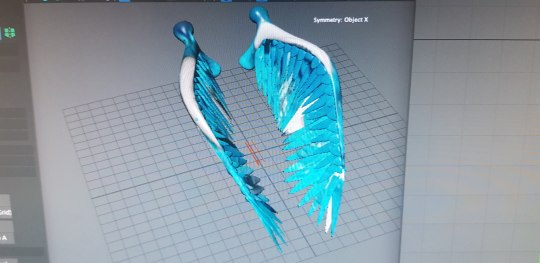
The wings of my creature were the next things on my list to add texture to. I had to do them separately though as the UV’s of both my creature model and wings wouldn't fit into the same UV square (there were too many of them). I started by taking a different approach to adding texture, by importing one which I liked from the internet to see what it would look like UV’d. The outcome wasn't too great as I had not yet separated/laid them out nicely in the UV editor window, so they were still all muddled up together in a clump. It was then that I decided it would be easier for me to just separate them to export into substance painter than it would be for me to separate and lay them out nicely in a way that would suit the texture being projected. This way was also more unprofessional, as the seam lines on each UV were visible on the actual wings where the texture didn't properly wrap around the object.
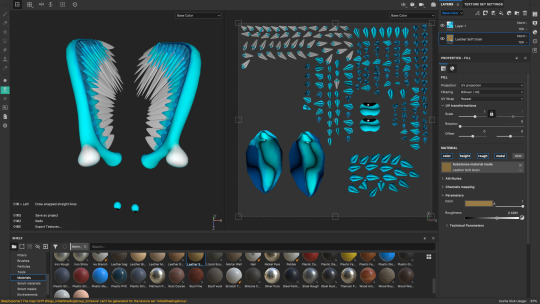
After importing them into Substance painter I then was able to add colour and texture to them. I definitely feel this was the best route to take as it meant I had more control as to what the finished result would turn out like. It also meant I could paint the wings in a way that matched my own design. The wings, fortunately, took a lot less time to complete as I was shown the way to switch a setting to ‘UV mode’ which meant when you painted on the actual UV’s, the colour would only be added to the one you were painting and none others. This was so helpful and I wished I had found that out beforehand, but at least now I know for next time.
Once the wings were finished I then imported the textures of both the wings and my creatures body back into Maya so I could apply them to the UV’s. This was the easiest part and I am very pleased with how they turned out. My next stage was adding the fur. I definitely feel this was the hardest part for me as I came across a lot of problems which I knew could be fixed but I didn't know how to fix them myself, and research wasn't helping either. The problem I faced, was even though I was adding white fur to my model, no matter how light I tried to make it with the ambience lighting, it always turned out grey in the render view. After spending what felt like 4 hours trying to fix the problem, I then decided to give up and wait till I could go into Uni and ask for help.
Once I was in Uni, I managed to acquire the help I so deeply needed to fix my issue and the results were amazing. I’m so glad I asked for help otherwise I would never have worked out how to do it. My problem was that I had used xgen fur splines instead of interactive grooming ones, so for some reason, they don't go white and you can't lighten them. To fix this I was shown how to switch them to the interactive groom editor, as well as how to apply an ‘AI Standard Hair shader’ to them, which allows you change the lightness of the colour. It also means the render turns out that colour too.
After I had got the colour sorted out, I then applied the finishing touches by sorting out the final lengths that I wanted the sections of fur on my creature to be, as well as the directions I wanted them to be brushed in.
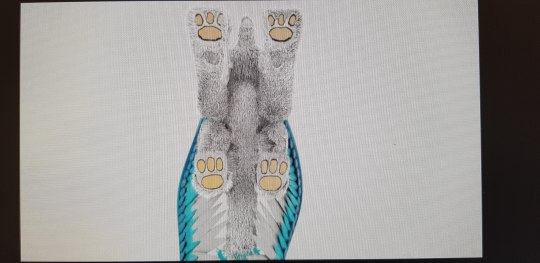
When painting my UV’s in substance I also applied gold plated pads to my creature which have some height to them. Even though they won’t be seen in the actual render for my turntable, I feel they still worked out really well with my creature and I’m proud of how they turned out.

Once I was happy with my creature’s fur it was then finally time to render its turnaround. My tutors had very helpfully already prepared a 250 frame turntable sequence for us, so all we needed to do was import our creature into that project and pair it with the rotating floor, so they would turn together. Once I was happy with the camera view of the scene and the lighting, I was then ready to click ‘Render Sequence’. (Side note: Rendering took 2 and a half hours)
0 notes
Text
Weekly Summary: 29/04/2019 - 03/05/2019
Mythical Creatures:
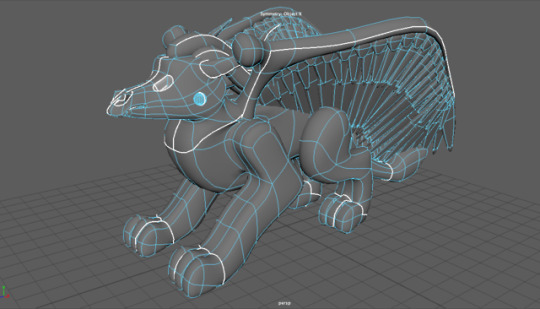
This week I have encountered quite a few problems with my mythical creature. For starters, I ended up spending about 3 hours on retopologising it, to then deleting what I’d done to go back and fix the problem myself (which probably ended up being a lot quicker). I was then able to successfully create UV’s for the parts of my creature which I am wanting to add textures to, though I may need to UV the rest of my model in order for it to export into substance painter so I will find that out in my next workshop.
I have also done some research on textures and colours that I want to include on my creature, as well as this, I have played around with the texture presets which Maya already has pre-installed. In doing this I have now chosen the type and length of fur which I would like my Griffagon to have. Even though I had a slow start to the project, Overall, even though I have encountered problems over the course of the modelling stages, I feel I have progressed so much since the start and I’m so excited about moving on to the texturing stage.
Lip Sync:
This week I managed to finish the chin movement of my person as well as adding in the new mouth shapes, which I restarted as I didn't really like my first idea. I also had a good start on adding eyes and eye movement as well as my person's neck, which I will refine when I next have a chance to do my lip syncing.
Overall, I feel the eyes are going well since I’ve managed to add blinking and a squint at one point, and to include principles within my lip sync I am thinking of having the eyes ‘squash’ in and ‘stretch’ outwards when the person squints, this will also add some exaggeration to my lip sync which it doesn’t really have at the moment.
0 notes
Photo
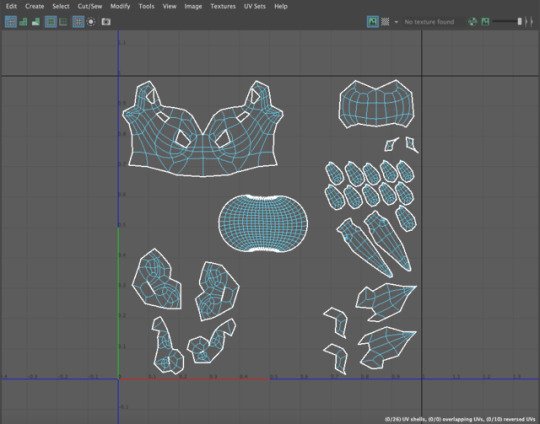
Time For UV’s
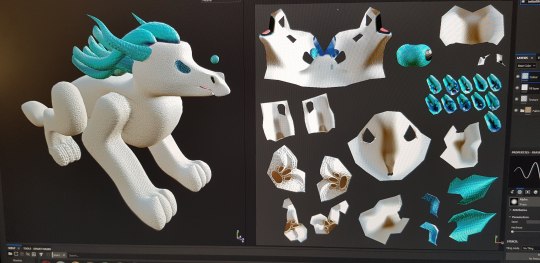
I then went on to the UVing stage, being thoughtful about how I would cut the mesh. I wanted to make sure each part was as symmetrical as possible as this would make it easier for texturing. I now have all the UV’s for the parts of my creature which I’d like to add textures to, but I’m not sure If the whole model is needed to be UV’d in order for me to be able to export it into substance painter. So I’ll find that information out in my next modelling Session.
0 notes