#these are little postcards with watercolour and markers
Text
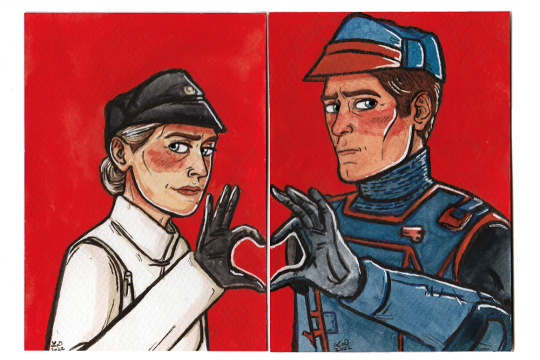
Dedra and Cereal xoxo
A cursed sithmas gift for @hegodamask!
Forgive me... I had to...
#probably the only time anyone will ever refer to either of them as a gift lmao#posting this here in case it doesn't arrive on time#lawd I'm sorry#I am so out of practice for trad art#these are little postcards with watercolour and markers#and there is a silly little secret message at the back of Syril's card#dedra meero#syril karn#imperial officer#imperials#sithmas#syril x dedra#???#I still don't know anything much about these two except that their micro facial expressions are deranged in any gifset I see
84 notes
·
View notes
Text
ART EVALUATION - MULTIVERSE ASSIGNMENT
themes of the assignment
The multiverse assignment took us through a variety of artistic styles, drawing, printmaking, typography and collage, but there was also a narrative element introduced through the penguin book, we were tasked several times to draw inspiration from narrative elements from the book, or to depict scenes from it, this I felt was similar to fine art, however while on the computers we worked on 'postcards' (personally though I always felt their purpose was more like covers for our books), which again had inspiration taken from the book, this reminded me of graphic design; we were attempting to express a product through a visual means.
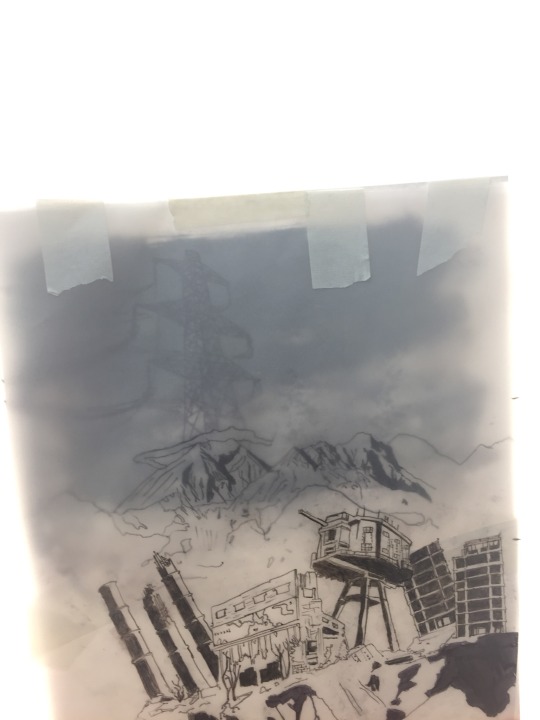
the three ‘postcards’ that had text added to them, overall i find that the first one below is my favorite, the central image i feel is a strongly emotive one, figures shrouded in darkness, almost in solidarity over some tragedy, which is why i annotated it “a reminder of better days”, as a reference to how i felt the image was tragic.

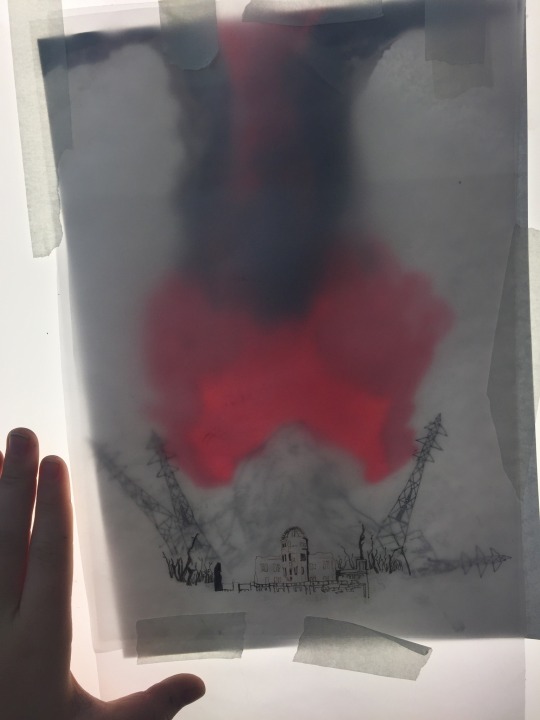
this image i annotated it with words associated with god, the drawing i used because i wanted it to resemble an old medieval representation of an angel, which i feels far more visually interesting, and below it is the shattered sky and broken buildings, riven by strange flames, all part of the ‘wrath’ and ‘profound fear’.

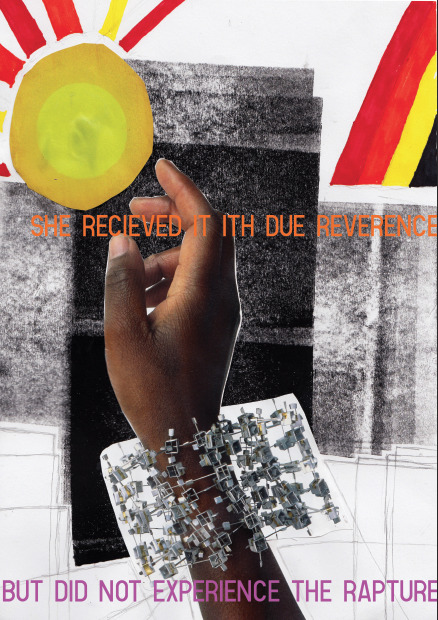
here was see the hand receiving what should cause ‘the rapture’ i used the sun as the object because i felt as though the sun’s connection to the heavens, and it being unreachable was going to add to the piece. i also inverted the colours of each of the annotations, to draw contrast between the statements.
This all being said I'm confused over how the multiverse plays into this, the assignment was about creating art based around a narrative, not around other universes.
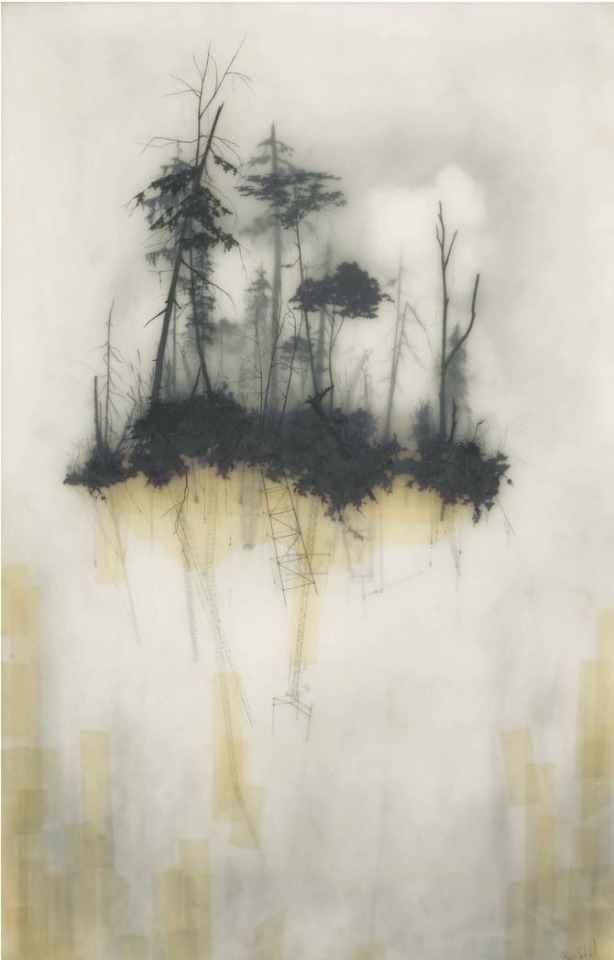
Two artists I felt influenced the art I made during the assignment were Brooks salzwedel and pokras lampras, Brooks' art I have already examined, still, he depicts floating land masses, and strange forested scenes obscured by mist, while pokras lampras is an asemic writing artist, his particular
Brooks salzwedel
style was structured and merged aspects of Cyrillic, English, Greek and Arabic creating an interesting visual style.
Pokras lampras

What did we learn in lesson
This assignment did not focus on new artisic methods (in comparison to the last unit we learnt screenrinting, intaglio, chalk, graphite etc.) but rather ways to express ideas through it, in this case through the aforementioned narrative.
Animation:
animation is relatively simple, animations are composed of several frames, then the amount of frames per second will determine how the animation plays put, generally the higher frame rates are used for smoother, more high effort animations, 24 fps (Frames Per Second) is industry standard.
In a programme the last frame can be viewed to better let the animator decide where they want to go with the animation.
Light box art:
our light box art used tracing paper, each piece of paper was drawn on, the penned, the most 'misted' paper would be at the back, giving an impression of dictance, the paper in fromt would similarly appear closer to the veiwer.
Though as for what we used, screen printing, digital, painting, drawing were all used, of note was the continued use of animations in digital atr.
the use of light boxe was interesting particularly the use of layered tracing paper to create a obfuscated image, though I personally wonder how I could use them in my own art.
Out of lesson
digital art became my focus, I've found my transition from traditional methods difficult, lines are less stable, and dealing with confusing interfaces has proven itself difficult.
The quality of my artwork has been reduced as a result, but this is expected when moving to a new, unfamiliar medium.
Though digital art has allowed me to use colours freely, which again is difficult, as I never developed any real sense over how to use colours using traditional drawing methods.
Inspiration
Additionally I asked each individual artist the same three questions about their work, which were
what is your source of inspiration? (meaning what initially inspired you and what continues to)
how did you start? (what did you draw initailly, when?)
what processes and materials do you use?
void_illustration - Richard Saunders Illustration
Richards art either is obviously biological, where a creature is depicted, or has a distinctly biological edge to it, metals seem to bend,twist and stretch like flesh, nothing seems to be truly just a machine or device, rather every ridge, bulge and groove hints at a more organic truth to his figures and objects.
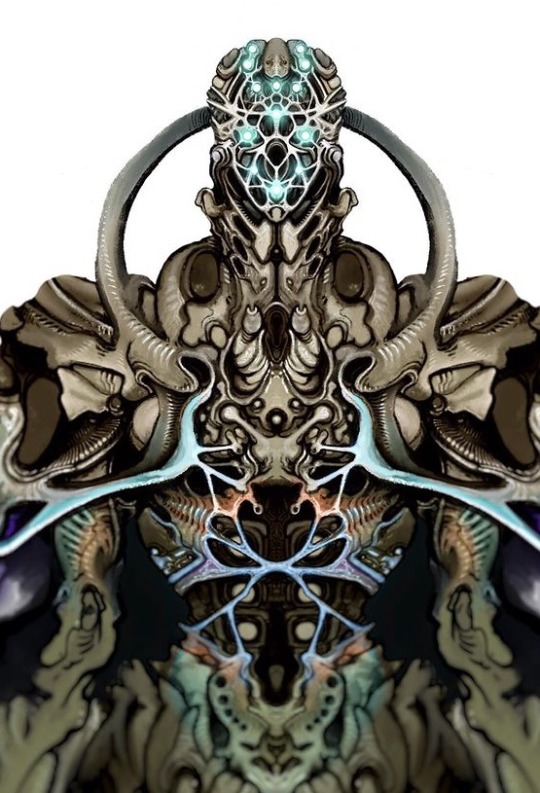
1. im inspired by so many things, its good to pull from a wide range of inspirations.
2. Ive been drawing for a long time, im not professional but im hoping to change that, most of my work forms into narrative universes and then develops on from there.
3. For materials I use a range. My 'bio warrior' series is mainly pencil sketches with marker colours and white paint pen highlights. My brown paper dragons are watercolour on strathmore toned tan paper, lined digitally, though I will layer them up further with paint and markers.
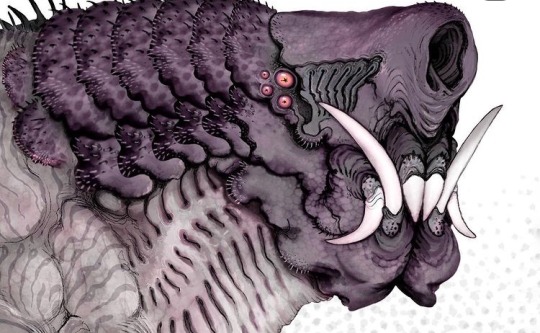
Fuelstains - Nikolay Georgiev
His work similarly to Richard's trends to directly be a creature or rather, monster, these organism often have strongly textured skin, often appearing to have many grooves, showing the musculature underneath, then there are his mechanical pieces, either directly depicting a machine of some kind, such as a robot, or depicting a human who has been massively altered by technological augmentations.
1.I was initially inspired by comics, as a kid, stuff like spiderman, bat man and transformers, but later on it could be anything that inspires me.
2.I started in primary school and it was mostly superheros or stuff from movies.
3.Pencil, ink fineliner, brushpen, watercolour, ballpoint pen, digital.
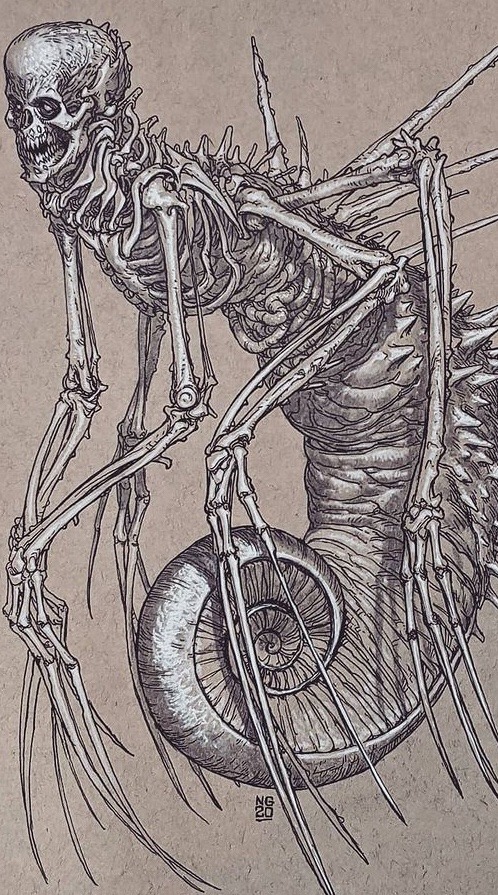
Milesr.art – Miles R art
miles' art focuses on creature drawings, particularly drawings of alien life, creating some truly bizarrely fascinating, most bearing little resemblance to earth organisms, if any. Another aspect of Miles' work that I appreciate is that it seems grounded, the animals, in spite of their bizzarreness still seem like they could exist.
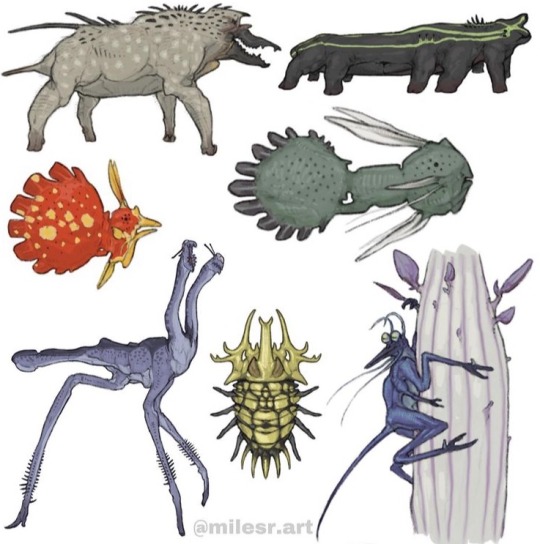
1.some of my biggest sources of inspiration:
- C.M koseman, Brynn metheny, and dougal dixon are some of my most inspiring artists
-just thinking about the natural world in general like on our planet
2.what initially inspired me to draw and that goes into number 2) in kindergarten I saw some kid drawing a honey comb pattern with neon markers and was like huh okay im going to do that but better.
And I always drew monsters and characters, always becoming more based on science overtime, and here I am now.
3.Now I exclusively make finished things digitally with my ipad pro and apple pencil using procreate, but I often make sketches on post it notes with just regular pencil. In terms of processes I feel like I just do what I do it, its hard to define ones process.
1 note
·
View note
Text
youtube
Watch the American Climate Leadership Awards 2024 now: https://youtu.be/bWiW4Rp8vF0?feature=shared
The American Climate Leadership Awards 2024 broadcast recording is now available on ecoAmerica's YouTube channel for viewers to be inspired by active climate leaders. Watch to find out which finalist received the $50,000 grand prize! Hosted by Vanessa Hauc and featuring Bill McKibben and Katharine Hayhoe!
#ACLA24#ACLA24Leaders#youtube#youtube video#climate leaders#climate solutions#climate action#climate and environment#climate#climate change#climate and health#climate blog#climate justice#climate news#weather and climate#environmental news#environment#environmental awareness#environment and health#environmental#environmental issues#environmental justice#environment protection#environmental health#Youtube
17K notes
·
View notes
Text
Full colours watercolour / ink paintings for sale
So, as I said on a post on my main blog, I’m a little short on money, and had decided to sell some pieces some time ago anyway.
All these pieces have been photographed today, but you can find scans or better pictures of them in this blog archive. Pen is for size, you will notice most of my paintings are postcard sized. I am smol and I make smol drawings.
They have either been done using watercolours, inks or watercolour pencils, and most of the time a combination of the three.
This is the first of two posts, second post will show sketches for sale.
Don’t hesitate to IM me if you are interested, have questions or wonder why another piece of mine isn’t for sale on this list - we can find a way ;)
Prices are shown without shipping - it will depend on where you live. All shipment will leave France, if that can give you a rough idea. I can check the shipping price for you if you’re interested.
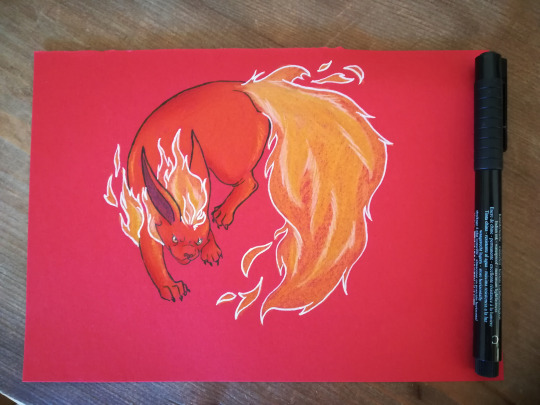
Flareon
Ink markers and watercolour pencils. 15€

Anthro doe
Ink markers and watercolours. This is an old drawing, so I only ask 10€
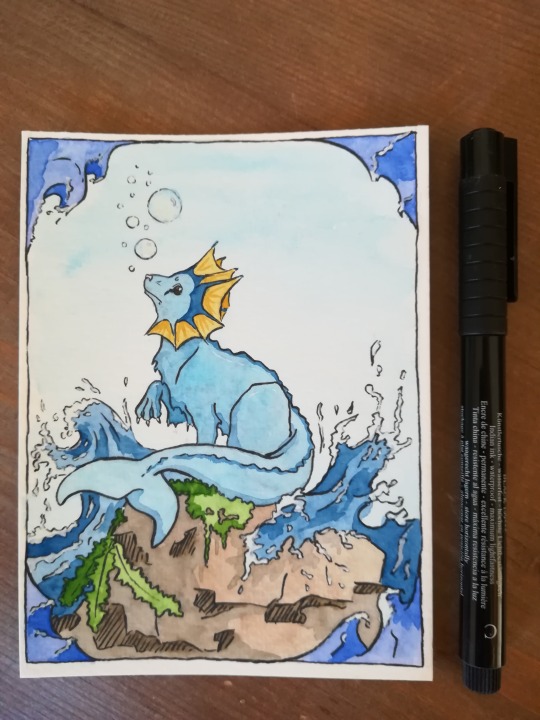
Vaporeon
Ink markers and watercolours. Same, old drawing, so only 10€
(even if I have spent a lot of time on it)

The Star and the Unicorn (Stardust fan art)
Ink markers and white paint. 20€
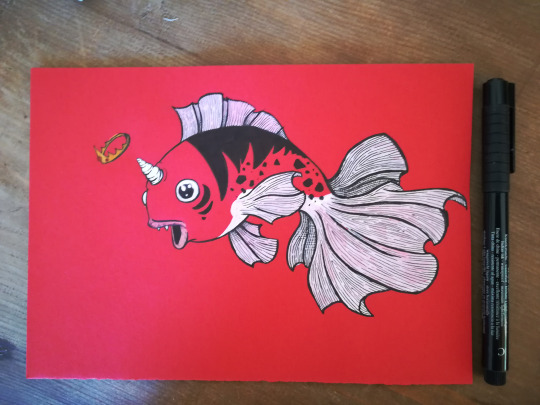
Seaking
Ink markers, watercolour pencils. 15€

Young Drake in Egypt
Ink markers, watercolour pen, watercolour pencils. 15€
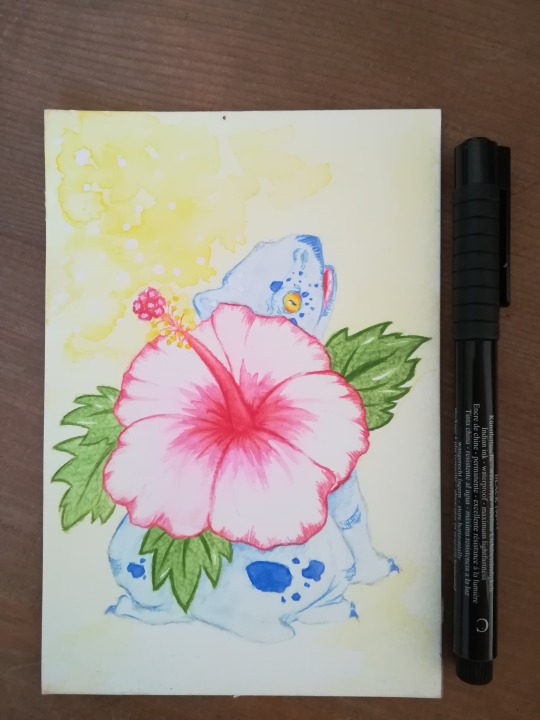
Venusaur
Watercolour pencils, watercolours. 20€
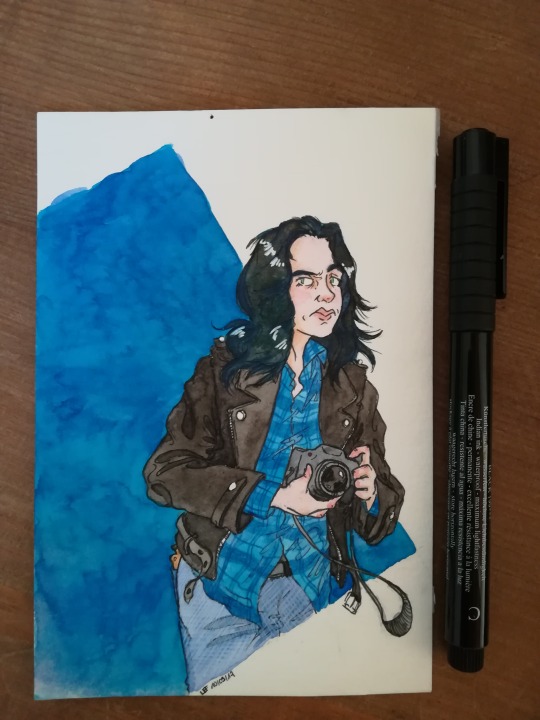
Jessica Jones
Ink markers, inks, watercolours, watercolour pencils. 20€

Green Deer
Ink markers and watercoulours. 20€ - I can add the frame for 1,50€ more (price of the frame at IKEA...) but this would make shipping cost more (weight ++).
(yes some of those have holes because I displayed them and had no room nor any way to put up frames)(sorry about that)
Here you go, and I hope some people would be interested in these... lost of pokemon haha.
Thanks for looking and spreading if you can ! <3
#art#art for sale#artists on tumblr#paintings#watercolours#painting for sale#watercolor#illustration#fan art#pokemon#ripper street#bennet drake#jessica jones#anthro#vulture culture
67 notes
·
View notes
Text
How To Create A Beautiful Oracle Deck In 8 Steps
Julie Hopkins
An Oracle deck is a series of cards with images or words on them that can be used for divination, goal-setting, to lift your mood, or to connect with your intuition or a higher power. Each deck has a theme, and really, anything goes. There are many oracle decks out there with a variety of themes such as angels, animals, and positive affirmations.
How Are Oracle Decks Different Than Tarot Decks?
Oracle decks (generally) differ from tarot cards in three ways.
A tarot deck consists of 78 cards, and an oracle deck could be any number cards.
Tarot decks have major arcana cards and minor arcana cards divided into four suits. An oracle deck can be structured similarly, but there are no set rules around it. Usually, the theme dictates the structure of the cards.
Tarot cards are usually read in spreads of multiple cards, and oracle cards tend to be read one card at a time.
Why Create Your Own Oracle Deck?
Maybe you’ve experimented with other oracle decks and felt your intuition nudging to make your own. Maybe you’re working towards a goal and want a personalised deck that speaks directly to your hopes and dreams.
Whatever your reason, I say go for it! There is power in creating something inspired by your intuition. Intention is the “secret sauce” behind spells and magical tools, and when you make something from an idea in your head, it’s supercharged with your personal power.
Let’s Get Started!
Step 1: Check Out Other Oracle Decks.
Head on over to Pinterest and check out the different oracle decks that others have created. Which decks are you drawn to? Do you like larger cards or playing card size? What colours schemes catch your eye? Notice the intentions behind each deck. Some are geared toward divination, while others are all about adding a little inspiration to your day.
After browsing what’s out there, you’ll start to see some patterns. Most oracle decks fall into one of two categories: topical or character-based. For example, a topical deck might have a different affirmation on each card. A character-based oracle deck could have a different animal on each card.
Step 2: Brainstorm Themes for Your Cards.
Now that your brain is brimming with great deck ideas, take some time to jot down ideas for your own deck. As you’re doing this, let your creativity flow. Write down every idea that pops into your head without judgement or censoring. You might surprise yourself with the themes you come up with.
If you get stuck, think about the things in your life that “feel” magical and spark something inside of you. This could include nature, sacred spaces (in your environment or in the world), magical tools you use in your rituals, shapes, people you admire, characters from books, musicians, affirmations to keep you motivated, food, quotes or poetry.
After you settle on a theme, make a list of all the individual card design ideas around this theme. Decide if you want to include words on the cards or just an image. Sift through the design ideas and pick the ones that resonate with you most (even if you don’t know why). Plan out as many or as few cards in your oracle deck as you want. This deck is uniquely yours so you get to make the rules.
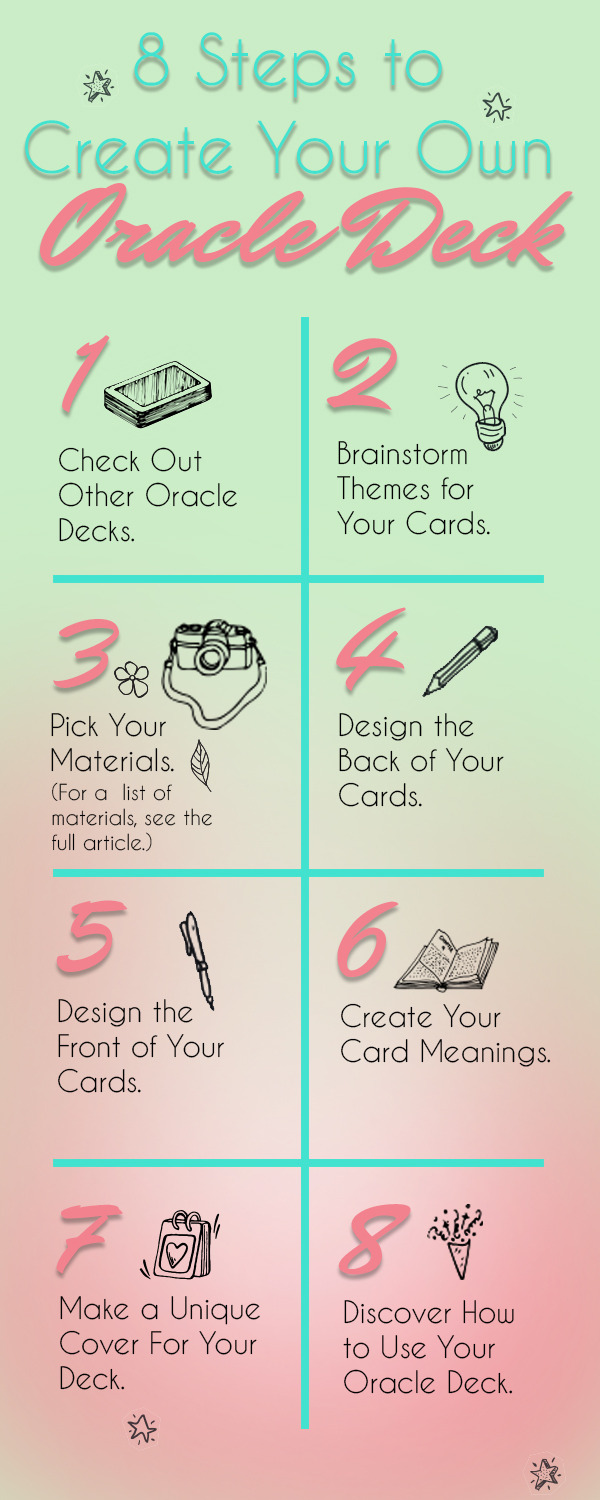
Step 3: Pick Your Materials.
You have a lot of options here. You can head to your local craft store and buy your materials, or just use what you have on hand. Witches are resourceful people, and I think it’s fun to go looking around my house for unconventional art supplies.
Here’s what I’ve used to make oracle decks:
4 inch by 6-inch note cards - These are great because they’re all the same size and sturdier than regular paper. Plus, they’re already card-shaped. No cutting required!
A pad of cardstock - You can trace your cards on this paper and cut each card out. This gives you more freedom with card shapes and sizes. (And keep in mind, no one said these cards have to be rectangular. Circles, triangles or hexagons work, too!)
Cardboard from cereal boxes, cracker boxes, etc - This thin, firm cardboard will make for durable oracle cards. And it’s a magical way to recycle stuff you already have in your house! I usually paint over the cardboard with white so I have a blank canvas for my card designs.
Elmer's Glue - It always comes in handy.
Gloss Medium or Mod Podge - This can be used for adhering paper to non-paper materials, or for image transfers.
Paint brushes - You can use these with paint, glue or gloss medium.
Paint - Acrylic paint and watercolours work better than oil paint because they’re less textured when they dry.
Spray Paint - This is perfect for stencils. Make sure you use this outside. It gets fumy!
Markers, coloured pencils or calligraphy pens - Drawing your own designs and handwriting the words will give your oracle cards a totally custom look.
Glitter - Use with caution because it gets everywhere, but I’m kind of obsessed with the stuff.
Old magazines - Cut out the images that fit your oracle deck theme and adhere them to the cards with tape or glue.
Photographs - If you have personal photos that fit your theme, go for it!
Postcards or Birthday cards - Infusing your oracle cards with things that hold meaning to you will increase the power of your deck.
Pressed dried flowers, leaves or grass - Get all earthy with it! These adhere to the paper better when you paint the gloss medium or mod podge directly on the paper and again right over the plants as you’re adhering it to your cards.
Tissue paper - I love cutting out shapes of tissue paper and using gloss medium or watered down Elmer’s glue to stick them on. This creates a “stained glass” look.
Gift Wrap Paper - This is great for giving the back of the cards a uniform look.
Scotch tape - I use this for image transfers.
Clear packing tape - This works for image transfers or as a way to create a smooth finish on your cards. It’s kind of like laminating.
Whatever the heck you want!
Step 4: Design the Back of Your Cards.
Decide whether you want the back of all the cards to be uniform or more of a “mixed bag”. Traditionally, decks of cards will all have identical “backs”. The benefit of this is you won’t be to identify the cards as you’re drawing them for a reading.
To achieve this uniform look, I recommend using pattern stencils, gift wrap paper, or pieces of masking tape.
The other option is to make each card different. This is not traditional, but it’s super fun. Because you’ll be familiar with differences in your cards, you’ll have to keep your eyes closed when drawing a card, but it could make for an interesting reading for other people who aren’t familiar with the cards. During readings, their intuition can guide them towards a certain colour or pattern from your assortment of mini masterpieces.
Another method I love to use for the back of my oracle cards is paper weaving. I take two pieces of coloured paper (both the same size) and cut them into strips. I’ll line up one set of strips vertically side-by-side and secure it to a flat surface with tape. Then I weave in the other set of strips horizontally, alternating over and under until all the strips are weaved in. This created a checker-board look that you can glue to the back of your cards.
Step 5: Design the Front of Your Cards.
Remember that list you made from step two? Take that out and look it over. Assign a design idea to each card in your oracle deck.
You can use whatever medium you like to design and decorate your cards. Just keep in mind, you want these cards to be shuffleable. Go easy on the textured materials.
If you can draw, try sketching out your symbols or characters on the cards. If you’re not that confident in your art skills, find images that fit with your theme and glue them to the cards to create a sort of collage-look.
Tip: It helps to work on one card at a time to keep from getting overwhelmed. Creating these should be fun, not a chore, so only work on these when you’re feeling inspired. Your cards will absorb your energy while you’re making them, so make this process joyful!
Step 6: Create Your Card Meanings.
Gather up all your finished oracle cards take some time to connect with each one. Hold one card at a time and focus all your attention on it. Close your eyes and notice the energy that the card carries. How does it feel in your hand? Does it bring up any emotions? Then open your eyes and examine the details of the card. Notice what thoughts float through your mind. Ask yourself, “what does this card mean?” Write down your observations and create meanings for each card based on your notes.
Don’t be afraid to edit meanings as you get to know your cards more. This should be a fun, fluid process. Don’t overthink it.
Step 7: Make a Unique Cover For Your Deck.
To avoid losing or damaging your cards when you’re not using them, decide on how you want to store them. You can tie them with a ribbon, keep them in a pouch, or store them in a decorative box. I like to keep my cards wrapped in a white cloth that I’d used to wipe my paintbrush on while painting my oracle cards. This leaves me with a beautiful cloth that matches the colours of my deck AND it’s already charged with my creative energy.
Step 8: Discover How to Use Your Oracle Deck.
Experiment with your oracle cards. Try pulling a card a day, or create some spreads around the theme of your deck. Add or take away cards to your deck if you want. This is YOUR creation, so let your oracle deck change and grow along with you!
Do you know how to get the best readings from your Tarot yet?
If the answer is no, then you’re missing out on one of the most useful tools in the craft!
Getting started with Tarot can be intimidating. There are a ton of rules and a bunch of them contradict each other and then there’s memorising all those cards… it’s too much! Not anymore though.
In my Intro To Tarot class series, you’ll learn step-by-step how to become a confident, spiritually attuned Tarot reader so that you can make the most of this amazing tool for yourself.
Learn More Here >>
https://thetravelingwitch.com/blog/2018/4/17/how-to-create-a-beautiful-oracle-deck-in-8-steps
0 notes
Text
Team Favourites: 25 of the Best Colouring Materials
We spent everyday of our Christmas holiday colouring and painting. Two weeks! Experimenting with mark making, drawing our favourite memories, making imaginary worlds, and just having fun… creating art is wonderful for all ages. And beautiful materials create beautiful art.
Our twenty five art and colouring materials will provide you with a lot to choose from so you can select the very best for your children’s ages, interests, and desires. We love this collection from our team. Hopefully you will add some of these to your art ‘studio’ or give them as birthday gifts (a super smart gift in my book)!
Twenty Five of our Team’s Favourite Colouring Materials :
Lyra Colour Pencils — My younger kids like these thicker pencils because they’re easier to hold, and they come in pretty colours. — Courtney
Oil Pastels — Chunky and fun to work with on large surfaces. — Lara
Stablio Cappi Felt-Tip Pen — These felt tips can be strung together on a ring! So super practical!! Perfect for pre-schoolers. — Esther
Caran D’Ache Coloured Water-soluble Pencil (Pack of 40) — Beautiful colours and so great because if you brush water over them they become watercolours! I still have my battered box of these from when I was a child!!! — Esther
Artist Sketch Book — Love having these kind of sketch books around — and ALWAYS bring when traveling (to use as travel diary or simply as sketch book). One per child. — Esther
Three Star Chalk — My daughter loves coloring on her chalkboard and the sidewalk outside our house. This chalk, from a 140-year-old German company, is the best we’ve found. The colors are so vibrant and beautiful. — Shannon
Honeysticks — These are delicious! They smell of honey, and are just as beautiful to colour with. I love that there aren’t any labels as well, so little kids can colour with both the end and the sides of them. Great for making rubbings and creating textures. They are all natural and nice and chunky 100% beeswax, non toxic, and sustainable too. — Alies and Lara
Graphite Drawing Pencil — Good quality pencils are the most essential basic for drawing and sketching! — Esther
Pencil Sharpener — Perfect for both the big and the skinny colour pencils. — Courtney
Crayola – Twistable Crayons — Super handy for pre-schoolers — just twist up! — Esther
Eraser — Best eraser on the block! — Esther and Lara in Paris
Inktense Watercolour Pencils Tin – Set of 12 — Beautiful rich pigmented colours which become permanent when dry. — Vanessa
Djeco Gel Crayons�� So soft and easy to draw with — they are like butter! Great for young little hands since you don’t need to apply pressure, but instead just experiment with mark making. — Lara
Bathtub Crayons — Crayons to use in the bathtub! How fun. — Lara
Stabilo Woody 3 in 1 — A pencil, watercolour, and crayon all in one, these lovely wooden pencils make such gorgeous art. Use them on proper watercolour paper, and after drawing introduce paintbrushes to the art session. Layering drawing on top of painting! Fun! — Lara
Pentel Water Brush Pens — Perfect in combination with the watercolour pencils. (Also great to bring traveling or to restaurants in combination with some watercolour pencils!!). — Esther
Kitpas Marker Crayons — These are such a fun way to take coloring beyond paper, as they mark beautifully on glass and whiteboards. Kitpas also make a set of bath markers that comes with the cutest little sponge in the shape of a cloud. So great for adding to a sense of celebration and they are really easy to clean off. — Shannon and Helen
Waterbrush — If we don’t have our watercolour paints with us, I love using these pencils with the paintbrushes. So handy for going to restaurants. — Vanessa
Sanford Mr. Sketch Scented Watercolor Markers — These markers last forever and are available in great colours and they never seem to dry out. Plus, they are scented too – so fun! — Rebecca
Chalk — Thicker version of the chalk (from number 6) perfect for drawing outside. — Shannon
Stockmar Crayons Tin of 16 blocks — Pure beeswax, these blocks are great for first crayons for babies and toddlers. — Esther and Lara
Canson Watercolour Paper Pad — I like to have these in different sizes (A4 but also postcard size!). — Esther
Watercolour Box — We use our water colours pretty much every weekend. We also take ours on holiday and take watercolour paper postcards with us. — Vanessa
Lyra Groove Slim Coloured Pencils — Triangular shape ensures a good grip, plus super pretty colours and nice to work with. Our kids love colouring with these. — Esther & Courtney
Staedtler Pens — My bigger kids love these for drawing (I do too — I learned to work with these when I studied as an architect!). — Esther
And one of our favourite colouring materials we traveled with over our Christmas holiday was this lovely wool felt roll of coloured pencils made from natural wood. Money from each set even goes to the RSPB to save sparrows! How sweet.
We would love to know what your favourite colouring materials are. And we would love to hear about your favourite paper and brushes too… what materials do you use?
Lara
x
ps A great way to cherish those beautiful drawings and paintings are with Doodle Nest books. Especially if you want to make numerous books from your original art for the grandparents!
The post Team Favourites: 25 of the Best Colouring Materials appeared first on Babyccino Kids: Daily tips, Children's products, Craft ideas, Recipes & More.
from kid games toys http://ift.tt/2DxAMm4 via kid games toys
0 notes
Text
youtube
Watch the 2024 American Climate Leadership Awards for High School Students now: https://youtu.be/5C-bb9PoRLc
The recording is now available on ecoAmerica's YouTube channel for viewers to be inspired by student climate leaders! Join Aishah-Nyeta Brown & Jerome Foster II and be inspired by student climate leaders as we recognize the High School Student finalists. Watch now to find out which student received the $25,000 grand prize and top recognition!
#ACLA24#ACLA24HighSchoolStudents#youtube#youtube video#climate leaders#climate solutions#climate action#climate and environment#climate#climate change#climate and health#climate blog#climate justice#climate news#weather and climate#environmental news#environment#environmental awareness#environment and health#environmental#environmental issues#environmental education#environmental justice#environmental protection#environmental health#high school students#high school#youth#youth of america#school
18K notes
·
View notes
Last Seen Blogs
ffcd
Fuchigami to Funato CD catalog

new-genesis-pso2
新たなる創世の記録

sappymix1
CALICO CRITTER ASYLUM
notthesaint
DEEPNEST ZONE

kythecorg
Kythecorg