#the background is an image from ibispaint image library
Text
as I roam this never-ending today, i wait impatiently for the dawn that exists somewhere.
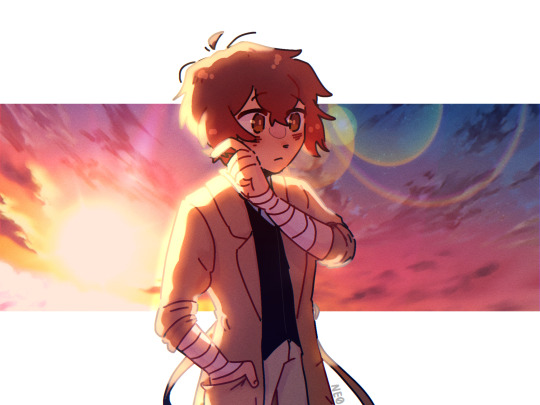
#dazai osamu#bungo stray dogs dazai#bungo stray dogs#bungou stray dogs#bsd dazai#bsd fanart#song: eien misui ni goodbye (dazai's character song)#neo's art#i dont remember if he has pockets in his coat but i gave him two anyway#surprisingly this took only an hour#the background is an image from ibispaint image library#god bless IbisPaintX#i need to learn to draw my own backgrounds tho eughhhh#id in alt text
353 notes
·
View notes
Text

Happy belated birthday to the bagel himself
(Background image from the Ibispaint image library)
20 notes
·
View notes
Note
hiii i just saw your ryuseitai phone theme and it’s so cool!! can you make a tutorial of how you did it?
hi !!!! id love to! im so glad you liked my ryuseitai theme! :3
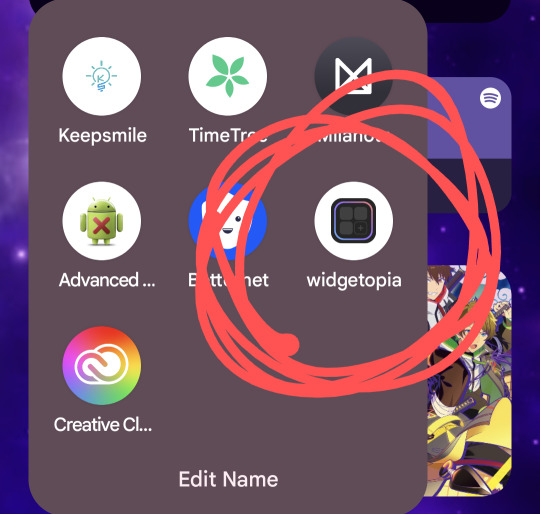
first step: this widget app (widgetopia), or any other of choice. i used this to make the little square widgets as well as the countdown timer labeled LIBERATION (which is actually my graduation date)
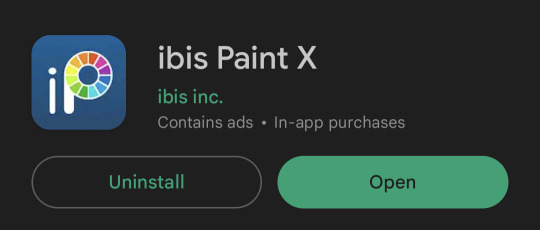
in addition, i would recommend having some kind of drawing app / image editing program on hand in case you want some custom graphics like my lock screen / wallpaper! ibisPaint X is my app of choice, as its free and has a pretty simple interface, but any programs will reasonably work!
keep in mind both of these programs have ads and paid versions but you dont need to pay for anything for this!
also i dont have progress pictures so. bear with me lol.
for the small square widgets, youre going to want to go to the LIBRARY panel and hit +SMALL.

this will open the NEW WIDGET menu! from here, youre going to want to hit NEW WIDGET (should show up as a tealy green button), which brings up this menu

from here, you can set various things, such as making the background of the widget transparent, making it a specific color, or setting it to send you to a website via an embedded link if you please!
for this tutorial we'll just make a basic regular widget with a picture on it :3
on this screen, hit the PLUS icon, and choose the option that says IMAGE. choose the image you want, and voila! its there!
although...

the borders are an issue. youre going to want to resize your image! this is a part of the process regardless of the image's original size.
click on the image to open the image property menu! here you'll find a ton of options for moving the image around, and edit it! here you can add some extra flair such as a slight rotation or tint, or you can set it to have an action when you tap on it! i wont get into that in this, but its neat to take a look at on your own!

make sure the chain icon between width and height is LINKED, and then increase the size! this is just a matter of eyeballing it based on your image, and will result in corners being cut off, so avoid having important bits of the image in the very corner! when youre done, you should be able to see rounded corners INSIDE the image's bounding box! this means that your image is as large or larger than than the widget, meaning that no weird borders will show!

from here, you can hit the back button, and then the purple ADD WIDGET button to put it on your homescreen!
note: if youre editing an already made widget of the same size, you do not need to press ADD WIDGET, as it will result in having two of the same widget on your screen!
from here, itll look something like this!

if you ever want to change the widget image, you can just click on it (if you have multiple, click on the specific one you want to replace), and go through this process again!
as for the lock and home screen backgrounds, thats more tedious. i recommend a 9:16 aspect ratio for phone screens, but other than that theres not many tips i can give you in the design sector of things, sorry 😔
one tip i can give is that if you dont want your home screen image to shift when youre swiping between screens, go into google photos, and zoom in on the image! make sure its cropped the way you want it to by the borders of your own device, get the UI out of the way (done easily by tapping once on the image), and take a screenshot, that way there wont be any buffer room on the sides for it to shift!
---
anyways, i hope this helps! i absolutely advocate for playing with some of the more advanced options on your own, as its super fun to learn new modes of phone customization! if anyone makes any themes with help from this tutorial, feel free to tag me in the comments! id love to see your work! :3
15 notes
·
View notes
Note
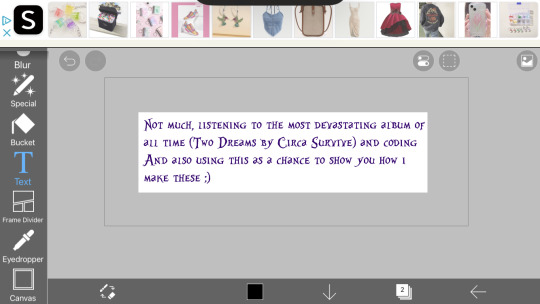
HOW ARE YOU DOING/WHAT ARE YOU UP TO?
[^PRETEND IT'S SPARKLY AND FUN BECAUSE I DON'T KNOW HOW TO MAKE THE COOL THINGS]
below the cut ~~
So the sparkle things are gifs, which means we need to
1.) make the frames and
2.) turn the frames into a gif
Step 1: Making the frames
I use ibispaint bc its free and has great versatility, it doesnt matter what photo editing app you use it will just change how you add the glitter. To keep this super simple im just going to show you how to glitter
In ibispaint, open whatever size canvas you want/open the image youre glittering. Choose the text tool and add your chosen text
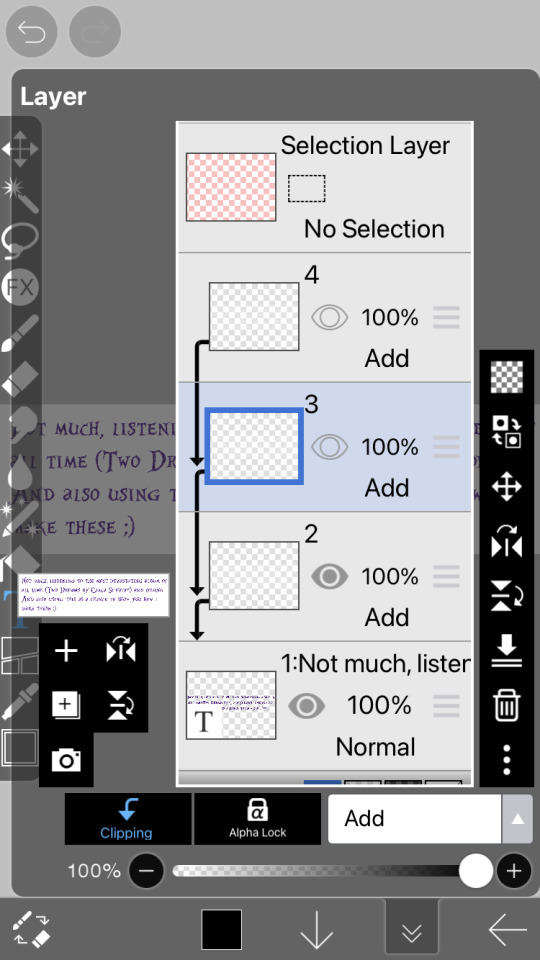
On the bottom row here ^^ you can see a little button with a number two, its where you can open the layer/canvas menu. Click that
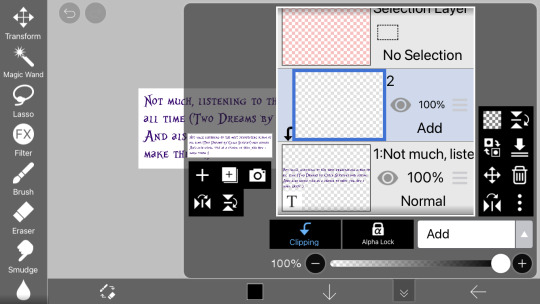
Click the "+" on the left hand side, click clipping, and click the dropdown that says "normal" and choose "add" (this is the blending mode). Your screen should now look the same as above.
in the menu on the righthand side (the "tools" menu), click the fx filter icon
Scroll to "artistic"

Fix the settings until they look like the ones above
Type: color
Strength: 75
Amount: 25
And blending mode normal
Click the green check
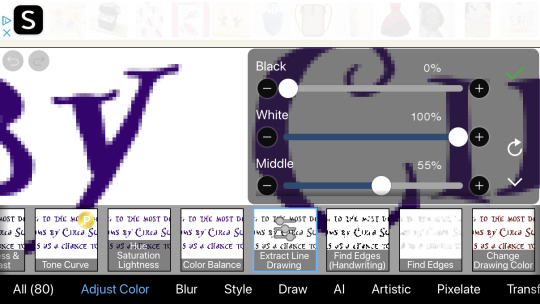
Now go to the adjust color section and click "exact line drawing" and match it to the settings above
Black: 0
White: 100
And middle: 55
Click the check
The layer is now going to be black rather than the colors it was before, that means youre on the right track
Click the x to leave the filter menu, go back to the layers/canvas menu
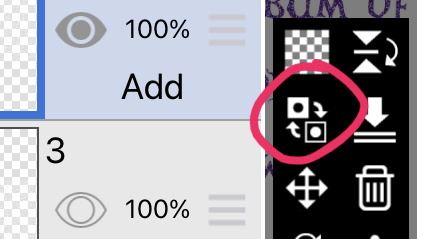
Click this little flippy button, "invert layer color" now you should have a glitter layer!! This glitter layer is going to be part of one of our frames
Now repeat the steps of making a new layer, clipping it and changing the blending mode, adding the filters, and inverting the layer color 1-2 more times to have two or three glitter layers (yes theyll be stacked on one another but that is okay for now)
Saving the frames to make a gif:
Now we have several layer, descending they should be:
2-3 glitter layers
A text layer
(And an empty base layer, just ignore it lols its just chillin, u can delete it if you want it doesnt matter)
All these layers have eye images on them. If the eye is dark the layer is visible. If its not its invisible. We are going to save every glitter layer over the text layer individually to get the frames for our gif
The text layer needs to be visible at all times during these next steps.
Turn off the visibility of all the glitter layers except the bottom one (by clicking the eye icon on the layer)
Only one should be visible while we're saving the frames
There is an arrow on the bottom bar all the way at the right
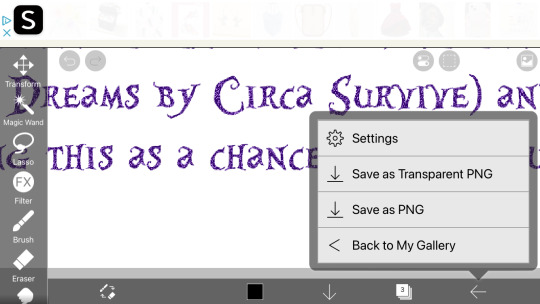
Saving as transparent png makes the background see through like the gif above, save as png makes the background white. Pick whichever, but choose the same one for all of them (if you choose transparent choose transparent for all frames)
Go back to the layer canvas menu, make the glitter layer that is currently visible invisible. Click the eye on the layer above that one to make it visible (the second glitter layer)
Repeat the saving process. If you have a third glitter frame, make glitter frame 2 invisible, glitter layer 3 visible, and save.
Part 2: making the gif itself
go to ezgif dot com. ezgif dot com is the best simple gif maker. ezgif dot com is now your best friend. hashtag not sponsored
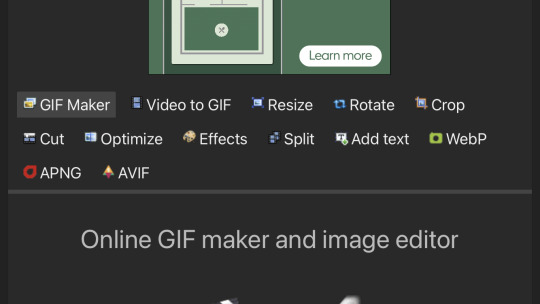
Click gif maker
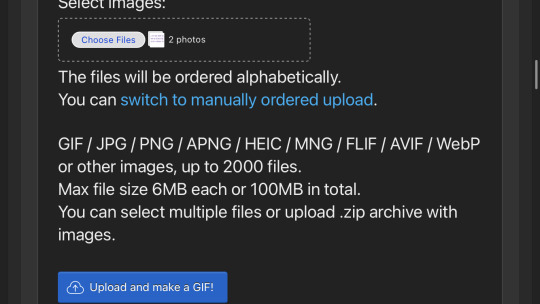
Click "choose files", "photo library", add the glitter frames you made and click add or choose whatever is at the top idr
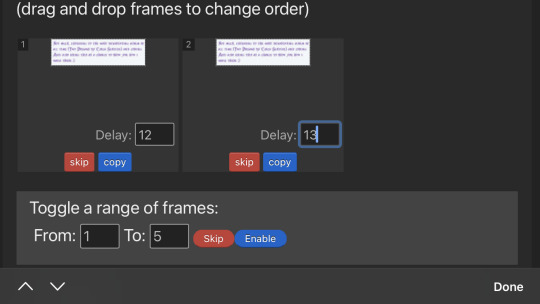
(I wound up using 3 frames not 2) where it says delay under each gif, delete the "20" and add 12 to one and 13 to the rest (the delay is how much time each frame will take in the gif, using one number thats different keeps tumblr from screwing up and accidentally converting them into videos. Idk why that happens but sometimes it does.)
Ignore all the rest of the settings, you dont need to mess with them just for lil glitter gifs and click the create button at the bottom
Now you can either click download when your gif pops up or you can long press to save it directly to your camera roll
Extra notes:
If you want your glitters to be rainbow, skip the "exact line drawing" and "invert layer color" steps
Ezgif isnt good for high quality gifs. For the gifs on my website i make the frames in ibispaint and use photopea (a free online photoshop) to make the gifs themselves. But thats more difficult to do as you cant really use photopea on mobile without a mouse and its much more complicated (so thats a separate tutorial if you ever need high quality gifs)
#If any part of this was confusing or if you need help lmk on discord im more than happy to help you ^w^#gifs#crimson answers#crimson explains#kaikaikaikaikai
3 notes
·
View notes
Photo

Digital version of one of my Melanie sketches! I really loved drawing this. Melanie is my child and I love her.
One thing I dislike about this is she looks kinda chunky? I mean I guess it’s kinda cute but her body type is average so it’s inaccurate to her design. The shadow under her Mimikyu is a bit unrealistic too, so I might alter that later.
I like how innocent she looks. Making characters have kind expressions is one of my talents. Melanie is super friendly towards Pokémon so it really suits her.
Melanie is one of my favorite OCs right now so I’ll probably be drawing her a lot. I’ve been really into Pokémon lately 😅
Character (Melanie) belongs to me. Mimikyu belongs to Pokémon/Game Freak. Art drawn by me, background image from ibispaint’s asset library. Please don’t copy or trace my artwork, but inspiration is allowed.
2 notes
·
View notes
Text
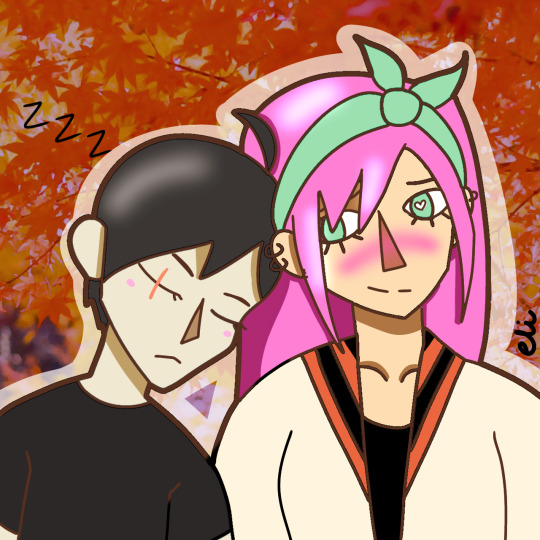
Sleepy
(Background image from the ibispaint x image library)
Headcanon: Sunny feels so safe around Aubrey, he feels so comfortable being around her that he'll just fall asleep on her at the most random times.
@writeranon69 i saw your sunburn ideas/headcanons and I wanted to contribute :)
#omori#art#artists on tumblr#teeny tiny omori spoilers#sunburn#omori sunburn#sunny omori#omori aubrey
17 notes
·
View notes
Last Seen Blogs
variipes
The Symbol.
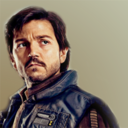
thefulcrumcaptain
Cassian Andor Appreciation Corner
marymiew
Mary.

taylorbracken-blog
Taylor Bracken