#tenkeyless
Text
truly, capri pants are the TKL of the pants world
inefficient use of space, and less attractive than either full size or compact versions
5 notes
·
View notes
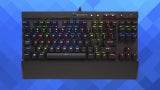
Photo

The best gaming keyboards don’t always n... https://www.xtremeservers.com/blog/the-best-tenkeyless-mechanical-gaming-keyboard-in-2024/?feed_id=134975&_unique_id=6615c3c659c11&The%20Best%20Tenkeyless%20Mechanical%20Gaming%20Keyboard%20in%202024
0 notes
Photo
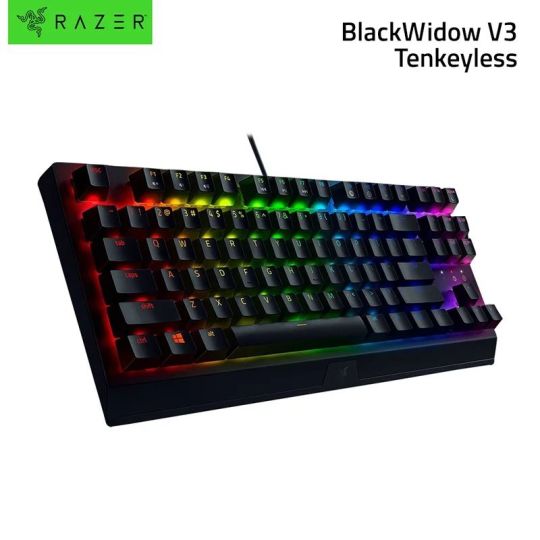
☆NOW: PhP4,195 | Cash On Delivery RAZER Blackwidow V3 Tenkeyless Chroma RGB Mechanical Gaming Keyboard ✅Brand New ✅Original 》BEFORE: PHP9,349 ➤ J&T Express Nationwide Delivery ➤ Personal Pick-Up or via Lalamove, Grab, Toktok (Cut off 2pm) Monday - Saturday 📍 Quiapo, Manila ➤ COD / GCASH / BDO ➤ 7Days Replacement, Up to 1 Year Warranty ●Product Link: https://www.yomo.ph/web/item/detail/537155863190700032?ref=636494961834983424 ●Register and use this invitation code (1031) to activate the discounted price. ■Item are subject to availability. ■Item price are subject to change without prior notice. #RAZERBlackwidowV3 #Tenkeyless #ChromaRGB #MechanicalGamingKeyboard #yomoqualitybrands (at Manila, Philippines) https://www.instagram.com/p/Cgls6QBvXsa/?igshid=NGJjMDIxMWI=
0 notes
Text
The celebrated Razer DeathStalker V2 keyboards arrive with complete revamp from previous lineup
The Razer DeathStalker V2 series, the fastest low-profile, ultra-slim optical keyboards, is optimized for top-tier gaming performance, durability, and ergonomic use.
#WinItYourWay
#RazerDeathStalkerV2
@Razer
Razer™, the leading global lifestyle brand for gamers, today announced the return of the acclaimed DeathStalker keyboard in the form of the new Razer DeathStalker V2 Pro, Razer DeathStalker V2 Pro Tenkeyless, and Razer DeathStalker V2.
The celebrated Razer DeathStalker V2 keyboards arrive with complete revamp from previous lineup

View On WordPress
#gaming keyboard#high-speed wireless technology#Razer#Razer DeathStalker V2#Razer DeathStalker V2 Pro#Razer DeathStalker V2 Pro Tenkeyless#Ultra Slim Optical Keyboards
0 notes
Note
Tell us about your boards. I touch keybosrds sometimes(don't ask me how much I own) I'm curious what you have 💕.
I'm a poor baby typist, I just have one board; tenkeyless, wired & bluetooth, blue switches cause I'm a horrible person that yearns for the typewriter's tactile-ness
I'm building up the courage and funds to build one from scratch, but for now I'm just using a keychron
13 notes
·
View notes
Text
i did something terrible.
i had a glass of ice water on my desk two days ago bc i was sick and my throat was killing me. i thought i could lean over my desk to reach my coughdrops without tipping over the glass.
i forgot i have stupid big tits. and, with those twenty or something pounds on my chest, i tipped a full glass of water directly onto my beloved mechanical keyboard. now, it is splash-proof but not entire-glass-of-water-proof.
now to understand the severity of my upset you gotta know that i LOVED that keyboard. i got it as a gift from my cousins when they gave me the computer they built for me five years ago. they spoiled me with a nice fancy keyboard. it's a mechanical, so it's super clicky and tactile, and it has lights under all the keys, and i set it to fade through the rainbow, and it's amazing to type on. most keyboards are membrane keyboards (the flatter, quieter kind) and i hate flat ones now.
if only i didn't like it so much, because it's kind of expensive and now i have to replace it 😭 i'm borrowing one from my twin rn and i hate it so much. it's full size which doesn't fit so well on my desk, and it's a membrane keyboard. i rly miss my mechanical blue switch tenkeyless led backlit redragon kumara. anyway, this is last straw. i'm getting a mastectomy.
#at least i found mine in white for a replacement. that'll look cute when i eventually get pretty keycaps#harpy overshares
8 notes
·
View notes
Text
What Are Mechanical Keyboard PCBs?
Mechanical keyboards have gained immense popularity due to their tactile feedback and durability. However, behind their satisfying keypresses lies a crucial component - the Printed Circuit Board (PCB). In this guide, we delve into the inner workings of mechanical keyboard PCBs, exploring their functions, features, and the key role they play in keyboard layouts.
The Role of a Mechanical Keyboard PCB
At its core, a mechanical keyboard PCB acts as the central nervous system of the keyboard, facilitating communication between the keys and the computer. Each key is linked to a specific switch on the PCB, and when a key is pressed, the switch sends an electrical signal to the PCB, which then translates it into a digital signal that the computer understands. This seamless interaction is what allows you to type, game, or perform any other function on your computer using your keyboard.
Features Supported by Mechanical Keyboard PCBs
Beyond basic key input, modern mechanical keyboard PCBs offer a range of advanced features that enhance the user experience. These include:
Stabilizers: Some PCBs support screw-in or clip-in stabilizers for larger keys like the spacebar and enter key. These stabilizers provide a more uniform and stable keypress.
Hot-swap Sockets: Certain PCBs come with hot-swap sockets, allowing you to easily replace switches without the need for soldering. This feature is particularly useful for users who enjoy customizing their keyboard's feel and sound.
RGB Lighting: Many mechanical keyboard PCBs support RGB lighting, allowing for customizable backlighting effects. This feature adds a vibrant and aesthetic element to your keyboard setup.
Mounting Options for Mechanical Keyboard PCBs
Mechanical keyboard PCBs can be mounted in several ways, each affecting the typing experience:
Top Mount: In this configuration, the PCB is secured to the top of the keyboard case, providing a sturdy typing platform.
Tray Mount: Tray-mounted PCBs are secured to the bottom of the keyboard case. While this mounting style is common, it can lead to uneven typing due to tension from the screws.
Gasket Mount: This mounting method involves using foam pieces between the PCB and plate. It provides a cushioned typing experience, reducing typing fatigue.
Keyboard Layout Support
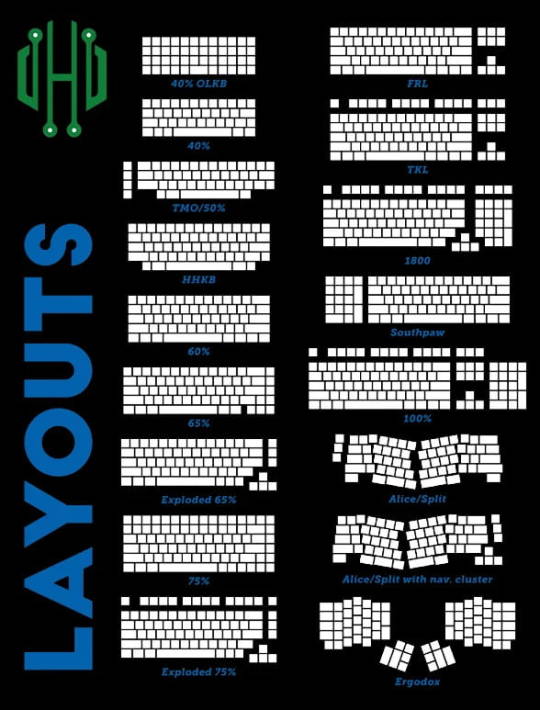
One of the most appealing aspects of mechanical keyboard PCBs is their flexibility in supporting various layouts. Common layouts include:
60%
65%
75%
TKL (Tenkeyless)
100%
These layouts vary in size and key configuration, catering to different user preferences. Moreover, enthusiasts can design and create their own PCBs using online PCB makers, allowing for limitless customization possibilities.
Conclusion
In conclusion, mechanical keyboard PCBs are the backbone of any keyboard build, dictating its functionality and layout. Understanding the role and features of a PCB is crucial for anyone looking to build or customize their mechanical keyboard. By familiarizing yourself with the intricacies of mechanical keyboard PCBs, you can create a personalized typing experience that suits your preferences and style.
3 notes
·
View notes
Text
to hell with minimalism and desk space and "tenkeyless" or even more cut down keyboards. i want a mechanical keyboard that has a bunch of buttons at the top like late 90s/early 2000s "multimedia" keyboards did. i want to be able to change my volume and pause my music with little buttons at the top of my keyboard again
7 notes
·
View notes
Text
epomaker mini cat 64 build talk
ok i guess a couple people said theyd be interested so let's talk to most recent custom i did, for my friend @jowritesfantasy, of an epomaker mini cat 64.

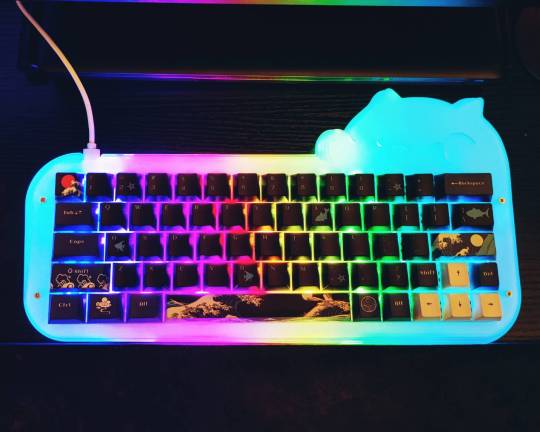
the final build is an epomaker mini cat 64, with kailh box white v2 switches, and a great wave off of kanagawa (dark) cherry profile keycap set. total cost for what is essentially a full (budget) custom build is about $150USD without tax (off of bezoshell).
note: i am a vision-impaired hobbyist with shitty, shaky hands. i am by far not an expert. this is literally just "all the crap i've had to figure out from the ground up as a basic guide". there are more comprehensive references out there, and build guide videos for most custom kits, and do more research, not less, before building. nothing here is gospel and many people do it differently.
anyway, let's talk turkey.
BASIC GLOSSARY:
keyboard: the whole shebang. case, pcb, switch, caps, everything. the thing you type on.
case: the acrylic/aluminium/ceramic/whatever body that the pcb, switches, and keys live in.
pcb: the brain of the keyboard. you can have one where the switches must be soldered in, or you can have one where the switches can be hot swapped, which means you can change them out without any need to use a soldering iron. pcbs can be bought separately from cases.
group buy: when a bunch of people buy in to get a custom keyboard made by pooling resources up front.
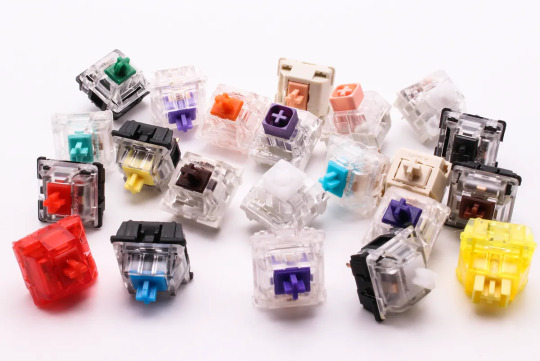
switch: the mechanical switch that you solder or hot swap into a pcb to make the button press. there are thre (standard) types: linear, tactile, and clicky. switches work just fine without lubing. this is optional.
stabilizers/stabs: the support stabilizers for your wider keys that help keep them steady and don't let them wobble. there are two standard types—pcb mounted (screw-in, usually) and plate-mounted (click-in). please lube your stabs. krytox 205g0 is good. otherwise trust me, they will rattle. oh, god, will they fucking rattle.
keycaps: the thingy that goes on top of the switch that you actually press. they come in about a million profiles and in every possible permutation or color you can think of. if they're cherry/mx stem, they'll be compatible with most modern mechanical keyboard switches on the market.
QMK/VIA: software that lets you change what buttons on your keyboard do what.
keyboard %/keyboard #: how many keys are on the keyboard. the 64 mini cat has...64 keys. a 78ish key is the full f-row and most standard laptop keyboards. TKL is tenkeyless, or no numpad. 100%/180 is the entire keyboard, numpad and all. 40% is babymode aka "you like layers? i'll give you layers". each board has its use, everyone has their preferences.
ergo: a keyboard designed to be more ergonomic. ergo boards have different layouts and spacing and height. some are split, some aren't, these days one of the more standard ergo layouts is the alice/arisu. it's nice. i recommend it. (my custom is an alice)
custom: you build it, you decide everything you want on it, you buy all that shit, and you put it together.
prebuilt: open box, plug and play.
from the getgo, while epomaker does offer this for sale ready to plug and play, i knew we would not be buying this premade (both because i wanted to build it, the whole point was i wanted to build it and jo wanted it) and also, epomaker didn't offer clicky switches. jo's previous board had cherry/gateron (not clear which? one or the other) blues, which are the "standard" clicky switch: they're 65g actuation, they click, and there are better options. (note: this blog is a cherry mx hatezone. sorry.) i also knew that i was going to have to get a bit creative with VIA layers because jo works on spreadsheets and this is a 64 key board—no numpad. you kinda need a numpad for spreadsheets.
i didn't know much about clicky keys before this (i personally have sad shitty little goobaby hands that can barely even handle 43g linear switches and most people i know use tactiles), so i had to do a bit of research. you can hear (cherry only) sound profiles and comparison here, and this gives you a pretty standard idea of what mechanical switches sound like.
linear keys tend to be the lightest actuation, since they're for gaming most of the time; tactiles are all over the place and have the most options since theyre the most popular; clicky tend to be a little heavier overall. the "actuation" force in grams is how much pressure it takes to make a keypress go through, the "bottom out" is how much it takes to make the key hit the bottom of its arc. tactiles and clicky keys both make sounds/have texture bumps when the actuation of the key happens; linears you just push.
a short list selection:
cherry mx blue (the "standard" click): 60g actuation, 60g bottom out.
gateron blues (the original clone of the standard): 55g actuation.
cherry mx green/gateron green: 80g actuation, 90g bottom out
kailh box white v2: 45g actuation, 55g bottom out. (note: this is the same actuation/bottom out as the v1; the v2 has increased stability and stronger springs)
we ended up picking the kailh box white v2s because of comparative sound testing, the revision being even sturdier than the original box whites, they were on sale when we bought them and came in a closer to 64 switch pack, and they're about 65¢ a switch. not bad, all things considered. they're lighter than the standard mx blue, have a brighter, springier sound (even unlubed) and the "box" around the stem of the switch makes the connection between switch and keycap more reliable, which is a problem that happened to jo's old keyboard (the stem housing of the keycap broke; there's basically no way to get a replacement without shelling out a good bit of cash for an entire set, the box should help prevent that in the future).
the next thing was keycaps—you can do research about keycap profiles until the cows come home, but there's basically two types. "flat" keycaps are interchangeable per row (so work great if you aren't using a qwerty layout or you don't have a standard layout keyboard), "differentiated" have different heights per row (so work great if you have a hard time finding the right keys or are using a condensed keyboard model where you might get lost in the sauce if everything is the same).
the most common profile is cherry—if you want to find something super fun keycaps-wise, cherry is probably what you'll end up with. every keycap profile presents a slightly different sound because of how the plastic housing handles the noise of the switch (sa has more hollow thock; xda has a little more rumble because it's flat; cherry is a little snappier). frankly, imo, the texture/shape of the key is more the question to keep in mind (as well as the type of plastic they're made with—pbt is much, much more reliable). jo wanted dark wave with whale, we found dark wave with whale, it was cherry profile. success.
(note: knockoff keycaps can be a mixed bag—they use different fonts, the stems can be less reliable, even if they are doubleshot (two different kinds of plastic, layered on top of each other for more stability) and pbt. however, they're a lot more affordable. i like having more keycaps. im also cheap. that said, groupbuy or direct from source keycaps are also rad as hell. it's your call)
the epomaker mini cat is a hot-swap board, which means all that the switches had to do was to be popped into their housing. when popping switches into hotswap, always test the pcb beforehand. always. if you fuck up the pcb during switch installation, that is what it is, and you want to know if there's a problem before that happens. (shit can get weird. trust me. my custom pcb is currently getting replaced because of a freak usb-c daughterboard soldering incident that basically cannot be fixed, and everything worked fine in testing... but it's uncommon).
to build this board, i took it in a series of steps:
1: disassemble the entire board, flip the pcb (the "brain" of the keyboard) over, and manually test all the keys with a keyboard tester website and a paperclip. to test the diodes, you want to put your paperclip/tweezers/whatever into the outsides of the diode, not directly into the slot where your switch pins will go

you shouldn't need to shove. just set them there. your key tester should click, light up, or, if you're me, say "josh"
2: once i knew the pcb was good, it was time to disassembe the plate and the stabs. the stabs that came with the mini-cat 64 were plate-mounted and came unlubed, so i clicked them out with my tiny screwdriver, took them apart, and lubed them. if i had a buck for every stabilizer build and lube guide that actually refused to show the parts of a stabilizer, i'd have a lot of bucks, so here's some photos from me. these are akko transparent pink pcb-mounted, screw-in stabilizers. my hands are shaky as fuck so i apologize for any blurriness.

there are three basic components to the stabilizer—the bar, and the two-part housing. when you take a stabilizer apart, whether or not it's screw-in or clip-in, the bar clips and unclips, and the housing works the same.
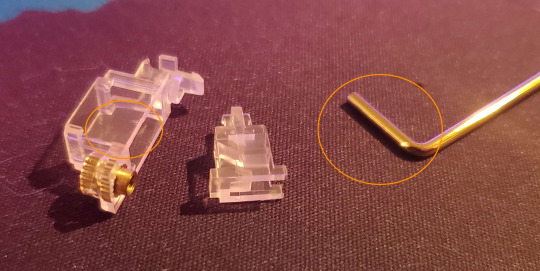
less lube is always better (you can always add more): when lubing stabs, you want to lube the inside of the larger housing on the two wider portions and the back, where the smaller portion is levered up and down and will hit the plastic, and the part of the bar that goes into it. this is all the stuff that will click and clack if it touches each other.
sorry this is a transparent stab so it's kind of hard to see, but when reassembling your stabilizers, the smaller piece will have one side with two holes, and one side with one hole. two holes goes in the front. business in the front, party in the back, whatever. you can see here where the clicky space thing that you click the stabilizer bar into.

i apologize for my shaky ass hands. sorry. the realy nice thing about transparent stabs, otoh, is you can see where the actual bar goes—it goes into the bottom of the two holes, so that the interior part of the housing is lifted up and down when the bar moves. that's it! click it in once it's in the right hole, you're done.
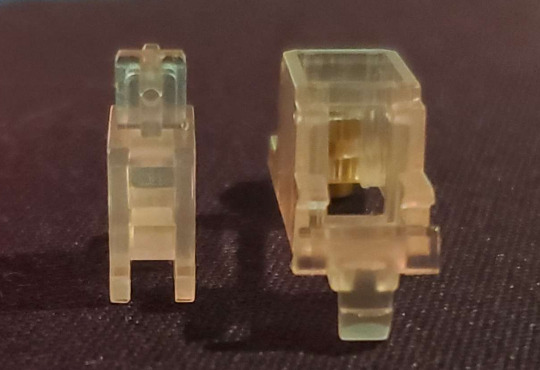
3: it is time to Insert the Switch. most switches tend to be plate-mounted. the "plate" is the part of the case that goes above the pcb, and is what aligns (and holds in) the switches, so that they land in the right spot. here's an example of a pcb and a plate

the plate fits on over the stabs, and then you have your "alignment" for your switches in place. now you know where your switches go, it's time to stick them in. the smaller, metal holes on each switch location are where the pins go—this is a "south facing" rgb pcb, meaning the pins go in up top, with the smd led (the little per-switch light) facing toward, not away from, the user. north-facing switches are more common. (for anyone curious, this is a mechloving adelais en ciel rv3 pcb, akko transparent pink screw-in stabs, and a switchcouture aluminium plate)
take your switch, align your pins, push in the side with the pins first to be sure they go into their sockets straight, and then push them the rest of the way in to click. hot swap sockets can be finnicky and a little fragile, so when installing switches into a hot swap pcb, you want to push straight down into something below—i.e., take the back off of the case and put the pcb flat on a soft, but sturdy, surface, like a deskmat. then click them in.
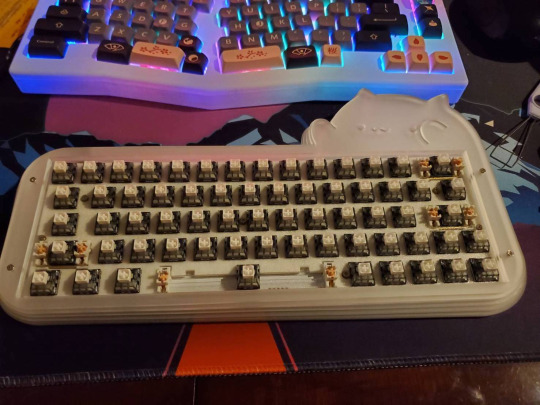
and now you've got a keyboard! time for the fun part. put those keycaps on and give it a test.
well, now you have a working keyboard. except for one small issue... the person using this keyboard needs a numpad! okay, so that means that you need to get CREATIVE.
all our keyboards have some level of "layer mapping"—shift + a = A. that's a layer, becuse it changes the key input. on my keyboard, because i use a mac with the extended international keyboard, alt + a = ¯. that's another layer. most people are more familiar with fn + 1 = f1. that's a layer.
for this keyboard, since jo needed a numpad, the way to do that is to make use of it being via compatible and to build that in as a layer. via is a great program (wish it worked with firefox!) in that it's as close to plug and play as you can really get for something like this. it's all overlay, you just click what you need. i am stupidbad at tech, and i can figure it out. let's take a look at the layers that are mapped into this keyboard:


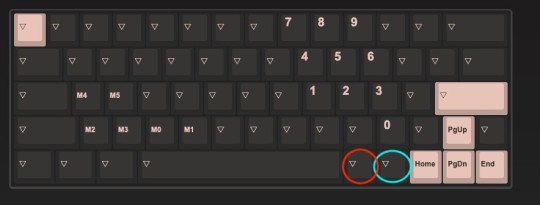
here we have layer 0 (the "home" layer, what the keyboard's base state is), layer 1 (the "modifier" layer), and layer 2 (the "spreadsheet") layer. i made a few changes after i took these screenshots pgup/dwn/home/end are on the modifier layer now and not just the spreadhseet layer), but this is pretty much the final version. in via, the upside-down triangle means that the button naturally defers down to the layer below it. this means, on all layers, the red circle is always the fn/modifier button. if you're on the spreadsheet layer and press fn+1, it will be f1, because that button is always fn.
the "modifier" layer came baked into the keyboard, since that's the way that the function row buttons/the keyboard light adjustment works. all i added was the blue "toggle" layer button, which, when pressed with the fn button, turns the spreadsheet layer on.
even more simply, if you push fn+ralt, it makes the keyboard be for spreadsheets.
on the spreadsheet layer, the right-hand side of the keyboard becomes a numpad, the arrows automatically work as up/down/home/end, and, most importantly, a/s/z/x/c/v are all macros. what those look like, in the via programming, is {KC_LCTL,KC_C} (that's "ctrl+c" as one button press), with the KC_[] changed out for the key you're swapping in as a shortcut. when on the spreadsheet layer, pressing "z" is the same as "ctrl/cmd+z" normally is—only now you only have to hit the button once. that's true for that entire set of macros. so, if you need to save? hit s. if you need to select all? hit a. if you need to cut? hit x. paste? hit v. there's no need to push ctrl at the same time—that's baked into the keys.
you can do this with any keyboard that is qmk/via compatible, by the way. it's fucking amazing. if you work on spreadsheets all the time? awesome. now you can numberpunch one-handed, and copy/paste/undo with the other, no need to use multiple keys.
the macro building and layering on via for this keyboard was waaaay better than what i did on my wife 1.0 (sorry, wife 1.0) and i'll be using the same setup on wife 2.0 (whenver wife 2.0 gets here). overall, this is honestly a really affordable custom board with a lot of adjustment options built in. it was a ton of fun to build, really simple and straightforward in terms of setup, and it's got bongocat on it.
also honestly if i had to get clickies, i'd do the box whites. they're really nice and dont make my fingers feel like they're about to break when typing.
#keycaps are for eating#next time whenever wife 2.0 comes in the mail i'll talk about all-custom builds i guess and more advanced via stuff#and keycap changing in and out#and what kind of screwdrivers you want#uh. and also aviator cables maybe i guess.
18 notes
·
View notes
Note
your nails look fantastic!!
but tbh i'm kinda more intrigued by the keyboard in the background? I didn't expect you to be like a fancy keyboard nerd?
but the nails are really great! just less surprising to me because i'd seen you do nail witchcraftery before already lol
thank you!! they are so much fun to do lolol and i am Slowly getting better at not like, trapping hair in the gel lolol
re: keyboards LOL i would not say i have risen to the level of Keyboard Nerd (as in person who knows the lingo and has opinions on it), but i definitely have Keybord Preferences. Like i'm at the level where i know there's stuff that i don't know, you know?
the keyboard in the bg of the nail photo is the Glorious Gaming GMMK 1 which i was previously using for my personal pc! but after munting the second wireless dongle for my work keyboard i finally decided to give up on wireless keyboards for my work station because the laptop travels fro my home work station to like, actual work with me and i keep kinda dropping the it places and fucking up the dongle. which then renders the whole keyboard + mouse combo useless! so now i have this wired keyboard that plugs into my work station and nothing that plugs into work laptop
the only customisation i did for this one was switching out the keycaps from plain white to the ones u can see below. the GMMK1 has some like, minor customisation software available, but it mostly only affects the LEDs in the bg. i REALLY like the sound it makes tho, it's very satisfyingly clicky without being too obnoxiously loud

and then for my personal pc i am using the Glorious Gaming GMMK2, because i liked the v1 enough that i could not be bothered to do further research on other brands. i ended up 'building' this one, insofar as 'building' means 'i purchased all the parts separately because they were on sale and cheaper to buy separately than it was to buy the whole keyboard pre-built', but there are like. three parts. keyboard base, switches, keycaps. it's more like putting together simply 3d puzzle than building anything.
i don't actually know much about switches - the ones i got for the GMMK2 were chosen solely because i needed a new keyboard and these were the cheapest available on the website i was buying them from. they are less clacky than the ones on the GMMK1, which i dont like as much, but they have a little more resistance when u press them, which i do like!
i also prefer the full layout on the GMMK1 with space in between the numpad and arrows and stuff. the GMMK2 is a 96% layout, wehich is like,,,fine, in that it has all of the buttons i prefer to press, but i don't like how cramped it was. unfortunately, the GMMK2 only comes in 96% or Tenkeyless (without the numpad) form, and bc i live in NZ and am very impatient, i could not be bothered doing further work to find a Perfect solution when i wanted to get the keyboard together like, That Day LOL.
the thing that IS very cool about the GMMK2 is that it has the level of keybinding customisation that i wanted, so i have been able to map some specific keys that i wanted but can't do on the 1.

i realise that this is a long post for a bitch who claimed she wasnt a keyboard nerd but like. idk what a macro is and can't imagine having a use for one u know, like there are things mx GMMK2 is capable of that i do not understand and don't have a call for. the Real Nerds are out there, and they have opinions on whether or not your switches need to be Lubed.
#does this count as#femme shit#sometimes it's just very important to you that your keyboards fit your vibes#it's also important to note tht both of these desks are kind of fucked#because they're where i also do my nails LOL#the pink keyboard is stationed directly over some kind of nail chemical stain#that i dont actually understand how it was made
5 notes
·
View notes
Text
Про механические клавиатуры
Посетила меня очередная навязчивая идея попробовать механическую клавиатуру. Мне уже лет 10 служит верой и правдой мембранка Logitech k270, и в общем то у меня нет к ней претензий, но я вдруг подумал, а если я что-то упускаю в этой жизни?
Для справки, любая обычная т.н. мембранная клавиатура внутри имеет силиконовый коврик с пупырками (мембранами). Под ними находятся контакты. Когда мы нажимаем пластиковую клавишу, пупырка продавливается и замыкает контакты.
Переключатели
В механических клавиатурах под каждой кнопкой находится отдельный свич — маленький переключатель. В зависимости от его устройства нажатия на клавиши звучат и тактильно воспринимаются оооочень сильно по-разному.
Проблема в том, что разных типов свичей на данный момент существует более 150 видов. Абсолютно бесшумные и громко щелкающие, линейные и тактильные, с разной силой нажатия. А ещё бывают все вышеперечисленные и при этом оптические.
Понять, какие именно свичи нужны именно вам по статьям в интернете или по видео совершенно невозможно. Чтобы их выбрать надо:
попросить кого-то у кого уже есть клавиатура их попробовать,
поехать в места их продажи, шоурумы и т.д. и перетыкать там всё, что можно и нельзя
либо купить на али тестер, который сам по себе стоит немало.
Когда я ездил в шоурум думал об одной паре вариантов, а выбрал совершенно другие.

Дальше, если вам повезло влюбиться в какие-нибудь стандартные Cherry Brown, то просто берёте клавиатуру нужного размера с ними «из коробки» и радуетесь жизни. А если вы такие как я и не можете выбрать между редкими Kalih Novelkeys X Bluberry и дорогущими Zeal PC Zilents V2, то готовьтесь к тому что придётся докупать и паять либо заказывать в мастерской замену, что в любом случае плюс 5-20 тысяч сверху к стоимости самой клавиатуры.
Типоразмер
Дальше надо определиться с размером, точнее с тем, какое количество клавиш вам надо. Они идут на уменьшение, сначала убирается нумпад, потом стрелки и кнопки insert, home и т.д. потом клавиши f1-f12 и так до бесконечности. Чем меньше остается клавиш, тем больше их отсутствие компенсируется хоткеями, когда одна клавиша имеет разные значения в зависимости от зажатой Fn или более сложных комбинаций.
Мне вот нумпад совершенно не нужен, а всё остальное нужно, и я не хочу учить сокращения, поэтому я для себя выбрал размер 80% или TKL (Tenkeyless).
Кейкапы, стабилизаторы, шумоизоляция
Кейкапы это собственно клавиши, те самые пластиковые кнопки с цифрами и буквами (или без них). Они отличаются материалом пластика, шершавостью поверхности и способом нанесения раскладки. Ну и цветами до кучи. Самые трушные делаются по технологии double-shot, это когда клавиша сплавляется их двух контрастных цветов пластика, один для корпуса, а второй, проступающий сквозь первый для символа. Такие клавиши не стираются никогда. Но проблема в том, что если вы не владеете слепым методом печати, то найти их с кириллицей ооочень большая проблема. Все остальное - краска, гравировка и т.д. не так надёжно.
Стабилизаторы это такие штуки, которые не позволяют люфтить и дребезжать, как старые, жигули длинным кнопкам типа шифта и пробела. Они тоже бывают разные и прост�� поверьте мне, что лучше с ними, чем без них.
Шумоизоляция бывает разная. Начиная от поролоновых вставок в корпусе клавиатуры, заканчивая такими в каждой клавише. Еще есть всякие резиновые прокладочки, кольца и т.д. С ней тоже приятнее, чем без неё.
Подключение, софт и прочее
Если вы думали, что это всё, то нет. Клавиатуры бывают проводные и беспроводные, с подсветкой и без, а ещё, если ��на малоразмерная, то вероятно может потребоваться специальный софт, чтобы подсветка и/или шорткаты работали правильно.
И вообще продолжать этот пост я могу бесконечно, но всё равно никто не будет читать. Поэтому коротко: если вы так же как я задумаетесь о таком приобретении, то езжайте в шоурум трогать, пока до дыр не затрогаете, прежде чем даже начать думать о том, чтобы заказывать что-то конкретное.
А я тем временем жду зарплату…
35 notes
·
View notes
Photo
The best gaming keyboards don’t always n... https://www.xtremeservers.com/blog/the-best-tenkeyless-mechanical-gaming-keyboard-in-2024/?feed_id=133124&_unique_id=660ae9406574d&The%20Best%20Tenkeyless%20Mechanical%20Gaming%20Keyboard%20in%202024
0 notes
Text
these newfangled tenkeyless keyboards (or w/e they're called) drive me nuts. how do you expect me to use the computer without scroll lock. where the fuck is the sysreq key.
11 notes
·
View notes
Text
I wish a bitch like me coud get by with tenkeyless but i love roguelikes too much. Please forgive me
3 notes
·
View notes
Text
another fun little note on my mechanical keyboard shopping/research
the specific size/layout i’m looking at is called TKL (TenKeyLess, basically a full keyboard minus the numpad)
but my muscle memory keeps making me type TLK (The Lion King)
2 notes
·
View notes
Last Seen Blogs

immunobiz
Sans titre

lostfairy
the place where my demons speak

bluelightconstructs
Kristy's ancient art blog

sunfish999
kyaa~

ariariari-freehounreal
Half life