#smart parts exports
Text
1884111051: Orijinal Hyundai Bujilerini Çevrimiçi Satın Alın
1884111051 Hyundai Bujileri, tanınmış bir otomotiv parçaları tedarikçisi olan Smart Parts Exports'un birinci sınıf bir teklifidir. Bu bujiler, Hyundai araçları için özel olarak tasarlanmıştır ve kusursuz bir uyum ve optimum performans sağlayacak şekilde üreticinin spesifikasyonlarını karşılayacak şekilde tasarlanmıştır.
Smart Parts Exports, birinci sınıf otomotiv bileşenleri sunma konusunda itibar kazanmıştır. Kalite ve performansa bağlılıkla 1884111051 bujileri, Hyundai'nizin motor performansını artırmak için güvenilir bir çözüm sunar.
0 notes
Text
12290RB0J11: Honda Spark Plug, PLUG SPARK DIFR6D13
The Genuine Honda OEM spare parts are sold by Smart Parts Exports. The genuine SPARK PLUG DIFR6D13(Ir TYPE 100K KM CHANGE PERIOD)-12290RB0J11 will be delivered to you at the best price.
Visit us at: https://www.smartpartsexports.com/brand/oem-brands/honda-spare-parts/spark-plug-difr6d13-ir-type-100k-km-change-period-

0 notes
Link
Smart Parts Exports is a leading exporter of genuine and aftermarket Bajaj spare parts, serving customers around the world. Our selection includes 3 wheeler spares, 2 wheeler parts, as well as authentic Bajaj parts that meet international safety standards. With years of experience under our belt, our company continues to excel at all over the world.
#Bajaj spare parts#Bajaj genuine parts#bajaj genuine spare parts#Bajaj parts exporter#Bajaj parts online#smart parts exports
0 notes
Link
Smart Parts Exports has a wide range of Tata spare parts like Tata OEM, Tata genuine parts ( Original Parts) or Aftermarket Parts. Select your car to begin comparing between parts and choosing the best value spare part for your car. Smart Parts Exports is the largest genuine Tata spare parts exporter India.
0 notes
Text
Hyundai genuine parts
Smart parts exports is the largest exporter of hyundai genuine parts. Hyundai parts specially designed for delivering great performance and longevity to hyundai cars. hyundai genuine parts are tested under various conditions to ensure the quality , reliability and durability. we ensure to every customer that we export 100% genuine spare for all the hyundai vehicles. the smart parts exports are dealing in more than 80 countries across the world.
0 notes
Text

ANIMATED TEXT TUTORIAL: ★★✩✩✩
Difficulty: Beginner/Intermediate
This is a step by step tutorial on how I did the text for my Pink Venom swinging text.
We are going to be making this text:
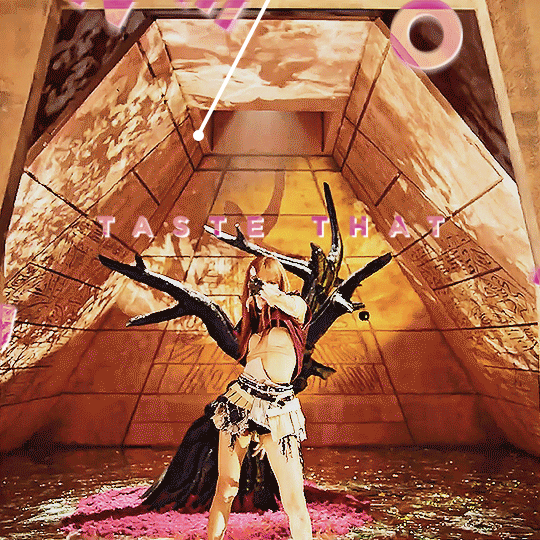
Before I start, you WILL need Adobe After Effects, but I will show you step by step how to achieve this.
Tutorial below the cut!
✔ Step One: Composition
Open After Effects and create a new project, then a new composition making sure the composition matches your gif settings.
(ex: 540 x 540, 2 seconds, 30 fps)


✔ Step Two: Creating Our Text
Add a new text layer. It should be the same as Photoshop, you can just select the text tool and write what you want.
Customize the text to say what you want and change the font and size to your liking.


We should have something like this:

✔ Step Three: Adding Our Animation
There should be a box that says "Effects & Presets", in that box you can search for effects. Search for "Explosion".
It will be under Text > Miscellaneous.

Select the first one and you can either drag it on top of your text layer or just double click it with your text layer selected.
Sliding the time, we should have something that looks like this:

✔ Step Four: Adjusting the Animation
With your text layer still selected, press "U" on your keyboard. This will open our key frames for the animation.

It's a lot to look at but don't worry, we will only be focused on Amount and Opacity, and I will make this as easy as possible for you.
On the Opacity setting, click on the little time clock. This will remove the keyframes. Make sure your opacity is set to 100%.

Next we are going to adjust the amount so that it explodes INWARD instead of OUTWARD.
Find a good spot where the letters are out and add a new keyframe the same way you would on Photoshop.
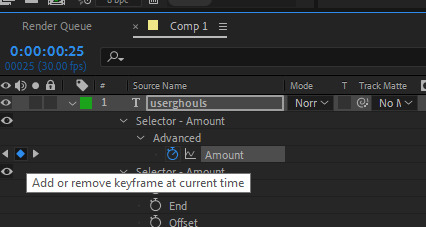
Now swap the two keyframes so the explosion animation is reversed.
Next we are going to remove the scale keyframes.
Click on the second stop watch for the second amount parameter, and make sure that one is set to zero.

We should be left with only ONE thing that is keyframed. And the keyframes should look like an hourglass.

You can stop now and leave it or we can make it a little smoother and more fun looking.
✔ Step Five: Editing the Graph & Adding Motion Blur
To add a motion blur to our text, we just need to select the three little circle stack on our text layer. Also double check that the same symbol is highlighted blue up top.

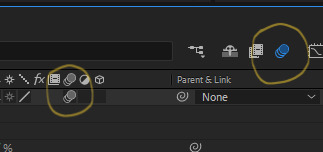
Now we have motion blur.
Next we are going to adjust the graph. To open the graph select the little graph icon and then select our keyframed buy clicking on the amount parameter.


Now our graph should look like this:
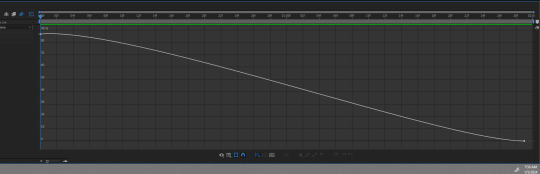
Select one of the dots and two little arms should pop up and we can drag those around to adjust the graph (the speed of our animation).
Adjust to your liking, but to make it look like the text in the tutorial, my graph looks like this:
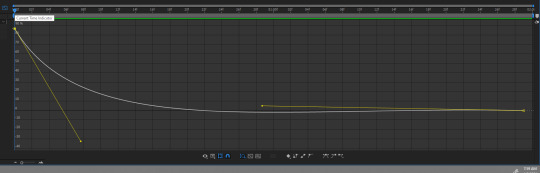
With my graph, the animation looks like this:

Now all the hard work is done!
✔ Step Six: Exporting
Now to export our video so it can be turned into a gif:
Go to File > Export > Add to Render Queue

We should be at a menu like this:
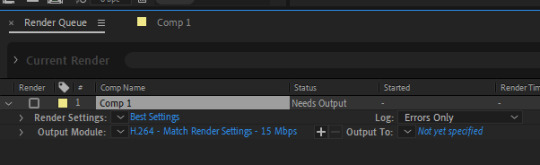
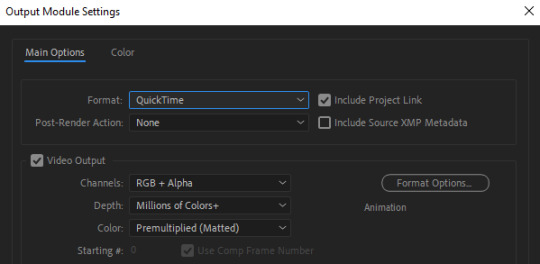
Click on the part that is blue next to "Output Module" and another box should pop up.
For format: change to "Quicktime"
For Video Output > Channels: select "RBG + Alpha"
(this will ensure our background is transparent)
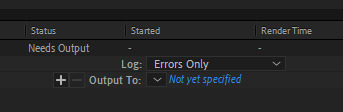
Select "OK" and then under "Output to" select where you want the video to save.
Now all you have to do is Render.
Once that finishes, YOU'RE ALL DONE!
Import video to frames as you usually would in Photoshop, just don't change the frame delay.
Treat it like a normal text layer/smart object.
As usual, you can play around with all the animation settings to get the look you want, this is just the basics for the main animation.
It looks like a lot but the difficulty is minor once you get the hang of the steps.
Any questions you have during the process just DM me! ★
109 notes
·
View notes
Text
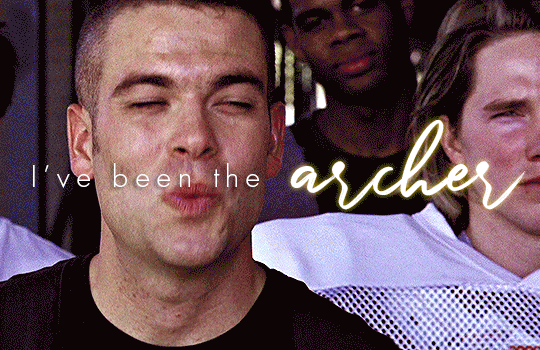
How To Gif: Glass Shatter Effect
By popular demand (ie, 7 people who voted in this poll), here is a tutorial on how to do the glass shatter effect I used to create the first gif in this set.
I use Photoshop CC 2015 (yes I know it's old) for my gifmaking, but you should be able to apply everything to newer versions of Photoshop. For this tutorial I'll be assuming you know the gifmaking basics, but if not, I would recommend this tutorial, which is the process I use to make gifs. Note that this particular process involves saving all of the frames, importing those frames into Photoshop, and then using an action to convert to a smart object.
Keep reading below the cut to learn how to do this effect!
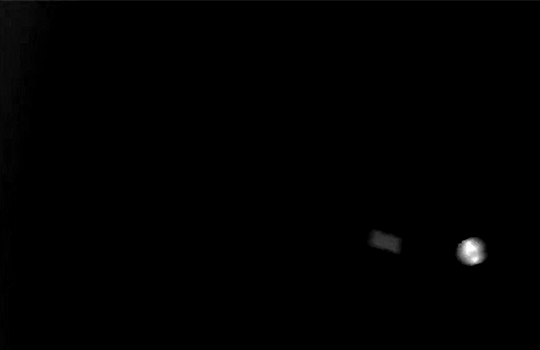
Before I could start making this gif, I needed three things; the two scenes that I wanted to use, and a video of the glass shattering effect. I already knew the scenes I wanted, so then I took to YouTube to find a video which I can't for the life of me find again, but it looked like this:
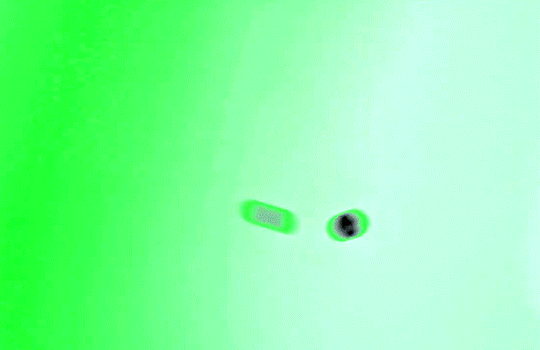
Something like this is what you want. Ideally the green part would be entirely white, but as long as there are two clearly different colours you can usually work with it.
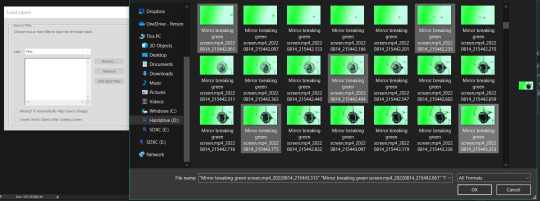
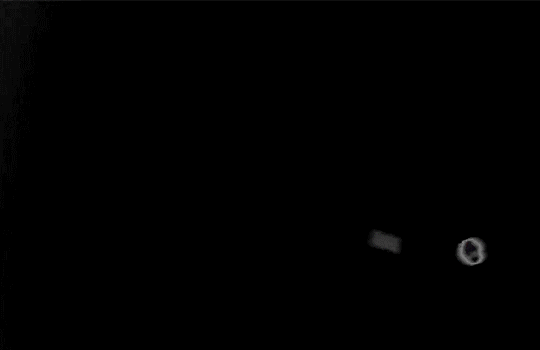
This looks a lot slower than the gif that I made, but that's not because of the frame rate - which is exactly the same above as in the final gif - it's just because there are extra frames in this slower one that I cut out. In the video I used, the glass shattering happened very slowly. I didn't want that, so I ended up skipping several frames when I loaded the frames into Photoshop before using my gifmaking action. I just did this by manually selecting one frame, skipping the next several before selecting another frame, and repeating this until I had selected 60 frames.
After using my gif action, I had a smart object of the glass shatter effect that looked like this:
That's a much better speed! It still wasn't quite where I needed it to be though. I needed this in black and white, so I slapped a hue/saturation adjustment on the smart object and set the saturation all the way down to -100.

Okay great, I could start putting the gif together now.
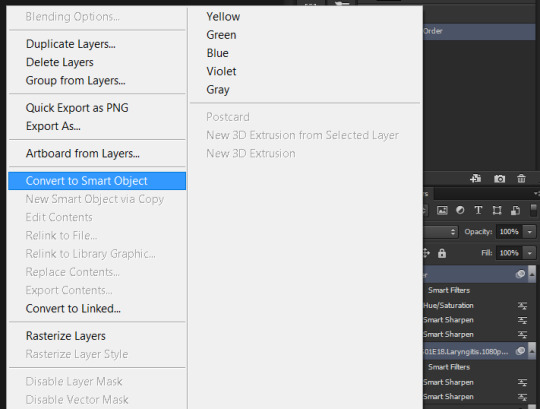
First, I made a copy of the glass shatter smart object, because I'll need that later. Then, I pulled in frames from the scene that I wanted to appear in the hole after the glass shatters, and I used those to create a new smart object with my gif action (we'll call it Scene-bg). I pulled Scene-bg into the same window as the glass shatter objects. Then I created a new smart object by combining one of the glass shatter objects with Scene-bg, which I did by selecting both layers right clicking, and selecting "Convert to Smart Object".
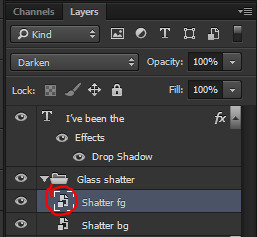
I renamed this smart object to Shatter-fg. I opened it by clicking on the little icon next to the layer name in the layers window here:
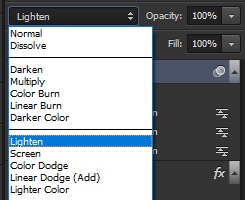
The most important thing here is that the shatter effect object should be the top layer, and I set the mode to "lighten". This will make sure that the lightest colour of either this layer and the layer behind it is displayed; that means that anywhere that's white in our shatter animation will still show up, but anywhere that's black we'll see what's in the layer(s) behind it.
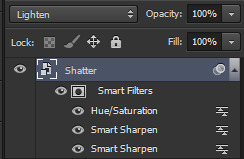
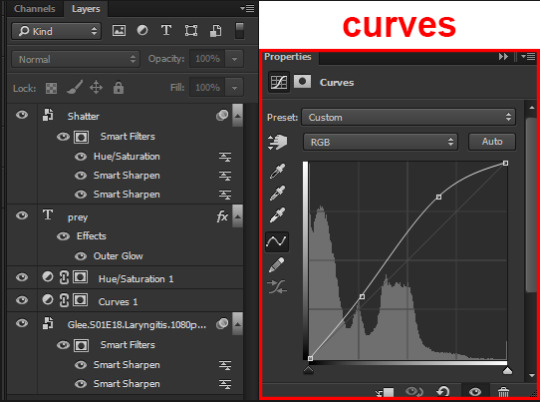
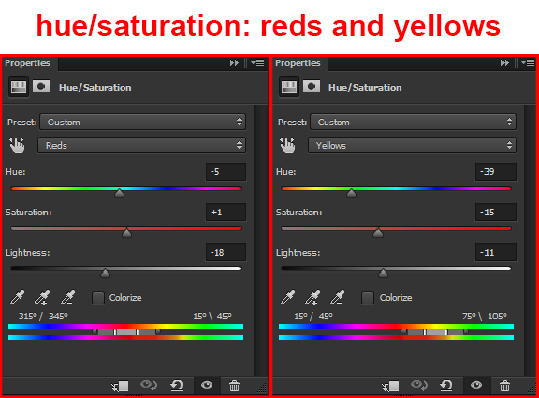
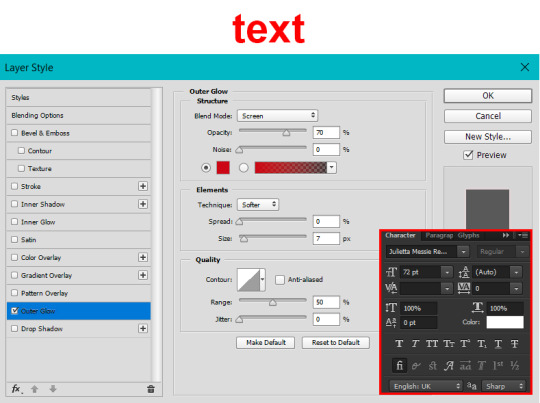
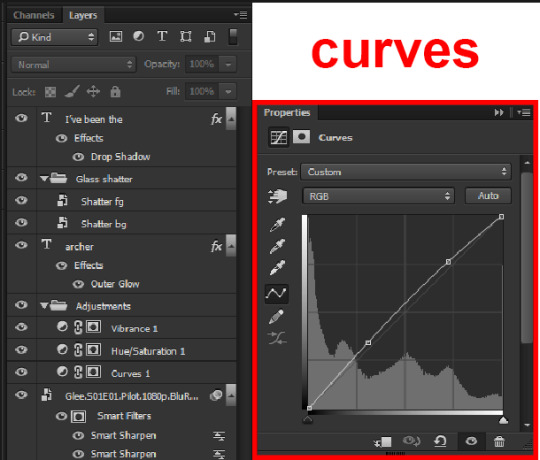
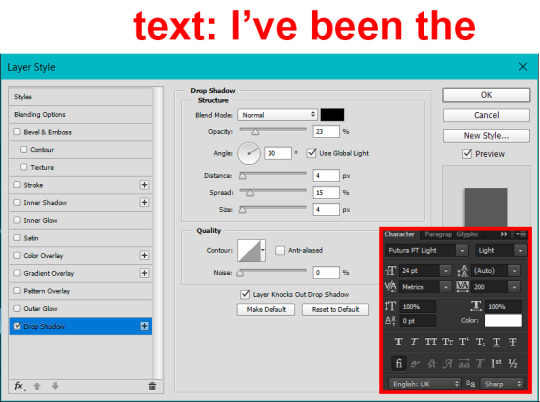
Then I threw some adjustment layers between them to get the colouring I wanted. I used a curves layer, a hue/saturation layer, and I also added text with an outer glow layer effect. Here's what the layer order looked like and the settings I used for each layer:
After this process, Shatter-fg looked like this:

Okay nice, this is starting to look like something! I saved this and went back to the main file with the other glass shatter object.
I needed to invert that other glass shatter object. There's a weird quirk with the version of Photoshop that I use where it doesn't like it when I apply specifically an invert adjustment to a smart object (it appears correctly when editing, but not on export) so I did this by creating a new smart object which included a separate invert layer, but if you have a newer version of Photoshop you can probably just apply the invert adjustment directly. Just note that you'll need to do one of these options; it won't work if you add a separate adjustment layer in the main file, it needs to be applied specifically to the smart object (which we'll now be calling Shatter-bg). It looked like this after I inverted it:
Once that's done, I made sure Shatter-fg was the layer directly above Shatter-bg, and set the mode of Shatter-fg to "darken" and Shatter-bg to "lighten". Since Shatter-fg is set to darken, it will be visible only when it is darker than the layer behind it. By setting Shatter-bg to lighten, I've guaranteed that the layer behind it will always be lighter (ie, white) in the places we want Shatter-fg to be visible, and will be black otherwise. Once I update those settings, this is what the gif looked like:
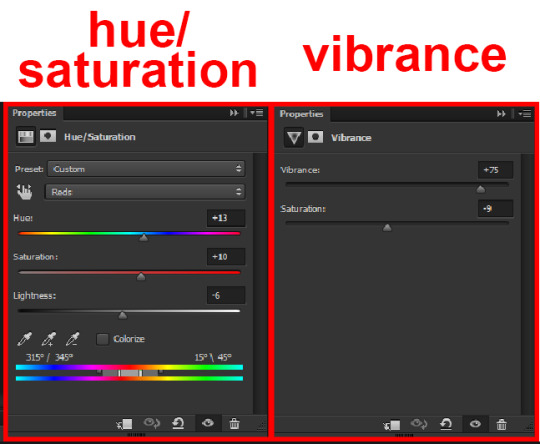
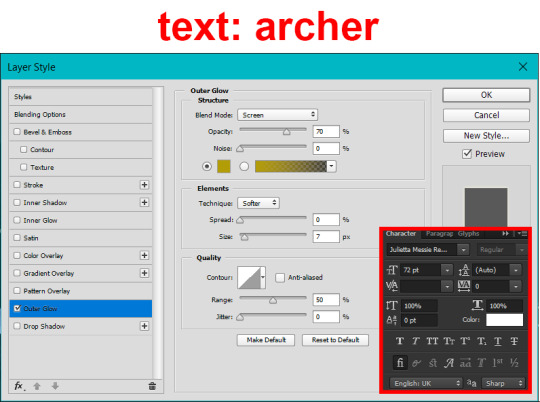
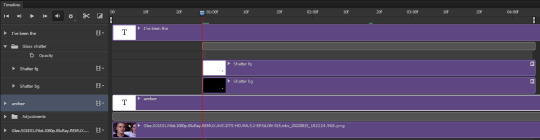
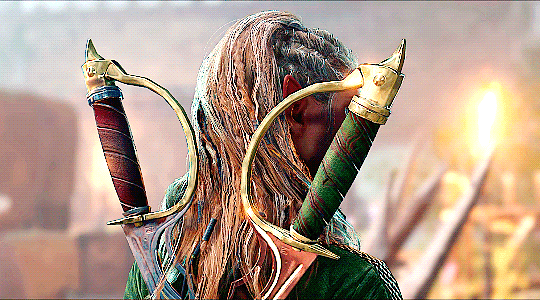
This is all there is to the glass shatter effect itself. Next I pulled in frames from the second scene to fill in the black areas. This layer needed to go below both glass shatter layers, so that it only shows through where the black. Then I added adjustment layers and some text. I used curves, hue/saturation, and vibrance adjustment layers, and I also added the "archer" text below the glass shatter layers so that it would be hidden to reveal the "prey" text. The other text I added above all of the layers, since I wanted this to be visible all the time. Here is the layer order and all of the settings I used for each of the layers:
I also grouped Shatter-bg and Shatter-fg and shifted them on the timeline so there would be some time to see the background gif before the shatter effect starts.
And that's all! Then it''s just a matter of exporting the finished product:
This is the first gifmaking tutorial I've ever made, so I hope I was able to be reasonably coherent and helpful! I'd love to hear if you make anything by following these steps, or even if you just feel like you've learned something reading through this. And if you have any outstanding questions, feel free to reply or send me an ask and I'd be happy to answer!
#gifmaking#tutorials#gifmaking tutorial#gif tutorial#photoshop#photoshop tutorial#usergif#gleesource#my tutorials#mine#how to gif#tw mark salling#mark salling tw#not tagging as glee because it's not actually about that but wanted the tw tags just in case#this was so much more effort to put together than I thought it would be lmao#I was like oh yeah I've already made the whole gif I just need to go back and explain how I did that...#it took A WHILE#anywayyyy it was fun though so I'm glad I did it#would love to know if anyone finds this helpful or interesting or tries out the effect or something similar!#you can also just grab the black/white gif I included above if you want to do the effect since I can't find the video... sorry lol#but yeah you have my permission to steal the black/white gifs for gifmaking purposes if you would like#just don't like. post your own tutorial claiming you made it or something?? but like you don't need to credit me or anything obviously.#ANYWAYYYY#I feel like... a LITTLE pretentious thinking I'm good enough at making gifs to be qualified to make a tutorial#but like it's fineeee everything is fine#gonna finally post this now enjoy byeeee
97 notes
·
View notes
Text
Making Baldur’s Gate 3 GIFS Tutorial
TOOLS USED:
Nvidia or alternate game video recording software
PotPlayer
GIMP (Optional)
Adobe Photoshop
PART 1: Recording
I personally use the Nvidia recording software that came with my computer to capture videos of the game, but there are plenty of video recording options out there. I know OBS Studio is a popular one, for example. Whatever your choice may be, here are three important tips for when capturing video:
Use the least amount of compression settings your recording software can output, and I recommend at least 30FPS, though 60 is better
Press F10 to hide the Baldur’s Gate 3 UI and capture the entire screen
Give about three seconds worth of video before and after the section you want to record, as safety buffers, if you can
PART 2: Frame Extraction
Open the video you’ve recorded in PotPlayer in window mode (not full screen), and pause a little bit before where you want to start your GIF. Press Ctrl + G to open up the Consecutive Image Capturer window, and drag it to the side of the video player. These are the settings I recommend in general:
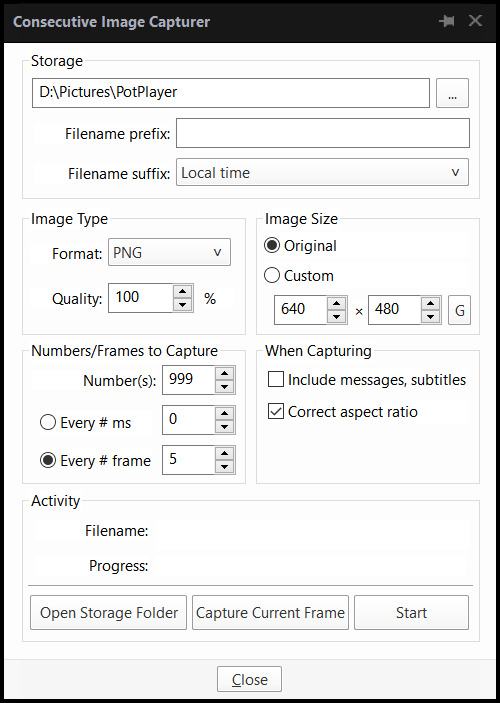
HOWEVER, I suggest playing around with the “Every # frame” option to your own liking. I have a pretty high framerate for this video I’m using, so 5 is fit for me, but if you have a lower framerate, you may want a lower number, like 2.
With your settings in place, click “Start” and unpause the video. Pause the video again after you’ve captured all the frames you want, then click “Stop”. If you’re making a gifset, I recommend then storing each set of frames in a single folder at a time.
PART 3: Resizing
I personally use GIMP to resize/crop the images because I find it easier, then export the image as a PSD for the next steps in Photoshop. But you can use Photoshop for this step too, if you’re more comfortable with that.
The number of frames you can get away with in a single GIF for Tumblr depends on the aspect ratio you plan on saving it as—for example, 270x200 obviously can handle more frames than 540x300 while still fitting within Tumblr’s size limit.
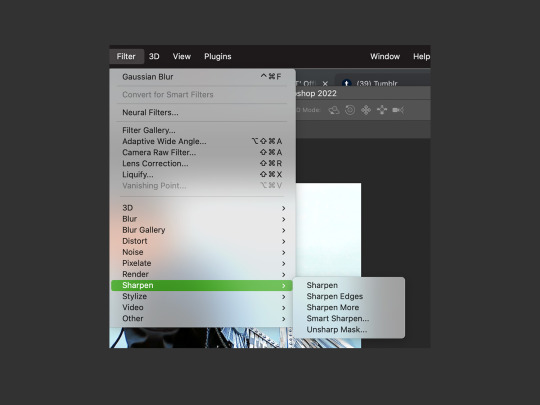
PART 4: Sharpening
In Photoshop, use the Filter > Sharpen > Smart Sharpen tool on each layer. The settings are your choice, but I usually use 200 for the Amount and 0.5 for the Radius.
PART 5: Animation
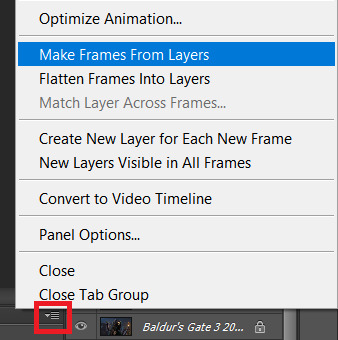
If you don’t yet have the timeline set up in Photoshop, click on Windows > Timeline to bring it up. Then from the arrow, choose “Create Frame Animation” and click on the button to do so. This will insert the first frame into your timeline. Click on “Make Frames from Layers” in the timeline options menu to add them all.
Click on frame 1, then hold down Shift and click on the last frame to select them all. Then click on the drop-down arrow from the last frame and set the delay between each frame changing. I usually use 0.1 seconds.
Change the “Once” option to “Forever” to make the GIF repeat itself ongoing.
PART 6: Editing/Colouring
Click on frame 1. Then click on the top layer, while still keeping frame 1 visible.
You can use a variety of tools in Photoshop to editing the colours, brightness, contrast, etc. of the gif. Make sure the filters are the top layers to apply them to all the frames. If you test out your gif and see that the filters are not applied to all the frames, toggle the visible option on them off and on again.
I’m not going to go into detail of how to edit your GIF here, because each one is different. But I will say the tools I most typically use are Brightness/Contrast and Curves.
PART 7: Export
Click on File > Save for Web. These are the settings I like to use:
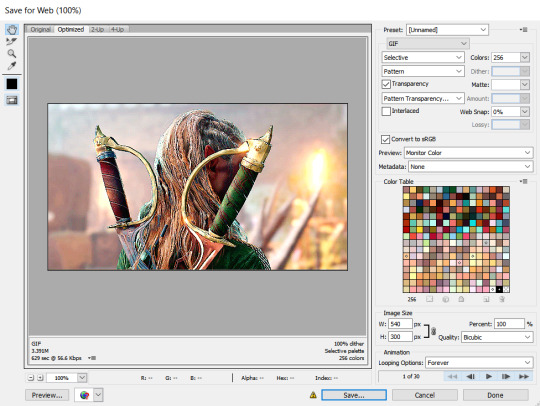
Congratulations, you’ve made a GIF!
143 notes
·
View notes
Text
Smart Parts Exports: Genuine Excellence for VW Parts.
Elevate your VW experience with Smart Parts Exports' Volkswagen Genuine Parts. Unmatched quality ensures enduring precision and performance. Discover driving excellence today."

0 notes
Text
#oil filter#best quality#best price#genuine parts#spare parts#152081HC0A#nissan oil filter#nissan#smart parts exports
1 note
·
View note
Text

OEM spare parts for Hyundai cars can be found at Smart Parts Exports. The Hyundai 263502J000, SERVICE KIT-OIL FILTER from Mobis Hyundai is perfect for the Hyundai 263502J000, SERVICE KIT-OIL FILTER. We are the genuine parts exporter at Smart Parts Exports. Best prices from India. Order now!
0 notes
Photo

Smart Parts Exports is a leading exporter of genuine and aftermarket Bajaj spare parts, serving customers around the world. Our selection includes 3 wheeler spares, 2 wheeler parts, as well as authentic Bajaj parts that meet international safety standards. With years of experience under our belt, our company continues to excel at all over the world.
#Bajaj spare parts#Bajaj genuine parts#Bajaj parts online#Bajaj genuine spare parts#Bajaj parts exporter#Bajaj spare parts exporter#Bajaj genuine parts exporter#Bajaj genuine spare parts exporter#Bajaj online parts exporter#Smart Parts Exports
0 notes
Link
Smart Parts Exports is the Genuine seller of VOLKSWAGEN OEM spare parts. You will get this genuine WATER PUMP-03C121008J, at best prices.
0 notes
Text

Smart parts exports is the largest exporter of hyundai genuine parts. Hyundai parts specially designed for delivering great performance and longevity to hyundai cars. hyundai genuine parts are tested under various conditions to ensure the quality , reliability and durability. we ensure to every customer that we export 100% genuine spare for all the hyundai vehicles. the smart parts exports are dealing in more than 80 countries across the world.
1 note
·
View note
Photo

— i think it’s been a year and a half since i posted my last tutorial! with a few more requests (and me learning new things) i decided to make a new and updated tutorial 💎
— this is a VERY image heavy tutorial and it is also very long! i’ve put it under the cut <3 like there are OVER 50 images...this is more of a masterpost really. if there is something that does not make sense, feel free to ask!! i will more than happy to clarify!
— i promise the header gif was once good quality but for some reason, i did something to it and it became weird. please ignore that 😭

the first step is to make the gif! i’ll try to go through everything, step by step! there are different methods to make gifs but i’ll only be explaining the method i use. but i’ll link some incredible tutorials from other content creators later :D
i’ll be using photoshop. make sure you use a version of photoshop that allows you access to the timeline option! there was a weird update where the adobe timelines were not compatible with the m1 macbook chips so look out for that!
— the first thing you need is an .mp4 video. i use the in-built screen recorder on a macbook (which you get by pressing command + shift + 5). i usually just record the section of the video that i need but some people use programs such as 4k video downloader (which also works very well but i stopped using it because i was worried that i was using too much data downloading longer videos!)
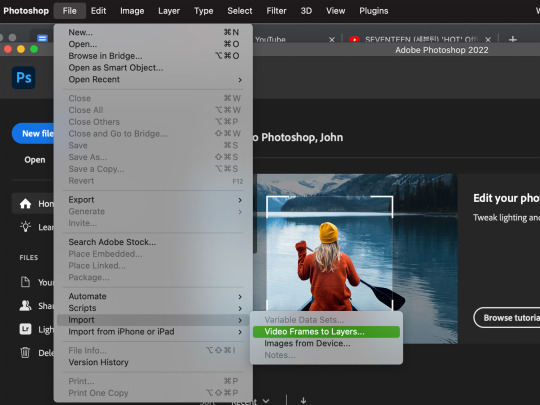
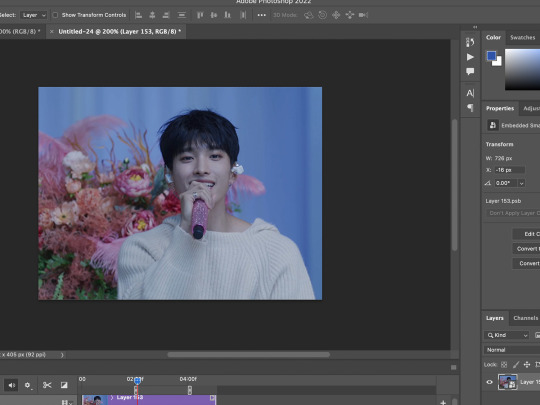
— i’ll be using a clip of jeonghan from the hot music video! when you open photoshop, go to file > import > video frames to layers
— this will open up your files and from there, you should select the video that you want to make a gif out of!
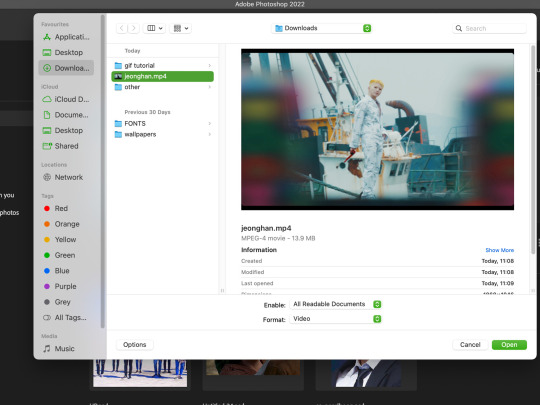
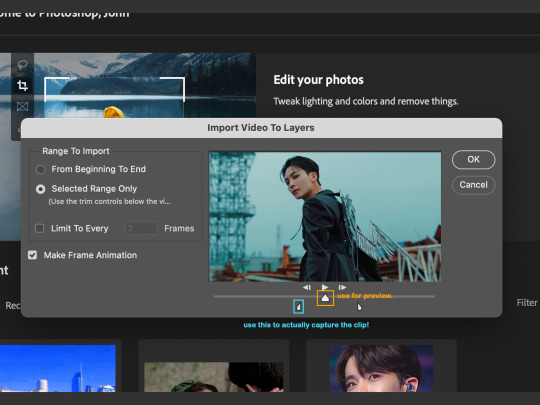
— once you have selected the video, you will get a pop-up and it has a little trimmer (that i’ve highlighted in the blue box!) that you can use to find precisely what you want to gif. the little triangle that i’ve placed in the yellow box is like a slider than you can use to preview the video!
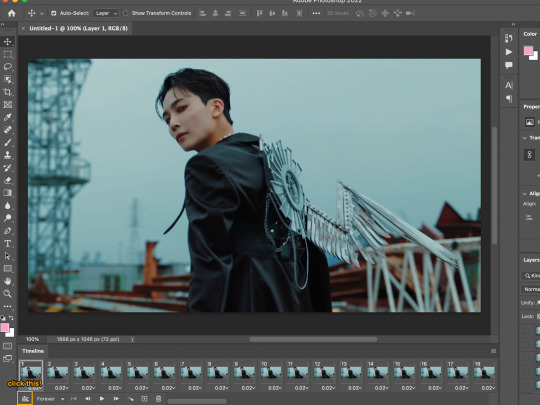
—now your specific video clip will be opened as a bunch of layers and you want to press the small button (i am so sorry 😭 i don’t know what it’s called) and it will do something (which, even after three years of making gifs, i still don’t what its called) but just press it!! i’ve highlighted it in the yellow box!!
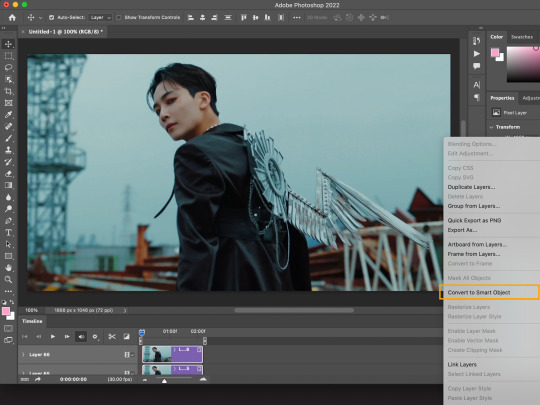
— then select all the layers and right click and then convert to smart object. this will make it a lot easier for you to sharpen and colour your gif at a later stage.
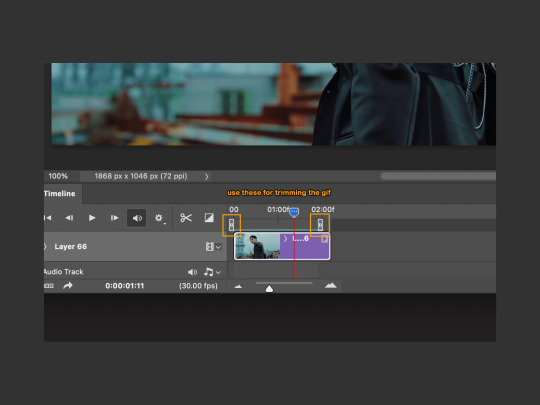
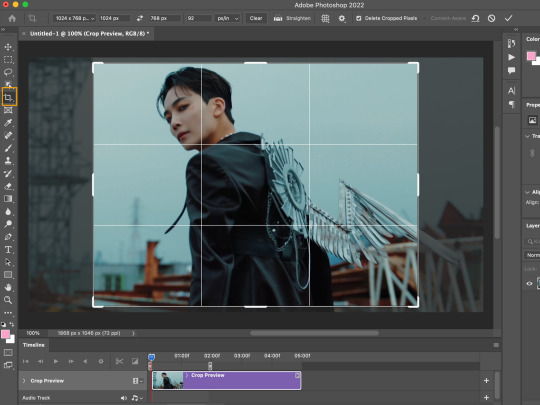
— if you still think your gif has unnecessary frames/scenes, use the small trimmers in the timeline to trim the gif even further!
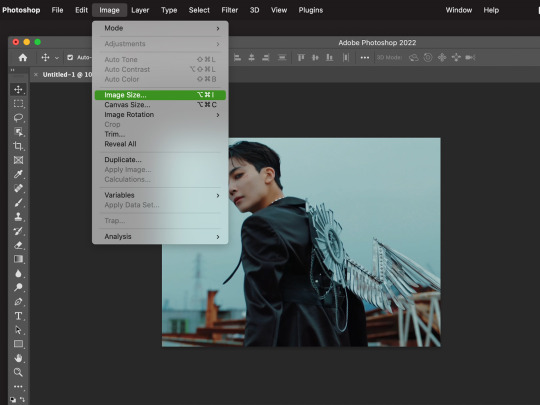
— now at this stage, your gif is technically ready but the chances are that the gif is too large to be posted on tumblr. tumblr has a 10mb gif size limit (praying that they don’t go ahead with the bad updates) so we want to bring that gif size down into a gif that can be posted onto the dashboard.
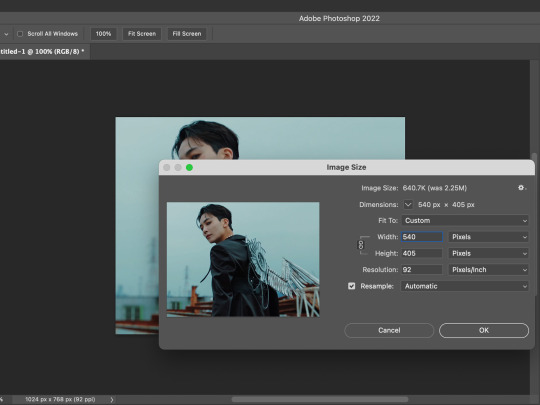
— go to image > image size! something very interesting that you can also do when resizing your gif is changing the resample settings (look at this post by @usergif here!)
— now there are many sizes you can make your gif but if you want a recommended size for a single gif on the dashboard - check this out! the width should always be 540px but the height can vary!
— now that your gif is ready (unsharpened and uncoloured - but this is just the base gif tutorial) we can now save the gif! go to file > export > save for web. don’t make the same mistake as me back in 2018 when i was trying to make lotr gifs but i kept clicking save as...and it would save as a still image.
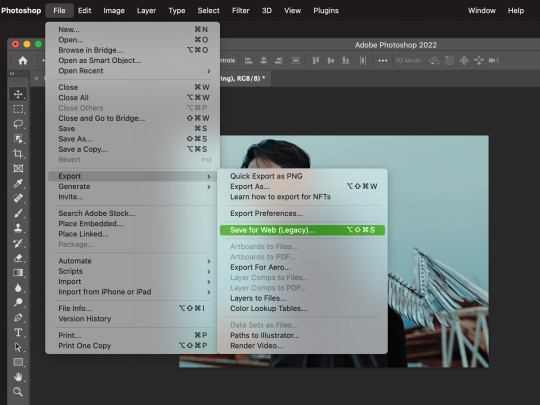
— saving settings can vary! but these are the ones i use and they usually work for me! make sure that your looping is set to forever otherwise your gif will play out and then stop :(
— and this is our final gif! it has no sharpening or colouring but its a functioning gif on its own :D


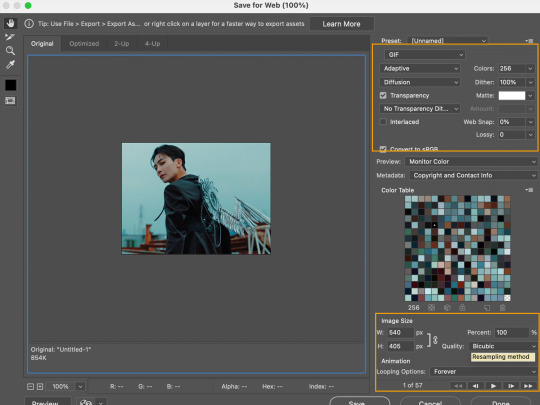
— i enjoy this part the most!! there are so many different ways that you can colour a gif and it is all up to personal preference! but this is first the basic colouring on a gif. you should go to layer > new adjustment layer > curves.
you’ll see three eyedroppers on the side (black, grey and white)! we’re going to be using the black and white ones! when you click the black eyedropper, you’re going to click it onto the darkest pixel in the gif. and then take the white eyedropper and place it onto the whitest/lightest pixel in the gif! it makes a huge difference!
— as you can see, the difference is immense. that cyan sort of washed tone has been lifted from the gif!

— the gif on the left is a comparison of only the curves layer against the original gif. the gif on the right includes some extra adjustments that may help your gif :D
the two little skin-tone rectangles compare jeonghan’s skin tone without selective colour and then WITH selective colour (respectively). the rectangles near the bottom-right corner show just one example of how you can play and adjust hues with selective colour!


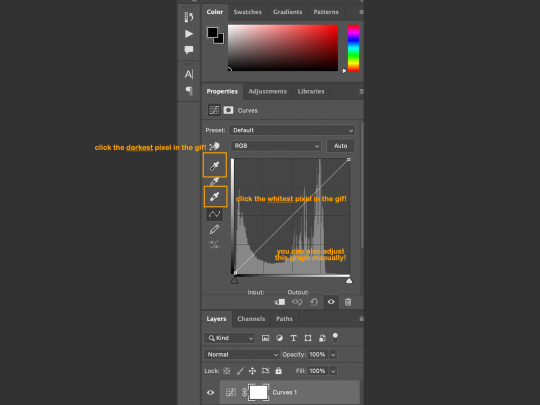
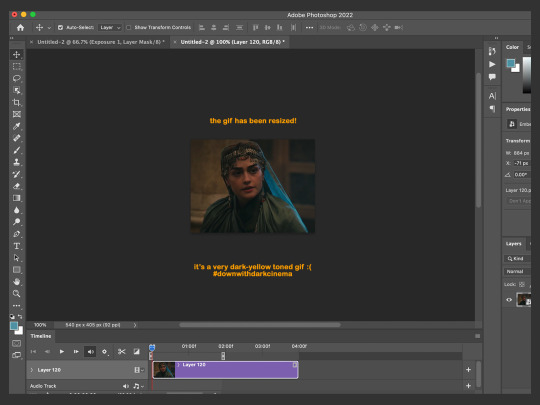
— now i’ll show an example of how this might with a more yellow/darker toned scenes. for some reason, so many shows love turning the brightness down on their scenes and its up to gifmakers to actually make the scenes visible 😭 i’ve taken a small clip of halime sultan from dirilis ertugrul!
— i resized the gif but i have not added any adjustments yet to it!
— i created a new curves layer and i took the black eyedropper, placing it on the darkest pixel i could find (a fold in her headdress) and this is how the gif looks now. arguably it looks worse but this is a necessary step for the final gif.

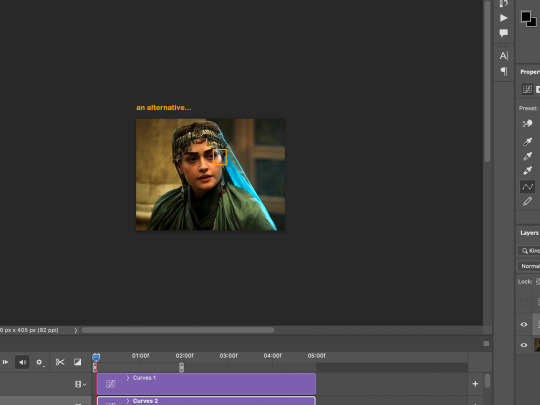
— so now i took the white eyedropper and placed it on the lightest pixel i could find. it was a reflection on the metal decor on the headdress. and it brightened the gif up quite a bit!! but here is where things can get interesting...

— this is an alternative use of the white eyedropper! in this case, i placed the dropper on the highlight reflection on her cheekbone (which was originally tinted a more blue with red on the edges) and this also brightened up the gif but it gave it a more green/yellow hue!!
this is important and something that is so useful for me because basically if your gif is too BLUE-hued, find the lightest blue-ish pixel but if it is too YELLOW-hued, then find the lightest yellow-ish pixel. you can easily manipulate the tones in the gif this way!
— so on the left i have the final gif!! and on the right i have a comparison on how the lighting has improved so much from the original gif!

— now i could go on forever about all the ways you can colour a gif but we would be here forever, and you would be scrolling forever so instead, i put together some colourings that you can download here!

— cheers: it brings out the reds and orange and it turns greens into teals and blues!
— selemzar: if you’ve watched historical turkish dramas, especially ones with tribe/city sets you know that they love their yellow hues! this one gets rid of the yellow cast on a scene <3
— httyd: a very basic psd that turns blues into greens and brings out skin tones!
— up: i use this one very often (and named it after the mv in which i first made it). its a psd for bright and vibrant gif colourings that focuses on making the blue colours as bright as possible!

— i’m gonna be honest...i am not a huge expert in this area and my knowledge of sharpening is limited to photoshop’s own features. there are so many softwares and programs you can use to clean up a video and to make it smoother and sharper such as avisynth and topaz!
— this is the sharpening i use the most nowadays! it has two layers of differing smart sharpens and then a layer of noise on top. it usually works well for me except noise increases the size of the gif a LOT so my gifs are never too long 😭

— this is one that i used to use all the time. it gives a very glowy look to the edges and i’ll use it if the video is lower quality as this sharpening covers up some of the weird pixel squares!

if you would like some more clean and comprehensive sharpenings, then take a look at these!
this tutorial by most beloved @woozi / this tutorial by @trashcora / this tutorial by @haleths / or this one from @hyunfelix
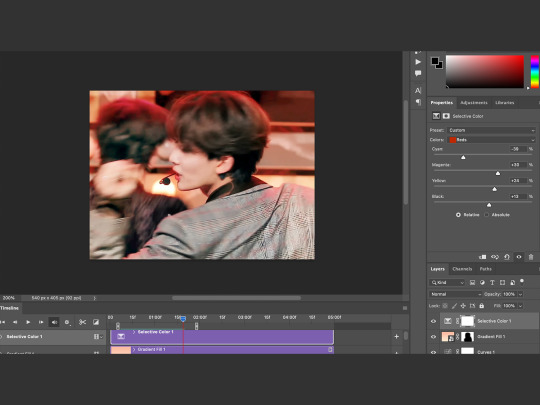
— another thing i like are matte gifs!! i haven’t made many of them but they are such a neat effect to add onto gifs - especially stage/live gifs! so here i’ve made my base gif of heeseung and given it some base colouring (curves and selective colour)

— now i saw this tip from another blog (an nct/wayv blog im so sure but i cannot remember the url for the LIFE of me) but what i remember is that you add a levels layer (and with the three numbers under the graph in order: it’s 20 / 1 / 250 and then with the numbers next to output levels it’s: 20 / 240) and then you add a solid fill colour of #2f2f2f and set it to screen and you get the results below!


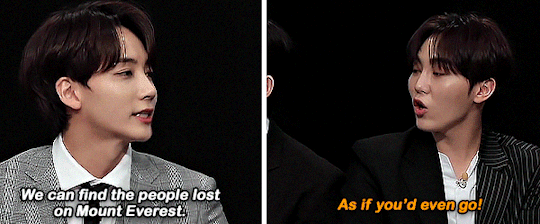
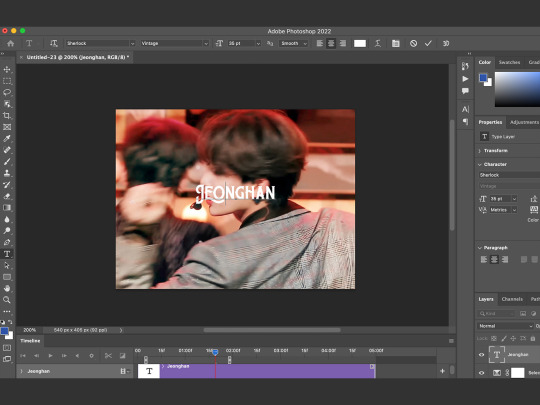
— often if you’re giffing a music video / a film / a show, there are people speaking and you want to add subtitles!! i like to use the font: arial rounded mt bold and then i open the character window and click on the bold and italic T <3
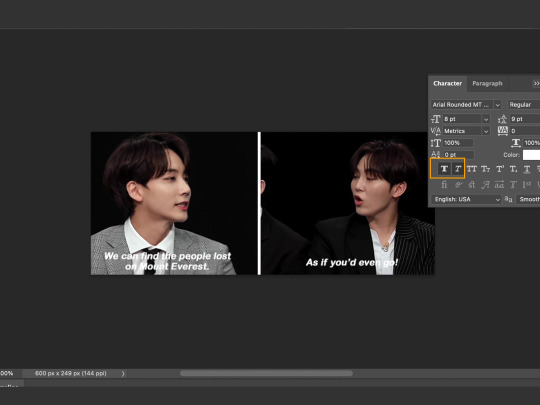
— now we have the basic subtitles, but they are not as easy to read against jeonghan and seungkwan in the background so we’re going to right click on the text and go to blending options and then you add a shadow behind it!
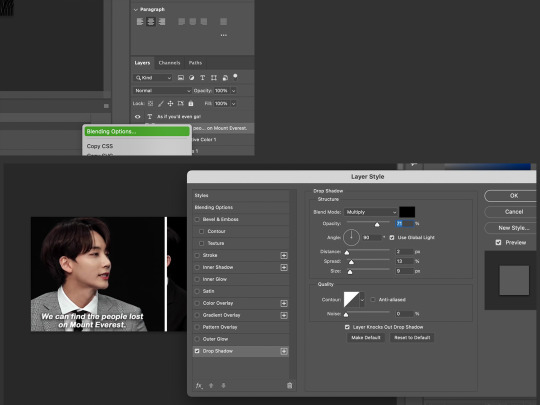
— i personally find that subtitles look nicer with a stroke as well, so you can add a stroke (any size of your choosing) and set the position to outside.
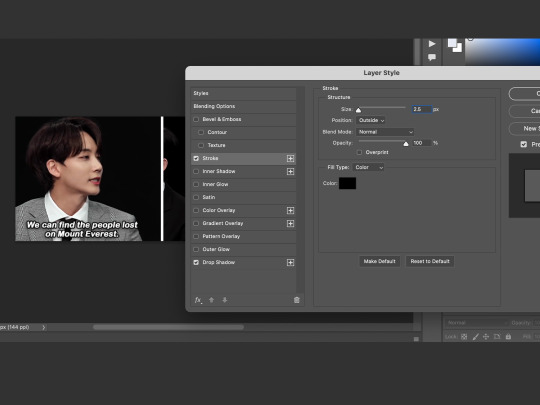
— and here we have subtitled gifs!!! if there is more than one person speaking, you can change the colour of the gifs and my go-to secondary colour is #fda700 :)
— if you want to learn how to blur captions, i recommend this tutorial by @chanstopher

— now that i’ve gone through the basic tutorials for making gifs, let’s take a look at some fun effects!!
a place that i really recommend learning these things from is @usergif as they have super cool tutorials and a directory as well that you can access here <3
— if there is one thing i love...it’s gradient backgrounds. and also this video of seventeen and thus i will show both in this next tutorial! i’ve started off with this seokmin clip and i’ll add some adjustments to it.
— so now that i’ve added curves, exposure, colour balance etc (all the basic adjustments) we’re ready to add the gradient!
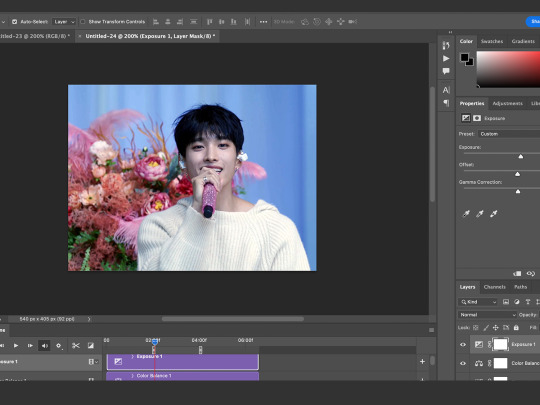
— go to layer > new fill layer > gradient!

— a small pop-up comes up and click on the gradient (in this case that blue-transparent bar) and another pop-up will appear! here you can make your own gradient or choose a pre-set gradient (there are heaps of good options)
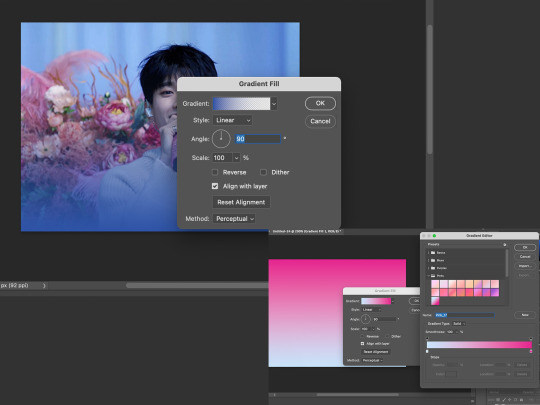
— once you’re satisfied with the gradient, you can click OK and then set the gradient layer to hard light. you can play with different settings but this is the one that i prefer the most!

— now convert the gradient to a smart object!
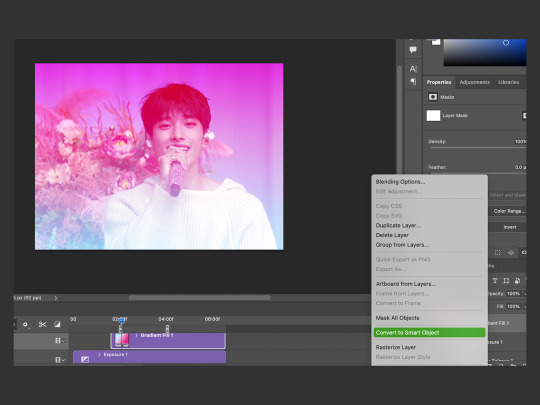
— in the small yellow box, i’ve highlighted the layer mask button and you should add one to your gradient layer! a layer mask will be useful because if you make a mistake later on, you can simply make another layer mask and start again! also bring out a soft brush (hardness set to 0%) and make sure the brush colour is BLACK. a black brush erases the layer mask and a white brush brings it back. use the brush and you can erase over the subject in the gif!
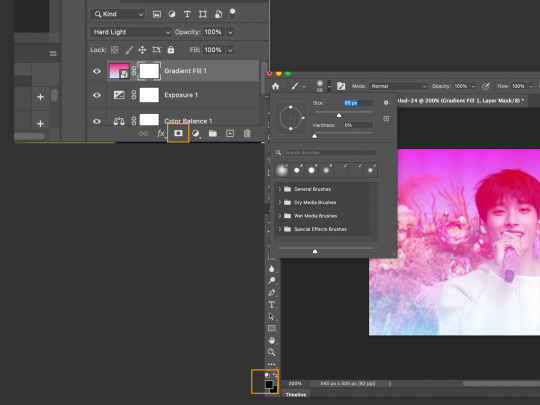
— so now we have a seokmin-shaped hole in our gradient (if he is not a heart🧡 why heart shaped?) but the edges (even with the 0% hardness) are still too sharp and we want to soften the gradient!
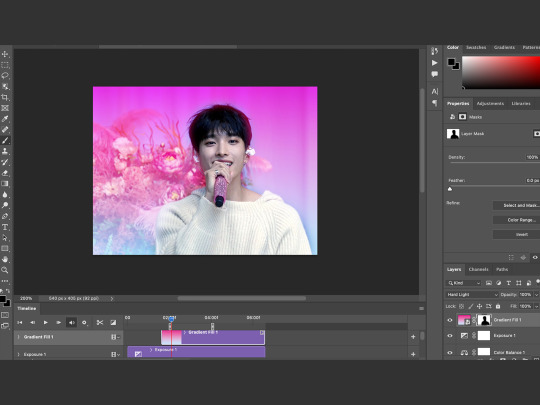
— go to filter > blur > gaussian blur and play around with the blur settings till you find a gradient edge that satisfies you! you don’t want it to be so soft that the gradient ends up covering the subject again but not too hard either.
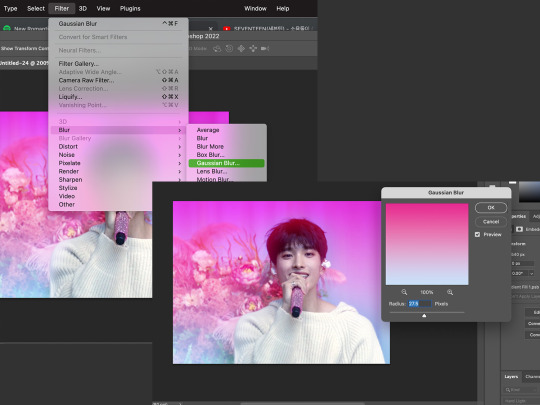
— and this is our final gif!! the gradient background is really so versatile and it adds pops of colour to your gifs (and can be very useful in covering pesky pixel ugly-coloured backgrounds!)

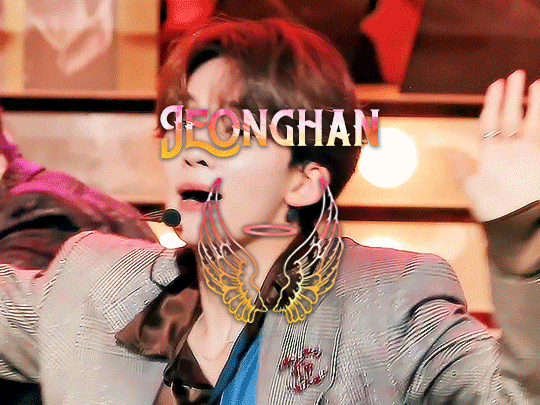
— another effect that i love so much is adding gradient text and pngs to gifs! i feel like they just make the gif so much more fun and interesting <3 so here i’ve got a gif ready (its been coloured and resized) and i want to add text and an image onto it!
— in any font you like, and any size you like, you can type out your text but make sure that the text is WHITE (otherwise you won’t achieve the same gradient effect)
— i love adding transparent pngs and a site i like to use is called nicepng.com as they’re free to use and they have a great selection of transparent images! i looked up an angel image (for beloved jeonghan ofc) and i downloaded one! i prefer images that have a thicker outline as this helps the gradient appear more clearly!

— i downloaded the png and placed it on the gif. but the original png was NOT white so i need to make it white. for that, i made a small white rectangle and placed it in a clipping mask over the angel wings and then merged the layers. then you can reposition the text and png to wherever you want them to sit in the image.

— now we’ve reached the gradient part! set the text to EXCLUSION (this will let your text have that see through property and if you don’t want it to look transparent, then you can keep it on normal). then go to BLENDING OPTIONS and go to gradient overlay. here you can select the gradient that you would like!
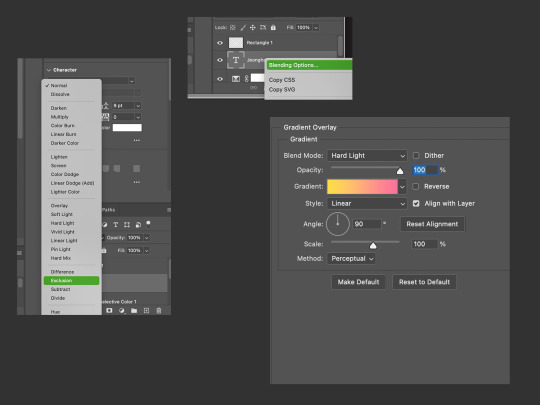
— once you’ve selected a gradient to your liking, click OK and then make sure that the blend mode of your gradient (in the gradient overlay box) is set to HARD LIGHT. in the previous step, if you did not change the white text to Exclusion, then you can keep the gradient blend mode on normal. i also like to add a shadow on my text as it helps it stand out a bit more!

— so i did the exact same process to the angel png (exclusion > blending options > gradient on hard light) and there we have our final gif! its such a versatile and fun effect that can liven up your gifs!!
there are countless more effects and tricks and tutorials that you can use to make your gifs but we would be here for another fifty years so i will add some links below of some incredible tutorials that i often refer back to!
if there was anything that i said above that didn’t make sense (because after a while, my brain turned to mush), you can always come and ask for clarification :D
colour isolation tutorial by @simoneashly
my own tutorial on blending over @kgifsource
an amazing guide on colouring those heavily yellow tinted scenes by @nobodynocrime as well as this amazing glitch effect tutorial!
the tutorials from which i learnt blending gifs together are these two: this one by @jackarthurdavenport and this one by @yenvengerberg
a guide on vapoursynth and colouring by one of my favs @wonublr
and this comprehensive guide on gif making in general by @soonhoonsol <3
#tutorial#gif tutorial#usergif#allresources#photoshop tutorial#completeresources#pshelp#kpop gif tutorial#photoshop#usernik#userbecca#cheytermelon#userjoanna#userkitty#tusermanny#usershreyu#usermarcy#aleksbestie#ANYWAY 48 hrs later...
1K notes
·
View notes
Text
When the darkness comes | Tommy Shelby x Shadowhunter!Reader - Part 4

Summary: you are a shadowhunter investigating the sudden rise of yin fen in the Downworld, the trail leads you to Small Heath and a blue eyed gangster.
A/N: I'm not sure about how this part turned out. Anyway, thanks for reading it. English isn't my first language, sorry if there are mistakes!
Warning: nothing.
Part 3 - Peaky Blinders Masterlist

Usually, patrolling the streets was boring. Not tonight. You had been following the trail of a ravener demon for about half an hour without it noticing. It was the first demon you had encountered in Small Heath since your arrival.
Luckily, it was a minor one and not very smart. Its disgusting appearance, a mix between a centipede and crocodile with some scorpion parts, made your stomach turn. Sometimes these kinds of demons were used to follow someone or to keep an eye on something.
That’s why you weren’t surprised when the ravener moved around all the places that were clearly Shelby territory. More specifically, the parts of Small Heath dedicated to their non legitimate businesses. So, without any doubts, the demon had something to do with the yin fen.
However, you didn't think it was directly related to the Shelbys.
That is, someone external, maybe the one responsible for sending them the drug so that they could distribute it throughout England and export it to America, was the one controlling the ravener. It could be a warlock’s work. Also, there were probably more than one demon, although you hadn’t seen others, which could be a problem if they decided to attack you in group.
Tired of walking around the city among piles of garbage and puddles from the same place to the next, you took out of your coat one of your seraph blades and got ready to finish off the ravener.
“Uriel,” you said out loud, giving a name to the blade. Instantly, it lit up, filled with angelic power as it brought light into the darkness.
At that moment, the demon noticed your presence. You already knew that the poor thing wasn’t very clever. It lunged at you with quick movements, trying to reach you with its disgusting insect-like legs. You moved faster thanks to a heightened speed rune. The seraph blade traced luminous arcs through the fog as well as the ravener’s body.
With a screech and a gush of dark ichor, the demon disappeared. They didn’t die, instead, they returned to their own dimension. You observed the light from the blade fading away, it was covered in ichor and it was starting to corrode so you dropped it, no longer useful. At least the ravener’s blood hadn’t splash all over yourself or your clothes.
You scrunch your nose for a moment, looking around. There were no signs of more demons but the night was still long until dawn. With a sight, you closed your coat to protect yourself from the cold wind and continued patrolling.
A couple hours later, you headed to The Garrison. A drink or two wouldn’t hurt.
The warmth of the pub welcomed you like a hug. You appreciated the cosy atmosphere, despite the noise of the drunk customers laughing and talking. So you headed to the bar, where you sat in one of the seats and rested your head on your hand.
After a while, you felt the presence of someone next to you, so close that their arm was brushing against yours. Slowly, you turned your head and watched him through your eyelashes, blinking lazily. “Good night, Tommy.”
He nodded, watching you closely. “Long night?”
You nodded back. "You have no idea. By the way, I'm not following you, in case you were wondering. I just wanted to get something to drink," you said quietly.
Tommy chuckled and turned to the bartender. He ordered a couple of bottles and glasses before turning to you, placing his hand on your lower back. "Come with me, we can talk in a quieter place."
Without removing his hand from your back, he guided you to the private room at the side of the pub. After closing the doors behind him, the noise was muffled and distant. You took off your coat and sat down on one of the seats, resting your head against the wall. Tommy sat by your side, watching you like someone does with an exotic animal. He lit a cigarette and started smoking in silence.
The small window opened, revealing the bartender with Tommy’s order. He got up to pick it up and left it on the table. Your eyes followed him, too tired to move.
"I'd like you to try something," he said, pouring a clear liquid into one of the glasses and setting it down in front of you.
You grabbed the glass and brought it to your face, smelling the contents. "What is it?"
“Try it,” he replied, leaning back in the chair, never taking his eyes off your face. At your expression of rejection, Tommy rolled his eyes and took the glass from your grasp, brushing his fingers against yours and drinking it in one gulp. “It isn’t poisoned, see? I just want you to try it and give me your honest opinion.”
You had learned the hard way not to drink or eat things offered by strangers, more specifically if those strangers were fairies. One could never trust them. However, you had already ruled out the possibility of Tommy being a fairy, right?
"Okay, I'll try it."
Tommy poured another glass and slid it in front of you. You took a small sip and hummed softly.
"Well?" he asked, putting out the cigarette in the ashtray.
You shrugged. "It's sweet, I suppose," you said unconvinced. "I don't drink regularly, so I don't know. It's not bad."
"Not bad..." he murmured.
You grabbed the bottle and turned it in your hands, looking at the label. "Gin," you read aloud, "distilled for the eradication of the seemingly incurable sadness... Shelby Company Limited, it’s your own gin?"
"It's part of the business," he explained as he sipped his whiskey.
As you finished the contents of your drink, a sudden wave of warmth spread through your chest, so you rolled up your shirt sleeves. That night you had discarded your shadowhunter gear and had decided to wear a simple white shirt and trousers. You loved wearing pants, it made fighting much easier than a dress or a skirt.
Actually, from a distance you could pass for a boy or a young man. If you had worn one of those peaked cups, you could infiltrate among the Peaky Blinders and they wouldn’t be able to tell the difference. Up close you couldn’t fool anybody. Tommy was delighted in the way the pants hugged your waist as well as the dark runes spread throughout your body, barely visible through the thin fabric of your shirt.
"Do you like horses?" he asked suddenly.
You watched him with a raised eyebrow and nodded slowly, finding the question quite odd. "When I was little and lived in Idris, we had a horse. I used to ride all the time, it made me feel like Boudica. Why do you ask?"
Tommy shrugged. "Have you ever been to the races?"
After seeing you shake your head, he slapped the table cheerfully. He seemed to be in a good mood. "Tomorrow I'll take you to the races. Wear something nice."
“Alright,” you agreed, laughing softly at his enthusiasm.
He sat closer to you, throwing an arm over the back of your seat. You suppressed a smile, men were so easy to read sometimes.
"So, you don’t ride anymore?" he asked after a while. The tips of his fingers began to brush against the side of your neck, sending shivers down your spine.
You heaved a long sigh. "No. Unfortunately, I had to move to London a few years ago and it's not the same. In Idris I used to live in the countryside, where I could ride freely, here I feel like I'm in a cage. Everything is grey, smokey and smells bad."
Tommy laughed. "I don't really understand what you mean about Idris but it sounds like a good place. What made you come to London?"
You looked into his eyes, he seemed genuinely interested. Still, you looked away, focusing your attention on your hands.
"I'm a Nephilim, remember? A Shadowhunter," you saw Tommy nod out of the corner of your eye, "although we're all over the world, because there are demons everywhere, our home country is called Idris."
“I’ve never heard of it,” he commented, sitting a little closer to you.
"Of course, because it is non-existent for mundanes. It is located between Germany, France and Switzerland. Mundanes cannot access it, it is our sanctuary," you explained. "Years ago my parents were sent on a mission, it seemed like something routine and simple but they were ambushed and it didn't end well. They..."
Finishing the sentence wasn’t necessary because Tommy had understood. He squeezed your shoulder gently. "I'm sorry," he whispered.
You looked at him with a frown. "Don't be sorry, that’s how life works. We are warriors, we must fulfil what has been entrusted to us since our creation, keep the Earth free of demons. Most Shadowhunters die young, that's how it is. We have been trained for it since we were children."
Tommy seemed surprised at the sudden vehemence of your words. Out of the blue, your face had become a hard facade, lacking the typical sparkle of amusement in your eyes. Instead, it seemed to have been replaced by a layer of grief and resignation.
"They sent me to the London Institute to finish my training there and I stayed. I had nothing to return to in Idris," you said with a sad smile on your lips.
He closed the little space that separated him from you and pressed his lips against yours. You closed your eyes, tasting tobacco and whiskey. Then, you reached up and placed your hand on the back of his neck, where his hair was so short that it was barely there. Tommy grabbed your waist, pushing his tongue deeper in your mouth.
As you began to feel your crotch getting wet, you pulled away from him with a soft whimper and held his sharp jaw in your hand. “At what time will we meet tomorrow?" you asked in a whisper.
“Meet you here at five,” he muttered, staring at your lips hungrily. You released him, connecting your mouths again.
An overwhelming feeling started to grow inside of your chest, so you got rid of his hands on your waist and stood up with fluid movements. You grabbed your coat and leaned to give him one last kiss. “See you tomorrow, Tommy.”
"Stay a little longer," he pleaded softly, trying to catch his breath.
You shook your head. A small smile threatened to peek at the corner of your mouth. It didn’t reach your eyes though. “I better get going, my night is not over yet,” you said, walking out of the room into the crowded pub.
Tommy remained there as he watched you disappear without looking back.

#tommy shelby#tommy shelby x reader#reader insert#thomas shelby x reader#thomas shelby#shadowhunter!reader#peaky blinders#shadowhunters and peaky blinders#tommy shelby fanfic#tommy shelby x y/n#tommy shelby x you#soleilceirinen writes#when the darkness comes
42 notes
·
View notes
Last Seen Blogs
officialgritty
- Zoe

lilsynth
lilsynth
lovedyouless
loved you more

tubbotums
Your home for Big and Rounded muses!

arumpuspitasari10
Semangat Belajar