#my iPad is filled with 8% finished drawings and sketches
Note
sorry if this has been asked before but i'd love to know your process for creating animatics. not only are they so incredibly fluid and perfect to the music but they're COLORED! absolutely inspiring. i'd love to know what you do for planning and editing, basically how to put an animatic together in general. i use procreate to make art but other than that i'm completely clueless on how to make animatics
ooooh okay i would LOVE to tell you!!!! So first things first I will say that my animatic process is probably not the most like. Efficient way to do it. I'm not an artistic expert and I'm very self-taught so this is just what I've come up with over the years with the resources I had.
This has ended up VERY long so I'm sticking a read more in
All that to say I have two main programs that I use, one to draw (Medibang Paint Pro) and one to put the frames together for my animatics (Davinci Resolve). These days, I have both of these programs on my laptop so I have everything on one device. Before I had my current laptop, I used Medibang Paint on my iPad and iMovie on my laptop, but the overall process is basically the same.
So. I have five main stages of making an animatic once I have a song and a character/narrative in mind.
Stage 0 is arguably the most important stage, which is deciding it's something I for real want to do. Making an animatic is a big commitment, so it has to be something im 100% on board with or I'll get bored before I finish it. So usually when I hear a song and I think "oh I can apply that to x character" I'll have to listen to that song on repeat for at least a few weeks just to iron out the story in my head, decide what moment I'm going to put with each lyric, basically plot out the narrative internally.
This stage is a bit different for every animatic. For some of them, like the Snackrifice as an example, I heard the song for the very first time and went: i know EXACTLY how this is going to go and then I went home and started planning it out immediately. Others, like Aequitas Aug, I had the song as a vague "oh this is Coin vibes" for months before Expansion Era ended and I finally knew I had all the material I would need for a full cohesive narrative. And then a bit longer to really decide "okay so the redactions are going to be at this point, the semicentennial will be at This moment" and so on.
I have a whole playlist full of songs that I COULD make into animatics that I vibe to on a regular basis, basically marinating them until I have enough content and ideas to start actually planning them out into an animatic.
Stage 1 is scripting it out: I write out all the lyrics of the song, count up how many beats correspond to each line, and plan out what I'm going to do with each section. As an example here's a portion of my script for Miguel's first animatic Autoignition. As you can see my script is often pretty loose and jokey at myself, because I already kinda know what I want it to look like by the time I start scripting it, this is just to get it down for pacing and to fill in any gaps.
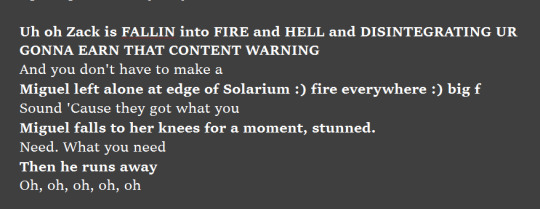
[Image ID: Screenshot of white writing on a dark background. There are eight lines, alternating between bolded writing to signify planned action, and regular writing to signify the lyrics of the song Everybody Loves Me by OneRepublic.
Line 1, in bold: Uh oh Zack is fallin into fire and hell and disintegrating ur gonna earn that content warning.
Line 2, regular: And you don't have to make a
Line 3: Miguel left alone at edge of Solarium :) fire everywhere :) big f
Line 4: Sound 'Cause they got what you
Line 5: Miguel falls to her knees for a moment, stunned.
Line 6: Need. What you need
Line 7: Then he runs away
Line 8: Oh, oh, oh, oh, oh /end ID]
Stage 2 I do my actual draft. I do every frame as a very quick sketch. This stage is where I put all my frames into Divinci Resolve and match it all up to the beats of the song. I work out my timings, I figure out if I need to add/delete frames somewhere. The majority of the fiddly work happens here in terms of lining it all up to the music. All the frames look about as basic as this lmao the idea is Quick and To the point so i get can idea of what I'm working with. Very often I'll have figures in this draft stage where, as an example, I know I'll need to put players from the Flowers or the Dale from a certain point in time, but I haven't decided exactly who yet, so they're just vague humanoid blobs.
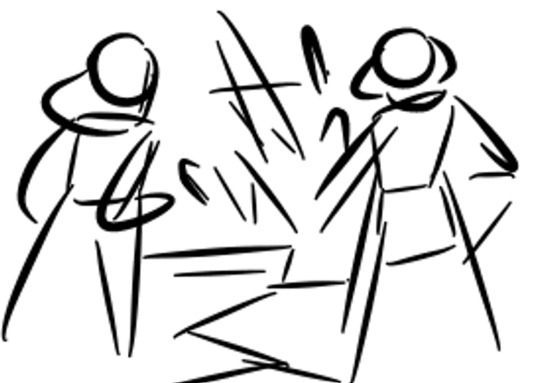
[Image ID: A very basic sketch with black lines on a white background, showing two figures facing away from the camera with loose lines showing the ground exploding in the distance. /end ID]
Stage 3 is Lineart, and this stage takes the longest because I'm actually doing the proper drawings for everything. I don't do colouring yet, because this stage takes so Long and I prefer to do my colouring all in one go so I can keep it consistent. it also allows me to catch any errors that I might make in my Lineart because I get to go over it again when I colour. This is where I make my final decisions on who all the extra characters are that show up that don't Really need to be there.
When it comes to deciding Who Gets To Appear in the Animatic, there are a few tiers.
Characters that NEED to be there for plot/emotional reasons (think like Nagomi Mcdaniel appearing in Alaynabella because Layna switched with her for the Shadows)
Characters that I want to put in there for theme reasons (think Luis Acevedo in Hall Stars, I included them as a cameo because they were later incinerated and the whole animatic was about incinerated players)
Characters that I like/my friends like (Esme and Howell making appearances at the start of Aequitas Aug)
Characters that are just easier to draw, depending on how many times I have to draw them and how tired I am at the time (when in doubt, I tend to default to humanoid characters with reasonably simple designs. If I'm like 400 frames in on Aequitas Aug and I have to choose between horse person Winnie Hess and regular human Eizabeth Guerra to help represent the Breath Mints getting got, I'm gonna go with Eizabeth even if Winnie is technically more iconic and recognisable.)
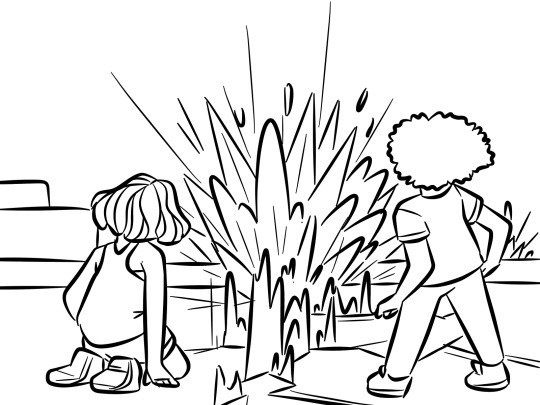
[Image ID: Lineart of a digital drawing showing Miguel James and Zack Sanders as humans, facing away from the camera and looking towards the ground exploding in the distance. Miguel is kneeling on the ground while Zack is standing. /end ID]
And so of course Stage 4 is Colour. I add in the colours, any lighting effects, all the extra fun bits.
My colouring is USUALLY pretty basic, to save time and effort. For colours that I tend to reuse a lot (typically sunbeams uniforms and the main colours for the various beams) I have them saved in my paint app so I can access them easily. For other players I've drawn before I usually have to bring up one of my previous drawings to reference the colours. Backgrounds are the bane of my existence and as thus are usually kept as simple as possible, and lighting is typically something I use sparingly. Basically, I take as many shortcuts as I possibly can to save my sanity.
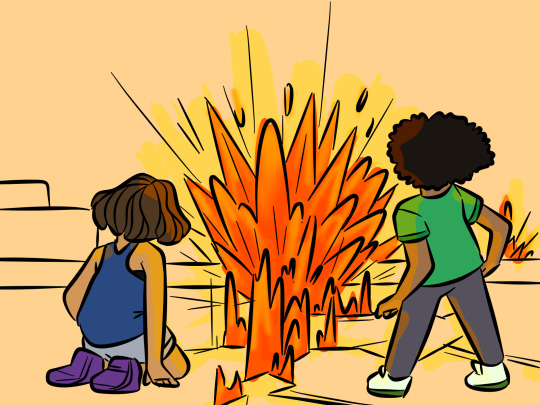
[Image ID: The above picture but with basic colour. The background is a pale orange. There are some lighting effects on the explosion. /end ID]
And voila! Off to Youtube. Like I said above, I'm sure this isn't the quote unquote 'Best' way to do it. But it works for me, and doing it in these stages give me a fun little progress video to look back on when I'm slogging through the lineart stage.
It's definitely really tedious at times, and keeping up the motivation to do hundreds of frames three times in a row can be really difficult (especially with a full time job) but it's definitely sooooo exciting when I finally finish. I publish all the draft and lineart videos on youtube as well as unlisted videos, and its always fun to look back on them to see the difference between the draft and the final finished product.
Most of all though, it took me AGES to get to the point of animatic making where I am now. My very first animatics for Dimension 20 were SO different to what I do now, and I was very lucky for a while to have a lot of free time to focus on doing it a lot. My VERY first animatic wasn't even set to a song. It was from a Fantasy High clip, and i never got past the draft stage for it.
The other part of animatic making that I had to start taking really seriously was character design credit. For Quite a while, I did not include credits for designs of players that I did not create. It wasn't until Aequitas Aug (which had an OBSCENE number of players) that I realised what a massive oversight that was. Nowadays I have a big spreadsheet that lists every Blaseball player that has ever appeared in my animatics and the creator of the design that I used/riffed off of if I could narrow it down to one or two. For some players its trickier, often because their design was consistent over multiple artists or I couldn't be sure what the origin was, but I do my best to be as accurate as possible. If you're looking to make some blaseball animatics, I totally encourage you to do so, but I would advise getting on top of credits sooner rather than later! It's so much easier to add in new characters and their designers now as I find them rather than trying to backtrack and remember exactly which picture on the wiki I took inspiration from, along with it being a lot more respectful to all the other amazing artists in the fandom.
Overall, animatics are a lot of effort, but they're soooo worth it. If you have any more questions please feel free to ask me, I love to talk about my animatics and my process.
#ask#my art#animatics#long post#i hope this is helpful!!!#legitimately feel free to ask me more questions or send me a dm#i love to talk about myself and my work
9 notes
·
View notes
Note
Ask game let's hear it for: 2,8,9
Wah! Thank you!
2 / Favorite Thing About My Style
Probably that it's fast? XD I remember worrying early on that I'd never be a really stunning artist because I didn't have as much time to devote to it as other people. A smart friend told me to just focus on making pieces I could call "complete" in a short amount of time.
Basically, adjust my view of what my "art" would be. And it worked! I have other artist's styles that I like more, but I realized too some of my favorite fanart back in the day was fanart that looked like it was pulled right out of someone's sketchbook. With big chunky lines and little marks and forms that tell you where their focus was!
-
[More Answers Below!]
-
8 / Most Fun and Least Fun Parts
I really enjoy the "concept" phase. You put just anything down, and because I'm a Kirby fanartist, that's usually a circle and then you just keep adding onto it. A pair of triangle horns ears? You've got a Magolor. Big eyes? A Marx. Draw a circle on top? A Meta Knight. Draw a circle halfway below it, a Dedede. Etc...
I'll often pick a perspective at random and then start filling in what the character might be seeing/doing from that!
Least fun is figuring out things like light and where my characters are in space. I've got a vision impairment that means I can't see "depth" in RL so perspective is hard for me. I found a trick for lighting that has you douse the object in shadow and then "carve out" the light, which helps because I can imagine what's on "top" easier than what casts shadows, but I still haven't gotten perspective down. I've even used 3D models but things just get more confusing somehow!! :cries:
-
9 / Finished Piece and Original Sketch
Here's two, based on the fact that I have two different brushes I use for sketching and that leads sometimes leads to two different styles.
The first one, for my Father's Day piece, I did the rough sketch in PaintStorm Studio, which is an under-appreciated little app (It doesn't work flawlessly on iPad but it's highly functional) and is my favorite app for concept sketches because it's like the FocusWriter of drawing apps. Then I imported it to Clip Studio, adjusted the size (I draw my concepts VERY small, usually starting with a box to help figure out how much canvas I want to use) and built it up from there.
The second, I did the sketch in Clip Studio using this soft painterly builder brush I made based on some other artist's brushes. This style of sketch is more "chisel-y" and I'm frequently carving out areas as I draw them by lowering the brush's alpha to zero. It's pretty easy to apply colors on top in this style (as opposed to the previous style, which requires cleaner line work.) I also started this piece as just a solemn, lonely Magolor looking "captured" and regretful. Adding the crown and then adding the reflection in the water came later on.
I was gonna have him be hanging by some Dark Matter looking vines originally, but then I remembered I'd seen someone on JP Twitter say that his magic circles in Soul form were almost like handcuffs restricting his actions, which is why I switched to those.
(You can't see it here from the sketch, but I knew from the beginning I wanted it to be color on a black background.)
One last thing because I think this is probably something weird only I do? (But maybe other novice artists will find it freeing??)
When I'm drawing sequential comics, even for the four-panel ones, because I can lose my train of thought easily, I tend to draw them completely OUT OF ORDER, going with whatever image is strongest in my mind first. Then I just scatter the rest over the page wherever there's room as I get ideas, finally using the lasso tool to re-arrange them later! You can see everything in the proper sequence here!
(You can also see that originally, Marx shows some barely concealed sorrow that Kirby doesn't recognize his childhood friend after all that he's been through. In the finished piece, I had him respond by going all fangs-out crazy instead. He IS a villain after all!)
5 notes
·
View notes
Text
Commission Prices
Cost: Depending on what you want, anywhere from $16 to $70
Payment Method: USD through paypal, Ko-fi, or Cashapp. I also accept DA Points and Amino Coins
Turnaround: Up to 1 week per piece (allowing for breaks and my full time job)
Tools of the Trade: Ipad, Apple Pencil, Procreate
What I WILL Draw: RPG characters, humans/humanoid (male and female), Anthros, Ferals, Ponies, Geological fantasy maps, backgrounds
What I Will NOT Draw: Heavy gore (intestines and blood are my extent), Extreme NSFW (I can draw nudity, but no porn), anything illegal (This includes minor/adult relationships of any kind, bestiality, and hard drugs), any hate towards any group of people
**COMMISSIONS RULES**
I have the right to decline any piece I do not think I can do or do not want to do. I will not tolerate begging or insulting. You will be reported and blocked.
I do not work for exposure. Obviously if you're reading this, you intend to pay me for my work, but I feel I need to add it to the rules anyway.
You must pay for the commission up front. I will not start on the commission until payment has been received. I can also accept half up front and half when finished before I send the unwatermarked image through email or toyhouse. I understand that people get ghosted and lose trust in people. I'm okay with some payment beforehand and some payment after.
Commissions can take time depending on my schedule. I'm chronically ill, have a full time job, and take care of children when I'm not working. Please be patient. Each piece takes anywhere from a few hours to a few days. I try my best to get pieces out as quickly as possible while still providing excellent work. If there's an issue on my end that will delay your piece, I will keep you updated.
I am a digital artist only. I do not do tradition or canvas art.
If you repost the art on Deviantart (gayfairyorc0930), Instagram (gayfairyorc0930), Twitter (gayfairyorc), Amino (gayfairyorc), or Reddit (gayfairyorc), I'd love it if you could tag me. I love seeing happy customers spreading a good word.
**COMMISSION PRICES**
HEAD SHOTS (Neck Up)
Lineart- $16 (1280pts, 1600ac)
Flat Color-$18 (1440pts, 1800ac)
Shaded (your choice of blended or cell)-$20 (1600pts, 2000ac)
BUSTS (Chest Up)
Clean Sketch-$22 (
Lineart- $24 (1920pts, 2400ac)
Flat Color-$26 (2080pts, 2600ac)
Shaded (your choice of blended or cell)-$30 (2400pts, 3000ac)
HALF-BODY (Thighs Up)
Clean Sketch-$32
Lineart- $34 (2720pts, 3400ac)
Flat Color-$36 (2880pts, 3600ac)
Shaded (your choice of blended or cell)-$40 (3200pts, 4000ac)
FULL-BODY (Entire Body)
Clean Sketch-$42
Lineart- $44 (3680pts, 4400ac)
Flat Color-$46 (3840pts, 4600ac)
Shaded (your choice of blended or cell)-$50 (4000pts, 5000ac)
REFERENCE SHEET (2 Full-bodies, 1 Bust, and tidbits of info) begins at $50, 4000pts, 5000ac
Info I need:
NON-D&D CHARACTER
-Name, gender/pronouns/sexuality, age
-usual outfit(s)
-6 to 10 likes and dislikes OR 5 specific favorite things (favorite food, drink, flower, etc)
-any other information you wish to give me about your character
FOR D&D AND OTHER RPG CHARACTERS
-Name, gender/pronouns/sexuality, background
-usual outfit and current equipment
-stats and proficient skills
-a bag filled with common items your character has ($5, 400pts)
-An animal companion (cats, dogs, rodents) ($5, 400pts)
-An animal companion (horses, dragons, birds) ($8, 640pts)
-Additional Bust ($10, 800pts)
-Additional Fullbody ($20, 1600pts)
0 notes
Text
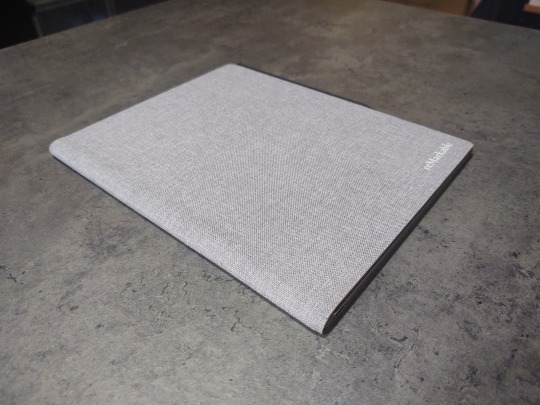
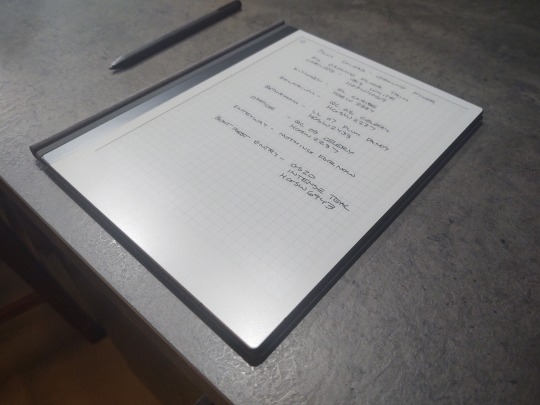
reMarkable 2 Review
I had some requests for a review of this device, and I am glad to oblige in this case. I've been closely following digital pen stylus tech for about eight years. I'm just old enough that I still need to handwrite a lot of things to tap into my creativity, but greatly dislike clutter in my life.
The reMarkable is for the person that writes enough by hand to fill several notebooks a year. For someone that wants the tactile and somatic component of writing on paper to associate with their process. The new reMarkable 2 does basically what the reMarkable 1 did; faster, better, and with a much improved piece of hardware.
If you've read my previous review from May 2018, you know I basically raved about the first generation reMarkable. I had a few criticisms of the Gen 1, and a lot of that has been addressed with the Gen 2.
Support & User Experience
I've used a reMarkable tablet continuously for almost three years. I've never had a support issue with one. The software is updated regularly, features added, and user experience improved with each iteration.
There is really no comparisons to be made with that kind of uninterrupted usage. No smartphone, tablet, or computer you ever own will be that reliable. A 3-4 year old Thinkpad, running Linux, is about as close as it gets to that level of, switch-on-and-use, every day, without fail feeling.
The reason is that the reMarkable 2 is leveraging the most reliable hardware, user input methods, stylus technology, and operating system basis available. My fear has always been that my reMarkable wouldn't be as reliable as a regular piece of paper, and a good pen. So far, that fear has never been realized with the reMarkable 1, or 2.
Pen Stylus Input
The majority of what one picks up and uses will be Microsoft Pen Protocol (MPP) stylus tech, with Microsoft Surface Products, or Wacom AES (Active Electrostatic) like that found in a lot of Asus, Dell, Lenovo, and so forth. The older Wacom EMR (Electromagnetic Resonance) is used less frequently, and usually only with their own products, or a version thereof with Samsung Phones and Tablets.
Of the three options, Wacom's EMR is still the best.
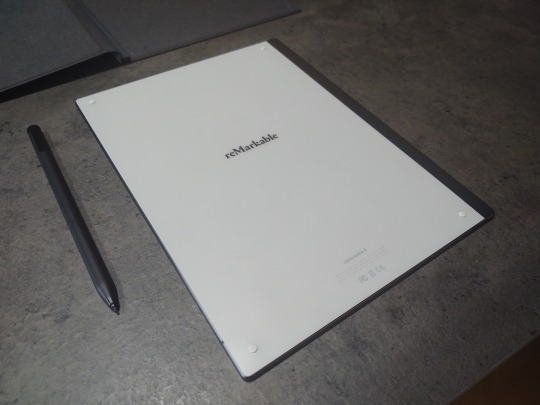
That's what you'll find on the reMarkable Tablet, and if you get their Marker Plus (it's the black one) it has the magical EMR eraser tip opposite the drawing point. There is no better pen stylus experience, for general use, sketching, handwriting capture, tilt sensitivity, and so forth.
The Marker Plus is $50 more than the regular Marker. It is worth it.
What if you're like me, and you have a drawer full of pen stylus products? Products that include the legendary Excalibur stylus pen that came with the Thinkpad Tablet 10 Gen 1, and worked with the EMR capable Thinkpad Yoga S1 from 2013? The one with the eraser tip, and sweet felt tip point? Will that stylus work?
Yes. Yes, yes it will.
However, the reMarkable Marker Plus just feels better. It's heft (19g) is perfect, eraser tip rounded to feel like the real thing, and tips that degrade gracefully without marking up the screen. Buy. The. Marker. Plus.
The Hardware
The manufacturer says that the reMarkable 2 gets 3 times the battery life of the 1, is 2 times as responsive (relative to rendering digital ink), and is the world's thinnest tablet at 0.19". Mostly, this is all of this seems to be true. Also, as mentioned before all the new Marker Plus has a built in eraser, all the new accessories snap together with magnets, and it charges with USB-c.
The screen is capacitive touch capable now. No more page turning buttons, and you can swipe down from the top to back out of a document or folder. You can turn pages with the swipe of a finger now. It takes a second to get the gestures down, but they're crisp and reliable once you do.
The tablet runs off of a dual core ARM process (a good thing, in my opinion).
My only quibble is that it is supposed to be able to connect to both 2.4GHz and 5.0GHz WiFi, but so far I've only gotten it to connect to 2.4. It might be something with my specific router, and I'm not sure if my experience is typical.
On the lower left hand side of the tablet there are 5 connection points. This suggests that the tablet may have the ability to connect to other accessories in the future. If reMarkable added a Plain Text Editor, and a keyboard cover to the reMarkable, I would be over the moon.
There is no evidence that they will do this, but a guy can dream. Having what's basically an e Ink Typewriter this thin and light would be the ultimate for this writer.
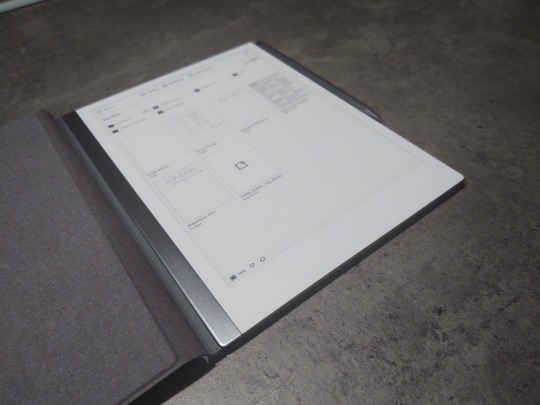
The Software
It is much the same experience as the reMarkable 1 with a few new additions.
You can convert your handwritten notes into text, cursive or block letters, and share by email. There is support for 33 languages.
With a Google Chrome plug-in, you can read web articles and pages on your reMarkable. If you're already battling with eye strain from looking at glowing screens all day, this is a nice feature.
Reading large PDFs and eBooks is still not crisp and snappy, but it is a vastly improved experience when compared to the reMarkable 1. Large graphically intense documents can be navigated without it taxing your patience. What I store on my reMarkable is vastly different now because of how much improved document handling has become.
I find the small sacrifice in speed rendering pages worth it, compared to the eye strain I get reading on other screens.
More pens, features, page templates, and ease of organizing have been added incrementally over time. With regard to the core functioning (Linux Based Codex OS) of the device, the manufacturer has only ever improved and supported the reMarkable.
Aesthetics
The reMarkable 1 was good for what it could do. It wasn't a bad looking product, but compared to the reMarkable 2, it was a rough prototype. Most tablets do not feel as nice in the hand as the reMarkable 2.
Rubber no-slip nubs on the back, rounded edges, satin finished glass and aluminum, make the tablet itself feel like it's from the future. I bought the Polymer Weave Book Folio, a step up from the regular Folio. A close friend got the same device and marker options as I did, but opted for the Premium Leather Folio.
Definitely, get the Book Folio, and if you can scrabble together the extra money, get the premium leather. That's my only regret is that I didn't spring for the best accessory offered. Is the Polymer Weave good? Absolutely, worth the $99. It is rigid, will protect your investment, and it's very classy looking.
My friend who picked up the Leather Folio is a graphic designer, and has greatly informed my sense of aesthetics over the years. She says the Leather Book Folio is well worth the extra. She is, most certainly, correct.
So, yeah, if you're going to get a reMarkable 2 and want a slightly used Polymer Weave Book Folio (mine), I'll let it go for cheap (so I can atone, and get the leather version, ha ha).
Value
The reMarkable 2 doesn't have a web browser, app store, Merge Dragons, audio player, or other third party applications. It won't replace your iPad, or Android Tablet. It will replace all the paper, notebooks, and pens in your life. This is especially true if you have a small scanner (like a Doxie), and leverage reMarkable's Smartphone app and cloud sync feature.
This tablet is for people that like paper, a lot, but don't want to carry it around or keep track of it. It is for people that fill 8-12 Moleskines a year, and mark up hundreds of pages of documents, for themselves, and others. It is for people that tap into their creativity by writing things down, sketching diagrams, and making lists.
The act of holding a pen or pencil against paper is a cognitive trigger, built into their implicit memory, every day, for years, that allows them to do their things.
$399 will buy a decent Samsung or Apple branded tablet, but neither of those is designed to emulate the experience of writing on paper like the reMarkable 2 tablet is. The reMarkable 2 will run you $399, a Marker Plus $99, and a Polymer Weave Folio $99, bringing it all to almost $600.
Unless you lurk reMarkable's website, and wait for a promotion. They did run a promotion for their pre-order, and will likely do something similar within a year of release. It is my recollection that the manufacturer ran at least two promotions for the Remarkable 1, and the savings were significant.
If you don't need one right this minute, check the website every week or so, their Amazon Store edifice, and whatever other options they have for your region.
Competitors
In the last few years, reMarkable has only acquired more competition in the e ink Tablet market. That competition varies depending on where you live in the world. In the US, no one makes a thing that directly competes. I looked at other products, didn't see anything that made me pull out my reMarkable 1 and make a list of pros and cons for comparison.
That isn't to say there isn't a better thing for your use case, but there wasn't for mine.
Final Thoughts
If I didn't drive this point home earlier, I'm going to make it now. The reMarkable 2 will not replace your laptop, mobile OS (iOS/Android) Tablet Device (meant to replace your laptop), or Smartphone. There isn't even a calculator app on the reMarkable 2.
The Remarkable 2 will replace the pens, pencils, highlighters, notebooks, and print outs cluttering up your daily carry bag, desk, and life. It's a digital paper option, not a personal computing option. When used for that purpose, it is exceptional, and well worth the investment.

4 notes
·
View notes
Text
There is no better way to get to know someone than through a good question tag. In this case we have decided to make an Indie game dev question tag with the responses of our four developers. We hope that it will reveal many unknowns, but if you are left with any questions, do not hesitate to use our ask.
What part of game development are you responsible for?
Athe: I write and write, I melt in my seat, I correct, I cry and then I program. It’s an endless cycle. Occasionally I laugh like crazy while I eat Pringles.
Sam: I draw and color without leaving the lines (almost always) the sprites, the illustrations and the ravings that usually occur to us past 3 in the morning.
Illy: English translations.
Sher: I draw BGs
What tools do you use (hardware / software)?
Athe: Recently my desktop PC has passed away, so I’ve had to rescue my old PC from the garage. I also have a laptop that saves my life more times than I would like to admit. As for the software, I need, above all, drive documents, video editing programs, image etc (I have an Adobe package) and of course Renpy and Atom.
Sam: My main friend and companion is my tablet, a wacom intuos S (pistachio color, so cute). As programs I mainly use the Paint Tool Sai, because there is nothing in this life like its stabilizer. And less frequently than I would like (for details, texture brushes, effects ...) I also use Clip Studio Paint, which I only know how to use at about 2% of its capacity ... If someday I have time I would love to stop and learn seriously what can be done with it.
Illy: During the school year I live in a residence, so I use an old laptop, and when I return home I use a desktop computer that never has memory space. I translate the chapters in the same Atom where the complete script is and I keep them in google drive files where I share them with our beta reader. I also use editing programs like photoshop when I have to translate comics or procreate for when my artistic skills are required.
Sher: ipad+procreate+some final tweak in photoshop, I don't need much more
What is your favorite part of the job?
Athe: Would it be wrong if I say that is when we released the episode? During the whole production time everything is very stressful, there are times when it’s really uphill, but when we release a new chapter it feels soooo good. It's like saying to yourself, yeah, dammit, I can do it. Look at everything you've climbed by yourself. You're doing it right.
Sam: In general, my favorite parts are when the first scenes start to be programmed, and I can see the sprites with the backgrounds, the texts, and how the illustrations look. Everything always looks so much better when viewed in-game… I also really like being able to check out the script as it is written. And from the artistic part that concerns me, when I see that my hands capture the idea that I had in my head ... Especially in character designs.
Illy: Having to find a way to translate very spanish expressions into English, research vocabulary that I have never had to use and commenting on some translations with our beta reader (which we adore) to make it understandable without losing the original meaning.
Sher: I like to do the lineart when the sketch is complete, if I no longer have to think about anything else and it's just going through it, I find it very fun and relaxing
What is the most difficult part for you?
Athe: Offf, yes, I admit it, sometimes writing is the WORST. Other times I love it, especially when I can expand on the descriptions or stop at a part that is intimate or that I find interesting (for example, Hasiel's conversation from 6.3, small spoiler: P). But, I HATE having to paste scenes, often the protagonist moves between scenes and you always have to add lines to those transitions that really do not interest anyone, but that otherwise the text would be confusing. Anyway... It is a very wide world, with a lot of history, I have to deal with what I need readers to know to understand the facts, although sometimes it gets a bit boring.
Sam: What part does not... Rather who e.e Zihel and Ariel are a thorn in my side. Especially Zihel. I know it has to do with the fact that it has never been my strength to draw boys, and much less if they are more masculine in appearance... That's why I also suffer a lot from drawing muscles. Another thing that brings me a headache is the perspective of the illustrations. Every time I try to get out of the typical shot or poses a little... It doesn't work out.
Illy: Doughy’s stuttering ¬.¬
Sher: chairs, sofas, tables... anything with four legs is my enemy
Anything to help or encourage you while you are working?
Athe: I need music, no, seriously, I NEED IT. I’m unable to focus without it. If, on top of that, I can get what I hear to act as a sounding board for what I write, the text is a thousand times better... But the muse is a pretty bad person.
Sam: Having a show/movie in the background that entertains me. The longer the better, so I don't have to stop to think what I want to put on next.
Illy: Eating sunflower seeds to trick my brain and not be tempted to do something else that distracts me.
Sher: I try to see other artists to motivate and inspire me before I start drawing, what I find most difficult is that initial push and that is where I need the motivation, then I usually have something in the background but it is not necessary
Something that’s a pet peeve or discouraging?
Athe: Some narrative climax moments. Generally, they are not important plot moments (that is almost entirely decided), they are often small decisions to go from scene A to scene B, but I can spend a LOT of time deciding which is the fastest and best way to tie those two ends. I'm the worst.
Sam: Many times when starting, I can't get the poses to fit the way I want, for example.
Illy: Finding many parts in a row that I find especially difficult to solve and that make me believe that I have forgotten how to English properly. And looking at how many lines I still have left.
Sher: When I don't know how to fill in some area, if I see something very empty but I don't know how to solve it, I can spend days looking at the screen without being able to advance, even if I have other areas that I could do in the meantime
What is required on your table or work surface?
Athe: Notebooks, sticky notes, pens… I’m a person who writes everything down, especially the tasks, but I also order the story by color schemes. The stack of sticky notes have 9 different colors, each one represents a character and I play a lot with them for a lot of nonsense. Besides, even though I have been writing on the computer for many more years than I wrote by hand, I still have a preference for the analogical.
Sam: Coffee, sweets, chocolate, cereals... And cats.
Illy: My phone, the sunflower seeds, a Capital America: Civil War 1L water cup, sticky notes that remind me of tasks.
Sher: I have nothing really lol all my things are for decoration
Your most productive hours?
Athe: Owl. Totally nocturnal. Although I have several crises a month to force myself to work at other times that always end... Wrong.
Sam: Also at night for the most part, although I can no longer stay awake as long as I endured before having a job (the good old days...) However, in the middle of the afternoon, when the zoo that I have at home is still taking a nap, I also manage to go a long way.
Illy: From when I finish eating until 7 or 8 in the afternoon, when I don't have to cook, clean, run errands...
Sher: I take over for Illy apparently, from 7 or 8 is when I start to get into the mood until bedtime
Do working hours make you forget to eat or make you eat twice as much?
Athe: It depends, in the past I ate a lot, now if I have stress I don't eat anything. If I'm in a normal productive phase and I'm not on my nerves, I'm probably eating by inertia.
Sam: They make me eat more, but especially junk food e.e And they make me forget healthy meals, especially dinner at night.
Illy: It depends on my mood, but I usually eat twice as much.
Sher: I'm generally a VERY distracted person so I don't usually get to focus on a task to get to either of those two modes but I guess when I am sooooooo much on the task, I forget. But that happens like a couple of times a year and "forgetting" is "I delay an hour."
What part of your set up would you improve / change (in aesthetics or functionality) if you had no money limit?
Athe: I'm trying to match some of my peripherals with the rest. They are all a damn different color, apparently I'm cursed... Now seriously, I wish I had a better graphic card that would allow me to make video captures, some speakers and a quality printer.
Sam: Actually, I don't think I need anything more complex than what I already have… But if I had to improve something, I'm curious about the most professional tablets, the big ones with the included screen and all that stuff.
Illy: A new laptop that lets me open 4 chrome tabs, Atom and photoshop at the same time without dying.
Sher: A pc screen that will not change the colors I use on the iPad would be nice, really
Which character are you most like? And why?
Athe: Phew I think the easy answer would be to say Akane ... But, Akane is a better person. : P
Sam: This is very difficult... They are all very different, but still I do not think I look much like any of them. If I have to say something, I could identify with Maske's tendency to avoid problems, and his more homey and calm side. And well… Since Akane has been an OC of mine for many years, surely I have something of her too.
Illy: I think I partly have Maske's instinct to stay out of trouble, and on the other hand Joe's shallowness, although tbh I wish I really did look like any of our awesome babies.
Sher: surprised because (unpopular opinion around here) is one of those who I "least care" about really but I would say that Pin because he is a little dumb, happy and probably has a Satanic room and proud of it
Favorite CG/art.
Athe: AT THE MOMENT. Maske chapter 1. It couldn't be more predictable. I know.
Sam: I quite agree with Maske in chapter 1. But I would also put Pin in chapter 5 and Akane in chapter 6.2 on the top.
Illy: Kyeran in Coco's tank ?? Is he even real? Being basic is my brand.
Sher: surprised again and disappointed but I would say that of angel Hasiel because I like pretty dresses, pretty hairs and pretty wings
Favorite BG/scene.
Athe: The Red Light District amazes me. I already liked the life of that place, its history, but the way of expressing it... Uggg Sher took it to another level. The dirt on the street, the night, the constricted buildings...
Sam: I think I’ll say Raziel’s square, I like it a lot from the first day.
Illy: I don't know if I can choose just one T__T but I would say that the Red Light District and Valefar's pub are at the top.
Sher: for not repeating the red light district that I also like very much, I really like the areas of Coco's laboratory, including the “main” area although the perspective is horrible and makes the characters look tiny, but I like how it looks :(
Your favorite chapter to date?
Athe: Ufff... The first and second one I assure you no, hahaha. I will say that the third one, but also for things that are not necessarily from the chapter, but of the production. It was a good moment. I felt that everything was flowing with ease. We all assumed a clear role, they were times that made us feel comfortable and capable of assuming what came next, I think it was a qualitative leap also, both in texts and in art.
Sam: Oh. Well let's see... Chapter 5 is amazing for me, for everything that happens but also because there are many personalized interactions and choices. I can't say I have a definitive favorite, but it could come close… Also from the last ones I really like the 6.2.
Illy: Chapter 5 has so many details, so many things happen, it's hard not to be my favorite. But the last ones with the specific routes are so great that if I stay with the 5 it’s with the pain of my heart to have to choose one.
Sher: I would say 5 also because in the end when a lot of things happen is when you remember the most
Twitter | Instagram | Itch
🚧🚧🚧🚧🚧🚧🚧🚧🚧🚧🚧🚧🚧🚧🚧🚧
No hay mejor forma de conocer a alguien que a través de un buen tag de preguntas. En este caso hemos decidido hacer un Indie game dev question tag con las respuestas de las cuatro desarrolladoras. Esperamos que os aclare muchas incógnitas, pero si os quedáis con alguna no dudéis en usar nuestro ask.
¿Qué parte del desarrollo del juego llevas a cabo?
Athe: Escribo, escribo, me derrito sobre mi asiento, corrijo, lloro y después programo. Es un ciclo sin fin. Ocasionalmente me río como una demente mientras como Pringles.
Sam: Dibujo y coloreo sin salirme de las líneas (casi siempre) los sprites, las ilustraciones y los desvaríos que suelen surgir a partir de las 3 de la mañana.
Illy: Las traducciones a inglés.
Sher: Hago fonditos
¿Qué herramientas utilizas (hardware/software)?
Athe: Recientemente mi PC de sobremesa ha fallecido, así que he tenido que rescatar mi viejo PC del trastero, también tengo un portatil que me salva la vida más veces de las que me gustaría admitir. En cuanto al software, necesito, sobre todo, documentos de drive, programas de edición de video, imagen etc (tengo un paquete de Adobe) y por supuesto Renpy y Atom.
Sam: Mi principal amiga y compañera es mi tableta, una wacom intuos S (color pistacho, muy cuqui.) Como programas uso sobretodo el Paint Tool Sai, porque no hay nada en esta vida como su estabilizador. Y con menos frecuencia de lo que querría (para detalles, pinceles de texturas, efectos…) también utilizo el Clip Studio Paint, el cual sólo se usar como a un 2% de su capacidad… Si algún día tengo tiempo me encantaría pararme a aprender seriamente todo lo que se puede hacer con él.
Illy: Durante el curso vivo en una residencia, así que uso un portatil del año que reinó carolo, y cuando vuelvo a mi casa un ordenador de sobremesa que nunca tiene espacio en la memoria. Los capítulos los traduzco en el mismo Atom en el que está el guión completo y los guardo en drive donde los comparto con nuestra beta reader. También uso programas de edición como photoshop cuando tengo que traducir viñetas o procreate para cuando mis habilidades artísticas son requeridas.
Sher: ipad+procreate+algún retoquito final en photoshop no necesito mucho más
¿Cuál es tu parte de favorita del trabajo?
Athe: ¿Estaría mal si digo que es cuando sacamos el episodio? Durante toda la producción todo es muy estresante, hay veces, que se hace realmente cuesta arriba, pero cuando liberamos un nuevo capítulo sienta taaaan bien. Es como decirte a ti misma, sí, joder, puedo hacerlo. Mira todo lo que has escalado tú solita. Lo estás haciendo bien.
Sam: En general, mis partes favoritas son cuando se empiezan a programar las primeras escenas, y puedo ver los sprites con los fondos, los textos, y cómo se ven las ilustraciones. Todo queda siempre mucho mejor cuando se ve dentro del juego… También me gusta mucho poder cotillear el guión conforme se va escribiendo. Y de la parte artística que me toca, cuando veo que mis manos plasman la idea que tenía en mi cabeza… Sobretodo en diseños de personajes.
Illy: Tener que buscar la forma de traducir a inglés expresiones muy nuestras, investigar vocabulario que no he tenido que usar jamás y comentar algunas traducciones con nuestra beta reader (a la que adoramos) para conseguir que se entienda sin perder el significado original.
Sher: me gusta hacer el lineart cuando el sketch está completo, si ya no tengo que pensar nada más y es solo ir repasando me parece muy divertido y relajante
¿Cuál es la parte que más te cuesta?
Athe: Ufff, sí, lo admito, escribir a veces es lo PEOR. Otras me encanta, sobre todo, cuando puedo explayarme con las descripciones o detenerme en una parte íntima o que a mí me parece interesante (por ejemplo, la conversación de Hasiel del 6.3, pequeño spoiler :P). Pero, ODIO tener que empastar escenas, a menudo el protagonista se mueve de escenarios y hay que agregar siempre líneas a esas transiciones que realmente no interesan a nadie, pero que de lo contrario el texto quedaría mal montado. En fin… Es un mundo muy amplio, con mucha historia, tengo que lidiar con lo que necesito que los lectores sepan para entender los hechos, aunque a veces se haga un pelín peñazo.
Sam: Qué parte no… Quiénes, más bien e.e Zihel y Ariel son mi espinita. Especialmente Zihel. Sé que tiene que ver con el hecho de que nunca ha sido mi punto fuerte dibujar chicos, y menos si son de aspecto más masculino… Por eso también sufro mucho dibujando músculos. Otra cosa que me trae de cabeza es la perspectiva de las ilustraciones. Cada vez que intento salirme un poco del típico plano o poses… No sale bien.
Illy: El tartamudeo de Doughy ¬.¬
Sher: sillas, sofás, mesas… cualquier cosa con cuatro patas son mis enemigos
¿Algo que te ayude o anime mientras estás trabajando?
Athe: Necesito música, no, en serio, LA NECESITO. Soy incapaz de concentrarme sin ella. Si ya consigo que lo que escucho haga de caja de resonancia de lo que escribo, el texto es mil veces mejor… Pero la musa es bastante mala gente.
Sam: Tener alguna serie/peli de fondo que me entretenga. Cuanto más larga mejor, así no me toca pararme a ver qué es lo que quiero poner después.
Illy: Comer pipas para engañar a mi cerebro y no tener la tentación de ponerme a hacer otra cosa que me distraiga.
Sher: intento ver otros artistas para motivarme e inspirarme antes de empezar a dibujar, lo que más me cuesta es ese empujón inicial y es donde necesito la motivación, luego ya suelo tener algo de fondo pero no es necesario
¿Algo que te corte el rollo o te desmotive?
Athe: Los nudos narrativos. Generalmente, no son nudos gordos de la trama (eso está decidido casi en su totalidad), a menudo son decisiones pequeñas para pasar de la escena A a la escena B, pero puedo tirarme MUCHO tiempo decidiendo cuál es la forma más rápida y mejor planteada para atar esos dos cabos. Soy lo peor.
Sam: Muchas veces a la hora de empezar, no conseguir encajar las poses como quiero, por ejemplo.
Illy: Encontrar muchas partes seguidas que me cueste especialmente resolver y que me hacen creer que no tengo ni idea de hablar inglés. Y mirar cuantas líneas me quedan todavía.
Sher: cuando no se como rellenar alguna zona, si veo algo muy vacío pero no se como solucionarlo puedo tirarme días mirando la pantalla sin ser capaz de avanzar, incluso aunque tenga otras zonas que pudiera ir haciendo mientras
¿Qué no puede faltar en tu mesa o superficie de trabajo?
Athe: Libretas, post-its, bolígrafos… Soy una persona que lo anota todo, sobre todo, las tareas, pero también ordeno la historia por esquemas de colores. La pila de post-its tienen 9 colores diferentes, cada uno representa un personaje y juego mucho con ellos para miles de idioteces. A parte, a pesar de que llevo muchos más años escribiendo a ordenador de los que escribí a mano, sigo teniendo querencia a lo físico.
Sam: Café, chucherías, chocolate, cereales… Y gatos.
Illy: El móvil, las pipas, un vaso de 1L de agua de Capital America: Civil War, post-its que me recuerdan las tareas.
Sher: no tengo nada realmente lol todas mis cosas son de adorno
¿Tus horas más productivas?
Athe: Búho. Nocturna totalmente. A pesar de que tengo varias crisis al mes para forzarme a trabajar a otras horas que acaban siempre… Mal.
Sam: También por la noche en su mayoría, aunque ya no aguanto trasnochando tanto como antes de trabajar (qué tiempos aquellos…) Aunque a media tarde cuando el zoo que tengo en casa aún está echando la siesta también consigo dar un buen empujón.
Illy: Desde que acabo de comer hasta las 7 o las 8 de la tarde, cuando no tengo que cocinar, limpiar, hacer recados...
Sher: le tomo el testigo a Illy aparentemente, a partir de las 7 u 8 es cuando empiezo a entrar en el mood hasta que llega la hora de dormir
¿Las horas de trabajo hacen que te olvides de comer o te hacen comer el doble?
Athe: Depende, antes comía mucho, ahora, si tengo estrés no como nada. Si me encuentro en un rango productivo normal y no estoy de los nervios, probablemente, esté comiendo por inercia.
Sam: Me hacen comer más, pero sobretodo porquerías e.e Y hacen que me olvide de las comidas sanas, sobretodo de cenar por la noche.
Illy: Depende de mi estado de ánimo, pero normalmente comer el doble.
Sher: en general soy una persona MUY distraída así que no suelo conseguir centrarme en una tarea para llegar a ninguno de esos dos modos pero supongo que cuando estoy muuuuuuy dentro de la tarea, me olvido. Pero eso pasa como un par de veces al año y “olvido” es “lo retraso una hora”.
¿Qué parte de tu set up mejorarías/cambiarías (en estética o funcionalidad) si no tuvieses límite de dinero?
Athe: Estoy tratando de que alguno de mis periféricos peguen con el resto. Todos son de un maldito color diferente, al parecer estoy maldita… Ahora en serio, desearía tener una mejor gráfica que me permitiese hacer videocapturas, unos altavoces y una impresora de calidad.
Sam: En realidad, no creo que necesitara nada más complejo de lo que ya tengo… Pero por mejorar, me llaman la atención las tabletas más profesionales, las grandes con la pantalla incluida y eso.
Illy: Un portátil nuevo que me deje abrir 4 pestañas de chrome, el Atom y photoshop al mismo tiempo sin quedarse tieso.
Sher: Una pantalla de pc que no me cambiara los colores que uso en el ipad seria bonito la verdad
¿A qué personaje te pareces más? ¿Y por qué?
Athe: Ufff Creo que la respuesta fácil sería decir Akane… Pero, Akane es mejor persona. :P
Sam: Esto es muy complicado… Son todos muy distintos, pero aún así no creo que me parezca mucho a ninguno. Por decir algo, me podría identificar con la tendencia a evitar problemas de Maske, y su lado más casero y tranquilo. Y bueno… Dado que Akane es OC mío de hace muchos años, seguramente tenga algo de ella también.
Illy: Creo que en parte tengo el instinto de alejarme de las movidas de Maske, y por otro la superficialidad de Joe, aunque tbh ojalá parecerme realmente a nuestros bebés geniales.
Sher: sorprendida porque (unpopular opinión por aquí) es de los que “menos me importan” realmente pero diría que Pin porque es tontito, feliz y probablemente tenga una habitación satánica y orgulloso de ello
Tu CG/arte favorito.
Athe: DE MOMENTO. Maske capítulo 1. No podría ser más predecible. Lo sé.
Sam: Coincido bastante en la de Maske del capítulo 1. Pero también metería en el top la de Pin del capítulo 5 y la de Akane del capítulo 6.2.
Illy: ¿¿Kyeran en el tanque de Coco?? ¿Es siquiera real? Ser básica es mi marca.
Sher: sorprendida de nuevo y decepcionada pero diría que la de Hasiel de ángel porque me gustan los vestidos bonitos, los pelos bonitos y las alas bonitas
Tu BG/escenario favorito.
Athe: Me flipa el Barrio Rojo. Me gusta la vida de ese sitio, su historia, pero la forma de plasmarlo… Uggg Sher lo llevó a otro nivel. La suciedad de la calle, la nocturnidad, los edificios constreñidos...
Sam: Creo que me quedo con el de la plaza de Raziel, me gusta mucho desde el primer día.
Illy: No sé si puedo elegir solo uno T__T pero diría que el Barrio Rojo y el bar de Valefar están en el top.
Sher: por no repetir el barrio rojo que también me gusta mucho, me gustan mucho las zonas del laboratorio de Coco, incluida la zona “principal” aunque la perspectiva sea horrible y haga a los pj parecer diminutos, pero me gusto como quedo :(
¿Tu capítulo favorito hasta las fecha?
Athe: Ufff… El uno y el dos os aseguro que no, jajaja. Diré que el tres, pero también por cosas que no son necesariamente del capítulo, sino de la producción. Fue un buen momento. Sentí que todo estaba fluyendo con facilidad. Todas asumimos un rol claro, unos tiempos que nos hacían sentir cómodas y capaces de asumir lo que venía después, creo que fue un salto cualitativo también, tanto en los textos, como en el arte.
Sam: Ay. Pues a ver… El capítulo 5 es una pasada para mi, por todo lo que pasa pero también porque hay muchas interacciones personalizadas y elecciones. No puedo decir que tenga un favorito definitivo, pero podría acercarse… También me gusta mucho de los últimos el 6.2.
Illy: El capítulo 5 tiene tantos detalles, pasan tantas cosas, que es difícil que no sea mi favorito, pero los ultimos de rutas específicas son tan geniales que si me quedo con el 5 es con un poco de dolor de tener que elegir uno.
Sher: Diría el 5 también porque al final cuando pasan muchas cosas es cuando mas se te queda grabado
Twitter | Instagram | Itch
#chr 4012#Chronicles from 4012#otome#otome game#visual novel#vndev#vn#indie dev#indie game#gamedev#tumblronday
6 notes
·
View notes
Text
Screen Share Ios Lg Tv

Lg Screen Share Apple
Screen Share Iphone To Lg
How To Screen Share On Lg Tv
Screen Share Iphone To Lg Tv Youtube
Screen Share Iphone Lg Tv Free
Once all your devices are connected to the same network, follow these steps to mirror your iPad screen to your Samsung smart TV: 1) via the App Store (a $ 4.99 value). 2) Run the application from your. 3) Wait for your Samsung smart TV to appear in the list of available TVs and then tap on it: 4) Your Samsung TV will ask if you want your device to connect. Make sure that your devices are on and nearby. Check that your AirPlay-compatible devices are on. TV Mirror for Fire TV is the easy screen mirror app to share your iPhone or iPad screen on your Fire TV. It's the most advanced screen mirroring solution with zero delay and the highest screen quality. Mirror photos, videos, games, websites, apps, presentations, documents and spreadsheets on Fire TV. How To Reset an LG Smart TV to Default Settings Press the Home button on your remote, and select the cog icon in the top-right corner of your screen to open then Settings menu. Next, head to General Reset to Initial Settings. With AirBeamTV’s app for LG TV, you can watch anything from your iPhone and iPad on your television screen! Here is how it works in 3 easy steps: Make sure that your iPhone or iPad runs on iOS 13 or higher and is connected to the same local network as your Samsung TV. Don’t use multiple VLANs, a.
Can anybody show me how to share iPhone screen with another iPhone?
How do I mirror my iPhone to my Samsung Smart TV?
In most cases, people want to mirror the iPhone screen to a large display, like a TV or PC. Thus, more people can see the screen sharing iPhone contents.
Well, no matter which digital device you want to use, you need to update your iDevice to iOS 11 first. Because you can mirror your screen with the default iOS 11 screen sharing function directly. Otherwise, you may fail to broadcast an iPhone screen.

Screen Share iPhone
Part 1: 5 Methods to Share iPhone Screen with PC
If it is the first time you know iOS 11 screen sharing, you need to add this function to the Control Center first. So open your “Settings” app first. Choose “Control Center” followed by “Customize Controls”. Later, add the “Screen Recording” option to the “Include” list. Now you can start to share your iPhone screen to PC.
Method 1: Share Your iPhone Screen with PC and Record iOS Screen
By using Apeaksoft iOS Screen Recorder, you can capture all on-screen activities from your iPhone to PC wirelessly. For instance, you can record gameplay videos, tutorials and other videos with a large display.
Moreover, there are much editing filters you can use while recording the iPhone screen. This program is compatible with all Apple smartphones running iOS 7.1 to iOS 12.
Mirror and record the iPhone/iPad/iPod touch screen on your PC with no lag.
Capture on-screen live contents from any iDevice in real time.
Export the recorded HD video in MP4 format by default.
Customize the screen recording settings freely to meet your needs.
Work with all iOS devices, such as iPhone XS Max/XS/XR/X, iPhone 8, iPhone 7, iPhone 6 and more.
Step 1 Connect to the same local area network
Drupal 7 remove addthis module. The AddThis module provides Drupal integration to addthis.com link sharing service. WHY USE ADDTHIS SHARE BUTTONS ON YOUR DRUPAL SITE? AddThis share buttons are the quickest, easiest way to encourage visitors to promote your site across across the web. Boost the number of times your site is shared, and view how people are interacting with your content on your AddThis analytics dashboard. AddThis and Drupal have an active Technology Partnership according to www.drupal.org. There are 93 companies in the AddThis partner ecosystem and 278 companies in the Drupal partner ecosystem. 12 companies exist in both ecosystems, representing 13% of the AddThis parther ecosystem and 4% of the Drupal partner ecoystem.
Free download and install iOS Screen Recorder on your PC. To start with, you need to connect your iPhone and computer to the same Wi-Fi network.
If your computer connects to the local area network, you need to put your iOS device under the same network, too. Otherwise, you may fail to share your iPhone screen.
Step 2 Share your iPhone screen to the computer
Different iOS models require different steps to mirror the screen to your PC. So you need to choose the most relevant method to share your iPhone screen.
For iOS 7/8/9:
Swipe up from the bottom of your iPhone screen, you see the Control Center. Trigger the “AirPlay” option to the “On” state, choose “Apeaksoft iOS Screen Recorder” under the “AirPlay Mirroring” list.
For iOS 10:
Tap the “AirPlay Mirroring” option in the Control Center. Later, select “Apeaksoft iOS Screen Recorder” to share your iPhone screen with the computer.
For iOS 11/12:
Open the Control Center by swiping up from the bottom. Choose the “Screen Mirroring” icon. Then you can see all available options under its list. So tap the “Apeaksoft iOS Screen Recorder” option to enable iPhone screen sharing.
Step 3 Record your iPhone screen on PC
Lg Screen Share Apple
Once the screen sharing function is triggered, you can see a gray icon with a red dot inserted on your iPhone. This button plays an important role in iPhone screen recording. You can start and stop recording your iPhone screen with this button. Once the screen recording process ends, you can see the recorded video file directly.
Cross-platform password management. Get LastPass Chrome for the most robust feature set of any password manager option. View, edit, and manage your LastPass Vault from your desktop with our Mac App. LastPass for iOS is an app that will allow you to carry your LastPass data around with you and easily log in to websites from your iPhone, iPod Touch, and iPad. Once you install and log in to the app, you can set up and use Touch ID or Face ID, enable and use autofill, add and manage passwords, secure notes, and form fill items in your LastPass Vault, use security tools and manage your settings. Lastpass for ipad safari. LastPass is an online password manager and form filler that makes web browsing easier and more secure. LastPass for Safari. LastPass browser extension for Apple Safari. This is a Mac App which includes the Safari extension. LastPass for iPhone/iPad. LastPass for Android.
Method 2: Screen Share iPhone Contents with PC Using TeamViewer
TeamViewer is a popular screen-sharing program that allows users to share the iPhone screen remotely. You can mirror iPhone and iPad screens to other mobile or desktop devices as well.
For instance, it lets you share iPad screen with another iPad using TeamViewer. All you need to do is updating your iDevice to the iOS 11/12. Then TeamViewer can do the left things effectively.
Step 1 Run TeamViewer on your iPhone and PC
Install TeamViewer Quick Support app on your iOS device. Then download TeamViewer 13 software on your PC. You need to enter the TeamViewer partner ID and password to establish the connection.
Step 2 Share your iPhone screen to PC wirelessly
You will be prompted with “Allow remote support?” on your iPhone. Choose “Allow” to confirm.
Swipe up your iPhone to access the Control Center. Tap the “Record” button. Then select “TeamViewer” followed by “Start Broadcast”. Sooner, you can see the mirrored iPhone screen on your PC.
When you want to stop sharing iPhone screen, you can choose the “Stop Broadcast” option to finish the process.

Method 3: Share an iPhone Screen with Your PC by Reflector
Reflector 3 can mirror an iPhone screen with your PC seamlessly, too. Both Windows and Mac computers are supported. Thus, you can share an iPhone screen with your Mac computer by Reflector 3, too. In another word, Reflector 3 can mirror devices using Google Cast, Miracast and AirPlay mirroring features.
Step 1 Run Reflector 3 on PC
Bumblebee drawing easy. Even a semi-realistic bee drawing starts with just a few simple shapes. Draw a small, slightly tilted oval for the head. Then add a circle next to it - this will be the thorax - the middle part of the bee's body that holds legs and wings. Step 2: Sketch the abdomen. All the best Bee Drawing Easy 38+ collected on this page. Feel free to explore, study and enjoy paintings with PaintingValley.com. All the best Simple Bee Drawing 34+ collected on this page. Feel free to explore, study and enjoy paintings with PaintingValley.com. 55,788 bee drawing stock photos, vectors, and illustrations are available royalty-free. See bee drawing stock video clips. Honeycomb ladybird print vintage bee drawings bees concept bee line art vintage ladybird illustration bee logo outline bee with honey bee drawing bee line drawing.
Download Reflector 3 from its official site on your PC. Well, you will receive the notification from Windows Firewalls. Choose “Allow” to move on. Launch Reflector 3 after the installation.
Step 2 Share your iPhone screen with PC
Turn on your iPhone. Swipe up from the bottom to get the Control Center. You need to choose the “AirPlay” icon. Then select the name of your computer from various choices. Be aware that you need to turn on the “Mirroring” toggle under the selection. Once you trigger the iPhone screen mirroring feature, you can see your iPhone displaying on the PC.
Method 4: Enable Screen Sharing from Your iPhone to PC with AirServer
AirServer can turn your Windows computer as a remote mirroring receiver. As a result, you can share the display of an iPhone or iPad through AirPlay mirroring wirelessly. Remember that you need to make sure your iPhone and computer work in the same network.
Step 1 Launch AirServer
Download AirServer on your PC. Follow its setup wizard to complete the installation. When you locate the “Activation” section, you can try its trial version or activate the program directly.
Step 2 Share the iPhone screen with PC remotely

Open the Control Center on your iOS device. Find and tap the “AirPlay” or “AirPlay Mirroring” option. Later, you can trigger the iPhone screen sharing feature. There is no need to prepare a lightning USB cable.
Screen Share Iphone To Lg
Method 5: Share an iPhone Screen with PC Using LonelyScreen
LonelyScreen can cast your iPhone screen to a PC or Mac, just like what a TV used to do. Consequently, you can share the display of your iPhone or iPad with more people. Furthermore, LonelyScreen allows users to share the captured iPhone screen video to YouTube or Vimeo by one click.
Step 1 Run LonelyScreen software on PC
Visit the official site of LonelyScreen. Download and install the latest version on your computer including Windows 10/8/8.1/7/Vista, etc.
Step 2 Share the screen of your iPhone to PC
Head to the Control Center on your iPhone, you can swipe up from the bottom to access it quickly. Enable the AirPlay mirroring feature manually. You can find this icon near the bottom of your iPhone screen. Tap an icon with the name of your computer.
Once the “Mirroring” icon turns green, it means you can start to share the iPhone screen immediately.

Part 2: Frequently-asked Questions about Screen Sharing Your iPhone
In spite of those methods, you may want to mirror the iPhone screen to other digital devices. Therefore, this section introduces hot questions while sharing an iPhone screen. You can read and check if you have the same problem.

Question 1: How Can I Share My iPhone Screen with The LG TV
Answer 1: LG TVs are popular in the smart TV market. Many people are attracted by LG TVs because of the WebOS and Netcast features mainly. So it is quite common to mirror the iPhone screen to a LG TV. During this time, you can use Video & TV Cast for LG TV to solve the problem.
Step 1 Connect your iPhone and LG TV to the same Wi-Fi network.
Step 2 Download and LG TV screen sharing app from App Store.
Step 3 Open your LG TV and locate the “TV cast” section.
Step 4 Run the “LG Content Store” and enter your IP address.
Step 5 Choose “OK” to confirm the iPhone screen sharing on your LG TV.
Question 2: How Do I Mirror My iPhone to My Samsung Smart TV
Answer 2: You need to put your iPhone and Samsung Smart TV under the same Wi-Fi network. Well, Mirror for Samsung TV is a screen mirroring app you can use. Though you need to pay $4.99 to unlock all features.
Step 1 Download Mirror for Samsung TV app on your iPhone.
Step 2 Find and tap the Samsung Smart TV within the app.
Step 3 Choose “Allow” when you are prompted with the screen sharing request.
Step 4 Go back to the Mirror for Samsung TV app, then follow the on-screen guide to start sharing your iPhone screen to the TV.
Question 3: How to Share the iPhone Screen Using Skype
Answer 3: You can share photos and websites while having a Skype call with your friends. Long press the file and choose “Share” to enable Skype. However, the screen-sharing feature is not supported in the latest Skype 6 version. You are not allowed to share your screen with your contacts. But others can share their screen during the one-to-one video call.
From the above 5 methods, you can share your iPhone screen with PC easily and quickly. Still have questions about iPhone screen sharing? Please don’t hesitate to contact us. You can also share other good screen sharing software in the comments below.
What do you think of this post?
Excellent
Rating: 4.5 / 5 (based on 51 votes)
October 19, 2018 10:00 / Posted by Andrew Miller to Tips Laurie berkner video songbook.
The Simplest Way to Use AllShare Cast to Mirror Samsung Screen
What is AllShare Cast? How to use AllShare Cast dongle to mirror screen on Samsung Galaxy S3/S4/S5/S6? Get the details here to use AllShare Cast to mirror your photos and videos.
Control Mac from iPhone – 4 East Apps You Can Use for Remote Access
From this article, you can learn how to control Mac from iPhone without tech background easily. Moreover, you can get 3 excellent applications to remotely control your computer, too.
Android Screen Mirroring & Mirror Android to TV/PC/Mac
What is Android screen mirroring? How to mirror Android screen to PC/TV/Mac? This post will show you how to use Chromecast, Rokku, Amazon Fire TV, Miracast, and Xbox One/360 to do it.
If you do not want to watch a movie sitting in front of your Mac, you can share your Mac screen to TV and enjoy the movie on a larger screen. Also, this can help you display a presentation or any files from your Mac to your TV if you are discussing a topic in a large audience. Luckily, there are top screen mirroring tools that can help you screen share Mac to LG TV. Check out these tools below.
Top 3 Tools to Mirror Mac to LG TV
LG Smart Share
To connect Mac to TV, you can rely on the built-in screen mirroring feature of the LG TV – Smart Share. This feature allows you to mirror your phone, tablet, and PC, and Mac to LG TV including the audio-visual capability of the devices. With this, streaming videos and watching movies are highly enjoyable as these movies and being casted on a wider screen. Just follow the simple and easy steps below to mirror Mac to TV.
Using your TV remote to navigate to the Smart Share feature of your TV.
On your Mac, click the AirPlay icon located on the right side of the Menu bar. Select your LG TV then choose the name of your Mac to connect.
Your Mac is now mirrored to your LG TV.
LetsView
Next, we have LetsView. This amazing screen mirroring tool can help you cast your Mac’s screen to your LG TV in no time. It is useful for entertainment, app presentations, meetings, livestream, and also teaching because of its high-quality screen mirroring display. To learn how to use this tool to cast and stream Mac to LG TV, simply follow the steps below.
Go to the official website of LetsView and download the application on your Mac. Also, install LetsView for TV on your LG TV. You can also click the button below to get the tool.
On your Mac, launch the app and click Computer Screen Mirroring.
Input the PIN code displayed on your TV to connect your Mac to your LG TV.
How To Screen Share On Lg Tv
ApowerMirror
ApowerMirror is also a great tool for screen mirroring Mac to LG TV. This top screen mirroring tool allows you to connect your Mac to your LG TV smoothly with a high definition resolution. You can stream videos, browse photos, display files, and many more with this tool. Check out the steps below to learn how to mirror Mac to LG TV.
Screen Share Iphone To Lg Tv Youtube
Get the app and have it installed on your Mac and LG TV. Run the app once installed.
Go to your Mac and click TV option on the application’s interface.
Enter the PIN code and click the Start mirroring button.
Then your Mac will be connected and mirrored to your TV immediately.
Screen Share Iphone Lg Tv Free
Conclusion
These are the best screen mirroring tools for you to cast Mac to LG Smart TV. All listed tools are helpful and feasible when it comes to using your LG TV as an external screen for your Mac. Moreover, these methods and tools are safe, easy, and free to use. Just choose the one that fits your needs best.
Related posts:
0 notes
Text
How to Paint a Spirit Day Inspired Illustration in Procreate
What You'll Be Creating
Spirit Day, celebrated in October, is about supporting the LGBTQ+ community and taking a stand against bullying. We'll show some support for this day and its cause in this Spirit Day inspired illustration tutorial.
Please note that Procreate is required for this tutorial, as well as a compatible pen. This tutorial was created using an iPad Pro and an Apple Pencil. My setup includes an extra wide pen holder/cushion for added support and a matte screen protector, to give the screen more tooth.
1. How to Create a Sketch in Procreate
Step 1
First, let's start with a New Canvas. Select the Plus Sign in the upper, right-hand portion of Procreate. We'll select Create Custom Size.
Step 2
Now, input your desired dimensions. I worked at 10 inches by 8 inches. I like to work at 300 dpi, so it's a resolution appropriate for printing.
Step 3
When creating the sketch, I like to use the 6B Pencil under Sketching. It has a lovely texture and is generally great to use, right out the box!
Step 4
Here's a look at my settings for my 6B Pencil. You'll notice that I didn't stray far from the defaults, although I do like to raise the Size Limits.
I also like to create a new Color Palette for myself, so I can quickly save any colors I might want to reference later. You can do so by clicking below the Color Wheel. To Save a Color, simply click within your palette.
Step 5
Create a New Layer by clicking on the Plus Sign in the Layers Panel. I like to keep my artwork on a separate layer, so it's easier to manipulate as I go along.
In this case, I drew each character in a different color. This helps me block out where the different parts of the body are and how they interact with each other.
Again, you can select different colors via the Colors Panel. In the screenshot below, it is the green circle (as I have green selected).
I wanted to draw a hug to visually symbolize support and love. I thought a wing might be a fun addition, as support and compassion can feel heaven-sent, when dealing with something damaging, like bullying.
Step 6
I created another Layer to experiment with other aspects of the illustration, like the clothing and hair.
Step 7
Once I was pleased with my work, I Merged my Layers and then Lowered the Opacity of the Combined Layer.
Step 8
Now, using my rough work as my guide, I began to draw a more refined sketch on a New Layer, on top of my initial work.
I hesitate to call this "line art" because I like to paint on top of my lines. This is just a stylistic choice; I enjoy continually painting on top of my work and manipulating it that way. That's the method we'll experiment with in this tutorial.
2. How to Add the Initial Colors in Procreate
Step 1
Once I've finished my refined sketch, I like to alter the color of the lines. In this case, I thought I might like them a little lighter.
Click on the Adjustments Icon in the upper left-hand side of Procreate. Then, select Hue, Saturation, Brightness. This will bring up three sliders that you can use to alter the Hue, Saturation, and Brightness of the selected Layer.
Step 2
When adding my initial colors, I like to do so on top of my lines. Here, I've created a New Layer and set its Blending Mode to Multiply. Notice how the color also alters the color of the lines.
Step 3
Proceed in the same fashion for the other colors in the illustration. I often like to separate each color on its own Layer, as it makes it easier to adjust them if need be.
Step 4
Once I'm happy with my color choices, I like to Flatten all of them into one Layer. This helps prevent some color overlap that was giving me undesired results on my lines.
3. How to Paint a Background in Procreate
Step 1
Now, let's create a simple background. First, I started by Creating a New Layer below the character artwork. Fill this Layer will a blue color. You can do this by selecting the Layer and then choosing Fill.
Step 2
I wanted to set these characters against the sky, because I thought that would help illustrate a free and uplifting feeling.
Under Organic, I chose the Cotton Brush. We'll use this to paint some clouds.
Step 3
Create a New Layer between the layer containing the character art and the layer with the blue fill.
Using the Cotton Brush, create the basic shapes of our clouds. Notice that my Brush Opacity is around 50%. I used a light blue color that is a little lighter than the background.
Step 4
Create a New Layer above the one we just worked on. Raise the Opacity of your Brush, and begin adding lighter values.
Step 5
Next, Create a New Layer above the one we just worked on. This time, I used the background color to create little "gaps" between the clouds. Again, this is all using the Cotton Brush with its default settings.
Step 6
Once I was happy with my clouds, I Merged my Layers. Again, you can do this by selecting the Layer you want to Merge and choosing Merge Down.
4. How to Add the Initial Shadows
Step 1
Now, let's decide where our light source is and add some initial shadows.
To do so, Create a New Layer on top of the character art. Set this Layer's Blending Mode to Multiply. At this point, I don't really worry about things being perfect. Instead, I just messily experiment with color and placement. In this case, I used a light purple color.
Step 2
To clean up those edges, however, we can use Procreate's Selection Tools. Select the Selection Icon, highlighted below in blue. With my character artwork Layer selected, I chose Automatic, and then selected the background area.
Step 3
This is what my selected work looks like. Now, I can easily erase the content outside of this area. Note that my Shadow Layer is selected now, as that's where I wanted to remove extra content.
Step 4
Moving forward, I'm going to use the Soft Pastel Brush a lot. It has a really nice texture to it, and I like to use it for softer edges in the composition.
Step 5
Please note these other key points, now that we have all the basics laid out.
Procreate makes it very easy to "pick up" color, and I do this often while I'm painting. Just touch and hold, and a circle will pop up, as shown below. In this example, I've picked up the brown in the character's hair.
The Brush Size and Brush Opacity are also a very important part of my process. I highly recommend experimenting with them and adjusting them regularly!
5. How to Refine and Blend in Procreate
Step 1
At this point, I'm ready to start refining my work. In areas like the face, I like to keep things softer and smoother. I used a Soft Pastel Brush to do so.
Personally, I like to achieve a soft look in two ways. First, I adjust the Brush Opacity and take advantage of the pen's sensitivity. Secondly, I continually lift mid values as I paint and use them to blend.
For harder edges, I like to go back to my 6B Pencil Brush. For example, I used this brush on the eyelashes.
Step 2
I applied this premise to the skin areas, as I generally like to portray them as smooth. You'll see that I also did so in the afro textured hair. The only difference here is that I used rounder strokes and did less blending in those areas.
Step 3
Clothing folds, however, are different from skin. My work is stylized, so there's room for interpretation, but folds tend to have a harsher presence, in general. In this case, I want to maintain some harsher edges and a little less softness.
I achieved this using the Soft Pastel Brush with varied Size and Opacity. However, if I need a harsher edge, again, I like to go back to the 6B Pencil.
Step 4
However, this raises the question: "How do you know where folds go?" I generally like to think about the basic shapes that the cloth is wrapped around. For example, arms are generally cylindrical shapes. Therefore, the folds should look as if they naturally fall in a way inspired by this shape, as illustrated in pink, below.
Step 5
The second character (in the background) has a different hair type. I'd like it to look straighter, so I want it to have visible strands. To start this off, I created a New Layer and used a 6B Brush to begin to define the direction the hair flows and falls on the head.
Step 6
Then, Create a New Layer with the Blending Mode set to Add. I used a Soft Pastel Brush and a light brown color to place down some initial highlights.
Step 7
Finally, Create a New Layer and use it to build and refine the hair. I like to "pull" color directly from the illustration, so I know I'm using colors inspired by what I've already drawn. Keep the direction of the hair in mind; these lines and shapes should flow with it and not be haphazard.
6. How to Add the Finishing Touches
Step 1
Now, on to the finishing touches. I wanted the foreground character to wear a heart earring that visually relates to the LGBTQ+ flag. This would further visually communicate the Spirit Day message. I drew this using a 6B Pencil Brush.
Step 2
Then, I wanted to push my shadows a little further. I did so on a New Layer with the Blending Mode set to Multiply. I used a light purple, again, as I did initially.
With these added values down, I could place even more refinement on top, on another New Layer. This is great for minor tweaks like cleaning up lines and edges.
Step 3
I also wanted to push the lighter values further, too. So, I created a New Layer and set its Blending Mode to Add. Then, using a Soft Pastel Brush, I applied large, soft areas of color, using a light brown.
Step 4
Finally, let's take a look at the wing. Select Alpha Lock to maintain the Layer's edges. With this selected, I could easily use a Soft Pastel Brush to apply whites and blues to this area.
To soften it, however, I applied a slight Gaussian Blur in the Adjustments Panel, as shown below. Make sure to Turn Off the Alpha Lock first!
Awesome Work, You're Done!
We've created a Spirit Day inspired illustration—I hope it inspires you to create your own works, as well as spread love and compassion, not only on Spirit Day, but every day!
If you enjoyed this tutorial, here are some others that you might enjoy!
How to Draw & Paint a Rainbow Date Duo in Adobe Photoshop
Love comes in so many beautiful shapes and colors! In this tutorial, we'll draw and paint a happy, colorful couple in Adobe Photoshop.
Daisy Ein
05 Jun 2018
Digital Painting
How to Create an Awareness Avatar Action in Adobe Photoshop
Join us as we celebrate Spirit Day to rally against teen bullying. In this tutorial, we'll create a Photoshop action to create a purple themed avatar for...
Melody Nieves
20 Oct 2016
Spirit Day
How to Draw People
Here you'll find a list of great free tutorials to learn how to draw humans—everything from gesture to anatomy, hands, feet, and other details. Every...
Monika Zagrobelna
28 Aug 2018
Drawing
from Envato Tuts+ Design & Illustration https://ift.tt/2CoW2vC via http://www.webmasterforum.ws/rankwyz-discount-code-2015-coupons/
0 notes
Text
Deke’s Techniques
Title: Deke’s Techniques
ID: 789179d7a2766e48952a94501b4700b6
Original Page: Deke’s Techniques
Released: 1/13/2011
Duration: 144h 31m
Author: Deke McClelland
Level: Intermediate
Category: Photography
Subject Tags: Design Techniques Design Photography Raw Processing
Software Tags: Illustrator Photoshop
Description: This course is a collection of short Photoshop and Illustrator projects and creative effects that can be completed in ten minutes or less. The series is taught by computer graphics guru Deke McClelland, and presented in his signature step-by-step style. The intent is to reveal how various Photoshop and Illustrator features can be combined and leveraged in real-world examples so that they can be applied to creative projects right away.Note: Because this is an ongoing series, viewers will not receive a certificate of completion.
Course Content:
(Please leave comment if course url is broken)
884 Faking a GoPro over-under shot
885 Developing your over-under in Camera Raw
860 Using an iPad as a Sidecar drawing tablet
861 Introducing Adobe Fresco for the iPad
862 Adobe Fresco paints halftone patterns
863 Live brushes in Adobe Fresco
864 Using oil brushes in Adobe Fresco
865 Masking layers in Adobe Fresco
866 Repurposing and inverting masks
867 Vector brushes in Adobe Fresco
868 Opening Fresco art in Photoshop
869 Customizing the Auto Color command
870 Camera Raw 12: Panoramas with fill edges
871 Developing your panorama in Camera Raw
872 Healing with Clone Source plus Diffusion
873 The improved Simplify command in Illustrator 2020
874 Filling in any post-Simplify gaps
875 Posterizing colors, in the style of “Hair”
876 Recoloring art with the Paint Bucket tool
878 Adjusting your poster art dynamically
877 Posterizing colors nondestructively
879 Hiding the Filmstrip in Camera Raw
880 Making an awful photograph awesome
881 What if Rembrandt had painted sea lions?
882 Recolor a freeform gradient in Illustrator
883 Recoloring a gradient using a color group
767 Mandala patterns in Photoshop CC 2019
768 Painting a free-form mandala pattern
769 Painting mandala-style dot patterns
770 Coloring your mandala pattern
771 The final full-color mandala
772 Illustrator CC 2019 new preview mode
773 Illustrator CC 2019 presentation mode
774 Global edit in Illustrator CC 2019
775 Applying a global edit from the control panel
776 Freeform gradients in Illustrator CC 2019
777 Freeform gradients: Points versus lines
778 Freeform gradient limitations
779 Crop and develop a great white shark
780 Sharpening your great white shark
781 Low vibrance and high saturation
782 Vibrance, saturation, and sharpness
783 Actioning a full-color hedcut in Photoshop
784 Recording an action to play all actions
785 Draw something, color the outlines
786 Combining multiple works of line art
787 Group your line art, clip to the group
788 Coloring outside your line art in Photoshop
789 Flip horizontal view in Photoshop CC 2019
790 Creating a White Walker in Photoshop
791 The White Walker begins
792 Giving a guy a digital shave in Photoshop
793 Carving deep wrinkles or scars into skin
794 Shading the White Walker’s deep-set brows
795 Creating pale, lifeless lips in Photoshop
796 Giving your White Walker glowing blue eyes
797 Adding some creepy lifeless pupils
798 Adding a cold and gloomy background
799 Adding cold and brittle snowflakes
800 Using the Transparency Shapes Layer option
801 Combining a radial filter with a range mask
802 Flipping a photograph in Camera Raw
803 An actual dream effect, in Photoshop
804 Augmenting your Photoshop dream
805 Applying distortions as Smart Filters
806 Combining distortions with blend modes
807 Drawing a 24-sided star in negative space
808 Making your star a repeating hex pattern
809 Shading your star pattern in Illustrator
810 Creating a gradient pattern in Illustrator
811 Making one pattern fade into another
812 Welcome to my seamlessly repeating summer
813 Drawing a cubical gobstopper in Illustrator
814 Creating a pattern of gobstoppers
815 Aligning your many gobstoppers
816 Blending line textures in Illustrator
817 Combining object blends with a pattern
818 Carving cubical holes into cubical objects
819 Nesting gradients inside a pattern
820 Drawing 3D isometric arrows in Illustrator
821 Positioning the tips of your arrows
822 Filling in the gaps in a repeating pattern
823 Drawing cartoon teeth aligned to the hair
824 Drawing a triangular cartoon eye
825 Adding windows to the houses pattern
826 Creating a perfectly tessellating pattern
827 Op art experiment 4: Triangle tunnels
828 Expressing your triangles as a hex pattern
829 Adding color to your triangle tunnels
830 Recoloring your triangle tunnels
831 Creating rainbow gradients with blends
832 The downside of using blends in patterns
833 Drawing an impossible trident in Illustrator
834 Shading an impossible trident with gradients
835 Painting paths with opposing gradients
836 Adding impossible shadows in Illustrator
837 Drawing an impossible hex object
838 Creating impossible latticework
839 Painting like Joan Miró in Adobe Sketch
840 Painting a watercolor wash background
841 Signing your artwork like Joan Miró
842 Opening your Sketch artwork in Photoshop
843 Enlarging your Miró to poster size
844 What if Joan Miró had met Jordan Peele?
845 Coloring your terrifying Miró/“Us” scene
846 Painting a Rorschach background
848 What to do when Content-Aware Fill fails?
847 Finishing your “Us” artwork in Photoshop
849 Hand turkey 2019
850 Tracing your actual hand on an iPad
851 Drawing a highly articulated hand
852 Adding color to your hand-drawn hand
853 Painting your hand-drawn fingernails
854 A hand becomes a Thanksgiving hand turkey
855 Painting the turkey’s tail feathers
856 What’s wrong with this drop shadow?
857 Introducing Photoshop for the iPad
858 Photoshop for the iPad: Part 2
859 Photoshop for the iPad: Part 3
669 Customizing a QR code in Photoshop
670 Adding more color to your QR code
671 Coffer illusion and the hidden circles
672 Filling out the hidden circles illusion
673 Shading the panels in a Coffer illusion
674 Drawing a classic “café wall” illusion
675 Skewing your crazy café walls in Illustrator
676 Creating a “magical checkers” illusion
677 Swapping magical checkers for dots
678 Reversing the direction of your illusion
679 Decorating your illusion
680 Adding more and more gizmos
681 Connecting the gizmos wirelessly
682 Drawing a Wi-Fi symbol in Illustrator
683 Drawing the official Bluetooth logo
684 Introducing Trajan Color Concept
685 Trajan Color Concept in Illustrator CC
686 Using stylistic sets in Photoshop CC
687 Using stylistic sets in Illustrator CC
688 Creating gradient molecules in Photoshop
689 Sharpening your very soft molecules
690 Editing your smart-filtered molecules
691 Exploring regular molecule patterns
692 Blending opposing rows of colorful molecules
693 Sharpening molecules with High Pass
694 Creating shimmering cells in Illustrator
695 Turning regular hexagons into organic cells
696 Enhancing your organic cells in Photoshop
697 Making dead cells spring to life
698 Creating letters with accordion extrusions
699 Combining object blends with skews
700 Making one object blend cut through another
701 Making one object blend slice across another
702 Object blends and dynamic distortions in Illustrator
703 Another random distortion: Roughen
704 Dynamic warp distortions: Fish and Twist
705 Adding a dynamic background, part 1
706 Adding a dynamic background, part 2
707 “Quieting down” an overly elaborate design
708 The Marvel disintegration effect
709 Building up more flakes and ashes
710 Enhancing and masking your disintegration
711 Turning your flakes into dull, dead ash
712 Jogging your memory with the Note tool
713 Contour mapping with Distort > Displace
714 Contour map + gradient map
715 Contour map + arbitrary map
716 Riffing on a contour map in Photoshop
717 Smoothing out jagged contour lines
718 Contour mapping for cash in Photoshop
719 Infusing an image with the color of money
720 Simulating an adjustment layer in Illustrator
721 Drawing a stylish computer key
722 Spelling a word in computer keys
723 Creating a faux hedcut in Photoshop
724 Tracing outlines around your hedcut
725 Creating a full-color hedcut effect
726 Creating an E.T. moon in Photoshop
727 Adding a forest of trees for your E.T. moon
728 Combining the best of E.T. and Jurassic Park
729 Tracing vectors with a universal glow
730 Creative uses for Content-Aware Fill
731 Creating a porthole to a far-away galaxy
732 Enhancing your crazy space porthole
733 Creating a galaxy of rushing stars
734 Using the Puppet Warp tool in Illustrator CC
735 Illustrator Puppet Warp tips and tricks
736 Puppet-Warping very complicated selections
737 Shift-P for Puppet Warp!
738 Introducing the Pentagon Patterns
739 Types 1–5: The Reinhardt pentagons
740 Types 6–8: The Kershner pentagons
741 Type 10: The James pentagon
742 Types 9, 11, 12, and 13: The Rice pentagons
743 Type 14: The Stein pentagon
744 Creating a type 15 pentagon in Illustrator
745 Tessellating your type 15 pentagon
746 Expressing pentagons as proper tile patterns
747 Applying and modifying a tile pattern
748 Combining complementary patterns
749 Combining a tile pattern with a photograph
750 Adjusting a tile pattern to fit its photo
751 Creating a creepy Candy Keeper in Photoshop
752 Enhancing the Candy Keeper text
753 Creating an old monster movie poster
754 Adding a monochrome halftone effect
755 Enhancing a special word, such as “Haunted”
756 Cheating letters into an ancient border
757 Naming an adjustment layer as you create it
758 Under the sea in strict monochrome
759 Backscatter and split toning
760 Sampling any color outside Photoshop
761 Designing a vector-based logo in Photoshop
762 Free-transforming shape layers
763 Adding a photo element to your vector logo
764 High-resolution snowflakes in Photoshop
765 Enhancing your big, juicy snowflakes
766 Adding a snowflake bokeh “on the lens”
576 Creating a two-way portrait in Photoshop CC
577 Quick-and-dirty chalk type in Photoshop
578 Creating spray-painted stencil type
579 Adding drips to your spray-paint type
580 Symbols and spaces in Illustrator CC 2017
581 The wacky world of live polygons
582 Creating custom arrowheads in Illustrator
583 Creating custom line caps in Illustrator
584 Creating tinted arrowheads in Illustrator
585 Designing multicolor arrowheads
586 Multicolor arrowheads emojis
587 Customizing a new document in Illustrator
588 Creating trendy Twirl art in Photoshop
589 Creating symmetrical Twirl art
590 Turning a face into a piece of Twirl art
591 Increasing the resolution of your Twirl art
592 Capturing a screen that can’t be captured
593 Adding color and grid lines to a histogram
594 Creating an LCD screen effect in Photoshop
595 Mastering Adobe Illustrator 88
596 Fixing jagged Illustrator art in Photoshop
597 Fixing problems with an AI smart object
598 Center-stroking letters in Illustrator
599 Hand-drawing inline character strokes
600 Cropping inline strokes with an opacity mask
601 Oodles of differently angled screw heads
602 Creating dynamic inlines using Offset Path
603 Drawing a half circle in Keynote
604 Using the Pen tool in Keynote
605 Auto-stitching scanned artwork in Photoshop
606 Auto-trimming without clipping artwork
607 Creating crinkled paper with Clouds
608 Making your crinkled paper even crinklier
609 Bringing back Refine Mask in Photoshop CC
610 Power up with dekeKeys for Photoshop CC
611 Creating your own shortcuts in Photoshop
612 Every keyboard shortcut for Photoshop CC
613 Creating a multipage doc in Photoshop CC
614 Photoshop CC artboard tips and tricks
615 Exporting a multipage PDF from Photoshop CC
617 Photoshop Clouds pattern variations
616 Seamless patterns with the Clouds filter
618 Healing with a pattern in Photoshop
619 Creating a vector-based gradient mask in Photoshop
620 Creating a multicolor vignette in Photoshop
621 Excluding elements from your custom vignette
622 Masking like a pro with Photoshop’s Pen tool
623 Contrast: bright image, dark background
624 Tattoo your face in Photoshop
625 Drawing tattoos with the Pen tool
626 Selecting and masking eyes in Photoshop
627 Selecting and masking ruby-red lips
628 Pasting Photoshop paths into Illustrator
631 The 2017 American Solar Eclipse
632 Smoothing out a noisy universe in Photoshop
633 Designing an intriguing cube logo
634 Stroking your logo with mitered corners
635 Turning an orthogonal cube into a pattern
636 Turning a photo into a Chuck Close effect
637 Making a seamless pattern of paint splotches
638 Imbuing your Chuck Close effect with color
639 Infusing more colors into the midtones
640 Creating a wrapped logo in Illustrator
641 Enhancing your wrapped logo
642 Creating a gently blanketed logo
643 Completing your gently blanketed logo
644 Modify a TIFF clipping path in Illustrator
645 Modify an EPS clipping path in Illustrator
646 The best way to mask an image in Illustrator
647 Dr. Frankenstein’s monstrous emoji
648 Frankenstein’s emoji’s eyelids and brow
649 Frankenstein’s emoji’s rippling hair
650 Frankenstein’s emoji’s mouth and scar
651 Frankenstein’s emoji’s iconic neck bolts
652 Drawing HAL 9000 from 2001: A Space Odyssey
653 Adding realistic reflections to HAL’s eye
654 Op art experiment 3a: Volumetric waves
655 Op art experiment 3b: Rolling windows
656 Create a concentric ring logo in Illustrator
657 Create an octagon of concentric rings
658 Automatically converting circles to diamonds
659 Drawing a perfect snowflake in Illustrator
660 Adding lines to your snowflake pattern
661 Enhancing a perfect snowflake in Photoshop
662 Editing a smart snowflake in Illustrator
663 Creating a gradient sunset in Photoshop
664 Simulate a total solar eclipse in Camera Raw
665 Celebrating the winter solstice at Carhenge
666 Adding a time lapse of partial eclipses
667 Oh Illustrator, where is your Control panel?
668 Downsizing the massive Properties panel
486 Creating high-resolution ice type in Photoshop
487 Editing type inside a nested smart object
488 Introducing PixelSquid: 3D for 2D designers
489 Creating your own Jurassic Park in Photoshop
490 Lighting up a dinosaur’s eyes and teeth
491 Combining Field Blur with a depth mask
492 Helping your dinosaur escape to the big city
493 War of the Worlds: The sun attacks!
494 Weaving tendrils of lightning into a cloud
495 Turning off Live Rectangle widgets in Illustrator CC
496 More Live Shapes: ellipses and polygons
497 Turning off the new CC Start screen
498 Correcting shadows with Dehaze
499 Creating an infrared/snow effect in Photoshop
500 Creating a custom angry emoji in Illustrator
501 Adjusting your emoji to match Apple’s style
502 Exporting your emoji as a device-compatible PNG file
503 Elongating a snake in Photoshop
504 Blackening an animal to create a silhouette
505 Two ways to select a silhouette in Photoshop
506 Moving and scaling a selection outline
507 Auto-tracing a masterpiece in Illustrator
508 Drawing a dynamic atom symbol in Illustrator
509 Rotating your atom with electrons intact
510 Applying Knockout Group to a dynamic path
511 Solving the world’s problems with Illustrator’s Rasterize effect
512 Blending multiple shots to better frame a photo
513 Rebuilding an octopus’s garden
514 Turning a logo into a star in Illustrator
515 Dressing up your logo star
516 Using chromatic-style fonts in Illustrator
517 Using chromatic-style fonts in Photoshop
518 Casting 3D font shadows in Illustrator
519 Creating a pattern in Adobe Capture
520 Bringing Capture patterns into Photoshop
521 Creating an authentic Möbius strip in Illustrator
522 Coloring the Möbius strip with Live Paint
523 Shading your authentic Möbius strip with gradients
524 Masking a Tilt-Shift landscape in Photoshop
525 Combining Multiple Group Photos
526 Introducing Adobe Photoshop Sketch
527 More fun with Adobe Sketch
528 Tracing a photograph in Adobe Sketch
529 Tracing facial features with the Ink Pen
530 Painting with the Blend and Combine modes
531 Lips, eyes, and specular highlights
532 Painting hair with Pencil and Marker Brush
533 Blending a photo with your Sketch art
534 Tweening a layer’s position and opacity
535 Tweening new layers across existing frames
536 Turning the world upside-down in Photoshop
537 Zooming thru the universe with Photoshop
538 Turning a panorama into a tiny planet
629 Drawing a kern-perfect logo in Illustrator
630 More kern-perfect, now with overlap
539 Adding depth and shading to your tiny planet
540 Rendering a person in chrome
541 Creating a fiery blast in Photoshop
542 Rendering a person in liquid metal
543 Creating a better screen shot
544 Recording a screen shot action
545 Drawing a bacterium with Gradient Mesh
546 Drawing randomly waving pili (or hairs)
547 How Bézier curves really truly work
548 Drawing Bézier time and tangent lines
549 Drawing a complex network of lattice lines
550 How many dots can you see at once?
551 Creating a scintillating grid in Illustrator
552 The two-thirds rule of Bézier curves
553 Creating a classic neon sign in Illustrator
554 Adding real-world neon light fluctuations
555 Connecting neon letters with dark blockouts
556 Creating photorealistic neon in Photoshop
557 Photoshop CC’s top-secret banana tool
558 Toast and transient witticisms (Easter eggs)
559 Creating a hovering head in Photoshop
560 Connecting head and neck with a grisly spine
561 Projecting simple shapes into 3D perspective
562 Creating an American flag in Photoshop
563 Creating a field of 50 evenly spaced stars
564 Designing an M.C. Escher-like tessellation
565 Completing your Escher-inspired creature
566 Making an M.C. Escher-inspired hex pattern
567 Designing matching pattern variations
568 Creating a Doctor Strange–like mirror world
569 Replacing one mirror world with others
570 Creating wildly purple supervillain eyes
571 Adding ominous crystallized skin texture
572 Creating embroidered type in Photoshop
573 Stitching the letters in a script font
574 Cheerful holiday trees in Photoshop CC
575 Lighting your holiday trees in Photoshop CC
377 Two ways to create center guides in Photoshop
378 A new way to create center guides in Photoshop CC
379 Two ways to create center guides in Illustrator
380 Clearing the list of recently used fonts in InDesign
381 Two ways to search fonts in InDesign CC
382 Drawing flowering vectors in Illustrator
383 Stroking the petals to create a lattice effect
384 Creating a flowering origami effect
385 Painting shapes with transitional gradients
386 Correcting the brightness and banding of a printed image
387 Further reducing banding with a gradient layer
388 Smoothing away noise with the Mean stack mode
389 Developing a sweetly romantic tropical island
390 Creating a Caribbean blue sea with Photo Filter
391 Creating letters chiseled into stone
392 Adding a chiseled border
393 Assembling MRI slices into a 3D volume
394 Assigning multiple strokes to gradient type in Illustrator
395 Filling in the gaps between stroked letters
396 Fragmenting a photo through ribbed glass
397 Applying a displacement map with the Glass filter
398 Infusing an image with vivid nightclub colors
399 Adding MDNA-inspired bands of color
400 Patching badly displaced edges
401 Styling type with a pattern of vertical lines
402 Reshaping letterforms to match the intervals of a pattern
403 Swapping one image for another with smart objects
404 Forging a million-dollar stamp in Photoshop
405 Masking graphic frames and natural edges
406 Matching a real-world paper texture
407 Casting multiple drop shadows in Photoshop
408 Developing an awesome angelfish in Camera Raw
409 Tweaking a fish photo to perfection
410 Assigning spot colors to a logo in Photoshop
411 Blending spot colors inside a logo
412 Exporting spot-color separations from Photoshop
413 Exporting spot-color separations from Illustrator
414 The latest and greatest 2015 Facebook image specifications
415 Creating the perfect Facebook cover photo 2015
416 Extending your profile picture into your Facebook cover photo
417 Preparing images for your Facebook timeline
418 Converting all corner points in a drawing to smooth points
419 Adding field blurs to a vector-based illustration
420 Great uses for Color and Gradient Overlay
421 Easter Island
422 Creating a string of pearls in Illustrator
423 Drawing a letter to match a dingbat font
424 Assembling an interior, vertical panorama
425 Developing a dark and stormy photo in Photoshop
426 Developing a dark and stormy photo in Lightroom
427 Sharpening your dark and stormy photo for print
428 Auto-blending multiple depths of field
429 Assigning multiple strokes in Photoshop CC 2015
430 Combining multiple drop shadows to create faux-3D type
431 Combining multiple Color and Gradient Overlay effects
432 Removing unwanted perspective from a photo
433 Correcting the perspective of a single image element
434 Extracting an unmodified photo from a Smart Object
435 Extracting a raw photo from a Smart Object
436 Orthogonal pattern 1: The boxed towers
437 Repeating a tile pattern Brick by Row
438 Refining the color scheme of your tile pattern
439 Orthogonal pattern 2: Which way is up?
440 Upping the number of colors in a dynamic pattern
441 Achieving real pointillism with the Pointillize filter
442 Adding Emboss to give your painting depth
443 Blending multiple motion photos
444 Creating a wildly colorful High Pass effect
445 Correct in Lab and leave a smooth histogram
446 Combining the best of Lab and Camera Raw
447 Wrapping a gradient around a circle in Illustrator
448 Blending gradients with the Saturation blend mode
449 Using the Join tool in Illustrator CC
450 Using Illustrator’s Shape Builder tool
451 Wrapping text around a graphic in Illustrator
452 Curly quotes and the Smart Punctuation command
453 Creating the perfect smartphone home/lock screen
454 Creating a smartphone graphic in Photoshop
455 Islamic design 1: Flirting with geometric genius
456 Islamic design 2: The eight eight-pointed stars
457 Islamic design 3: Connecting the pieces
458 Islamic design 4: Completing the corners
459 Islamic design 5: Coloring and sculpting
460 Islamic design 6: Photoshopping the pattern
461 Creating a bat-faced moon in Photoshop
462 Cartoon bat 1: Drawing the head
463 Cartoon bat 2: Drawing the bodies
464 Cartooning the moon!
465 Changing a daytime scene to night
466 Lighting up the windows of a dark mansion
467 Adding a moon to a nighttime sky
468 Adding a ghost to your haunted mansion
469 Creating a custom Dual Brush in Photoshop
470 Adding texture to your custom brush
471 Framing a photo with a custom brush
472 Creating place cards for your holiday dinner
473 Tracing your guests with the new Pencil tool
474 Coloring your guests with the Live Paint Bucket
475 Drawing a custom coloring-book place card
476 Drawing a generic male place card
477 Coloring your cartoon place cards in Illustrator
478 Removing power lines from a photo
479 Turning a utility pole into a tree trunk
480 Creating candy cane type in Photoshop
481 The seamlessly repeating candy cane pattern
482 Adding snow to your holiday design
483 Making a little boy fly in Photoshop
484 Creating blast trails with Motion Blur
485 Masking clouds with the Quick Selection tool
282 Ringing in the New Year with dynamic effects in Illustrator
283 Dynamically transforming fills and strokes
284 Tracing an avatar from a photograph in Photoshop
285 Drawing a vector-based avatar in Illustrator
286 Coloring and shading your avatar
287 Exporting an illustration as a universally supported PNG file
288 Upsampling a layered composition with great results
289 Rebuilding a pattern at a higher resolution
290 Painting happy little trees
291 Shading and lighting the happy forest
292 Enlarging a low-res photograph in Photoshop
293 Enlarging a photo by tracing it in Illustrator
294 Mastering Exposure in Camera Raw
295 Super smooth and unflinchingly sharp
296 Deleting an inadvertent photo bomber
297 Correcting a distorted panorama
298 Rebuilding bad stitching in a panorama
299 Nondestructive dodge and burn
300 Blending a shadow into any background
301 Saving a PNG image with a translucent shadow
302 Cleaning up a smart phone photo
303 Using Photoshop 1.0
304 Creating your own Chinese seal (or chop)
305 Simulating hand lettering with art brushes
306 Adding texture to your hand stamp
307 Creating a black chop on red paper
308 Auto-hiding iconic panels in Photoshop
309 Creating a custom toolbox in Illustrator CC
310 Creating the perfect passport photo
311 Retouching your passport photo
312 Turning a photo into a giant mural
313 Enhancing the reality of your mural
314 Creating a 3D bump map
315 UV overlay and 3D bump paint
316 Using Lens Flare for good (not evil)
317 Using the Perspective Crop tool
318 Reducing real-world camera shake
319 Reducing glare in a photograph
320 Restoring repeating details
321 Integrating a detail captured with a phone
322 Blending two exposures of a single scene
323 Masking mountains away from sky
324 Creating a photographic caricature in Photoshop
325 Exaggerating facial features with Liquify
326 Masking a caricature against a new background
327 Shading and sharpening a caricature
328 Drawing a Möbius strip in Illustrator
329 Shading the Möbius strip with gradients
330 Adding twisting edges to the Möbius strip
331 Creating an impossible Penrose triangle
332 Shading the cubes in your Penrose triangle
333 Selectively converting a photo to black & white
334 Straightening and “uncropping” a photo
335 Restoring a missing photograph detail
336 Drawing a hand (clenched in a fist)
337 Cleaning up a sketch captured with a phone
338 Four hands united in brotherhood, solidarity, and teamwork
339 Swapping out colors in existing gradients in Illustrator
340 Select > Focus Area and the pseudo engraving effect
341 Integrating 3D art into a 2D scene in Photoshop
342 Creating a 3D shark in Photoshop
343 Creating a 3D doughnut in Illustrator
344 Creating a golden 3D ring in Illustrator
345 Mapping Elven runes (or text) onto a 3D ring
346 Hand-drawing custom-made letters in Illustrator
347 Drawing letters with curves and holes
348 Enhancing your hand-drawn text in Photoshop
349 Mixing a low-color photo with Camera Raw
350 Mixing a low-color photo with adjustment layers
351 Saving your effect as a color lookup table
352 Extracting a classic painting from its frame
353 Extracting that same painting nondestructively
354 Archiving and enhancing a child’s art
355 Combining a child’s art with a real classic
356 Developing the perfect sunset in Camera Raw
357 Lush landscapes: The real green is yellow
358 Painting away Camera Raw “Clarity halos”
359 Selectively sharpening a stressed photograph
360 Transforming yourself into a Dark Elf
361 Hand-masking the elf against a vivid background
362 Making the Dark Elf that much darker
363 Developing a photograph of The Joker
364 Carving expression lines into The Joker’s face
365 Creating a campaign poster in Illustrator
366 Creating a Prohibition (or Universal No) symbol
367 Using Photoshop CC’s new Flame Generator
368 Creating cool Flame Generator art
369 Setting type on fire with the Flame Generator
370 Blending synthetic flames with type
371 Creating secret-message type in Photoshop
372 Animating a continuously morphing message
373 Creating a piece of Minecraft-inspired art
374 Extruding your Minecraft art into 3D space
375 Adding a big-pixel, Minecraft background
376 Developing the perfect holiday portrait
185 Creating a custom 2013 calendar in Illustrator
186 Adding dates to a calendar using tables
187 Branding your calendar with a field of logos
188 Crafting an Infinity symbol to match a specific font
189 Op art experiment 1a: Inflated checkers
190 Op art experiment 1b: Rounded windows
191 Building a universal ISOTYPE man with strokes
192 Building a universal ISOTYPE woman with strokes
193 Drawing an ISOTYPE couple in love
194 Creating a Warhol-style silkscreen effect
195 Creating a series of Warhol-style variations
196 Adding Warhol-style background variations
197 Creating opaque colored shadows
198 Assembling multiple variations into a single comp
199 Creating a pattern of unique inset circles
200 Changing a static blended color scheme
201 Op art experiment 2a: Undulating pattern
202 Op art experiment 2b: Concentric rings
203 Developing a dramatic castle in Camera Raw
204 Artificially coloring a photo in Camera Raw
205 Creating an antique photo effect in Camera Raw
206 Adding a weathered old-photo frame effect
207 Drawing an Angry Birds-like character
208 Stroking an entire layer in Illustrator
209 Drawing a classic snarling cartoon face
210 Drawing a radiant, cheerful cartoon background
211 Stroking any kind of type in Illustrator
212 Creating synthetic water droplets
213 Simulating liquid reflections with effect
214 Simulating liquid refractions with a dmap
215 Creating an eye-catching splatter effect
216 Defringing purples and greens in Camera Raw 7
217 Making a danger sign more dangerous
218 Using texture and depth to add realism
219 Precisely aligning artwork to the bleed
220 Creating and importing a tracing template
221 Drawing a distinctive 2D video game character
222 Adding features to the face of a 2D character
223 Creating a vivid aura around an entire character
224 Adding variable-width strokes in Illustrator
225 Animating bird wings with Puppet Warp
226 Animating text by onion skinning in Photoshop
227 Creating an animated movie in Photoshop
228 Exporting an animation to QuickTime and GIF
229 Correcting an underwater photograph
230 Making a photo razor-sharp and porcelain-smooth
231 Reducing noise in a high-ISO shot with Camera Raw
232 Creating highly reflective sunglasses
233 Adding drama to an outdoor portrait shot
234 Creating volumetric forms with shape layers
235 Creating a bloodshot eye effect
236 Shading an image with shapes and layer masks
237 Creating fabric textures with pattern layers
238 Colorize any layer with Color Overlay
239 Turning a portrait into a dot drawing
240 Creating a full-color dot drawing
241 Drawing an orthogonal cube with the line tool
242 Creating a cube of differently colored cubes
243 Recreating the Creative Cloud Logo in Illustrator
244 Creating a psychedelic fabric texture
245 Turning psychedelic fabric into rock letters
246 Creating a more finely rendered dot drawing
247 Converting from RGB to CMYK via Multichannel
248 Creating printer-safe CMYK shadows
249 Creating bright, golden motion trails
250 Creating schematic art with grid
251 Drawing precisely aligned arrowhead
252 Adding arrowheads around a closed path
253 Drawing the Pen tool without touching the Pen tool
254 Merging frames for the best possible UAV photo
255 Retouching details in an aerial landscape
256 Editing a video and adding transitions in Photoshop
257 Importing the quadcopter crash sequences
258 Color correcting a video and adding a soundtrack
259 Adding precisely timed titles to your video
260 Hand-painting an image with a Wacom Cintiq
261 Blending the final false-color artwork
262 Creating a honeycomb pattern in Illustrator
263 Building up strokes to create 3D honeycomb
264 Turning yourself into a zombie
265 Enhancing an ambience environment for the undead
266 Creating dripping, gooey ghost letters
267 Turning type into gooey green slime
268 Creating heavy metal type (updated for Photoshop CS6 and CC)
269 Cleaning up a crummy product shot
270 Scaling and rotating photographic objects
271 Tracing a line drawing with uniform strokes
272 Coloring line art using Live Paint Bucket
273 Creating a pigture using shapes and letters
274 Integrating a cartoon into a photograph
275 Converting a photo into a Lichtenstein drawing
276 Adding bring Ben-Day dots and a talk balloon
277 Painting an eye using a custom brush
278 Painting and smoothing straight-sided brushstrokes
279 Simulating pressure with path outlines
280 Developing a 32-bit HDR image in Camera Raw
281 Converting from 32-bit to the more flexible 8-bit mode
091 Removing people from a photo
092 Masking people back into a photo
093 Hand-painting a mask
094 Masking a real-life shadow
095 Turning a photo into line art
096 Adding a crosshatch shading pattern
097 Creating type that inverts anything behind it
098 Creating auto-inverting line art
099 Creating movie poster credits
100 Creating a dual-focus hybrid image
101 Adding text to a hybrid composition
102 Drawing with the reshape tool
103 Hand-drawing a really great letter
104 Creating a vanity frame
105 Adding a frame to a photograph
106 Drawing a highly graphic explosion with Illustrator
107 Drawing a Ninja Turtle nose
108 Mapping a dog face onto a duck
109 Putting a tongue on a duck
110 Making synthetic lightning in Photoshop
111 Creating a driving rain effect in Photoshop
112 Designing a railroad track
113 Bending the railroad track around curves
114 Creating a Star Wars hologram effect
115 Creating leafy letters
116 Creating topiary type
117 Creating type in grass
118 Rendering type in smoke
119 Rendering type in brushed metal
120 Adding brushed copper effect
121 Reflecting type in water
122 Reflecting water back into type
123 Joining type to a circle
124 Making flared type on a circle
125 Making a person emerge from water
126 Creating progressive water ripples
127 Creating an upside-down face effect
128 Achieving silky smooth skin with retouching
129 Pearly white teeth
130 Head-shrinking
131 Getting a big head
132 Adding a photographic texture to vector type
133 Adding strokes in back of photo type
134 Adding a border to an image in Illustrator
135 Two ways to crop in Illustrator
136 Inventing a 3D temple with a depth map
137 Drawing a 3D object with Curves
138 Creating a superhero shield in Illustrator
139 Turning Illustrator paths into Photoshop shapes
140 Creating a photorealistic superhero shield
141 Pimping your ride in Photoshop
142 Masking and blackening a car
143 Drawing a multi-part vector mask
144 Masking and painting a shadow
145 Integrating blades of grass into tires
146 Making a (ridiculously) dramatic sky
147 Adding flame stripes to a car
148 Creating interlocking octagons in Illustrator
149 Hand-coloring line art
150 Creating a custom wave pattern
151 Simulating a screen print
152 Drawing a perfect linear spiral in Illustrator
153 Drawing a spiraling nautilus shell
154 Designing a hex pattern in Illustrator CS6
155 Making a hex pattern in Illustrator CS5 and earlier
156 Creating a Facebook cover in Photoshop
157 Matching a profile picture to your cover
158 Cloning yourself in Photoshop
159 Lighting the clone party
160 Hand-carving letters into wood
161 Creating a Spirograph-like pattern
162 Tracing scalloped gear teeth around a circle
163 Applying custom carve and shadow styles to type
164 Turning a pencil sketch into digital ink
165 Adding a graph-paper background
166 Creating a continuous single-line Spirograph
167 Scaling circles into complex patterns
168 Creating a money-like design
169 Attack of the killer pumpkin
170 Simulating a glowing Jack-o-lantern
171 The headless stranger in the mist
172 Creating 3D punched letters
173 Designing a double-wave line pattern
174 Assembling a seamless pattern brush
175 Creating a hand turkey in Photoshop
176 Creating a depth-of-field cast shadow
177 Creating a lustrous round jewel
178 Cutting and brushing light on a gem
179 Creating a shiny button with inset text
180 Creating a jaunty six-sided star
181 Interweaving star shapes and adding gradients
182 Casting shadows between interwoven shapes
183 Creating a Hobbit-like text effect
184 Enhancing a landscape photo in Camera Raw 7
001 Creating ice type
002 Branding type on a texture
003 Creating an image-branding machine
004 Capturing effects with layer comps
005 Rendering type in gold
006 Creating a hammered metal background
007 Creating heavy metal type
008 Creating a molten letter effect
009 Setting type on fire
010 Using an anti-edge mask
011 Blending textures onto a face
012 Rendering a face as a cave painting
013 Creating a reflection in shattered glass
014 Creating a face in a tree
015 Building a synthetic star field
016 Making 3D type with Repoussé
017 Casting 3D shadows and reflections
018 Adjusting 3D light sources
019 Masking highlights and shadows
020 Masking glass
021 High key high contrast
022 Simulating sub-pixel rendering
023 Fixing chromatic aberrations in Photoshop
024 Fixing chromatic aberrations in Camera Raw
025 Correcting red-eye like a pro
026 Turning a photo into an ink drawing
027 Turning a photo into a pencil sketch
028 Creating a seamlessly repeating pattern
029 Repairing seams in a repeating pattern
030 Creating a 3D pie chart
031 Splitting and modifying 3D meshes
032 Using the Ground Plane Shadow Catcher
033 Creating a talk show-style curtain
034 Assembling a flawless panorama
035 Removing people with image stacks
036 Creative stacking with Maximum and Range
037 Creating synthetic wood grain
038 Making slats of uniquely textured wood
039 Kerning within a single character
040 Creating a raised bevel effect
041 Putting wings on a horse
042 Creating a classic heart in Illustrator
043 Glossing up a heart in Photoshop
044 Shooting and assembling a stereoscopic photo
045 Extending 3D beyond the screen plane
046 Adding stereo 3D text and shapes
047 Tilting text and shapes toward the viewer
048 Creating a shooting star in Illustrator
049 Using blends to draw path outlines
050 Inventing custom starbursts
051 Making a fictional creature
052 Transforming a creature into a monster
053 Capturing a monster in motion
054 Changing the color of a car
055 Painting a colorful car black
056 Coloring the stripes on a zebra
057 Drawing trendy swirls in Illustrator
058 Creating variable-width and brushed swirls
059 Drawing trendy ornaments in Illustrator
060 Designing a magically updating pattern
061 Automatically collapsing a selection
062 Adding a magnifying glass into a design
063 Healing one eye onto another
064 Creating a giant command key
065 Drawing common symbols part 1
066 Drawing common symbols part 2
067 Filtering images with Camera Raw
068 Creating a vivid HDR effect
069 Creating an ambigram in Illustrator
070 Making a two-word ambigram
071 Drawing a Halloween scareflake
072 Creating true clones in Illustrator
073 Taking your scareflakes into Photoshop
074 Making a faux HDR image in Lab
075 Turning a guy into a zombie
076 Miniaturizing the world in Photoshop
077 Creating a synthetic rainbow
078 Casting an artificial shadow from a layer
079 Rendering a portrait in type
080 Rendering a portrait in tile patterns
081 Rotating a pattern layer in Photoshop
082 Tracing an image with path outlines
083 Turning path outlines into a vector mask
084 Drawing rays of light in Photoshop
085 Drawing concentric glow rings
086 Designing an Indiana Jones-style logo
087 Achieving mitered corners in Photoshop
088 Masking with Blunt Instruments in Photoshop
089 Creating a stained-glass ornament
090 Designing a stained-glass window
The post Deke’s Techniques appeared first on Lyndastreaming.
source https://www.lyndastreaming.com/dekes-techniques-2/?utm_source=rss&utm_medium=rss&utm_campaign=dekes-techniques-2
0 notes
Last Seen Blogs

fireflychaosdemon
Questionable Chaos

kidshowsarecool
Kids Show I’ve watched
xyklapse
Xyklapse

mikeymike-itboy-blog
make it last

duakerjacom
Lowongan Kerja