#i HAD to gif it so yeah i learned gifmaking for this
Text


"Sadusky has a clue room. To a treasure? I don't understand, why would he never tell us that—wait, wait, that's...the pipe."
National Treasure: Edge of History (2022) // 1x04: "Charlotte"
#national treasure#national treasure: edge of history#riley poole#the way this scene hit me like a punch#i HAD to gif it so yeah i learned gifmaking for this#zanna makes things#it was so full of grief and fondness and echoes of memory you know. you come to your friend of 19 years' wake#and you discover he kept this massive secret from you. but he also kept mementos of the crazy things you once did#those could have been in a museum or an evidence locker but peter sadusky kept them in his secret room and looked at them often#arghhhhh insane#this episode hit me with so much truly#it was like seeing an old friend and losing one all at once
37 notes
·
View notes
Note
🦋 - hi! If u can't recall, I was the anon who asked you about gifmaking before.
I know some of the raw videos of jannik/tennis in general may or may not have good video resolution. But your end-result of your gifs are usually sharpened but not that grainy either. How do you usually adjust your gifs' adjustments when it comes to low quality videos? Bcs your gifset tends to be in 540px wide, so it makes me wonder as well how you retain/enhance the quality of the gifs. I hope I delivered my question well 😂
i remember u omg hiiii! now i may have gone a little overboard on details here under the cut but i suppose you’ll appreciate it anyway haha
disclaimer, for a lot of these settings, i can’t remember where i first found them but i had seen them used in gif tutorials when i was just learning how to make them. i’ve basically stuck with these ever since!
so join me as i go through the process of making this jannik gif (exclusive content, never before seen on my blog, etc etc):

okay so first of all, ofc as much as possible i try to get the best quality version even if the video itself is bad. like, if it’s on streaming i would screen record but otherwise i try to download the original file. it makes the end result much better imo
i generally go for 540px width bc i read somewhere that that’s the ideal size for tumblr gifs. if the cropped video is smaller than that or needs to be portrait oriented, i would usually just put two gifs side by side (like in this gifset) bc it’s better than trying to resize it bigger
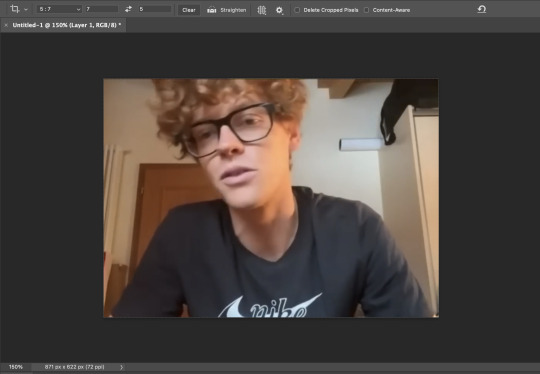
but when a source video is around 720p, i can generally work with it! so here’s a sample that i trimmed from a fairly low quality jannik video from youtube. he's presumably on webcam here, which explains the bluriness
i loaded it in using video frames as layers. this pic shows it already cropped on my photoshop, with a frame delay set to 0.08 (my personal default, which i realized after everything was saved was still too fast for my liking but oh well i’m not redoing it):
as you can see on the bottom left corner, it still has a width slightly over 540px. so then i can proceed with the next step: resizing. what i do is go to the image tab and select image resizing, which brings up this window:
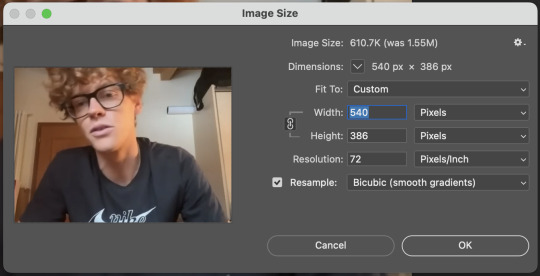
i change only the width to what i want (in this case 540px) and i use bicubic (smooth gradients) resampling
when that’s done, i convert to video timeline on the timeline window. then i select all the layers on the layers window and convert into smart object
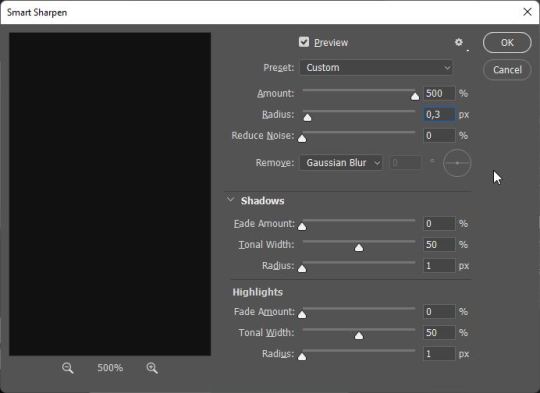
now we can move on to sharpening! under the filter tab, i select sharpen and then smart sharpen. that gets this window to open up:
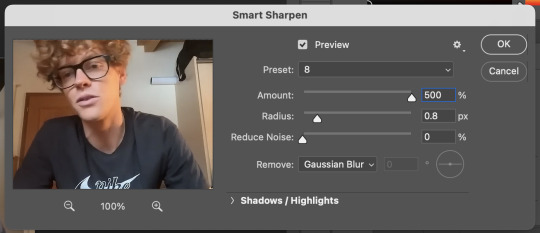
my presets have the amount at 500%, reduce noise at 0%, and remove gaussian blur. as for the radius, that depends on the video. by default i have it set to 0.5px, but i change it as needed. in this case, since it’s a close-up of jannik’s face, i feel comfortable using 0.8px (my highest setting). usually, if the video is shot from afar, i use something lower like 0.3px or 0.4px. i tend to find that oversharpening some really blurry videos makes them look worse, so i prefer to keep it looking a bit blurry if i really have to. thankfully, in our case right now jannik looks fine with high sharpening!
then i adjust the color and lighting as i wish. i would say that creating more contrast between the black and white levels of the gif helps it to appear sharper! though personally, i just like having more vibrant and contrast-y gifs so yeah
the final important thing happens when i save it. here are my settings in the save for web window:
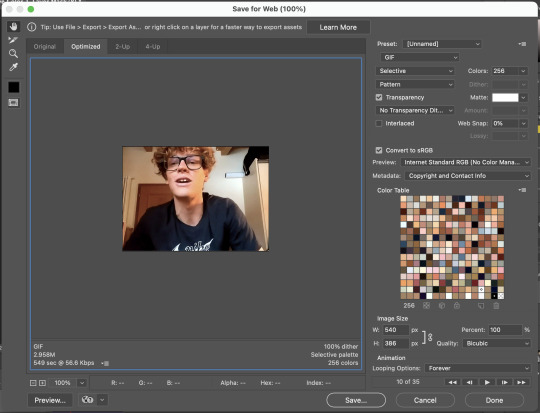
i set max colors to 256, color reduction to selective, and dither to pattern. the last bit there is what i think is most important for keeping my gifs looking non-grainy! i looooove pattern dither, and i find that the other settings do make my gifs look more grainy so i never use them
and that’s it!! this is the process i use for all my gifs tbh, the main thing i play with for low quality ones is cropping and resizing + the smart sharpening radius
hope this helps 🫶
#theres also smth abt MB sizes and whether or not tumblr will compress a gif further based on that which probably affects the quality too#but i didnt rly. pay attention to it LMAO sometimes u just cant make certain gifs any smaller yknow#asks#anon#*#*gifs#<- sorta????
5 notes
·
View notes
Text
F1 GIFMAKER ASK GAME.
tagged by @ivettel and @leclerqued, tysm ♡
1. which drivers do you mainly make gifs for?
ok so. i've not made f1 gifs in a while, (am i still considered an f1 gifmaker?) but i guess mostly charles, lewis and mick. occasionally seb and other drivers. crazy to think i was one of the mick blogs™ a while back, but you know how that turned out.
2. out of the above (if more than 1), who’s your fav to make gifs for and why?
i think charles? he has a very nice and expressive face to gif. he’s also my favorite driver so that’s that kdfj
3. link the favorite gifset you’ve made and tell me a little about it
just as a general rule, i’ve discovered that all of my greatest hits came from me wanting to gift something to my friends heh. from those, i think my favorites are the sebchal doodle edit, because i had to learn a bunch of shit for it to work, and also the eternal schulott linked lives edit, because i like the parallels a lot.
4. link your fav gifset from another creator
it’s no secret that my favorite gifmakers will always be fir and ames (other besties are also immensely talented, specially when it comes to graphics), so my favorite works my them are: glory and gore gifset (ouch), arabella x charles gifset (for me!!! i still don’t know how this set doesn’t have 1k+ notes...) by @josefnewgayden, and seb’s tribute gifset (OUCH) and roc seb gifset (what the actual fuck how can a person do something like this) by @ivettel.
for more incredible sets and graphics, i have my favorite posts tag, if you want to check it out!
5. off the top of your head, tell me about the most memorable tag you've received
i don’t think i remember one in particular, but i love the “OP WHY WOULD YOU DO THIS!!!!!” tags. my favorite heh.
6. which f1 media source (post race interviews, sf full accesses, no brakes, etc) is your fav to make gifs from?
oof. again, not done f1 gifs in a while. but my favorite are from the actual races. a win/pole position, choosing nice shots to gif? yeah.. that’s my actual favorite. too bad it’s been long since i’ve got anything to celebrate dkjd. last thing i remember loving giffing was charles’ pole in italy, or charles’ win in austria.
7. tag someone else!
i have no idea who’s tagged already but if not, @josefnewgayden, @toyotagazoo, @h-f-k, @hockenheim, @finalgirlcharlesleclerc if you haven’t done this/you want to <3
5 notes
·
View notes
Note
your gif editing skills were so good in that older post??!? They look so crisp and clean I could neverrrr. I also wanted to ask if u had any tips on how to edit gifs, like what programmes you use and some common adjustments you make? If you’re too busy, that’s totally fine, no worries. Thanks lovely! ⭐️
thank u 🥺🥺💕 I geuss people constantly tagging that post with "yeah but op's gifs are ugly" & the occasional mean anon I've gotten about this post has gotten to me 😓
anyways, I use photoshop cc2017 for all of my gifs! here's a very basic gifmaking tutorial I made a while ago ☺️
common adjustments I practically always make are below the cut!
concerning sharpening, I changed my process so it's no longer the same as in my basic gifmaking tutorial! it now looks like this:
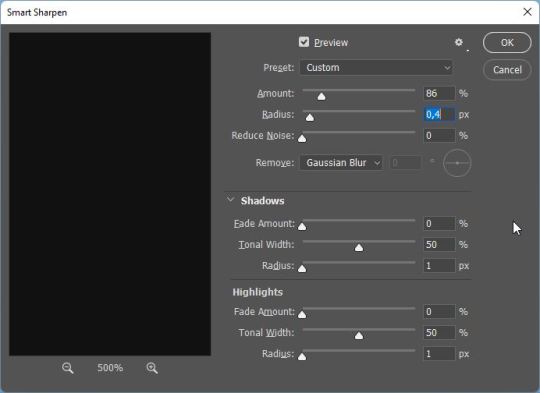
first I smart sharpen my gifs using 86% for amount and 0,4 for radius
then I smart sharpen them again, this time with 500% for amount and 0,3 for radius

and then I add a Gaussian Blur with these settings!
concerning coloring, I also made a coloring tutorial a while ago, you can find it here!
A couple things that have changed since then:
I always always add a color balance layer after my exposure layer nowadays! you'd think it doesn't make a difference but imo it makes or breaks the coloring. Especially changing the highlights panel! I nowadays always make the highlights more cyan (and by that I mean usually at least +10 if not more) - I feel like gifs look far more "neutral" that way
in my old tutorial, I explained how I always do two curves layers first: one for making the shadows black using the black eyedropper tool, and one for making the highlights white using the white eyedropper tool. While the black eyedropper tool practically always works, I find that sometimes it is very useful to adjust the highlights curves layer myself! especially in Taylor's recent music videos, see e.g. this gif I made of the I Bet You Think About Me music video, which imo is painful to color & for which my previous colorings alway looked not that good:
the way I go about it is hard to explain (I actually learned it through a turoial which, for some reason, I cannot find anymore rip), but basically you want to neutralize the tints in the og videos.

I usually just click on the individual colors (under RGB) and slide the upper point of the curve to the left for each color until I'm satisfied. It's honestly mostly trial and error! and also some basic color theory stuff that
is explained in this tutorial for using the channel mixer adjustment layer, which I nowadays also use if doing the whole scheme with the shadows and highlights curves adjustment layers doesn't work out and the gif is still heavily tinted. I usually add the channel mixer layer after these two curves layers then. This tutorial explains it better than I ever could, so I would check that one out ☺️ I would definitely recommend reading through it as it is very useful for grasping the basics of how coloring works.
and, as I said in my previous coloring tutorial, these are just the adjustment layers I use! depending on your own taste, you can vary these, use different ones, use a different order of adjustment layers etc etc. find what works for you! ☺️
hope this helps!
1 note
·
View note
Last Seen Blogs

polos-and-buttonups
polos and button ups

mimsey-studebaker-things
Mimsey Studebaker
noeticyellow
noeticyellow

hotgogdamn
HOT GOG DAMN!

nanablra
NanaBlra.