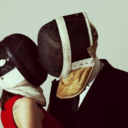
#foamcraft
Text
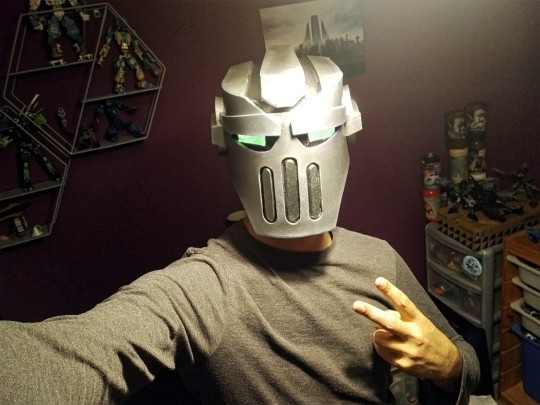
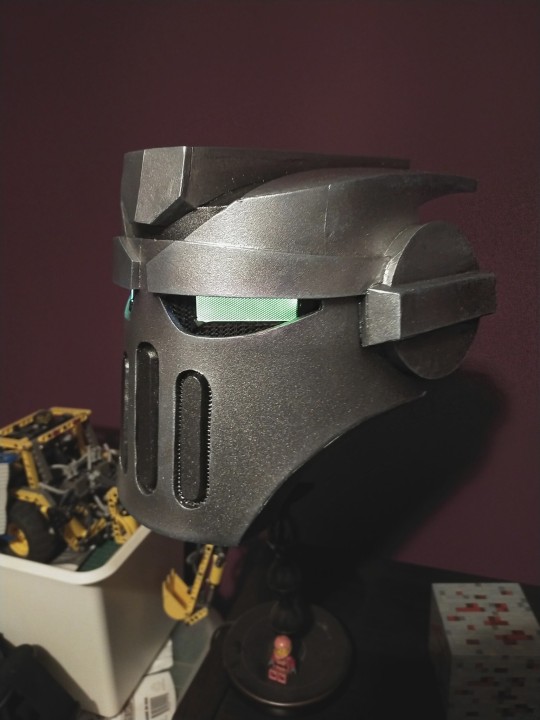

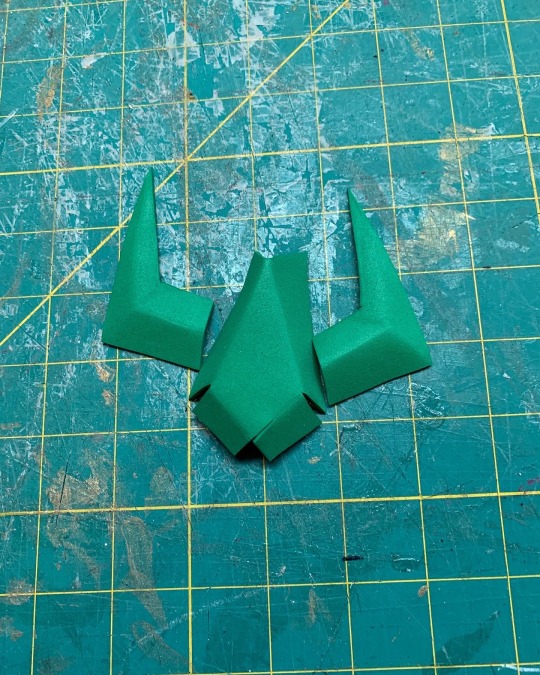
I showed you my bionicles, please respond
171 notes
·
View notes
Photo
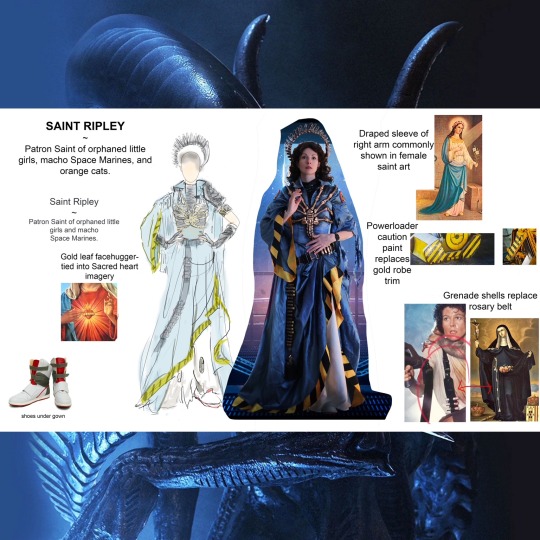
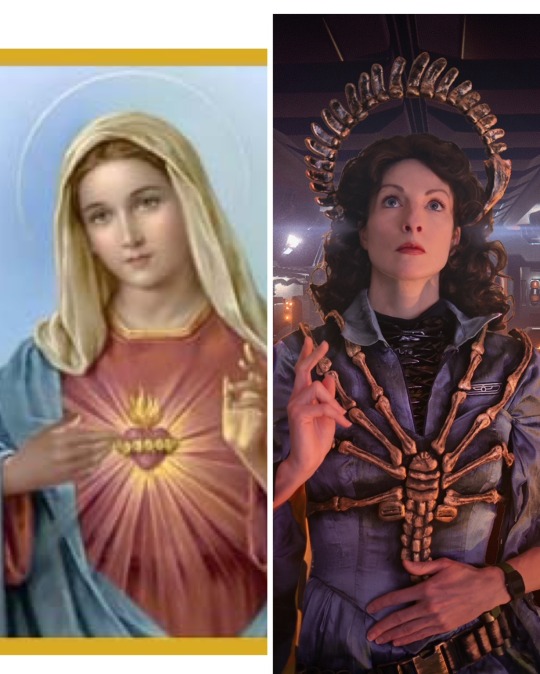
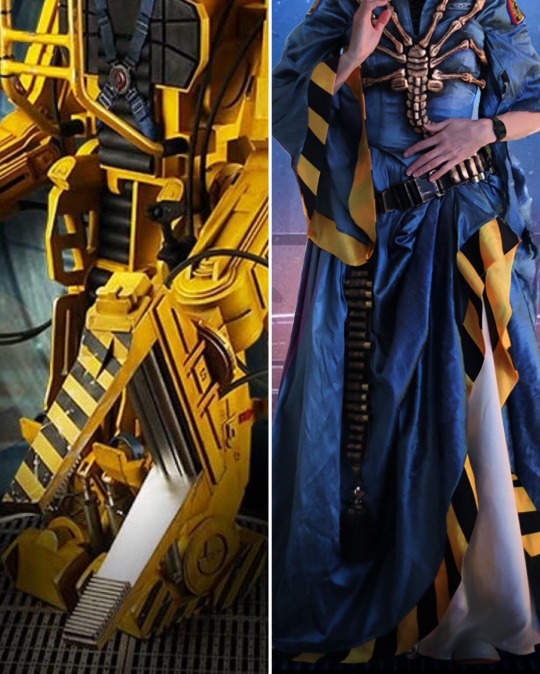

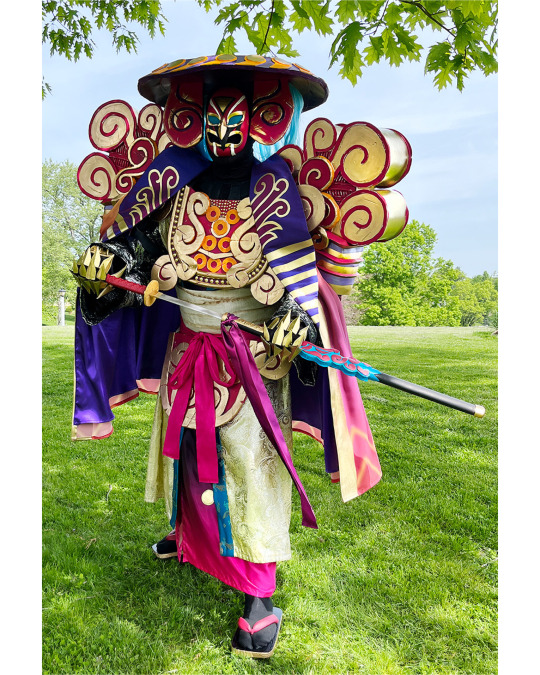
FINALLY!! Saint Ripleys Detail Breakdown!
I still have a few more images to go through of Ripley, but I finally had some time to get to my details!
Pic 1 shows the original sketch, you can see I had a lot more xenomorph garbage on the costume. I realized it made it overwhelming & messy. I do still have the back spines I made, but I don't think I'll be implementing them on this costume. Maybe another??
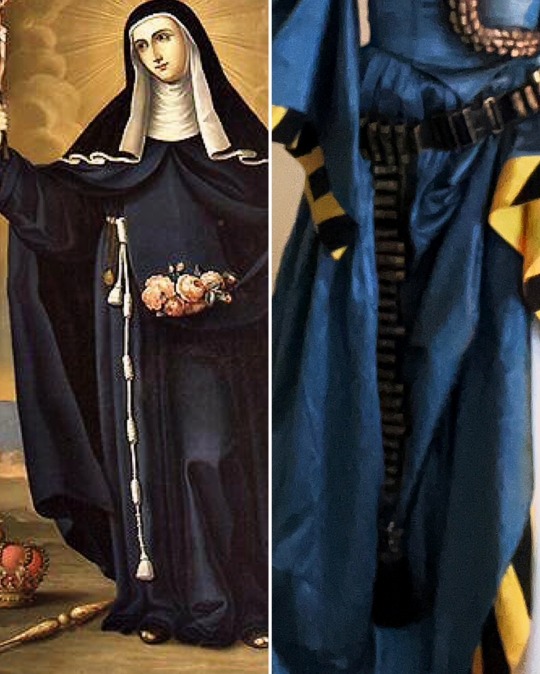
2: The Sacred Heart. I wanted the Face Hugger to sit where the Sacred Heart sits in such iconography, the legs being the 'rays".
3: An obvious detail: the Power Loader aesthetic used for the border on the robe, replacing the typical gold
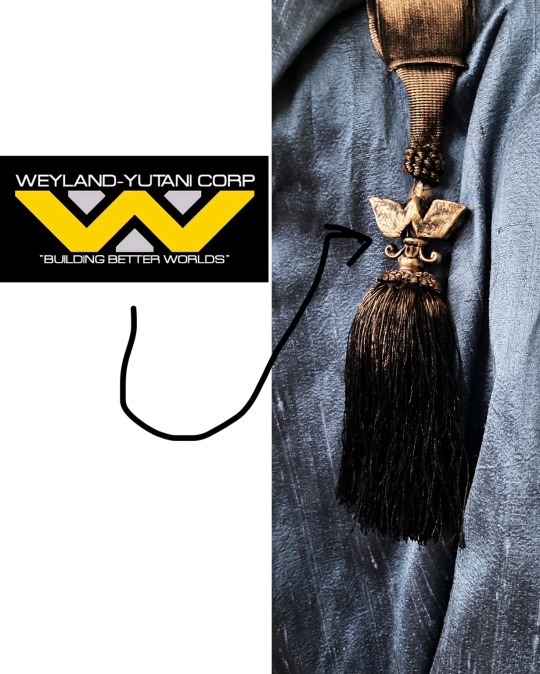
4: The Cincture has been replaced with the M41-A Pulse Rifle ammo bandolier
5: Hidden detail: the tassle at the end of the cincture has a hidden Weyland Yutani logo on it!
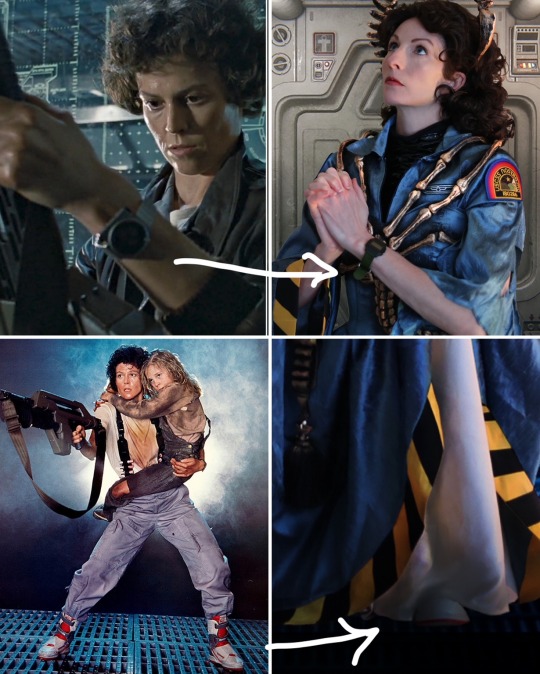
6: I incorporated both the tracker watch & of course, her shoes!
7: Finally: the halo is a Xenomorph Queen tail, gilded in gold.
The main body of the dress was a gorgeous silk I chose to match her blue jumpsuit, of course with the Nostromo patches on arm/chest!
I put so much thought and love into this costume, I wanted it to be a celebration of one of the characters that shaped me, growing up.
~
#ripley#saint ripley#ellen ripley#alien#alien movie#aliens#aliens movie#xenomorph#face hugger#saint#amazonmandy#foamcraft#foamsmith#seamstress#cosplay#alien cosplay#ripley cosplay#aliens cosplay#colonial marines#alien queen
154 notes
·
View notes
Text
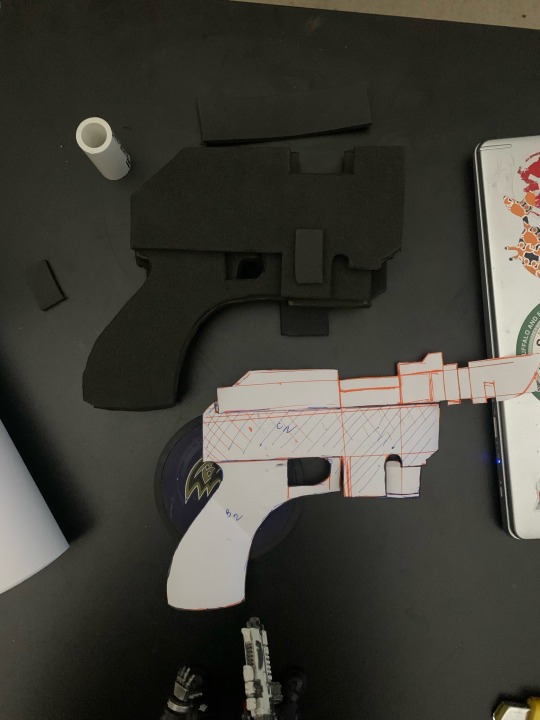
Decided to get a las pistol together for my Lotara Sarrin cosplay so here’s the beginnings- paper pattern and layers of foam. Some dremel clean up and then we’ll start gluing them together. Pvc pipes and we’ve got a pistol!
9 notes
·
View notes
Text
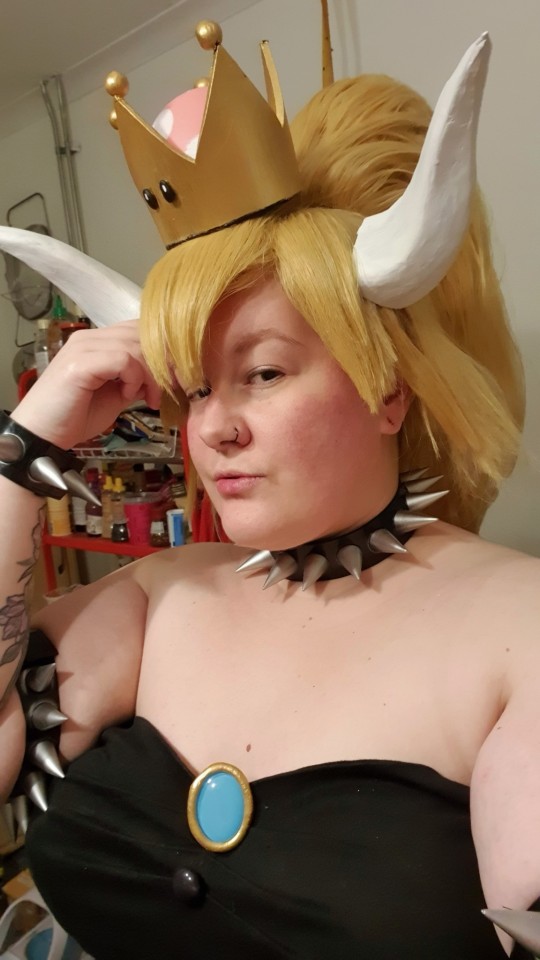
Hi, I'm Finnley. A nonbinary fat person that likes art and crafts with a bunch of different media and I'll occasionally stream on Twitch.
My pronouns are they/he and I prefer neutral terms, but masculine will do if none are available.
Have a picture of my Bowsette costume test! This is my first proper cosplay in years and I'm excited!
17 notes
·
View notes
Text
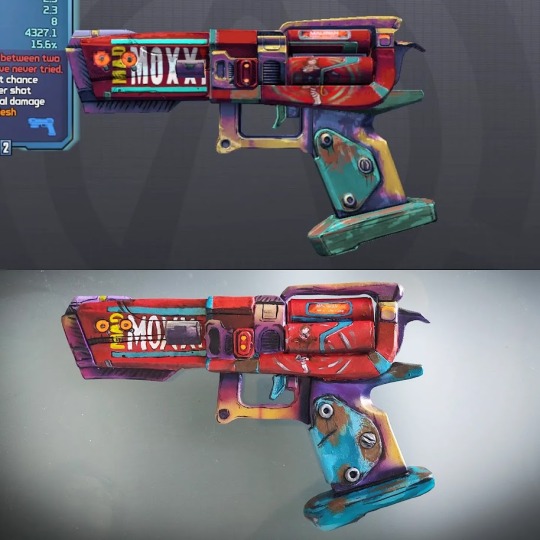
Currently working on Mad Moxxi cosplay from Borderlands! The costume parts are in various stages of progress, but I've done her pistol Rubi already. Made out of foam, glued with foam hot glue, painted with acrylics - brush and airbrush.
#cosplay#cosplaywip#cosplayer#mad moxxi#borderlands#borderlands 3#borderlands cosplay#foamcraft#prop making#airbrush
11 notes
·
View notes
Text
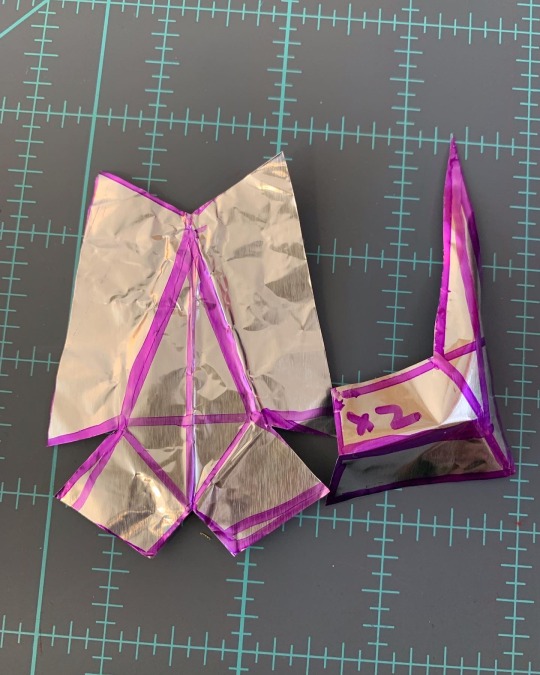


That little aluminum foil trick for making more complicated foam patterns is a lifesaver
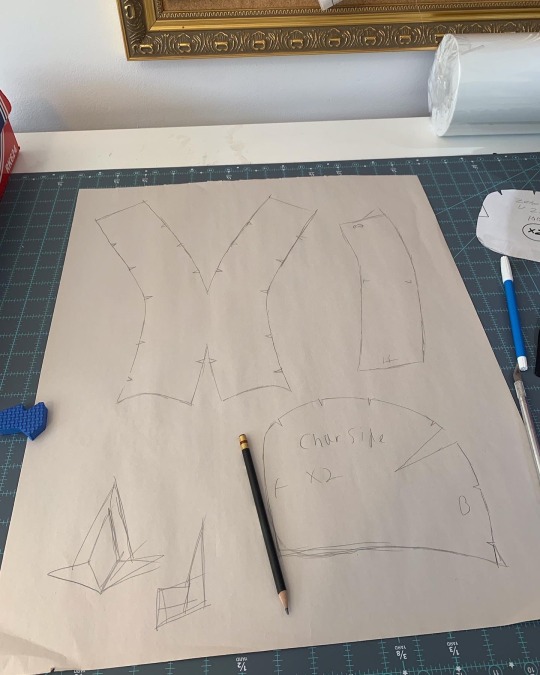
#from the ashes#livin la vida phoenix#cosplay#cosplay wip#foamcraft#Gundam#gundam cosplay#char aznable
9 notes
·
View notes
Text
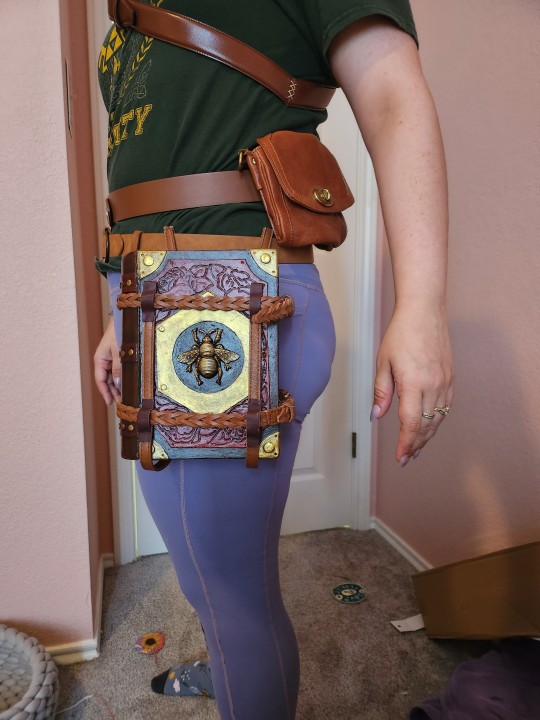
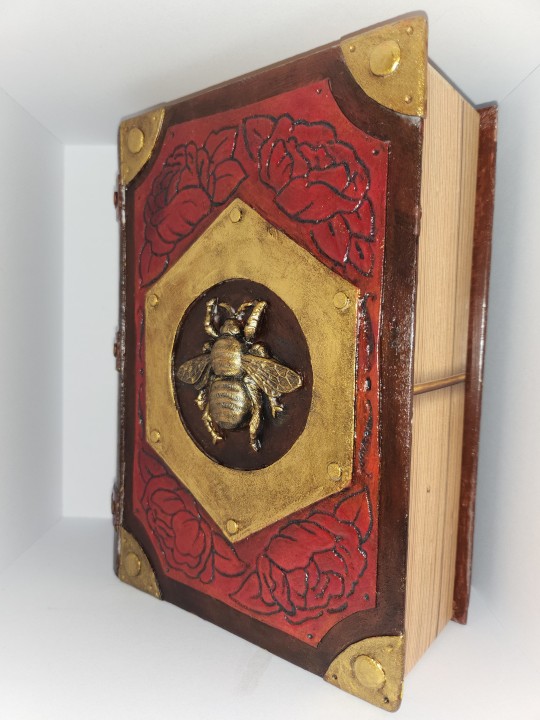
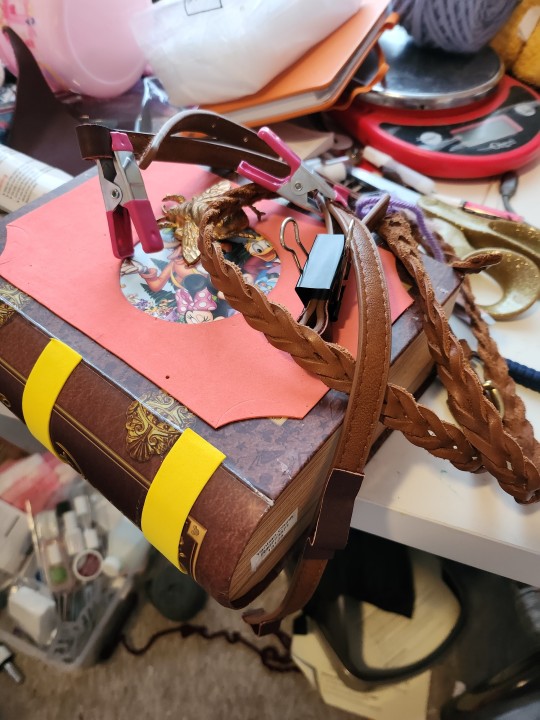
been crafting props for going to renfest :] super proud of this book, which I modified to look more fantasy instead of d*sney
modified leather belts & bags for straps & pouches; book decorations made with craft foam, acrylic paint, metal bee emblem, and mod podge
0 notes
Note
YO GIRL WHERE'D YOU GET THAT GAS MASK.
Asking for uh
Personal reasons.
its a painters mask from bunnings! it is not rated for anything finer than aerosol paints but it is very comfy
3 notes
·
View notes
Text
I mean this in the nicest most doting way possible when I say that some crafts peeps are fucking nuts.
#watching someone make an Allosaurus skull out of LAYERS OF FOAM#foamcraft fossilcrafters scare tf out of me and I envy their skill#ramblings
0 notes
Text
SO ACTION FIGURES
(TikTok Short Reviews, Toyspotting, And More)
https://vm.tiktok.com/ZMe4TBp66/
Also check out our other toy related stuff:
WCWA BURNWOOD
Check out our toy photography page:
https://wcwaburnwood.blogspot.com/
HEEL VS. M.O.C.
(Toy Videos)
https://youtube.com/c/tinuniversepresents
For All Things Tin Universe tinuniverse.blogspot.com
#toys #actionfigures #figlife #toyspotting #dioramas #toyphotography #toyartistry #art #hobbies #hobbiest #miniatures #photography #photos #crafting #tiktok #toypic #toyphoto #toyphotographyisart #toytribe #Halloween #crafting #foamcrafts
0 notes
Text
Someone spent my Splatoon 3 money on packaging supplies 😒
0 notes
Text
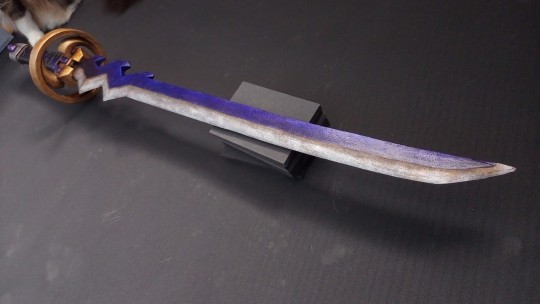
New commission: YOJIMBO!
New commission: Summon Yojimbo!! This was an unusual style of commission for me to take on, but I really wanted to make it! I have been trying to focus on taking on commissions that I WANT to make. I absolutely love the colors and the design of this. The accessories and armor parts are all foam, very lightweight, and the sword is balsawood so it’s con-safe.
It was really hard to get proper photos of this because none of my mannequins are the appropriate size, and the client is very tall. I took pics of it pinned onto a mannequin as well as being worn by someone, but it will fit the customers measurements much better!
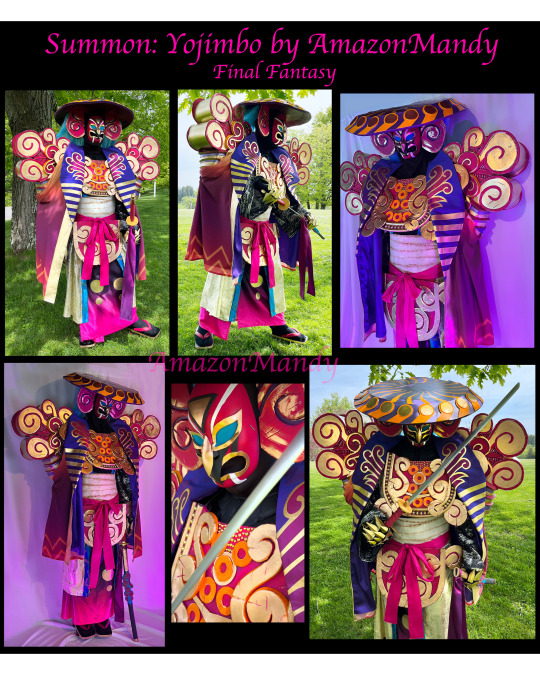
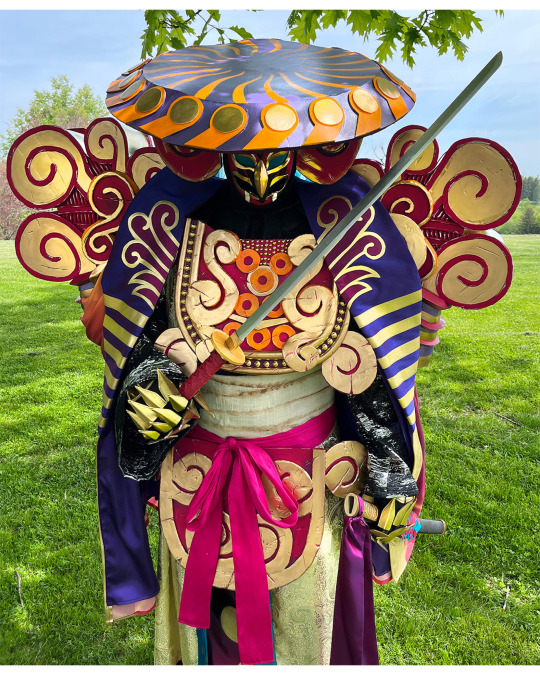

#cosplay#cosplaycommission#amazonmandy#sewing#seamstress#cosplaycommissioner#commission#cosplay commission#Yojimbo#samurai#summon#finalfantasyx#final fantasy x#ffx#final fantasy cosplay#foamcraft#foamarmor#foamsmith
51 notes
·
View notes
Text
If I cannot find laios's armor patterns on Etsy I will face god and walk backwards into hell (learning how to pattern armor on blender) (so that I can use a pepakura pattern maker to make it into a paper pattern) (so that I can turn the paper pattern into a foamcrafting armor pattern) (I may be biting off more than I can chew)
It took me two hours to get this far. I think I might be starting to get a hang of the process but still. wish me fuckin luck yall. i gotta go to bed so hopefully I still have any sense of what i'm doing after work tomorrow
21 notes
·
View notes
Note
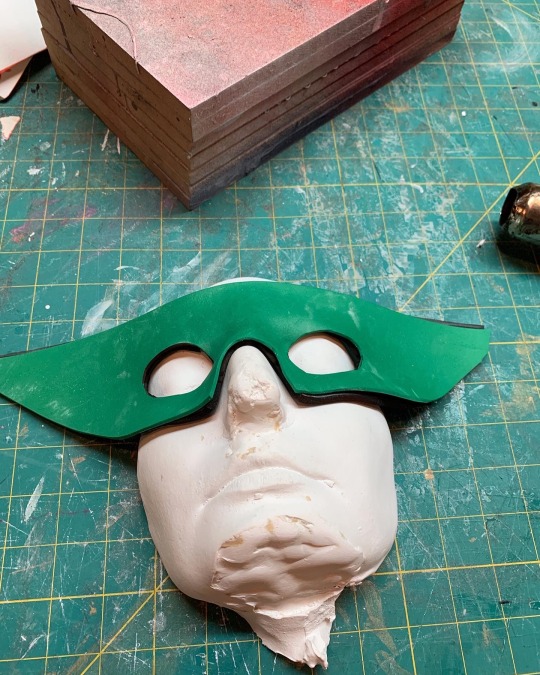
Hello! Your Gabriel cosplay WIP is looking fantastic. I've been picking up foamcrafting for the first time in years and am rusty as hell, but it's been fun and satisfying.
I had a few questions about your build. Did you find your armor templates online somewhere or make your own? Have you been using hot glue or contact cement for the chestpiece/arm greaves/shoulders? And what thickness EVA have you been using?
I really want to make an Ultrakill cosplay once I shake all the rust and dust off, and have been debating between V1 or Gabe, but I think I'd lean towards whichever has available templates online somewhere. Making your own is...difficult!
Thanks in advance for the answers, and I hope your crafting goes as smoothly as it can. Good luck!
Thank you for the ask :]]
I made the templates largely by myself with the help of my dad, I made them out of paper first before going on to use foam. Had to find a LOT of references, but the ultrakill wiki’s great for that (though I discovered Gabriel’s armour changes slightly between cutscene arts, which is a bit annoying lol) (there was also a lot of improvising by me as I’ve been working on the cosplay, so I didn’t follow the templates 100%)
As for materials, I used 8mm foam for the chest plate and shoulders, and 12mm for the belt (wanted them to be the most durable pieces), the rest of it is 6mm, aside from the hand & shoe plates which I’ll probably make out of 3mm. And I’ve been using a mix of contact cement and hot glue— hot glue’s definitely easier to use and is better with more complicated shapes (like the chest plate) but if you just need to stick two flat surfaces together I’d definitely go with contact adhesive/cement, since it leaves less to clean up and tends to make cleaner seams :]
#ty for the questions and I hope I helped a bit :]#my cosplay#ultrakill#Gabriel ultrakill#ultrakill cosplay#asks
20 notes
·
View notes
Text
I'll post pics from the con and my haul at some point (and make a beautiful display for my Miku nendroid I didn't know I wanted until I was holding it) but for now highlights eeee
Periodically hearing "Hi Barbie!" "Hi Barbie~" from all the barbie cosplayers
My Sinclair cosplay being recognized by not one, not two, but THREE groups, despite it being very lowkey!!! ❤️❤️❤️ i appreciate y'all
Someone wanting a picture on the day I didn't cosplay at all, just did a fancy outfit
Stamp rallies!! I've never done one before but I finished THREE and I'm gonna put the link click one up on my wall.
SCENE NYAN CAT COSPLAYER. I didn't end up asking for a photo but you were the COOLEST
The link and Zelda artist alley booth!!! In my other post I'll put their socials they were so nice and had such cool stuff
ENSTARS COSPLAYER WHO GAVE ME A NIKI CARD????
Tsukasa cosplayer giving me a worm on a string after I asked for a picture of them with my Wonderland Miku nendroid. I felt like a kid meeting santa
This con awakened interests I didn't know I had (or cared this much about). Nendroid collecting? Project Sekai? Foamcrafting? TikTok dances (who AM I)?? It was so Fucking joyful and. To every single person who was there, you helped make it awesome. My favorite part of cons is just experiencing crowds full of nerds unapologetically loving what they love, and sharing that love with others, and it's so magical
#sacanime#sacsummer2023#sacanime summer 2023#im so so busy with moving and school but all i want is to do a con haul spread#and write about it in my journal and revive my instagram so i can find people#also planning an enstars cosplay meetup w my partner for sacwinter.#and using that to advertise an enstarrie cosplay server and a fan panel we wanna do next summer.#crazy:b likers who go to sacanime Hit Me Up
4 notes
·
View notes
Text


I seem to be spending more time on other people's cosplays than my own 😅
There's more on my other sideblog @foamcraft-armory
1 note
·
View note
Last Seen Blogs
valegofe
Melancolía

sekushi-gaming
𐐪 gaming enthusiast 𐑂

what-a-ray-of-sunshine-blog
My Ray's of Sunshine!

erisnsn
ఌ eris ও

deathshe
INTO HER LONG BLACK HAIR