#and the slight spice and the garlic are perfect
Note
"What are you cooking?" From Lexus to Grayson
My Muse will Make Them a Meal
The plates were each placed with the utmost grace in front of Lexus as their time came to be presented, for a four course meal.
The first was an appetizer of sorts; home-made bread and salty butter churned from locally-sourced cream. It was comprised of half a loaf that appeared to have been braided with a few floral designs before it was cooked, and a golden wedge of butter beside it. Several slices had been perfectly cut to rest artistically on the plate from both. The bread's crust was a deep golden brown and had a crispy texture, but the inside was perfectly soft, aerated to be fluffy without losing any substance. With a smear of butter added, the combination was creamy and rich, melting in the mouth and flavoring the bread with a delicate, savory tang and an herbaceous freshness. There was just a pinch of salt in the butter as well, to highlight the balance of soft, almost-sweetness of the bread, and the light but savory flavor of the butter.
The next course, also an appetizer were raviolis, a set of six, placed on the plate in a circle. The pasta it was cooked in was translucent, allowing you to see the filling inside where it lay, a medley of greens and reds. a slight extra lip to the pasta also gave it the appearance of seashells, with the filling packed at the base. Their flavor is delicate, something bright with citrus and flavorful but earthy like basil and ricotta and a hint of beet or celery, depending on the color ravioli chosen. All of it was garnished with pest and a swirl of olive oil, one of the finer brands. Inside the ring of Raviolis were finely sliced, thin sea scallops, served chilled and garnished with colorful beets of red and green, as well as several herbs and lemon, for a refreshing flavor that was both light and unobtrusive, almost seamless with the similar flavors of the ravioli. The warm and chilled temperatures played together, as did the soft skin and filling of the ravioli, the bouncy yet tender texture of the scallop, and the soft crunch of thinly sliced beet and cucumber, drizzled with scallions and an tart, citrus vinaigrette.
The main course provided was pan seared duck, the outside crisped to perfection with a golden glazed crust decorated in an array of herbs and spices. The meat is topped with a garnish of an expensive serbian cheese, a crumbly feta-like textured cheese that bring a nutty, earthy flavor to the dish with a pinch of salt, carefully balanced with a rich, buttery taste that overall tastes quite clean. The duck itself is crisp, but on the inside it's divinely tender, flavorful and almost sweet from the sauce it is served with, that has a honey and fig flavor to balance against the savory of the meat. The duck is cooked perfectly as well, with no additional oiliness.
Several mushrooms, cut into coins also join the dish to form a small ring around the duck breasts, and they have a meaty texture that adds an almost autumnal, spiced flavor to the dish. There is also mashed potatoes on the plate, buttery soft and finely processed to the softest, cloud-like texture, but still with a weight on your tongue with each bite. A small sprinkle of truffle is added atop the potatoes as well, grated finely so it melts into the warm softness of the potato, bringing with it a robust, woodsy flavor. Sliced baby tomatoes, cooked confit with garlic and herbs, are also on the plate, as well as grilled slices of fresh squash and zucchini. The tomatoes bring a distinct texture that melts in your mouth almost immediately due to their small size and how they were cooked, but they pack a wallop of fresh flavor. The other vegetables bring a similar flavor in their own way with a slightly crispier texture and clean taste, with only salt and pepper to augment them slightly, to balance against the spiced starches and sweet-and-savory meat from the rest of the dish. The main course is served with a glass of aged brunello, a drink that adds a dark, fruity but acidic flavor, tannin heavy to pair with the fattiness of the duck, also with notes of fig, cherry, and hazelnut to tie it to the dish's flavor.
The final dish, dessert, is brought out; a square of chocolate pudding, separated into four distinct layers, each a chocolatey delight born from different styles of Belgian chocolate. It is creamy, soft, and layered with a fine topping of champagne jelly, which adds something fresh to the chocolate to keep it from being too rich. It appears to be dusted with a fine glitter. All of which is hidden beneath a dome of chocolate drizzled with the thinnest layer of salted caramel. A drink is also provided with the last dish, a saffron cordial, called Safran Şerbeti, a Turkish drink known for it's floral, fruity, and sweet elements, turned a beautiful shade of gold by the saffron threads dissolved in the sugar. It is served chilled, and has notes of lemon and orange, as well as honey and a pinch of spiced ginger. It is served in a long glass, which also contains an additional lemon slice submerged inside.
#cooking meme#ask meme answers#this was fun!!! even if it got fucking long and kinda wild lol#i had fun thinking of fancy dishes he would make ^^#i went expensive too a bit since i do think there were be high end options and lexus is fancy so i figured he'd go for broke xDDDD#but yeah welcome to greysons!!!#long post#cw food#i only get to be this fancy with this guy so i'm happy i got to do this at least once ^^#ryouscared#rp#Greyson#Lexus
3 notes
·
View notes
Text
Keto deviled eggs are a delightful twist on the classic appetizer, perfect for those following a ketogenic diet or simply looking for a low-carb, high-fat option. These savory treats feature hard-boiled eggs filled with a creamy, flavorful mixture of mayonnaise, mustard, and spices, resulting in a satisfying snack or party dish that's both delicious and keto-friendly. Garnished with a sprinkle of paprika or fresh herbs, these deviled eggs are sure to be a hit at any gathering or enjoyed as a tasty snack.
Recipe: Keto Deviled Eggs
Ingredients:
6 large eggs
3 tablespoons mayonnaise (preferably keto-friendly)
1 tablespoon Dijon mustard
1 teaspoon apple cider vinegar (optional)
1/4 teaspoon garlic powder
1/4 teaspoon onion powder
Salt and pepper to taste
Paprika or fresh herbs for garnish (optional)
Instructions:
Hard-boil the eggs: Place the eggs in a single layer in a saucepan and cover with cold water, ensuring the eggs are submerged by at least an inch. Bring the water to a boil over medium-high heat. Once boiling, remove the saucepan from heat, cover, and let the eggs sit for 10-12 minutes.
Cool and peel the eggs: Transfer the cooked eggs to a bowl of ice water and let them cool for a few minutes. Once cooled, carefully peel the eggs under cool running water to help remove the shells easily.
Slice the eggs: Once peeled, slice the eggs in half lengthwise. Carefully remove the yolks and transfer them to a separate bowl, placing the whites on a serving platter.
Prepare the filling: Mash the egg yolks with a fork until they are crumbly. Add the mayonnaise, Dijon mustard, apple cider vinegar (if using), garlic powder, onion powder, salt, and pepper to the mashed yolks. Mix until well combined and smooth. Adjust seasonings to taste.
Fill the egg whites: Spoon or pipe the yolk mixture evenly into the egg white halves, creating a slight mound on top.
Garnish: Sprinkle the filled deviled eggs with paprika or garnish with fresh herbs like parsley or chives, if desired, for an extra pop of color and flavor.
Chill and serve: Refrigerate the deviled eggs for at least 30 minutes to allow the flavors to meld and the filling to set. Serve chilled and enjoy!
These keto deviled eggs are not only delicious and satisfying but also a perfect addition to your keto-friendly menu for any occasion. Enjoy as a snack, appetizer, or part of a low-carb meal.
To Learn More Click Here
#weight loss#custom keto diet#diet#healthy eating#healthy living#keto#keto food#keto life#keto meal#ketogenic
2 notes
·
View notes
Text
Old Dutch Ripples All Dressed Potato Chips Review

Happened upon these chips at Cub recently, and knowing they were a Canadian flavor intrigued me. I'm familiar with the brand, being a Minnesota staple, and the other snack offerings by Old Dutch Foods are classics.
These chips are a perfect blend of thin and crispy, crunchy but not overly so. I think they're similar to Ruffles, but with even thinner ridges, almost like Corduroy fabric. They don't tend to break as much in the bag, and a full chip can be easily put in the mouth and crunched without breaking on their way in. Furthermore, they're not as hard and crunchy as kettle chips (which I do like, but sometimes they are too much). The full size chips are impressively large and feel great in the hand.
The flavor initially is reminiscent of ketchup flavored chips, but there's more going on. Supposedly the mix is supposed to include ketchup, salt and vinegar, sour cream and onion, and bbq flavors. Definitely a ketchup-forward flavor, and there is a garlic / onion flavor present, but hard to pick it out without knowing to look for it. It can easily be explained by the ketchup flavor. There is some sourness too but not not to the degree of a salt and vinegar chip. BBQ too is hard to find, but there are what I would call "miscellaneous spices" but really nothing I would point to and say "that's BBQ!". I could be convinced that there was a slight creamy flavor present, but typically I don't notice the sour cream flavor on other sour cream chips, so that could just be me.
I enjoy these chips very much, despite the flavors being somewhat muddled. My only real complaint is that there were a good amount of brown/black potato bits on the edges, which are not a problem for most people, but I tend to pick those bits off and not eat them. I would rate them as ketchup flavor with extra steps, but since I've been hunting for ketchup flavored potato chips for years, there's no complaints here.
9/10 is my overall score. I don't buy potato chips too often unless they're on sale or if I have a hankering, but I'd definitely pick these up again. I hope they become a permanent offering from Old Dutch.
2 notes
·
View notes
Text
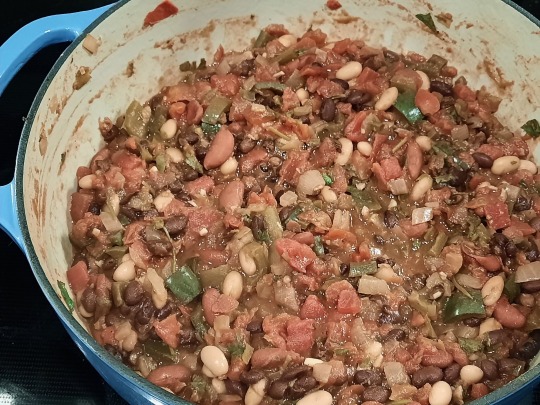
Vegetarian Chili
Given the chilly status of much of the US at this time of year, I decided to start the new year with my step-dad's chili which I have altered and perfected to become vegan friendly. My family is a huge lover of spicy, but unlike them, I like my food to not be over powered by spiciness. What this means is that yes, this chili is a bit spicy, but it is not overwhelming and it can always be tampered down with some shredded cheese (vegan or regular).
INGREDIENTS
4 cans of diced tomatoes
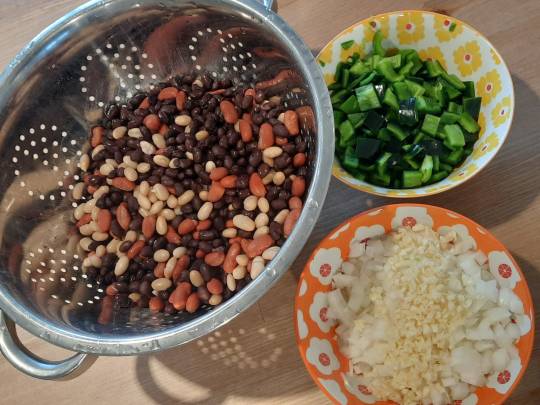
2 cans of black beans
1 can of kidney beans
1 can of great northern beans
1 jalapeño pepper
1 poblano pepper
1 Anaheim peper
1 medium onion, diced
3 cloves of garlic, diced
1 tablespoon oil (olive or vegetable)
1/2 lime
1 cup of fresh cilantro, chopped
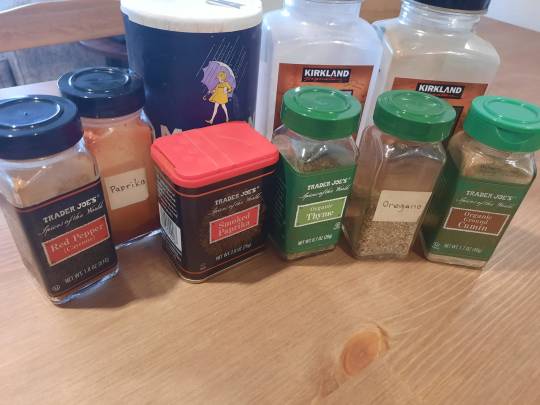
1 teaspoon cumin
1/4 teaspoon black pepper
1 teaspoon garlic powder
1 1/2 teaspoon paprika
1/2 teaspoon thyme
1/2 teaspoon oregano
1 teaspoon salt
1/4 teaspoon sugar
1/4 teaspoon smoked paprika (optional)
Shredded cheddar cheese (optional)
Tortilla chips (optional)
INSTRUCTIONS
Chop up the onion, poblano, and anaheim into dice sized pieces. Mince the garlic. Chop the jalapeño into small bites too.* Make sure you get rid of all the seeds from the peppers to reduce the spice level.**
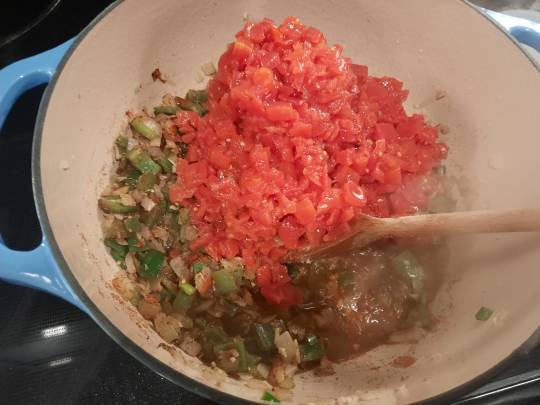
Add a tablespoon of oil to a big, chili sized pot and place it over medium heat. When the oil gets less viscous (moves around the pot easier), add the onion and diced garlic. Stir every minute or so. Cook for about 3 minutes.
Add the peppers to the pot. Cook onion, garlic, and peppers together until the onions become translucent and the peppers have a slight golden brown to them. This should take about 5 minutes. Stir periodically so nothing burns.
Add the cumin, paprika, thyme, oregano, salt, pepper, and dried garlic to the pot.*** Stir it into the onion, garlic, and pepper mix. By adding this now, it adds an extra element of flavor to your chili, but you can add the spices after the tomatoes and beans have been added.
Add the black beans, kidney beans, and great northern beans along with the 4 cans of diced tomatoes to the chili pot.**** Mix everything together.
Turn up the temperature and bring the pot to a simmer.
Once it reaches a simmer, turn the temperature down to low-medium, add the juice of 1/2 a lime, stir everything together, and place a lid over your chili. Let the chili cook for about 1 hour. Stir it once or twice during that time.
After an hour, check your chili. If it looks cooked and the flavors seem to have melded together nicely, add the cup of chopped cilantro and let it cook for another 15 minutes.
Serve your chili into bowls and add shredded cheddar cheese if you want. You can also eat it with tortilla chips.
*Unless you like surprise bites of spice, I recommend chopping the jalapeño into small bits, but keep in mind that the smaller you dice the jalapeño, the spicer it will make your chili.
**It helps to wear gloves when handling the jalapeño so you don't have to worry about the chili oil clinging to your skin later. This isn't a concern with the poblano and anaheim. If you don't have gloves, you can "wash" your hands with some vegetable oil then clean off your hands with a lot of soap and water. I prefer wearing gloves.
***You can use a spice mix if you don't have all these spices on hand. This was an issue for me when I lived in a dorm my first 2 years of college. If you need to do this, I recommend McCormick Chili Seasoning Mix.
****I recommend placing your beans in a strainer and rinsing them with water before you use them, but it is up to you.

3 notes
·
View notes
Text
Why Jamaican Cabbage Should Be Your Next Side Dish Sensation with Cool Runnings Foods in Canada
Introduction
When it comes to Caribbean cuisine, Jamaican Cabbage is a standout side dish that offers a delightful blend of flavors and textures. This versatile and nutritious dish can elevate any meal, making it a must-try for food enthusiasts. At Cool Runnings Foods, we bring the authentic taste of Jamaican Cabbage to Canada, allowing you to enjoy this delicious dish in the comfort of your own home. In this blog, we'll explore why Jamaican Cabbage should be your next side dish sensation.
What is Jamaican Cabbage?
Jamaican Cabbage is a flavorful and healthy side dish made by sautéing cabbage with a variety of seasonings and vegetables. It typically includes ingredients such as onions, bell peppers, carrots, and Scotch bonnet peppers, which add a subtle heat and vibrant color to the dish. The result is a savory, slightly spicy, and aromatic side that pairs perfectly with a wide range of main courses.
Why Choose Jamaican Cabbage?
1. Bursting with Flavor
Jamaican Cabbage is not your average cabbage dish. The combination of fresh vegetables, spices, and herbs creates a rich and complex flavor profile that is both satisfying and memorable. The addition of Scotch bonnet peppers provides a gentle kick of heat that enhances the overall taste without overpowering it.
2. Nutritional Powerhouse
Cabbage is known for its numerous health benefits, including being a good source of vitamins C and K, fiber, and antioxidants. When combined with other vegetables and spices, Jamaican Cabbage becomes a nutrient-dense dish that supports overall health and well-being.
3. Versatile Side Dish
One of the great things about Jamaican Cabbage is its versatility. It can be served alongside a variety of main dishes, from jerk chicken and grilled fish to rice and peas. Whether you're hosting a Caribbean-themed dinner party or looking for a simple weeknight side, Jamaican Cabbage is a perfect choice.
4. Easy to Prepare
Jamaican Cabbage is easy to make and requires minimal ingredients. With a straightforward preparation process, you can whip up this delicious side dish in no time, making it ideal for busy weeknights or last-minute gatherings.
How to Make Jamaican Cabbage
Here's a simple recipe to get you started with making Jamaican Cabbage at home:
Ingredients:
1 medium head of cabbage, shredded
1 large onion, thinly sliced
1 bell pepper, thinly sliced
2 carrots, julienned
1 Scotch bonnet pepper, chopped (optional for heat)
2 cloves of garlic, minced
2 tablespoons of vegetable oil
1 teaspoon of Cool Runnings Foods all-purpose seasoning
Salt and pepper to taste
Instructions:
Heat the vegetable oil in a large skillet over medium heat.
Add the sliced onions, bell pepper, and garlic, and sauté until the vegetables are soft and fragrant.
Stir in the shredded cabbage and carrots, mixing well to combine.
Add the Cool Runnings Foods all-purpose seasoning, salt, and pepper. If you like it spicy, add the chopped Scotch bonnet pepper.
Continue to cook, stirring occasionally, until the cabbage is tender but still has a slight crunch.
Adjust seasoning to taste and serve hot.
Conclusion
Jamaican Cabbage is a vibrant and flavorful side dish that deserves a spot on your dining table. With its delicious taste, nutritional benefits, and versatility, it's no wonder why this dish is a staple in Caribbean cuisine. Thanks to Cool Runnings Foods, you can easily bring the authentic taste of Jamaican Cabbage to your home in Canada. Try this recipe today and discover why Jamaican Cabbage should be your next side dish sensation!
0 notes
Text
The Essential Guide to Vegetable Soup Stock
Ingredients and Their Roles
A well-balanced vegetable stock starts with a combination of vegetables, herbs, and spices. Here are some essential ingredients and their contributions:
Onions: Provide a robust, sweet flavor and serve as the stock's backbone.
Carrots: Add sweetness and a vibrant color.
Celery: Contributes a subtle bitterness and enhances the overall depth of flavor.
Garlic: Imparts a rich, aromatic quality.
Leeks: Offer a mild onion-like flavor, enhancing the stock’s complexity.
Tomatoes: Add acidity and a slight umami taste, balancing the sweetness of other vegetables.
Herbs (parsley, thyme, bay leaves): Infuse the stock with aromatic and earthy notes.
Spices (peppercorns, bay leaves): Introduce a gentle spiciness and warmth.
Mushrooms: Optional, but they add an umami depth, especially if you’re looking for a richer stock.
The Art of Preparation
Choosing and Prepping Vegetables
Choose fresh, high-quality vegetables. Soup Stock Vegetables Wash them thoroughly to remove dirt and pesticides. Peeling is optional; often, the skins add extra nutrients and flavors. Chop the vegetables into uniform pieces to ensure even cooking and flavor extraction.
Cooking Process
Sweating the Vegetables: Begin by heating a small amount of oil in a large pot. Add onions, carrots, and celery, cooking them gently until they soften and release their aromas. This step, known as sweating, helps to deepen the flavors of the stock.
Simmering: Add the remaining vegetables, herbs, and spices. Pour in cold water, enough to cover the vegetables by a couple of inches. Slowly bring the mixture to a simmer. Avoid boiling, as this can make the stock cloudy and impart a bitter taste.
Cooking Time: Simmer the stock gently for 45 minutes to an hour. Overcooking can lead to a loss of fresh vegetable flavors.
Straining: Once the stock has developed its flavor, strain it through a fine-mesh sieve or cheesecloth to remove the solids. Press down on the solids to extract as much liquid as possible, but do not force it, as this can cloud the stock.
Tips for Perfect Stock
Avoid Overpowering Flavors: Certain vegetables like broccoli, cauliflower, and asparagus can dominate the stock with their strong flavors. Use them sparingly or avoid them altogether.
Balancing Sweetness and Acidity: Carrots and tomatoes can balance each other out, preventing the stock from becoming too sweet or too acidic.
Enhancing Umami: Adding mushrooms, especially dried varieties like shiitake or porcini, can deepen the umami profile.
Salt Control: It's best to season the stock lightly with salt, if at all. Lingonberry Singapore You can adjust seasoning in the final dish that uses the stock.
Storage and Uses
Once cooled, vegetable stock can be stored in airtight containers in the refrigerator for up to a week, or frozen for up to three months. Freeze in ice cube trays for easy portion control.
Vegetable stock serves as an excellent base for soups, stews, risottos, sauces, and gravies. It can also be used to cook grains or as a flavorful liquid in place of water in various recipes.

0 notes
Link
0 notes
Text
New favorite curry alert!! It takes a lot for a curry to impress me these days, but this one was utterly divine.
I made this in full to get three servings, freezing two (used only 3/4 cup chickpeas leftover from a can I'd already opened). Making a big batch of a new recipe like this is always a bit of a gamble, but this one definitely paid off in the end — I am so glad I now have spare portions in the freezer to look forward to.
I did a little bit of prep work up front to get the onion, ginger, and garlic ready, but other than that, this is really just a matter of dumping things in the pan — so easy, even allowing me time to clean up and then spend 20 minutes of the simmer time in bed with a book.
I served with a couple of my chickpea pancakes and a good squeeze of lime, and, God, was this amazing! The spices here were just perfect — a teaspoon of cinnamon may seem like a lot for something like this, but it honestly gave the whole thing a slight, yet richly enhancing sweetness that was truly incredible. This is absolutely going to be a recurring meal for me — it is equal parts easy, cozy, and delicious, and what more can you ask from any recipe!
0 notes
Text
Keto Chicken Bacon Ranch Casserole
New Post has been published on https://eazywellness.net/keto-chicken-bacon-ranch-casserole/
Keto Chicken Bacon Ranch Casserole
If you’re looking for an easy weeknight meal that’s guaranteed to satisfy the whole family, look no further than our chicken bacon ranch casserole recipe. Made in under 30 minutes and only using common pantry and fridge ingredients, this casserole is full of savory goodness and will be devoured just as quickly as it takes to prepare!
When the flavors of chicken and bacon combine in your mouth, something quite magical happens to your taste buds. While chicken is high in protein, its subtle taste means it can take on a lot of spices, herbs, and seasonings, and the smoky, salty flavor of bacon is a perfect complement to the skinless chicken thigh in this recipe. Incorporate garlic and onion powder, and you get a fantastic depth of flavor throughout the whole casserole.
The star of the show is undoubtedly the sauce that generously coats the chicken, bacon, and vegetables. And the best part is that you don’t need to make the sauce in a separate pan before pouring it on. Instead, everything is combined in the casserole dish throughout the cooking process for less mess and easier cleanup.
Tangy and creamy ranch dressing mixed with mozzarella and cheddar cheese means you get a well-rounded flavor profile, exemplified by the slight nuttiness and saltiness of the cheese when it combines with the smoothness of ranch. Adding some extra cheese before baking gives the casserole that signature golden brown top that takes this dish to the next level.
Yields 6 servings of Keto Chicken Bacon Ranch Casserole
The Preparation
24 ounce boneless, skinless chicken thighs
1/2 teaspoon onion powder
1/2 teaspoon garlic powder
salt and pepper, to taste
4 ounce bacon, chopped
8 ounce broccoli, cut into small florets
2 teaspoon garlic, minced
1 cup ranch dressing
3/4 cup mozzarella cheese, shredded and divided
3/4 cup cheddar cheese, shredded and divided
The Execution
1. Gather and prep all ingredients. Preheat oven to 375F.
2. Cut the chicken into bite-size cubes using kitchen shears or a sharp knife. Cut the bacon into small pieces as well, then set aside.
3. Season the chicken thighs with onion powder, garlic powder, and salt and pepper to taste.
4. In a casserole dish, add the chicken, bacon, broccoli, and minced garlic. Gently toss together, then bake for 15-20 minutes.
5. Pour the ranch dressing and about half of each cheese into the casserole dish. Mix together until everything is well combined.
6. Top with the remaining cheese and return to the oven to bake for an additional 13-18 minutes. The cheese should be melted and bubbling.
7. Remove from the oven and let cool before serving. Enjoy!
This makes a total of 6 servings of Keto Chicken Bacon Ranch Casserole. Each serving comes out to be 555 calories, 45.2g fats, 5.2g net carbs, and 32.4g protein.
NUTRITION CALORIES FAT CARBS FIBER NET CARBS PROTEIN 24.00 ounce boneless, skinless chicken thighs 973 60.76 0 0 0 115.39 0.50 teaspoon onion powder 4 0.01 0.93 0.18 0.75 0.12 0.50 teaspoon garlic powder 5 0.01 1.15 0.14 1.01 0.26 0.00 none salt and pepper 0 0 0 0 0 0 4.00 ounce bacon 604 52.92 0 0 0 30.24 8.00 ounce broccoli 79 0.93 16.28 7.48 8.8 5.4 2.00 teaspoon fresh garlic 8 0.03 1.87 0.12 1.75 0.36 1.00 cup ranch dressing 1032 106.9 14.16 0 14.16 3.17 0.75 cup mozzarella cheese 252 18.77 1.84 0 1.84 18.62 0.75 cup cheddar cheese 371 30.6 2.84 0 2.84 21.01 Totals 3330 270.9 39.1 7.9 31.2 194.6 Per Serving (/6) 555 45.2 6.5 1.3 5.2 32.4
Keto Chicken Bacon Ranch Casserole
This makes a total of 6 servings of Keto Chicken Bacon Ranch Casserole. Each serving comes out to be 555 calories, 45.2g fats, 5.2g net carbs, and 32.4g protein.
The Preparation
24 oz boneless, skinless chicken thigh
1/2 tsp. onion powder
1/2 tsp. garlic powder
salt and pepper, to taste
4 ounce bacon, chopped
8 ounce broccoli, cut into small florets
2 teaspoon garlic, minced
1 cup ranch dressing
3/4 cup mozzarella cheese, shredded and divided
3/4 cup cheddar cheese, shredded and divided
The Execution
Gather and prep all ingredients. Pre-heat oven to 375F.
Cut the chicken into bite-size cubes using kitchen shears or a sharp knife. Cut the bacon into small pieces as well, then set aside.
Season the chicken thighs with onion powder, garlic powder, and salt and pepper to taste.
In a casserole dish, add the chicken, bacon, broccoli, and minced garlic. Gently toss together, then bake for 15-20 minutes.
Pour the ranch dressing and about half of each cheese into the casserole dish. Mix together until everything is well combined.
Top with the remaining cheese and return to the oven to bake for an additional 13-18 minutes. The cheese should be melted and bubbling.
Remove from the oven and let cool before serving. Enjoy!
3.1
https://www.ruled.me/keto-chicken-bacon-ranch-casserole/
Copyright 2023 | Ruled.Me
Source link
0 notes
Text
How to make the perfect Masala Rice With Indian Masalas

Making perfect Masala Rice with Indian masalas involves a blend of aromatic spices and perfectly cooked rice. What makes Indian cuisine truly magical is the skillful use of masalas. These spice blends aren't just a seasoning; they are the key to unlocking a world of taste sensations. Our chefs at Masala Courtyard take pride in creating these masalas in-house, meticulously grinding and blending spices to perfection
The magic of masalas goes beyond the palate. They aid digestion, provide essential nutrients, and have medicinal properties. At Masala Courtyard, we embrace this holistic approach to cooking, where flavor and health harmoniously coexist.
Our chefs at Masala Courtyard took instructions to prepare a good and healthy masala rice'
The way of cooking in Masala Courtyard
Rinse the Rice:
Wash the basmati rice under running water until the water runs clear. Soak the rice in water for about 30 minutes.
Cook the Rice:
In a pot, bring 2 cups of water to a boil.
Drain the soaked rice and add it to the boiling water.
Cook the rice until it's 70-80% done. It should have a slight bite to it. Drain any excess water.
Prepare the Masala:
In a large skillet or pan, heat oil or ghee over medium heat.
Add cumin seeds and let them splutter.
Add chopped onions and sauté until they become translucent.
Add Aromatics:
Add the ginger-garlic paste and sauté for a minute until the raw smell disappears.
Add green chilies and continue sautéing.
Add Vegetables:
Stir in the mixed vegetables and cook for a few minutes until they are slightly tender.
Spice it Up:
Add turmeric powder, red chili powder, coriander powder, and garam masala. Mix well to coat the vegetables with the spices.
Add Tomatoes:
Add chopped tomatoes and cook until they are soft and the oil starts to separate from the masala.
Combine with Rice:
Add the partially cooked rice to the masala mixture. Gently mix everything together, ensuring the rice is evenly coated with the masala.
Simmer:
Cover the pan with a tight-fitting lid and let the rice cook on low heat for another 10-15 minutes until it's fully cooked and the flavors are absorbed.
Fluff and Garnish:
Once done, fluff the rice gently with a fork.
Garnish with fresh coriander leaves.
Serve:
Serve hot Masala Rice with yogurt, raita, or any side dish of your choice.
Adjust the spice levels according to your taste preferences. This versatile dish can also be customized by adding protein sources like cooked chicken, paneer, or tofu if desired. Enjoy your homemade Masala Rice!
Masala Courtyard is an best Indian Restaurant in Carrollton TX. The magic of masalas goes beyond the palate. They aid digestion, provide essential nutrients, and have medicinal properties. At Masala Courtyard, we embrace this holistic approach to cooking, where flavor and health harmoniously coexist. Our chefs at Masala Courtyard take pride in creating these masalas in-house, meticulously grinding and blending spices to perfection. Experience the orginal flavor of Indian Food. Order delicious food online from Masala Courtyard in Carrollton TX.
0 notes
Text
The Ultimate Flour Tortilla Recipe: Elevate Your Taco Game at Home
Tacos are a beloved staple in many households, but what sets an ordinary taco apart from an extraordinary one? The answer lies in the foundation – the tortilla. While store-bought options are convenient, there's something special about crafting your own homemade flour tortillas. In this blog, we'll guide you through the process of making the ultimate flour tortilla, ensuring your tacos reach new heights of flavor. Additionally, we'll explore where to buy the best corn tortillas if you're looking for a convenient alternative.
I. The Art of Homemade Flour Tortillas
1. Ingredients: The Building Blocks of Flavor
To start your flour tortilla journey, gather high-quality ingredients. You'll need all-purpose flour, baking powder, salt, lard or shortening, and warm water. The combination of these simple components creates a dough that's both pliable and flavorful.
2. Mixing and Kneading: Finding the Right Texture
Detail the steps of combining ingredients, emphasizing the importance of kneading for the right consistency. A smooth, elastic dough is key to achieving soft and chewy tortillas. This section could include tips on adjusting the water or flour if necessary.
3. Resting the Dough: Patience for Perfect Tortillas
Explain the significance of letting the dough rest before rolling it out. This step allows the gluten to relax, making the tortillas easier to shape and preventing them from shrinking during cooking.
4. Rolling and Cooking: From Dough to Deliciousness
Describe the technique for rolling out the tortillas and cooking them on a hot griddle or skillet. Include tips for achieving that desirable golden-brown color and slight puffiness.
II. Elevating Your Taco Game
1. Freshness Matters: The Impact of Homemade Tortillas
Highlight the superior taste and texture of homemade tortillas compared to store-bought alternatives. Freshly made tortillas enhance the overall taco experience, bringing authenticity to your home-cooked meals.
2. Versatility: Beyond Tacos
Discuss how homemade tortillas can be used for more than just tacos. They make excellent wraps, quesadillas, and even chips. Encourage readers to get creative with their newfound tortilla-making skills.
3. Flavor Variations: Adding a Personal Touch
Introduce the idea of customizing the flavor of the tortillas by incorporating herbs, spices, or even a hint of garlic. This allows readers to tailor the tortillas to their taste preferences and the type of filling they plan to use.
III. Where to Buy Corn Tortillas
1. Local Grocery Stores: Exploring the Aisles
Guide readers on where to find high-quality corn tortillas in their local grocery store. Mention popular brands known for authenticity and taste.
2. Specialty Markets: Uncovering Hidden Gems
Encourage readers to explore specialty markets, where they might discover artisanal or locally-made corn tortillas. These often boast unique flavors and textures.
3. Online Options: Convenience at Your Fingertips
In the digital age, buying corn tortillas online is a viable option. Provide recommendations for reputable online retailers that deliver quality corn tortillas to your doorstep.
Conclusion
Wrap up the blog by summarizing the key points and encouraging readers to embark on their flour tortilla adventure. Emphasize the satisfaction that comes from creating a foundational element of Mexican cuisine from scratch and the convenience of finding the best corn tortillas to suit their needs.
By following these steps, you'll not only elevate your taco game but also gain a newfound appreciation for the art of tortilla-making. Happy cooking!
0 notes
Text
Culinary Delight: Benny's Pork Belly Asian Crisp
Embracing the fusion of flavors, textures, and culinary finesse, Benny's Pork Belly Asian Crisp stands as a testament to the artistry of Asian cuisine. This dish, a harmonious marriage of succulent pork belly and Asian-inspired seasonings, promises a symphony of tastes that captivate the palate.
The Star: Pork Belly Brilliance
Pork belly, with its perfect ratio of meat and fat, serves as the canvas for Benny's masterpiece. This cut, revered in various cuisines around the world, offers a luxurious tenderness when cooked to perfection. It's the ideal foundation for absorbing flavors and achieving that perfect crisp.
Preparation: Crafting the Perfect Crisp
The journey to Benny's Pork Belly Asian Crisp begins with meticulous preparation and seasoning.
Scored Brilliance: Benny's culinary expertise involves scoring the pork belly's skin, creating a crosshatch pattern that allows the fat to render while ensuring a crispy finish.
Marinade Magic: The magic lies in the marinade—a blend of Asian aromatics such as soy sauce, ginger, garlic, Chinese five-spice, and perhaps a touch of honey or brown sugar for a subtle sweetness. This marinade, applied generously and allowed to infuse for hours or even overnight, imparts depth and complexity to the pork belly.
Cooking Technique: Achieving Perfection
The art of Benny's Pork Belly Asian Crisp lies in the cooking process, which brings the flavors together in a tantalizing union of textures.
Slow Roasting: Slow roasting the pork belly at a low temperature allows for the fat to render gradually while ensuring the meat remains tender and succulent.
Crisp Finish: A final flourish involves a high-heat blast or broil to achieve that coveted crispy skin. This transformation elevates the dish, offering a tantalizing contrast to the tender meat beneath.
Presentation: Aesthetics in Cuisine
Benny's Pork Belly Asian Crisp demands a presentation as exquisite as its flavors.
Slicing and Serving: Whether served as bite-sized portions or elegantly sliced, each piece showcases the golden-brown, crispy skin alongside the succulent, flavor-infused meat.
Garnishes and Accents: A sprinkle of sesame seeds, a drizzle of reduced marinade, or a scattering of finely chopped scallions adds visual allure and an extra layer of flavor.
Savoring the Experience: A Culinary Overture
As the first bite is taken, Benny's Pork Belly Asian Crisp offers an orchestrated symphony of tastes. The initial crunch gives way to a cascade of rich, savory flavors, the tender meat yielding effortlessly in the mouth. The amalgamation of spices, enhanced by the slight sweetness and depth of the marinade, dances on the taste buds, leaving a lingering appreciation for the culinary mastery achieved.
Conclusion: A Culinary Masterpiece
Benny's Pork Belly Asian Crisp stands as a testament to the convergence of culinary expertise and cultural fusion. It embodies the art of balance—between textures, flavors, and presentation—offering a sensorial journey that celebrates the essence of Asian-inspired gastronomy. This dish, a testament to Benny's culinary prowess, beckons all who savor it to indulge in the beauty of culinary craftsmanship and revel in its flavorful magnificence.
0 notes
Text
Food review - Bloomington IN 07/08/09
August 15th, 2009
First an apology; I'm suffering from computer problems at the moment so I'm having to write reviews in a laborious way. For all of you thinking I had died from food poisoning, sorry to scare you. My mum brought me up to have a tough stomach. I know there's a back log so I'll try to get up to date as quick as possible.
Certain types of food are fairly common in countries, so it's always interesting to find something new. In Bloomington some of us saw a restaurant that sounded good. The menu comprised dishes similar to curries and kebabs. We ordered our food before we even asked what type of food it was. I'll leave it until the end to tell you what country the food originated from.
Due to our food taking a while they gave us a complimentory starter. It was such a simple but a brilliant starter. We were each given a plate of sliced carrots that had been lightly fried inbolive oil with garlic & herbs. The carrots were very flavoursome, softer than how I would normally have carrots but with the garlic & herbs it created a simple but perfect starter. For my main I had North Atlantic Cod in a spicy creamy sauce. The cod was lightly spiced, & was so soft and flakey that it just melted in my mouth. The sauce had a sligt sweet taste so I presumed it had yoghurt as an ingredient. It left a slight tingle on your tongue, & this with the flufflness of the fish worked perfectly together. It came with some spinach which tasted like it had been steamed & then lightly fried in butter. It came with rice, a perfect amount for someone not playing a show but slightly too much for me. As you are aware I don't like being bloated on stage.

This was, & has been probably one of the best meals on the tour so far. And the name of the place; Samira's, a restaurant specialising in Afghan cuisine. Definitely worth a visit if you're in the area.
0 notes
Text
Clam chowder is often thought of as a traditional staple of New England cuisine. However, the jazzy flavor of this classic dish makes it a favorite among many types of eaters.
The signature creamy base of clam chowder, made up of rich broth, potatoes, and minced clams, is what gives the soup its great taste. But the real flavor of the dish comes from the seasonings that give clam chowder its unique taste. Commonly, bacon, onion, garlic, and celery are added to the mix to provide balance and a savory flavor.
But the real magic ingredient is the old bay seasoning. This blend of herbs and spices provides a zesty, flavorful kick to the already delectable clam chowder. Old Bay seasoning is a mix of celery, salt, paprika, mustard, bay leaf, black pepper, clove, and a few other secret herbs and spices. It adds a slight zing and herbal flavor that is unique and delicious.
Clam chowder is a classic American dish that is full of rich, satisfying flavors. Combining the signature creamy base with smoky bacon and zesty old bay seasoning is the perfect way to liven up any meal. Whether served at a dinner party, an intimate gathering, or enjoyed in the comfort of your own home, clam chowder is a surefire hit.
0 notes
Text
Chicken Tikka Masala: A Classic Indian Dish

Chicken Tikka Masala is a popular dish that originated in India and has since become a favorite all over the world. This delicious and aromatic dish is made with marinated chicken that is baked or grilled and then cooked in a creamy tomato-based sauce with a blend of aromatic spices. It's typically served over basmati rice, making it a satisfying and filling meal that's perfect for a cozy night in.
The marinade used for Chicken Tikka Masala is made with yogurt, lemon juice, and a blend of spices such as cumin, coriander, paprika, and cayenne pepper. Marinating the chicken in this mixture infuses it with flavor and helps to tenderize the meat. Once the chicken is cooked, it's then added to a creamy tomato-based sauce that is flavored with a blend of aromatic spices like turmeric, cinnamon, and cardamom, giving the dish its signature flavor and aroma.
More Delicious Recipes You Will Love:
- Lemon Garlic Roasted Chicken Recipe
- Golden and Cheesy: How to Make Delicious Chicken Parmesan at Home
- Sweet Italian Chicken Sausage With Basil Polenta And Oven Roasted Tomatoes
Tips:
Here are a few tips to help you make the perfect Chicken Tikka Masala:
- Use Boneless, Skinless Chicken Breast: The chicken breast is the best cut of meat for making Chicken Tikka Masala. It's tender and cooks quickly, making it perfect for this dish.
- Marinate the Chicken: Marinating the chicken in yogurt and spices is an essential step in making chicken tikka masala. It will help to tenderize the chicken and infuse it with flavor.
- Use Aromatic Spices: Chicken Tikka Masala gets its distinctive flavor from a blend of aromatic spices. The most common spices used in this dish are cumin, coriander, turmeric, cinnamon, and cardamom.
- Bake or Grill the Chicken: To achieve that smoky flavor in the chicken, it can be baked in the oven or grilled on a barbecue. This step will give the chicken a nice char and add depth of flavor to the dish.
- Make the Sauce Creamy: The sauce for Chicken Tikka Masala is typically made with tomatoes and cream. To make the sauce extra creamy, use heavy cream or coconut cream.
- Garnish with Cilantro: Chopped fresh cilantro adds a fresh and vibrant touch to the finished dish. It's often used as a garnish for Chicken Tikka Masala.
What are some common side dishes to serve with Chicken Tikka Masala?
There are many side dishes that go well with Chicken Tikka Masala. Here are a few ideas:
- Basmati Rice: Basmati rice is the most common side dish served with Chicken Tikka Masala. It's a fragrant, long-grain rice that complements the dish perfectly.
- Naan Bread: Naan bread is a traditional Indian bread that is great for soaking up the sauce in Chicken Tikka Masala. It's soft, fluffy, and has a slight tangy flavor.
- Raita: Raita is a yogurt-based dip that is often served alongside Indian dishes. It's made with yogurt, cucumber, mint, and spices, and adds a cool and refreshing contrast to the spicy flavors of Chicken Tikka Masala.
- Samosas: Samosas are a popular Indian appetizer that can also be served as a side dish with Chicken Tikka Masala. They're crispy, fried pastries filled with spiced vegetables or meat.
- Roasted Vegetables: Roasted vegetables, such as cauliflower, eggplant, or carrots, can be a great complement to the spicy and rich flavors of Chicken Tikka Masala. Roasting the vegetables brings out their natural sweetness and adds a nice texture to the meal.
- Chutney: Chutney is a condiment made with fruits, vegetables, or herbs that is often served with Indian dishes. It adds a sweet and tangy flavor that complementsthe flavors of Chicken Tikka Masala. Mint chutney or tamarind chutney are common choices.
What are some vegetarian options for side dishes?
If you're looking for vegetarian options for side dishes to serve with Chicken Tikka Masala, here are a few ideas:
- Vegetable Biryani: Biryani is a popular Indian rice dish that is often mixed with vegetables and spices. It's similar to basmati rice, but has a more complex flavor profile due to the addition of various spices and vegetables.
- Aloo Gobi: Aloo Gobi is a vegetarian Indian dish made with potatoes and cauliflower. It's a flavorful and hearty side dish that complements the spicy flavors of Chicken Tikka Masala.
- Saag Paneer: Saag Paneer is a popular Indian dish made with spinach and paneer cheese. It's a creamy and flavorful side dish that goes well with Chicken Tikka Masala.
- Chana Masala: Chana Masala is a vegetarian Indian dish made with chickpeas and tomatoes. It's a hearty and flavorful side dish that pairs well with the spicy flavors of Chicken Tikka Masala.
- Papadum: Papadum is a thin, crispy Indian bread that is often served as a side dish or appetizer. It's made with lentil flour and can be seasoned with various spices.
- Cucumber Salad: A simple cucumber salad with a tangy dressing is a refreshing counterpoint to the spicy and rich flavors of Chicken Tikka Masala. You can use cucumbers, tomatoes, onions, and a variety of other vegetablesto make the salad.
These are just a few vegetarian options for side dishes that can be served with Chicken Tikka Masala. You can also experiment with different flavors and textures to find the perfect combination that suits your taste.
Conclusion:
In conclusion, Chicken Tikka Masala is a flavorful and aromatic Indian dish that has won over the hearts and taste buds of people all around the world. This dish is typically made with marinated chicken that is cooked in a creamy tomato-based sauce with a blend of aromatic spices. It's typically served over basmati rice, making it a satisfying and filling meal that's perfect for a cozy night in.
When looking for side dishes to serve with Chicken Tikka Masala, traditional options include basmati rice, naan bread, and samosas. However, there are plenty of vegetarian options that can also complement the dish, such as vegetable biryani, aloo gobi, saag paneer, chana masala, papadum, and cucumber salad.
By following the tips provided for making Chicken Tikka Masala and pairing it with the right side dishes, you can create a meal that's full of flavor and sure to impress. So, whether you're a fan of Indian cuisine or just looking to try something new and delicious, Chicken Tikka Masala is a must-try dish that's sure to delight your taste buds.
Read the full article
0 notes
Text
From Farm to Table: The Best Ingredients for Authentic Jamaican Curry Goat
Introduction: The Essence of Authenticity
When it comes to cooking an authentic Jamaican Curry Goat, the quality and source of the ingredients play a pivotal role. This beloved Caribbean dish, known for its rich flavors and tender meat, requires a careful selection of spices, goat meat, and accompaniments. In this blog post, we'll guide you through choosing the best ingredients that can make your Jamaican Curry Goat as authentic and delicious as it is in its homeland.
Selecting the Right Goat Meat
1. Freshness Is Key:
The most crucial ingredient in Curry Goat is, unsurprisingly, the goat meat itself. For the best results, the meat should be fresh and sourced from a reputable supplier. Young goat meat is preferable because it's tenderer and cooks faster than meat from older goats.
2. Cuts of Meat:
Opt for goat meat that includes bones, as they add flavor to the curry during cooking. Common cuts for curry include the shoulder, leg, and rib. These parts provide a good balance of meat and fat, ensuring the curry is rich and moist.
Essential Spices and Herbs
1. Jamaican Curry Powder:
A staple in any Curry Goat recipe, Jamaican curry powder differs from Indian versions in its ingredients and flavor profile. It typically contains turmeric, coriander, cumin, and fenugreek, among other spices, and is less sweet but more savory.
2. Scotch Bonnet Peppers:
No Jamaican dish is complete without the heat. Scotch bonnet peppers offer a spicy kick and a hint of sweetness to the curry. Adjust the amount based on your heat preference.
3. Fresh Thyme:
Thyme is another critical herb in Jamaican cooking. Its earthy, slightly floral flavor complements the spices used in the curry.
4. Allspice (Pimento):
This spice is a must for adding depth. Allspice berries, also known as pimento, are native to the Caribbean and provide a warm, aromatic flavor that is quintessential in Jamaican dishes.
Quality Vegetables and Aromatics
1. Garlic and Onions:
These aromatics form the base of many dishes, including curry goat. They should be fresh and finely chopped to integrate well into the sauce.
2. Potatoes or Carrots:
Added towards the end of cooking, these vegetables not only thicken the curry but also add a subtle sweetness that balances the spices.
Cooking Medium
1. Coconut Oil:
For sautéing the spices and aromatics, use coconut oil to maintain authenticity. It adds a slight coconut flavor that enhances the tropical feel of the dish.
Cooking Tips for Perfect Curry Goat
1. Marinate Overnight:
To maximize flavor, marinate the goat meat overnight with curry powder, salt, pepper, and a bit of vinegar or lemon juice. This not only tenderizes the meat but also deepens the flavors.
2. Slow Cook:
Curry Goat should be cooked slowly, either in a slow cooker or on the stovetop at a low simmer. This method ensures that the meat is tender and the flavors are well-developed.
3. Serve with the Right Accompaniments:
Authentic Jamaican Curry Goat is best served with rice and peas or fried plantains. These sides complement the rich flavors of the curry and make for a fulfilling meal.
Conclusion
Making Jamaican Curry Goat is as much about the journey of flavors as it is about the end result. By selecting the best ingredients and taking the time to prepare and cook the dish correctly, you can bring a taste of Jamaica to your table. Whether you're a seasoned chef or a curious foodie, following these tips will help you create a Curry Goat that's not only authentic but also incredibly satisfying. Dive into the vibrant world of Jamaican cuisine and enjoy the rich, aromatic delight of Curry Goat cooked right in your kitchen.
0 notes
Last Seen Blogs