#Production boards for concrete pavers
Text
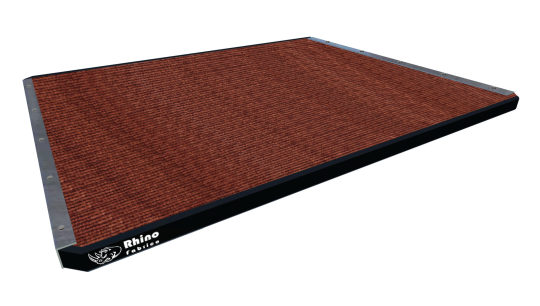
Buy Production Boards for Concrete Pavers Online with Complete Guide

Concrete pavers need durability, strength, resistance to moisture and chemicals and above all accuracy in production. For them, the most crucial thing is selection of the best quality production boards that are in varied shapes, sizes and designs. Choosing the best range of boards is a crucial decision to make. For this, the best way is to search for the top manufacturers who are dealing in production boards for concrete pavers.
If you don’t have any idea about the production board for concrete pavers and you are spending more on internet searching for the best range of pavers, here is a better option to fulfill your requirement. Go online as it is counted as one of the convenient ways to enhance your experience There are a number of recognized manufacturers and wholesale suppliers bringing to you the best quality pavers and ensuring you will get them delivered to your address without any delay. All details are provided to you that will be a plus point.
GPE Pallets Has the Best Range of Production Boards for Concrete Pavers
GPE Pallets is a one stop trusted name, when it comes to choose the best range of production boards for concrete pavers. Different sizes of such boards are available in varied dimensions. All details are provided to you that will be a plus point to enhance your experience. You can contact from anywhere and anytime and get the best range delivered on time – right to your address. GPE Pallets has a broad range of pallets. A complete user guide is provided to you to ensure you are getting the best range. Place your order now and get delivery in timely manner.
#Hardwood pallets for concrete block machine#Timber Pallets For Concrete Block machine#Production boards for concrete pavers
0 notes
Text
Brisbane Termite Services

Protecting your home or business from termites requires a multi-pronged approach. This includes regular pest inspections, termite treatment and a termite management system.
Flick offers a range of termite protection services, including both physical and chemical barrier systems. The Kordon Termite System and the Bayer Homeguard are all-in-one barriers that are installed in new homes, extensions or renovations. To know more about Brisbane Termite Services, visit the Bug Out Pest Solutions website or call 0426263320.
Termite infestations cause more damage to Australian homes than floods and fires. Unfortunately, many termite infestations are only discovered once major structural damage has already been done. That’s why it is so important that Brisbane homeowners and business owners arrange regular termite inspections by an experienced professional.
A termite inspection is a detailed visual examination of your property. This includes checking the soil around the building, looking for mud shelter tubes along the walls of your home or business and examining door frames, architraves and skirting boards for signs of damage. Our qualified inspectors will use a moisture meter and thermal imaging testing to pinpoint any termite activity.
In addition to conducting a thorough visual inspection, an accredited inspector will use the latest technology such as termite detection tools and a thermal imaging camera (Flir e50) to pinpoint any areas of interest. Our comprehensive inspections are an affordable option that is much cheaper than repairing the damage caused by termites.
The termite baiting system is an ecofriendly technique that doesn’t infuse chemicals into the soil around your home. The product is very low in concentration and the termiticide is only absorbed by the individual termites when they consume it. This approach is perfect for new builds, renovations, and for homes with a natural garden.
Termite stations (or “termite traps”) are placed in the ground or above ground in areas of known termite activity. They contain a bait made from cellulose combined with a slow-acting insecticide that prevents the termites from completing their normal molting process. As the termites eat and molt, they transmit the lethal ingredient to their nest mates – eliminating the colony.
The baiting system is most effective when installed in conjunction with a chemical barrier, such as the Kordon Termite Barrier or the Bayer Homeguard System. These systems block termite access to your home with a physical and chemical combination that is effective for up to 10 years.
Termite barriers are an effective way to protect your home against the dangers of termites. They are either physical or chemical. Brisbane termite services offer both options, so you can choose which one is best for your home. Termite prevention is vital because these pests can cause serious damage in very little time, and they often hide under hard surfaces like concrete or pavers.
The best way to avoid the costs of repairing termite damage is to have an annual inspection. These inspections will uncover hidden termite activity that you may not have seen. Look for mud shelter tubes, hollow sounds in the walls and floor, and dry mud around power points or door frames.
Termite barriers can be physical or chemical and are a requirement for any new home, extension, or renovation project in Queensland. There are two types of chemical soil barriers available – repellent and non-repellent. The barrier is applied to the soil in accordance with AS3660.1 – New Building and consist of continuous treated zones or a chemical reticulation system like Termguard or Termidor, which involves drilling holes spaced around 200mm’s apart on the perimeter of your building and injecting them with the liquid termiticide.
Termite reticulation systems are a series of pipes around a structure that is filled with Termiticide. The Termiticide slowly disperses into the soil abutting the house or building, deterring and preventing any termites that might try to attack the property.
Subterranean termites are found throughout Brisbane and the state of Queensland and cause the majority of damage to timber. They nest underground and move through closed mud galleries to search for timber. They can also travel above ground to infest structures.
Drywood termites are also common in Brisbane and the state of Queensland. Heterotermes spp are found on a variety of timber items including fence palings and posts, decking and the flooring of houses. These termites are very aggressive and eat away at any wood they come across. This results in the classic ‘patchy’ appearance of termite damage. It is not uncommon for them to infest the same areas on a house several times causing extensive damage. To know more about Brisbane Termite Services, visit the Bug Out Pest Solutions website or call 0426263320.
#cockroach control solutions#termite control solutions#termite control brisbane#pest control brisbane#cockroach control solutions in brisbane#termite inspection#bug control services#cockroach termination services#pest control services#pest control#pest spray brisbane#sandgate pest control#brisbane termite services#cockroaches brisbane
0 notes
Text
Hire Reliable Services of Gutter Cleaning in Bentleigh: Maintain Healthy Home
Property owners should hire reliable services of gutter cleaning in Bentleigh to clean their residential and commercial premises. These services employ a team of experienced gutter cleaners who are committed to delivering exceptional cleaning services for gutter, driveways, roofs and floors as well as outstanding customer service.
Whether anyone resides in a single-story, double-story house, townhouse, or apartment, they can hire the expertise of pressure-cleaning services to have a clean and hygienic property.
Their experts possess the expertise to thoroughly clean and restore the proper flow of the gutters, irrespective of height or type.
Additionally, Berwick high pressure cleaning services have a skilled team equipped with industry-leading cleaning equipment and products.
They are fully trained professionals who can handle all types of gutter cleaning as well as pressure cleaning services.
With years of experience serving homeowners throughout Melbourne, they possess the knowledge and skills required to safely complete the job.
Importance of High-pressure Cleaning Regularly:
A skilled team of cleaners delivers regular gutter cleaning to maintain its functionality in redirecting water and debris away from the property.
Inappropriate and ill-maintained gutters accumulate debris and waste, impede proper drainage, leading to potential issues such as rotting soffit sheathing, compromised foundations, and damaged fascia boards.
These problems come with costly repairs and often need the entire roof replacement. By scheduling professional gutter cleaners regularly, owners can prevent these costly issues, save money and extensive repairs.
They have expertise in appropriate cleaning to ensure the longevity and well-being of the home.
These expert services apply high-pressure cleaning catering to a wide range of needs designed to restore the immaculate condition of these surfaces.
They assist to maintain the cleanliness and appearance of various surfaces such as gutters, driveways, windows, concrete, or pavers.
They have expertise of utilize advanced equipment of high-pressure cleaning to effectively remove dirt, grime, stains, and debris, leaving the surfaces looking refreshed and revitalized.
In addition to the expertise, they focus on details, to ensure that all surfaces are thoroughly cleaned, promote longevity and prevent deterioration caused by accumulated dirt and contaminants.
Overall, whether anyone is preparing for an event, enhance the curb appeal of the property, or simply seeking a clean and inviting environment, should hire these high-pressure cleaning services to get all these outstanding results.
Source
0 notes
Text
High-Grade Pallets for Concrete Blocks in Varied Sizes and Thickness
Concrete blocks are used in the construction domain in different ways to make any structure strong and give stability to the building for long term. These blocks are designed in different patterns, styles, shapes and sizes. Choosing the best range of concrete blocks can be far easier than carry them from one place to another in convenient way. For such blocks, you need something durable, strong and in the shape to carry them easily and in convenient way. Choosing the right type of pallets for concrete blocks will be the right option to enhance your experience. Depending on your requirement, you can choose the right type of pallets for concrete blocks that are designed by keeping in mind their weight, type and size.
High-grade pallets for concrete blocks machines are designed to give them stability. These pallets are designed to last through harsh and abrasive working conditions for production of concrete blocks, pavers, and other concrete products in all types of block machines.
Pallets Are Manufactured with Different Surfaces to Cater Individual Needs
These high-grade pallets are manufactured with different varieties of surfaces to cater individual requirements of concrete block manufacturers around the world. Not to mention the surface of synthetic film, industrial fabric or glass fibre – known for offering different levels of resistance to the abrasive nature of concrete products. These high-grade pallets for concrete blocks are known for having high density in comparison to hardwood, softwood and plastic production boards for concrete blocks that ensures efficient transmission of vibration to the concrete.
They are available in all sizes with thickness up to 70mm and sometimes in other thicknesses. These pallets are manufactured in state-of-the-art hydraulic press and exclusive use of tropical plantation hardwood. Not to mention the use of fibers in manufacturing that ensures consistent quality. In this way, they outlast ordinary softwood and hardwood pallets for concrete block manufacturing. Different types of engineered surfaces are offered that ensure long life of trouble free services by the pallets.
Find Top Manufacturer of Pallets for Concrete Blocks
Depending on your requirement, you can choose the best range of pallets for concrete blocks machines and for other purposes. Pricing depends on the type of pallets you are using and getting their delivery will be far easier to your address without any delay.
For the best range of pallets for concrete blocks and machines, you need to reach the top manufacturer. Go online and it is counted as one of the convenient ways to provide you with some of the best options to choose the best one. You can place your from anywhere and get delivery to your address without any delay. Check all details and get the best range of pallets for concrete blocks.
0 notes
Text
Pallets for Concrete Pavers with Complete User Details
Antekad has the large stock of wooden pallets, production boards, timber pallets and different other items in the same category for pavers, concrete blocks and other purposes.
0 notes
Text
Know The Timbers Before You Hire Timber Deck Builders Melbourne
Whether you're building a new deck or renovating an existing one, it's important to choose the right timber and Deck Builder Melbourne. This will help ensure your dream outdoor space is also long-lasting and low maintenance.
Low Maintenance Decking
The best decking material for you will depend on your budget, how much maintenance you want to do, and the aesthetic of your home.
If you are looking for a low-maintenance option then decking boards should be considered as they are very easy to maintain with little or no special cleaning required. However, these products are often more expensive than pressure-treated timber which requires regular cleaning and treatment but can be quite cheap.
If you prefer a cheaper option but still want something that is low-maintenance then composite decking boards could be suitable as they do not require much maintenance at all (although it may be advisable to clean them regularly with soap and water).
If you want a product that is easy to maintain but also provides a low-maintenance option then composite decking could be suitable as these boards do not require much maintenance at all (although it may be advisable to clean them regularly with soap and water).

Consider Your Budget
Timber decking is more expensive than alternatives like PVC or composite decking. It’s also more durable and stylish, but the higher price point can be prohibitive for some homeowners.
If you are looking to save money on your timber Decking in Melbourne, consider using a cheaper alternative such as concrete pavers or brick paver stones with timber edging - this will allow you to have a long-lasting product that looks great while keeping costs down.
Timber decking is a beautiful and stylish alternative to traditional pavers, but it’s also more expensive. If you’re on a budget, consider using concrete pavers or brick paver stones with timber edging instead. This will allow you to have a long-lasting product that looks great while keeping costs down.
Consider Your Current Garden or Home Design
You also need to consider your current garden or home design. This is important because the color of your house and garden can greatly impact how different deck designs look in them.
For example, if you have a very colorful home and garden, then it's not going to work well with a decking color that is darker than that.
The same goes for those who have a lighter-colored house and garden—they may find they prefer lighter-colored wood stain on their timber deck build. Also, consider what types of items are already in your yards such as trees or flowers; these items could affect how well certain colors look when paired with them.
You may want to use dark furniture on top of light-colored floors because some natural elements can distract from the beauty of your investment. Think about how much sunlight will hit each area before deciding what type of material would work best for each situation.
Conclusion
We hope this article has been helpful to you. If you have any questions about which type of timber decking is right for your home, please contact Deck Builder Melbourne today!
0 notes
Text
Building Material testing labs in Delhi NCR

The construction industry is a vital part of any country's economy. Because India is a developing country, the construction industry is vital to its economy. In the construction industry, quality control is critical. Only with proper quality control over the materials used in construction can economical and long-lasting structures be built. Quality control can be achieved through regular testing of building materials such as cement, aggregate, steel, concrete, tiles, fly ash, bricks, stones, and soil. The NABL accreditation validates KC India's ability to provide reliable and accurate test results. Cement, Steel, Aggregates, Tile, Bricks, Concrete, Bitumen, Admixture, and all building stones are all thoroughly tested by KC India. KC India Building Materials Testing Lab Services in accordance with the following standards:
Cement
OPC(Ordinary Portland Cement) -IS : 269 -2015
PPC(Portland Pozolona Cement) - IS 1489 -2015
WPC(White Portland Cement) IS 8042
SRC(Sulphate Resistant Cement) IS 12330
PSC(Portland Slag Cement) IS 455
Tiles :
Ceramic tiles - IS: 15622
Acid Resistance tiles I 4457
Terrazo tiles - IS: 1237
Vitrified tiles - IS : 15622
Chequered tiles IS 13801
Chequered tiles
Building Stones:
Granite
Marble
Sandstone
Limestone
Boulders
Building Bricks:
Common Burnt clay bricks
Fly ash bricks
Acid Resistant bricks
Refractory bricks
Aggregates:
Coarse aggregates
Fine aggregates
Steel :
TMT
Structural Steel
Wire
GI Sheet,etc
Paint :
Texture paint
Enamel paint
Road marking paint
Cement paint
Distemper
Concrete :
Hardened Concrete
Concrete Block
Concrete Slab
Paver block
Wood and wooden products :
Block Board
Ply wood
Flush door
Laminate
Particle/Laminated Board Wood
Bitumen and Bitumen Product :
Industrial Bitumen
Paving Bitumen
Cutback bitumen
Emulsion
Petroleum Product:
Diesel
Lubricating oil
Furnace Oil
Engine oil
Hydraulic Oil
Admixture/Water proofing compound
Fly Ash/Microsilica
0 notes
Text
Just How To Compact Pavers Without Plate Compactor
Pavers are either rocks, blocks, concrete or brick-like product laid down as an exterior flooring. Pavers are pre-manufactured products which have a large range of forms, dimensions & colors. These products await installation on your whole lot.
Pavers have actually been the go-to choice of house owners not even if of the aesthetically attractive appearance it offers on their driveway, lead method, patios and also decks but likewise since pavers are more long lasting as well as lasting compared to concrete-poured floor covering. Pavers additionally are low-maintenance since cracks will certainly not likely to take place in contrast with the concrete-poured floor covering. If sadly your pavers have cracked, you can simply take the split paver and also change is with a brand-new one, which is does not take lengthy to fix, much less inconvenience!
Now, plate compactor dolly of the most typical issue pavers' is weeds expanding between joints. This is due to the wetness it accumulated as a result of the improper compaction where pores are being developed and with the seeds being blown or fallen pollens, weeds do expand. The question is currently increased, with no plate compactors, how do I compact my pavers by hand?
Subfloor Preparation
Design
After determining with exactly how huge your area is, mark your lot relying on your format using strings and also batter boards. Examine the squareness of your whole lot, one pointer of doing so is examining whether the diagonal measurements are equivalent. Otherwise, due the necessary modification by gliding the strings.
Excavation
By doing so make sure that you are excavating the ideal depth of the substratum and additionally take into factor to consider the thickness of the pavers. You have to recognize that the soil below can clear up by itself when added by the weight subfloor and pavers.
Compaction
Tamp your substratum to make certain that no air pockets are left. You can try to include percentage of water as you tamp your substratum causing these air pockets to work out as a result of the water penetration. Now await it to completely dry.
Developing your foundation
Add your substrate material.
This differs your prep work and also your location but most substrate foundation must consist of crushed stones and gravels. It is advisable to make use of great size rock like 2". You can proceed doing so until you accomplish your gravel base thickness.
Compact your gravel base
One fantastic tip in making your compaction simpler is to always wet it. This will certainly aid dampen up the pores leaving no area for air pockets. Tamp as long as you require till you really feel that it is stable enough.
Sand Bedding
When dried, you can now add your sand. Your pavers will certainly be put on top of it so ensure it is additionally well compacted. Use your sand uniformly, you must see to it that the sand are evenly distributed so the pavers will certainly be leveled.
Paver Installation & Compaction
Apply dirt stabilizer
Without the effective tool, it will be hard to make sure that the pavers will certainly be leveled as well as well-compacted. Including a soil stabilizer will certainly help boosting the stability as well as stamina so that the pavers will be leveled equally.
Laying of pavers
After making certain that your subfloor is secure, now place your pavers on top of it. As you lay your pavers, begin tamping from the edges and also slowly in the direction of the middle.
Don't forget to provide a little gap between the pavers. This is to make sure that the pavers have an area during the growth as well as shrinking as it is subjected to various climate condition. If plate compactor bunnings are not given, there is a big propensity that your pavers will certainly pop-up with time.
Inspect the levelness throughout the training course of setup utilizing a straightedge. Adjust the needed levelness of the pavers making certain that the blocks doesn't generate any type of lip web page or are not interlaced well with its sublayer. Proceed doing so until you reached as well as finished the center item.
Fill the spaces
When all the pavers are set on their made location, include a polymer sand on the spaces in between the pavers. Polymer sand will certainly help seal the voids and maintain the weeds expanding. Spread uniformly a layer of polymer sand on the entire area. Make use of a soft bristle broom and also load the voids to their full depth. Do it up until the joints are evenly loaded.
Cleaning
Sweep or strike off the excess sand. Make certain that there are no continuing to be polymer sand on top of your pavers as they might leave white areas or haze upon the curing of the materials. Once machineSL.com are done cleansing the surface area, water your pavers. Watering the surface assists with the long term toughness and also interlocking of the polymer sand prior to being exposed to various climate condition. Enable it to treat for 24 to 48 hours prior to intending to include required furnishings.
Now that you're performed with installing your pavers, you can now wage your finishing touches. It may be including an exterior furniture or including your plants along developing your own yard. Preserve the tidiness of the location by having a regular upkeep of sweeping as well as rinsing of the area.
Final thought:
Have you been desiring for your own pavers however is afraid that it might turn out to come to be a disaster since you don't have the necessary power tools? No demand to fret due to the fact that by adhering to these actions you will attain your wanted pavers. It might take longer than common yet the contentment of having it done on your own and achieving your dream pavers will take all those concerns away. Now what are you awaiting? Beginning picking your paver shade as well as style and also begin producing your desire paver! If you need assistance, you can go on talk with a professional and also discuss your spending plan as well as your style needs.
If regrettably your pavers have fractured, you can simply take the broken paver as well as replace is with a brand-new one, which is does not take lengthy to resolve, much less hassle!
Use your sand evenly, you should make certain that the sand are equally distributed so the pavers will be leveled.
As soon as all the pavers are set on their designed area, add a polymer sand on the voids in between the pavers. Make sure that there are no remaining polymer sand on top of your pavers as they might leave white spots or haze upon the healing of the materials. Start picking your paver shade and also style as well as begin producing your desire paver!
1 note
·
View note
Text
Exactly How To Compact Pavers Without Plate Compactor
Pavers are either stones, bricks, concrete or brick-like product put down as an exterior flooring. Pavers are pre-manufactured products which have a wide selection of shapes, colors & dimensions. These products are ready for installment on your lot.
Pavers have actually been the best option of home owners not even if of the aesthetically enticing look it gives on their driveway, pave way, decks and also outdoor patios however also due to the fact that pavers are a lot more lasting as well as long lasting compared to concrete-poured floor covering. Pavers likewise are low-maintenance given that cracks will certainly not likely to happen in comparison with the concrete-poured flooring. If regrettably your pavers have actually cracked, you can simply take the broken paver and replace is with a brand-new one, which is does not take long to deal with, less inconvenience!
Currently, the most usual issue pavers' is weeds growing between joints. This results from the wetness it collected due to the inappropriate compaction where pores are being produced and with the seeds being blown or fallen plant pollens, weeds do grow. The question is currently raised, with no plate compactors, exactly how do I portable my pavers manually?
Subfloor Preparation
Format
After choosing with just how big your location is, mark your great deal depending on your design utilizing strings and also batter boards. Check the squareness of your great deal, one suggestion of doing so is inspecting whether the angled measurements are equivalent. Otherwise, due the needed modification by gliding the strings.
Excavation
By doing so make sure that you are excavating the appropriate deepness of the substrate and also take right into factor to consider the density of the pavers. You must know that the dirt below can resolve by itself when included by the weight subfloor and pavers.
Compaction
Tamp your substratum to ensure that no air pockets are left. You can try to add percentage of water as you tamp your substratum causing these air pockets to settle as a result of the water infiltration. Now wait for it to completely dry.
Producing your foundation
Add your substratum material.
This varies your preparation and your area yet most substrate structure need to contain crushed stones and gravels. It is suggested to use fine dimension stone like 2". You can continue doing so up until you attain your crushed rock base thickness.
Small your crushed rock base
One fantastic suggestion in making your compaction less complicated is to constantly wet it. This will certainly aid dampen up the pores leaving no area for air pockets. Tamp as much as you require up until you really feel that it is steady enough.
Sand Bedding
Once dried, you can now include your sand. Your pavers will certainly be positioned on top of it so see to it it is also well compressed. Apply your sand uniformly, you have to make certain that the sand are evenly distributed so the pavers will certainly be leveled.
Paver Installation & Compaction
Apply dirt stabilizer
Without the effective device, it will certainly be difficult to make certain that the pavers will be leveled and also well-compacted. Adding a soil stabilizer will assist boosting the stability and toughness to make sure that the pavers will be leveled uniformly. Soil stabilizer is comprised of pulverized materials combines with suitable additives. Wait for a pair of hours till it attained the consistent stabilized surface area.
Laying of pavers
After ensuring that your subfloor is steady, now position your pavers in addition to it. Utilize a rubber club and also sharp functioning on the outer border of your location moving your means to the. As you lay your pavers, begin tamping from the sides and also slowly towards the middle. Stay clear of pool as they may sink gradually.
Don't neglect to give a small gap in between the pavers. This is to make sure that the pavers have an area throughout the growth and contraction as it is subjected to different weather. There is a huge propensity that your pavers will pop-up over time if small voids are not provided.
Check the levelness throughout the training course of setup making use of a straightedge. Change the required levelness of the pavers seeing to it that the blocks doesn't generate any type of lip page or are not interlaced well with its sublayer. Continue doing so until you got to as well as ended up the center piece.
Fill up the spaces
Once all the pavers are set on their created area, include a polymer sand on the spaces in between the pavers. Polymer sand will certainly assist seal the spaces as well as maintain the weeds growing. Spread evenly a layer of polymer sand on the entire location. Make use of a soft bristle broom as well as fill up the spaces to their complete deepness. Do it till the joints are evenly filled.
Cleaning up
Make sure that there are no staying polymer sand on top of your pavers as they may leave white places or haze upon the curing of the materials. Once you are done cleaning the surface area, water your pavers.
Since you're done with mounting your pavers, you can now wage your finishing touches. It might be including an outside furniture or including your plants along producing your own garden. Maintain the sanitation of the area by having a regular upkeep of sweeping and also rinsing of the location.
Conclusion:
No demand to stress because by adhering to these actions you will achieve your desired pavers. It could take longer than typical yet the satisfaction of having it done by yourself and also achieving your desire pavers will take all those concerns away. Start picking your paver color and also design and also start producing your desire paver!
If unfortunately your pavers have cracked, you can simply take the cracked paver and also change is with a brand-new one, which is does not take long to settle, much less trouble!
Use your sand uniformly, you have to make sure that the sand are evenly dispersed so the pavers will certainly be leveled.
Once all the pavers are set on their created area, add a polymer sand on the voids between the pavers. Make plate compactor dimensions that there are no continuing to be polymer sand on top of your pavers as they might leave white places or haze upon the healing of the products. Beginning picking your paver color and design as well as begin developing your desire paver!
1 note
·
View note
Text
Just How To Compact Pavers Without Plate Compactor
Pavers are either stones, blocks, concrete or brick-like material set as an exterior floor covering. Pavers are pre-manufactured materials which have a variety of shapes, shades & dimensions. These materials are ready for setup on your lot.
Pavers have been the best choice of homeowners not even if of the aesthetically attractive look it gives on their driveway, lead means, decks as well as patio areas yet also since pavers are more durable and also sturdy compared to concrete-poured flooring. Pavers likewise are low-maintenance given that fractures will not likely to occur in contrast with the concrete-poured flooring. If sadly your pavers have split, you can simply take the broken paver and replace is with a brand-new one, which is does not take lengthy to settle, much less headache!
Now, the most typical trouble pavers' is weeds growing in between joints. This is because of the dampness it gathered because of the incorrect compaction where pores are being produced as well as with the seeds being blown or fallen pollens, weeds do expand. The question is now elevated, without any kind of plate compactors, just how do I portable my pavers by hand?
Subfloor Preparation
Layout
After deciding with exactly how big your location is, mark your great deal depending on your layout making use of strings as well as batter boards. Inspect the squareness of your whole lot, one pointer of doing so is examining whether the diagonal measurements are equal. If not, due the necessary adjustment by moving the strings.
Excavation
By doing so make certain that you are digging deep into the right deepness of the substratum and also take right into factor to consider the density of the pavers. You need to know that the dirt below can resolve by itself when added by the weight subfloor as well as pavers.
Compaction
Tamp your substrate to make certain that no air pockets are left. You can try to add little amount of water as you tamp your substrate causing these air pockets to resolve because of the water infiltration. Now wait on it to dry.
Developing your structure
Include your substratum material.
This differs your prep work and also your location but most substrate foundation ought to include smashed rocks as well as crushed rocks. It is recommended to make use of fine dimension rock like 2". You can continue doing so up until you accomplish your crushed rock base thickness.
Compact your gravel base
One fantastic tip in making your compaction simpler is to constantly damp it. This will certainly help moisten up the pores leaving no space for air pockets. Tamp as a lot as you need till you really feel that it is steady enough.
Sand Bedding
As soon as dried, you can now include your sand. Your pavers will certainly be put on top of it so make certain it is additionally well compressed. Use your sand uniformly, you need to see to it that the sand are evenly distributed so the pavers will certainly be leveled.
Paver Installation & Compaction
Apply dirt stabilizer
Without the powerful device, it will be hard to ensure that the pavers will certainly be leveled and also well-compacted. Adding a dirt stabilizer will help boosting the security and toughness so that the pavers will certainly be leveled uniformly. Soil stabilizer is comprised of crushed products integrates with proper additives. Wait for a couple of hrs till it attained the regular supported surface.
Laying of pavers
After making certain that your subfloor is stable, now put your pavers on top of it. As you lay your pavers, begin tamping from the edges and also progressively in the direction of the center.
Do not neglect to supply a little void in between the pavers. plate compactor bushings is to make sure that the pavers have an area during the growth as well as shrinking as it is subjected to various climate condition. There is a huge tendency that your pavers will pop-up over time if little gaps are not given.
Examine the levelness throughout the training course of setup using a straightedge. Adjust the necessary levelness of the pavers ensuring that the blocks doesn't generate any type of lip web page or are not interlaced well with its sublayer. Continue doing so till you got to and also completed the center item.
Fill the spaces
Once all the pavers are set on their created location, include a polymer sand on the spaces in between the pavers. Polymer sand will help secure the voids as well as keep the weeds growing.
Cleaning
Move or strike off the excess sand. See to it that there are no continuing to be polymer sand in addition to your pavers as they might leave white places or haze upon the treating of the materials. Water your pavers as soon as you are done cleaning up the surface. Watering the surface area assists with the long term toughness and also interlocking of the polymer sand before being exposed to different weather problem. Allow it to heal for 24 to 48 hours before preparing to add required furniture.
Since you're done with installing your pavers, you can now continue with your completing touches. It might be adding an outdoor furnishings or adding your plants along producing your own garden. Keep the sanitation of the location by having a regular upkeep of sweeping and also rinsing of the location.
Conclusion:
No requirement to worry due to the fact that by complying with these steps you will certainly achieve your desired pavers. It may take longer than typical however the satisfaction of having it done by on your own as well as achieving your desire pavers will take all those fears away. Beginning choosing your paver shade as well as style as well as start developing your dream paver!
If unfortunately your pavers have broken, you can just take the fractured paver as well as change is with a new one, which is does not take lengthy to fix, much less headache!
Use your sand equally, you should make certain that the sand are equally distributed so the pavers will certainly be leveled.
When all the pavers are set on their designed location, include a polymer sand on the spaces in between the pavers. Make certain that there are no remaining polymer sand on top of your pavers as they may leave white spots or haze upon the treating of the materials. Start picking your paver shade and design and begin developing your dream paver!
1 note
·
View note
Text
Why do you need Timber Pallets For the Concrete Block machine?

During the production of concrete block machines, timber pallets are often used as it provides many profits and benefits as compared to any other materials. In this post, why you require Timber Pallets For Concrete Block machine is well explained.
Cost-effective
It has been found that timber pallets are quite costly compared to other materials like plastic and steel. They can be easily sourced and readily available, which makes them a cost-effective option for manufacturers of concrete block machines.
· Durability
You can get high durability with timber pallets that can withstand the pressure and heavy weight of the wet concrete mix in the concrete block manufacturing process. It has resistance to moisture as well as resists decaying and rotting that helps to endure its lifespan.
· Customizable
These pallets involve different manufacturing processes and customization options that help to meet the specific needs of the manufacturers. It allows the manufacturers to cut to size and shape to produce concrete blocks of various dimensions and sizes.
· Environmentally friendly
Timber pallets are known as renewable resources, which can be repurposed or recycled after ending their lifespan. The biodegradable nature of this pallet makes them an environmentally friendly option.
· Good insulation
Good insulation properties are associated with the timber pallets that help to maintain the wet concrete mix temperature during the manufacturing process.
Conclusion
Many advantages are associated with the timber pallets, like offering good insulation, customizable, cost-effective, durability, etc., which makes them more attractive to many manufacturers. Thus, choose the right Timber Pallets For Concrete Block machine based on your specific needs.
#Timber Pallets For Concrete Block machine#Production boards for concrete pavers#Hardwood pallets for concrete block machine
0 notes
Text
Just How To Compact Pavers Without Plate Compactor
Pavers are either rocks, bricks, concrete or brick-like product set as an outside floor covering. Pavers are pre-manufactured materials which have a wide range of colors, forms & sizes. These materials await setup on your great deal.
Pavers have actually been the best selection of property owners not even if of the visually appealing appearance it provides on their driveway, lead method, decks and also outdoor patios but also due to the fact that pavers are more resilient as well as long-lasting compared to concrete-poured flooring. Pavers additionally are low-maintenance because cracks will certainly not likely to occur in contrast with the concrete-poured flooring. If sadly your pavers have actually broken, you can simply take the fractured paver and also replace is with a new one, which is does not take lengthy to solve, less problem!
Now, the most common issue pavers' is weeds growing between joints. This results from the wetness it accumulated as a result of the inappropriate compaction where pores are being produced and also with the seeds being blown or dropped plant pollens, weeds do grow. The concern is now elevated, with no plate compactors, just how do I compact my pavers manually?
Subfloor Preparation
Format
After determining with exactly how huge your location is, mark your great deal depending on your format making use of strings and batter boards. Inspect the squareness of your great deal, one tip of doing so is checking whether the diagonal dimensions are equal. If not, due the required change by gliding the strings.
Excavation
By doing so make certain that you are digging deep into the ideal deepness of the substrate as well as also take into factor to consider the density of the pavers. You must recognize that the soil below can clear up by itself when included by the weight subfloor and pavers.
Compaction
Tamp your substrate to make sure that no air pockets are left. You can try to add tiny amount of water as you tamp your substrate creating these air pockets to resolve as a result of the water infiltration. Currently wait for it to dry.
Creating your foundation
Add your substratum product.
This differs your preparation and also your location but most substrate foundation must include smashed stones and crushed rocks. It is advisable to use great dimension rock like 2". You can proceed doing so till you attain your crushed rock base thickness.
Small your crushed rock base
One fantastic suggestion in making your compaction less complicated is to always damp it. This will aid moisten up the pores leaving no space for air pockets. Tamp as high as you require till you feel that it is steady sufficient.
Sand Bedding
Once dried, you can now add your sand. plate compactor exciter oil will be put on top of it so ensure it is also well compressed. Use your sand equally, you have to see to it that the sand are evenly distributed so the pavers will certainly be leveled.
Paver Installation & Compaction
Apply dirt stabilizer
Without the powerful tool, it will certainly be hard to make certain that the pavers will certainly be leveled and also well-compacted. Including a soil stabilizer will assist enhancing the stability and also toughness so that the pavers will be leveled equally.
Laying of pavers
After ensuring that your subfloor is steady, now place your pavers in addition to it. Utilize a rubber club and sharp dealing with the outer boundary of your area relocating your way to the center. As you lay your pavers, start tamping from the edges and also gradually in the direction of the center. Prevent pool as they might sink in time.
Do not forget to provide a little gap in between the pavers. click is to ensure that the pavers have an area throughout the growth as well as contraction as it is subjected to various climate condition. If little voids are not provided, there is a large tendency that your pavers will certainly pop-up in time.
Examine the levelness during the training course of installment making use of a straightedge. Readjust the needed levelness of the pavers making sure that the blocks does not produce any type of lip web page or are not interlocked well with its sublayer. Proceed doing so until you got to and also completed the center piece.
Load the gaps
When all the pavers are established on their created area, add a polymer sand on the gaps in between the pavers. Polymer sand will assist seal the gaps as well as maintain the weeds growing.
Cleansing
Move or strike off the excess sand. Ensure that there are no remaining polymer sand on top of your pavers as they may leave white places or haze upon the curing of the products. Water your pavers once you are done cleaning the surface. Watering the surface area aids with the long-term stamina and also interlocking of the polymer sand before being revealed to different weather. Permit it to cure for 24 to 48 hrs prior to preparing to include necessary furnishings.
Currently that you're done with installing your pavers, you can now wage your finishing touches. It may be adding an exterior furnishings or adding your plants along creating your own garden. Keep the cleanliness of the area by having a routine upkeep of sweeping and also rinsing of the area.
Final thought:
No need to worry due to the fact that by adhering to these steps you will achieve your wanted pavers. It might take longer than usual but the complete satisfaction of having it done by yourself and also attaining your dream pavers will certainly take all those concerns away. Start selecting your paver shade as well as design and also start producing your desire paver!
If regrettably your pavers have cracked, you can simply take the broken paver as well as change is with a new one, which is does not take long to resolve, much less hassle!
Apply https://www.machinesl.com/plate-tampers/ , you need to make sure that the sand are evenly dispersed so the pavers will be leveled.
Once all the pavers are established on their made area, add a polymer sand on the voids in between the pavers. Make sure that there are no staying polymer sand on top of your pavers as they might leave white places or haze upon the healing of the materials. Beginning choosing your paver color and also design and start producing your dream paver!
1 note
·
View note
Text
Just How To Compact Pavers Without Plate Compactor
Pavers are either stones, bricks, brick-like or concrete product set as an exterior flooring. Pavers are pre-manufactured products which have a wide range of forms, dimensions & colors. These materials are ready for installment on your great deal.
Pavers have actually been the best selection of property owners not even if of the aesthetically enticing appearance it offers on their driveway, pave means, outdoor patios and decks however likewise because pavers are much more resilient and also resilient compared to concrete-poured floor covering. Pavers also are low-maintenance given that splits will not likely to happen in contrast with the concrete-poured floor covering. If unfortunately your pavers have actually fractured, you can just take the broken paver as well as replace is with a brand-new one, which is does not take long to settle, much less headache!
Currently, the most typical problem pavers' is weeds growing in between joints. This results from the moisture it built up as a result of the improper compaction where pores are being developed and with the seeds being blown or dropped pollens, weeds do expand. visit us is currently raised, without any type of plate compactors, just how do I portable my pavers manually?
Subfloor Preparation
Format
After making a decision with exactly how big your area is, mark your great deal depending upon your design making use of strings as well as batter boards. Examine the squareness of your whole lot, one idea of doing so is examining whether the angled measurements are equal. Otherwise, due electric vibratory plate compactor for sale needed adjustment by sliding the strings.
Excavation
By doing so make sure that you are excavating the ideal depth of the substratum and additionally take into factor to consider the density of the pavers. plate compactor for sale home depot should know that the dirt below can work out by itself when added by the weight subfloor and pavers.
Compaction
Tamp your substrate to make certain that no air pockets are left. You can attempt to add percentage of water as you tamp your substrate causing these air pockets to resolve because of the water penetration. Currently wait on it to completely dry.
Developing your foundation
Add your substrate product.
This varies your prep work as well as your area but most substrate foundation should contain smashed rocks and also crushed rocks. It is a good idea to make use of great dimension stone like 2". You can continue doing so until you attain your crushed rock base density.
Compact your crushed rock base
One fantastic tip in making your compaction easier is to always wet it. This will assist dampen up the pores leaving no space for air pockets. Tamp as high as you need up until you really feel that it is steady enough.
Sand Bedding
Once dried, you can currently add your sand. Your pavers will certainly be positioned on top of it so ensure it is also well compressed. Use your sand equally, you should make certain that the sand are uniformly distributed so the pavers will be leveled.
Paver Installation & Compaction
Apply dirt stabilizer
Without the effective device, it will certainly be difficult to make certain that the pavers will certainly be leveled as well as well-compacted. Adding a soil stabilizer will certainly aid enhancing the stability and strength so that the pavers will certainly be leveled equally.
Laying of pavers
After making certain that your subfloor is steady, now place your pavers on top of it. Use a rubber mallet and also tart working on the outer perimeter of your location moving your method to the. As you lay your pavers, start tamping from the sides and slowly towards the center. Stay clear of pool as they may sink over time.
Do not neglect to give a little void between the pavers. This is to make certain that the pavers have a space during the growth and also shrinking as it is revealed to different weather condition. If little voids are not offered, there is a huge tendency that your pavers will certainly pop-up in time.
Check the levelness throughout the program of installation utilizing a straightedge. Readjust the required levelness of the pavers making certain that the blocks does not produce any lip web page or are not interlaced well with its sublayer. Proceed doing so till you reached as well as ended up the facility item.
Fill the spaces
As soon as all the pavers are set on their created area, add a polymer sand on the gaps between the pavers. Polymer sand will assist seal the voids and maintain the weeds growing.
Cleaning up
Make certain that there are no remaining polymer sand on top of your pavers as they may leave white places or haze upon the healing of the products. Once you are done cleaning up the surface, water your pavers.
Since you're performed with mounting your pavers, you can currently continue with your finishing touches. It may be including an outside furniture or adding your plants along developing your own garden. Keep the tidiness of the area by having a routine maintenance of sweeping as well as rinsing of the area.
Conclusion:
Have you been desiring for your own pavers however hesitates that it might end up to become a disaster because you do not have the needed power devices? Since by adhering to these actions you will accomplish your preferred pavers, no requirement to fret. It might take longer than common however the satisfaction of having it done on your own and also attaining your dream pavers will certainly take all those concerns away. Now what are you awaiting? Start selecting your paver shade and also style as well as begin creating your dream paver! You can go in advance talk with a specialist as well as discuss your budget and also your style requires if you require aid.
If however your pavers have fractured, you can just take the cracked paver as well as change is with a brand-new one, which is does not take lengthy to solve, less hassle!
Apply your sand evenly, you must make sure that the sand are equally dispersed so the pavers will certainly be leveled.
As soon as all the pavers are set on their developed place, include a polymer sand on the voids between the pavers. Make certain that there are no staying polymer sand on top of your pavers as they might leave white places or haze upon the curing of the products. Start selecting your paver shade and design and start producing your dream paver!
1 note
·
View note
Text
How To Compact Pavers Without Plate Compactor
Pavers are either stones, bricks, brick-like or concrete material laid down as an outside flooring. Pavers are pre-manufactured materials which have a wide range of sizes, colors & shapes. These products await setup on your whole lot.
Pavers have actually been the go-to option of homeowners not even if of the aesthetically enticing look it provides on their driveway, pave method, patios and decks however also because pavers are extra long lasting as well as lasting contrasted to concrete-poured flooring. Pavers likewise are low-maintenance given that cracks will certainly not likely to happen in comparison with the concrete-poured floor covering. If sadly your pavers have broken, you can simply take the cracked paver and replace is with a brand-new one, which is does not take long to resolve, less hassle!
Currently, reading more of the most common issue pavers' is weeds expanding in between joints. Shuanglong is due to the moisture it gathered because of the improper compaction where pores are being created and with the seeds being blown or fallen pollens, weeds do grow. The question is currently increased, with no plate compactors, just how do I portable my pavers manually?
Subfloor Preparation
Design
After deciding with how huge your location is, mark your great deal depending upon your layout utilizing strings and batter boards. Examine machineSL of your whole lot, one idea of doing so is checking whether the diagonal measurements are equal. If not, due the necessary adjustment by moving the strings.
Excavation
Remove initially the dirt, grass or turf. Following the design, start excavating out the soil. By doing so see to it that you are excavating the right depth of the substrate as well as also consider the density of the pavers. You need to understand that the dirt underneath can work out by itself when added by the weight subfloor and pavers. Make certain that the deepness is just enough for it to degree with your finish floor.
Compaction
Tamp your substrate to make certain that no air pockets are left. You can attempt to include little amount of water as you tamp your substratum causing these air pockets to clear up because of the water penetration. Currently await it to dry.
Developing reading more
Add your substrate material.
This differs your preparation as well as your area but most substrate foundation must be composed of smashed rocks as well as gravels. It is a good idea to use great dimension rock like 2". You can continue doing so up until you accomplish your gravel base density.
Compact your gravel base
One terrific tip in making your compaction simpler is to always wet it. This will aid moisten up the pores leaving no space for air pockets. click here as high as you require up until you really feel that it is steady sufficient.
Sand Bedding
When dried, you can currently add your sand. Your pavers will be placed on top of it so see to it it is additionally well compressed. Apply your sand uniformly, you need to ensure that the sand are evenly distributed so the pavers will be leveled.
Paver Installation & Compaction
Apply soil stabilizer
Without the effective device, it will certainly be hard to make sure that the pavers will be leveled as well as well-compacted. Adding a dirt stabilizer will certainly assist enhancing the stability as well as toughness so that the pavers will certainly be leveled equally.
Laying of pavers
After making certain that your subfloor is stable, now position your pavers on top of it. Utilize a rubber mallet and also tart working on the external border of your area moving your means to the. As you lay your pavers, begin tamping from the edges as well as gradually in the direction of the center. Stay clear of puddle as they may sink over time.
Don't forget to give a small void in between the pavers. This is to guarantee that the pavers have a room throughout the growth and also contraction as it is subjected to different climate problem. There is a big propensity that your pavers will certainly pop-up over time if small voids are not supplied.
Examine the levelness throughout the course of installment utilizing a straightedge. Adjust the essential levelness of the pavers ensuring that the blocks does not generate any lip web page or are not interlocked well with its sublayer. Proceed doing so up until you completed the facility as well as got to item.
Fill the spaces
When all the pavers are set on their created place, add a polymer sand on the spaces between the pavers. Polymer sand will certainly assist seal the voids as well as maintain the weeds expanding.
Cleaning up
Make certain that there are no staying polymer sand on top of your pavers as they may leave white spots or haze upon the treating of the materials. As soon as you are done cleansing the surface, water your pavers.
Since you're performed with installing your pavers, you can currently wage your ending up touches. It may be including an exterior furniture or adding your plants along developing your own garden. Maintain the tidiness of the location by having a regular maintenance of sweeping and also rinsing of the area.
Conclusion:
Have you been imagining your own pavers however is scared that it might turn out to come to be a disaster due to the fact that you don't have the necessary power devices? No need to worry due to the fact that by complying with these steps you will achieve your preferred pavers. It could take longer than normal however the satisfaction of having it done on your own as well as accomplishing your dream pavers will certainly take all those fears away. Currently what are you waiting on? Start selecting your paver color as well as design and begin producing your desire paver! You can go ahead speak with a specialist and also discuss your budget plan and your design requires if you need help.
If sadly your pavers have actually fractured, you can just take the broken paver and change is with a brand-new one, which is does not take long to fix, much less headache!
Apply your sand evenly, you have to make certain that the sand are equally dispersed so the pavers will certainly be leveled.
When all the pavers are set on their developed area, add a polymer sand on the voids in between the pavers. Make sure that there are no staying polymer sand on top of your pavers as they may leave white spots or haze upon the curing of the products. Beginning choosing your paver shade as well as style and begin creating your dream paver!
1 note
·
View note
Text
How To Compact Pavers Without Plate Compactor
Pavers are either stones, bricks, brick-like or concrete material laid down as an outside floor covering. Pavers are pre-manufactured products which have a broad selection of dimensions, shades & shapes. used plate compactor for sale in durban await setup on your whole lot.
Pavers have actually been the go-to choice of homeowners not even if of the visually appealing appearance it offers on their driveway, pave means, patio areas and decks however additionally because pavers are much more lasting and sturdy contrasted to concrete-poured floor covering. Pavers additionally are low-maintenance because fractures will certainly not likely to happen in contrast with the concrete-poured floor covering. If unfortunately your pavers have split, you can just take the fractured paver and change is with a brand-new one, which is does not take long to resolve, much less problem!
Currently, the most usual problem pavers' is weeds expanding in between joints. This results from the moisture it accumulated as a result of the improper compaction where pores are being created and also with the seeds being blown or fallen pollens, weeds do expand. The inquiry is currently raised, with no plate compactors, exactly how do I compact my pavers by hand?
Subfloor Preparation
Layout
After making a decision with exactly how huge your area is, mark your lot depending on your design making use of strings and also batter boards. Examine the squareness of your great deal, one idea of doing so is examining whether the angled measurements are equivalent. Otherwise, due the essential change by gliding the strings.
Excavation
Remove first the lawn, dirt or lawn. Adhering to the format, start digging out the dirt. By doing so make sure that you are excavating the right depth of the substratum as well as likewise take into account the density of the pavers. When added by the weight subfloor as well as pavers, you must know that the soil beneath can resolve by itself. Ensure that the depth is simply enough for it to degree with your surface floor.
Compaction
Tamp your substratum to see to it that no air pockets are left. You can attempt to add percentage of water as you tamp your substratum causing these air pockets to clear up as a result of the water penetration. Now await it to completely dry.
Developing your foundation
Add your substratum material.
This differs your prep work and also your area yet most substrate structure ought to include crushed stones and crushed rocks. It is advisable to make use of great dimension rock like 2". You can continue doing so up until you accomplish your gravel base thickness.
Small your crushed rock base
One wonderful tip in making your compaction simpler is to constantly damp it. This will certainly aid dampen up the pores leaving no area for air pockets. Tamp as long as you need until you feel that it is secure sufficient.
Sand Bedding
As soon as dried out, you can currently include your sand. Your pavers will certainly be put on top of it so ensure it is likewise well compacted. Apply your sand evenly, you must see to it that the sand are equally dispersed so the pavers will be leveled.
Paver Installation & Compaction
Apply soil stabilizer
Without the powerful device, it will be difficult to ensure that the pavers will certainly be leveled and also well-compacted. Including a soil stabilizer will help enhancing the security as well as stamina to ensure that the pavers will certainly be leveled uniformly. Soil stabilizer is composed of crushed products combines with appropriate ingredients. Wait on a number of hrs up until it accomplished the regular stabilized surface.
Laying of pavers
After making certain that your subfloor is stable, currently put your pavers on top of it. As you lay your pavers, start tamping from the edges as well as gradually in the direction of the center.
Don't fail to remember to supply a little space between the pavers. This is to make certain that the pavers have an area throughout the expansion and also shrinking as it is exposed to different climate condition. If little spaces are not offered, there is a big propensity that your pavers will pop-up over time.
Examine the levelness throughout the course of installation utilizing a straightedge. Change the needed levelness of the pavers ensuring that the blocks doesn't produce any type of lip web page or are not interlocked well with its sublayer. Continue doing so up until you reached as well as ended up the facility piece.
Load the voids
As soon as all the pavers are established on their developed place, add a polymer sand on the spaces between the pavers. find plate compactor for sale will assist seal the voids and keep the weeds growing.
Cleaning
Make sure that there are no continuing to be polymer sand on top of your pavers as they may leave white areas or haze upon the curing of the products. As soon as you are done cleaning the surface, water your pavers.
Now that you're finished with mounting your pavers, you can now continue with your completing touches. It might be adding an exterior furniture or adding your plants along producing your own garden. Maintain the tidiness of the area by having a regular maintenance of sweeping and rinsing of the area.
Final thought:
No requirement to stress because by adhering to these steps you will certainly achieve your desired pavers. It could take longer than common however the fulfillment of having it done by on your own and also attaining your desire pavers will certainly take all those concerns away. Beginning picking your paver color and also design and also begin creating your desire paver!
If sadly your pavers have actually broken, you can just take the broken paver as well as change is with a new one, which is does not take long to settle, less trouble!
Apply your sand evenly, you have to make certain that the sand are equally distributed so the pavers will certainly be leveled.
As soon as all the pavers are set on their made area, add a polymer sand on the gaps between the pavers. Make certain that there are no staying polymer sand on top of your pavers as they might leave white spots or haze upon the curing of the materials. Begin selecting your paver color and also style and start producing your dream paver!
1 note
·
View note
Text
Pallets for Concrete Pavers with Complete User Details
If you are looking for strong and durable pallets for concrete pavers, you will have some better options to fulfill your requirement by going online – a convenient way to save you time and money and provide you with some added options. There are a number of recognized names in this domain offering you the right solutions and ensuring you will get complete peace of mind. Check all details, know about the specialty of the pallets that are required for concrete pavers and get the right solutions according to your specific needs.

Pallets for Concrete Pavers in Different Sizes and Shapes
These pallets for concrete pavers are in varied designs, styles and shapes. Their details are provided to you for your convenience. You can contact as per your requirement and get the right solutions. For the best units of pallets for concrete pavers, you will get the best solutions from Antekad is a one stop name in this domain providing you with the best range of pallets for concrete pavers with a complete guide and ensuring you will get delivery on time and right to your address without any delay. Installation support is provided to you that will be a plus point. Check all details and get the best range of pallets with complete user details.
Antekad Offers the Best Range of Pallets for Concrete Pavers
Antekad has the large stock of wooden pallets, production boards, timber pallets and different other items in the same category for pavers, concrete blocks and other purposes. Choose the best range, check all details and place your order accordingly.
1 note
·
View note
Last Seen Blogs

westsharpshirt
Untitled

freensrcha
we are each other's now

flowercrowntale
FlowerCrowntale

dinoskatestoo
Hello!!

thegoodwitch6x9veronline-blog
(SUB — ESPANOL) The Good Witch 6x9 Online Español Latino