#EDIT: fixed a weird colouring thing that did not show up on my tablet but did on my laptop screen?
Photo
sunset in silence
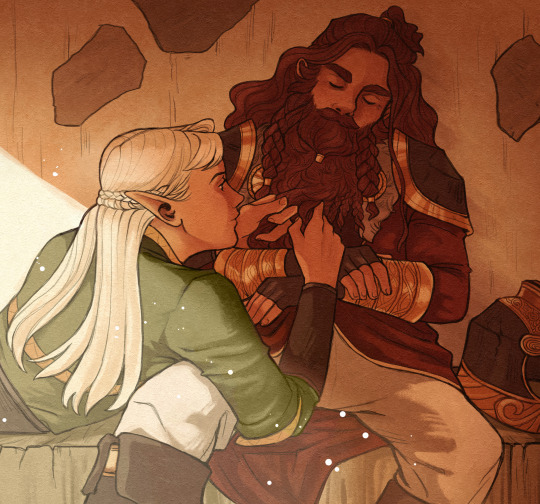
#lord of the rings#legolas#gimli#gimleaf#gigolas#my art#this started all sweet and funny but then!!!#i remembered how in the Fanfics braiding is always portrayed as something really intimate#so then this got kind of a risky vibe...#like kissing someone when they're sleeping. kind of iffy but you want them so much#bordering on illicit... oOOooOOO#ANYWAY let me know what you think#legolas fell both first and harder#EDIT: fixed a weird colouring thing that did not show up on my tablet but did on my laptop screen?#EDIT2: fixed legolas's head... twas a bit Elongated
7K notes
·
View notes
Text
Ok so this will be the tutorial!
I will stick this under a read more but this will fully go into detail how I make these edits. This tutorial will be detailed fro readers who may have no experience with drawing apps. Some info may seem redundant. There are also tutorials by FE-pride-edits and overwatch-pride-edits
To start! I use the mobile app “ibisPaintX”. It is completely free on the app store and very easy to use. However, this tutorial can be applied to almost ANY drawing app. If you use a computer, FireAlpaca is another easy-to-use free alternative. (I use my phone because my eyesight is poor and I need a screen closer to my face. I also have more control than I do with a drawing tablet)
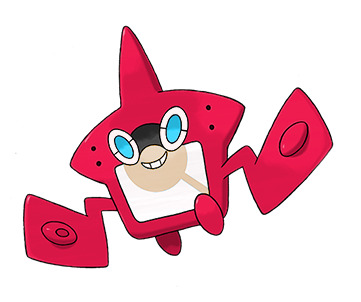
First, pick a pokemon. I will use Rotom Dex as I have a request for them to be done in their shiny colours. All of my images are official pokemon images taken from Pokemondb.com (pokemon database) or google images IF I CAN GUARENTEE IT ISNT FANART (It’s hard to tell sometimes, so an official site removes that risk).

Here he is! This is the screen layout, if you are new to the app take a moment to fiddle around and see whats available.
To start, click the icon of three stacked squares. These are “layers”, and if you are new to digital art essentially you use layers to keep sections separate. Imagine drawing on a clear sheet of paper and then layering it on top of another. This way if you need to change something you wont have to edit the ENTIRE image.
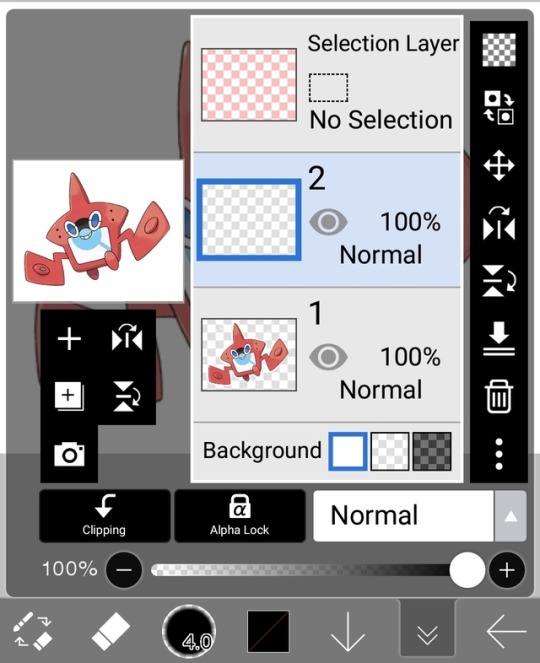
Here, keep your pokemon at the very bottom. Hit the (+) icon to make more layers. This will be where the colour goes.
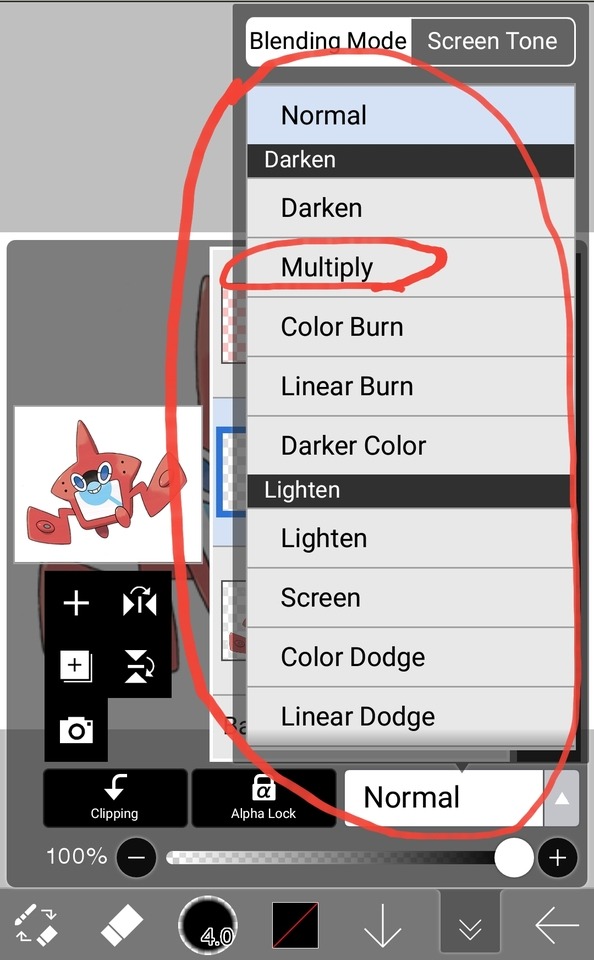
There are different types of layers, each with a different function. “Normal” will act as if you are drawing over the image, covering any layer underneath. We dont want that. Selecting the box shows all of the options. For start, select “multiply”.
What’s multiply? I’m not super well-versed in digital art, but the way I descrbe it is it makes an image darker and, if you use a colour in this layer, also adds a tint to this shade. This is a great tool for shading drawings. Why use it here? because it makes things so dark, it’s easier to see if you’ve missed a spot. This means you’re less likely to have to backtrack and fix anything.
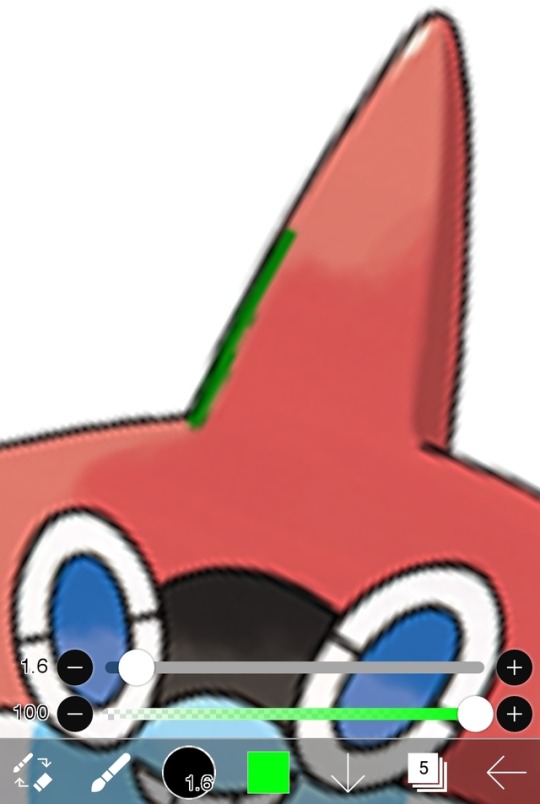
Now! With this layer selected (PLEASE MAKE SURE IT IS! AVOID DRAWING IN THE WRONG LAYER), choose a colour that isn’t already in the pokemon’s palette, choose a spot, and begin making an outine. Try to keep same colours in one layer, so for this example I will ONLY be working with the orange parts of Rotom.

Once your outline is made, head over to the tools icon (usually a pencil or eraser), select the bucket tool, and then in tool options (shown above) toggle Easy Settings and set it to Current Layer. Normally, the bucket will affect the WHOLE CANVAS, regardless of the layer. Changing this means you only affect the area you’ve outlined.
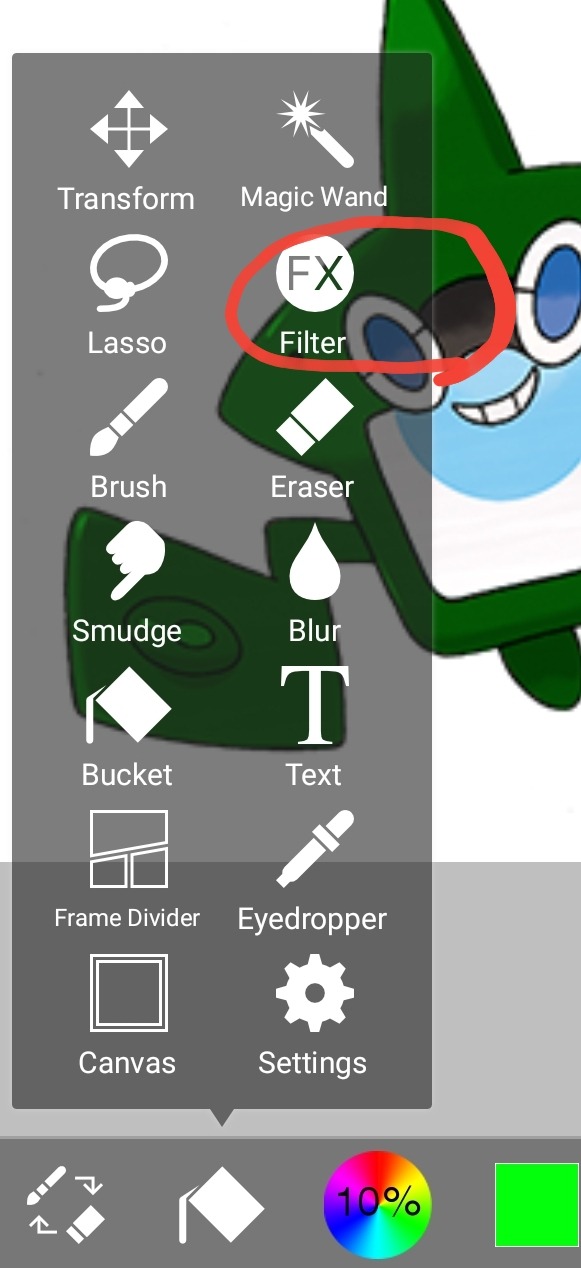
Look at that! All the orange is green now. Now, we do a little legwork. Go back to tool options and select “Filter”. That will bring up the menu shown below.
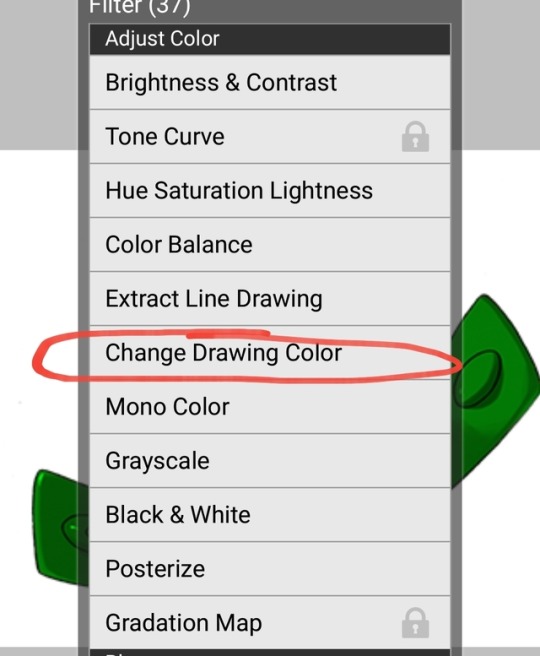

Select “Change Drawing Colour” and set Saturation to 0%, and Brightness anywhere in the 50% zone. It will look weird, but trust me this will work.
“What was the point of that?” again, multiply is easier to see if you’ve missed a spot, and is one of the few ways to get light/white colours to change. However, we will use 3 kinds of layers for 1 sections of colour. Below is the ideal setup. Use the duplicate option (the two squares with a + on them) to make more layers, and set each one accordingly.

- Colour goes on the bottom. This sets the base colour to grey, which is easiest for editing. Imagine trying to colour overtop a picture that already has colour. It comes out muddy, right? Grey is the base coat, and this setting doen’t remove any features such as the shading.
- Multiply should be above colour but below everything else. Multiply is useful here as it is one of the FEW ways to change white/light colours. NOTE: this layer can easily overpower the colours and make them way too dark. It also can make shading or light less viewable. Lower the opacity or hide the layer entirely (the eye symbol) if you want to weaken the effect.
- Overlay is where your actual colour comes in. Keep the bottom one grey, and if you want a lighter colour you can duplicate it and make it whiter to make the desired white or pastel. The top overlay is “clipping” the bottom, meaning if you did draw in the layer IT WILL ONLY COLOUR WITHIN ITS CLIPPED SECTION. If I wanted to draw stripes, or put a rainbow layer, clipping it to the bottom layer means only that section will appear to change (great for pride flage edits). NOTE: Overlay doesn’t show on white (this is where multiply comes in)
Now, rinse and repeat for the other sections! Then, use the “change drawing colour” option from earlier to get the desired colour
and that’s it! You now also have a saved file of this, so you can go back in and just change the colour without having to start all over again.
There’s a lot more tips and tricks, and plenty of other ways to do this, but this is the way that works for me. If you have any questions or need clarification please let me know!
188 notes
·
View notes
Last Seen Blogs

meatdevil
Meat Devil

unluckiestclover
Kiss Kiss Fall in Love
speakviolence
wretch.

gin-and-luce
Lucy Crawley

ghinamew
Unbetitelt