#20hole
Text
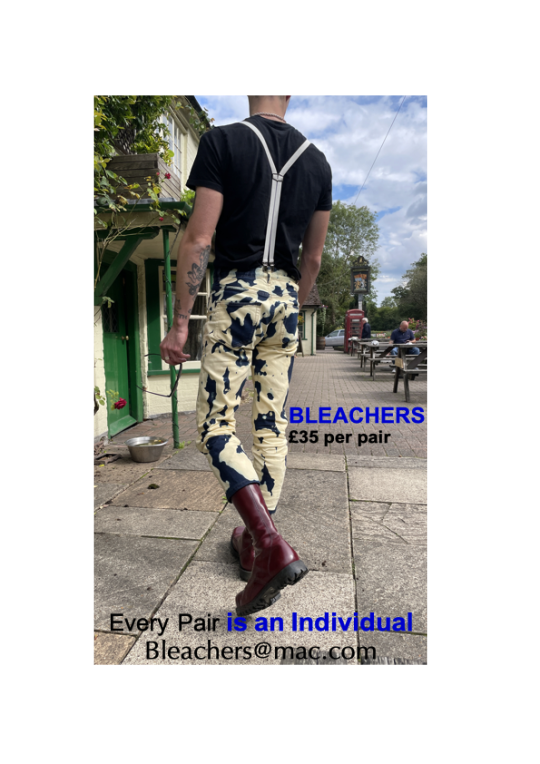
#skingear#bleachers#doc martens#skins#skingirl#doc boots#14hole#20HOLE#skinheads#skinhead#skinhead bleachers#skinhead rangers
28 notes
·
View notes
Note
https://hypnospiral.vercel.app/#%7B%22bgColor%22%3A%7B%22r%22%3A132%2C%22g%22%3A126%2C%22b%22%3A217%7D%2C%22spColor%22%3A%7B%22r%22%3A255%2C%22g%22%3A102%2C%22b%22%3A158%7D%2C%22txtColor%22%3A%7B%22r%22%3A251%2C%22g%22%3A255%2C%22b%22%3A240%7D%2C%22spinSpeed%22%3A%224%22%2C%22throbSpeed%22%3A%224%22%2C%22throbStrength%22%3A%222.86%22%2C%22messages%22%3A%5B%22lotus%22%2C%22Pretty%20spiral%22%2C%22Keep%20looking%22%2C%22Heavy%22%2C%22smile%22%2C%22smile%20now%22%2C%22good%20girl%20%22%2C%22such%20a%20good%20girl%22%2C%22Warm%20spiral%22%2C%22Love%20the%20spiral%22%2C%22lotus%22%2C%22good%20puppy%22%2C%22pet%22%2C%22lotus%22%2C%22submit%22%2C%22be%20a%20good%20girl%22%2C%22open%22%2C%22pink%20and%20soft%22%2C%22needy%22%2C%22obedient%20pup%22%2C%22open%22%2C%22such%20a%20needy%20hole%22%2C%22empty%20hole%22%2C%22mindless%22%2C%22no%20need%20to%20think%22%2C%22don%E2%80%99t%20think%20just%20submit%20and%20be%20filled%22%2C%22cock%20goes%20in%20brain%20goes%20out%22%2C%22good%20girl%22%2C%22good%20pet%22%2C%22soft%22%2C%22sleepy%22%2C%22can%E2%80%99t%20focus%22%2C%22keep%20looking%22%2C%22deeper%20%22%2C%22mindless%22%2C%22drop%20deeper%22%2C%22empty%20%22%2C%22a%20bit%20ditzy%3F%22%2C%22you%E2%80%99re%20very%20smart!%22%2C%22silly%20girl%22%2C%22deeper%20%22%2C%22deeper%20%22%2C%22sleepy%22%2C%22sinking%22%2C%22sinking%22%2C%22drop%22%2C%22drop%20sink%20drop%20deeper%22%5D%2C%22messageAlpha%22%3A%220.3%22%2C%22messageDuration%22%3A%220.15%22%2C%22messageGap%22%3A%221.01%22%2C%22randomOrder%22%3Afalse%2C%22bgImage%22%3A%22https%3A%2F%2Fimgs.search.brave.com%2FmInsHHEPK3yxHWDK4UbyQeEwjwdLR4lnY2zIZj0HUjk%2Frs%3Afit%3A1032%3A774%3A1%2Fg%3Ace%2FaHR0cHM6Ly9pLnBp%2FbmltZy5jb20vb3Jp%2FZ2luYWxzLzg1L2Fk%2FLzlhLzg1YWQ5YWY5%2FNDJlNWU5ZWRmMDBi%2FMTBiZTViY2EwNWQy%2FLmpwZw%22%2C%22bgImageAlpha%22%3A%220.1%22%7D
Spiral for you : )
thank you
it was very nice
stared at it for 3 min and 18 sec but it's harder to come up now for some reason
the words were just really nice
5 notes
·
View notes
Text
My Gopher Hole Simulacrum is complete and hosted on the website: http://farragofiction.com/ZampanioHotlink/Gopher%20Hole%20Simulacrum.html
It's not really easier per se, but I think the quality of life improvement of having the text immediately available on entering a room and my changes to the start make it more immersive overall. Most of the text isn't mine, though. The original just fits the format that well. With the little experience I had with Twine, I'm happy with what I made.
5 notes
·
View notes
Photo

Arrowhead Studios continues loading up H... https://www.xtremeservers.com/blog/helldivers-2s-r-36-eruptor-is-your-new-best-friend-for-clearing-bug-holes/?feed_id=137319&_unique_id=6621a8803f13b&Helldivers%202%E2%80%99s%20R-36%20Eruptor%20Is%20Your%20New%20Best%20Friend%20For%20Clearing%20Bug%20Holes
0 notes
Photo
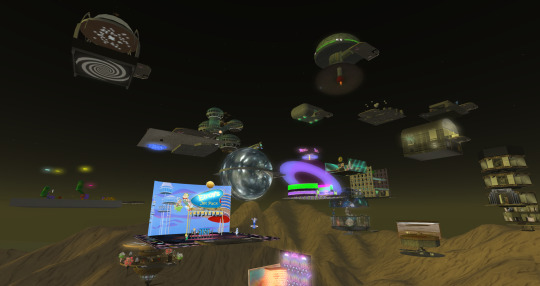
Gasp! and wow. Burn2 is in the sky, and you get a vehicle to fly around! I started here at the L&LF and UASL plot. It opens later today, 5 PM, but I got in easily earlier.
http://maps.secondlife.com/secondlife/Burning%20Man-%20Deep%20Hole/173/239/187
3 notes
·
View notes
Text
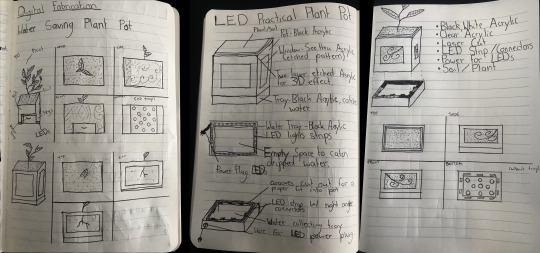
Digital Fabrication Beginnings
Designing a Plant Pot with windows/easily accessible water tray to save water.
STARTING OFF
In order to be a successful new home for my rubber plant, I wanted to measure to get an idea of how big I want my plant pot to be. By the looks of it, 20cm by 20cm seemed to be the best size in order to greatly increase the soil room for my plant to grow and spread its roots.
The actual pot will more be around 25cm tall, adding the 5cm to the bottom of the pot as the water tray for future watering. Because I’m going to be doing low-fi cardboard prototypes, I’m going to set parameters within my fusion document, and start with the plant pot being 10 by 10cm, with 5cm for the drip tray. This is so they can be easily changed for the future when I begin to create my final plant pot product, changing the values to higher numbers.

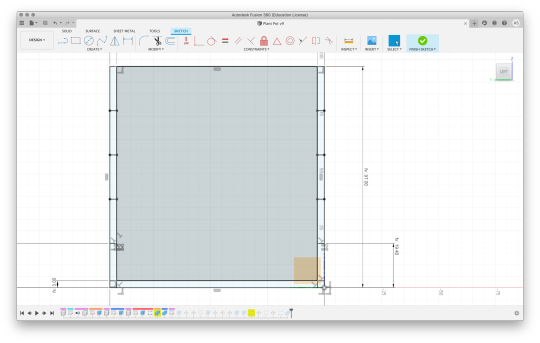
CREATING THE PLANS/ORTHOGRAPHIC DRAWINGS

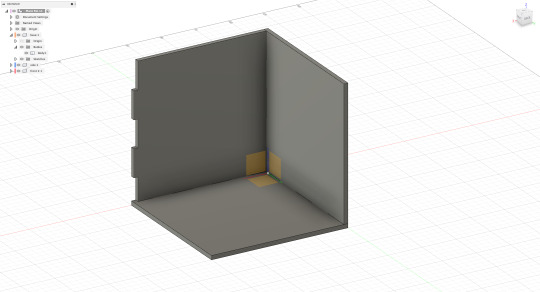
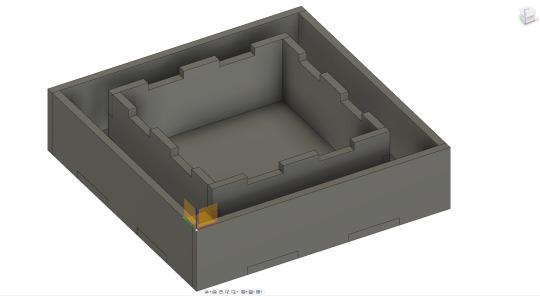
BEGINNING 3D MODELLING THE POT

FINGER JOINTS

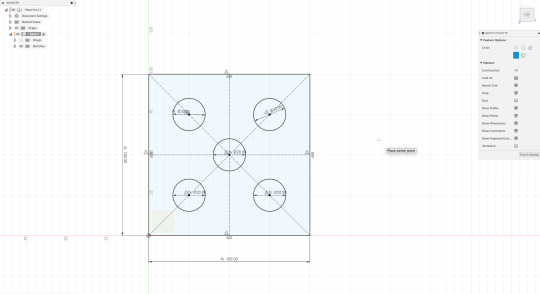
ADDING THE DRAINING HOLES
“Drainage Holes
There may be conflicting advice about how to keep your container garden plants from drowning. Some people say you don’t need drainage holes; just put rocks or packing peanuts at the bottom of your container. Plants in container gardens that don't have drainage holes often find themselves sitting in a soggy mess. Avoid very small drainage holes since they often get clogged. You want large drainage holes; an inch in diameter is a good place to start.”
https://www.thespruce.com/watering-and-drainage-in-dontainer-gardens-847774#:~:text=Avoid%20very%20small%20drainage%20holes,a%20hammer%20and%20large%20nail.
1 inch is the equivalent of 2.54cm, which to me actually looks bigger than I expected, which means I’ll most likely have to put a layer of mesh down on the bottom base of my pot in order to keep all the soil from spilling out the holes. I will prototype with different sized holes to see what I personally think will work best, so far I am leaning towards 20mm rather than the 2.54cm.
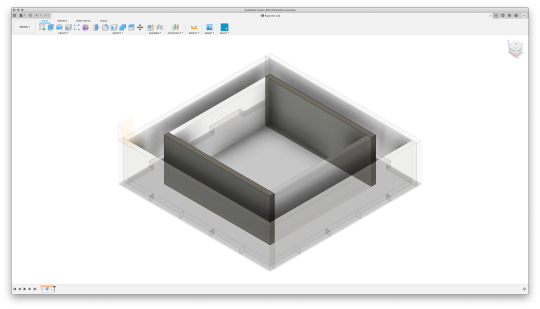
CREATING WINDOWS FOR THE ETCHED ACRYLIC

LED SPACING/WATER TRAY
FIRST PROTOTYPE

DXF Files Ready For Laser Cutting

Sadly the DXF files were all the wrong size, and in order to laser cut with Luca I had to go through and re-size every single dxf, and since the wood we were using to laser cut was 5mm and my original thickness was 3mm, I had to go through and change my thickness parameters and then re-save all the DXFs again.
Unfortunately changing these parameters didn’t work for my inside box (the acrylic layer), so I spent hours re-doing them all trying to figure out how to make it so that I could change the size and thickness of my parameters as much as I want, and the inside box will work correctly.
PROTOTYPE 1

WHAT I LEARNT FROM FIRST PROTOTYPE
Prototyping made me realise that I hadn’t actually created a slit in the base for the LEDs to shine through, so I had to go through my sketches adding slits, which resulted in me pretty much having to create all the outside box pieces all over again, and re-combine them.
I also discovered that when I go to change the thickness, my inside box totally breaks, since I discovered that I spent hours redoing all of the parametres to get it so that they would no longer break when the thickness was changed.

IMRPOVED PROTOTYPE

TESTING THE LEDS

PLANNING A NEW PROTOTYPE

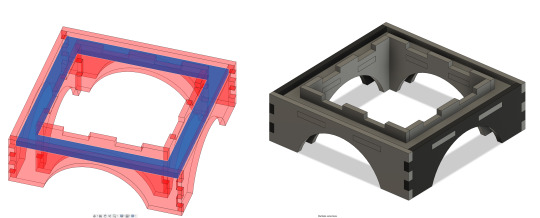
CHANGING UP THE BASE STYLE

SKETCHES AND PARAMETERS FOR THE ARCS

COMBINING THE PIECES FOR FINGER JOINTS
TESTING ACRYLIC PANEL WITH DIFFERENT COLOURS
I got extremely lucky, because I currently don’t have brand new LED strips to test with my plant pot, however, I have LEDs that go around my roof in my bedroom, and to my surprise there was actually three connectors that came off of it, and I had a tiny amount of LED strip left to connect and test what my etched acrylic panels would look like with LEDs shinning on them.
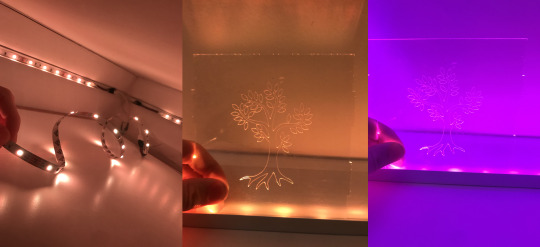
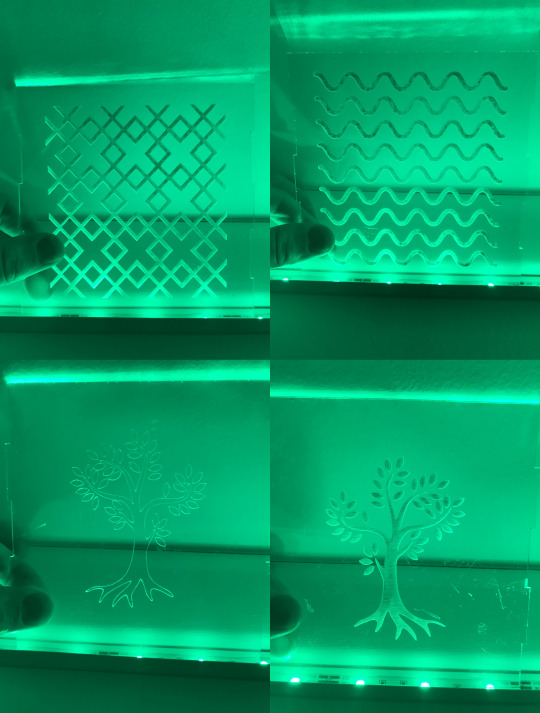
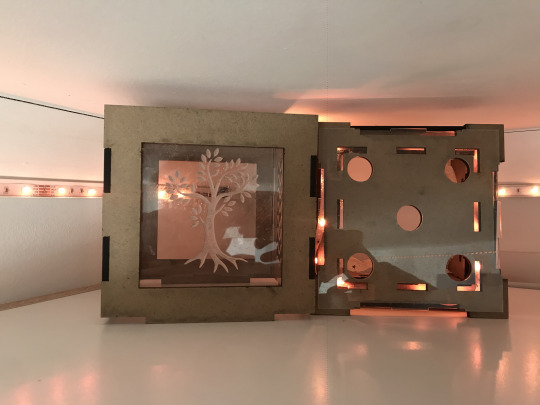
TESTING THE ETCHED ARYLIC
After a very long time peeling away the acrylics plastic covering, I was able to test out each type of pattern that I got etched on, so far the two that shine the best are the trees. From this prototype I’ve discovered that the thicker the lines, the more difficulty the LEDs have of shinning through (and also up close, they look messy). So, thanks to this prototype, my future version is going to be closer to thin lines rather than thick, but more thick than they are on the tree currently.
STICKING PLANT POT TOGETHER

DRILLING A HOLE FOR THE LED STRIP IN THE BASE
When I got this prototype laser cut, I hadn’t actually had the chance to find out exactly how big of a hole I needed in order to thread the LEDs through, luckily I could use a drill and slot the LEDs in.

TESTING LEDS INSIDE POT
Unfortunately, the LED strip does not actually fit inside the box without me cutting them and altering them, which I do not have the supplies to do right now, I’m going to order parts in so I can test this in the future, and in my future prototype, I am also going to lower the part which the LEDs rest on, as they COULD fit, if this piece was lowered about 20mm.

Since the LEDs are on my roof, the only part to access them is from my wardrobe as they’re hidden behind it, and sadly this meant I wasn’t able to put the entire plant pot together while testing the LEDs, I’ve been searching around for the parts I need in order to power it from the wall, which I will be attempting in a future prototype.
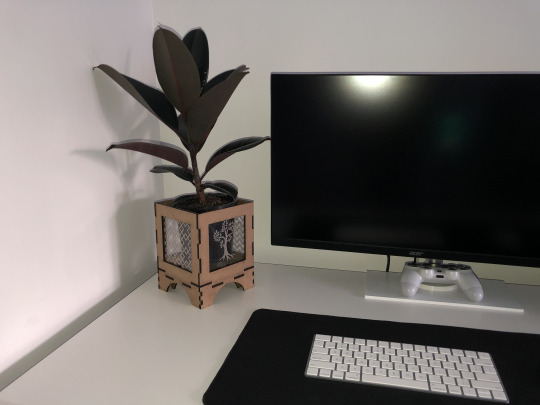
PROTOTYPE COMPLETE
After insane amounts of hours, and countless issues, I have my first completed prototype, I already see so many issues that I want to fix, and loads of things that I’d do differently with future iterations. Currently, I’ve placed my plant inside the box inside its original pot, and that’s because in a future iteration, I will be custom fitting it to an already establish pot plant, this is because through research, I discovered that the roots actually need to be in complete darkness, and the windows that I currently have, as cool as it would be to view the roots and soil, it would actually be bad for the plant.

MODEL SHOTS

3 notes
·
View notes
Text
Tuesday October 12th Field Trips!
Tuesday October 12th Field Trips!
Safe Tuesday everyone ♫
2 pm Poetry Field Trip: RoseDrop Rust at Burn2 Center Camp!
http://maps.secondlife.com/secondlife/Burning%20Man-%20Deep%20Hole/177/32/25
4 pm Field Trip: Wald Schridde at The Blarney Stone!
https://maps.secondlife.com/secondlife/Dublin/83/82/25
6 pm Field Trip: Reno Jones at Cold Harbor!
https://maps.secondlife.com/secondlife/Rolypoly/211/85/24
7 pm Field Trips:
The…

View On WordPress
0 notes
Photo
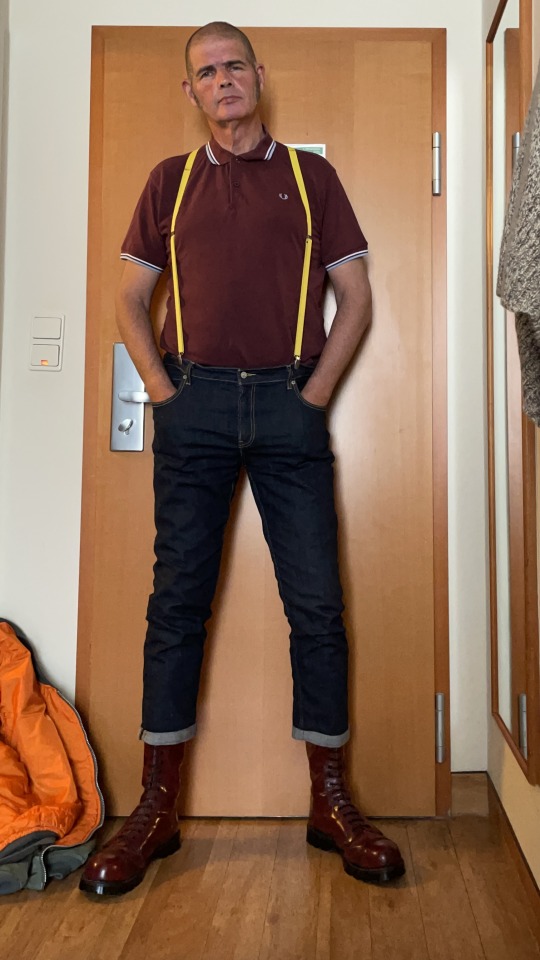
I was donated a pair of Cherryred size 12 Grinders - I can tell you there are superbly comfortable - gotta get a black pair too in UK12
64 notes
·
View notes
Text
Finished Film 30/04/2021
https://livenapierac-my.sharepoint.com/personal/40429384_live_napier_ac_uk/_layouts/15/onedrive.aspx?id=%2Fpersonal%2F40429384%5Flive%5Fnapier%5Fac%5Fuk%2FDocuments%2FBlack%20Holes%20Documentary&ct=1619791629477&or=OWA%2DNT&cid=b9ab388a%2D0f16%2Dba5c%2D2d43%2D4469fb362e58&originalPath=aHR0cHM6Ly9saXZlbmFwaWVyYWMtbXkuc2hhcmVwb2ludC5jb20vOmY6L2cvcGVyc29uYWwvNDA0MjkzODRfbGl2ZV9uYXBpZXJfYWNfdWsvRW5qMk9RWFd0OWhEaDd1cXotRDlDRzBCNGJjOTdCTGVCWE5rX2JqLXU5dWdodz9ydGltZT01X0lVUC1FTDJVZw
While I had fun working on the documentary, and absolutely loved the idea, overall I’m slightly disappointed with the outcome. I think that with some extra work and coordination we could have put together a more organised and structured edit. This is partly due to our communication as a group, the restrictions covid has placed on us - as it has made it harder to meet up all together and work on things together, and our abstract idea. Since our concept was quite abstract, it was difficult to create a structure for it. We weren’t sure where we wanted to take it.
Nevertheless, this project has been a learning experience and I am looking forward to seeing our classmate’s documentaries and receiving feedback for ours.
0 notes
Photo

Decades since its debut, no side-scrolli... https://www.xtremeservers.com/blog/fall-down-a-retro-action-rabbit-hole-with-every-mega-man-ever-for-just-30/?feed_id=86865&_unique_id=64dbb3d075bd9&Fall%20Down%20A%20Retro%20Action%20Rabbit%20Hole%20With%20Every%20Mega%20Man%20Ever%20For%20Just%20%2430
0 notes
Text
0 notes
Photo
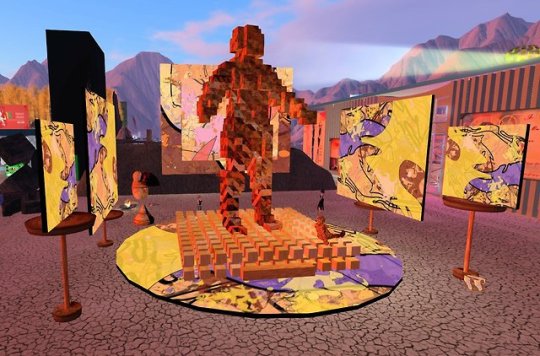

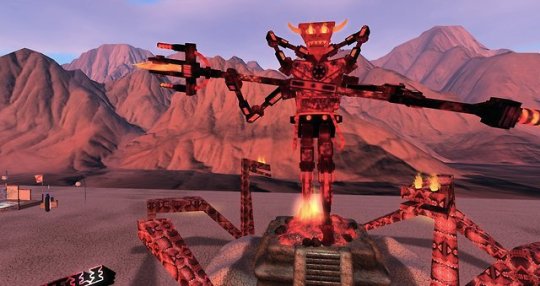
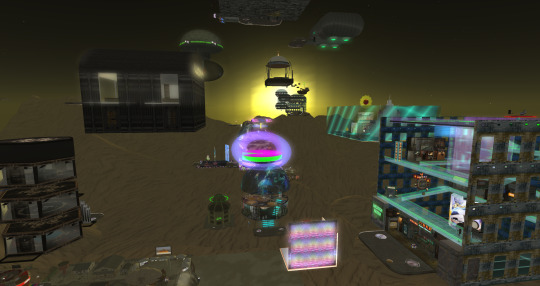
The Burn2 theme is “I, Robot” and the robots come in all shapes and sizes. I shot fast and got these robots, made by 1. Elle Thorkveld, 2. Daark Gothly, and 3.Dimitri Mint. I can’t decide which is my fave. Start here for your own tour.
https://maps.secondlife.com/secondlife/Burning%20Man-%20Deep%20Hole/174/32/25
3 notes
·
View notes
Link
// In case anyone was ever curious about the floor plans and a few features about Jack`s club. I FINALLY made a page for it.
Enjoy!
0 notes
Last Seen Blogs

high-business-link-blog
High Business Link

zoeybee96
ZoeyBee

gamebettingblr
无标题


ao3feed-cherik
Ao3 Feed for Erik/Charles fics