
snacken
ALL THINGS FOOD
A plantbased,vegan and glutenfree-friendly blog with all those delish recipes you'll find over the whole web collected on one page! Make this blog your cookbook wherever you go xx Full recipes included!
51 posts
Don't wanna be here? Send us removal request.
Last Seen Blogs

ursaced
ᔕ ᒪ O T ᕼ


andreia-carbonari
Andreia Carbonari

eggomeggo
Hearts, they don't lie they just quiver in fear

brainscrambl3r
☆Johnny☆
Photo

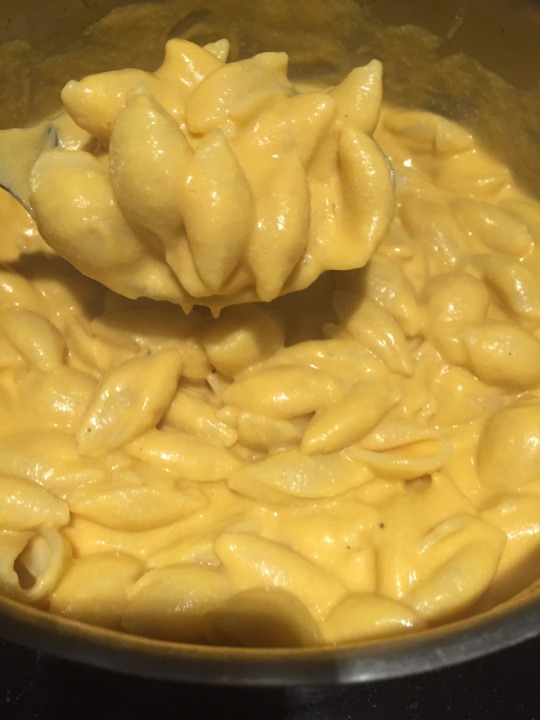
Vegan Mac and cheese from scratch!! Just made this for a large group of non-vegans and everyone loved it and went back for seconds!
How to make the sauce:
boil water in a large pot
add in 2 yellow or white potatoes, pealed and chopped
after 2 minutes add in 1 large carrot, pealed and chopped
after 5 minutes add in ¼ an onion, pealed and chopped
once they are all soft put all the veggies in a blender
do not throw out the water
to the blender add in ½ cup of cashews
also add 1 ½ cup of the water the veggies were cooked in
blend until smooth and cheesy looking
pour on top of 1 bag regularly cooked pasta of your choice
enjoy!!
5K notes
·
View notes
Photo
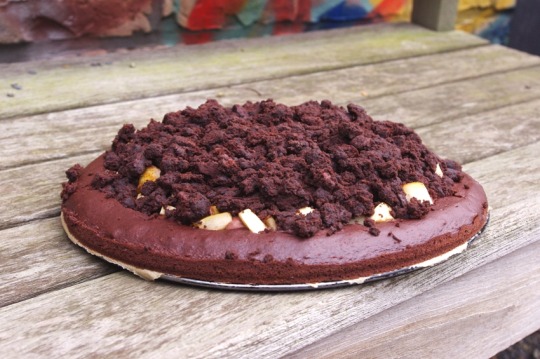
für le Teig:
200 g Mehl
50 g KULAU Kokosmehl
125 g Zucker
50 g Kakaopulver
½ Pck. Backpulver
2 Pck. Vanillezucker
100 ml Öl (ich habe Sonnenblumenöl genommen, Kokosöl ist ebenfalls geeignet)
100 bis 200 ml Wasser (je nach gewünschter Konsistenz)
für le Belag:
400 ml Kokosmilch
1 Pck. Puddingpulver (Schokogeschmack)
1 EL KULAU Bio-Kokosblütenzucker
1 Tafel Schokolade (Zartbitter)
2 Bananen
1 Birne
La Sübereitung
Alle Zutaten für den Teig in eine Schüssel geben und zu einem Rührteig verarbeiten. Vom Wasser nur so viel hinzufügen, dass eine geschmeidige, nicht zu feste Masse entsteht (bei mir waren es knapp 200 ml).
Fertigen Teig in eine Springform geben und etwa 45 Minuten bei 180 °C backen (Stäbchenprobe).
Währenddessen die Kokosmilch aufkochen lassen, einen Esslöffel Zucker dazugeben und damit den Pudding zubereiten (siehe Zubereitungshinweis auf der Puddingpackung). Anschließend abkühlen lassen.
Die Schokolade in einem Wasserbad erhitzen, ein paar Esslöffel Pudding dazugeben und gut verrühren. Warm halten.
Sobald der Kuchen den Stäbchentest bestanden hat, aus dem Ofen nehmen und abkühlen lassen. Mit einem Löffel anschließend den Kuchen aushöhlen. Dabei sollte gut 1 cm Boden und ein 1,5 cm breiter Rand erhalten bleiben. Die entnommenen Brösel dann mit dem warmen Schokoladengemisch vermengen und zur Seite stellen. Den ausgehöhlten Kuchen zuerst mit Pudding und dann mit den geschnittenen Bananenstücken und Birnenstücken füllen. Zum Schluss die Schokobrösel drüber streuen. Fertig!
#kuchen#vegan#kokos#glutenfrei#gesund#lecker#süß#foodporn#rezept#scokokuchen#maulwurfskuchen#bananen#cake
2 notes
·
View notes
Photo

Vegan Snickers Slice
Serves 10.
Prep: 30 minutes, freezing: 1 hour. Total Time: 1 h 30 minutes
You will need:
For the base:
1/2 cup cashew butter
1 tbsp maple syrup
1 tbsp coconut flour
For the peanut butter caramel:
10 medjool dates, soaked and pitted
1 tbsp coconut oil
1 tbsp maple syrup
2 tbsp peanut butter
1/4 cup water
1/2 tsp vanilla
dash of salt
For the topping:
1/4 cup roasted peanuts
50 g dark vegan chocolate
Method:
1. In a food processor combine the ingredients for the base. Once combined pressed into a small square tin that is lined with baking paper.
2. Combine all ingredients for the caramel until smooth, then smooth over the base. Sprinkle with peanuts, and if desired, drizzle with chocolate now or later, once it has been cut up. Freeze for 1 hour.
3. Cut into bars before serving.
11 notes
·
View notes
Photo


BAUMKUCHEN (VEGAN & GLUTENFREI)
150g gemahlene Bio-Mandeln (oder Bio-Marzipan, gibst bei DM)
200g Vollrohr(zucker)
300ml Sojajoghurt
100ml flüssiges Kokosöl
1 TL Vanillepulver
15g Backpulver
50g Speisestärke
100g glutenfreier Mehl-Mix (gibst im Biomarkt) oder Dinkelmehl
Saft von 3 Orangen
(optional 1 EL Amaretto)
150g fair-trade Zartbitter Kuvertüre
Heizt als erstes euren Backofen auf 250 Grad (am besten Oberhitze/Grill) vor. Vermengt in einer großen Schüssel die gemahlenen Mandeln mit Stärke, Mehl, Backpulver, Zucker und Vanillepulver. Gebt dann die restlichen, flüssigen Zutaten dazu und mischt alles mit einem Schneebesen zu einem zähflüssigen Teig. Wer gutes Bio-Marzipan findet, kann dieses mit dem Saft der Orangen in einem Topf erhitzen, bis eine homogene Masse daraus wird und diese anstatt der Mandeln in den Teig geben. Dann 50g mehr Mehl verwenden.
Fettet eine kleine Springform (18cm) mit etwas Kokosöl ein, gebt 4 EL des Teiges hinein und verstreicht diesen gleichmäßig. Stellt die Form nun möglichst weit oben für 4 Minuten in den Ofen, die Teig-Schicht sollte an der Oberfläche nun etwas brauner geworden sein. Verteilt dann weitere 4 EL Teig auf dem bereits gebackenen Teig, backt dies erneut für 4 Minuten und wiederholt diesen Vorgang, bis der Teig verbraucht ist (ca 6 Mal). Lasst den Kuchen dann vollständig abkühlen. Wenn ihr ihn aus seiner Form befreit, solltet ihr schon die einzelnen Schichten erkennen können.
Schmelzt in einem Wasserbad die Kuvertüre und verteilt sie gleichmäßig auf dem Kuchen und an den Rändern. Wenn die Schokolade dann ausgehärtet ist, könnt ihr endlich genießen!
10 notes
·
View notes
Photo
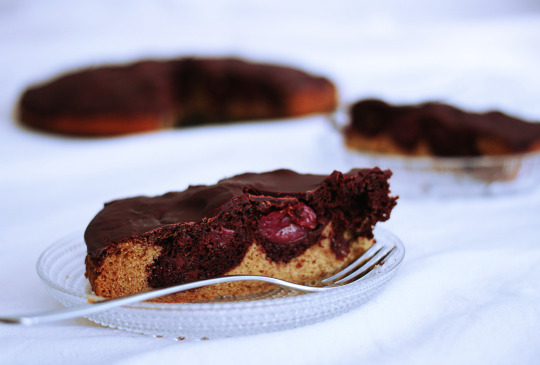

KIRSCH MARMORKUCHEN (VEGAN, GLUTENFREI)
Für eine Springform (28cm):
300g glutenfreier Mehl-Mix „universal“ (gibts im Biomarkt)
150g Rohr- oder Rübenzucker oder 200g Vollrohrzucker
1 TL Natron
1TL Backpulver
30g fair-trade Kakaopulver
1 TL gemahlene Vanille
50g fair-trade Zartbitter Schokolade
400ml Sojamilch
50ml Wasser
(optional 100ml Kokosöl)
300g abgetropfte Sauerkirschen (aus dem Glas)
100g fair-trade Schokolade als Glasur
In einer großen Rührschüssel zuerst Mehl, Zucker, Natron, Backpulver und Vanille gut vermengen. Dann Sojamilch und Kokosöl dazu geben und zu einen zähflüssigen Teig verrühren. Die Hälfte des Teiges in eine zweite Schüssel füllen und Kakao, 50ml Wasser und 50g zerhackte Schokolade dazu geben.
Die Springform etwas einfetten und den hellen Teig gleichmäßig darauf verteilen. Von der Mitte aus den Schoko-Teig mit kreisenden Bewegungen über den hellen Teig gießen und danach mit einem Löffel möglichst gleichmäßig darauf verteilen. Dann die Kirschen auf dem Teig verteilen und etwas hinein drücken. Den Kuchen nun bei 180 Grad 30 Minuten Backen. Wenn bei der Stäbchenprobe noch etwas kleben bleibt ist das nicht schlimm. Bei glutenfreiem Kuchen ist es oft besser ihn möglichst kurz zu backen, damit er nicht austrocknet.
Den Kuchen dann vollständig abkühlen lassen und mit geschmolzener Schokolade überziehen. Lässt sich übrigens auch prima einfrieren und schmeckt nach dem Auftauen genau so gut, wenn nicht besser!
2 notes
·
View notes
Photo
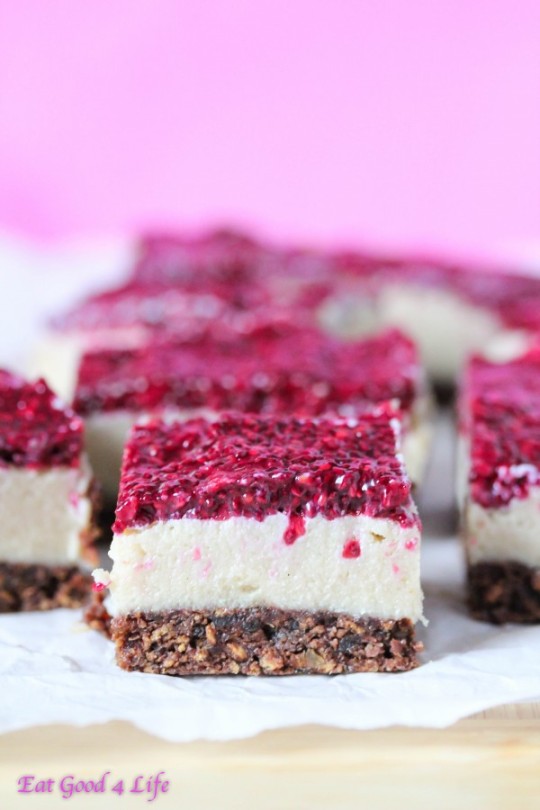
RAW VEGAN VANILLA RASPBERRY CHEESECAKE
INGREDIENTS:
1 cup Cascadian Farm cinnamon crunch
1 cup pitted dates
1 tbsp cacao powder
1-2 tbsp almond milk
Cheesecake layer
1 1/2 cups raw cashews
1/3 cup maple syrup
2 tsp vanilla extract
2-3 tbsp almond milk, if mixture is too dry
Top Layer
10 oz organic Cascadian Farm raspberries, defrosted
1/4 cup chia seeds
1/4 cup maple syrup
DIRECTIONS:
Soak the cashews in water for 1 hour. Discard the water and line a loaf baking pan with unbleached parchment paper and set aside. In a medium mixing bowl, mix the topping ingredients and let it sit for 1 hour until it thickens.
Place the crust ingredients in your food processor and pulse until the mixture comes together; this should take about 1 minute.
Press this mixture evenly onto the bottom of the prepared loaf baking pan and place it in the freezer while you prepare the cheesecake topping.
Place the cheesecake ingredients in your food processor and pulse until smooth. Pour the cheesecake mixture over the crust in the baking pan and spread it evenly. Freeze the dessert for at least 1 hour. Spread topping ingredients evenly over the cheesecake layer. Freeze for another hour.
Cut the cheesecake into squares before serving. Keep leftovers covered in the freezer for up to 3 months.
8 notes
·
View notes
Photo


INGREDIENTS
MOROCCAN CHICKPEA WRAPS
1/2 Cup Chickpea Flour
1 Tsp Morrocan Spice Blend
1 Tsp Ground Flax
1/2 Tsp Garlic Powder
1 Tsp Cold Pressed Extra Virgin Olive Oil
Cold Water (Add 1 TBS at a time)
Salt and Pepper
FILLINGS
Cajun Spiced Hummus - See recipe archives
Baby Spinach
Red Onion
Raw Carrot
Sprouts
Radishes
Baby Tomatoes
INSTRUCTIONS
In a mixing bowl add all the ingredient except for the water.
Slowly add water until you've combined all ingredients into a pancake like batter.
You want the consistency to be runny, but not too thin, so about a medium thickness.
If you accidentally add too much water, you can add more chickpea flour to correct.
In a preheated to medium frying pan, spoon the batter, and pick the pan up and circulate to spread the mixture into a medium thickness circle. It should be slightly thicker than a tortilla.
When the little air bubbles start to show, and the underneath is nicely cooked through, use your skills and flip onto the other side.
6 notes
·
View notes

Photo


Ingredients
CAKE
4 flax eggs (4 Tbsp (18 grams) flax seed meal + 10 Tbsp water)
1 cup (250 ml) unsweetened plain almond milk + 1.5 tsp apple cider vinegar
3 tsp baking soda
1/2 cup + 2 Tbsp (146 ml) maple syrup or agave nectar (sub honey if not vegan)
2/3 cup (154 grams) cane or granulated sugar
1/2 cup (126 grams) melted coconut oil or vegan butter (such as Earth Balance)
1 tsp pure vanilla extract
2 cups (~486 grams) unsweetened applesauce (or other hearty fruit puree, such as beets)
1/2 tsp sea salt
1 cup (120 grams) unsweetened cocoa powder (if clumpy, sift)
1 cup (118 grams) almond meal (finely ground from raw almonds)
1/2 cup (50 grams) gluten free oat flour (finely ground from raw oats)
1 1/2 cups (200 grams) gluten free flour blend (*see notes)
FROSTING / TOPPINGS
1/2 cup (120 grams) unsweetened plain almond milk
1 1/4 cups (230 grams) dairy free dark or semi-sweet chocolate, chopped
1/4 cup (56 grams) melted coconut oil or softened vegan butter, cut into slices (such as Earth Balance)
1 1/4 - 2 cups (~150 - 250 grams) powdered sugar
1 1/2 cups (~175 g) roasted unsalted hazelnuts
Instructions
Preheat oven to 350 degrees F and butter two 8" round cake pans (or line 24 muffin tins with paper liners). Dust with gluten free flour and shake out excess.
Measure out almond milk and add vinegar. Stir and let curdle while moving onto the next step.
Prepare flax eggs in a large mixing bowl and let rest for 5 minutes.
Add baking soda to the almond milk vinegar mixture and stir.
Add the sugar, maple syrup and almond milk mixture to the flax egg and beat/whisk to combine. Then add applesauce, vanilla, melted coconut oil, salt and mix.
Add cocoa powder, almond meal, oat flour and gluten free flour and beat/whisk to combine. If the batter appears too thick, add a touch more almond milk, but it should be perfect. It should resemble a semi-thick batter that’s pourable.
Divide batter evenly between cake pans (if using muffin tins, it should be enough for roughly 24 filling generously 3/4 full).
Bake cake for 35-45 minutes or more (cupcakes for about 29-35 minutes) or until a toothpick inserted into the center comes out clean and the top appears dry. Time will vary if you sub ingredients, as well as depending on the size of your pan.
Let rest in the tin for 15-20 minutes, then carefully run a butter knife along the edges and invert onto cooling racks. Let cool completely.
FOR FROSTING: Add almond milk to your rinsed out mixing bowl from earlier and microwave for 1 minute. (Alternatively, heat in a saucepan until just simmering and then transfer back to mixing bowl.)
Immediately add chocolate to warm milk but don’t touch for 3 minutes so it can melt.
Stir with a wooden spoon to incorporate, then add coconut oil or softened butter and cover. Let rest untouched for another 10 minutes.
Use your mixer (or a whisk) to beat the mixture together. Then add 1 cup powdered sugar, mix again, and place in fridge to set for 20 minutes. You’ll know it’s ready when you tip it and it’s slow to move.
Remove from fridge and beat again. If it’s still too thin, add another 1/4 - 1/2 cup powdered sugar and beat until light and fluffy. I found that adding 1 3/4 cups total powdered sugar was perfect. Set aside.
Transfer the bottom layer of the cooled cake to a serving plate/dish. Spread a semi-generous layer of frosting on the top of the bottom layer and top generously with hazelnuts. Press down with hands to settle them into the frosting (see photo).
Carefully top with second layer and frost the top generously, then the sides. Using a butter knife yields a smooth surface. It should be the perfect amount of frosting - not too thick, not too thin.
Add hazelnuts around the perimeter of the top of the cake. Slice and serve.
Will keep well-covered at room temperature for several days, though best when fresh. Refrigeration not necessary.
4 notes
·
View notes
Photo


Ingredients
CRUST
1 cup packed dates, pitted (if dry, soak in warm water for 10 minutes then drain)
1 1/2 cups raw walnuts (or sub almonds or rolled oats)
3 Tbsp unsweetened cocoa or cacao powder
Pinch sea salt
FILLING
1 1/2 cups raw cashews (soaked in water 4-6 hours, then drained OR pour boiling hot water over the cashews, soak for 1 hour, then drain and blend as instructed)
1 large lemon, juiced (scant 1/4 cup)
1/4 cup olive or melted coconut oil (or any neutral-flavored oil)
1 14-ounce can full fat coconut milk (sub light coconut milk or another non-dairy milk for a less creamy result)
7 ounces dairy free dark chocolate (chopped and melted over a double boiler or in microwave in 30 second increments)
1/4 cup maple syrup or agave nectar (or honey if not vegan)
TOPPINGS
Dairy Free Peanut Butter Cups
Peanut Butter Sauce (see notes)
Fresh Berries
Coconut Whipped Cream
Cacao Nibs
Instructions
Add dates to a food processor and blend until small bits remain and it forms into a ball. Remove and set aside.
Next add nuts, salt and cocoa powder and process into a meal. Then add dates back in and blend until a loose dough forms - it should stick together when you squeeze a bit between your fingers. If it's too dry, add a few more dates through the spout while processing. If too wet, add more almond or walnut meal.
Cut out parchment paper into circles the shape of your ramekins, muffin tins or pan (see notes for size options). In addition, to make removing the cheesecakes easier, cut out two strips of parchment paper per ramekin and lay them in an "X" shape at the base. Top with circle shape. This creates little tabs that make removing the cheesecakes easier to pop out once set.
Divide crust among serving dishes and carefully press with fingers to distribute. To pack it down, use a small glass or the back of a spoon to and really press it down, allowing some crust to come up the sides. If it sticks, separate the crust and glass with a small piece of parchment paper. Set in fridge or freezer to firm up.
Add all filling ingredients to a blender and mix until very smooth - up to 2-3 minutes. If it won't come together, add a touch more lemon juice, maple syrup/agave or a splash more coconut milk as the liquid should help it blend better.
Scrape down sides as needed and blend until very creamy and smooth. Taste and adjust flavor/sweetness as needed.
Divide filling evenly among the ramekins (or other serving dish). Tap a few times to release any air bubbles, then cover loosely with plastic wrap and refrigerate until set - about 4-6 hours depending on size of dish. Expedite this process by popping them into the freezer for 1-2 hours.
Once set, run a butter knife along the edge and gently remove by tugging on the tabs in an upward motion. They should pop right out. If they aren't quite set, pop them in the freezer for 15-20 minutes and they should come out easily.
Top with a touch of coconut whipped cream and fresh berries, or as is! See notes for storage.
Notes
*Peanut Butter Sauce Recipe: 1/4 cup Salted natural peanut butter + 1 Tbsp sweetener + 1/2 Tbsp melted coconut oil. Whisk to combine and warm if desired.
3 notes
·
View notes
Photo
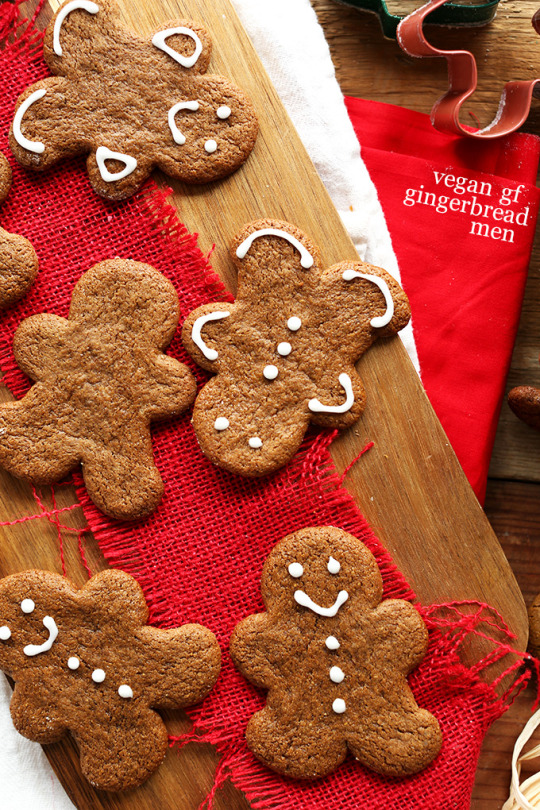
ngredients
1 flax egg
1/2 cup brown sugar
1/4 cup almond butter
3 Tbsp molasses
1/4 cup vegan butter, softened
3/4 tsp ginger
1/2 tsp cinnamon
1/4 tsp nutmeg (optional)
1/4 tsp salt
1/2 tsp baking soda
1 1/4 - 1 3/4 cups gluten free baking / pancake mix
Instructions
In a large mixing bowl, prepare flax egg by mixing flax and water and letting rest for 5 minutes.
Add softened butter, molasses, almond butter, brown sugar, salt, spices, baking soda and beat on a low with a mixer, or vigorously whisk.
Add gluten free flour to the wet ingredients and stir with a wooden spoon. Stir until well combined. Your dough should hold its shape when pressed, but not feel dry. I found that 1.5 cups was about the perfect amount, but this will depend on your blend.
Cover and chill dough for at least one hour, preferably overnight.
Preheat oven to 350 degrees.
Carefully roll out dough to a little thicker than 1/8 inch between two sheets of plastic wrap or parchment/wax paper, generously sprinkling the bottom layer and the top of the dough with white or brown rice flour before rolling. You don't want it too thin or they'll be too crisp.
Remove top sheet and, working quickly, dip your cookie cutters in rice flour and cut out shapes. Next, lift the plastic wrap (with all of the dough) and place it on a baking sheet or large plate and freeze for 5 minutes to let them firm up. This will make them easier to transfer to your baking sheet for baking.
Next, use a lightly floured spatula to carefully transfer the cookies to a baking sheet, working quickly. Leave 2 inches for spreading.
Bake for 8-10 minutes or until they appear only slightly browned on the edges. They'll continue firming up as they sit on the pan. Let rest on the pan for 2-3 minutes, then transfer to a cooling rack.
Once cooled, decorate with frosting or sprinkle with powdered sugar. I think a perfect, simple frosting option is piping on a mix of 2 cups icing sugar, 1 Tbsp melted butter, and 1-2 Tbsp almond milk. Just make sure it's on the thicker side so it doesn't run.
Store covered at room temperature for several days. Freeze for longer term storage. The batch should make between 25-35 cookies, depending on the size of your cookie cutter / or if you decide not to cut them and roll them into balls.
Notes
0 notes
Photo
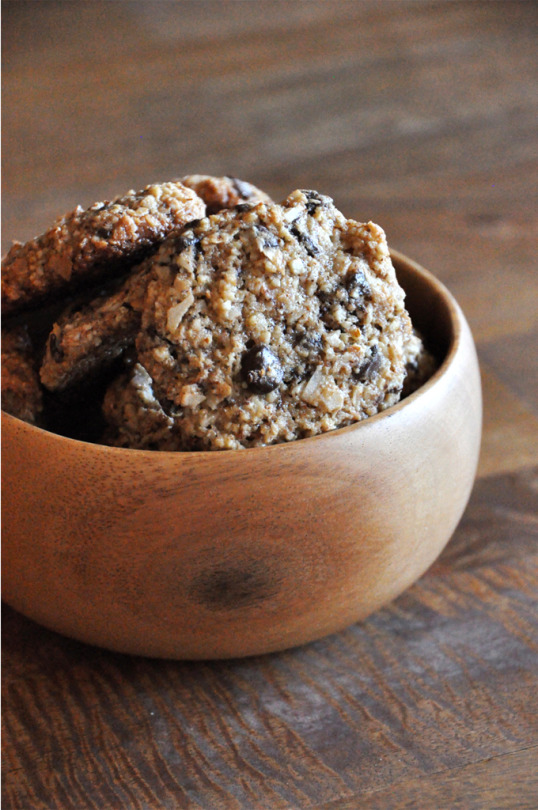
Ingredients
1 1/4 cups almond meal
1/4 cup chopped dark chocolate (Sara used cacao nibs)
1/2 cup shredded unsweetened coconut
1/2 tsp baking powder
1/4 teaspoon salt (Sara used sea salt)
1/3 cup brown sugar (Sara used muscovado)
1 egg
3 Tbsp coconut oil, melted
1/2 tsp vanilla extract
Instructions
In a large mixing bowl, stir together almond meal, dark chocolate chips, coconut, baking powder, salt and sugar.
In a separate bowl, beat egg until uniform in color and doubled in volume.
Whisk in the coconut oil and vanilla, then add to dry ingredients and mix until just combined.
Chill in the fridge for at least 30 minutes or even overnight.
Preheat oven to 375 degrees.
Shape dough into 1-inch balls, place on baking sheet with 1-1/2 inch space in between each. Press down slightly to flatten a bit.
Bake until edges begin to brown, 7-10 minutes.
Remove from oven and let cool before serving.
2 notes
·
View notes
Photo
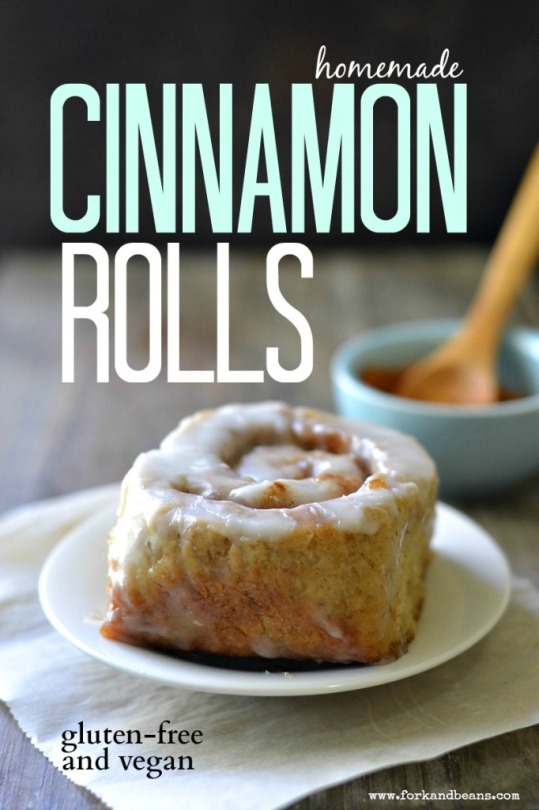
INGREDIENTS
Wet Ingredients:
¾ c. nondairy milk
½ c. water
2¼ tsp. dry active yeast
2 Tbsp. ground chia seeds (I used white, feel free to use black)
2 Tbsp. ground psyllium husk (or use more chia seeds OR flaxseed meal)
4 Tbsp. vegan butter, melted
1 Tbsp. apple cider vinegar (or lemon juice)
Dry ingredients:
3 c. Cara's All-Purpose Flour Blend (or other gluten free mix)
2 Tbsp. granulated sugar
1½ tsp. baking powder
½ tsp. baking soda
½ tsp. sea salt
Cinnamon Sugar Filling:
¾ c. brown sugar
¼ c. granulated sugar
2 tsp. cinnamon
pinch of sea salt
2 Tbsp. vegan butter, melted
Icing:
2 c. powdered sugar
1 Tbsp. coconut oil (or omit)
1 Tbsp. hot water
1 tsp. vanilla
INSTRUCTIONS
Warm up your nondairy milk and water together until lukewarm or at 100*F/38*C. Whisk in your yeast and allow to froth up for 10 minutes. Add the chia seeds, pysllium, butter and vinegar. Whisk together and set aside so it can thicken a little.
In a large bowl, whisk together the dry ingredients. Dump the wet ingredients into the middle of the flour mix and stir with a wooden spoon. Your dough will begin to look scrappy. That is A-Okay. When this begins to happen, ditch the wooden spoon and start kneading the dough in the bowl with your hands. That's right, you heard me correctly. Get those hands dirty! Play with the dough until it gets manageable and somewhat smooth. See the pictures below as to what the dough will look like.
Roll out on your counter under a piece of parchment paper. This dough shouldn't be too sticky where you have to use another piece of paper to roll out. Roll into a large rectangle--not too thin however, thicker than ¼"/3 mm though. Combine the sugar filling in a small bowl and dump on top of the dough.
Tightly roll the dough up (use the parchment paper to guide you if you need).Trim the edges and slice in half. Then slice those halves in half until you have eight pieces.
Grease a pan of choice and place the rolls inside, cut-side up. Cover with plastic wrap and allow to rise for 1 hour in a warm, non-drafty space in your kitchen. These should rise enough to be touching each other in the pan now. They will not, however, double in size.
Preheat your oven to 375 degrees. Bake for 18 minutes or until the edges have firmed up. Place the pan on a wire rack to briefly cool down.
Whisk together the icing--you want this thick so if it's runny, use more sugar (or if it's too thick to mix, add a teaspoon of hot water at a time). Pour over the cinnamon rolls.
NOTES
1. Tastes best when eaten warm and straight out of the oven.
2. Store in an airtight container and keep in the fridge for 3 days.
3. The dough can be made ahead of time. Simply place in fridge during the rise time and allow to sit overnight. Baking time might need to be longer.
5 notes
·
View notes
Photo

Vegan Pistachio Cheesecake
Ingredients
6 medjool dates, pitted, halved, and at room temperature
½ cup raw pecans
⅛ teaspoons salt
¾ cup raw cashews, soaked overnight
¾ cup raw or roasted and unsalted shelled pistachios, soaked overnight (I find that raw pistachios are especially hard to find, so roasted and unsalted work fine here too)
2 Tablespoons lemon juice
1 vanilla bean, split and scraped
⅓ cup liquid coconut oil
⅓ cup agave
chopped pistachios for garnish (optional)
Instructions
Rub coconut oil on a 6-inch springform pan and set aside.
In a food processor or mini-chopper combine the dates, pecans, and salt. Blend until uniform and the pecans look like a very coarse meal.
Press the pecan/date mixture into the springform pan using your fingers to achieve a relatively even thickness. Set aside.
Strain the cashews and pistachios of their soaking liquid and rinse them well. Place them in a blender with the lemon juice, vanilla bean seeds, coconut oil, and agave.
Pulse a few times to begin to break down the nuts. Blend on high until the mixture is very smooth. This took me about 2-3 minutes of blending and I had to stop and scrape the sides a few times.
Pour the filling mixture onto the crust and smooth the surface. Cover with foil and place in the freezer until solid, at least 4 hours.
When ready to serve remove from the freezer 30 minutes prior to serving and immediately remove the outer ring of the springform pan. Garnish with chopped pistachios if desired.
Any leftovers can be stored in the fridge.
3 notes
·
View notes
Photo
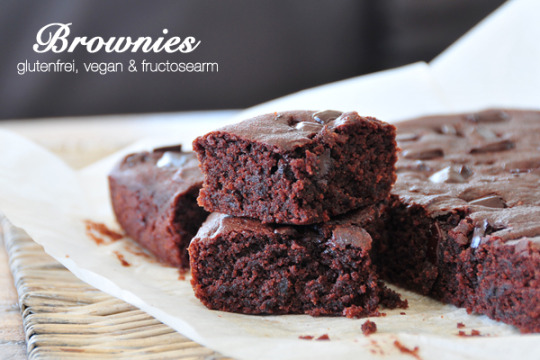
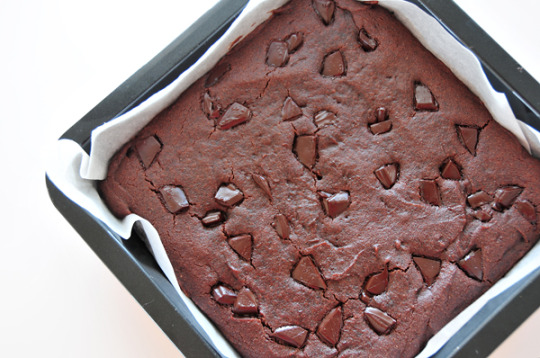
Trockene Zutaten:
1 Tasse Weißes Reismehl (250 ml)
1/4 Tasse Tapiokastärke (60 ml)
1/4 TL Xanthan Gum
2 EL Maisstärke
35 g Traubenzucker
25 g Kakaopulver, ungesüsst
2 TL Backpulver
1/4 TL Backsoda
1/2 TL Zimt
eine Prise Salz
Feuchte Zutaten:
125 ml Reissirup
125 ml Sonnenblumenöl
125 ml kochend heißes Wasser
2 EL flüssiges Vanille-Extrakt
Sonstiges:
30 g fructosearme Zartbitterschokolade in kleine Stücke gehackt (ca. 1/3 Tafel)
Zubereitung
Das Backrohr bei 170°C Ober- und Unterhitze vorheizenund eine 20 x 20 cm Backform mit Backpapier auslegen. In einer Rührschüssel sämtliche trockenen Zutaten gut miteinander vermengen. Die feuchten Zutaten nach und nach hinzufügen und alles zu einem cremigen Teig rühren. Diesen in die Backform füllen, glatt streichen und mit den Schokoladenstücken belegen.
Im vorgeheizten Backofen bei 170° Ober- und Unterhitze für 20-25 Minuten backen. Die Brownies sollten eine leichte Kruste erhalten und in der Mitte noch schön saftig sein. Nach dem Backen die Brownies etwas abkühlen lassen, in kleine Stücke schneiden und am besten noch lauwarm geniessen! In einer luftdicht verschlossenen Box aufbewahren.
Tipps
Am besten schmecken die Brownies mit Reismehl; man kann aber auch zB Kichererbsenmehlverwenden.
Anstelle von Tapiokastärke kann man auch Kartoffelstärke nehmen.
Die 2 EL Maisstärke haben die Funktion von einem Ei-Ersatz. Anstelle dessen kann man auch 2 EL Pfeilwurzelmehl oder 1/2 -1 Banane zerdrückt (je nach Größe) verwenden.
Anstelle vom Traubenzucker kann man auch Sukrin oder Puderzucker verwenden – bei Puderzucker sind die Brownies allerdings nicht mehr fructosearm!
Genauso kann der Reissirup durch Ahornsirup ersetzt werden; Ahornsirup ist jedoch auch nicht fructosearm!
3 notes
·
View notes
Photo


GREEN TEA PISTACHIO MUFFINS
INGREDIENTS
2 tbsp. ground flaxseeds
¾ cup unsweetened non-dairy milk of choice
1⅓ cups whole wheat pastry flour (could sub all purpose)
2 tsp. baking powder
1 tbsp. matcha powder
1 tsp. lemon zest
1 tsp. cinnamon
¼ tsp. nutmeg
⅛ tsp. salt
½ cup vegan margarine at room temperature
½ cup sugar
2 tsp. vanilla extract
½ cup chopped pistachios
INSTRUCTIONS
Whisk milk and flax seeds together in a small bowl and allow to sit for at least ten minutes. You can get your other ingredients together in the meantime.
Preheat oven to 425. Line 12 muffin cups with papers.
Combine flour, baking powder, matcha, lemon zest, cinnamon, nutmeg and salt in medium bowl. Set aside.
Cream margarine, sugar and vanilla with mixer in medium bowl. Add milk/flax mixture, a little bit at a time, to avoid taking a shower in it. Next add dry ingredient mixture, ⅓ at a time, mixing well between additions and scraping bowl as needed.
Spoon mixture into muffin cups and top with chopped pistachios. Place in oven and immediately lower temperature to 375. Bake 15 minutes.
8 notes
·
View notes
Photo


Dark Chocolate, Coconut & Macadamia Nut Tart
Ingredients For the crust
½ cup (40g) unsweetened shredded coconut
1 ½ cups (190g) almond flour
2 tablespoons (30g) coconut oil, melted
2 tablespoons (30g) maple syrup
¼ tsp salt
For the ganache
1 cup (240ml) canned coconut milk
12 oz. (340g) bittersweet chocolate, finely chopped
1 teaspoon vanilla extract
For the topping
½ cup (40g) unsweetened coconut flakes
½ cup (68g) roasted unsalted macadamia nuts, coarsely chopped
A pinch of sea salt
DirectionsFor the crust:
Preheat oven to 350 degrees. In a food processor, pulse together almond flour, salt and shredded coconut until finely ground. Melt together coconut oil and maple syrup and add to almond flour and coconut mixture. Pulse until coarse crumbs form (dough should clump together when squeezed with fingers).
Transfer dough to a greased 9-inch tart pan with a removable bottom. Using a measuring cup or your fingers, evenly press dough in bottom and up sides of pan.
Bake in center of oven until golden and firm, about 12-16 minutes. Transfer to a wire rack to cool completely, at least 1 hour.
For the ganache:
Place finely chopped chocolate in a large bowl. In a small saucepan, just bring coconut milk to a boil. Pour hot coconut milk over chocolate and let stand 1 minute, then stir until smooth and creamy. Stir in vanilla extract.
For the topping:
Spread the chopped macadamia nuts and shredded coconut evenly over a sheet pan and bake until lightly golden (about 3-5 minutes). Set aside and let cool.
To assemble the tart:
Pour warm chocolate mixture into cooled tart shell. Lightly sprinkle toasted macadamia nuts and toasted coconut across the top. Sprinkle with a pinch of flaky sea salt if desired. Chill for at least one hour or until set and serve.
8 notes
·
View notes