pikaboo-pikachu
I Am Pikachu.
I am also anime trash. Forgive.
810 posts
Don't wanna be here? Send us removal request.
Last Seen Blogs

mtndw-whteout
picking up sticks and throwing stones


mynewhome6i-blog
Untitled

trying414
Chaotic and Emotional

Text
Hey guys! From the moment I played Overwatch, I chose Ana, and fell in love with her character and story, and more importantly, her Captain Amari skin! I’ve been tossing up for a long time whether or not I will cosplay her and after months of deliberation, I finally decided to jump on the Overwatch bandwagon for PAX this year. The first thing that was done and dusted was the beautiful sniper rifle. It was my first time making a firearm prop so it’s probably not as impressive as I think it is, but I’m proud of my efforts, and I can’t wait to try everything I’ve learned thus far on another prop.
This will be a quick tutorial, so I’ll be keeping it relatively brief.

Captain Amari Gun
First things first, I found my reference, then drew it up on Adobe Illustrator. If you’ve got the game, you can easily use the viewers screen to check it out from all angles. I also found a really cool Sniper Tutorial by Regrettable Props and used it as my guidance. Because he made the original gun, I thought I might make up another reference on Illustrator: Ana gun
Regrettable Props also provides a link to his files, which I also used and adapted, mostly following his instructions. I cut out my foam and glued them all together, and when I was done, I Dremeled it.
This is where I think he went wrong, and I would definitely change it the next time I do this and that’s that I wished I had sanded it down before sticking it all together, especially since I used contact adhesive to get a strong bond. Contact adhesive needs a nice flat surface to bond properly though, and that can’t be achieved cleanly with rough and uneven blocks of foam piled together.
Check out Kamui Cosplay’s D.Va gun tutorial for a better understanding of this.
I also used Worbla instead of foam for the barrel and Lumiflex for the canister.
Afterwards, I primed with gesso, wood glue and enamel, waited a loooooong time, then painted with black, white, silver, and blue, and for the dark yellowish colour, I mixed yellow with a little brown and orange, and to coat it, I used my satin spray twice to protect my paint job.
This was the culmination of 25 hours work, and I’m pretty proud of myself. It’s not great, but I know I worked hard and gained valuable experience in the process.
Stay frosty!
Quick tutorial of my Ana gun :) Hey guys! From the moment I played Overwatch, I chose Ana, and fell in love with her character and story, and more importantly, her Captain Amari skin!
2 notes
·
View notes
Photo
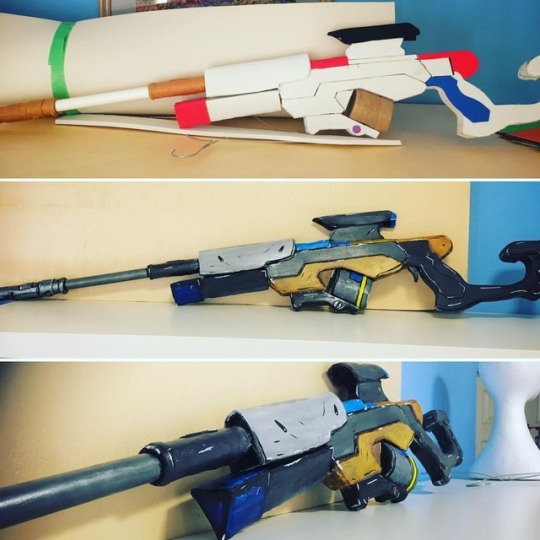
Mini progress pics of #Ana gun. All finished, and it was so worth all the experience I've gained and lessons I've learned 💙🐢 some mistakes were made but next time I'll have @kamuicosplay 's books to guide me!! #captainamari #overwatch #anaamari #cosplay #cosplaywip #cosplayprop #cosplayfun #overwatchcosplay #overwatchana #blizzard #blizzardgames #blizzardoverwatch #blizzardcosplay
#cosplayfun#overwatchana#captainamari#anaamari#blizzardcosplay#overwatchcosplay#cosplayprop#blizzardoverwatch#cosplaywip#blizzard#cosplay#blizzardgames#overwatch#ana
0 notes
Text
So what’s a great tool to use when you’re crafting? That’s right, you guessed it, a rotary tool, in particular, a Dremel.
When I started crafting, buying a tool like this just seemed unreal, like a massive investment, like things were going to get really real, really fast. Honestly, that’s kind of what it is? There’s not much sense in buying a Dremel if you’re not planning on sticking with armour or prop making, or anything of the sort.
Buying my Dremel was the best thing I’ve ever done for my cosplays, I love it so much and it really is just so amazing. So what is it?
It’s essentially just a a high-speed, rotating sander, designed to make those fine, clean, smooth edges, sides, and points, but that’s just what it’s meant to do. This tool can also be used for anything you put your mind to, and is only limited by your creativity. It can be used to cut clean circles in foam, make battle damage on your armour and props, create indents for artistic design, make “screws”, cover seamlines, make your pieces look textured, organic, etc, and so much more that I can’t even begin to imagine.
Do you need it?
I’d definitely say yes, if you’re going to get serious in the slightest. You can use it on practically anything – foams, thermoplastics, woods, even hot glue (though you should be careful about that last one). Even though it can be very intimidating at first if you’ve never worked with a power tool, it’s actually relatively harmless, which brings me to safety.
It is a power tool, and does have some risks attached to it, and the biggest things are respiratory and optical. Always wear eye protection, (even if you already wear glasses, this can be a pain, trust me, I’m in the same boat) and always wear a mask or respiratory mask so you don’t inhale any dust. Reason being, and you’ll quickly find out for yourself, is that your Dremel sands down its “sandee” be it foam or thermoplastic, and spits back a very fine dust. You do not want this in your eyes, or in your lungs.
‘But Tama, won’t this spinny thing spin on my fingers creating a massive pool of endless, non stop crimson fluids that drains my life force away leaving me sickly pale?’ I hear you ask.
No. I only have a two speed Dremel, so slow or fast, and I always use fast. Naturally, friction can burn or tear at your skin a little, but it’s almost always tiny, barely noticeable, and harmless. You will not bleed! The biggest piece of advice I can offer is always pay attention when you’re sanding, and you’ll more than likely walk away fine.
Speaking of two speeds, you’re next question might be, what Dremel should I get? Or do you even get the brand, Dremel?
Well, obviously I bought a Dremel, as opposed to another brand, so I can’t say much for other brands. However, I did do some readings and I found that most people aren’t too bothered by which brand, because in the end, it all still works the same, so if you can find a good deal on another brand, go for it. I bought a Dremel personally because I knew that the local hardware store I go to has heaps of different accessories to accompany my Dremel so that may be a deciding factor. I’d also heard lots of things about Dremels, and not much about anything else so I had no issue.
Next thing was speed. You can get a simplistic one like me, two speed: low and high, or maybe five speed, so forth. For cosplay, I’d probably just stick with two speed, you don’t need much more than that when you’re just working with foam.
There are so many more factors to consider, like it’s watts usage, accesories that come with it, wireless or not, and so on.
Generally, in Australia, the power usage doesn’t matter because whatever you use, you’re not going to short your household electricity. In America, I think it’s different, (and I’m not sure for other countries) so I wouldn’t recommend buying your Dremel online from overseas, and instead but it from your local hardware store or an online hardware store in your country.
Accessories. Do you need them? Maybe not, it’s up to you. If you decide you don’t need 50 accessories, then get equipped with less and learn how you can manipulate what you’ve got to provide a new appearance. Creativity, ftw!! I didn’t get a heap, only 30, so that made my first time working with them a lot less intimidating.
So, long story short, if you buy a Dremel, I guarantee you’ll love it, and I highly recommend it!
And that’s a wrap! Let me know if there are any questions I can answer for you, or if there’s any confusion and I’ll be happy to help you out! And remember, just keep swimming.
Handy Tools [Rotary Tool] So what's a great tool to use when you're crafting? That's right, you guessed it, a rotary tool, in particular, a Dremel.
0 notes
Text
Hey everyone! First, I’d like to quickly thank those that decided to give this tutorial a shot. I really hope that this provided some insight at the very least to your own approach to crafting the Hylian Shield. When I started this tutorial, of sorts, my aim was to give people the opportunity to learn alongside me, or even just from my mistakes, so I hope there will be some people who find my experiences as rewarding as I do.
Moving on, this part will cover the last half of the prop making journey – painting. But before we jump into that, we’ll cover priming.
Step 9
Priming is probably the most important part of the painting process, and the reason being is that it creates a strong surface for your paints to cling to.
If you paint straight on to your foam, your foam will soak up the paint and just look quite icky overall, transparent paint. I recommend you trying on a scrap piece of foam so you can get to understand it first hand. There are some other reasons, but that’s probably the biggest.
The tricky part is finding which primer to use, and for that, I’m linking you to Kamui Cosplay’s video on primers you can use for your EVA foam:
How to Prime your EVA Foam Armor
At the end of the video, she will mention that she prefers to use PlastiDip. Unfortunately, in Australia, that can be really hard to find, and the Amazon seller she provides doesn’t ship to Australia. I didn’t use PlastiDip for this reason, otherwise, it was my first go-to. The other great thing about it, however, is that you can get it in many colours and in liquid/paint form, not just spray form.
A very common primer she didn’t mention is what I used, and that’s Gesso.
Gesso is a popular choice, literally known as a primer for “porous surfaces” such as EVA foam. It’s very accessible and can be found in many different places. I found this one in a local discount store.
Depending on what primer you choose, how you apply it may differ accordingly, but since I used Gesso, I’ll talk about applications with Gesso in particular.
Obviously, you’ll need your primer, and in this case, a brush, as well as some newspapers to spread around you. If you get any of this stuff on you, it will wash off, but you must be fast. You might like to wear a smock if this is the case.
I forgot to take photos (soz, pals) but it’s pretty straightforward anyway. Simply apply the primer over your piece and let it dry. It might take a while if your house is particularly freezing but if that’s the case, I beg you, be insanely careful if you put it near a heater or use a hairdryer – some foams expands, and others might melt if you use too much heat (I used my Dremel on some foam the other day, the friction heat it up so much and for so long it became very stretchy and soft, it almost melted).
If you have a place where you can hang up your shield, you can probably get away with doing all the sides in one go, otherwise, some of you will definitely be slow and steady.
After you’ve finished priming, prime again. I did three thin coats, and depending on what primer you use, it may differ. I recommend, for Gesso, a minimum of two coats, but three or four should be fine. This makes sure that all surfaces are cleanly covered.
Beware though, don’t let your primer pool! This can be avoided by doing thin coats, and simply paying attention.
One more thing, your brush quality DOES matter, but you can definitely get away with lower quality brushes. My brushes were poor quality, and I had to keep picking brush hairs off my freshly primed piece. Try pulling out all the loose strands in that situation before you paint. Don’t forget to take care of your brushes, and clean them after every application with warm water!
Step 10
Painting time!
This part can be really daunting, if nothing else was, especially after you’ve just spent countless hours crafting and cutting and sanding and gluing and priming…you don’t want to screw it up…But have no fear, it’s actually not that bad, and painting mistakes are pretty fixable overall.
But first, you need some materials.
Acrylic paints
Variety of brushes
Mixing pallet/tubs
Newspapers
Smocks
Painter’s Tape (optional)
Pen
I would like to note that you can also use spray paints instead of acrylic paints, it’s really more of a personal choice, much like priming, not to mention, if you have an airbrush handy, that’s perfectly usable, too.
How much time and effort you put into the painting process will show at the end of the day, and that’s what makes the difference between an experienced painter and a non-experienced painter. I, myself, am not terribly experienced, painting has never been my forte, but I was still pretty proud of the end result.
There are still many questions about what you buy. Go to a craft store and pick up some decent acrylic paints. High end is unnecessary, but sometimes, buying the cheap, kids’ stuff just isn’t good enough. I used Global Colours’ Fine Artist range, and Driven Matisse Structure set. For my black and white (which is necessary) Liquitiex Basics.
As for brushes, you really only need a thin domed brush for hard to reach places, and perhaps a large(ish) flat brush. Good brushes can be worth the investment, unless you decide to do a dabbing technique (hardy ha), any old brush will do.
I also picked up some little tubs, which helped to maintain the mixes I made for long periods of time. A paint pallet or even just an old takeaway container will do.
Let’s talk in mini-steps.
One
I started with the red bird thing first. I brought out my handy-dandy template and traced around it with a black pen. I used my thin domed brush to paint the edges and tight corners, then used a larger brush to get solid colours. I used a solid red here first, so it looked quite flat.
I then went around with a red/black combo, in the edges and red/white combo in the middle. I found a light dab worked best, but it’s up to you.
Two
Next was the Triforce, which was easy enough. I didn’t want to use a basic yellow though and worked with a gold as well.
With both my gold and silver, I can’t say I was happy with them, they were both incredibly thin, and looked more like shimmers than actual paint. What I did to remedy this was mix it with yellow (gold) or grey (silver). For when I wanted depth, I used combinations of the gold and the white or black accordingly. I can’t say the Triforce was my favourite but it still turned out fairly well.
Three
The snakey bits were next, and I approached them much the same as I did the Triforce. Don’t worry too much about going “over the lines”, just use your thin brush for tight corners and edges, and you can paint over any mishaps later. Remember to add shadows and highlights were necessary, it adds a much more realistic look and it shows in photos.
Four
I did the border the same way, with shadows on the inside, in the carved triangles and under the bolts, with highlights at the top, scattered along the edges, and the top of the bolts and triangles.
Five
The blue background was both the easiest and most time-consuming. I recommend doing a base coat all around, then adding black to make your shadows along the inside of any three-dimensional part. I added white around the bird, at the very top and in and out and all around the three-dimensional parts, which I thought made everything pop just that little more.
Six
I did the sides and the back the same as I did four, which was easy enough. There’s no real need to spend all your time on the back, as it’s not going to be seen.
Step 11
On to sealing! I actually had a lot of trouble finding the right thing to seal with, but what I can say is pick what is most applicable to what your piece is.
There are three basic types of sealants, or varnishes: matte, satin, and gloss.
Matte is your flat sealant, which works well for something organic like wood, or just something that’s really not reflective at all.
Gloss is kind of like lip-gloss, its very shiny but it can be a bit over-the-top for metal, because its reflective surface is more plastic-looking than sheeny metal.
Satin, strangely enough, is actually more like an in between of matte and gloss. It fits well with something like a shield…
But why do you need it? Because it’s actually fab.
It protects your paint from coming off during the convention, and just generally protects it from wear and tear. Battle damage is great on props, but chipping paint can look a little disappointing.
I used a spray satin sealant. I sprayed, waited for two hours, then sprayed again for an extra boost, but you should follow the instructions on the packaging. If you use a spray, remember to spray in a well-ventilated space!
Step 12
Adding the belt straps ! Honestly, I did this part before the painting, and I kinda regretted it, which is why I wrote this step last, but it is up to you.
All I did was cut up a belt and stick it down with contact adhesive. You might like to reinforce it with hot glue around the edges as well, but overall, it’s a pretty simple process. It’s not like our reference picture, but it’s not something I was fussed about looking perfect, so all I was concerned with was making it adjustable.
The adjustable strap sat on the centre line, on the wood, where it sits around the middle of the forearm. The second strap was placed wherever the hand would fit in accordance to the adjustable strap.
Of course, feel free to try this another way, but this is simply how I chose to do it.
Final Message
Thank you to everyone who stuck around and read this, it means a lot! I hope you all learned something from this, whether it’s “that’s a good idea, I’ll try that!” or “that girl’s an idiot, I’ll never do that!”. My learning experiences are here for you to use. Hopefully, I’ll be adding more and more tutorials, but for now, kyaa raah yaa!
***
Part 1
Part 2
Part 3
Part 4
Hylian Shield [Part 5: Final] Hey everyone! First, I'd like to quickly thank those that decided to give this tutorial a shot.
0 notes
Text
It’s been ages since I updated you on the shield progress, and I’m so sorry, but I had so much time after finishing uni for the semester than I dove straight into this cosplay and didn’t look back!
Last time, on Hylian Shield, I left you off with a nice looking front so I wanted to have a look at the side most people won’t see, as well as the extra details on the front that I may or may not have forgotten about.
This Part is a little shorter, but it was still an important part of my project.
Step 7
So for this step, you’ll need:
Craft foam
Adhesive
A thin panel of wood (say Balsa, or thin oak)
Marker
Hack saw/sharp bladed saw
Sandpaper
Protective gear (glasses, gloves)
The way I approached this step is a little weird and mostly unnecessary, but I found it worked for me and I thought the end result was quite nice.
In order to give a sturdier back for my future belt straps, I grabbed some thin pieces of wood, marked along the wood where I wanted the wood to fit to the Shield and sawed along the lines. I then used sandpaper to smoothen out the edges, and glued it along the length of the shield with contact adhesive.
(I actually had two strips of wood that I had to glue together first. If you ended up doing this, you might like to go in with sandpaper along the seam.)
Next, I cut out some large strips of craft foam, fitted them to the outside of the shield as well as the centre strip, and glued them all down.
This is a nice and easy step, but it took some patience!
I didn’t use my Dremel because it was definitely a small and easy job, and would’ve just been more of a hassle.
Step 8
This is the final details to actually crafting the shield, before it’s ready to prime. Get excited!
The shield is held together with rounded bolts on the two top corners and the bottom, and there are triangular holes and the very top and the bottom two corners.
You will need:
EVA foam
Dremel
X-Acto knife
Adhesive
Marker
I started marking out where I wanted to carve out the triangular holes first, and used my blade carve them out. They were a tad tricky but I got the job done. If it looks a little messy, you might like to go in with your Dremel. Otherwise, paint jobs can cover it just fine.
Next, I cut out a small circular template and drew six circles onto my foam, cut them out and used my Dremel to sand them into rounded bolts. You might like to draw a dot where the centre is to make sure its nice and even.
I stuck the best three down on the front side with Contact Adhesive, and the worst three on the back. People aren’t going to pay too much attention to the back so you could even get away with the three front bolts.
If you do all six, try to situate them in relation to each other, and use a marker where they’d look the best.
There you have it, you’ve finally finished crafting your shield! How long did that take? It took me about nine hours of solid work. Don’t worry, that’s the easy part! There will be another nine hours priming, painting, sealing, strapping, not including waiting, so work up the patience to get over this next hurdle. And tune in for the final part within the next week!
Happy uni break holidays to you, folks!
Hylian Shield [Part 4: Backside] It's been ages since I updated you on the shield progress, and I'm so sorry, but I had so much time after finishing uni for the semester than I dove straight into this cosplay and didn't look back!
0 notes
Text
Handy tools [Utility knife]
Handy tools [Utility knife]
Or X-acto knife, or cutting blade, or whatever. Either case, It’s definitely a blessing to have a sharp knife such as this when you’re working with foam and the like. I took a while deciding which of my many tools to write on, and I decided I’d work on this blade, simply because I think it’s very common to walk into foam-smithing thinking you’ll save a tonne of money by cutting back on your…
View On WordPress
0 notes
Text
Handy tools
There are so many different cosplay tools, so here, I hope to give you a run down on some different tools that can be helpful to your overall cosplay progress. The only thing I can guarantee is that this list is inexhaustible, there will always be too many to talk about, and you’re only limited by your own imagination. I’ll try to add a few every month when I’ve got time but please do forgive me,…
View On WordPress
0 notes
Text
How are we doing today, everyone? Last time, we left off at gluing the frame of our shield down, and this time ’round, we’ll be working with our rotary tool.
To start with, I want to talk about rotary tools, and a little bit of safety.
So I recently bought a corded, two-speed Dremel 200 for this project. There were later and fancier models but I’m not planning on doing hardcore sanding with 50 accessories so this will do for me. You won’t need the top of the range, but it’s definitely a handy tool. Any armour-crafting tutorial will talk or mention a Dremel, and it’s just about a staple in the craftsperson’s collection, much like and hot glue gun or a cutting blade. Mine cost $70 at Bunnings but you can probably find something cheaper elsewhere or online.
As for safety, if you do not own a protective mask or safety glasses, I highly recommend you buy them! You will definitely make a mess with the foam dust going EVERYWHERE, and you don’t want foam dust going in your eyes or in your lungs. Safety first!
You might like to work outside when using your Dremel (or other rotary tool) so you don’t make a mess on your lovely white carpet or keep a (hand) vacuum nearby.
I would also highly recommend trialling your Dremel on scrap pieces of foam and see which one works best for for sanding. You might light to experiment with the speed and see what feels comfortable. For you first project, I do advise you keep it on a low setting so that you can become more equipped to it, most especially if you don’t often work with power tools.
The sanding tip I used was the high grit large tip as pictured above.
Always keep aware when working with power tools of any sort. As I implied before, safety is your number one priority, and although you’re not going to lose a limb working with the Dremel, it can still hurt you, and you are more important than your project.
Step 5
After putting on my safety equipment, I begun working on my shield with my Dremel, the only tool you’ll need! If you’d like, however, you might like to grab a pair of scissors to neaten any edges or corners up.
I neatened up the edges along the outside of the shield to make sure it was all nicely aligned and there were no awkward bits hanging off the sides, before sanding along the inside of the frame. The reason being that I didn’t like the squared look it had and thought the rounded look to be a lot more pleasant. I also cleaned up any excess glue.
Careful, don’t sand the wrong part of your shield! If you do, no biggie, when you paint it later, you can fix it right up.
With the triforce, it as a bit tricky, since I found all my Dremel wanted to do was roll right off the edge and sand the wrong part – this is where practice, and a steady hand, pays off. I didn’t sand too much off of the edges with these.
As for the snakey bits, they were a lot more difficult. I sanded any excess craft foam before sanding the sides to create a pointed look. I was really happy with how they turned out, and found it nicer to take off more than I originally would’ve thought. It’s all subjective, and you can still use paint to give it a better, more accentuated effect.
Be prepared though! This part is incredibly time consuming. It took me around two hours to sand everything mentioned (though I had my slow setting on), so have patience, listen to some music and let yourself get immersed in your craft. Enjoy it while you can!
If you’re stopping for the day, make sure to clean up your workspace afterwards! There’s nothing worse than sitting at your bench the next day only to see there’s dust on everything. Allow yourself the time to clean before lunch, dinner, work, bedtime, school, outings, etc. and you will appreciate it the next time you sit down to get to work.
Step 6
Thus, begins the gluing all over again!
This time, instead of working with hot glue, I went out and bought some contact adhesive, because I wanted every little edge to be stuck right down without glue pouring out all over the place but it’s entirely up to you. So the things you will need:
Adhesive (hot glue, or contact adhesive/cement)
Sharpie/marker
Brushes (for contact adhesive)
Ruler
You might also like your reference picture of your pattern to make sure you’re sticking everything in the right spot.
This part is a lot more straightforward than the border was, I found. I started with the Triforce first, and used my ruler to sit it down on a straight line. Although it’s quite straightforward, it is a little tricky, you want to make sure you align everything or it’s all wonky, especially if you spent a lot of time making sure the base and the border were symmetrical.
After ruling it, I lined it in sharpie (my bronze sharpie ran out :c ) before slapping on some contact adhesive. When using contact adhesive, you’ll want to be especially careful – once it’s stuck, it’s not coming off without destroying all your hard work! There’s about one second of fix up time, whereas hot glue has a few seconds before it settles.
After the Triforce, I repeated those simple steps with the snakey bits and voila! Around here is when I started to love what I’d created because you can really see the shield forming.
Unfortunately, this is not prime time! There are a few more details to do before you jump onto priming your piece, which will be covered in the next post.
Stay frosty!
Hylian Shield [Part 3: Spinny things] How are we doing today, everyone? Last time, we left off at gluing the frame of our shield down, and this time 'round, we'll be working with our rotary tool.
0 notes
Note
Since Halloween is soon, how about Hinata dressed as a bunny and Naruto as a fox?

413 notes
·
View notes


Photo

“Make me”
I think we’ve all read enough fanfiction to know where this is going ( ͡° ͜ʖ ͡°)
6K notes
·
View notes
Text
I think I’ve been trying too hard and it’s getting me nowhere.
43 notes
·
View notes
Photo

Day 21 - Dreams
If only Dream Eater let you eat your own dreams…
298 notes
·
View notes
Text
If I mispronounce your name because it is foreign to my tongue, correct me.
I don’t purposefully allow the accents of your name to fall flat on my tongue like the European English demands or the language to sound chopped and misheard.
If I don’t say your name correctly, don’t shrug and say it’s ok because people have been doing it all your life. Your mother worked hard to name you that name, with all its syllables and apostrophes and hyphens and inflection.
I don’t want to disrespect your heritage, your culture, your great grandmother or grandfather and their struggle.
If I mispronounce your name, forgive me, but don’t let it happen again. Make sure everyone knows your name.
382K notes
·
View notes