dragoonresources
𝕱𝖆𝖓𝖌 & 𝕮𝖑𝖆𝖜!
𝐁𝐥𝐚𝐜𝐤 𝐰𝐢𝐧𝐠𝐬 𝐰𝐢𝐥𝐥 𝐫𝐚𝐢𝐧 𝐝𝐨𝐰𝐧,
Resource blog by Ava, oriented towards graphics and coding, and dedicated to having tags for too many things.
𝐅𝐮𝐥𝐟𝐢𝐥𝐥𝐢𝐧𝐠 𝐭𝐡𝐞 𝐬𝐤𝐲𝐛𝐨𝐫𝐧 𝐩𝐫𝐨𝐩𝐡𝐞𝐜𝐲!
3911 posts
Don't wanna be here? Send us removal request.
Last Seen Blogs

jienyo
memento mori

kk4004
無標題
girlsedit
(rest)

austin-cartermahone
Austin Mahone

hd-hale
Steter, Sterek, et al.
Text
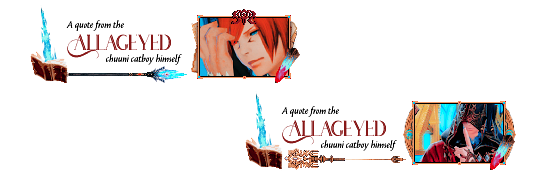
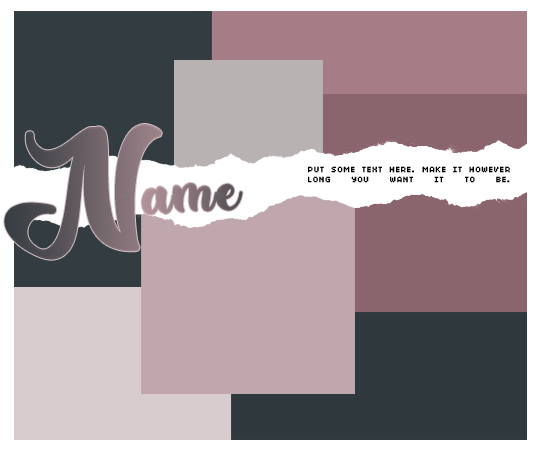
MY ROYAL EYE STIRS! – an rp icon template by dragoonresources
➻ 58 x 88px icon, full size is 80 x 290
➻ themed after my chuuni catboy son, g'raha tia of final fantasy xiv
➻ includes various "backings" for the icon: papers, crystal, and tomestone -- the latter is not pictured
➻ includes both his Endwalker and Crystal Exarch staff
➻ text is editable, fonts used are houston display and solveig text
➻ feel free to adjust as needed, just don't redistribute an edited version
➻ do not redistribute and/or use for commercial use
➻ do not use on fanart without artist’s permission
➻ do not use for krp/rping real life people
➻ credit not necessary, but please like or reblog
➻ check rules for full info
DOWNLOAD HERE.
#ffxiv rp#g'raha tia#mooglepalooza#rp resources#icon template#ffxiv spoilers#shadowbringers spoilers#spoilers#icon borders#rp icon border#✦ ━━━━ 𝖒𝖎𝖓𝖊 [ icon resources ]#✦ ━━━━ 𝖒𝖎𝖓𝖊 [ all resources ]#✦ ━━━━ 𝖒𝖎𝖓𝖊 [ templates ]#it has been years. heya. i have a chuuni raha agenda
7 notes
·
View notes
Text

ANALOG, texture pack
RULES: If you download/use, add to favorites and comment; Don't claim, repost, use to create other resources or share on other platforms and packages; Credits are required if you use this textures; For commercial use and to support our work, you have the option to purchase; Please contact us if you have problems downloading/using the material or prefer another purchasing platform (download)
218 notes
·
View notes
Photo

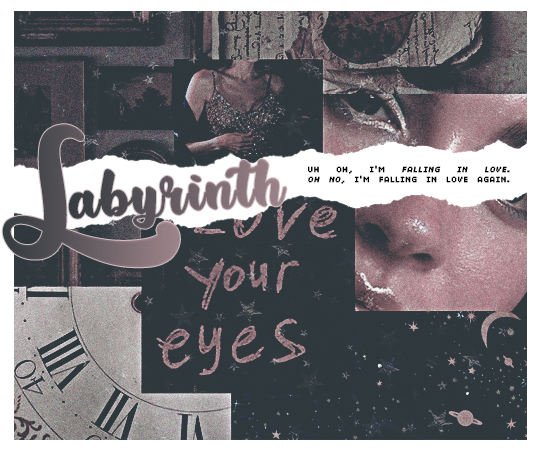
#09 “ labyrinth ” by jessource.
if using please like / reblog and don’t forget to credit.
notes: ripped paper promo template with seven images and text.
fonts used: gadimon and 04b03.
please don’t redistribute, steal or claim as your own.
any issues, don’t hesitate to contact me!
[ DOWNLOAD FROM DEVIANTART ]
250 notes
·
View notes
Text
#ETERNITY. a free psd based on genshin impact’s raiden shogun that focuses on the gold &. purple hues of eternity. like/reblog if using, credit is absolutely necessary. download here.
50 notes
·
View notes
Text

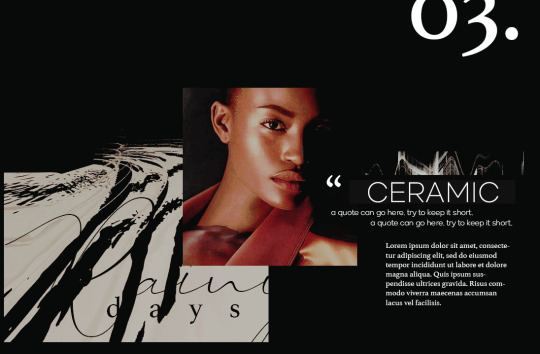
•✦ [ 10. 𝐂𝐄𝐑𝐀𝐌𝐈𝐂 ] ✦•
a header & character graphic template.
─── 𝒅𝒆𝒔𝒄𝒓𝒊𝒑𝒕𝒊𝒐𝒏.
a modern duo template inspired by magazine & collages. this set offers a light and dark version. try to keep the text aligned for the best results. basic knowledge of clipping mask is required! as always, if you have any questions feel free to shoot a message my way!
─── 𝒆𝒙𝒕𝒓𝒂 𝒅𝒆𝒕𝒂𝒊𝒍𝒔.
fonts: stixgeneral, kinetika, athelas, england
PSD coloring is NOT INCLUDED. [ click here for PSD ]
images do not belong to me and are credited to their rightful owners.
do not copy, do not steal, or monetize. [ read my rules ]
tip me at my coffee jar ♥
please credit me if you use the content.
please [ like/reblog ] this if you intend to use.
•✦── 𝐚𝐜𝐜𝐞𝐬𝐬 𝐠𝐫𝐚𝐧𝐭𝐞𝐝 𝐢𝐧 [ 𝐝𝐢𝐬𝐜𝐨𝐫𝐝 ] 𝐬𝐨𝐮𝐫𝐜𝐞 𝐥𝐢𝐧𝐤. ──✦•
133 notes
·
View notes
Text
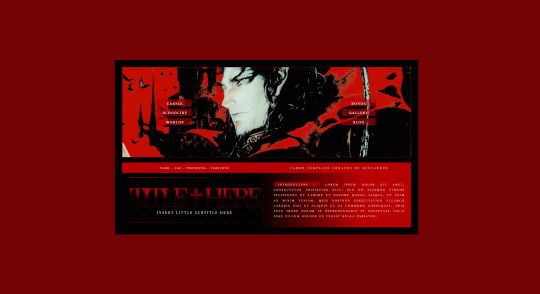
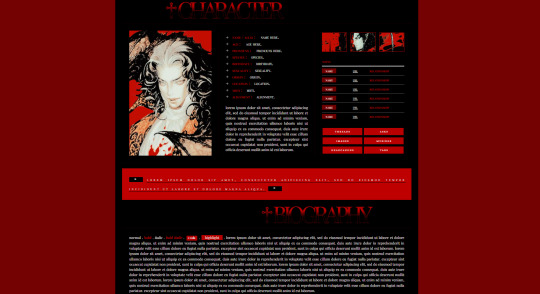

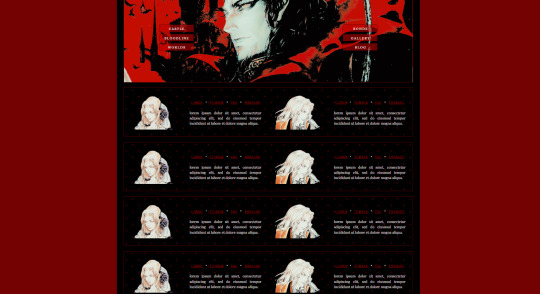
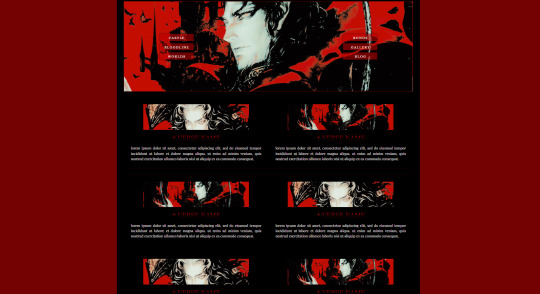
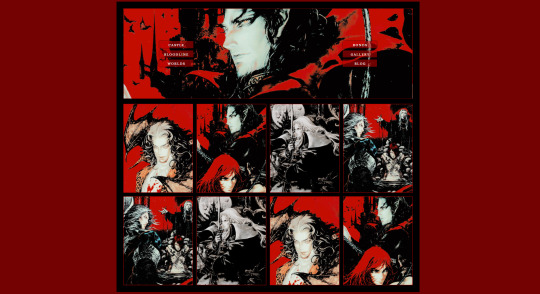
☀ CARRD TEMPLATE : 15. dracula. ( free! )
☀ [ PREVIEW ] [ PURCHASE ] pro - lite & higher.
☀ REFERRAL CODE : SUNNY | ☀ KO-FI
a castlevania inspired roleplay carrd requested by a lovely anon!
— inspiration from gorgeous art by ayami kojima!
— mobile friendly!
— a landing page with title, subtitle, fixed header with navi, and intro.
— an about chara page with core details, biography, and statistics.
— a verse, mains, and gallery page.
PLEASE DO NOT REMOVE THE CREDIT / DO NOT CLAIM AS YOUR OWN, you are free to alter the colors and adjust it as much as needed but the credit must remain at all times. ** if using, i'd also appreciate a like and / or reblog to show me that you're interested in my templates! thank you!
215 notes
·
View notes
Text
♡ PSD - LIFELINE :
→ please credit if using.
→ don’t repost or claim as your own.
→ you can adjust the layers if you need to.
59 notes
·
View notes
Text
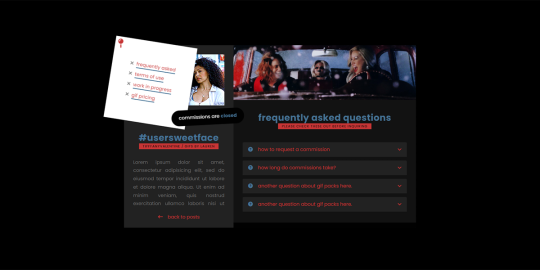
EARLY ACCESS FOR PATREON MEMBERS - AVAILABLE FREE ON MARCH 5th, 2023 !!
VALENTINE !!
page thirty eight by sugar !!
this theme is currently available to my patreon & ko-fi members, but will be available free to the public on march 5th, 2023 !!
this is a page theme created with gif commission blogs in mind; this all in one page features an faq section, a terms of use section, a works in progress showcase & a gif pricing section; this page could also easily be edited to work as an all-in-one for a multi-muse indie, rph or even a roleplay group page.
version one - the 'post' section is 400px wide; version two - the 'post' section is 500px wide; this page will require javascript.
for help with troubleshooting, please contact me directly on my main blog.
special thanks to:
@eggdesign / for their nightmode tutorial !!
@tifffanyvalentine / for letting me use their blog as inspiration for the page !!
view the live preview ( v2 )
early access for patreon members !!
early access for ko-fi members !!
get it free - ( available march 5th, 2023 ) !!
join my discord ( members get a discount !! )
79 notes
·
View notes
Text


* ∵ FEEL THE RUSH ! / A FREE RP BORDER
* icon size : 40 x 40 ; font : arial black
* credit is required , but you are free to edit however you wish
* do not resell , reclaim , etc .
* psd used is EVERYONE IS DUMB , it is not included in the file , but by clicking on the link you will be taken to the psd’s page
* download here , free but please consider buying me a kofi
48 notes
·
View notes
Text


ICON BORDER 03 / ♡ / DEATH DOES NOT SCARE ME. in the source link, you will be redirected to a payhip page containing a free icon border. this border was created with independent roleplayers in mind, but is free for all uses. please do not resell, steal, or alter without proper credit. please credit sourcelove if using. the coloring used in the preview was created by supersources on tumblr, and is not included.
70 notes
·
View notes
Text
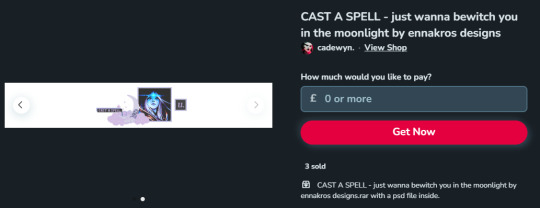
CAST A SPELL - just wanna bewitch you in the moonlight
$0.00 / FREE !!
↳ available now !!
all details and download available on ko-fi.
if you download, please remember to credit me.
3 notes
·
View notes
Text
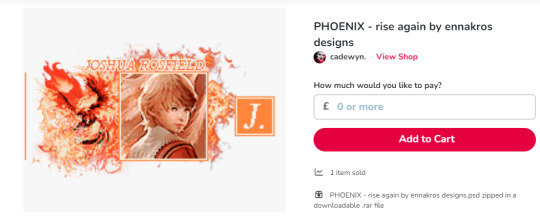
PHOENIX - rise again by ennakros designs : FREE !!
↳ available now !!
all details and download available on ko-fi.
an icon border based on the phoenix summon from final fantasy, inspired by ffxvi.
if you download, please remember to credit me.
please consider reblogging this post too !!
8 notes
·
View notes
Note
Hey there! Do you have any advice for making your gifs look (for the lack of a better word) even/matching? Whenever I gif different scenes for one gifset, I use the same process on each but the scenes are often so wildly different in hue/lighting/etc that the gifs end up looking like they were made by different people. And when I tamper with the finished results and try to assimilate them, I only seem to make it worse. It seems so awfully tedious to adjust them each by nuances just to match.
Hello! Sadly, the only way (that I know of) in making different gif scenes have consistent coloring is to do the awfully tedious thing.
To start, here are two uncolored 'gifs’ below. They’re both from Little Women (2019) but one has cool tones and the other is warm.

First, color grade one gif then apply the same adjustment layers to the other gifs. In this example, I colored the left gif first and it looks okay to me, but the right got much too warm.
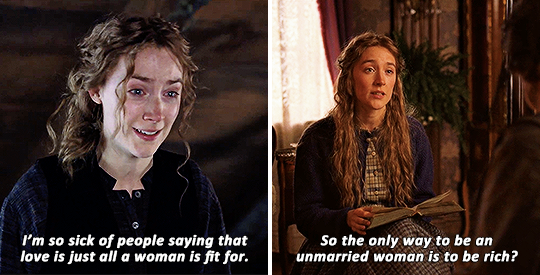
Color correct the other gifs. The skin tones and the scene lightings don’t match (especially since they did that on purpose for timeline purposes if I remember correctly) so I’m going to color correct the second gif.
Second, adjust the Curves layer. The warm tone was first removed by experimenting with the Curves—mostly Red, some green.
NOTE: I used the Curves eyedropper tool for the left gif (here’s a useful Curves tut), but I didn’t like how it worked on the right hence the experimenting.
Third, adjust the Selective Color layer. I added a new Selective Color adjustment layer to target the warmness (reds and yellows).
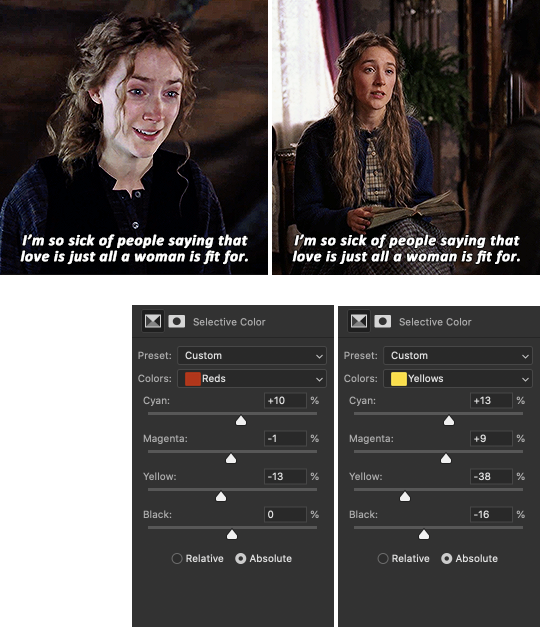
I upped the Cyan for both to make it cooler, upped the Magenta and decreased the Yellow to lessen the yellowish tones.
Fourth, adjust the Hue/Saturation layer. I added a new Hue/Saturation adjustment layer to modify the warm colors (reds and yellows).
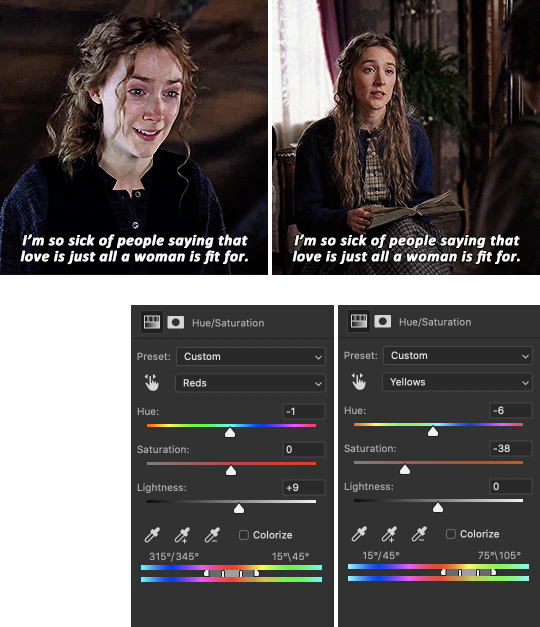
For the Reds, I only tweaked the Lightness to lighten the shadow on her cheekbone a little bit. For the Yellows, I made the Hue go left which makes it more pinkish than greenish, and I desaturated the Yellows to really match it with the gif on the left.
Now, we’ve got this desaturated gif (my bad) and I think it’s because I removed the scene’s major tone.
Fifth and last step, make some minor changes to other adjustment layers, including the first gif. So I’ve tried to fix this a bit by upping the Vibrance adjustment layer and the Brightness and Contrast (it was low to begin with).
I’ve also decided to up the warm tones of the first gif a bit using Hue/Saturation and Selective Color so they can both sort of meet halfway. 😂
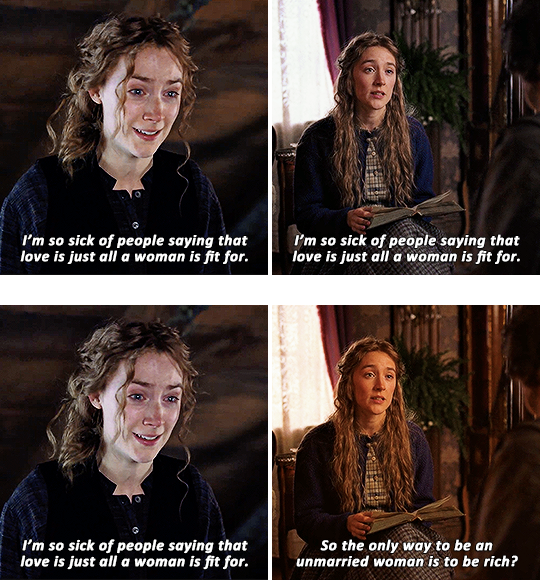
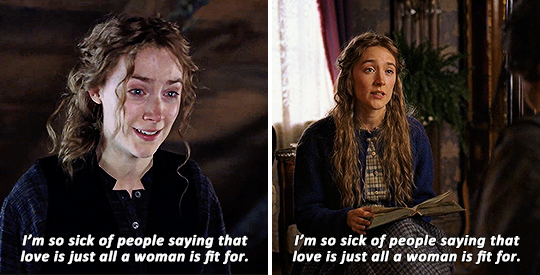
Comparing it with what we started (second set above), the final edits look good to me.
TL;DR: To achieve color consistency for a gifset with different scenes, play mostly with the Curves, Selective Color and Hue/Saturation adjustment layers.
You probably expected for a less tedious way to do this but I hope this helped :)
〰️
So... I just noticed, after typing this all out, that I got the subtitles of the second gif wrong in some pics 😬 Very sorry about that!
94 notes
·
View notes
Text
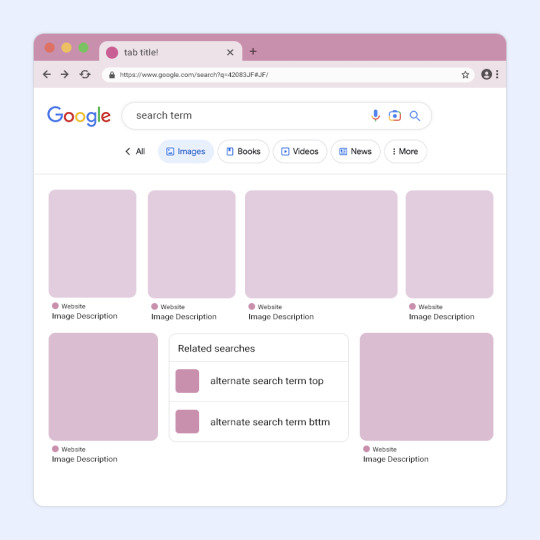
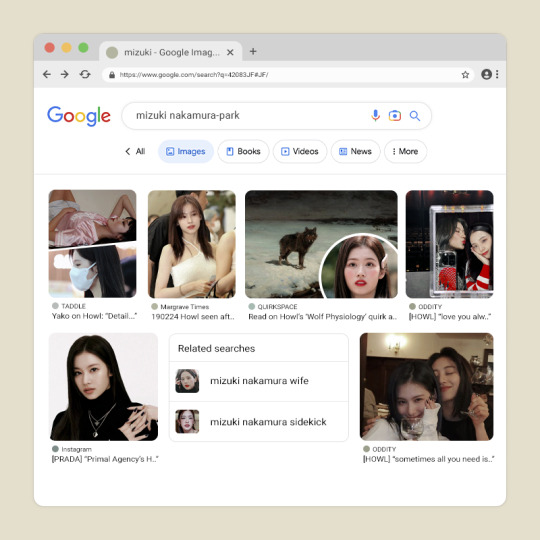
DAYSLILY DELIVERY 💌 template #42: image search.
by clicking the source link, you will be redirected to a psd download of the template shown above (via deviantart). as you can probably tell, this template is inspired by the google image search screen. this has been sitting in my cloud docs for so long so i hope everything makes sense! i added a layer to explain editing tips as well.
usage guidelines: read here.
fonts needed: roboto (google fonts).
if you like my work, consider donating to my dog’s surgery.
364 notes
·
View notes
Text
☀ CARRD TEMPLATE : 019. horimiya. ( free! )
☀ [ PREVIEW ] [ PURCHASE ] BASE ACCOUNT FRIENDLY!
☀ REFERRAL CODE : SUNNY | ☀ KO-FI
a minimal horimiya inspired personal carrd! that features:
— extremely mobile friendly interface!
— a static image & navi.
— about me, contacts for socials, and faves page!
PLEASE DO NOT REMOVE THE CREDIT / DO NOT CLAIM AS YOUR OWN, you are free to alter the colors and adjust it as much as needed but the credit must remain at all times. ** if using, i'd also appreciate a like and / or reblog to show me that you're interested in my templates! thank you!
524 notes
·
View notes
Text
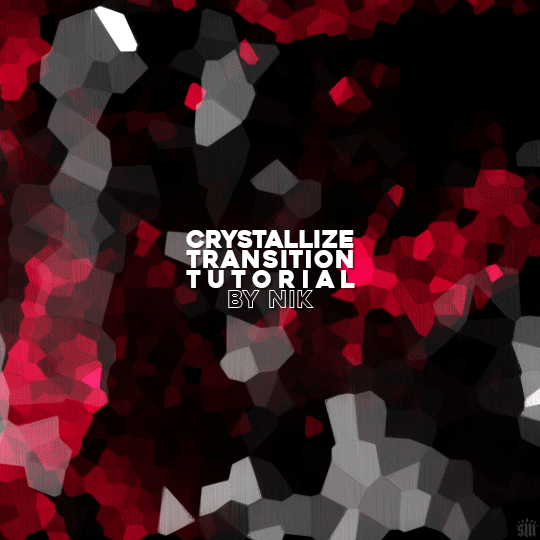
HOW TO: Do A Crystallize Gif Transition
Hi! I was asked to explain how I did the transition effect in this gifset, so here's a quick tutorial! Disclaimer: This tutorial assumes you have an intermediate understanding of gif-making in Photoshop using Video Timeline and requires the use of keyframes.

PHASE 1: THE GIFS
1.1 – Determine how many frames you need.
Since you need at least 2 scenes for a transition, consider limiting the amount of frames you'll use per scene. For a transition between 2 scenes that's 540x540px, I would recommend no more than 30 frames per scene (for a final gif that's 60 frames). Even that may be pushing it depending on your coloring. Just be sure to consider the dimensions and colors of your gifs in relation to the amount of frames to keep your final gif under Tumblr's 10MB limit.
1.2 – Import frames, crop, resize, convert to smart object for Video Timeline, color, blend, etc.
Do this as you normally would! If you need a tutorial for the basics, here's my tutorial. :) Please note, the methods in this tutorial only work with gifs that are converted into smart objects in the Video Timeline workspace.
Tip A: I recommend using scenes where there's a lot of one color (or scenes where you can manipulate it to look like that). The crystallize filter on a gif creates A LOT of movement that can feel a bit chaotic. Having your gif be primarily one color reduces the eye strain a bit imo.
Tip B: I like how this effect looks with blended scenes because it allows me to use different "crystal" sizes (more on this in Step 2.2). Check out the USERGIF Resource Directory for plenty of blending tutorials!
1.3 – Move all your gifs into one document, group into folders, and arrange.
Once everything's in one doc, keep everything organized in a group folder! I have just two scenes, so that's Folder 1 & 2. Within those folders are the gifs I blended, which I labeled by gif color. Then, simply drag Folder 2 so it continues right after Folder 1. (Make sure none of your adjustment layers from Folder 2 accidentally affect Folder 1! You can do this by clipping your adjustment layers to match the length of the gif as I did, or using clipping masks.)
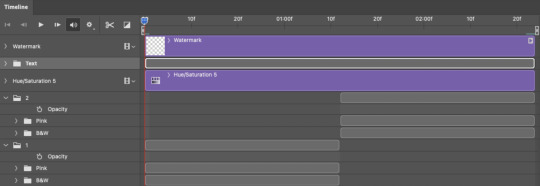
(Ignore that lone Hue/Saturation layer lol. I decided last-minute that I wanted my gif to lean more pink than red.)
PHASE 2: THE FILTERS
2.1 – Duplicate each scene.
We're going to use opacity keyframe animations on these duplicated scenes that allow it to go from "normal" to "effect" and vice versa. The filters will only be applied to the duplicates. In the screenshot below, all of my duplicates are highlighted:

2.2 – Apply the Crystallize Filter.
Above your sharpening settings, apply this filter by going to Filter → Pixelate → Crystallize. On the pink gifs, I made the crystals bigger (cell size: 45), and on the black and white gifs, I did a cell size of 25.
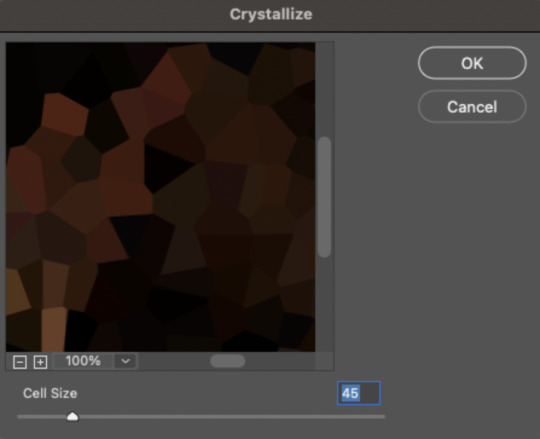

The different sizes help break up the uniformity of the crystals imo, creating more of a mosaic-like look, which is what I wanted to match my gifset concept.

2.3 – Apply the Oil Paint Filter (Optional).
Filter > Stylize > Oil Paint. Here are my settings (they're the same for both crystal cell sizes):
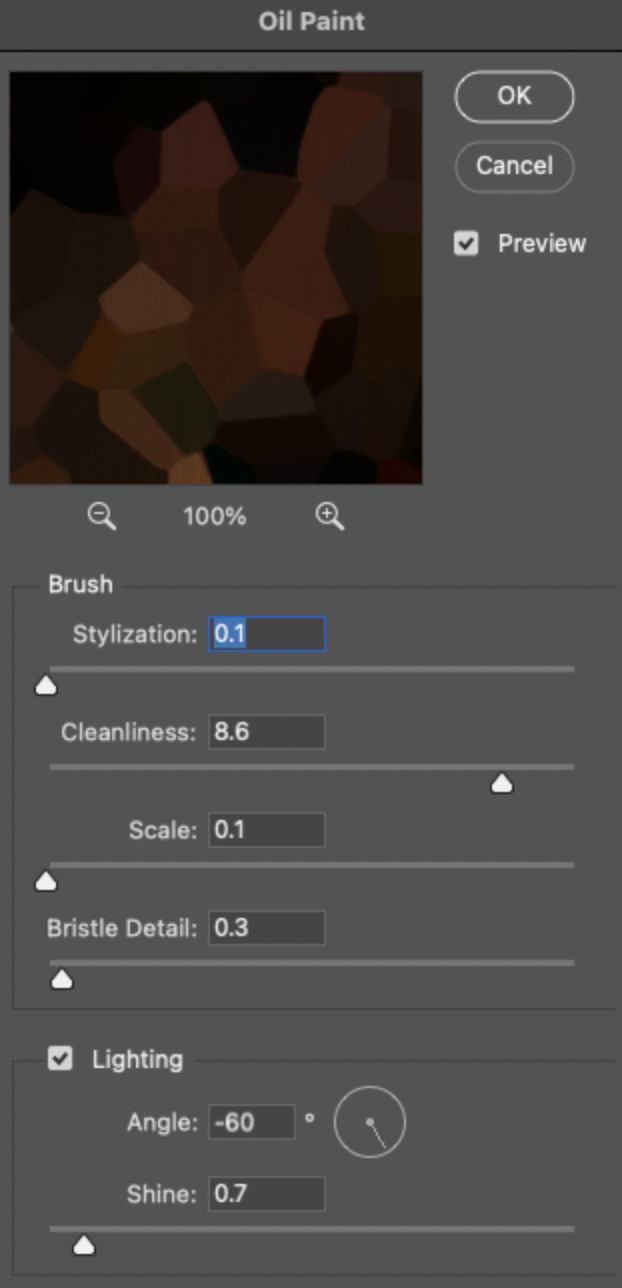
Brush – Stylization: 0.1, Cleanliness: 8.6, Scale: 0.1, Bristle Detail: 0.3
Lighting – Angle: -60, Shine: 0.7
This filter helps soften the cells a bit while adding some texture (left: no oil paint; right: with oil paint):

2.4 – Repeat steps 2.2 & 2.3 on all duplicated scenes.
PHASE 3: THE KEYFRAMES
3.1 – Add opacity keyframes.
The very start and end of each scene needs an opacity keyframe set to 100% opacity. Move 0.09 seconds from each of those points, and place another opacity keyframe, this time set to 0% opacity. We're basically making the crystals fade in and out. Please reference the screenshot below for keyframe placement:

If you need more info on opacity keyframes, check out Phase 2 from this fade transition tutorial I did on usergif.
3.2 – Repeat step 3.1 on all duplicated scenes.
All the keyframes in Folder 1 should line up exactly and all the keyframes in Folder 2 should line up exactly!
PHASE 4: THE DUPLICATES
4.1 – Convert back to Frame Animation.
If you're not sure how to do this, I've written out the steps here. I rec the action linked in my general gif tutorial which I shared earlier!
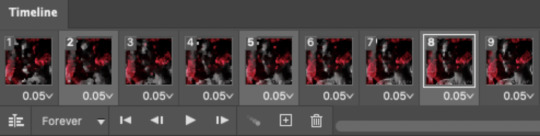
4.2 – Delete duplicate frames.
Whenever you use keyframe animations, you'll get duplicate frames. That's just how it works, unfortunately. If you follow my steps exactly (specifically the 0.09-second spacing, which follows my tried-and-true 0.03-second rule), you'll have a total of 12 duplicate frames exactly — 3 duplicates per keyframe section. Just manually delete them! You can spot the duplicates by eye, but with this spacing, it's usually the 2nd, 5th, and 8th frame for each transition section. The selected frames below were my duplicates:
If you want to learn more about why there are duplicates and the math behind it all, I explained it in more detail in this ask.
4.3 – Export and you're done!
I hope this tutorial helps! Let me know if you have any questions :)
292 notes
·
View notes
Text

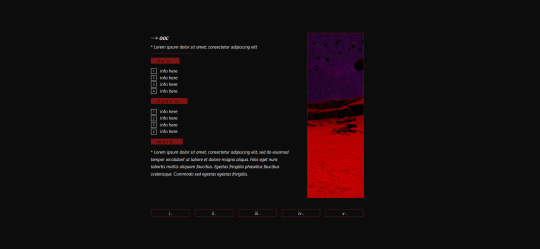
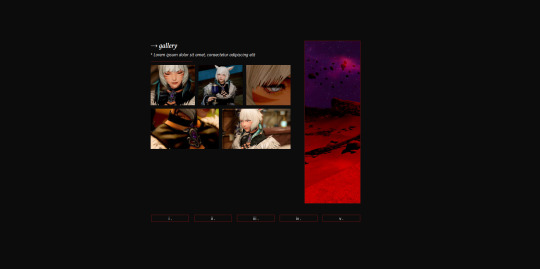

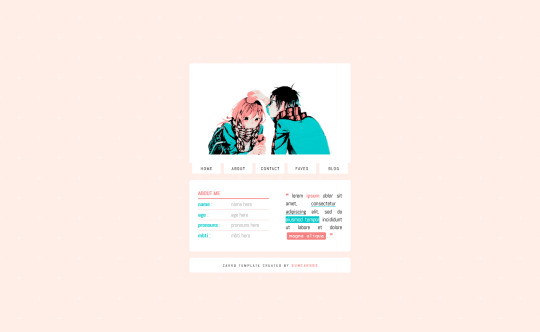
#02 REGOLITH [DEMO] [GET]
a free base-account carrd template made for ffxiv roleplay characters.* another simple and short layout. if the info gets longer you can probably adjust the image to match but, up to you really.
* feel free to change the colors / sizes / fonts. edit or change to your desire.
* the side images have the capability to be different. I just used one image and slid it around.
* The starting page is not returned to in any of the links. It also is the clickable item to take people into the carrd. Very easy to add a link or button to make it more clear.
64 notes
·
View notes