
wandasmel
dinah's #1 supporter
sideblog. multifandom. mila. she/her. xxi. bi. latina. dinah lance! will track #tusermila. my gifs. mobile tags. how to request gifs.
62 posts
Don't wanna be here? Send us removal request.
Last Seen Blogs

scarlynnvesper
scarlynn !

apunkalypse
coffee table store UK
debushit
arsena1
skweeez
Sans titre
wwwdlabrie
25 HOUR NETW3RK of DLabrie - 8 days a week!!
Text
ohmygod your tag can i do the gifset??? you mean the s1 twirl bat right??? if u have suggestions for s3 and s4 please tell me!!!
That scene with Steve throwing the lighter slowmo with his face half covered, crouching, putting himself between the kids and the danger, with his stupid floppy hair bouncing i fucking can’t
91 notes
·
View notes
Text
you all this new update of the tumblr app is fucking hell it doesn't let u see long posts in the tl it makes u go to the post in the blog
0 notes
Photo


325 notes
·
View notes
Photo


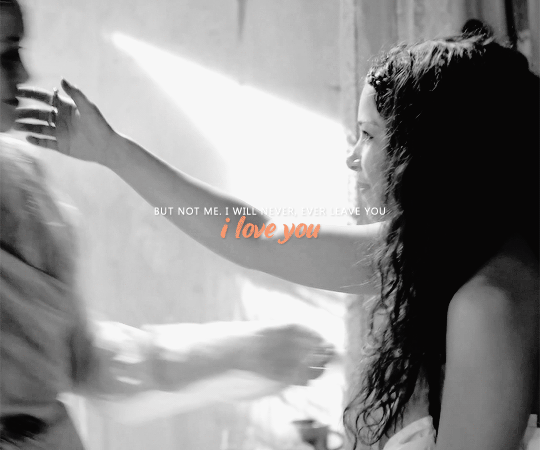
trini: *jumps over a cliff*
kim: i’m in love.
#trimberly#trimberlyedit#predit#saban's power rangers#power rangers#power rangers 2017#chewieblog#bbelcher#usersource#userstream#moviegifs#filmtv#rangerfam#powerrangersedit#ship: kim + trini#ch: kimberly hart (spr)#ch: trini (spr)#m: saban's power rangers#*mine#*gifs#the idea that this is the moment kim said 'i want this one' is amazing#and also i say very in character
812 notes
·
View notes
Text
does someone know which acc has fear street 1994 logoless pls? i found 1978 and 1666 but not the first and i wanna gif something SAD
1 note
·
View note
Photo


Carol Danvers 🌟 and Monica Rambeau ✨
#like mother like daughter#gosh i miss my rambeau danvers family 🥺#im gonna rewatch cm just so i can have them#f: rambeau danvers#ch: carol danvers#ch: monica rambeau#s: wandavision#m: captain marvel#the marvels#mcu#the half of queue
2K notes
·
View notes
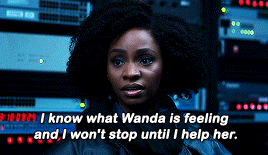
Photo

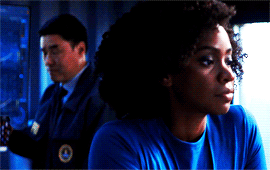

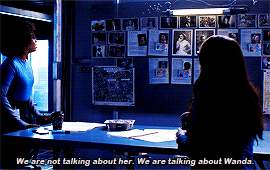
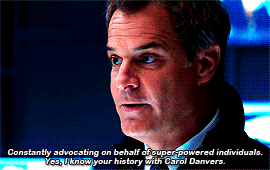
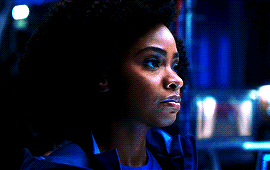
Monica + reacting to Carol being mentioned in Wandavision.
[ID: Six GIFs of Monica Rambeau from the TV Show Wandavision reacting to Carol Danvers being mentioned. 1: Jimmy Woo, at Monica’s left and slightly behind her, says “I’d argue that Captain Marvel came close [to killing Thanos]”. The camera slowly focuses on Monica’s face. 2: The camera is focused on Monica. Her expression is serious. Her eyes shift left to right to left; she licks her lips and looks down with her lips pursued. 3: Darcy Lewis asks Monica “Her powers came from an Infinity Stone, too, right?”. 4: Monica walks away from a table and to a wall with pictures from Wanda’s case, saying “We’re not talking about her. We’re talking about Wanda”. 5: Hayward tells Monica “Constantly advocating on behalf of super-powered individuals. Yes, I know your history with Carol Danvers” with a smirk at the end. 6: Monica’s head is slightly tilted to her left, and she slowly rights it, her expression turning more serious and closed off. End ID].
#monica rambeau#monicarambeauedit#mcufam#themarvelssource#marvelladiesdaily#mcupoc#bbelcher#chewieblog#usersource#userstream#mcuedit#f: rambeau-danvers#ch: monica rambeau#ch: jimmy woo#ch: darcy lewis#ch: tyler hayward#s: wandavision#mcu#*gifs#*mine#uHM pleease marvel don't ruin my favorite family#also#bring back maria rambeau!!!!#also eng isn't my first language sorry if it's not well said or whatever:(
60 notes
·
View notes
Photo


Reintroducing The Marvels Source!
We have rebranded our blog and Captain Marvel Source is now The Marvels Source and will focus on Carol Danvers, Monica Rambeau and Kamala Khan!
We are looking for new members to join the new era. Apply here.
Our new tracked tag is #themarvelssource.
Check out our new desktop design and enjoy our content!
186 notes
·
View notes
Photo


endless silverbones
the first meeting (aka the moment Silver’s crush on Billy started)
[ID: Three vibrant GIFs of John Silver, Billy Bones and Hal Gates from the TV Show Black Sails, with an emphasis on the cyans. 1: Gates approaches Billy with John at his side and slightly behind him. He says something to Billy and Billy glances briefly at Silver before looking down (presumably to keep doing what he was doing before they arrived). 2: Gates and Silver smile at each other before they both turn to look at Billy. When John looks at Billy, his little smile disappears and he blinks while his mouth falls slightly open. 3: Billy looks at Gates and tells him something, ignoring Silver. End ID]
94 notes
·
View notes
Text
fellow gifmakers how do you name your gifs when you save them? i usually number them or give them a name depending on whom i’m giffing
#themes!!! if it's based on a song the lyrics#if it has text the text#i also number each gif in the set AND ofc the character/ship/friendship etc first#it'd be like#name + theme/lyric/text + numbers for gif in set#sometimes the numbers are random others in order of how i wanna post them#*text
386 notes
·
View notes
Note
idk how to explain, but how do you make gradient text but in reverse colors with exclusion effect?
You explained it fine! I’m going off the assumption that you mean something like these:

I actually go for Difference instead of Exclusion. They do very, very similar things, so much so that I’d go so far as to say they’re near-identical, but if you play around with blending modes enough and compare those two in particular, you’ll find that Exclusion produces a lower contrast than Difference. But we’ll be working with white base text here—they’re actually-identical where white is concerned—so you’re welcome to pick whichever.
Once you have your font/s picked out and know where you want to place your text, set it to Difference (or Exclusion) so that it looks something like this:

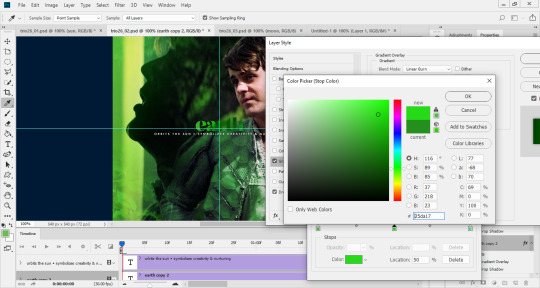
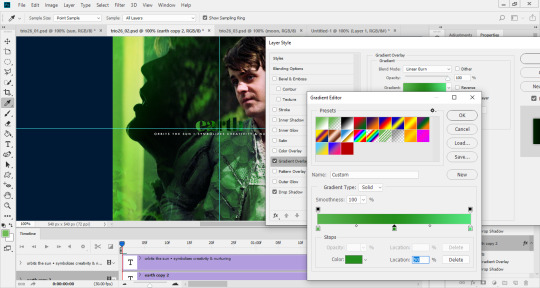
From there, it’s pretty much verbatim what I talked about in my original gradient text tutorial. We’re still going to double click on our text layer, then click on the Gradient Overlay tab of the Layer Style window that pops up, keeping in mind that we should pick colors that complement the gif and/or the overall set.
The only difference here is that we’ll also be playing around with the blending mode of the Gradient Overlay. The blending modes I tend to stick with are Linear Burn, Color Burn, Multiply, and Hard Light, but I’ve used Vivid Light and Linear Light as well.
This was my final product after setting my gradient to Multiply:
What blending mode you use is up to you, yes, but it ultimately depends on the background behind your text. Because of how both Difference and Exclusion work, some areas of your text can be harder to read, gradient or no. I recommend having your Layer Style window just a little to the side of your gif so that you can see for yourself what the different options (and colors, too!) look like as you scroll through them.
As an example: I didn’t like how light the middle of my text looked here, so I ended up deciding on a darker green for my gradient.
2K notes
·
View notes
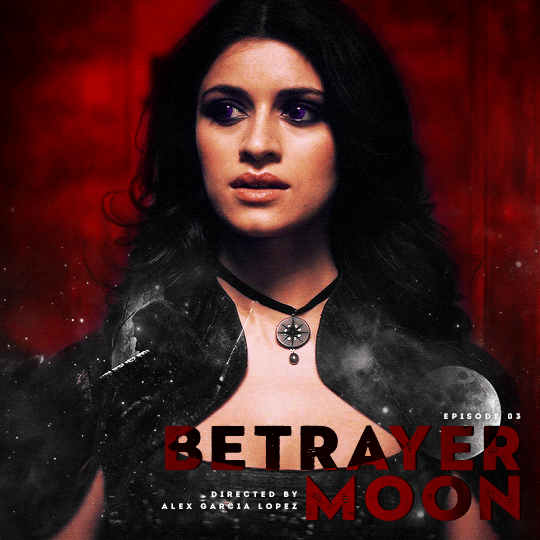
Note
📝 first, congrats on the 15k you deserve all the love and appreciation. Second, idk if you’re still taking these but a tutorial on those lovely double exposure gifs, I’m obsessed with them 💜
thank you so much! i’ve been meaning to a double exposure/blending tutorial for a while so i’m going to try my best at explaining, let’s get this party started.
i use photoshop cs5 for this and you need a general understanding of the basic tools. i’m going to be walking you through a set i’m currently working on to ultimately create a double exposure gif such as this:

step one: create your base gif
as always before you can start any gifset, you need to pick what scenes you want. i often pick several different moments and experiment with what works best, some scenes will just perfectly meld together while others will be trickier.
you want to firstly select a ‘base gif’, this is the gif that you’re going to layer your other scenes onto. it’s helpful to have a gif where you can identify a darker area where scenes might be able to be blended onto. silhouettes, side-profiles and shouts where you can see a portion of the body are an ideal place to start, but you can use any scene where there is a darker area in contrast to the rest.
for example, i picked this shot as my ‘base’:

in this shot, there are darker areas which standout, her body particularly below the shoulders but also in her hair. this provides a great ‘base’ for holding other scenes.
i’m going to colour my base gif in the way i usually would (i'm not going to go into details here, but if you want to know how i colour my gifs i have a tutorial here) but making an effort to ensure the blacks are thoroughly darkened (you can do this by adding a selective colours > black layer) and i’m done with my base gif:

step two: create your overlaying gif
next, you want to create your overlaying gif. personally i try to avoid using very light scenes as these can take a lot more work to blend in. if this is your first time blending i’d definitely recommend using a scene with a neutral backdrop, or even more ideally a dark backdrop, as this will just more seamlessly work with your base gif.
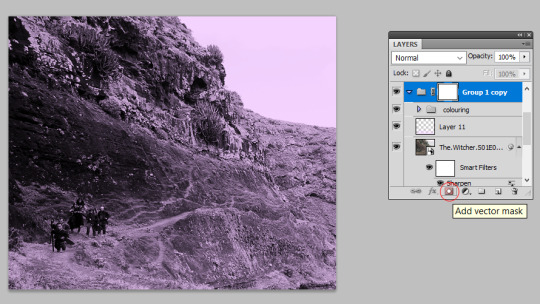
so, i’ve picked my first overlay scene as the mountain pathway, this will add a bit of texture to my gif and is fairly ‘neutral’ so should blend in well. i’m going to size and colour this as a separate gif with the same purple tones, then create a new folder (see red circle in screenshot) and drag my entire gif into it:

then i’m going to add a vector mask, to do this make sure you’ve selected the group and press this button highlighted in the screenshot:
step three: blending your gifs
now you’re ready to blend! from here, you want to just drag and drop your overlaying gif folder on top of the base gif, then set your overlaying gif folder to ‘screen’ or ‘lighten’ (i usually use screen, but sometimes lighten depending on the scenes - see what looks best!). it now looks like this:

the obvious issue here is that the overlay has taken over her face. so, we’re going to select that vector mask we added to the ‘overlaying gif’ folder, grab a black paint brush, and just brush over her face. this will remove the overlay from that area.
i use quite a large soft brush for this (around 200px), the larger you use the ‘smoother’ the transition you’ll get. the smaller the brush the harsher your transition will be. this is the part that takes practice, but the beauty of using a vector mask is that you can grab the eraser tool and erase any of the paint strokes you’ve just done to bring the overlay back. by the end my canvas and layer mask look like this:

from this we can see i’ve blocked out the overlay from the ‘top’ of the gif and concentrated it so it just spreads over her shoulders. this captures the overlay in the space i outlined on the base gif as my ‘blending space’ earlier. i’ve also blacked out the overlay on the right hand side as i want to put another gif in this space. at this point the gif is looking like this:

i think my ‘top tip’ with blending is to leave little details to make the transition between the two gifs more natural. for example, you can see there are still patches of the mountain moving up her neck. i could black these out so the mountain scene is just confined to her body, but in leaving it there is creates more of a transition. these little background details of the scene you’re overlaying can really add to the overall texture of your base gif, and for that reason don’t get too hung up on the ‘details’ of making sure your gif is limited to an exact space.
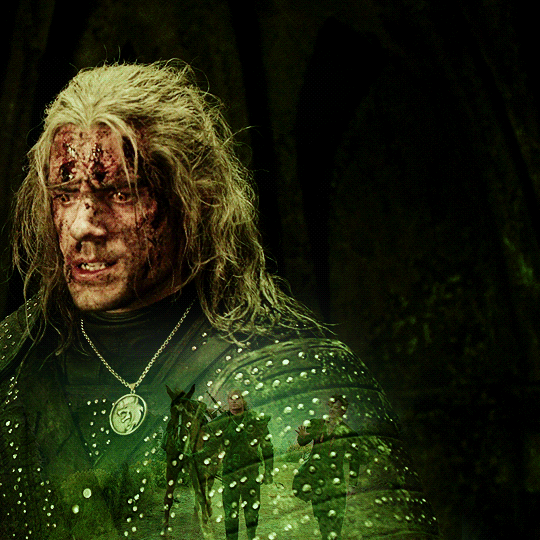
optional step four: adding more overlay gifs
for this gif i also added the dragon on the right hand side. you don’t have to be limited to overlaying two scenes and in fact, sometimes a nice idea is to use a more ‘landscape’ shot to add texture to your blended gif. to add more, i repeated step two to colour the shot i wanted, dragged this in its own folder on top of all my other blended gifs and set it to screen again:

i repeated the same steps in step three to black out the background, particularly concentrating in removing the line that we can see where the shot finishes. because in this shot the dragon’s head is actually partially cut off by the top, i was very careful with positioning this overlay and used a smaller black brush above the head. this positioning allowed it to look as if the overlay was giving way to yennefer’s face, rather than the shot cutting it off:
and that’s it, i’m done with my gif! this was a nice straightforward blend, but some scenes may not work as easily, which is where we turn to...
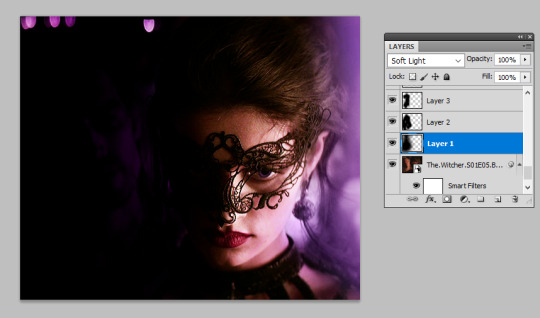
step five: using a black paint layer to create overlay space
sometimes your gif doesn’t have an easily blend-able space. maybe the character is wearing something patterned, or the area just isn’t dark enough. for example in this gif, i’ve done all the above sets but the overlay scene doesn’t stand out very well because the armour pattern gets in the way:
but we can fix this quite simply with our black paintbrush. i go back to my ‘base’ gif and under all the colouring create a new layer and with a large soft paintbrush, paint over the armour. i then set this layer to ‘soft light’. then i create another new layer and using a more medium-sized paintbrush, paint exactly behind where the figures are moving. this layer adds black behind the figures so they stand out more clearly, while the soft light layer aids the transition as it darkens the whole area. now we have this:

this has made the overlay a lot more visible. you can use this technique to pretty much darken any layer. i always try and darken the section i want using ‘soft light’ layers as this creates a smoother transition than you’d achieve by just jumping in with your normal black paintbrush layer, but remember you can use multiple layers to reach the effect you want.
this can be taken to the next step to literally blacken out one side of a gif (and it may be useful if you want to do more side-by-side blending scenes), starting with your normal base gif coloured (admittedly mess-ily):

to completely darkening the right-hand side of it using a few black paintbrushed soft light layers:

and overlaying another gif into this darkened patch:

i’ve even used this technique for light scenes with success, it just might take a bit more practice and you’re better off starting with scenes that naturally have a darker background if you are a blending beginner.
the end!
and that’s a wrap. i hope this made sense, as always i’m very aware that just because i know what i’m talking about doesn’t mean anyone else does, so please if you have further questions do ask. happy blending! :)
1K notes
·
View notes
Text
becca’s mega coloring tutorial
i’ve gotten a lot of requests recently asking me to make a tutorial for my ‘colorporn’ gifsets, and i think i’ve finally gotten over the traumatic incident 3 years ago, when i spent all day writing out a coloring tutorial only to accidentally hit backspace causing the entire thing to be wiped. so, here it is, buckle up folks! it’s going to be a long ride but here’s hoping it’ll be helpful.
so we’ll be going from left side (no coloring) to right (coloring & color porn):

Seguir leyendo
4K notes
·
View notes
Text
mr perfectly fine being about stucky > me: what if... i... did... a gifset
0 notes
Photo

In the spirit of BIRDS OF PREY turning 1 year old on February 7th, I thought it might be nice to have a little celebration event!
I know there’s a ton of you creatives out there so I came up with a quick little prompts list for the days leading up to the 7th:
Day 1/Feb 1: Favorite Color
Day 2: Favorite Music Moment
Day 3: Favorite Character
Day 4: Favorite Scene
Day 5: Favorite Outfit
Day 6: Favorite Dynamic
Day 7/Feb 7: Wildcard
You can do all, you can do just one, it’s all cool. Make gifs, playlists, moodboards, graphics, anything! In the spirit of Harley, there’s just one rule: have fun!
Tag your creations with #bop1year so others can find your stuff and please reblog this post to spread the word!
279 notes
·
View notes
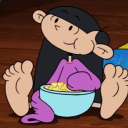
Photo


lilo and stitch
629 notes
·
View notes
Photo
endless silverbones
the first meeting (aka the moment Silver’s crush on Billy started)
[ID: Three vibrant GIFs of John Silver, Billy Bones and Hal Gates from the TV Show Black Sails, with an emphasis on the cyans. 1: Gates approaches Billy with John at his side and slightly behind him. He says something to Billy and Billy glances briefly at Silver before looking down (presumably to keep doing what he was doing before they arrived). 2: Gates and Silver smile at each other before they both turn to look at Billy. When John looks at Billy, his little smile disappears and he blinks while his mouth falls slightly open. 3: Billy looks at Gates and tells him something, ignoring Silver. End ID]
#silverbones#silverbonesedit#blacksailsedit#bsedit#black sails#perioddramaedit#tvedit#dailytvgifs#dailytvfilmgifs#bbelcher#usersource#chewieblog#userstream#moviegifs#dailyreblogs#ship: billy + silver#ch: john silver#ch: billy bones#s: black sails#*mine#*gifs#excuse me but imo silver hada crush on billy since he first saw him ty for coming to my ted talk#PINING SILVER RIGHTS
94 notes
·
View notes