
Last Seen Blogs

airhuarache1992-5
air huarache 1992 - nike air huarache premium

mariascorzelliart
Maria's sketchbook

ankifreelancer
BooksAndFashion-aholic

dokidobe
yellow.dr.monv

dmgreturns
DMGRETURNS
Text
Comprehensive guide about internet services
What is an ISP?
Your internet service provider (ISP for short) is what gives you access to the internet, you pay them and they connect you to the internet. The amount of money you pay can vary widely, depending on the various factors they are providing you, some of these factors are printed right on the Ad and some factors they don't want you to know.
But what are all those factors?
I'm going to list just the main factors here, and I will not take in consideration the difference in pricing of bundles or packs when they charge you, for other goods like TV, support, anti-virus, etc... Just focusing on the technical side of things, your ISP is like a delivery contract, and delivering goods there are many variables in play like, what kind of transport do you use, a car, a bike, a truck, a train, a plane? How much you can carry at once. How fast you can deliver. How many requests you can handle. How long it takes you to start each new delivery? How many parcels get lost in transit? Maximum the amount of deliveries in a month.
Things to take into consideration when talking about your internet:
Type of connection (cable, fiber, 3G, LTE...)
Speed (5Mbps, 25Mbps, 100Mbps...)
Data limit (500MB, 5GB, 20GB, Unlimited...)
Latency (ping)
I will try to explain a little bit about how each of these things will affect you in day to day use, and clarify some things they usually don't tell you.
Speed

Speed is commonly advertise in Mbps or Megabits per second (e.g. 25Mbps). This will define how long something will take to be loaded from the internet to your computer (Downloading a song from iTunes, a attachment on a file, or even loading images on a website).
Ok, 25 is just half of the story, this number is your downstream speed, AKA download speed. But the internet is not just a one way road, it is in fact two way road, one going out your device, and one coming to your device. For a website to load, when you type example.com address on Google Chrome, you computer first sends a request, and it goes of your computer in the "up lane" and it arrives at the desired server, and then it sends you the webpage back to your computer on the "down lane".
We refer as the traffic in the direction:
You → Internet as UP stream
Internet → You as DOWN stream.
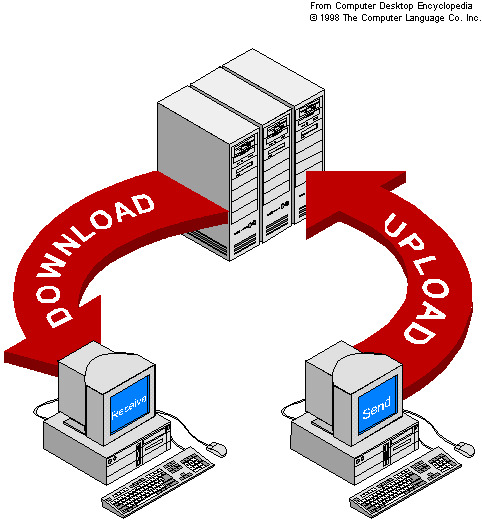
With that said, they only tell you the speed from the server to you, but they usually don't tell you what the speed from you to the server is going to be, unless you read the fine print, or ask them.
Almost all home plans have much lower upload speeds than download speeds. Expect your upload speed to be (usually) 10 times slower than your contracted download speed. This means that you can download a 50mb PDF in only 7 seconds on a 60Mbps internet, but it will take more than a minute to attach the same PDF on a email.
Upload speed is specially important for content creators, that will send content more often than they will consume content from the internet, like upload videos to youtube, attaching large files, backuping files to the cloud (Dropbox, Google Drive, iCloud), live streaming HD video, etc...
A little aside about bits and bytes
There are lots of confusing things when talking about speed, and all of this is caused by different but similar looking units. In the example 25Mbps (lower case b) means 25 billion (mega) bits in a second will arrive at your computer. But this doesn't mean you will download a 25MB PDF in one second, because here 25MB (uppercase B) is 25 mega bytes.
File sizes you are used to see on your computer or phone is expressed as kilobytes (KB), megabytes (MB), gigabytes (GB), terabytes (TB)...
Speed is usually advertives as mega bits per second (Mbps)
But if everything is reported in bytes, it would make sense to talk in bytes per seconds and not bits per seconds, right? yeah it does! But it make sense for then to talk in bits (for a reason I'm not going into), but it also makes the numbers appear bigger, so its good for marketing.
The conversion is: 8 bits = 1 byte
Data limit

Some ISP impose a limit of the amount of bytes you can receive and send over a period of time (e.g. 100GB of data in a month), this means when you reach that limit your service will be paused until the next cycle, you will be charged for extra or you connection will be slowed down. This will depend on your specific contract, so you should ask if you have any limits, what happen when the limits are reached and you should check if the limits are reasonable for what you expect.
Here are some tasks and the approximated amount of data it will take:
Watch a YouTube video of 10 minutes 200MB
Watch Netflix movie 2GB
Download Apps:
Angry birds 2 500MB
Clash of clans 110MB
Minecraft Pocket 140MB
Candy crush saga 200 MB
Type of connection

There are many types of connections, and each of them have their own pros and cons, this will also play a role in the cost.
ADSL
Coaxial Cable
Fiber
Cellular (3G/4G/LTE)
Satellite
ADSL is one of the oldest technologies listed, it uses the phone lines infrastructure so it is available even on the smallest towns. Reliability is not that good with this technology.
Coaxial cable is one of the most common in the United States, it uses the same cables as cable TV. The cost of this connection is usually one of the cheapest, This is one of the best price to quality options.
Fiber is the best you can get in terms of speed and stable connection. But often it comes with a cost that’s usually higher than the other options. fiber is also not readily available everywhere. This is definitely the best option for really demanding tasks like streaming, gaming in any real time application.
Cellular and this is the type of connection you have on your phone. This type of connection you should come comes with limits of usage. So you should avoid this type of connection if you use the Internet for anything else then casually browsing. But this is an option if you need mobility or if you can’t use any of the other options.
Satellite is the type of connection you would have if you live in a really remote area or you don’t have any infrastructure near you. This is the most expensive option, and contrary to what some may think this is the slowest type of all listed types of connection. Satellite connection suffers from really high delays (explained below), due to the distance the signal have to travel between the satellite and the earth. Another con is that you’re going to be off-line when the sky is cloudy.
Latency (ping)
Latency is the time it takes from a command to be send from your computer through every device on the network, reach its destination and come back to you.
For everything you do online from asking for your browser to load a website, or sending a tweet or clicking play on a video on YouTube, you computer have to send a request through the network. It goes to
PING is a tool that measures the Round Trip Time (RTT) of data to reach the destination and then return. It is measured as Latency in ms. Latency is a component of Lag, which is the perceived performance degradation. Packet loss is the other common contributor to Lag.
There are two major components to Latency. Data travels over the wire/fiber at roughly 120 miles per millisecond (ms). Thus for every 60 miles between you and the destination, you can expect 1 additional ms in a PING test. Keep in mind this is the distance the data has to travel, not direct distance or way of the crow.
Devices along the way also contribute to the overall Latency. Cable modems have been reported to add 5-40ms and DLS modems around 10-70ms. WiFi routers will contribute as well. Each additional device such as another WiFi repeater, firewall, router or switch (hops) between you and the destination will add to the overall latency as well. Expect older networking gear to add additional latency. So could a miscalibrated or misconfigured cable modem. Reference: https://www.pingman.com/kb/42
All wireless connections will likely incur some degree of Packet Loss due to the nature of the medium and additional Latency due to protocol overhead.
Many of these factors that contribute to Latency are outside of your ability to change. It is true that Fiber connections typically have fewer hops between you and the Internet. It also true that these hops can different than the path of hops from a DSL or cable modem. The different path could have lower Latency per hop. HOWEVER, fiber connectivity is not always guaranteed to lower latency and has an additional added cost of service.
Satellite: 750 - 2000 ms
3G Wireless: 100 - 350 ms
4G Wireless: 50-150 ms
DSL: 50-125 ms
Cable: 25-75 ms
Fiber: 5-30 ms
WiFi
As said earlier, a wireless connection between your computer and your mode/router will also add a extra delay contributing to the total latency. This amount will vary depending on various factors, like the number of devices connected, amount of nearby WiFi networks in range, distance between you and your router, interference from other appliances like microwaves, etc... If low latency is important for you, you should avoid wireless entirely and use a wired connection between your computer and router. But if you can't there are a few things you can do to improve things.
Don't use WiFi repeaters / boosters (unless they have a CAT5 cable coming in);
Prefer 5.8GHz band WiFi routers (802.11ac);
Don't place WiFi router near metal surfaces (refrigerator, computer case...)
Don't connect to a WiFi router on a different floor
Be near a WiFi router
If you use a WiFi USB dongle on a Desktop PC, don't use it on a rear USB port, plug it on the front of your case.
Place your WiFi router around 5 feet (1.6m) above the ground.
How different factors affect internet usage
Gaming

Having a consistent and low latency (ping) is the most important factor when it comes to gaming and not having issues with lag. Generally speaking, prefer fiber or cable over other types of connections, and prefer wired connection between your computer and your modem or router, to avoid fluctuations in ping caused by the wireless connection. Higher speed should not make much difference here, just make sure you have enough head room to account for other programs and people sharing the same internet. However a higher speed plan should make downloading the updates and games itself faster.
Live streaming

Upload speed is the most important factor here, you should have enough bandwidth (upload speed) to be able to send large amounts of data required to stream audio and HD video to (Youtube, Twitch, Ustream...). Latency (ping) will help you have a smaller delay between you and your viewers, but this is not very significant because those services usually will have a buffer of a couple seconds anyway. But it is really important your connection is steady and it is not losing packages, as you video is live, every video frame that fails to be sent will either get lost and cause the video to be choppy or it will be retransmitted making the video to be delayed.
Check out twitch guidelines for streamers https://stream.twitch.tv/encoding/
Watching videos

If you watch lots of videos online on Netflix, YouTube or even on social medias, Download speed will affect which quality will be able to watch without waiting for the video to load of buffer. Make sure to have a unlimited data plan or have plenty of data available, as videos takes large amounts of data specially HD or 4K content, or you will found yourself with no or a crippled internet or with a large bill on the end of the month.
Netflix have a chart that should give you an idea of the amound of data it will consume: https://help.netflix.com/en/node/87
Listening to music

Listening to online radios or using streaming services like Spotify, Pandora, Apple Music... it is not a really demanding on your internet, but if you stream for many hours a day you should be aware of Data limits, specially on mobile. If you have a 1GB limit it will be roughtly about 7 hours of content of high quality music.
Ok thats it, I hope this will help you better understand how each factor is important to you and help you choose which service you're contracting. If you have any questions feel free to ask.
2 notes
·
View notes
Text
Turn checkbox inputs into fancy toggle switches by just adding a CSS class
So I’ve made this, a pure CSS/SASS toggle switch, that styles the native
<input type=“checkbox”>
I like to point just some of the advantages of this approach over other solutions:
1. Checkboxes are very similar to toggle switches. Both have 2 states checked/unchecked on/off;
2. Keep HTML semantic and simple, No extra divs and wrappers.
3. No images used, easily theming and styling, scalable;
4. No javascript required, no click events, no initialization, no life cycle management;
5. Accessible via keyboard and assistive technologies out of the box;
6. Works with labels;
7. You can check then programmatically with pure javascript, jquery or any other javascript library.
8. Compatible with every javascript framework (React, Angular, Vue, Backbone, etc...)
9. It works with javascript disabled, obviously;
10. Gracefully degrades to a plain old checkbox on old browsers.
https://victornpb.github.io/vt-toggle/
0 notes
Text
ZoomNPan
I wrote this really compact image previewer that you can zoom with the scroll wheel and pan around using the mouse pointer.
It is written in Vanilla JS, and does not even need jquery. I should be very straight forward to modify as well.
You can test it below (or visit http://jsfiddle.net/Victornpb/1s3nm8h8/)
Check out ZoomNPan on GitHub
0 notes
Text
Creating a ASCII Table in Javascript
I want to share a small javascript module available in the NPM registry. It will help you to generate simple Tables using ASCII from a bi-dimensional array!
| ID | Price | Amount | Column D | Column E | |————|——————————|—————————|—————————————————————————————|———————————| | 1 | $ 100.00 | 0 | Very long text on this cell | 1 | | 2 | $ 100.00 | 10 | Left aligned | 123 | | 3 | $ 100.00 | 100 | Centered | 12345 | | 4 | $ 100.00 | 1000 | Right aligned | 123456789 |
var m = [ ['ID', '^Price', '^Amount', '^Column D', '^Column E'], //header null, //horizontal line ['1', '$ 100.00', '0', 'Very long text on this cell', '^1'], ['2', '$ 100.00', '10', 'Right aligned', '123456789'], ]; var table = matrixToAsciiTable(m);
We used it at our company internaly to post messages to a Slack channel using a bot written in NodeJS. It can also be useful for logging data to a terminal. If you find any other use for it, I would be very happy to hear.
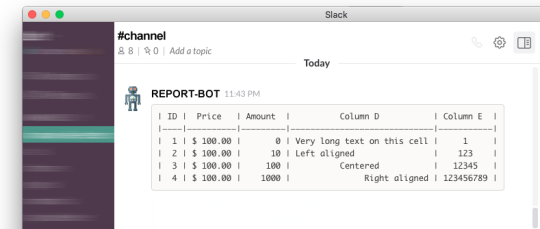
Get it from NPM using: npm install asciitable.js
Check it out on GitHub
0 notes
Text
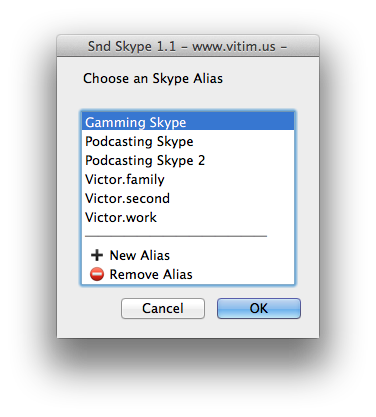
Launch multiple Skype instances with SndSkype
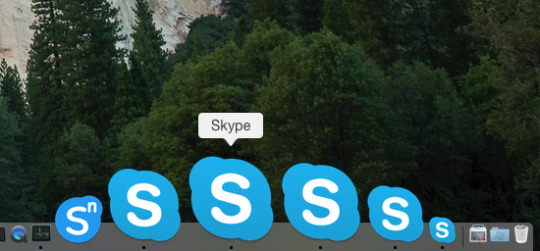
Some times you just wish you could login on your personal Skype account and maybe your work account at the same time on the same computer. With this small App you can Launch as many instances as you want of Skype on the same computer.
Inner working
I've found out that you can Launch an instance as usual then you can launch another using the super user, issuing the sudo command. But this is not considered a right thing to do, and it is potentially risky, if the application crashes or due to a bug it can actually damage system’s files.
And you don’t need to create a bunch of users and launch each instance on a new user, thats a bunch of waste. Also you loose the ability to copy & paste.
Many Mac applications store its configurations on the Application Support folder inside the User Library. Using the open command you can force the application to use a new preferences folder. And it will launch as a brand new instance. Yay :)
As-is
Keep in mind that the Skype team did not intended the Skype to work that way, although it seems to work without problems, I cannot guarantee that it will be free of issues. So it use at your own risk.
Download
Download App
1 note
·
View note
Text
Arduino Library for PT2257 Electronic Volume Controller IC
Connect the IC to the following pins, you can change it in the .c file.
Pull-up resistors are required on both pins (4K7 or 10K should be fine).
SCL -> A0
SDA -> A1
Datasheet - http://www.princeton.com.tw/Portals/0/Product/PT2257.pdf
Pinout |----._.----| 1 -| Lin Rin |- 8 2 -| Lout Rout |- 7 3 -| Gnd V+ |- 6 4 -| SDA SCL |- 5 |-----------|
API
Volume Attenuation are expressed as unsigned integers
e.g. : to set the attenuation to -21dB express it as 21
void evc_init();
Start the I2C communication
Call this on setup(); to ensure a reliable initialization, this will delay for 200ms.
void evc_setVolume(uint8_t dB);
Set the attenuation on both channels (between 0dB and -79dB)
void evc_setVolumeLeft(uint8_t dB);
Set the attenuation on the Left channel (between 0dB and -79dB)
Use this for implementing left/right balance offset.
void evc_setVolumeRight(uint8_t dB);
Set the attenuation on the right channel (between 0dB and -79dB)
Use this for implementing left/right balance offset.
void evc_mute(bool toggle);
toggle:
true: Mute both channels.
This mode have an effective attenuation of -95dB (+5/-2dB)
false: Unmute both channels.
Note: It will preserve the set Volume when mute is toggled (This behavior is not documented on the datasheet).
void evc_off();
Function OFF (-79dB)
The exact purpose of this instruction is not clear on the datasheet.
Initialization
The datasheet does not mention anything about it being volatile or not, but it seems to hold state after power cycle, I'm not sure about about if it's just an artifact, but I recommend setting it to a known state just after initialization, so you will not be in a situation that you are changing volume but nothing happens because you have mute on, after a power cycle. So does not expect it to be in a known state just after power on, handle it yourself.
void setup(){ evc_init(); //ensure power on consistency evc_setVolume(79); evc_mute(false); ... /* recover state from arduino eeeprom if desired */ //set the volume to stored state. }
Watch this project on GitHub
1 note
·
View note
Text
Add Code highlighting to your Tumblr Blog
Prettify as a Tumblr Theme extension
I wrote this extension that will add blog wide code highlighting to your Tumblr theme
I found code online that made this possible but, I didn't wanted to include the script on every post that I wanted to put some code on it.
And even worse a lot of then include jQuery just to load the script, which is not nescessary, so a lot of waste.
So I wrote this small piece of javascript that work as a extension to any theme, and will only load the prettify library on posts that have code in it.
It also let you configure a few things directly on the customize sidebar of your blog, without modifying code.
Usage
Just wrap your code like this on any post:
<pre><code> var foo = "bar"; //hi there! </code></pre>
And it will reder like this
var foo = "bar"; //hi there!
It also works with the markdown editor
Nice!
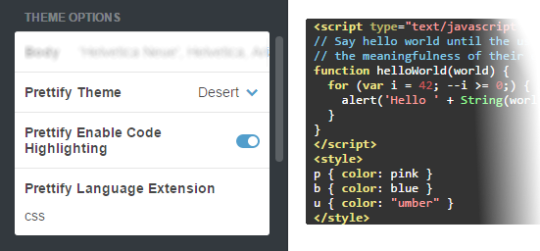
Skins
You can choose from 5 different Skins to theme your code on the THEME OPTIONS section of your blog.
Languages
It supports the following languages by default:
bsh, c, cc, cpp, cs, csh, cyc, cv, htm, html, java, js, m, mxml, perl, pl, pm, py, rb, sh, xhtml, xml, xsl.
You can load more languages using the text input on THEME OPTIONS section. Type the language file extension separated by comma or space:
Other languages are supported via extensions:
Apollo Basic Clojure CSS Dart Erlang Go Haskell Lisp, Scheme Llvm Lua Matlab MLs:F#, Ocaml,SML Mumps Nemerle Pascal Protocol buffers R, S RD Scala SQL TCL Latek Visual Basic CHDL Wiki XQ YAML
More info about the prettify library can be found here:
http://google-code-prettify.googlecode.com/svn/trunk/README.html
Just don't forget to scape HTML tags like <script><style><div> so they don't get interpreted by the browser. Replace < and > with < and >
http://www.htmlescape.net/htmlescape_tool.html
How to add this to your Tumblr
Go to your blog configurations on Edit Appearance, then click on Edit Theme
then click on Edit HTML button
Use ⌘+F or Ctrl+F to localize the </head> tag and insert the following code right before it.
Copy this code
<!-- Prettify Extension for Tumblr - by www.vitim.us --> <meta name="if:Prettify Enable Code Highlighting" content="0"/> <meta name="select:Prettify Theme" content="default" title="Default"> <meta name="select:Prettify Theme" content="desert" title="Desert"> <meta name="select:Prettify Theme" content="sunburst" title="Sunburst"> <meta name="select:Prettify Theme" content="sons-of-obsidian" title="Sons-Of-Obsidian"> <meta name="select:Prettify Theme" content="doxy" title="Doxy"> <meta name="text:Prettify Language Extension" content="css"/> {block:IfPrettifyEnableCodeHighlighting} <script> var prettify_skin = "{select:Prettify Theme}"; var prettify_langs = "{text:Prettify Extesion Languages}".trim().split(/[\s,]+/); /** Load prettify when theres a <pre><code></code></pre> on the page */ (function(fn){var d=document; (d.readyState=='loading')?d.addEventListener('DOMContentLoaded',fn):fn();})(function(){ var codes = document.querySelectorAll('pre code'); if(codes.length){ if(console) console.log("Enabling Prettify to highlight code"); Array.prototype.forEach.call(codes, function(el, i){ el.parentElement.classList.add("prettyprint"); }); var langs = prettify_langs.join("&lang="); var args = ["lang="+langs, "skin="+prettify_skin].join("&"); (function loadScript(url, callback){ var script = document.createElement('script'), scripts = document.getElementsByTagName('script')[0]; script.src = url; if(callback) script.onload = callback; scripts.parentNode.insertBefore(script, scripts); })("https://google-code-prettify.googlecode.com/svn/loader/run_prettify.js?"+args); } }); </script> {/block:IfPrettifyEnableCodeHighlighting}
Hit Save
Adding code to your blog theme
Enable the toggle switch on the side bar
Pick a theme
Save
Enjoy highlighed code anywhere in your blog!
2 notes
·
View notes
Text
How to add a custom 404 page on your Tumblr
Redirect to a custom 404 page
Go to your blog configurations on Edit Appearance, then click on Edit Theme
then click on Edit HTML button
Use CMD+F or CTRL+F to localize the </head> tag and insert the following code right before it.
Copy this code
<!-- Custom 404 Redirect --> <script> /** Detect the Not Found page on Tumblr and redirect to a custom /404 page */ (function(fn){var d=document; (d.readyState=='loading')?d.addEventListener('DOMContentLoaded',fn):fn();})(function(){ if((/^\s*Not Found\s*$/i).test((document.querySelector('h2')||"").innerText)){ var l = location, enc = encodeURIComponent; l.replace([l.protocol,"//",l.host,"/404","?source=",enc(l.pathname+l.search+l.hash),"&refer=",enc(l.origin)].join('')); } }); </script>
Paste it before the head closing tag
(paste right here)</head>
Hit Save
Adding code to your blog theme
Creating your custom 404 page
On the Edit Theme page
Click "Add a page"
Use the url yourblogurl/404
You can use Standard Layout or Custom Layout
Craft your custom page as desired
Bonus: Dynamic Links
If you want to add dynamic links like, the page the visitor was tryng to reach, and the page that sent him to the broken link. I also made a script that you can use on your custom 404 page.
The broken URL
<span class="source">{{this.source}}</span>
Link to the refer page
<a class="dynamic source" href="{{this.refer}}">{{this.refer}}</a>
Then add this script to your 404 page
<script type="text/javascript">//<![CDATA[ function ready(fn) { if (document.readyState != 'loading'){ fn(); } else { document.addEventListener('DOMContentLoaded', fn); } } function eachElm(selector, fn){ var elements = document.querySelectorAll(selector); Array.prototype.forEach.call(elements, fn); } function getURLParameter(name) { return decodeURIComponent((new RegExp('[?|&]' + name + '=' + '([^&;]+?)(&|#|;|$)').exec(location.search)||[,""])[1].replace(/\+/g, '%20'))||null } ready(function(){ eachElm(".dynamic.source", function(elm){ elm.href = getURLParameter("source"); elm.innerHTML = getURLParameter("source"); }); eachElm(".dynamic.refer", function(elm){ elm.href = getURLParameter("refer"); elm.innerHTML = getURLParameter("refer"); }); }); //]]> </script>
12 notes
·
View notes
Text
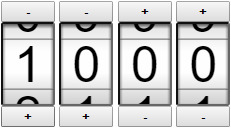
Analog Counter Wheel

The what I called the Analog Counter Wheel, was a proof of concept of a component for the web. My inspiration was the old counter wheels used in car dashboards, coin counters, etc
http://www.sandsmuseum.com/coinop/mechanisms/coincounter/
Also I wanted to build it from scratch but, I wanted it to be reusable and object oriented, so I could instantiate as many components as need and have then work independently.
The main purpose was to be a read only output component, but it also made sense to me to have an option to use it as input as well manipulating it rotating the mouse wheel. Which make it only suitable for input with a mouse because I haven’t implemented mouse drag or touch events, but I may do it in the future.
Screenshot: 4 components in a row
To use it is a simple as this
HTML:
<div id="myCounter1" class="counter"></div>
Javascript:
var myComponent = new Counter(myCounter1);
Custom Values
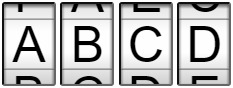
Screenshot: custom Values
<div id="myCounter1" class="counter">A|B|C|D|E|F</div>
or
var myComponent = new Counter(myCounter1); myComponent.values = ["A","B","C","D","E","F"];
Custom size
Screenshot: custom size
/* custom sized Counter */ #acw_example5.counter { width: 150px; } #acw_example5.counter .wheel { width: 150px; height: 40px; font-size: 20px; }
Buttons
Screenshot: with buttons
var c1 = new Counter(acw_example6_1); buttonPlus1.onclick = function(){ c1.next(); }; buttonMinus1.onclick = function(){ c1.previous(); };
DEMO
View demo on Jsfiddle. (Tumblr might not render the HTML)
Single
0
Single (inverted)
0
Custom (1,2,3)
1|2|3
Custom (A,B,C,d,e,f)
A|B|C|d|e|f
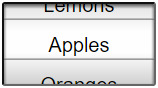
Custom (words)
Apples|Oranges|Bannanas|Pineaples|Lemons
4 in a row
- 0
+ - 0
+ + 0 - + 0 - /* custom sized Counter */ .acw-demo #acw_example5.counter { width: 150px; /*height: 30px;*/ z-index: 1; border: 2px inset #666; } .acw-demo #acw_example5.counter .wheel { /*margin-top: 5px;*/ width: 150px; height: 40px; font-size: 20px; } /* row */ .acw-demo .row span { display: inline-block; } .acw-demo .row span button { display: block; width: 100%; font-weight: bold; } /* misc */ .acw-demo { font-family: Helvetica, Arial, sans-serif; text-align: center; background-color: #F8F8F8; } .acw-demo hr{ margin: 2em 0; } //<![CDATA[ function ready(fn) { if (document.readyState != 'loading'){ fn(); } else if (document.addEventListener) { document.addEventListener('DOMContentLoaded', fn); } else { document.attachEvent('onreadystatechange', function() { if (document.readyState != 'loading') fn(); }); } } ready(function() { //instantiate counter 1 var ex1 = new Counter(acw_example1); //instantiate counter 2 var ex2 = new Counter(acw_example2); ex2.options.inverted = true; //invert counter 2 //instantiate counter 3 var ex3 = new Counter(acw_example3); //instantiate counter 4 var ex4 = new Counter(acw_example4); //instantiate counter 5 var ex5 = new Counter(acw_example5); setInterval(function(){ ex1.next(); ex2.next(); ex3.next(); ex4.next(); ex5.next(); }, 2500); //instantiate counter 6-1 var c1 = new Counter(acw_example6_1); plus1.onclick = function (e) { //add action to + button c1.next(); //increase counter 6-1 position by 1 console.log(e); //log click event }; minus1.onclick = function(){ //add action to - button c1.previous(); //decrease counter 6-1 position by 1 }; //component event c1.onChange = function(){ //event called when position of counter 6-1 changes console.log("pos changed to " + this.pos); } var c2 = new Counter(acw_example6_2); plus2.onclick = function(){ c2.next(); }; minus2.onclick = function(){ c2.previous();}; var c3 = new Counter(acw_example6_3); plus3.onclick = function(){ c3.next(); }; minus3.onclick = function(){ c3.previous(); }; var c4 = new Counter(acw_example6_4); plus4.onclick = function(){ c4.next(); }; minus4.onclick = function(){ c4.previous();}; }); //]]>
Documentation
DEMO
To create a analog-counter-wheel component you just need a div
var myComponent = new Counter(myDiv);
This will instantiate a new component and initialize it.
Public API
Properties
Counter.pos
[Integer] Current Index Position
Counter.values
[Array] of the possible values
e.g.:["A","B","C","D","E","F"];
Options
Counter.options.mousewheel
[boolean] enable mouse wheel manipulation
Counter.options.digitHeight
[Integer] height in pixels of a single digit
Counter.options.inverted
[boolean] invert direction
Methods
Counter.prototype.setValue(String value)
Set the position to the position of the String value
Counter.prototype.getValue()
returns the String value of the current position
Counter.prototype.setValue(String value)
Set the position to the position of the value
Counter.prototype.getPos()
returns the current index position
Counter.prototype.setPos (int index)
Set the position to the specified index
Counter.prototype.moveBy(int x)
Move by the specified amount (positive or negative)
Counter.prototype.moveTo(int pos)
Move to the specified index position
Counter.prototype.next()
Increase the position by one
Counter.prototype.previous(int pos)
Reduce the position by 1
Watch this project on GitHub
0 notes
Text
Character Generator for 7 segments Display
This is a little WebApp helper, for those who want to experiment with 7-segment displays, and draw numbers or even a few other symbols and letters.
It will generate the arduino code for you. For it just draw the symbol you want, give it a description name and click save to add it to the list. Then use the Generate Code button.
.display7{ display:inline-block; background-color: #000; padding: 1em; font: Monaco, "Panic Sans", Consolas, "Courier New", monospace; font-size: 12pt; color: transparent; } .display7:hover{ color: #666; } .display7 .a .display7 .b, .display7 .c, .display7 .d, .display7 .e, .display7 .f, .display7 .g,{ text-align: center; } .display7 div{ background-color: #121; text-align: center; cursor: pointer; } .display7 div:hover{ outline: 1px outset #0F0; } .a, .g, .g{ width: 4em; } .b, .c, .e, .f{ width: 1em; height: 4em; } .display7 div.on{ background-color: #CF0; } #panel{ text-align: center; background: #999; padding: 1em; } #animationPanel, #storagePanel{ display: inline-block; border: 0px solid gray; height:auto; } textarea{ text-align: left; }
A
F
B
G
E
C
D
Add character to List Save
Saved characters Load Remove Selected
Arduino Code Generate Code
var playing, t, d1, d2; var savedAnimations = {}; function saveChar(){ var charObj = { name: animName.value?animName.value:prompt("Type a character name","8")||0, data: d1.getValue() } savedAnimations[charObj.name] = charObj; savedList.innerHTML = ""; for(var a in savedAnimations){ var opt = document.createElement('option'); opt.innerHTML = savedAnimations[a].data+" → "+a; opt.value = a; savedList.appendChild(opt); } window.localStorage.setItem('savedChars', JSON.stringify(savedAnimations)); } function loadChar(){ var a = savedAnimations[savedList.value]; writeDisplay(a.data); } function deleteChar(){ if(savedList.value){ var a = savedAnimations[savedList.value]; delete savedAnimations[a.name]; savedList.innerHTML = ""; for(var a in savedAnimations){ var opt = document.createElement('option'); opt.innerHTML = savedAnimations[a].data+" → "+a; opt.value = a; savedList.appendChild(opt); } window.localStorage.setItem('savedChars', JSON.stringify(savedAnimations) ); } } function generateCode(){ var text = "byte dictionary[] = {\n"; var i=0; for(var a in savedAnimations){ text += ' B'+savedAnimations[a].data+', \t// ['+i+'] => "'+a+'"\n'; ++i; } text += '};'; code.value = text; } function pushB(){ anim.value += d1.getValue()+"\n"; } function play(){ if(!playing==true){ var sequence = anim.value.split(/\n/); var i=0; var r = parseInt(repeat.value); console.log('animation started'); t = setInterval( function(){ if(sequence[i]){ console.log('animation frame', i, sequence[i]); playing = true; var bytes = sequence[i];//.split(" "); writeDisplay(bytes); ++i; } else{ if(r>=0){ i=0; --r; console.log('animation repeat'); }else{ clearInterval(t); playing = false; console.log('animation ended.'); } } }, parseInt(speed.value)); } else console.log('already playing!'); } function stop(){ playing=false; clearInterval(t); console.log('animation canceled'); } /** * Add a event to a element; * @param {Object} element Element or ID; * @param {String} trigger Trigger to fire action eg:load,click,mouseover,etc; * @param {Function} action A pointer to a function to be called on trigger; */ function addEvent(element, trigger, action){ if(typeof element==="string"){element=document.getElementById(element);} if(element.addEventListener){ element.addEventListener(trigger,action,false); return true; } else if(element.attachEvent){ element['e'+trigger+action] = action; element[trigger+action] = function() { element['e'+trigger+action]( window.event );} var r = element.attachEvent('on'+trigger, element[trigger+action]); return r; } else{ element['on'+trigger] = action; return true; } } function writeDisplay(bytes){ d1.setValue(bytes); dispData.value = bytes; } /* * Counter.js - written by Victor N - 22/Nov/2013 - www.vitim.us */ function Display(displayElement){ var self = this; this.pos; this.values = [0,1,2,3,4,5,6,7,8,9]; this.options = { mousewheel: true, digitHeight: 0, inverted: false } this.DOM = { display : displayElement, segments: [ displayElement.querySelector('.a'), displayElement.querySelector('.b'), displayElement.querySelector('.c'), displayElement.querySelector('.d'), displayElement.querySelector('.e'), displayElement.querySelector('.f'), displayElement.querySelector('.g') ] } this.DOM.display.onclick=function(){ } for(var i=0; i<this.DOM.segments.length; ++i){ this.DOM.segments[i].onclick = function(){ this.classList.toggle("on"); if(self.onChange) self.onChange(); } } } Display.prototype.setValue = function(value){ if(typeof value=="number") value = value.toString(); for(var i=0; i<this.DOM.segments.length; ++i){ var b = value.charAt(i); if(b=="1") this.DOM.segments[i].classList.add("on"); else this.DOM.segments[i].classList.remove("on"); } } Display.prototype.getValue = function(value){ var byte=[]; for(var i=0; i<this.DOM.segments.length; ++i){ byte.push( this.DOM.segments[i].classList.contains("on")?1:0) } return byte.join(''); } function ready(fn) { if (document.readyState != 'loading'){ fn(); } else { document.addEventListener('DOMContentLoaded', fn); } } /* JAVASCRIPT GOES HERE */ ready(function(){ dispData.value = ""; d1 = new Display(digit1); writeDisplay("1111111"); d1.onChange = function(){ dispData.value = d1.getValue(); } //Load saved animations to memory var storage = window.localStorage.getItem('savedChars'); if(!storage){ storage ='{"0":{"name":"0","data":"1111110"},"1":{"name":"1","data":"0110000"},"2":{"name":"2","data":"1101101"},"3":{"name":"3","data":"1111001"},"4":{"name":"4","data":"0110011"},"5":{"name":"5","data":"1011011"},"6":{"name":"6","data":"1011111"},"7":{"name":"7","data":"1110000"},"8":{"name":"8","data":"1111111"},"9":{"name":"9","data":"1111011"},"A":{"name":"A","data":"1110111"},"dash":{"name":"dash","data":"0000001"}}'; } if(storage){ savedAnimations = JSON.parse(storage); for(var a in savedAnimations){ var opt = document.createElement('option'); opt.innerHTML = savedAnimations[a].data+" → "+a;; opt.value = a; savedList.appendChild(opt); } } });
Example code
I wrote a sample code that you can use as example.
Also avaliable on GitHub https://github.com/victornpb/display7
/** * 7-segments display example code * * This code is distributed under The MIT License (MIT) * Copyright (c) 2014 victornpb - www.vitim.us * created on 18-nov-2014 */ #define C_ANODE false const uint8_t myDisplayPins[8] = {3,4,5,6,7,8,9,10}; //dp A B C D E F G byte font[] = { B1111110, //[0] => "0" B0110000, //[1] => "1" B1101101, //[2] => "2" B1111001, //[3] => "3" B0110011, //[4] => "4" B1011011, //[5] => "5" B1011111, //[6] => "6" B1110000, //[7] => "7" B1111111, //[8] => "8" B1111011, //[9] => "9" B1110111, //[10] => "A" B0000001, //[11] => "dash" }; void setup(){ display7Setup(myDisplayPins); //configure myDisplayPins as outputs } void loop(){ display7(myDisplayPins, font[0]); //display "0" delay(1000); display7(myDisplayPins, font[9]); //display "A" delay(1000); display7(myDisplayPins, font[11]); //display "-" delay(1000); display7(myDisplayPins, B00000000); //turn all segments OFF delay(1000); //count 0 to 9 for(int i=0; i>= 1; } }
Software distributed under the License is distributed on an "AS IS" basis, WITHOUT WARRANTY OF ANY KIND, either express or implied.
0 notes
Text
How to make a Tabbed Panel using CSS without Javascript
Tabbed Panels are not a new thing, they have been around on your desktop since the first graphic interface. The web is here, but we don't do things like pepperidge farm remembers. A long time ago netscape came up with this client side scripting language, we call javascript, ECMAScript for picky. It has proven very useful for all sort of things. And more recently thankfully or not with the explosion of libraries like jQuery, you probably see Tabbed Panels everyday on the web too.
But Today I was fiddling around and I found something that I though it was very cool and I want to share with you guys that it is possible to make a Tabbed Panel with pure CSS and markup, without Javascript.
Don't get me wrong, I love javascript and I write javascript everyday, but is very cool to see that it is possible to do this kind of things without it.
DEMO
JSFIDDLE http://jsfiddle.net/Victornpb/h2nb6/
.tabbedPanel{ display: table; } .tabbedPanel .tabBar{ display: table-row; height: 0; } .tabbedPanel .tabBar label{ display: inline-block; } .tabbedPanel .tabs{ display: table-row; height: auto; } .tabbedPanel .tabs > input[type="radio"]{ display: none; } .tabbedPanel .tabs > div{ height: 100%; overflow: scroll; } .tabbedPanel .tabs > input[type="radio"]:not(:checked)+div{ display: none; } .tabbedPanel .tabs > input[type="radio"]:checked+div{ display: table-row !important; } /**** Visual ****/ .tabbedPanel{ border: 1px solid grey; height: 300px; width: 300px; } .tabbedPanel .tabBar{ background: #F0F0F0; font-family: Helvetica, Arial, sans-serif; } .tabbedPanel .tabBar label{ cursor: pointer; background: #C0C0C0; border: 2px outset #CCC; border-bottom-color: transparent; border-radius: 3px 3px 0 0; padding: 0.5em; padding-top: 4px; padding-bottom: 4px; margin-top: 3px; margin-right: 1px; } .tabbedPanel .tabBar label:first-child{ margin-left: 5px; } .tabbedPanel .tabBar label:hover{ color: #38f; } .tabbedPanel .tabBar label:active, .tabbedPanel .tabBar label.active{ color: blue; background-color: #DDD; border: 2px outset #BBB; border-bottom: 2px solid transparent; } .tabbedPanel .tabBar label:focus{ outline: 2px solid yellow; } .tabbedPanel .tabs > div{ border: 2px outset #DDD; }
Tab 1 Tab 2 Tab 3
Tab 1
Lorem Ipsum is simply dummy text of the printing and typesetting industry. Lorem Ipsum has been the industry's standard dummy text ever since the 1500s.
Tab 2
Lorem ipsum dolor sit amet, consectetur adipiscing elit. Proin iaculis diam eget leo dapibus suscipit. Integer vulputate lacinia libero, nec interdum diam consectetur non. Quisque elementum augue lectus, id euismod risus bibendum quis. Integer nec turpis facilisis, vestibulum mi vel, mattis nisi. Integer et sapien odio. Pellentesque enim ipsum, dictum vel malesuada non, elementum sed augue. Curabitur quis lectus libero. Proin vel elementum quam. Nam ipsum ligula, condimentum nec ante vitae, sollicitudin auctor elit. Morbi et elementum lectus. Aenean vulputate lobortis nunc.
Tab 3
Quisque orci metus, elementum et purus vitae, fringilla dictum orci. Sed tincidunt, lectus vitae bibendum vehicula, turpis nisi pharetra ante, et posuere diam sem eget metus. Curabitur id felis non odio aliquam dignissim. Fusce volutpat vulputate enim quis pellentesque. In ut nunc eleifend, rutrum velit non, sollicitudin lectus. Praesent fringilla ipsum lectus, condimentum varius elit accumsan nec. Curabitur hendrerit, orci pretium pulvinar lobortis, nunc metus ultricies elit, vel sodales urna erat et quam. Nulla ac turpis pretium, gravida mauris vitae, interdum arcu. Aenean porttitor, justo a consectetur iaculis, neque est varius nisi, a vulputate eros elit ac justo. Etiam elementum ipsum sit amet dignissim lacinia.
The little magic behind it is a radio button before each tab. By nature of how radio buttons work, when one radio is checked, it's the only one checked, which makes then useful for out TabbedPanel, which will only show one tab at time.
<input type="radio" name="tabs" id="tab1" checked> <div> <!-- Content tab 1 --> </div> <input type="radio" name="tabs" id="tab2"> <div> <!-- Content tab 2 --> </div> <input type="radio" name="tabs" id="tab3"> <div> <!-- Content tab 3 --> </div>
This selector will select a div that it's right after a checked radio button
input[type="radio"]:checked+div{ /* SHOW TAB */ }
But we don't want to show the radio buttons, so we hide then using CSS. But, there's a problem how we are supposed to check a radio button if it's hidden? The answer is a Label. A label let us refer to another element even if it's hidden, so that's what we are using as Tab buttons. The good thing is that allow us to place the tabs in any order we want, also put text and icons inside, even outside the tabbedPane.
<div class="tabBar"> <label for="tab1">Tab 1</label> <label for="tab2">Tab 2</label> <label for="tab3">Tab 3</label> </div>
The full markup is something like this
<div class="tabbedPanel"> <div class="tabBar"> <label for="tab1">Tab 1</label> <label for="tab2">Tab 2</label> <label for="tab3">Tab 3</label> </div> <div class="tabs"> <!-- TAB 1 --> <input type="radio" name="a" id="tab1" checked> <div> <h1>Tab 1</h1> <p>Content</p> </div> <!-- TAB 2 --> <input type="radio" name="a" id="tab2"> <div> <h1>Tab 2</h1> <p>Content</p> </div> <!-- TAB 3 --> <input type="radio" name="a" id="tab3"> <div> <h1>Tab 3</h1> <p>Content</p> </div> </div> </div>
This is more or less of what like the CSS would be
.tabbedPanel{ display: table; } .tabbedPanel .tabBar{ display: table-row; height: 0; } .tabbedPanel .tabBar label{ display: inline-block; } .tabbedPanel .tabs{ display: table-row; height: auto; } .tabbedPanel .tabs > input[type="radio"]{ display: none; } .tabbedPanel .tabs > div{ height: 100%; overflow: scroll; } .tabbedPanel .tabs > input[type="radio"]:not(:checked)+div{ display: none; } .tabbedPanel .tabs > input[type="radio"]:checked+div{ display: table-row !important; }
Adding some quick look and feel
/**** Visual ****/ .tabbedPanel{ border: 1px solid grey; height: 300px; width: 300px; } .tabbedPanel .tabBar{ background: #F0F0F0; font-family: Helvetica, Arial, sans-serif; } .tabbedPanel .tabBar label{ cursor: pointer; background: #C0C0C0; border: 2px outset #CCC; border-bottom-color: transparent; border-radius: 3px 3px 0 0; padding: 0.5em; padding-top: 4px; padding-bottom: 4px; margin-top: 3px; margin-right: 1px; } .tabbedPanel .tabBar label:first-child{ margin-left: 5px; } .tabbedPanel .tabBar label:hover{ color: #38f; } .tabbedPanel .tabBar label:active, .tabbedPanel .tabBar label.active{ color: blue; background-color: #DDD; border: 2px outset #BBB; border-bottom: 2px solid transparent; } .tabbedPanel .tabBar label:focus{ outline: 2px solid yellow; } .tabbedPanel .tabs > div{ border: 2px outset #DDD; }
I'm not sure how and if it can be used in a production environment. I can't answer that, but as-is, probably not. Somehow IE always finds its ways to not work with things properly, and that would kill every hope to let it going to production.
There's limitations. I couldn't figure out how to keep the current Tab button highlighted yet. Radio buttons require a name to work as a radio group, and labels require each radio button to have a unique ID.
Anyway, I hope you find it interesting, if you have any though on this, drop a comment.
0 notes
Text
SIME - System Information Menu Editor
Visit WebApp
SIME was an attempt to do a WYSIWYG editor to design menu interfaces for touchscreen GPS Systems and PocketPCs running Windows CE.
The tool was used to generate a serialized graphic representation in a "INI" like format file which is used to generate a menu by the SystemInformation32 application.
SystemInformation is a free german software by ultimatelaunch.de
It was a pretty good exercise writing javascript, everything was built from scratch, no jQuery or other fancy libraries. It uses only javascript CSS3 and HTML5 techniques, and there's no server back end.
Unfortunately I never managed to get it completed, but I hope I will get it done someday.
The source code is not minified or obfucated, so feel free to check it out, and if you want to continue this or use it to build another thing maybe, drop me a note on my contact page or social networks.
The documentation for the launcher software can be found here Ini-Beschreibung and here Tutorial, unfortunately texts are in german only, but you can use google translate for that.
Check it out here:
Visit WebApp
0 notes
Text
Resistor WebApp
http://victornpb.github.io/resistor
There are two things that I like doing, writing Javascript and playing with electronics.
Check out my little resistor color code helper.
It supports URL anchors, so you can easily use URLs like these:
victornpb.github.io/resistor/#4K7
victornpb.github.io/resistor/#4.7K
victornpb.github.io/resistor/#1.8MΩ 0.5%
victornpb.github.io/resistor/#brown-green-red
victornpb.github.io/resistor/#brown-black-red-gold
victornpb.github.io/resistor/#brown|black|red|red
pretty cool ha!?
And you can add to your home screen on your iOS Device.
Hope you like it!
Watch this project on Github
0 notes
Text
SimCity4 Launcher
If you play Sim City 4 this is a must have full featured Launcher! It will let you to play Sim City 4 on a custom resolution, or play in a window while surfing the web or doing other things in the computer.
Have you ever lost hours of progress due to a crash? Forgot to save?
Never loose you progress again, with the auto save feature.
Your game will be automatically saved while playing on a chosen interval.
Play your game in full 1920x1080p on a huge 27" monitor or any other resolution.
Play in widescreen resolutions.
Play in full-screen or play in a floating window, no more ALT+TAB.
Fully configurable.
Playing windowed while multitasking
You can select between 9 backgrounds or let it randomly choose one every time.
Supports additional parameters.
Option to exit launcher when the game is launched.
List of features
Auto Save Feature - automatically save your game progress while playing.
Quick saving - no one have time for long waiting dialogs.
Save in a customized interval, you can adjust from every minute up to 120 minutes.
Log saving events
Custom resolution
Detect current resolution
Color depth
Launch game in full-screen or windowed
Rendering mode (Software, OpenGL or Software)
Background Loading
Ability to turn Music and Sound On and Off
Option to skip the Introduction videos
Game pausing
Choose a custom game data directory
Change Language
Change process priority
Feature to change number of logical core used.
Browse for the location of the game
Auto detect game executable on common directories
Specify custom parameters
Change between 9 background images
Random background
Option to exit the launcher when the game is launched
Option to reset defaults
Auto save settings to INI file
No dependencies, single executable.
Works on Wine (Linux, OSX...)
How to use:
Download the executable
Place it in any folder you like
Double click it> If you place it inside the SimCity folder it will automatically find the game executable.
e.g.: ...\Maxis\SimCity4 Deluxe\ or ...\Maxis\SimCity4 Deluxe\Apps\
If you have the game installed on the default path it will find the game automatically even if you place the launcher in any other folder.
If you like this you can always pay me a coffee:
Donate via PayPal
I will thank you from the bottom of my heart!
Download:
Download now
0 notes
Text
iBattery 2.0
"A battery meter to the desktop of your Laptop, Notebook or Netbook."
Made for Windows Vista Sidebar or to Windows 7 Desktop
One of the most popular battery gadget, more than thousands of downloads, and now the version 2.0 is here.
New in version 2.0 (Released 30/Oct/11)
Now support 5 colors
Option to show and hide percent value, time remaing, and status icon
Remaing time estimation now is supported by all devices using a built-in algorithm
New all engine, rewritten from zero
Sound effects
3 sound themes
Performance improved
Low memory usage
Low CPU load
Improved response time
Update notifications
Other improvements
Avaliable in English and Portuguese
Version 1.0
Transparent
Show percent
Show charging status
Show AC status
Show when battery is removed
Show remaing time
Download:
Download now
0 notes
Text
Toggle visibility of hidden files and folders on Mac OS X
Now you can show and hide hidden files on Mac OS X directly from finder.
This utility allows to simple toggle visibility of hidden files and folders from Finder menu.
I made this utility using the Apple Automator App, works on Mac OS Lion and Mountain Lion.
Usage
Installation
Users using Mountain Lion or Above:
Control + Click or Right-Click > Open
To install just unzip, double click the file, you will be asked to install it,
just click Install and then click Done.
Tested on:
Lion
Mountain Lion
Mavericks
Yosemite
El Capitan
Download:
Download now
0 notes
Text
Skymote
Sky HDTV and Directv Remote Control
Web-App to control your Set-Top Box with this Virtual Remote Control, works with Sky HDTV and Directv, connecting your set-top box to your local network, using a ethernet cable and plugging to your router, few steps, and you have full control on any device, works with Laptops and Desktops using Safari/Chrome/Firefox, iPhone, iPod Touch and iPad.
Add the icon to your home screen, just open Safari and type the url http://vitim.us/sky and follow these 3 steps.
Click on the switch to open configuration panel, and enter the IP of your sattelite receiver.
Instructions:
Plugging your receiver to the network
Connecting to the network
Checking IP Address of the receiver
Compatible with ethernet capable receivers like SKY HDTV and DIRECTV HD DVR
.iphonescreenshot { width: 320px; height: 480px; padding: 131px 32px; display: inline-block; background-image: url('http://4.bp.blogspot.com/-WaLk7Dje160/TtvkapaXPpI/AAAAAAAAALE/zenNCnCffN0/s1600/iphone4_mask.png'); background-repeat: no-repeat; }
0 notes