
themesbytommy
Themes By Tommy
Hello! My name is Tommy and I'm an aspiring web developer.
This blog currently contains Tutorials and Tips & Trix. In the future I would love to start posting themes and other stuff. I love trying to figure out how things work.
31 posts
Don't wanna be here? Send us removal request.
Last Seen Blogs

masonxmahir
magic man

prettypetitecupcakes
Pretty Petite

vertbois
Vertbois

learnforprofit-blog
Untitled

kainebell
Must Be The Season Of The Witch
Text
My Tumblr Wishlist
This is a list of features I would love to see on tumblr.
Titles for all post types
Custom 404 pages
Folding/ Collapse code - Hide blocks of code in order to simplify what is displayed on your screen and help to give you a overview of the code. Click on a little arrow to show/ hide the code inside that block.
Pop out HTML editor
Tumblr Controls - The option to change icons, colors, text, position.
Ask box - Change colors and add text or other content above and/ or below the askbox itself to create a faq without having to use other techniques and code.
Blocks - More unique blocks so you can better show and hide content on different pages.
Like Button - Links. The same way as the {ReblogURL} work. Make it easier to use custom like buttons.
8 notes
·
View notes
Text
Old YT-Red

Youtube hit us with a new update not long ago and as always people have mixed feelings about it. One thing I saw people commenting on is the new color. They changed not only the logo/ logotype and the layout, the color also went from a dark red to a light brighter red, across the entire website.
This is a 5-minute solution and far from a ‘perfect fix’, so that means you have to deal with some things not working 100%. If you find that I have missed something or that something look weird while using this please send me a message and I will take a look at it and do my best to update the code.
Parts targeted by this style:
Icons in the sidebar
Logo in the top left corner
Video Player Progress bar
Subscribe Buttons on main page, under videos and on channel pages
Remember that this targets the new layout and the new layout only, if you have reverted back to the old layout and use this style things might not the way it’s supposed to.
To use this you need to use the plugin/ extension Stylish. Link
The style can be found here.
If you have any problems installing the plugin I suggest turning to google, there are many great tutorials out there on how to install and use it, however If you have any problem connected to the style I created feel free to send me a message and I will do my best to help you :)
If you find anything you want me to fix or something i missed, please send me a message and I will take a look at it.
#youtube#youtube update#stylish#usertyles#other#themes by tommy#theme switch#theme title tags#theme d5tags#youtube redesign#redesign#design#update
7 notes
·
View notes
Link
When learning JavaScript one of the first things you will learn/ should learn is naming and that you can’t just name your variables or other objects anything you want. Here is a link to a list containing reserved keywords that you can not use. Handy to have around.
4 notes
·
View notes
Text
Smooth scroll on overflow IOS
When you flick your finger on a mobile phone or tablet it will keep scrolling until eventually slowing down and stopping, this is called momentum-based scrolling.
When you add the css property overflow this momentum-based scrolling will return to “regular” scrolling, meaning you will immediately stop scrolling when you lift your finger from the screen.
Quite annoying when you have content or posts inside a div with overflow set and you want it to work in the same way as it normally would.
Luckily for us you can add it with a special property.
If you have the overflow set to scroll or hidden adding this code should work.
-webkit-overflow-scrolling: touch;
3 notes
·
View notes
Text
Browser Notepad
I found this little trick the other day, if you need to write something down and don’t feel like opening or creating a document you can open a new tab in your browser and type this in the address bar. Works in most modern browsers.
data:text/html, <html contenteditable>
This will give you a blank page and you can start typing. If you click ctrl + s or cmd + S (Mac) you can save it as a text file on your computer.
Source: Lifehacker
58 notes
·
View notes
Text
Styling Links

The two states people think about the most is link and hover since those are the most noticeable ones. Way to often I see people forgetting about the remaining ones or using the wrong order when styling. This is how you style links.
Every link has four five states.
a:link - a unvisited link
a:visited - a visited link
a:hover - when you mouse over a link
a:focus - same as hover
a:active - a selected link
In order to make the links work properly there are a few rules you have to follow.
a:hover must come after a:link and a:visited
a:active must come after a:hover
There’s a fifth property that people seem to forget about that’s called focus. It works in the same way as hover, but it works for keyboard users. Most of the time it makes sense to have hover and focus to look the same.
a:link {
color: red;
}
a:visited {
color: green;
}
a:focus, a:hover {
color: #456456;
}
a:active {
color: #990000;
}
I always have a problem remembering the correct order, but there are a few tricks I know people use to help remember. Just think LVFHA, or LoVe For HAte or if you are a Star Wars fan “Lord Vader’s Former Handle Anakin” or “Lord Vader Hates Furry Animals”. There are many tricks out there but the point remains, make it fun, it doesn’t have to be hard.
You can also target specific links. If you for example want to style the links in you navigation menu in a special way that differs from the other links on the page you can do that. Let’s say you have links inside a div with the id of nav, you can target those links by adding the #nav in front of your link in css.
#nav a:link {
color: black;
}
#nav a:visited {
color: black;
}
#nav a:focus, #nav a:hover {
color: orangered;
}
#nav a:active {
color: black;
}
Visited Links are probably one of the most useful links you can use, especially on larger websites. Knowing that you have visited a page can be really helpful if you want to find it again. It can be something as easy as slightly changing the colors on the visited links or changing the text-decoration.
Tips: Remember that users scan the text and don’t read it. Make sure your links are obvious. Give them an other color or style them in a way that makes them stand out from the other text.
#css#links#tutorial#Tips & Tricks#style#code#themes by tommy#theme switch#theme title tags#theme d4tags
11 notes
·
View notes
Text
What is the difference between IDs and Classes?

I have seen many people miss use IDs when coding so i thought i’d make a quick post explaining what the difference is and what to use what.
IDs
The ground rules for a ID are:
A ID is unique and can only be used once.
Each element can only have one ID
In HTML you type it like this:
<div id=“cereology”></div>
And in CSS and Javascript you can call on it like this
#cereology
Class
Classes are the opposite to IDs
Can be used an unlimited amount of time
A element can have multiple classes
In HTML it looks like this
<div class=“eucatastrophe”></div>
And in CSS and Javascript you can call on it like this
.eucatastrophe
When do I use what?
If you know you are going to use something multiple times, then use classes. If you know you are only going to use it once you should use IDs.
If you are still unsure stick to classes and it can’t go wrong.
4 notes
·
View notes
Text
z-index. What? Why? and How?

I did a little mini series on CSS Positions so I though I would make a post about z-index. What it is, how to use it and why it’s so important.
What is z-index?
You can think of z-index as layers, it controls the stack order of elements on the page. The higher the number, the higher up it goes in the pile. If you have elements overflowing, laying on top of each other, you must be able to control which element you want to be visible and which element to be hidden under the other.
How to use z-index?
the property looks like this
z-index: number;
You can choose any number, even negative numbers.
However you can only use z-index on elements with a declared position, if you try to use it on a element without a position or position: static; it will not work.
position: relative; , position: absolute; and position: fixed; should work just fine!
If I have two divs, one has the z-index of 2 and the other one has the z-index of 13, this means the div with the z-index of 13 will be displayed on top of the one with z-index 2.
8 notes
·
View notes
Text
Tumblr Base code
I grew tired of rewriting the basic code for a HTML Document and finding all the links to the stuff I use every time i code something on tumblr.
This is just a super simple HTML Document that I use as a foundation when creating something new on tumblr.
It got some basic things like Title, Favicon, Character set and Viewport fix as well as Google Fonts and some basic styles, it got links to jQuery and Normalize. That’s about it.
Link to Pastebin
46 notes
·
View notes
Text
CSS Positions - Part 3

This is the third part in my CSS Position Mini series. This post is all about Position Absolute and Fixed
Position Absolute
When you declare a element with the position of Absolute you kind of remove the dimensions of it and the other elements will ignore it and just pretend as if it was not there.
If you havn't delared any direction to the element it will simply sit on top of the other elements until a direction has been given.

If I would declare a direction to the element, for example top: 30px; and left: 10px; it will be positioned 30px from the top and 10px from the left of it's closest parent with a declared position.

If you do not have parent with a position declared it will be positioned relative to the document/ the page.

Position Fixed
Just like the absolute position it is like the element has no dimension and will just sit on top of the other elements, it’s pulled out of the flow.
A fixed element will never respect any of it’s parents, it’s always positioned relative to the document window.
If no directions are declared, it will just be stuck where it was and if you scroll it will be floating.

If I for example set it to position: fixed; and top: 10px; and right: 10px; it will be positioned 10px from the top and 10px from the right of your screen and when you scroll it will still be in the same position.
8 notes
·
View notes
Link
If you have been working really hard on a theme and then somehow it all got blown away or maybe you didn’t like the new changes you made?. There is a way to recover old versions.
Tumblr saves the last 20 versions of your theme and you can recover them any time you want. Click on the link and choose the blog you want to recover.
26 notes
·
View notes
Text
CSS Positions - Part 2

This is the second part in my CSS Position Mini series.
This post is all about Position Static and Position Relative.
Position Static
This is the most common position and the position you will run in to the most even if you don’t know it. This is the default position or default state of a element. The Directions are also set in a default state, auto.
If you try to declare a direction to a element that is positioned static, nothing will happen.
The default Value of almost every element are
position: static;
top: auto;
left: auto;
right: auto;
bottom: auto;
You don't have to declare this position in you code, the browser will do that automaticly.
You might not use this position very often but it is good to know if you ever want to reset the position of a element.
Position Relative
You will probably use this one quite often. If you add this position to any element, there are no visible changes. But as soon as you start to add Directions to this property you will notice that things change.
In my example below I have the word Pudding (highlighted in red) set to position relative. I have also given it some directions, i added top: 70px; and left: 200px;

As you will see the word moved, 70px from the top and 200px to the left from it’s default position.
There’s a hole or a gap in the text where the word should have been. The flow of the text (of the other elements) on the page still respects that element and the area the element would take up if it were there.
12 notes
·
View notes
Text
Favorite Atom Packages
Atom is one of many text editors out there and it’s the best one i’ve used so far. Just like some other text editors out there you can install themes and packages and in this post i’m gonna list my top atom packages that I use while coding.
Pigments
This packages is created to display the colors you use in your project files. This package highlights the code with the colors they represent. It also scans your files for color codes and creates a pallet where you can easily find the colors you have used. It also works with autocomplete to display a preview of the colors you have used.

Source: Atom.io
Color Picker
When a color is detected a helpful window opens that lets you choose between colors and formats. Super helpful when looking for the right colors for your project.

Source: Atom.io
Expose
Expose works in the same way as Mac OS expose feature. With this package you can display all open files as small thumbnails and quickly switch between them. It’s super helpful when you have many tabs open at them same time.

Source: Atom.io
Minimap
This plugin gives you get a preview of all the code in your file. It allows for quick navigation if you have a lot of code and it works great with other packages such as Pigments and Highlight Selected. Together with this plugin I sometimes also use the minimap-bookmarks package.

Source: Atom.io
Highlight Selected
If you have ever used Sublime you might know that you can double click on a word and the word will be highlighted throughout the file. If you use the Minimap package there is a minimap-highlight-selected package that makes the word appear highlighted on the minimap.
Source: Atom.io
Beautify
Beautify will help you turn messy code into more neat and readable code.

Source: Atom.io
CSS Comb
CSS Comb is like a cousin to Beautify, it help you sort unsorted code to make it easier to read

Source: Atom.io
27 notes
·
View notes
Text
CSS Positions - Part 1
To make a good post about CSS Positions is hard, not because it’s a difficult subject, because there’s so many things to cover. I decided to split this in to three parts.
In the first part we will talk about Directions, Parents and Children, in the second part we’ll talk about Position Static and Relative and in the third part Position Absolute and Fixed.
Directions
Not to be confused with the css direction property.
After giving a element a position you can use the directions to push and/ or move the element. There are four directions you can use:
top: ;
left: ;
right: ;
bottom: ;
They will behave differently depending on the type of position you have given the element, but we will talk more about that later. For now it's just important to know that they exist and what they do.
CSS Parents and Childs
Any element inside another element is a child to that element.
<div class="granddad">
<p class="dad">
<span class="me"> Me </span>
</p>
</div>
If we start from the span with the class of 'me'. This is 'me', and the element surrounding me is my parent (the paragraph with the class of dad). This makes 'me' the child of 'dad'.
In the same way is 'dad' the child of 'granddad' and 'granddad' the parent of 'dad'. This example also makes 'me' the grandchild of 'granddad'.
It's important! to understand the relationship between parents and childs, especially when playing around with positions.
We will talk more about all this as we make our way through the different Positions, but it’s important to know or at least have heard of before continuing.
The reason for this is that you will be using the different directions when positioning elements and depending on where your elements is located in your code and what position your parent elements have some position will behave different.
7 notes
·
View notes
Text
Comments

Comments are very useful if you have a big website with a lot of code, people often use comments to explain the code, so later when they or other people edit the code they got a brief explanation of what the different parts of the code do.
Comments are not displayed in the browser so everything inside or after the comments will be hidden.
HTML
The comments for HTML looks like this, anything inside the code will not be displayed in the browser.
<!-- -->
<!-- <p>This text will not be displayed in the browser</p> --> <p>This text will be displayed in the browser like normal, because it’s outside of the comments tags.</p>
CSS
The stuff inside the /* */ marks the CSS Comments. It works in the same way as HTML comments does, anything inside the /* */ will be hidden. example:
body{
font-size: 20px;
/* color: #252525; */
}
In this example the browser will read the font-size and set it to 20px but it will skip the color and not change it.
Javascript & jQuery
In javascript there are two types of comments.
The first one is what’s called Single Line Comments, any text between the // and the end of the line will be hidden, it looks like this:
// Comment here
This text will be visible // This text will not b/c it’s after the “//”
The second is Multi Line Comments, this works in the same way like CSS, anything inside the /* */ will be ignored.
/*** This text here will be ignored ***/
#html#css#jquery#Tips & Tricks#comments#code#web development#themes by tommy#theme switch#theme title tags#theme d4tags
3 notes
·
View notes
Text
How to use Google Fonts
There are a few basic fonts that you can use on the web, but for the longest time the web was lacking and the fonts we could use were very limited.
Google Fonts allows creators to use other fonts then the standards on the web, and this is how you can use it on your site.

Start by visiting https://fonts.google.com/, here you can choose between 809 fonts. (as of me writing this)
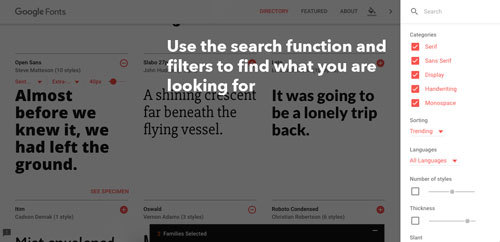
You can search and filter to find the type of font you are looking for.

Use the + to select the fonts you want to use.

Click on the big black bar in the bottom of the page

Then click on “customize” to choose what parts of the font you want to use.

Keep an eye on the Load Time, you don’t want to slow down your page.
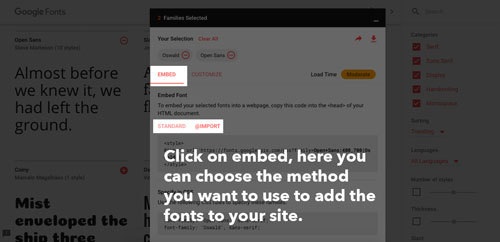
Click on Embed and choose the method you want to use to add the fonts to your page. (Standard or import)

If you use import you place the code inside the <style> tags in you css.

If you use Standard you place the code inside the <head> tags in you document.

To use the fonts, add the font families to the appropriate parts of you css.
Google Fonts
#html#css#tutorial#code#google fonts#style#themes by tommy#theme switch#theme title tags#theme d3tags
5 notes
·
View notes
Text
Letter Spacing

Letter Spacing controls the space between letters across a block of text or words, wherever you decide to use it. It’s commonly used on headlines or logos to make them stand out a little more and/ or to make them easier to read.
Most fonts are designed and optimised for readability, but this property can be useful in particular circumstances.
The CSS Property looks like this:
letter-spacing: 2px;
You can also change the value to a negative value if there’s to much space between the letters. And if you type in normal you reset the letter spacing to default.
letter-spacing: -2px;
letter-spacing: normal;
#css#easy#tutorial#css property#letter spacing#themes by tommy#theme switch#theme title tags#theme d3tags
4 notes
·
View notes