#tumblr killed the saturation again whats new -___- edited the colors
Photo

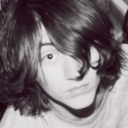
digimon 02!!
#digimon#digimon adventure#tk takaishi#kari kamiya#takaishi takeru#yagami hikari#yagami taichi#tai kamiya#davis motomiya#motomiya daisuke#patamon#gatomon#my art#seeing familiar faces with fresh new designs left a big impression on me when starting 02 like wow everyone’s really grown up a lot!!!#their outfits coordinated so well it looks like they went shopping together or something#super cute#tumblr killed the saturation again whats new -___- edited the colors
2K notes
·
View notes
Text
How 9/11 Became Fan Fiction Canon
Every fictional character you can think of has experienced 9/11 in fanfiction.
A Clone Wars veteran with two lightsabers is on United Airlines Flight 93 and prevents it from crashing. Ron and Hermione get caught up in the chaos as the towers fall. Buffy the Vampire Slayer and her friends watch the attacks unfold on TV from Sunnydale. We have spent 20 years trying to process what happened on 9/11 and its fallout, and that messy process can be tracked through the countless, sad, disturbing, and sometimes very funny fanfiction left across the internet.
Many of the fanfics written in the weeks and months following the 9/11 attacks seemed to directly respond to the news as it happened, processing the tragedy in real-time through the eyes of characters they loved. In the absence of a canon episode where Daria Morgendorffer paid respects to those lost, writing fanfic about these characters also experiencing trauma helped fans cope.
One YuGiOh fanfic published on fanfiction.net in May 2002 could have been ripped exactly from what this writer experienced that Tuesday morning. “It started as a normal day,” user Gijinka Renamon wrote. Yugi and his friends were in school, where their teacher informed them of the attacks and sent everyone home from school.
“After reading people’s 9/11 fics, I decided to write my own, and put a certain character in it. And Yugi and his pals were my first choice,” the author's note reads, explaining the connection they felt to United flight 93 and the World Trade Center attacks. Given that they lived in Pennsylvania, and “it’s close to New York, I felt really sad about it.”
Stitch, a fandom journalist for Teen Vogue, told Motherboard that this reaction to 9/11 is not at all uncommon in fandom.
"Fandom has always been a place that positions nothing as 'off limits,'" she said. "Historical tragedies like the Titanic sinking and atrocities like… all of World War 2 show up regularly across the past 30 years of people creating stories and art about the characters they love. So, on some level, it makes sense that 9/11 and the following 20-year military installation in the Middle East has joined the ranks of things people in different fandoms turn into settings for their fan fiction."
Reactions depicted in a handful of Buffy the Vampire Slayer fanfics published in the weeks after the attacks ring a little truer to the characters. “Tuesday, 11th September 2001,” written by Anna K, almost echoes the lyrics from “I’ve Got a Theory,” one of the songs in the musical episode that aired in November 2001. “We have seen the apocalypse. We have prevented it. Actually, we’ve prevented quite a few. So we know what they look like,” they write, before taking a darker turn. “They look a lot like…New York today.”
Killing demons and vampires doesn’t phase the Scooby Gang, but when preventable human death is brought into the picture, it’s gut wrenching.
“What am I supposed to do…When I can’t do anything to save the world?” Buffy cries into Spike’s chest, watching the attacks unfold on TV in a fanfic the author described as being “about feeling numb and helpless.”
In “Blood Drive,” Kirayoshi writes about Buffy and her friends saving a van full of donated blood meant for victims of the attacks from a group of thirsty vampires. One Buffy the Vampire Slayer fic even takes a blindly patriotic turn, where noted lesbian witch Tara McClay helps Xander hang an American flag from the window of the magic shop to make Anya feel better.
Experiencing 9/11 as a young teenager was overwhelming not just because of the loss of life. Almost immediately after the event itself, it was as if the entirety of American culture re-oriented itself towards an overtly jingoistic stance. As we get distance from the attacks, seeing the tone of television and movies from the early 2000s is jarring, and some have gone viral on Twitter. In the world of pop music, mainstream musicians like the Chicks, formerly known as the Dixie Chicks, were blacklisted from the radio while Toby Keith sang about putting a boot up the ass of terrorists. On the Disney Channel, a young Shia Labeouf reading a poem he supposedly wrote about the events. The poem concludes with the line, "it's awesome to be an American citizen."
In a world so completely saturated with this messaging, it is not surprising that fanfic authors started including 9/11 in their work so soon after the event. Even The West Wing had a strange, out of continuity, fanfic-esque episode where the characters reacted to 9/11. In some cases, it made sense that the characters in the stories would be close to or a part of the events themselves.
"For characters like John Watson or Captain America, the idea works to an extent," Stitch told Motherboard. "In the original Sherlock Holmes works and the 2011 BBC series, Watson had just returned from Afghanistan. For Captain America and other Marvel heroes, 9/11 was something that was addressed in-universe in The Amazing Spider-Man volume 2 #36. Technically, 9/11 is 'canon' to the Marvel universe."
In “Early Warning: Terrorism,” a fanfiction for the TV show Early Edition in which a man who mysteriously receives tomorrow's newspaper, predicting the future, avoids jingoism, but tries to precent 9/11 from happening. This fanfic remains unfinished; it’s unclear if the characters successfully prevent 9/11 in this retelling.
Largely in fanfic from the era just after 9/11, when many young authors were trying to emotionally grapple with it, the characters don't re-write or undo the events themselves. It's this emphasis on the reaction to tragedy that colors the fanfiction that features 9/11 going forward.
Although fanfiction authors have been writing about 9/11 consistently since soon after the event, whenever that fanfiction reaches outside of its intended audience, it looks bizarre.
A screenshot of a Naruto 9/11 fanfic on the Tumblr subreddit comes without any context, or even more than two lines and an author's note. It’s impossible to suss out if this falls into the category of sincere fanfic without the rest of the piece or a publication date, but modern-day commenters on the Reddit thread see it as classic Tumblr trash.

Screenshot from r/Tumblr
“Bin Laden/Dick Cheney, enemies to lovers, 10k words, slow burn,” one user joked in the replies, underscoring the weirdness of Naruto being in the Twin Towers by comparing it to a What If story about Cheney and Bin Laden slowly falling deeply in love.
It’s hard to tell how much of the 9/11 fanfic and fanart starting a few years after the attacks is sincere, and how much of it is ironic, and trying to make fun of the very concept of writing fanfiction about 9/11.
A 2007 anime music video (in which various clips, usually from anime, are cut together to music) that combines scenes from The Lion King with Linkin Park’s “Crawling” and clips from George Bush’s speeches immediately after the attacks feels like the perfect example of this. Even the commenters can’t seem to suss out if this person is a troll or not.
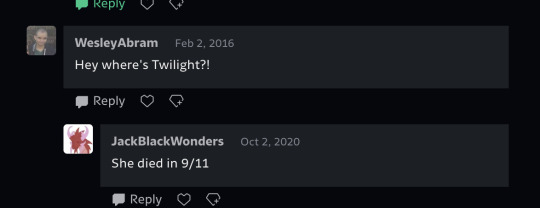
There’s no way that My Little Pony: Friendship Is Magic 9/11 fanart could be serious, right? Especially if the description pays tribute to “some of the nation's most memorable buildings,” and features five of the main characters as child versions of themselves. The comments again are split between users thanking the artist for a thoughtful remembrance post, and people making their own headcanon for why Twilight Sparkle is surreptitiously absent from the scene.
Screengrab via DeviantArt
There’s Phineas and Ferb fanfic that combines a 9/11 tribute concert with flashbacks to Ferb being rescued from the towers as a baby, written on the 10th anniversary of the attacks. It jumps from introspection to lines like, “‘Quiet Perry the Platypus. I’m trying to listen to these kids singing a 9/11 tribute.’”
The author's notes make it more likely that they meant for this to be a tribute piece, but it doesn’t quite make sense until watching a YouTube dramatic reading of it from 2020, fully embracing the absurdity of it all.
“For me, 9/11 is synonymous with war. It completely changed the course of my life," Dreadnought, the author of a Captain America fanfic Baghdad Waltz that sees Steve Rogers and Bucky Barnes fall in love over the course of the war on terror, told Motherboard. "It’s the reason I joined the military, and I developed deep connections with people who would go on to deploy to Afghanistan and Iraq. These very much felt like my generation’s wars, perhaps because people I graduated high school with were the youngest folks eligible to serve at the time.”
Dreadnought told Motherboard that although they didn't deploy, their career has kept 9/11 and the trauma from it in their mind. After seeing that people who fantasize about Steve and Bucky getting together seemed particularly interested in reading fanfiction that related to 9/11, they decided to try their hand at it.
"I had to do something with all of that emotionally, and I’m admittedly a bit emotionally avoidant. So I learned through fic that it’s easier for me to process those feelings and the knowledge of all the awful stuff that can happen in war if I can turn it into something creative," Dreadnought said. "Give the feelings to fake people and then have those fake people give the feelings to readers!"
To Dreadnought, who is a queer man, the experience of researching and writing this was more cathartic than they first expected, especially as a way to navigate feelings about masculinity, military culture, and queer identity. But they said the research they did, which included watching footage of first responders at ground zero, was what helped them finally process the event itself.
"It was like a delayed horror, and it was more powerful than I expected it would be." Dreadnought said. "When I was eighteen, I was pretty emotionally divorced from 9/11; I just knew I wanted to do something about it. So coming back to it in my 30s while writing this fic, it was a very different experience. Even the research for this story ended up being an extraordinarily valuable exercise in cognitively and emotionally processing 9/11 and all of its second and third order effects."
Fanfiction that features 9/11 provides an outlet for people who still grapple with the trauma from that day. But Stitch warns that the dynamics of fandom and how it relates to politics can also create fiction that's less respectful and more grotesque.
"With years of distance between the stories written and the original events of 9/11, there seems to be some sort of cushion for fans who choose to use those events as a catalyst for relationships—and Iraq and Afghanistan for settings," Stitch said. "The cushion allows them room to fictionalize real world events that changed the shape of the world as we know it, but it also insulates them from having to think about what they may be putting into the world."
The tendency of turning these events into settings or backgrounds for mostly white, male characters to fall in love has the unintended effect of displacing the effects that the war on terror has had on the world over. Steve and Bucky might fall in love during the war on terror, but they would also be acting as a part of the American military in a war that has been criticized since it started. Fanfic writers in other fandoms have come under fire for using real world tragedy as settings for fic before. In the aftermath of the 2010 Haiti earthquake Supernatural fanfiction about the actors Jensen Ackles and Jared Padalecki going to the island to do aid became controversial within the fandom. There have also been fics where characters grapple with the death of George Floyd that is written in a way that displaces the event from the broader cultural context of race in America.
"A Captain America story where Steve Rogers is a 'regular' man who joins the US Army and 'fights for our freedom' post-9/11 is unlikely to deal with the war’s effect on locals who are subject to US military intervention," Stitch said. "It’s unlikely to sit with what Captain America has always meant and what a writer is doing by dropping Steve Rogers into a then-ongoing conflict in any capacity."
After enough time, “never forget” can even morph into “but what if it never happened?” A 19k+ word Star Wars alternate universe fanfic asks this question, wondering what would have unfolded if someone with two lightsabers was on United Flight 93. This fic, part of a larger fanfic series with its own Wikia, considers what would have happened if Earth was a military front in the Clone Wars.
In this version of events, a decorated general who served in the Clone Wars is able to take back control of Flight 93 before it crashes, landing safely and preventing even more tragedy from happening that day. In the end, all of the passengers who made harrowing last calls to their loved ones before perishing in a Pennsylvania field survive thanks to the power of the Force, and are awarded medals of honor by President Bush.
Twenty years after the attacks, it’s painful to think about what would have happened if people got to work 15 minutes later, or missed their trains that morning. There weren’t Jedi masters deployed to save people in real life, but for some of the fanfic writers working today, the world of Star Wars might feel just as removed as the world before September 11, 2001.
Fiction serves as a powerful playground for processing cultural events, especially generational trauma. The act isn't neutral though; a decade's worth of fanfiction that takes place on or around 9/11 shows how our own understanding of a traumatic event can shift with time.
How 9/11 Became Fan Fiction Canon syndicated from https://triviaqaweb.wordpress.com/feed/
7 notes
·
View notes
Text

For this gif tutorial I’m going to try to keep it as basic as possible, I may add a few tips for coloring at the end, but for the most part this is going to be how I make my basic gif. Also I’m not going to use my vapoursynth to process the video beforehand, just because I know not everyone uses it and it’s harder to learn. This is going to be just a downloaded mp4 video through the gif process. Don’t let the idea that this is a BASIC TUTORIAL fool you, I’m going to try to teach you a lot of things. It’s gonna get wordy, but i will try my hardest to keep the process easy. I’m just going to explain what things do instead of having you just copy + paste my method and not know what it means. okay? okay.
Before we start though, if you plan of giffing live stages you either need to accept the they will not be super crisp and clear OR learn how to use avisynth/vapoursynth to resize the videos without quality loss.
If you just want to gif music videos or variety shows then this should still give you HQ gifs.
Other notes:
try to ONLY use 1080p and up video if possible, maybe 720p if you’re really desperate, but anything under that... it’s not going to look good at all, so try to avoid using them.
The Photoshop I am using is PS 2020, so all my screenshots will be from that version and with my weird set up. But I’ve been using pretty much the same method since cc 2015 so other than the fact that some placements and names are tweaked, it’s the same. (If you can’t find something on your version shoot me an ask and I’ll try to help! And asks I get on this tutorial I’ll link HERE for future reference)
CUTTING VIDEO
To cut videos I’ll just use my quicktime player.
I use edit > trim to select the portion of the video I plan to gif and save that as it’s own new mov file.
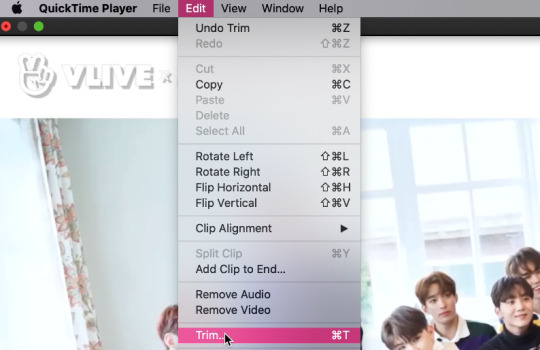
which pops up this tab

that you just slide until the part you want to gif is selected

then just save it as a new video and your done with part 1
ENTER PHOTOSHOP
Now what we’ll do is open our photoshop and import that clip into layers
FILE > IMPORT > VIDEO FRAMES TO LAYERS and select your video.
A small pop up will appear to show the clip you’re opening, you can trim it further here or just keep going by clicking okay
my setup is weird for drawing BUT you should have it looking remotely like this:

The things you will DEFINITELY need to see are TIMELINE, LAYERS, ADJUSTMENTS. If you don’t have these sections you can add them to your screen by clicking on the WINDOW tab at the very top menu bar and clicking on them

LAYERS - this is pretty self explanatory but each row is a layer in the gif. the more layers the bigger the gif will end up, the longer it plays. So bigger clips will have more layers and end up as larger gifs in the end.

TIMELINE - This is where you can edit the gifs timing (make it faster or slower)
We’ll be doing a bit of work with it so it’s important to know it well
ADJUSTMENTS - Best friend and worst nightmare. this is where ALL the tedious recoloring is done. VERY rarely would you not use these. 99.9% of kpop things are filmed through a green or blue lense so you’ll want to fix that to not have ghost idols
So, Let’s make a gif
Step 1 - In the top right corner of your timeline is a set of lines, click there and then click SELECT ALL FRAMES

under each frame is a time stamp (this video’s is 0.04) this decides how fast each clip goes by, or how quickly the gif moves. Personally I prefer slower gifs, but I say anywhere between 0.04-0.06 is a decent speed.
Step 2 - with all the frames selected, click on the small down arrow next to any of the frames and change the speed to your liking. (I’m going to use .06)
Step 3 - in that same tab of lines we’ll now click CONVERT TO VIDEO TIMELINE, which will change our Timeline to look like this:

Step 4 - Back in our very TOP menu we’ll click SELECT > ALL LAYERS, then on the TOP menu click FILTER > CONVERT FOR SMART FILTERS (this might take your computer a minute since our File is still pretty large.) Now our Time line will look like this:

Step 5 - Sharpening
This one is VERY MUCH something you’re going to have to play with to get your settings to be how you like them. It’s also where I’d use topaz adjustments, BUT since I said we’re doing basic PS gif we’re just going to be using smart sharpening. SO:
in the TOP munu again, click FILTER > SHARPEN > SMART SHARPEN
A pop up window will appear and you can edit the settings to your liking. Mine:
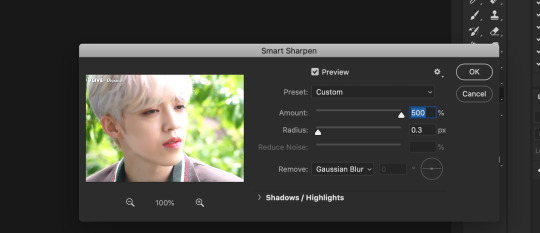
Step 6 - Resize your gif or crop it to tumblrs standards: big singal gifs have a 540px width || Two gifs use 268px || and three gifs use 177/178px
To do this we’ll use the crop tool and type in our dimensions in the menu bar:

and then crop to your liking. (this doesnt resize the gif it just crops to the correct ratio so we still have to shrink the gif)
Next, we’ll resize the gif to that size in the TOP menu click IMAGE > IMAGE SIZE a pop up menu will appear and you’ll type in your resize ratio and click enter.
Now technically thats a gif. it’s TECHNICALLY done. but mine is white washed and there are words on it that I dont want so onto the coloring and blurring.
First I’m going to show you how I blur text on gifs. because text is EVERYWHERE in kpop content and it’s hideous and I hate it. so lets kill it.
BLURRING LETTERING
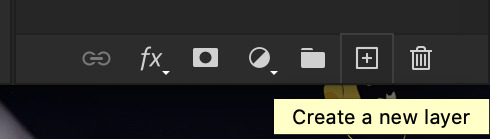
First we’re going to add a new blank layer to our LAYER TAB by clicking the little box with the + inside at the bottom
Sometimes doing this can mess up the timeline’s selection but its SUPER easy to fix so lets do that.
So in our timeline we have these two bars on each side that select what part of the gif will play. this is also where you can readjust your gif if it has extra frames at the end, or it ends up being too large and you have to make the gif smaller to save it. Just click and drag the bars back to where our gif actually ends, and all is fixed!

Now on our new layer we’re gonna take a paint brush (one of the ones with a lot of fade NOT the solid circle ) and paint over where the words are like so:

MAKE SURE ITS ON OUR BLANK LAYER AND NOT THE GIF LAYER!!
I know it looks stupid but trust me okay.
Now in your LAYER tab we’re going to duplicate our gif layer by right clicking on it and selecting duplicate.
Then we’re going to drag the new gif layer so that it’s above the paint layer in our LAYER tab :
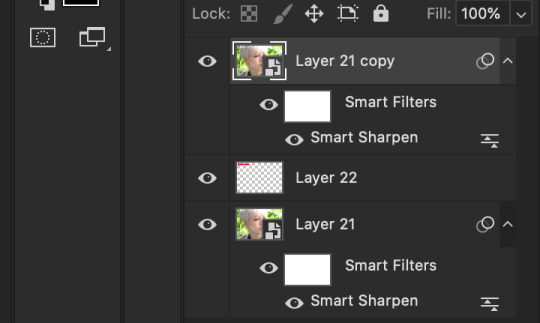
Now, right click on the top gif layer and select CREATE CLIPPING MASK. it should put a little down arrow to the left of the picture, toward the paint layer. This means the gif is ONLY visible where that paint is now.
So we’re going to click on FILTER in the TOP menu again (while we still have that top gif selected!) and Go to BLUR > GAUSSIAN BLUR. a pop up menu will appear and you can just drag the radius until the text is as blurry as you want it to be. (also IF you missed part of the text, you can just go add more paint to your paint layer and it will blur wherever you paint!)
so now my gif is like so:
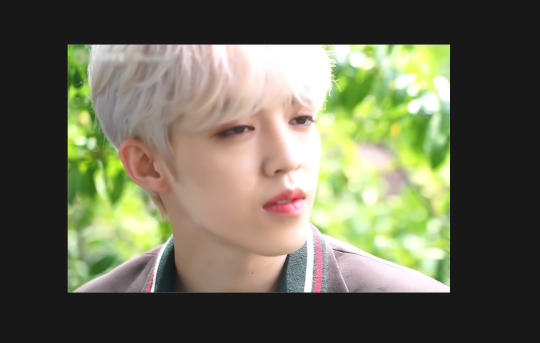
So now we’ll color him, because he’s pretty washed out.
ADJUSTMENTS
This is where I’m going to be the least specific about what I do and more about what tools do, so that you can learn how to color things the way you like them!
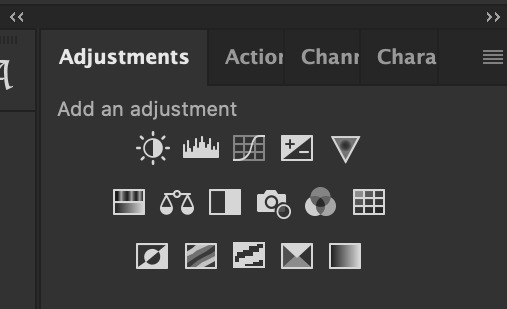
The Adjustment tab on Photoshop has 16 options but I’m really only going to talk about 6 of them. We’ll do it in order though. All the actual adjustment tools will open in the PROPERTIES tab
Brightness / Contrast - Pretty self explanatory, but definitely should be toward the end of your coloring, as if can effect the quality a lot. Small adjustments do A LOT so don’t go crazy,
Levels - Levels is all about the balance of how dar or light your gifs will be if you adjust in the RGB layer it will adjust for the entire image, but if you change the selection to RED/GREEN/BLUE it will adjust just those colors hues. Also there are three small droppers to the left of the graph. using those you can select which part of the gif you want the image to recognize as the lightest/darkest part of the gif, and the tool will adjust the gifs coloring to that point. ( play with those droppers! magic happens i swear!)
Curves - Kind of like levels but instead of how light or dark the entire image is it works more on contrast. REALLY play with the curves options, i’m sure most things you can do with other tools can also just be done in curves if you’re patient enough to learn
Vibrance / Saturation - Vibrance will make duller parts of an image higher contract and brighter and saturation will make everything a more neon shade. or in reverse lowering vibrance will dull out the things that were already neutral and saturation will dull out the more vibrant parts of the image (usually reds)
Color Balance - Good for fixing tones. so if a live stage is SUPER BLUE!!!!! you can readjust and calm down the blues to dull them out or get rid of them completely. Again play with this its insane what it can do
Selective Color - adjusts the different colors in your image without touching the other colors. if you wanna touch the reds, make them pinker but not change the blues and greens, you do it here
If you want MORE drawn out explanations of what each of the 16 adjustment layers do here and here are actual articles you can look at. But it’s all about practice. playing with all the adjustments alone and together. Finding out what you like to do!
Now when you gif is ALLLLL colored and you’re ready to save it we do FILE > EXPORT > SAVE FOR THE WEB and a whole new window of options pops up. I’ll give you two examples of how to play with those options and then we’re done!

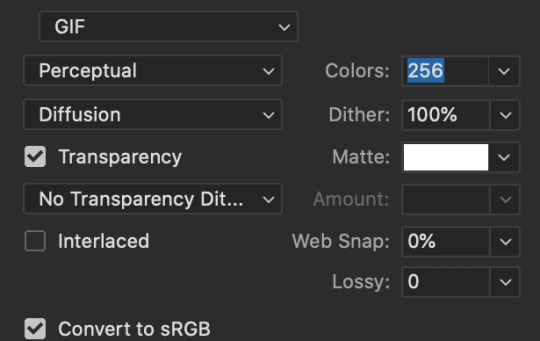
keep in MIND tumblr’s gif limit is 10MB which is pretty huge now, but still watch your gif size!!!!
AND SAVE your done!

I hope this was helpful! Let me know if you have any questions,again I’ll have an ask tag for it and it’ll get linked HERE if people end up needing help!
Happy giffing!!!
#drm.pst#drm.txt#Gif tutorial#this is LONG okay please be aware of that before you open it#als i did NOT reread it because it took me 3 hours to type out so it's probably a grammatic nightmare#BUT i'm JUST under a new milestone so i'm gifting this early because i had the patience to do it today lmao
97 notes
·
View notes
Text
How to gif without photoshop
Hello! By popular demand (of like 4 people) I am going to write out a tutorial of how I make gifs when I’m on my personal laptop and don’t have access to photoshop. There is another method I use with a different software that is a bit more complicated and if people are interested, I will make a tutorial of that method as well. I’ll do my best to keep this concise, so let’s get started.
Warning that this is VERY text and image heavy because I know how frustrating it can be when a tutorial feels like it’s skipping steps and I want this to be as clear as possible. Also please read this on desktop, tumblr mobile kills the quality of gifs inside text posts.
This is the video I will be giffing and here is the gif I will be making!

What you need:
A video to gif
For the best results, I recommend a video that is either 720p or 1080p (basically the higher the quality, the better). Videos with good lighting and bright colors also turn out the best. Unfortunately for me, I gif the TV show Prodigal Son a lot and that show has neither of those things, which is why my gif example is from that show; if you can make a scene with zero lighting or vibrancy look even somewhat decent, you can make anything else look good.
A video downloader or screen recorder
This is the video downloader I use and this is the screen recorder but basically any youtube video download website or screen recorder program works. Keep in mind that ezgif has a pretty low upload limit for videos, so if you want to gif something longer than like ~4 minutes, cut the video down to the specific parts you want first on a website like this one.
ezgif
A very straight forward website that anyone can access. You don’t need to download anything, it’s all online.
Bonus: Online Image Editor (not required, but I use this website to add text to gifs)
1. Making the gif:
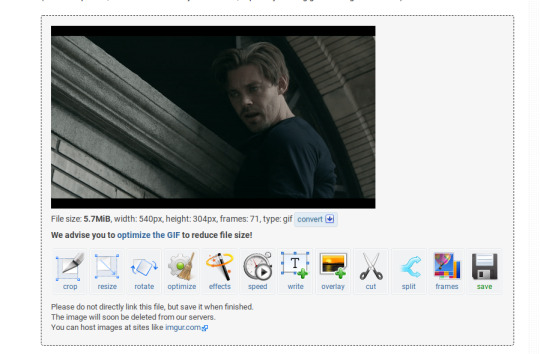
Once you have a video downloaded, you go to ezgif.com and go to the section video to gif. Click choose a file, scroll to your downloaded video, and hit upload video. Your screen should look like this now.
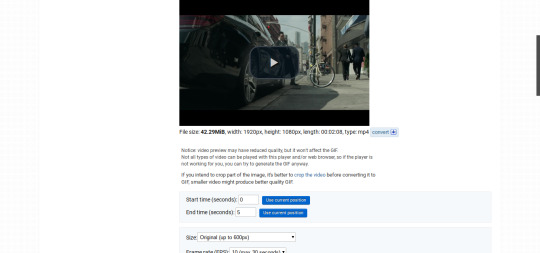
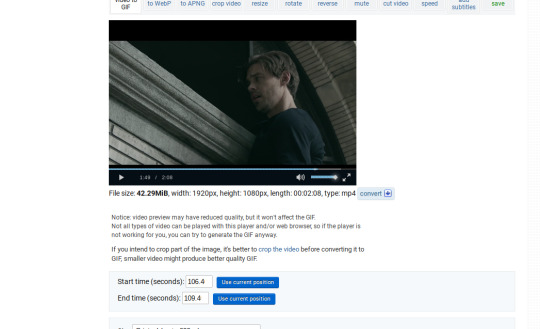
There are two ways to pull out the sections of the video you want to gif. You can either write in the start and end time in the little sections (you have to convert them to seconds: for example, if my gif started at 1:16 and ended at 1:20, it would be 76 seconds and 80 seconds respectively). Or you can do the method that I feel is easier, where you go to the section you want it to start on, hit pause, and hit the blue button that says “use current position” then let the video play until it hits your stopping point, hit pause again, and click on the second “use current position” button.
Once you have the start and end time recorded, scroll down to the next part of the screen with the size options. For size, select “540xAUTO (for Tumblr)” since tumblr gif sizes start at 540p and go down the more gifs are in a row. For frame rate, try to do either 20 or 25; the higher the frame rate, the smoother the gif will look. If you are trying to gif something in 540p that is longer, you might need to chose 10 to keep it under 5mb, which is the tumblr gif size limit. For method, leave it on FFMPEG. Then hit, convert to gif.

your gif will now look something like this!
Now, this gif is currently 5.7mb, which is above the size limit for tumblr (5mb or above gifs will still play if I recall, but the quality will be really bad when you post them). If I was planning on keeping the gif this size, I would go back and change the frame rate to either 20 or 10 to get the size down. However, I am going to resize the gif to 268p, so I don’t need to worry about it being to big.
Using the correct gif size for tumblr is one of the easiest ways to make sure the gif looks good! For gifs that take up a whole row, the size should be 540p wide. For two gifs in one row, the size is 268p each. For three gifs in one row, the sizes are 177p, 178p, and 177p in that order. Here is a visual of it.
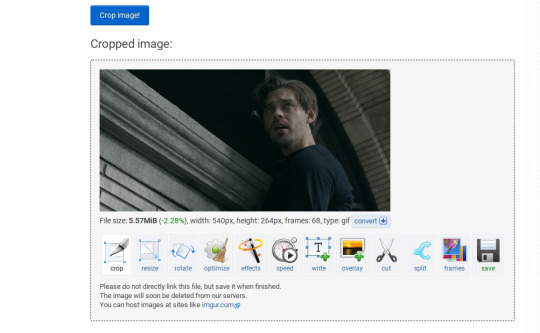
The next step would normally be resizing the gif, but Prodigal Son youtube videos come with a black banner on the top and bottom that I need to crop out. You will see a menu full of options under your gif, and you want to click on “crop.”
Cropping is pretty straight forward; you just move the little box over the part you want cropped, then hit the “crop image” button. Make sure width stays 540p!

Your gif now looks like this
Next, you look at the options under your gif again, and go to “resize.”
Again, resizing is pretty straight forward. I just put in 268 into the “width” section and leave the “height” section blank since the site will automatically resize the height. You can ignore the other menu options.
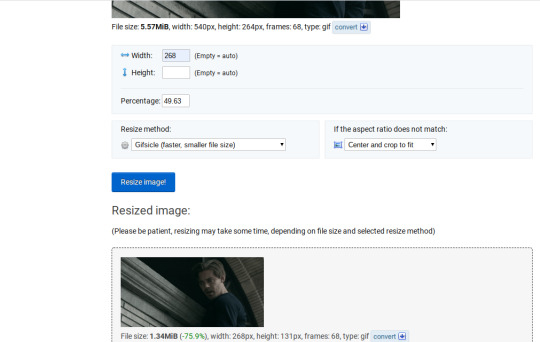
Your gif now looks like this

Next step is optional, but I usually do it. Once again, you go to the menu of options under your gif and select “speed.”

Speed is also super straight forward. I almost always reduce the speed of my gifs somewhere from 90% to 80% no matter what, just because I think it makes it look smoother. For gifs that are of short scenes that go really fast, I will reduce it to anywhere from 70% to 50%. You can try different speeds to test out what you think looks best. For this gif, I’m going to put it at 80%.
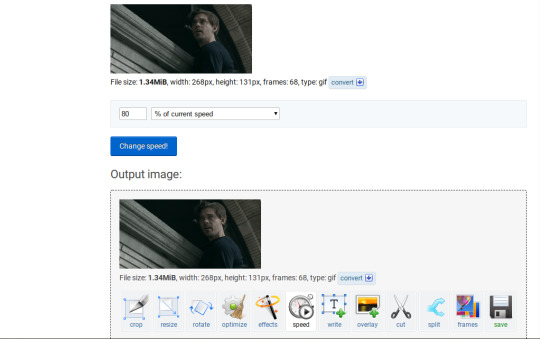
Here’s what we have so far. Congrats, you have made a gif!

Now for the fun part!
2. Coloring the gif
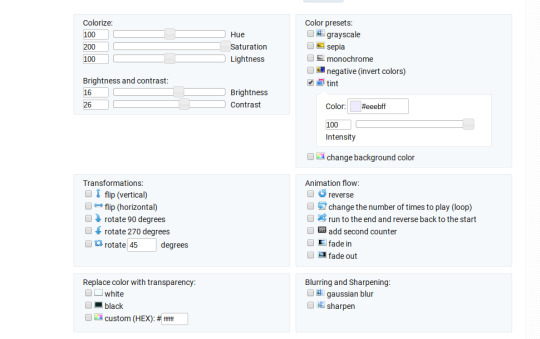
Go to the “effects” option, in the menu under your gif. You will see a LOT of options, but the panels I’m going to focus on are “colorize”, “brightness and contrast” and “color presets”. This section is going to vary a lot depending on what specific video you are giffing so remember to be flexible and try lots of different options out! It took me a while to get to a place where I can just eye a scene and know what settings to use. It’s super easy to go back and tweak a setting if the gif doesn’t look like how you want it the first time, but it’s a lot of trial and error.
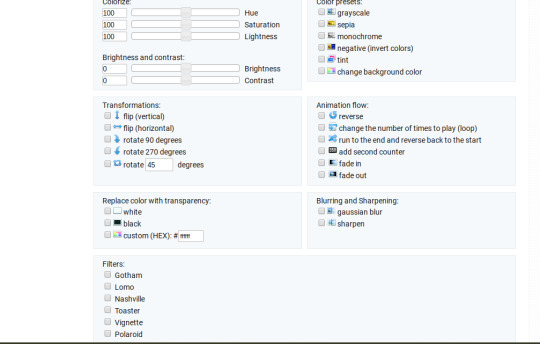
The main option I focus on in the “colorize” section, is “saturation.” This is what will make all the color in your gif pop out. The saturation I use varies a ton; for scenes that already are colorful/bright, I usually keep it around 120 to 150, since you don’t want it to be over saturated. If I’m making an edit that is supposed to look toned down or more grey/neutral tones, I’ll decreases the saturation in the range of like 90-40. For a show like Prodigal Son, where there is basically zero color vibrancy, I tend to go full out with saturation, usually in the 150-200 range. For this gif, I have it all the way up to 200.
Next is brightness and contrast. This also varies wildly, but a good rule of thumb is I always try to keep my contrast at least 5 points higher than whatever my brightness is, it just makes the lighting more even. You need to find a good balance; obviously, the darker the scene, the higher you want the brightness and contrast, but if you go too high, the gif with be staticy/grainy. For Prodigal Son, which has horrible lighting, my brightness is anywhere from 10-30 and my contrast is anywhere from 15-35. For this gif, my brightness is on the lower side since the scene is outside in natural light; brightness is 16, contrast is 26.

After you get those settings, I go over to “color presets” section and click on the “tint” option. It will pull up a color chart that looks like this
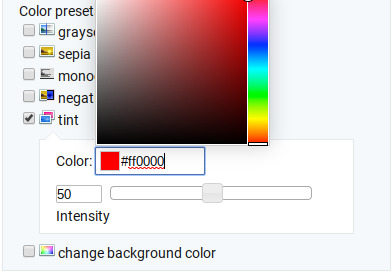
You ALWAYS want the intensity up to 100. This part is where the most trial and error occurs; there isn’t any one color option that works for every gif. The shade I use most often is light red/pink or light blue/light purple. For scenes that are lacking warm tones (which is almost all of Prodigal Son) I tend to go to the light reds, and for scenes that are lacking cool tones, I go to the light blues. The light reds are best for making characters skin tones look more...like actual skin tones and not totally washed out. To select a color, you just move your mouse around the chart. This is the range of color codes I tend to use.

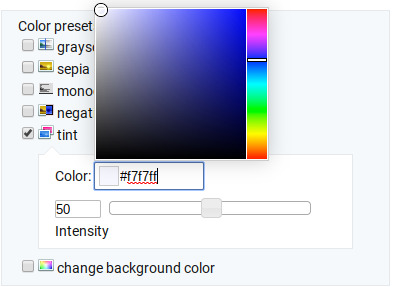
Again, intensity should be up to 100 (it automatically starts at 50 and I was too lazy to move it while getting screen shots :P).
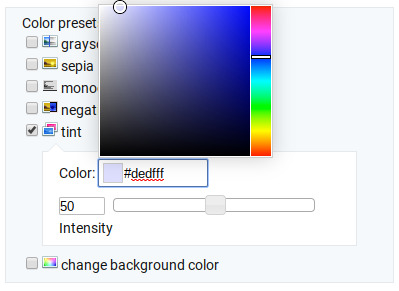
For this gif, I actually used a new technique I’ve been trying out where I start with a light blue tint to even out the color tones, then once that gif is done, I go back to effects and add a layer of pink to make the colors brighter. Usually, one color works fine, but sometimes it’s hard to find a good balance (the red colors can get too red and the blue sometimes brings out too much of a yellow shade). For now, I have my color tint set at #eeebff.
Ultimately, this is what my effect settings look like and this is what the gif looks like now.
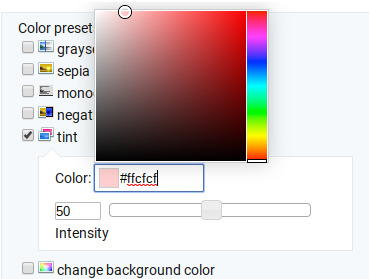
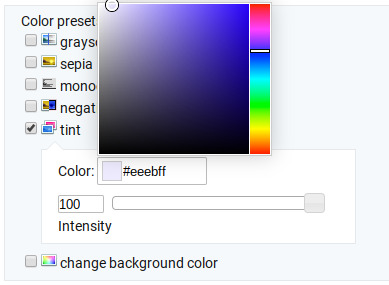
Now, like I said before, I added another layer of tint to this gif. All you have to do is go to the menu under your gif, and click on effects again.
It will take you back to the panel you were just on, expect now your colored gif is on the top and all the settings are blank again. The only setting you need to use now is the tint option; go there, and select a light red shade. I used #fff0f0.

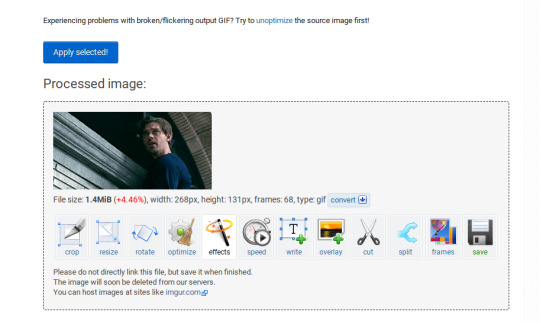
And here is the final gif! To save it, just right click and hit “save image as.”
I know it seems like a long process, but once you get a hang of it, it goes by super fast, especially if all your gifs are coming from the same video.
BONUS: Adding text
If you are trying to gif something with dialogue or you want a quote to put over your gif, you will want to put text over it. ezgif has a “text” option that you can use if you want, but I personally don’t really like their font options, so I use the website Online Image Editor.
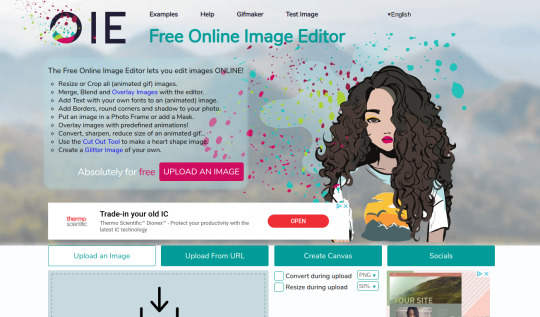
This is what it looks like. You can either hit “upload an image” and upload your saved gif, or you can go back to ezgif, right click the gif, hit “copy image url” and paste that url into the “upload from url” option. The web page should now look like this.
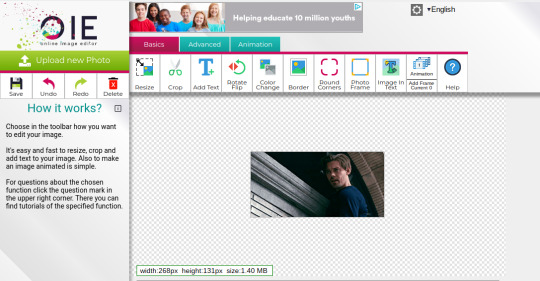
It’s pretty straight forward from here; click on the “add text” button and a menu will appear on the left hand with options for the text.
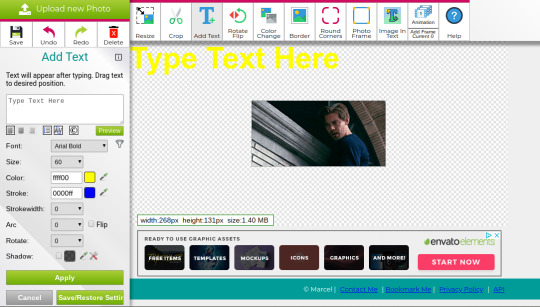
Type whatever you want the caption to be in the “type text here” box. This website has a ton of font options you can play around with, but when I just want to caption a gif, I stick with “Arial Bold Italic.” For a 268p gif, the font size should be 10-12, depending on how much writing you plan to put on each gif (if some gifs are going to have more writing than others, pick a smaller font size so it stays consistent!) When I make a 540p, the font goes up to 14-16. I use white for the color and black for the stroke. I make the strokewith 3 because it makes the caption stand out more. Once all these settings are selected, hit the “preview” button under the text box.
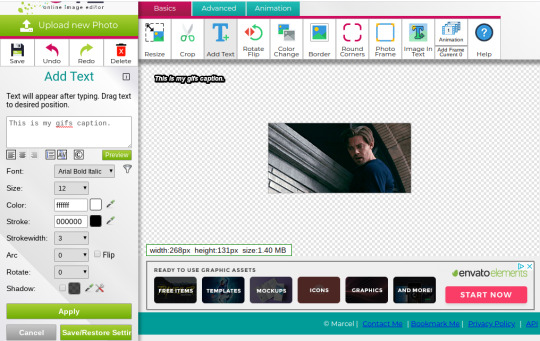
You can now drag your text anywhere you want on the image! The only bad thing about this website is that it doesn’t automatically center text, so you either have to eyeball it, or if you’re picky, like me, open up one of those online ruler applications and use it to measure out the center. For captions, I move the text just slightly above the bottom of the gif.
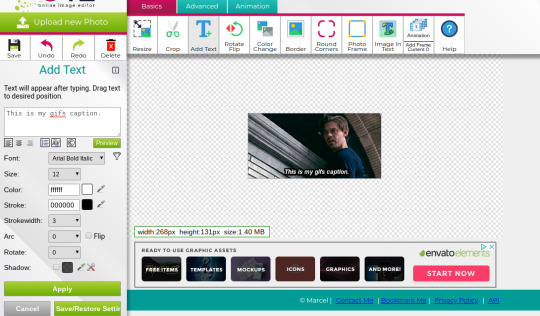
Finally, you hit apply. Once your gif has the text on it, all you have to do to save it is right click it and hit “save image as.” And here is the finished project!
That got a lot longer than I thought it would, but I hope it was informative! If anything was unclear or if you have further questions, feel free to send me an ask. Thank you for reading.
#gif tutorial#giffing tutorial#giffing#gifmaking#mine#my gifs#long post#I hope this makes sense lol#pls rb if it helped!!!#also if mobile doesn't keep the read more...idek
322 notes
·
View notes
Last Seen Blogs

leplaysir-blog
Le Playsir
themeetingplaces
i'll be by the batphone

n0-just
No.
tenka-akatsuki
Temple of the Red Moon

hangoutholidayskashmir
Hangout Holidays Kashmir