#the caption file from Zoom
Text
//
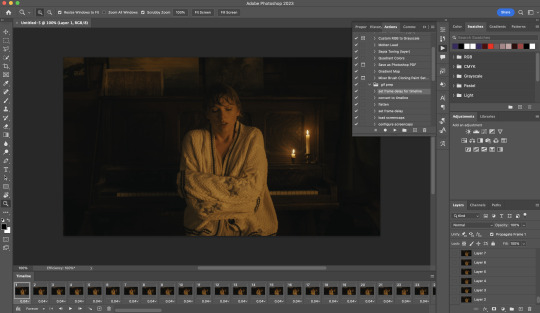
#i was asked to help record and edit a video (via zoom)#for the state talking abt their grant#BUT i was given a turn around time of like MAX 3 hours#lemme tell u that WOULD HAVE been enough time if i wasn't also trying to get fucking captions on the damn thing#if i were just cutting the dead space editing some of the misspeaks#wld've been done in like 45 minutes tops#but i had to get captions#((spoiler alert i didnt actually finish))#the caption file from Zoom#which in theory u shld be able to upload and have it automatically sync up w/ the visual#Did Not sync up#so i was going through the whole thing trying to make captions go where they were supposed to go#as well as catching typos that AI mis-captioned#basically i think i got maybe a third of the way through in the 2.5 hours i had#then i gave up#made another version just quick cutting some of the dead space#and uploaded it to youtube for auto captioning#i'll get them a more polished version Later#i shld be paid for this honestly.....#spent more time working kn this video than my actual job today lmao
0 notes
Photo


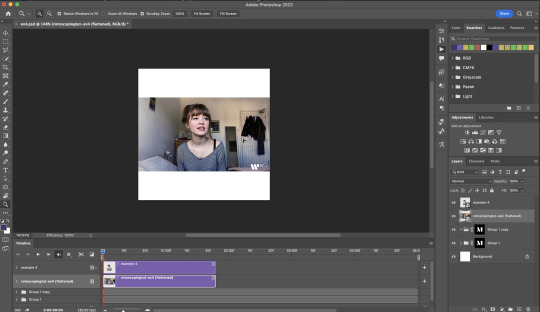
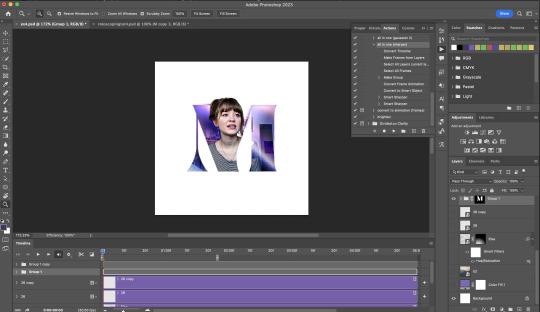
Rotoscoping Tutorial by @antoniosvivaldi
Hi everyone! I’m excited to announce my long-delayed Rotoscoping Tutorial - requested by a number of people over the past calendar year.
In this tutorial, I will show you how to create the cutout gifs like this (and seen in most of my gifsets under this tag) with Rotoscoping on After Effects. I’ll also provide additional examples and a number of things that I do to optimise my giffing / Rotoscoping workflow (e.g. useful shortcuts & other things to be aware of).
This is the structure of the tutorial:
Why Rotoscoping? Photoshop video timeline’s limitations
Photoshop workflow pt 1: Preparing your gif
After Effects workflow: Interface, shortcuts, and Rotoscoping tools
Photoshop workflow pt 2: Assembling your gif; with multiple examples
Bonus content: Rotoscoping tips* & workarounds to common issues
For quick reference, here are example gifsets (and where Rotoscoping is used in the posts) that I will mention in the tutorial:
Example 1: Cutout gif effect | panels 2 + 4
Example 2: Changing a gif’s background colour | all panels
Example 3: Cutout gif effect in a shape | all panels
Example 4: Putting it all together | panels 1, 3, & 5
What you need & need to know:
Software: Photoshop & After Effects (After Effects 2021 or later for Rotobrush 2.0)*
Hardware: 16GB RAM required to run later versions of AE*
Difficulty: Advanced; Knowledge in making gifs, applying layer masks, and using video timeline interface assumed
Key concepts: Rotoscoping (AE) / Video Timeline (AE+ PS) / Layer Masks & Groups (PS)
Supplementary files: tutorial resources
*I’m currently running the latest version of PS & AE on an M2 Mac, but I’ve also used older versions (CC 2015 & 2020) on Intel-based Macs. I’ll outline some known compatibility & performance issues, and workarounds later in this tutorial that could help streamline your giffing workflow.
Tutorial under the cut. Like / Reblog this post if you find this tutorial helpful. Linking this post / the example gifsets in your post caption, will be greatly appreciated if you read this to create effects seen in Examples 3 + 4.
1) Why Rotoscoping?
My Rotoscoping journey is motivated by the shortcomings on Photoshop - namely the limited options to manipulate the Layer Mask keyframes in the video timeline interface, as well my need to gif more efficiently.
Suppose I want to cutout this subject or recolour the background of a gif on Photoshop: I personally classify the gifs that I prepare on PS into 3 types based on the motion of the subject
These are the common Photoshop-only approaches when attempting to mask the subject in the gif.
Case 1: minimal motion in the subject → a simple layer mask will do the trick
Case 2: some linear panning of the subject in the gif → using the Layer Mask Position keyframes in the video timeline interface will do the trick
Case 3: subject moves around a lot (e.g. zoom motion) → Unfortunately this is where a Photoshop-only workflow will require frame by frame masking. Layer Mask Position keyframes only apply positional translation (but not transformation / rotation) on the layer mask
Enter Rotoscoping on After Effects: Instead of resigning to frame by frame procedure on Photoshop, I opted to make my life easier by learning to Rotoscope on After Effects. This essentially provides me an opportunity to cutout / recolour a wider range of gifs with relative ease.
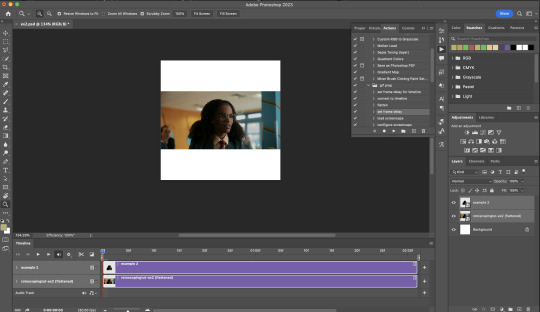
2) Photoshop pt. 1: Preparing your gif
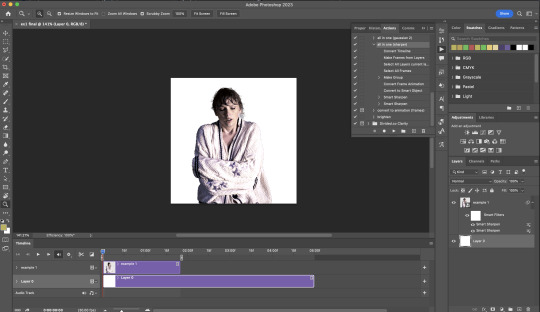
Prepare your gif the usual way - whether you screencap or import frames from video.
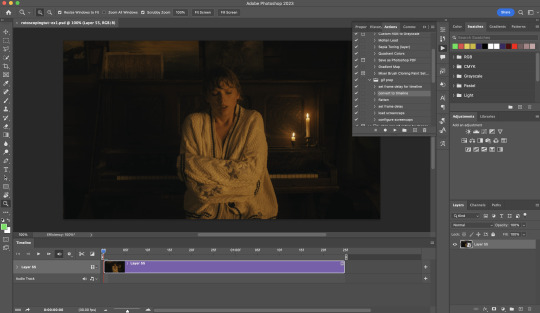
Then your Photoshop should look like this:
Now, I shall walkthrough & explain my personal giffing workflow (as of 2023) after loading the gif frames. To speed up the process, import my gif prep action file to Photoshop.
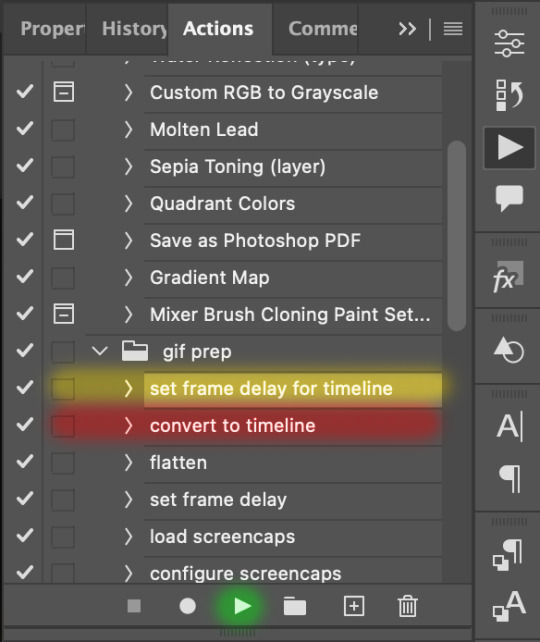
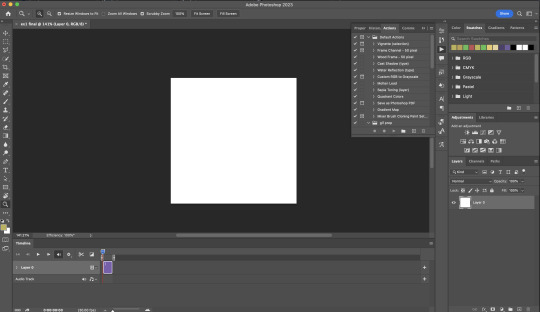
Going to Window > Action, you’ll see a set of actions under the “gif prep” folder.
"set frame delay for timeline” (highlighted in yellow) will set all of your entire gif’s frame delay to 0.03s
“convert to timeline“ (highlighted in red) will take you to the Video Timeline interface
To play an action, press on the Play button (highlighted in green)
i. Set the frame delay of the entire gif to 0.03s. (play “set frame delay for timeline” from my gif prep action pack)
I work with everything in 0.03s frame delay (or equivalently 30fps) at first. It’s always possible to change the frame delay of the final gif to 0.05s before uploading onto Tumblr.
ii) Convert this gif to a Smart Video Layer (play “convert to timeline” from my action pack)
Note: I personally don’t resize the gif just yet. That’s because Rotoscoping in full video resolution will render higher quality details around the edges as well as more flexibilities later on in the editing process.
Performance optimisation: If your computer has 8GB of RAM or less, you might find it helpful to crop / resize your gif to Tumblr dimensions now for a less sluggish performance in After Effects later on.
(I have giffed on a desktop with 8GB of RAM and it’s quite slow at rendering individual frames of a 1080p short clip on AE)
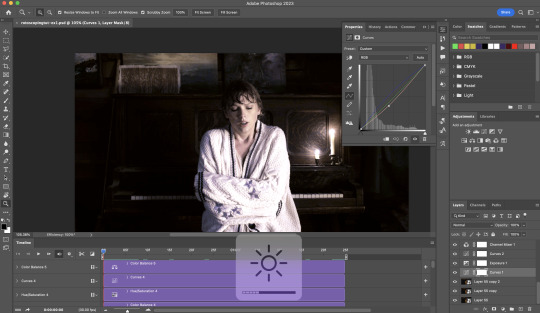
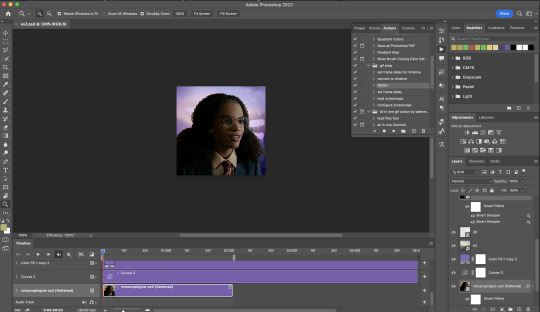
iii) Add colouring adjustments on the gif. This will save you A LOT of time when you Rotoscope gifs that are originally very dark / poorly lit (e.g. the uncoloured Taylor Swift gif shown just above).
If you usually colour your gifs at the very end of your giffing process (i.e. after sharpening), this will be a bit of a change.Nevertheless I still highly recommend adding some base colourings now to at least increase the contrast between the subject and the background.
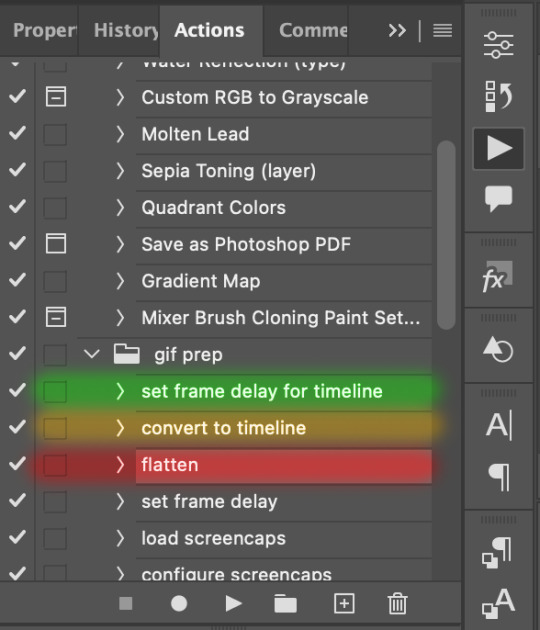
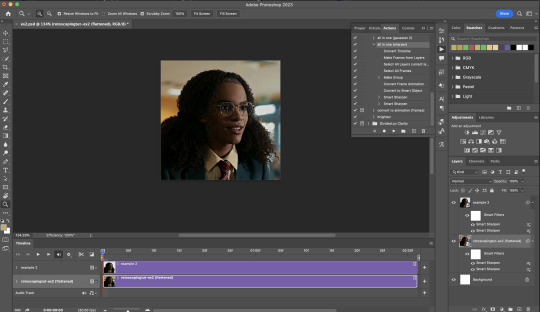
iv) To minimise lagging on After Effects, simplify this gif file as follows:
Flatten / Unsmart this gif file back to frame animation mode: play “flatten” (highlighted in red) from my gif prep action pack
Set the frame delay to 0.03s: play “set frame delay for timeline” (highlighted in green)
Convert the simplified gif file back to the video timeline interface: play “convert to timeline” (highlighted in yellow)
After “unsmarting” and converting back to the video timeline, your interface should look like this

And voila! This gif PSD is now ready to be imported to After Effects for Rotoscoping work!
3) After Effects: Interface and useful shortcuts
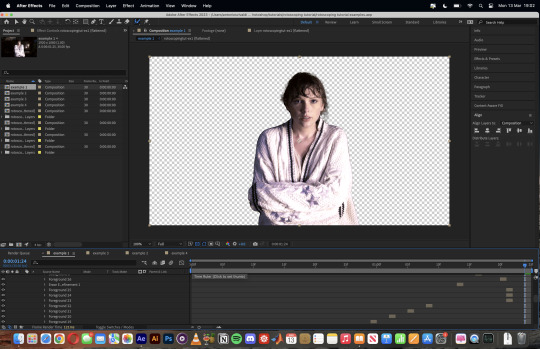
Open After Effects and Import (Cmmd / Ctrl + I) your gif PSD that you’ve just prepared.
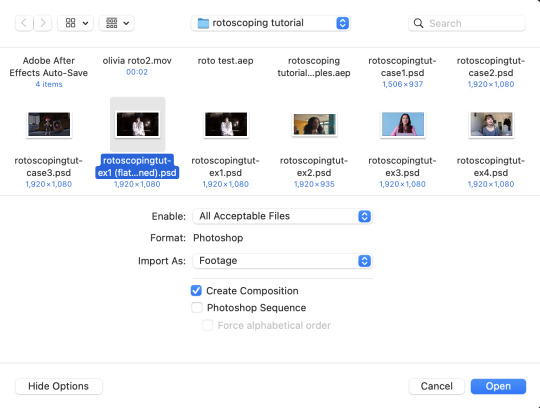
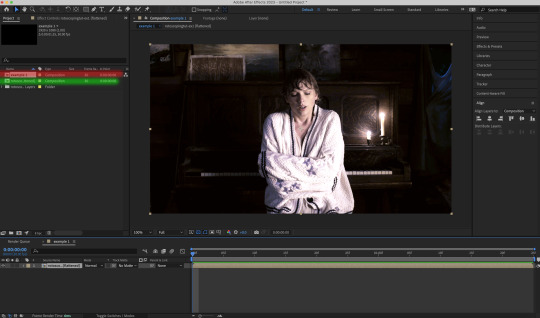
After importing your gif PSD to After Effects, the interface should look like this.
In the screenshot below, there are two compositions: the imported gif (highlighted in green) & another composition file made from selecting the imported gif (highlighted in red)
For the rest of the workflow, we will edit from the clone composition (the one highlighted in red), so select this one.
Before we take our plunge into the Rotoscoping, here are a few useful shortcuts to remember. I’ll explain the Roto Brush tool in the next section.
Preview the previous: fn + up arrow
Preview the next frame: fn + down arrow
Add to Roto Brush selection: holding Shift while you’re using the Roto Brush Tool
Subtract from Roto Brush selection: holding Alt while you’re using the Roto Brush Tool
Change Roto Brush size: while holding Cmmd / Ctrl, click + drag your mouse left / right
4) After Effects: The Rotoscoping Process
To access the Rotoscoping tools, click on the Roto Brush icon (highlighted in red in the screenshot below)
Then you’ll get the following dropdown options with two Rotoscoping Tools
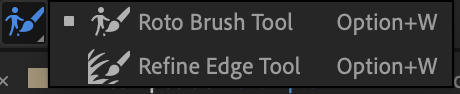
Roto Brush Tool: This is where you add / subtract your Rotoscoping selection in your composition
Refine Edge Tool: Paint around the edge of your selection for more refined edges. Very helpful for Rotoscoping fuzzy edges / hairs
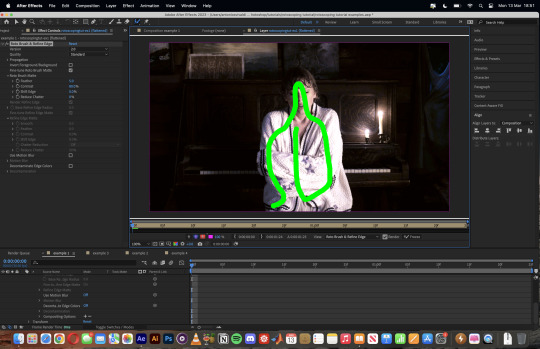
To make some Rotoscoping selection, first grab the Roto Brush Tool and click on the subject you want to cut out from your composition.
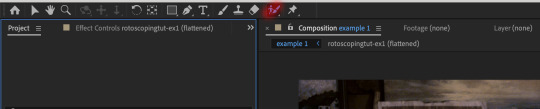
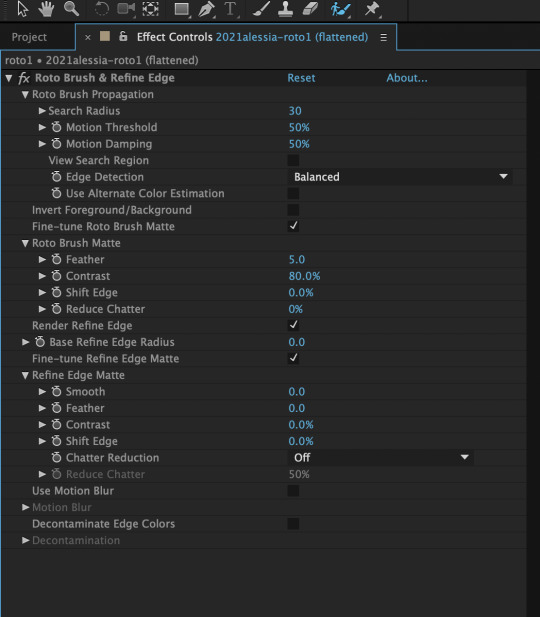
When you’re Rotoscoping you’ll see this in the Effect Controls panel.
There are two versions of Roto Brush:
Version 2.0: The Rotoscoping selection is powered by AI for higher accuracy when you propagate the frames.
Version 1.0 (Classic): This is the legacy Roto Brush Tool that uses a lesser algorithm. Recommended only if Roto Brush 2.0 is unstable on your machine due to RAM issues.
And two quality settings for Roto Brush 2.0:
Standard
Best
Note: I am currently unable to use Roto Brush 2.0 with Best quality model on my machine to compare the differences myself, so I’ll link this page that explains the two quality settings.

Note: if you’re using an older version of After Effects you’ll see this instead. This corresponds to Roto Brush 1.0 / Classic in the newer versions of AE.
When you’ve made a selection using the Roto Brush Tool, you’ll see the pink lines around the subject. This is the region that you’ve selected to Rotoscope!
To bring out some details around the edges, grab the Refine Edge Tool and paint around the edges
Then the interface will look like this

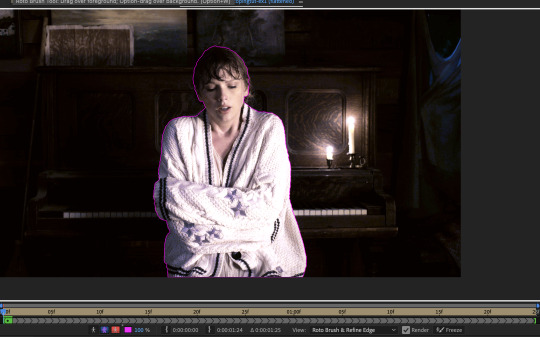
To view the Rotoscoping selection that you’ve made more intuitively, you could click on the following buttons.
Personally I like the viewing my selection using Toggle Alpha (the second box from the left) & Toggle Alpha Boundary (the 3rd box from the left)

Toggle Alpha
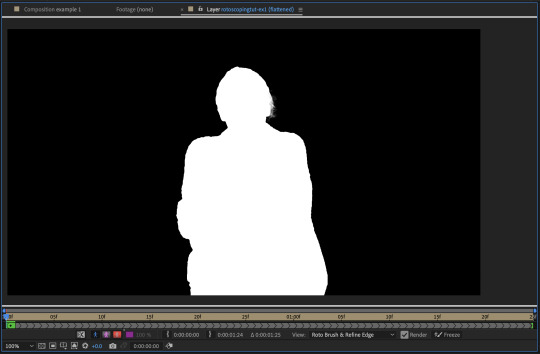
Toggle Alpha Boundary

Note: If you aren’t happy with the initial Roto Brush selection, you can always add (press Shift while using the Roto Brush Tool) / subtract (press Alt / Option using the Roto Brush Tool) your selection.
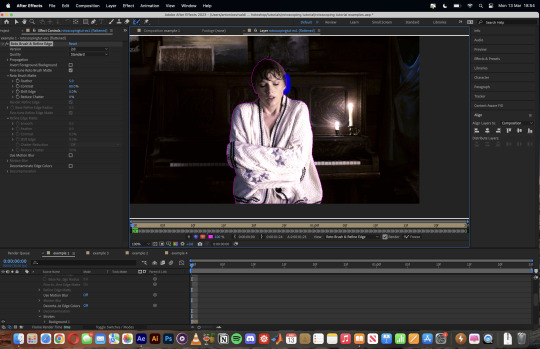
After you’re happy with your Rotoscoping selection in the first frame of your composition, press fn + down to view the next frame.
Repeat pressing fn + down and fix the selection along the way (e.g. I subtracted a small area from my Rotoscoping selection with the Roto Brush tool to make the edge look cleaner).

After fixing the selection along the way, go back to the composition file (select the clone composition again) and you will see that a cutout gif is made!
To export this, go to File > Export > Add to Render Queue. You’ll be redirected to the Render Queue panel at the bottom of After Effects.
Highlighted in red: click to change export setings
Highlighted in green: click to change save destination
Highlighted in yellow: click to render video

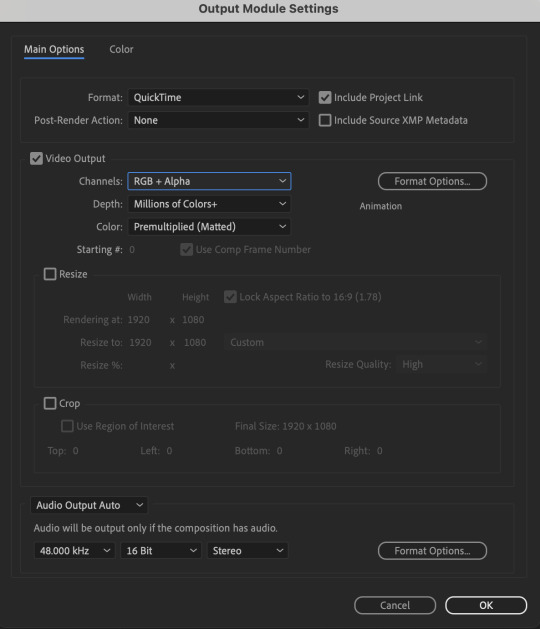
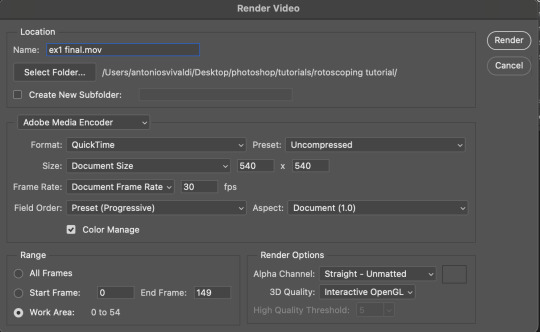
To preserve the transparency of your cutout gif, you need to change your export settings in the Output Module.
Under the Video Output section, change your Channels to RGB + Alpha. Press OK. Then Render the video.
5) Photoshop pt. 2: Assembling your final gif
The essence is to drag the cutout gif (aka the video file that you’ve just rendered on AE) into a new PSD composition file. This will be where you’ll do the rest of your giffing. Your workflow will contain the follow steps:
Make a new blank PSD composition file in Tumblr dimensions
Enable the Video Timeline
Follow the instructions detailed in the individual examples i.e. drag the cutout gif into the PSD & adjust the timeline start / end points
Exporting the final gif. If you’ve worked in 0.03s frame delay all the way up to here, just play the action that I’ve provided in the tutorial in the following order to set the frame delay to 0.05s.
EXAMPLE 1: finalising your cutout gif | sample gifset
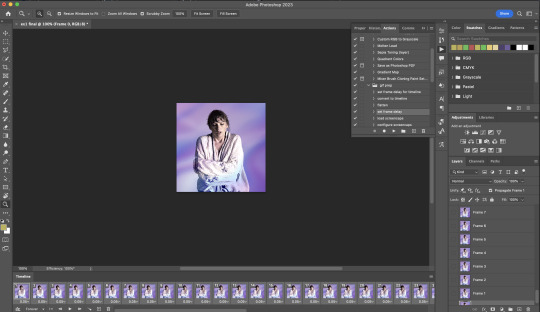
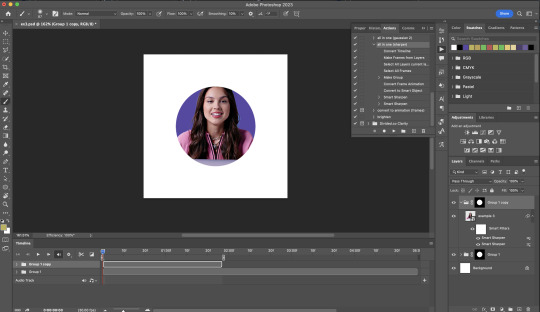
After enabling the Video Timeline in your PSD composition file you’ll see something like this
Go to your folder, drag the cutout gif you’ve made on After Effects, resize / reposition, then press Enter.
And also make sure to adjust the Video Timeline’s start / end values.
Add some finishing touches. Because I did the Rotoscoping at full HD resolution, I’ll also need to sharpen my gif in this step.
After you’re happy, you can export this into a gif file and do what you usually do to change the frame delay to 0.05s.

Notes on my “Unsmarting” approach:
To prevent accidentally writing over a PSD composition file that I’ve spent time editing, I personally render this into a short video (File > Export > Render Video) and use the following export settings (to prevent quality loss)
Then I open the rendered clip and play the actions in my gif prep action pack as follows:
flatten: this “Unsmarts” the clip / video
set frame rate: this sets all frames to have 0.05s frame delay
This is the final interface that I get before I pull up the Save For Web window.
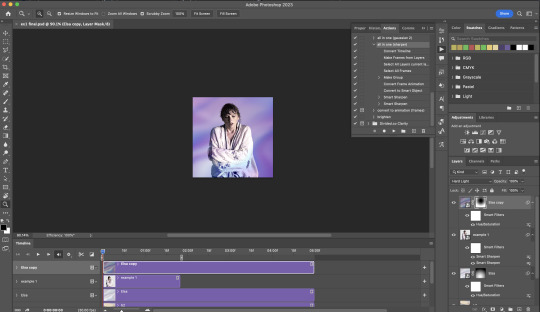
EXAMPLE 2: changing your gif’s background colour (for Case 3 gifs) | sample gifset
From your folder, drag BOTH the cutout gif (rendered on AE) and the original gif to your blank composition.
Important: you need to make sure that both layers are properly lined up in the composition file (i.e. selecting both layers when repositioning / resizing)
On Photoshop, press Enter twice and place the cutout gif on top of the original gif from the Layers panel. Then you should get something like this
Select both layers and resize / reposition them in your PSD composition until you’re satisfied with the placements.
The basic idea here is to add some adjustment layers / other things in between the cutout gif and the original gif. To do this, select the original gif layer in the Layers panel.
Then you can start adding.a bunch layers e.g. textures, onto the composition.
And then here’s the exported gif!

6) Fancier Rotoscoping examples
Note: knowledge in using layer masks / groups and making shape / text layers assumed
In the next two examples, I’ll show you how to combine the two previous examples with shape / text layers.
EXAMPLE 3: Placing your cutout gif into a shape / text layer | sample gifset
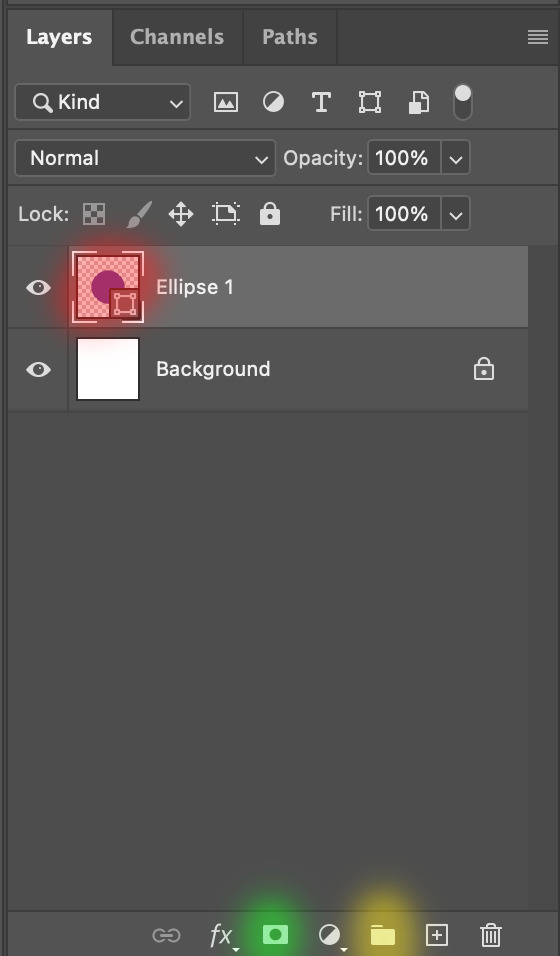
Add a text / shape layer to your blank PSD composition
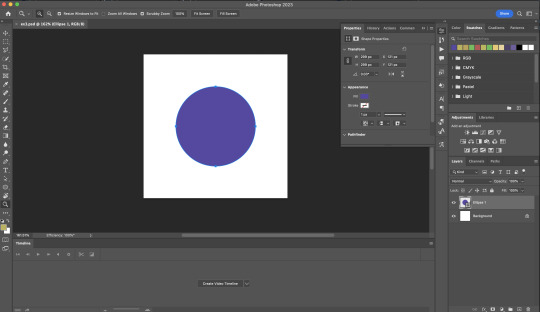
We want to prepare a masked group so in the Layers panel:
Make selection from layer: Cmmd / Ctrl + Click (highlighted in red)
Make a new group: click on the folder icon (in yellow)
Create layer mask: click on the icon (in green)
After duplicating the masked group you’ll get something like this in the Layers panel
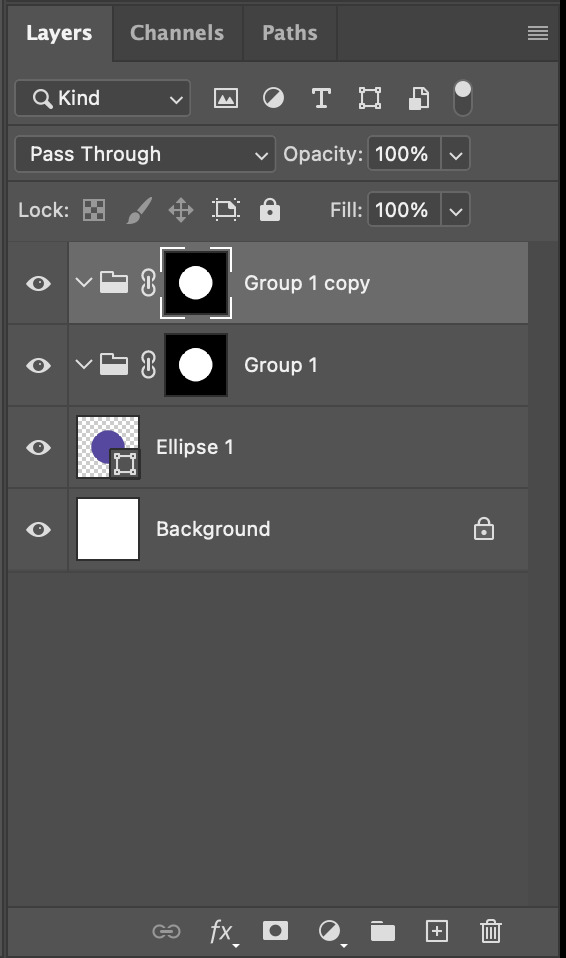
Drag your cutout gif into the PSD composition

Place the cutout gif into the masked group on top
Select the mask of the top group and paint (in white) over the region you want to reveal for the cutout gif
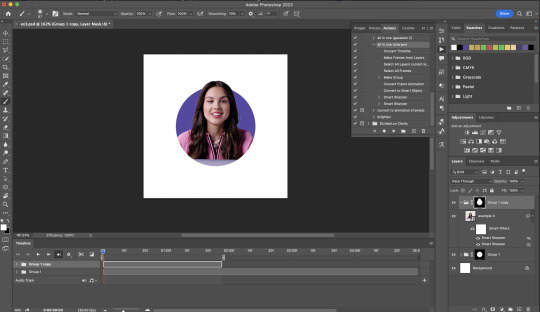
Add some finishing touches & export the gif!
EXAMPLE 4: Putting it all together | sample gifset
You follow the same approach as in Example 3 to prepare the masked groups, but you need to drag two gif layers in (and resize them using the approach outlined in Example 2)
Place the gif layers as follows
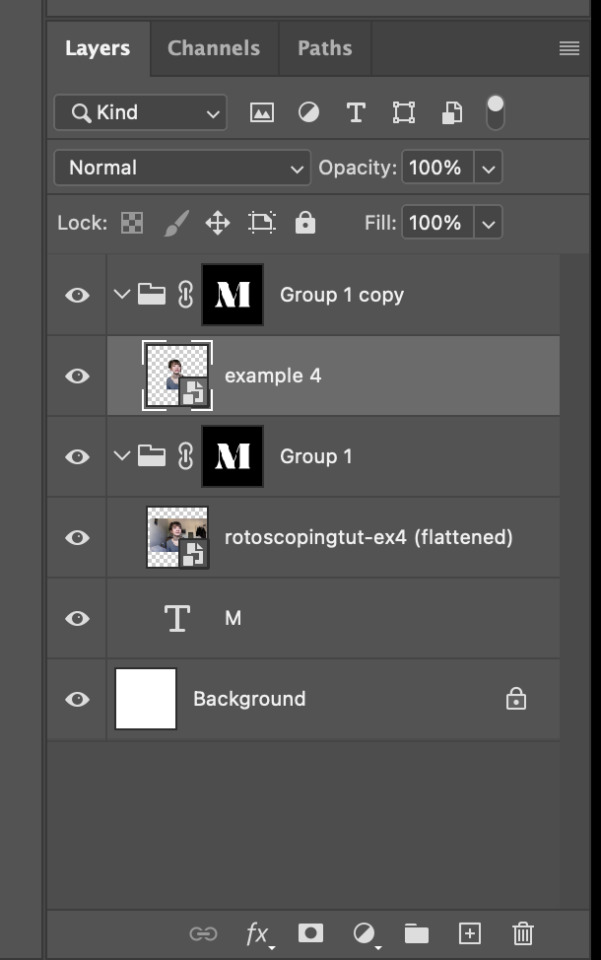
While selecting the mask of the group on top, paint (in white) over the region that you want to reveal in the cutout gif
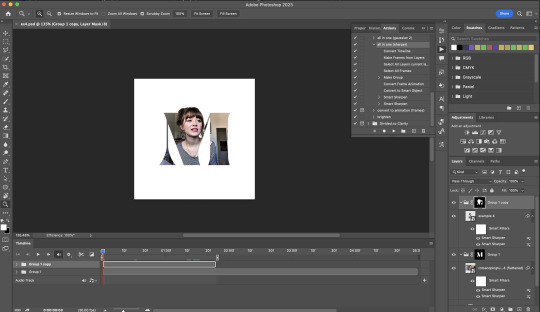
Now select the original gif (placed within the other group) and add some adjustment layers
After adding some finishing touches & exporting the gif, I get this!
Note: you can do even more overlay effects in the background portion of example 4. There will just be more masked groups + adjustment layers
7) Bonus: Some useful Rotoscoping / giffing lifehacks
GIFFING LIFEHACKS:
— Use best quality footage that you could find & Rotoscope in full video resolution, for better details around the edges
— Poorly lit scenes & low contrast edges are harder to Rotoscope (e.g. Toy Story set / TS evermore set).
If you’re new to AE, I would recommend choosing videos with well-lit gifs with simpler backgrounds and high contrast edges (e.g. Maisie Peters Cate’s Brother set)
— Use Rotobrush 2.0 if you’re using After Effects 2021 or later. It’s more difficult to Rotoscope / change background colour for gifs with a lot of movements with the classic Rotobrush tool. If the scene is tricky, you might want to switch to the “Best” quality model.
HARDWARE-RELATED PERFORMANCE OPTIMISATION:
— The recent versions of Photoshop require at least 8GB of RAM. If you have less RAM, it will still work provided you have enough scratch disk space. For better performance, it’s best to close other applications when you’re using Photoshop.
— The recent versions of After Effects require at least 16GB of RAM. If your machine has less RAM than this, there are some workarounds to prevent your machine from hanging:
Essential: close other applications that you’re running on your computer
Resize your gif down to Tumblr dimensions & sharpen it before importing to After Effects.
Install an older version of AE
8) Bonus: Some known software + hardware issues, and workarounds
KNOWN ISSUES ON PHOTOSHOP:
I currently have minimal issues in my giffing workflow, but I’ll nevertheless outline a few common known Photoshop issues for anyone who needs some workarounds.
— Video Timeline interface missing: this affects Apple Silicon Macs (i.e. M1 / M1 Pro / M1 Max / M1 Ultra / M2 / M2 Pro / M2 Max)
Update to newer version of Photoshop (updated 2022 or 2023)
Open Photoshop with Rosetta
— Scratch disk full error: This is a common issue with machines that lack RAM & have nearly used up internal storage. Editing video layers in the timeline interface uses a lot of memory hence will require a lot of scratch disk space.
Make sure that you have enough free storage space while using Photoshop. Alternatively you can use an external hard drive as a scratch disk.
KNOWN ISSUES ON AFTER EFFECTS:
These are a few issues that I have personally ran into over the course of giffing on multiple devices & multiple versions of After Effects.
Note: Inputs from M1 / M2 Mac users with regards to experiences on using the After Effects Rotoscoping tools are welcome!
— Rotobrush 2.0 set to “Best” quality model causes AE to crash: this affects anyone who’s using MacOS Ventura
I’m currently experiencing this issue on my M2 Mac. The workaround right now is to change the Roto Brush 2.0 quality setting to Standard.
This is due to some software compatibility issues on Adobe’s side specifically with MacOS Ventura. Fingers crossed that they will properly fix this bug in the future updates!
— Cannot re-open project files with Rotoscoping: this affects anyone using the initial release of After Effects 2020 (I had installed this on an Intel-based machine and it sucked)
The only option here is to update to a later version of After Effects.
8) More useful Rotoscoping resources
Rotoscoping + Keyframes Tutorial by @jenna--ortega
Rotoscoping + Masking Tutorial by @usergif
Rotoscoping For Beginners in After Effects | Motion Graphics Tutorial
I hope you enjoy reading this! If you have any questions / need any help related to this tutorial, feel free to send me an ask!
#after effects#tutorial#gif tutorial#photoshop tutorial#dearindies#tusermelissa#usernik#useryoshi#usershreyu#usercim#userrobin#useralison#userannalise#userkosmos#userisaiah#usergiu#userives#*#my resources#my tutorials
2K notes
·
View notes
Text
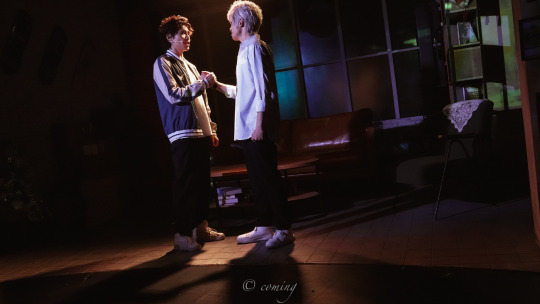
Link Click Musical update 170
(catching up on May performances yippee ✨part 1)


(housekeeping note in the end)
Links in replies: cq&wmh fighting for shoelaces, srb&ghx full encore bc I like their singing <3
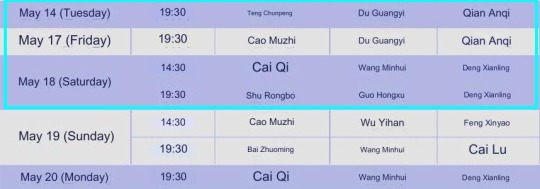
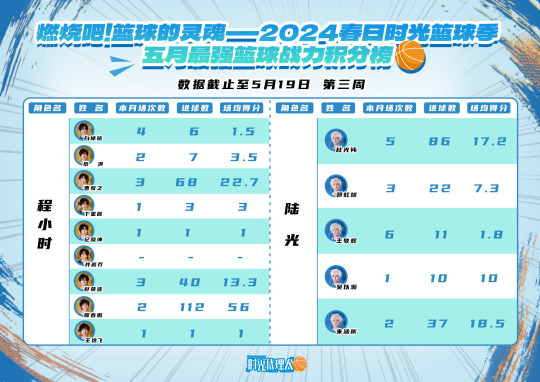
The latest scoreboard summary (big thanks to @shimmeringweeds for keeping track of individual scores 💖):
May 14th: Teng Chunpeng, Du Guangyi, Qian Anqi
After the legendary 100+ points match, the producers said they need to make the rules of basketball event more strict. If you watched last highlights vid you can see tcp abandoned the choreo completely for sake of shooting hoops ><' So this time they played fairly and dgy won 😇


May 17th: Cao Muzhi, Du Guangyi, Qian Anqi
Seems like it was an ordinary, chill performance 🙏 Cao Muzhi won the match with 18:17 score ^^


Cao Muzhi pls never change 💗

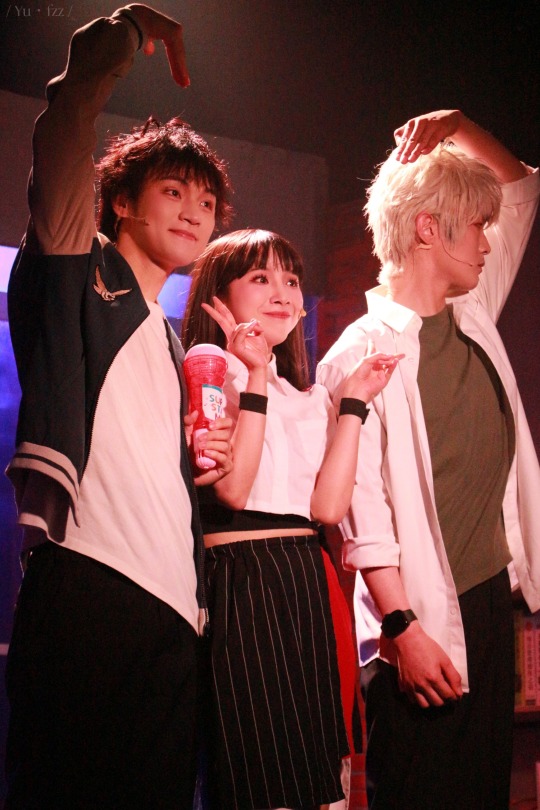
May 18th, noon: Cai Qi, Wang Minhui, Deng Xianling
The fight for shoelaces! Cai Qi started it by untying both of Wang Minhui's shoes during sofa choreo ><' To get back at him wmh first pushed cq off the table. Then, when cq was distracted by rock, paper, scissors, wmh managed to untie his one shoe.
Match score was 1:2, wmh won 🌟


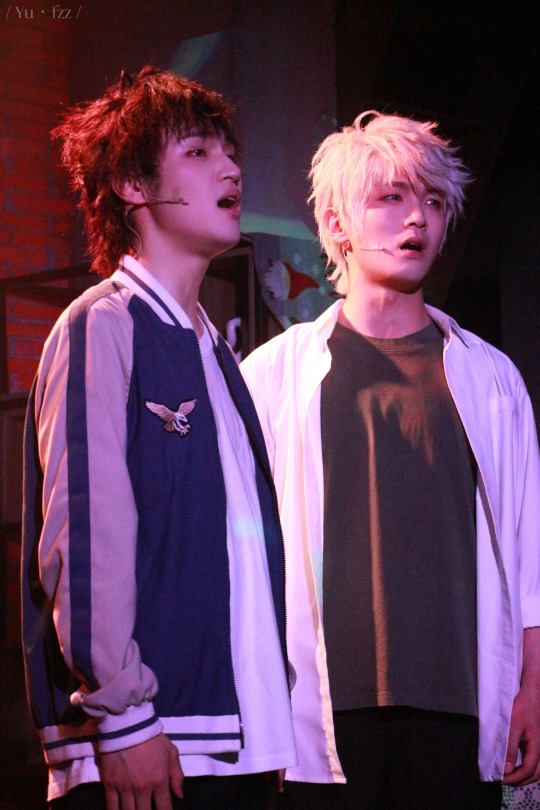
May 18th, night: Shu Rongbo, Guo Hongxu, Deng Xianling
Score was 6:8, ghx won ✨
These two sound so good together, they both have very powerful voices with surprising range ✨👌
Oh! During 'Pursuers of Light' srb went for the play fight with ghx. I thought it was cute since it's usually what Ji Xiaokun does :>


'Housekeeping' note:
If anyone was wondering why there were no musical updates for so long; aside from life stuff yadda yadda, main reason is that weibo had a bullshit update that blocks access to browsing user profiles if you don't have weibo account.
It has a roundabout but it's mundane and annoying (zooming out the website view, so you don't need to scroll to click newly posted pictures, then quickly opening the hq photo in another tab, before the login popup blocks you off) 💀 It's still working normally on mobile, but for sake of efficiency (translating captions and file management) I prefer desktop.
And making a weibo account isn't really an option since you need a chinese phone number to register and sometimes it requires you to send them ID. So yeah, no 🙃
BUT FEAR NOT I have the power of OCD and discord musical brainrot gang on my side 💪 My plan is to power through weibo's bs till 200th performance, to cover debuts of new actors and new lineups 🌟 but after that I'll have to quit/cut on the updates drastically 🙇♂️
I'll still keep track of performances and try to inform about any special happenings on twitter (it's faster and has bigger reach, hope you understand 🙇♂️).
I also have 600+ backlog pics, that are outdated, so maybe I'll use these later idk 🤔
OKAY BYEE
#link click#link click musical#shiguang dailiren#lu guang#source: weibo#qiao ling#cheng xiaoshi#teng chunpeng#du guangyi#qian anqi#cao muzhi#cai qi#wang minhui#deng xianling#shu rongbo#guo hongxu
71 notes
·
View notes
Text
The "Gethsemane" paintings: what they are and who created them
It's widely regarded as one of the most artistically effective -- and emotionally affecting -- sequences in the 1973 film of Jesus Christ Superstar. Nearly every reviewer has cited it (one calling it nothing less than a "masterly cinematic stroke of genius"), Wikipedia devotes the caption of an illustration to it, and I've seen more than one production (and one 50th-anniversary music video featuring the film's star, Ted Neeley) imitate it. (In fairness, it's not like anyone has come up with a better idea.)
Every draft of the screenplay uses the same language to describe it, and since I couldn't phrase it nearly so well, I will, too:
258 to 280. CRUCIFIXION MONTAGE.
On the heavy brass instrumental bridge, we cut to a rapid montage of about 23 shock cuts of full figure and details from the most powerful masterpieces, painted and sculpted, on the theme of The Crucifixion. Cut for impact of expression, nailed hand, wounds, thorns; for these 26 seconds we see how Christ was to die - both then and ever since. This is the agony of the cross.
It certainly is... especially those uncomfortably fast zooms and abrupt close-ups.
Some call it "foreshadowing," but I don't think that's a strong enough word. Truthfully, I find this series of famous paintings more brutal than the actual crucifixion scene in the movie. Compared to the visions Christ might be having about his death, the execution itself is in, out, and done so quickly that it's hard for me to feel any kind of way about it. But this sequence is a horse of a different color.
Anyway, one of the most asked questions about this montage has been, "What paintings were featured in this sequence, and who painted them?" In all honesty, I never cared who did it. I assumed they came from the Italian and Northern Renaissance eras, possibly with some Baroque mixed in. But I was never an art history major, and knowing the sources and their creators wouldn't have enriched my experience. I know it nailed me in the gut when I was a kid and has (somewhat) freaked me out ever since, and I thought that was all I needed to know.
However, it mattered to other people, so I did some digging. It was kind of tough, partly because many of the shots zeroed in on specific details rather than revealing the entire painting. But with a little help from the film's production file (courtesy of the Norman Jewison collection at the Wisconsin Historical Society Archives), and researchers Ethan Clark and José Garay, we've managed to identify 12 paintings by 10 artists in the final montage, as well as uncovering a few of them that didn't make the cut.
To learn about the paintings and take a closer look, hit the jump!
The Montage
Here, in order of appearance, are the paintings that made the cut, as well as the artists behind them, and how many times they show up:
Crucifixion of Christ (Derick Baegert) -- once
Isenheim Altarpiece (Matthias Grünewald) -- six times (thrice sequentially after Baegert, twice sequentially after the second Grünewald, and once after Bosch)
Crucifixion (Tintoretto) -- once (and incidentally, it's horizontally inverted)
The Crucifixion of Christ (Matthias Grünewald) -- twice (once after Tintoretto, once after the Austrian School)
Christ on the Cross (Diego Velázquez) -- once
Crucifixion (Masaccio) -- once
Crucifixion (Andrea del Castagno) -- once
The Trinity with Christ Crucified (Austrian School) -- once (the angel on the right-hand side, horizontally inverted)
Saint Luke Painting the Crucifixion (Francisco de Zurbarán) -- twice (once before Bosch, once before van der Weyden)
Christ Carrying the Cross (a follower of Hieronymus Bosch) -- twice (sequentially)
The Crucified Christ Between the Mourning Mary and St. John, a/k/a Crucifixion of Scheut or Escorial Crucifixion (Rogier van der Weyden) -- twice (sequentially)
Christ Crucified (Francisco Goya) -- thrice (sequentially)
Of the above list, ten of them were included in a memo dated June 8, 1973, concerning the contents of the montage that appears in the production file. (Grünewald's name appears only once, with no attribution, so it's unclear whether one or both paintings were initially intended for inclusion.)
The Leftovers
Only three classic paintings from the previously mentioned memo didn't make it into the film.
First on the list, which categorized the paintings alphabetically by artist's surname (or, in some cases, name), is "Antonello." This clearly refers to the crucifixion painted by Antonello da Messina, which incidentally was also source material for the production designs for Martin Scorsese's The Last Temptation of Christ. The only unclear thing is which one; Wikipedia lists three, all fairly similar-looking.
Second is an actual Hieronymus Bosch painting, Ecce Homo. Considering the Bosch-reminiscent image used in the final cut, I can only assume Jewison was either eying the crowd or confusing this painting with the more well-known descendant.
Last is an artist we have yet to identify. The memo lists them as "Guinewala," but Googling produces no artist by that name, and there is no helpful title to allow us to reverse-engineer who that actually is. (My assumption is that it's a phonetic spelling or a weird typo.) A friend who spends a lot of time at MOMA and the Brooklyn Museum of Art is wracking their brain. When they have an answer, we will!
Well... I'm glad I cleared that up for everyone. I hope this offers the art experts among us some insight into the construction of the scene. Maybe this will tell them something that we average folk don't know? Time will tell.
#jesus christ superstar#andrew lloyd webber#tim rice#jcs#jesus christ super star#jcss#jesus christ super-star#carl anderson#ted neeley#miscellaneous
21 notes
·
View notes
Text
Call for Volunteers!
Barricades is run entirely by volunteers, and we are so grateful for everyone who has given their time thus far to make the con a reality! As we approach the con weekend, we are seeking a few more volunteers in specific roles - whether you’ve already volunteered with us or have an interest, we’d love to hear from you!
We are specifically seeking Discord and Zoom Moderators for the weekend of the con, as well as captioners to add subtitles to pre-recorded presentations prior to the con.
Volunteering as a moderator:
Time commitment: As much or as little as you like! To keep things running smoothly you’d be hosting at least 1 programming item, so anywhere from 1 hour upwards
When: During the convention, as well as a 1-hour training in the weeks before
Responsibilities of a moderator during the con:
Discord moderation: Keep an eye on designated channels to ensure people follow the rules
Remind attendees of “discord etiquette” and Code of Conduct when necessary
Keeping discussions in appropriate channels, cw/spoiler tags when necessary, etc
Respond to violation reports
Assist with technical issues
Zoom moderation: make sure that the presentations run smoothly
Host and record the meeting
Introduce the panel and manage Q&A
Reminding attendees of “zoom etiquette” when necessary
Help participants with technical questions and issues (where to find the zoom, basic troubleshooting)
We prefer if you have your camera on as a zoom moderator, but it is not mandatory
The volunteer training sessions will be held on July 6 at 8 PM UTC and July 9 at 4 PM UTC. If you’d like to volunteer but cannot make a training session, please let us know so we can accommodate.
If you are interested in being a moderator for Barricades 2023, please fill out this form and join our planning discord!
We are also seeking volunteers to help us create .srt files for the presentations that will be subtitled. If you've done subtitling or captioning before and would like to help us out, please join the planning server and ask about captioning in the #communications channel, or email [email protected]
Thank you to all the volunteers who have helped us make Barricades a reality. We hope to see you at the con!
26 notes
·
View notes
Note
I can help with toyhouse! I'm sorry if this is too long and wordy :( (I'm on android mobile, so I'll help as best I can from there)
To make a character: go to the main bar (the bar at the top of the site that says toyhou.se on the left of the screen with the three lines on the right), click the three lines, find the "submit" dropdown, click that, then click "character." It'll bring you to a "create character" screen. From there, you can upload an avatar, type the name in, put it in a folder, change it's visibility, add tags, make and fill out fields, and do the description. You can also upload your first image for the character. After you've done all you need to do for your character, you click "create character" and TA-DAA you have your character!
To upload an image: go to the main bar (the bar at the top of the site that says toyhou.se on the left of the screen with the three lines on the right), click the three lines, find the "submit" dropdown, click that, then click "image." It'll bring you to an "upload image" screen. In the "Basics" box, click "choose file" and select the image you wish to upload. You can optionally make a thumbnail for this image using the zoom slider and you can select "watermark thumbnail" to add a watermark. You can also make an optional caption! On the "Privacies" box you can choose who gets the see the image and how (eg: logged in users get full access, logged out get watermarked), you also get to select the watermark type. It's worth noting you can upload your own watermark. Then, you can select content warnings. The next box below, allows you to select what character the image shows. Select the button, then select "select," and choose the character you wish. Finally, select upload image.
To upload writing: go to the main bar (the bar at the top of the site that says toyhou.se on the left of the screen with the three lines on the right), click the three lines, find the "submit" dropdown, click that, then click "literature." It'll bring you to a "create literature" screen. In the "General" box, you can choose a thumbnail by clicking "upload file" and selecting the image you want. You can use the slider tool to adjust how close or far the image should be. Type the title and the summary (under blurb). In the "settings" box, you can select if the writing will be multiple chaptered, one chaptered, or an collection and the progress of the writing. You can allow or disallow comments, favorites (likes), and subscriptions. You can change the visibility, listing, and maturity level. You can also add warnings. The last box allows you to add the cast of characters. Select the "add charcter" button, then select "select," and choose the character you wish. Repeat for each character. If one character is the protagonist, you can click the box that says "main character." If you select "quick publish," you can write the chapter and publish it with the stuff you just done. Finally, click publish literature.
To create links (relationship link) between two characters: Veiw the character's profile. At the top right of the screen, below the toyhou.se label, click the menu pull out. Click the "link" button. It'll bring you to the character's links. Click the "select" button and select your desired character. Click the "request link" button below the character's profile. Finally, write how the character's feel about one another. Make sure to click "edit link" when you're finished with one!
To make folders: go to the main bar (the bar at the top of the site that says toyhou.se on the left of the screen with the three lines on the right), click the three lines, and select your profile picture. Find the "folders" button and click it. It'll bring you to a screen labeled "folder management." Click new folder. Choose a thumbnail if you want, choose the privacy, choose the sorting, and the style. Make a description if you want! Then select "create folder." When you make multiple, you can nest a folder inside another!
To create a world: go to the main bar (the bar at the top of the site that says toyhou.se on the left of the screen with the three lines on the right), click the three lines, find the "submit" dropdown, click that, then click "World." Make a name for your world, then it's privacy level. Then, select "create world."
To make a profile warning: go to the main bar (the bar at the top of the site that says toyhou.se on the left of the screen with the three lines on the right), click the three lines, and select your profile picture. Click anything under the "manage" (folders, tags, characters, sort characters, designs, or images). At the top right of the screen, below the toyhou.se label, click the menu pull out. Click profile warning. It'll bring you to a screen that says "edit warnings." Turn on the account wide warning if you want and write your warning! Click "charcter warnings" to veiw warnings on characters.
I'm so sorry this is so, so long. I covered as many basic things as I could think of. If there's anything else, just ask around! I'm sure someone will happily answer! Have a wonderful day!
we will be saving and using this we want to make profiles fod our paras plushie and regular paras /OCs on there but it'll take time. cheese will probably be first haha.. we will do our best - HoneyLily+others
2 notes
·
View notes
Note
Not a request, just a question - how do you make stimboards? /gq
Long answer warning
I start with getting the static/regular image if possible you want a png (even if it has a background) since they’re higher quality than jpegs.
Then I open up a notepad on my computer or phone to keep all the links in until I put them into Linkslist.
Then I look for gifs, I usually start on Tumblr then move to google if I can’t find the right stuff then if I still can find the right stuff and won’t comprise I’ll try to find a video to make a gif from
When saving gifs be mindful of the scum of the earth know as webp. Webp was supposed to be a universal file format but not many sites support it this is made worse by google converting literally everything to webp. This can be avoided on Tumblr by doing this on computer: click open image in new tab, scroll to the end of the url, it will say gifv, take of the v and then press enter, it will now save as a gif.
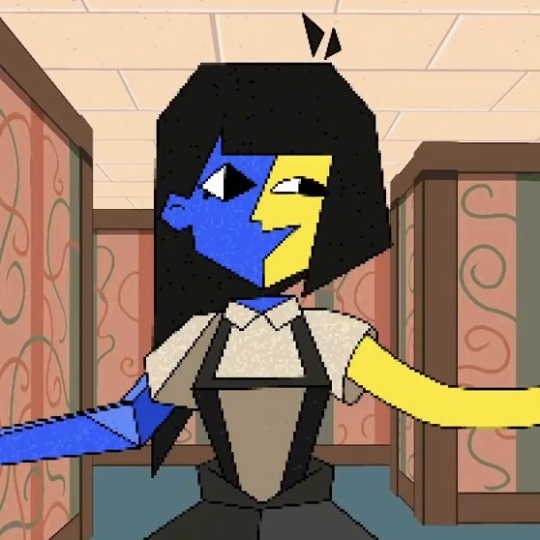
In an ideal world all the gifs you like would be a 1:1 ratio (square shaped) but alas that almost never happens. This is problem because of the way Tumblr formats images. Take this example: the pictures of both ENAs are the same file but since one was paired with a wide but short image it was zoomed in so it matches.

There is no way (as far as I know) to crop images within Tumblr so you’ll have to do it outside of here. Me and everyone else seems to use ezgif. Ezgif can convert webps to gifs, crop gifs, add effects to them and many other useful things.
Anyway now that I have some gifs I like I make a draft post and see how it looks. Then I rinse and repeat the gif finding process until I’m happy with the board.
Finally I put all my links into Linkslist (I do this because I’m lazy and don’t want to put 8ish links into a post one by one) then I add a caption to my board, put the sources link and done!
Also I believe it’s technically possible to make one large file in photoshop then post it to Tumblr as one image. I say technically possible because the size of a gif file that holds 8 moving parts and isn’t compressed beyond recognition would be too much for Tumblr to handle and would most likely exceed the size limit.
Also also Tumblr can only do 3 image for width. So if you wanted let’s say a 4x3 board you would have to merge gifs in photoshop or photopea put a white divider between them while also being mindful of how the image size stretching I mentioned before works. So that’s why no one does anything besides 2x3 and 3x3 stimboards.
This might sound like a lot of work but when you get in the groove it’s really fun. Especially when it’s a request so you’re extra excited to get it out so they can enjoy it.
Anyway I hope this wasn’t too bland a read and was maybe a bit insightful. Have a great day thanks for taking interest in the blog!
10 notes
·
View notes
Text

When Applying Styles - Place The Style You Are Applying Most On The Clipboard....
Scenario: Styles are applied to a large file. You have Heading Styles for the Multilevel Outline, Body Text Styles for the non-numbered paragraphs, and a Style Separator scenario whereby the text to the right of the Style Separator uses a Body Text type style to disassociate the remaining Body Text from the Heading 2 text that sits before the Style Separator.
When putting together an involved document, you don't want to have to go up and down the right side style pallet looking for each needed style. That eats up a lot of time and results in a lot of unnecessary movement. No matter what you have going on in your document you can take adventure of your clipboard to make your day easier.
Instead, we use a combination of things in order to smooth out the process of applying styles.
Back to your Style Separator Example:
1. You have the right side palette open where you are staring at Heading 2.
2. After we bring in the first instance of the Body Text style that is applied after the Style Separator, we can place the formatting of that style we will use again and again on your "clip board" by the use of Control Shift C. This style will now be available all day as needed on your clipboard until of course you establish a new Control Shift C or you close the document out.
3. The sequence then becomes apply the Heading 2 Style to the text that shares the paragraph. Heading 2 and its attributes come in.
4. Apply the Style Separator (Control Alt Enter) and your cursor will be sitting to the right of the Style Separator.
5. Use Control Shift V to paste the formatting of the body text style you placed on the clipboard that disassociates the Body Text from the Heading 2 text.
6. This method will help to cut down on much of the movement associated with applying styles. The use of the Control Shift V is more efficient than using the Paint Brush. FYI: Control Shift C and Control Shift V is the key combination for the Paint Brush.
7. Placing your most used style on the clipboard for your editing session will make the process of applying styles a lot easier.
Note: Make your work even easier by using Control Alt 1, Control Alt 2 etc. to bring in Heading 1 and Heading 2. This will really cut down on the up and down movement of the right side style pallet. Between the clipboard and the shortcut discussed in this paragraph gives you a major advantage when dealing with big documents.
Training From An Inside Perspective
We routinely and thoroughly go over Style Separator scenarios, Multilevel Outlines, Cross References, TOC, TOA, Index Of Terms, Strategy and so much more!
One Of The Very Few That Teach Top Tier Legal!
www.advanceto.com
https://advancetoffice.com/
www.awalkinthecenter.com
888-422-0692 Ext. 1 and 2
Email:
Books that hand hold you through all procedures. www.legaltestready.com and www.awarenessexplosion.com
Hey Students: AdvanceTo offers a very informative and information packed Litigation Formatting and Styling class. This 4.5 hour hands-on Zoom or Phone class (can be spit into 2 sessions) will go through a number of litigation documents piece by piece. You get to learn and experience a number of procedures, vocabulary and reasoning as to why things are constructed the way they are.
This is your opportunity to attain another large block of knowledge that you can put to use right away. We will cover everything from Caption Boxes to Table of Authorities. This high value class is $175.00 and includes narrative material as well as homework, so you can practice your new found skills. For those people who purchase 2 or more classes you receive a nice discount. All Groups receive a discount. Give us a call today! 888-422-0692 Ext. 1 and 2.
0 notes
Text
Introducing Copilot+ PCs: A New Era of Windows Computing

Copilot+ PCs, AI-optimized Windows PCs, were launched at a special event at new Microsoft campus today.
Copilot+ PCs are the fastest and smartest ever. Copilot+ PCs let you do things no other PC can with powerful new silicon capable of 40+ TOPS (trillion operations per second), all-day battery life, and the most advanced AI models. Recall helps you find and recall what you saw on your PC, Cocreator generates and refines AI graphics in near real time on the device, and Live Captions translates sounds from 40+ languages into English.
Microsoft Surface and their OEM partners Acer, ASUS, Dell, HP, Lenovo, and Samsung bring these experiences to life on thin, light, and attractive devices, with pre-orders starting today and availability on June 18. Copilot+ PCs are great value at $999.
This first Copilot+ PC wave is just the start. Over the past year, cloud AI has advanced rapidly, with Copilot letting us achieve things we never thought imaginable. Microsoft start a new chapter with device AI innovation. Microsoft redesigned the PC from silicon to the operating system, the application layer to the cloud, with AI at the centre, marking the biggest update to Windows in decades.
The quickest, safest Windows PCs ever
Microsoft created a new system architecture to combine the power of the CPU, GPU, and high-performance NPU. Copilot+ PCs can now perform like never before thanks to Azure Cloud’s long language models (LLMs) and small language models (SLMs). Industry-leading AI acceleration is delivered by their 20x power and 100x efficiency for AI workloads. They exceed Apple’s MacBook Air 15″ by 58% in sustained multithreaded performance and have all-day battery life. Copilot+ PCs can play local videos for 22 hours or browse the web for 15 hours on a single charge, which is 20% more than the MacBook Air 15”.
Starting with Qualcomm, Windows has the finest app implementation on the fastest chip. Microsoft’s quickest Microsoft 365 app implementations Teams, PowerPoint, Outlook, Word, Excel, OneDrive, and OneNote are native Arm64 experiences. Chrome, Spotify, Zoom, WhatsApp, Blender, Affinity Suite, DaVinci Resolve, and others now run natively on Arm for optimal performance. Slack will be released later this year. Today, 87% of programme minutes are spent on native Arm versions. Prism, a powerful new emulator, runs native and emulated apps well.
Every Copilot+ PC is factory-secured. All Copilot+ PCs will have the Microsoft Pluton Security processor on by default, and Windows 11 has many new features, upgrades, and defaults that make security easy. Microsoft’s personalised privacy controls let you protect what matters.
Unique, powerful AI experiences
Copilot+ PCs unleash new experiences you can run locally on the device with strong processors and several state-of-the-art AI models, including many of Microsoft’s world-class SLMs. This reduces latency, cost, and privacy constraints to boost productivity, creativity, and communication.
Recall instantaneously
Looking for anything Microsoft have seen on their PC is one of the most aggravating difficulties they face daily. Today, Microsoft must recall its file folder, website, or read through hundreds of emails to find it.
With Recall, you may virtually recall what you saw or did on your PC like photographic memory. Like us, Copilot+ PCs organise information by relationships and associations specific to their experiences. This helps you remember things you may have forgotten so you can discover what you need fast and instinctively using your memories.
You may navigate through your timeline to find material in any app, website, document, or more. Use screenshots and screenray to intuitively take the next step with object recognition-based suggestions. Return to a specific Outlook email or Teams chat.
Recall uses your device-built semantic index. Your PC stores your photos. You can delete the snapshots, alter and delete time periods in Settings, or pause from the Taskbar System Tray icon. You may also prevent apps and websites from saving. You have complete control and reliable privacy.
Windows has AI-powered image creation and editing
Nearly 10 billion images have been made since Image Creator launched, letting more individuals create their ideas by using natural language. Today’s cloud services may limit the quantity of photos you may create, delay artwork processing, or raise privacy concerns. Microsoft is providing new experiences to your favourite creative apps like Paint and Photos using NPUs and powerful local small language models.
Use Cocreator to create images in real time from ink strokes and text prompts. The artwork evolves with you, making it easier to tweak, edit, and evolve your ideas. Highly efficient diffusion-based algorithms optimise output quality over minimum steps to make you feel like you’re creating with AI. Choose literal or emotive artwork with the creative slider. After choosing your artwork, you can iterate on it to express your ideas, regardless of your creativity.
Improve photo editing and creation. Restyle Image combines image production and photo editing in Photos to restyle your personal photos. Use a pre-set style like Cyberpunk or Claymation to change the backdrop, foreground, or entire image to create a new one. Start your next creative endeavour with Image Creator in Photos and gain visual inspiration. Copilot+ PCs let you make unlimited, rapid, custom-tailored photos and store your favourites to collections.
Your favourite creative apps provide innovative AI experiences
Microsoft is also teaming with some of the world’s most popular apps to use the NPU to create new AI experiences.
Adobe
Together with Adobe and Microsoft are excited to provide Photoshop, Lightroom, and Express to Copilot+ PCs today. Adobe Illustrator, Premiere Pro, and more arrive this summer. Their partnership to optimise AI in these apps for the NPU continues. Adobe Creative Cloud members may express their creativity faster than ever with Copilot+ PCs’ full capabilities.
Resolve Studio
Easily apply visual effects to objects and people in DaVinci Resolve Studio with NPU-accelerated Magic Mask.
CapCut
CapCut NPU Auto Cutout removes the background from any video clip quickly.
Cephable
The new NPU-powered camera pipeline in Cephable makes adaptive input controls like head movement and facial expressions faster and more responsive.
LiquidText
Use NPU-based AI to annotate documents faster and smarter, keeping LiquidText data private.
djay Pro
Experience enhanced music remixing with the special NeuralMix feature in Algoriddim’s djay Pro for NPU users.
Easy communication with live captions
Windows aspires to unite individuals in a globalised environment. Microsoft want more people to enjoy your favourite international podcast, watch your favourite sports team, or collaborate with friends and colleagues around the world.
Live Captions now translates all audio that comes through your PC into a single, English-language caption experience on your screen across all your apps in real time. Live or pre-recorded audio from over 40 languages in any app or video platform can be translated into English subtitles instantaneously, automatically, and offline. With the NPU and available on all Copilot+ PCs, you can trust your words are comprehended.
Improved Windows Studio Effects
Look and sound your best automatically with Quick Settings’ simple controls. Portrait light automatically brightens foreground pixels in low-light environments and improves perceived illumination in gloomy environments. New graphic, animated, and watercolour filters add style. Eye contact teleprompter aids screen reading. New voice focus and portrait blur improvements keep you in focus.
Your daily AI companion, Copilot
Every Copilot+ PC comes with your personal powerful AI agent, only a tap away on keyboards with the new Copilot key. Customers will now enjoy the whole application experience in a streamlined, simple, powerful, and personal form. You may get the latest AI models with Copilot. In the following weeks, Microsoft OpenAI partners will provide the latest models, like GPT-4o, for more natural voice chats.
Responsible AI advancement
Microsoft is committed to ethical, safe, and secure AI development. These new experiences were developed using our responsible AI principles, and all AI elements meet our requirements. Find out here.
Microsoft Surface and partners reveal Copilot+ PCs
Microsoft partnered with Acer, ASUS, Dell, HP, Lenovo, Samsung, and Surface to bring exciting new Copilot+ PCs to market on June 18. These devices start at $999, $200 less than similar-spec products.
In the Windows ecosystem, Surface produces software and hardware to give customers and enthusiasts unique designs and meaningful experiences. The new Surface Pro and Surface Laptop are Surface’s first Copilot+ PCs.Image credit to Microsoft
The new Surface Laptop is a powerhouse with razor-thin bezels, a dazzling touchscreen display, AI-enhanced camera, premium audio, and a haptic touchpad.
Choose a 13.8” or 15” display and four gorgeous colours. Surface Laptop 15” and Surface Laptop13.8” offer 22 and 20 hours of local video playback, great performance, and new AI experiences.
Surface Pro, the most flexible 2-in-1 laptop, is now faster and more battery-efficient to support new AI experiences. It offers an optional OLED with HDR display and ultrawide field of view camera for Windows Studio Effects. For the first time, the Surface Pro Flex Keyboard can be utilised attached or detached. An integrated Surface Slim Pen storage and charging system and a quiet, tactile touchpad improve stability.
From June 18, the largest brands will offer Copilot+ PCs:
Acer: The Swift 14 AI 2.5K touchscreen lets you sketch and edit your vision with increased accuracy and colour accuracy. Use the AcerSense button to launch and explore AI-enhanced features like PurifiedVoice 2.0 and Purified View.
ASUS: The ASUS Vivobook S 15’s Snapdragon X Elite Platform and Qualcomm AI bring AI experiences to life. It has 40+ NPU TOPS, dual-fan cooling, and up to 1 TB of storage. Windows Studio Effects v2 and ASUS AiSense camera with presence-detection for Adaptive Dimming and Lock are next-gen AI advancements. Its ultra-slim, light all-metal design, high-capacity battery, and luxury styling with a single-zone RGB backlit keyboard make it portable.
Dell: The XPS 13, Inspiron 14 Plus, Inspiron 14, Latitude 7455, and Latitude 5455 are five new Copilot+ PCs from Dell that offer innovative battery life and AI experiences for consumers and businesses. The Latitude 7455 has a gorgeous QHD+ display and quad speakers with AI noise reduction, while the XPS 13 has Snapdragon X Elite processors and a premium, futuristic design. Snapdragon X Plus 1 and lightweight, low-carbon aluminium make the Inspiron14 and 14 Plus energy efficient with EPEAT Gold rating.
HP: The OmniBook X AI PC and HP EliteBook Ultra G1q AI PC with Snapdragon X Elite are small and stylish, offering increased performance and mobility for a more personalised computing experience. AI-powered productivity tools like real-time transcription and meeting summaries and long battery life are included. For better virtual interactions, Poly Studio’s crystal-clear audio supports a 5MP camera with automated framing and eye focus.
Lenovo launches two AI PCs: Yoga Slim 7x for consumers and ThinkPad T14s Gen 6 for businesses. A 14.5” touchscreen with 3K Dolby Vision and optimised power for 3D rendering and video editing make the Yoga Slim 7x efficient for creatives. With a webcam privacy shutter, Wi-Fi 7, and up to 64GB RAM, the T14s Gen 6 delivers enterprise-level AI performance and work experiences.
Samsung: The ultra-thin, light Galaxy Book4 Edge has a 3K 2x AMOLED display with Wi-Fi 7. The 22-hour video playback battery makes it ideal for business or leisure on the go.
Discover new Copilot+ PCs and pre-order today at Microsoft.com, major PC makers, and other top retailers.
Start commercial deployment testing today
Businesses get the fastest Windows 11 devices with AI to boost productivity, collaboration, and efficiency with Copilot+ PCs. Companies may install and operate a Copilot+ PC as a Windows PC using the same tools and processes, including IT controls for new features and AppAssure support. Microsoft propose IT admins evaluate and prepare for deployment to give your workers access to sophisticated AI features on high-performance devices.
Windows ecosystem AI innovation
Windows has always provided a platform for ecosystem partners to build on.
The initial Copilot+ PCs will use Snapdragon X Elite and Snapdragon X Plus CPUs, offering superior performance per watt with Qualcomm Oryon CPU for unmatched battery efficiency. Snapdragon X Series offers 45 NPU TOPS SoCs. The integrated Qualcomm Adreno GPU provides excellent graphics for immersive entertainment. Through deep Intel and AMD cooperation, starting with Lunar Lake and Strix, Microsoft hope to expand. Later, Microsoft will provide new Copilot+ PC experiences. By pairing this technology with powerful graphics cards like NVIDIA GeForce RTX and AMD Radeon, Copilot+ PC experiences will reach more experienced gamers and developers.
This is the moment when the PC will accelerate AI innovation. Microsoft thinks the best AI experiences will come from cloud and device collaboration. Microsoft is shaping Windows innovation for the next decade alongside their partners.
Read more on Govindhtech.com
#CopilotPCs#microsoft#microsoft365#aipc#windows#window11#pc#aimodel#technology#technews#news#govindhtech
0 notes
Text

Mentor Message 2.16.24
Sometimes I feel like a sloth...
🐱💻Campus Updates/Reminders
2 Reminders for Syllabi Policies:
A. AI: Include a policy on AI/academic integrity in syllabi. Departments may want to determine recommended policies for their disciplines See Syllabus Samples
B. Logging in is not “Attending”: See DE Handbook p. 6 for recommendations. This is per Federal financial aid regulations (see p. 5-65
2. Enrollment Concerns: Due to increasing cases of large-number false enrollments, it is important for online faculty to reach out & drop all no-shows/no contact students the first day & to contact & enroll waitlisted students. Pre-start enrollment numbers might be vastly "off."
3. DE Toolbox Resource Site: SDCCD Online Pathways has been updating the SDCCD DE Toolkit. This helps fill the gap now that the sdccdolvid site where Dave Giberson & Katie Palacios kept a library of tutorials is no longer supported. The site still works, but no updated content after Dave retired last year.
4. Student Email: Faculty can reach out to students using the non-sdccd email (especially important for pre-semester, drop/add, waitlists). Many thanks to Dean DeVore, Margarita Murray & their team for creating this. Tutorial: See 1.28.24 Mentor Message or Tumblr Blog for archived messages.
5. Office 365 Issue: PT faculty don’t have access to the Word/PPT/Excel software off-line. To create or open those types of files, PT faculty must be logged into their Outlook Account/Myapps If PT faculty need access offline, fill out a request.*Request Form for Downloadable 365 (not a guarantee it will be granted – requires Dean sign-off).
*365 LTI in Canvas not recommended: You still have to open the Word/PPT/Excel application in your MyApps or your desktop applications (if you have it downloaded).
6. Upgraded Wi-Fi at City is complete. Please submit a Help ticket if you have difficulties accessing the Guest-Connect or the SDCCD Campus Connect (faculty/students/staff only). Info & tutorials: See LRC Info or the District Wi-Fi site. You may need to “forget network” or work with the Helpdesk for your particular phone, tablet, laptop, etc.Many thanks to Charlie Mills on getting this gargantuan task completed!
7. New Paper Cut Pay-to-Print in LRC: See Student Accounting for transferring funds from the old system. The high-speed KIC scanner is available for free, fast scanning Info on printing and scanning in the LRC.
🧊🛠Cool Tools
MS 365 Add-ins for Word: No need to navigate away from your document to add accent marks, find images, symbols, etc. HUGE time saver for accent marks in Romance languages or math/chem symbols! Video Tutorial (3:44) Most are free; some have limitations.
Humanize Your Zoom Waiting Room: You can personalize the message people see in the Zoom Waiting Room before you start a meeting. This is global, so you may want something that would work for all your classes/meetings. Tutorial (2:42)
Multimedia/captioning Option for Discussion Boards: How to use Canvas Studio in DB
Can All Your Students View Your Beautiful Content? Use Pope Tech or the Canvas Accessibility Tool to check accessibility. This helps everyone, including those with slower Internet/cell speeds. Checkers are at the bottom of every box where you can type/edit in Canvas.
✨🆕Zoom Update: Polls & Quizzes are now housed with “Surveys”
Zoom polls work like “clickers” if you want anonymous responses in real time. You can share the percentages for each of the answer choices. Easy peasy – free for you & students to use; they can use any device with an updated Zoom client.
Faster workload: Copy/paste all questions/answers from Zoom polls/quizzes/surveys into MS Word! Click on “Preview” to copy/paste the text.
Quick anonymous surveys for Online Live classes. Your survey will automatically open after your Zoom class ends. I did a “Muddiest Point” one last week.
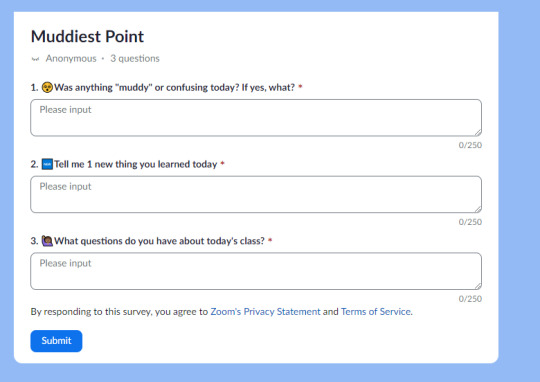
How To: Surveys>Create Survey>Type or paste in your questions>Save
Video tutorial (4:15) Note: “single choice” means picking only 1 answer; “multiple choice” means being able to select more than 1 answer in Zoom. Review the responses by clicking on the number in your survey.
🧠AI: Resources & Food for Thought
MS 365 Co-Pilot: Want to use an AI tool that keeps your content in SDCCD? You and your students have free Co-Pilot access with SDCCD Outlook email login/password.
Equity/Privacy Issues with AI Checkers: Why Vanderbilt turned off their Turnitin AI checker
Food for thought on creating prompts/assignments to outwit AI: Yejin Choi, The Not So Intelligent Side of AI
How AI Can Perpetuate Bias & Discrimination: Interview with Safiya Noble, UCLA
0 notes
Text
Navigating the Virtual Realm - A Comparative Analysis of Google Meet and Zoom

In the age of remote work and virtual collaboration, video conferencing platforms have become indispensable tools for businesses, educational institutions, and social gatherings alike. Among the plethora of options available, two giants stand out: Google Meet and Zoom. Both platforms offer a suite of features designed to facilitate seamless communication and collaboration across distances. Visit this site to learn more about Google Meet vs Zoom.
Introduction to Google Meet and Zoom
Google Meet, formerly known as Google Hangouts Meet, is a video conferencing platform developed by Google as part of the Google Workspace (formerly G Suite) productivity suite. It offers secure and reliable video meetings for teams and organizations of all sizes, with features such as screen sharing, real-time captions, and integration with other Google Workspace apps.
Zoom, on the other hand, has gained widespread popularity for its user-friendly interface and robust feature set. It caters to businesses, educational institutions, and individuals, offering high-quality video and audio conferencing, virtual backgrounds, chat functionalities, and more.
Feature Comparison
Video and Audio Quality
Both Google Meet and Zoom provide high-definition video and audio quality, ensuring clear communication during meetings. However, Zoom has gained a reputation for its superior audio processing capabilities, resulting in clearer audio even in low-bandwidth environments.
Meeting Capacity
Google Meet allows up to 250 participants in a single meeting for certain plans, while Zoom offers various plans with different participant limits, ranging from 100 to 1000 participants, depending on the subscription tier.
Screen Sharing and Collaboration Tools
Both platforms offer screen sharing capabilities, allowing participants to share their screens for presentations, demonstrations, or collaborative work. Zoom provides additional collaboration tools such as virtual whiteboards and annotation features, which can be useful for brainstorming sessions and interactive discussions.
Security and Privacy
Security and privacy have been major concerns for video conferencing platforms, especially with the rise of remote work and online learning. Both Google Meet and Zoom have implemented various security measures, such as end-to-end encryption, meeting passcodes, and waiting rooms to prevent unauthorized access. However, Zoom faced scrutiny in the past due to security vulnerabilities, prompting the company to enhance its security features and protocols.
Integration and Compatibility
Google Meet seamlessly integrates with other Google Workspace apps such as Gmail, Google Calendar, and Google Drive, allowing users to schedule meetings, send invitations, and access files directly from their Google accounts. Zoom also offers integrations with popular productivity tools like Slack, Microsoft Outlook, and Salesforce, providing users with a seamless workflow across multiple platforms.
User Experience
Interface and Ease of Use
Both Google Meet and Zoom feature intuitive interfaces that are easy to navigate, making it simple for users to join meetings, manage settings, and access features. Zoom's interface is slightly more customizable, allowing users to personalize their virtual backgrounds and display names.
Mobile Accessibility
Both platforms offer mobile apps for iOS and Android devices, allowing users to join meetings and collaborate on the go. Google Meet and Zoom provide similar functionalities on mobile devices, including video and audio conferencing, screen sharing, and chat.
Pricing
Google Meet and Zoom offer a range of pricing plans to accommodate different user needs and budgets. Google Meet is included with Google Workspace subscriptions, starting at $6 per user per month for business plans. Zoom offers a free basic plan with limited features, as well as paid plans starting at $14.99 per host per month for small teams and businesses.
In the battle of Google Meet vs. Zoom, both platforms offer robust features, high-quality video conferencing, and seamless collaboration tools. The choice between Google Meet and Zoom ultimately depends on your specific requirements, preferences, and budget. If you're already using Google Workspace and value tight integration with Google apps, Google Meet may be the ideal choice for you. On the other hand, if you prioritize superior audio quality, advanced collaboration features, and customizable settings, Zoom might be the better option. Enter here to learn more about Google Meet vs Zoom. Whichever platform you choose, both Google Meet and Zoom are sure to enhance your virtual meetings and empower your team to collaborate effectively, regardless of distance.
0 notes
Text
Create Accessible PDFs
The Ultimate Guide To PDF Accessibility: How To Make Your Documents Inclusive And Compliant
In today’s digital age, Portable Document Format (PDF) files have become an integral part of our information-sharing process. Whether educational materials, corporate reports, or government publications, PDF files with Accessibility maintain the original formatting and allow users to access information consistently across various devices. However, for PDFs to be truly effective, they must be accessible to all, including those with disabilities. Besides, as about 61 million adult Americans have some disability, you risk their not being able to access the ADA-compliant PDFs and content you create. And it’s not just those with visual impairments that are affected. Even people with a mobile or hearing disability may face problems accessing your web content or PDF.
This is why the ADA and Section 508 focus on making life for those people with disabilities much easier. They require that places of accommodation be accessible to users with disabilities. As PDFs are commonly used on the web, they also have to comply with these laws based on the criteria set by the WCAG. While web compliance is important, creating accessible web content can be challenging. PDFs are especially difficult to manage as they are complex files inaccessible out of the box. It’s only experts who know WCAG and ADA standards well who can take care of the task. We have provided some tips about PDF accessibility features in this article. However, don’t worry if the information overwhelms you. We at ADA Site Compliance can help if you don’t know how to ensure your website or PDF is accessible. Our team of accessibility experts will not only check your PDFs and website content for accessibility but also constantly monitor and update your website and PDFs based on the latest accessibility updates.
Overview of Portable Document Format (PDF)
PDFs, developed by Adobe, have transformed how we share electronic documents. The format was created to maintain document integrity while allowing easy sharing. PDFs are based on an image model that differs from the typical PostScript language commonly used. It is to improve interaction and accessibility that PDFs are structured differently.
What makes an accessible PDF?
As the name suggests, an accessible PDF is a PDF anyone with any disability can easily read and navigate through. And it can mean different things for users with different disabilities. For example, for those with visual impairments, an accessible PDF can mean any of these three. It can mean:
They can easily zoom into the texts if need be
The content has high contrast, making it easy to read
They can easily read the PDF using the help of screen readers
In the case of users with physical disabilities, it means ensuring users can easily navigate through the entire document with the help of a keyboard. These readers find managing a mouse for navigation difficult, so being able to use a keyboard is a welcome move for them. For users with hearing impairments, creating an accessible PDF will mean having captioned audio and video content. In short, the main aim of creating web-compliant PDFs is to provide them with an alternative means of accessing content. Most PDFs have some of these options as default, like zooming and keyboard navigation. However, it doesn’t mean that these PDFs are necessarily accessible. They can, however, be made accessible just by implementing some additional steps.
Characteristics of Accessible PDF Files
Accessible PDFs are a must to ensure inclusivity. Most importantly, they feature searchable text, which, in the process, makes content available to screen readers. Besides, unlike scanned images of text, accessible PDFs can be selected, copied, and edited. This can prove helpful to everyone requiring more clarity about the PDF. Optical Character Recognition (OCR) technology also plays a crucial role in making content searchable and thus accessible to all.
Navigating PDF Accessibility
Ensuring that your PDF documents are fully accessible can be a complex task, but it’s an essential one. This is especially required with the World Wide Web Consortium (W3C) Web Content Accessibility Guidelines (WCAG) having set the standards for digital accessibility. These guidelines encompass various aspects, including alternative text alternatives, navigation, and readability. Adhering to these guidelines is crucial to creating PDFs that are both legally compliant and user-friendly. Besides, ensuring that your website and the content you provide, including PDFs, are accessible is not just a legal obligation; it’s a moral imperative. By embracing accessibility, you not only comply with the law but also open doors for a more inclusive and diverse audience.
Accessible PDFs: A Key to Digital Inclusion
The importance of accessible PDFs cannot be overstated. They open up a world of information and opportunities for individuals with disabilities. Accessible PDFs offer text-to-speech capabilities, allowing screen readers to convey the content to visually impaired users. Moreover, they allow users to navigate the document efficiently, providing screen reader users with a seamless reading experience. When your documents are accessible, you broaden your reach and cater to a broader audience. This inclusivity can increase website traffic and customer engagement, benefiting your business or organization.
How to Remediate an Inaccessible PDF?
Making an inaccessible PDF accessible isn’t about perfection; it’s about improving and providing access for all. Whether you have the original source document or just a PDF, here is a rundown of the best ways to enhance existing PDF documents for accessibility with the help of the right tools and processes. Contact ADA Siite Compliance today so we can make ALL your PDF documents fully accessible.
1. Determining the Accessibility Path for Each PDF Document
As PDFs can be generated in various ways, there is no cookie-cutter accessibility solution. Each document has and needs a unique solution. The good news is there are some tools like Adobe Acrobat Pro with multiple accessibility features, making the remediation process more manageable.
2. Starting with an Accessible Document
The journey to accessible PDFs begins with the source document. Whenever possible, it is always better to start the remediation process with the document title in native file formats. The reason is that any and all documents created in Word or desktop publishing software can be later easily exported as PDFs. This is a useful feature as it allows for adding additional text, headings, data table structures, other document structure tags, language definitions, and more.
3. Preventing Security Settings from Interfering with Screen Readers
Ensuring that screen readers can navigate your PDFs smoothly is an important step in remediating inaccessible PDFs in the form fields in the proper PDF format. It is always better to avoid copying, printing, extracting comments, or editing PDFs. The reason is that these actions can hinder accessibility. There are tools that can help you ensure that access permissions do not interfere with screen reading.
How to Make a PDF Compliant with Accessibility?
Achieving document accessibility in your PDFs is essential. It ensures that users with difficulties can at least use the help of assistive technologies like screen readers to interpret your whole document structure’s structure correctly. Besides, as mentioned earlier, compliance with ADA standards helps make your digital landscape more inclusive to reach out to more of your target audience and, in the process, generate more web traffic.
How do you make accessible PDF documents?
There are a few optimal practices to adhere to within reading order to make a PDF accessible documents, and they are to:
Make things simple; in other words, use simple language in the PDF
Ensure you include as many relevant headings and subheadings as possible
Including meaningful alt-text for all the images and graphics you have in your PDF
Ensuring the text in the PDF is not only readable but has sufficient contrast with the background for better readability
Not depending much on colors to convey information as it can be intimidating to users with color blindness
Always make more use of accessible tables and lists in PDF documents
Adding bookmarks where possible
Using a catchy and interesting title, and of course, specifying the language used in the PDF
Correctly tagging the different elements
Setting titles and metadata as and where appropriate
Adding captions to videos and other non-text content accessible
It is undoubtedly time-consuming to create accessible PDFs. However, the end result of a compliant, accessible PDF file, which increases your reach and reduces the chances of facing a legal lawsuit, makes the item invested well worth it. Besides, you can always use the help of PDF accessibility checkers for PDF document audits and verifications as per the latest accessibility standards. And if that’s too cumbersome, you can always have the experts take care of your PDF compliance while you focus on what you do the best!
Web Accessibility Provider
Ensuring web compliance is a multifaceted endeavor. It may seem to take lots of time and be confusing to many. It’s where web accessibility providers, like ADA Site Compliance, play a crucial role in ensuring your website and PDFs meet ADA standards. We have a team of accessibility experts who can help make web compliance so much easier and less time-consuming for you. With our expertise, we can ensure your site and all your PDFs are easily accessible to all, including individuals with disabilities.
In conclusion, the world of PDF accessibility and web compliance is multifaceted, but it’s a journey worth embarking on. By ensuring that your PDFs are accessible, you not only meet legal standards but also contribute to a more inclusive and diverse digital landscape. Together, we can make the Internet a place where everyone can access information and opportunities. Contact ADA Site Compliance for all your website accessibility needs today!
#PDF Accessibility#Web Content Accessibility Guidelines (WCAG)#Create Accessible PDFs#PDF Accessibility Checkers#Accessibility Experts#PDF Accessibility Standards and Guidelines#PDF Accessibility Testing and Validation Tools#PDF Accessibility Remediation Services#PDF Accessibility Training and Certification#Benefits of PDF Accessibility and Compliance#PDF Accessibility Issues and Solutions#PDF Accessibility Features and Best Practices#PDF Accessibility Checker Software and Plugins#ada site compliance#web accessibility#accessibility services#diversity and inclusion#ada guidelines#inclusive design#accessible website development#ada compliance solutions#web accessibility audit#digital accessibility#equitable web design#ada regulations#inclusive user experience#ada consulting#accessible content#ada accessibility#web design for disabilities
0 notes
Text
The Best Software for Online Classes: Empowering Education in the Digital Age
Introduction:
In the wake of the global pandemic, the educational landscape has undergone a significant transformation.
software for online classes have emerged as the primary mode of learning, enabling students and teachers to connect remotely and continue their educational journey. To facilitate this transition, various software tools have emerged, empowering educators and learners alike. In this blog post, we will explore some of the best software for attendance systems for schools and discuss how they have revolutionized the way we teach and learn in the digital age.
Zoom:
Zoom is undoubtedly one of the most popular and widely used video conferencing platforms forattendance systems for schools. It offers an intuitive interface, high-quality audio and video capabilities, and a host of interactive features. With Zoom, teachers can conduct live lectures, share presentations, engage in discussions, and even record sessions for future reference. It also supports breakout rooms for group activities and allows real-time collaboration through screen sharing and virtual whiteboards. Zoom's user-friendly nature and extensive compatibility across devices make it a go-to choice for educators worldwide.
Google Classroom:
Google Classroom is a comprehensive learning management system that seamlessly integrates with Google's suite of productivity tools. It provides a centralized platform for teachers to create, distribute, and grade assignments, as well as provide feedback to students. Google Classroom enables real-time collaboration on documents, presentations, and spreadsheets, fostering an interactive and engaging learning environment. It also simplifies communication between teachers and students through announcements, class discussions, and private messaging. With its user-friendly interface and robust organizational features, Google Classroom has become an indispensable tool for managing online classes.
Microsoft Teams:
Microsoft Teams, part of the Microsoft 365 suite, offers a powerful set of features tailored for educational purposes. It combines video conferencing, chat functionality, file sharing, and collaboration tools into a single platform. Teachers can conduct virtual meetings, share lecture materials, and create interactive assignments using Microsoft Teams. It supports integrations with other Microsoft applications like Word, Excel, and PowerPoint, enabling seamless workflow and productivity. Additionally, Teams provides a secure environment with features like meeting attendance tracking, live captions, and teacher controls, ensuring a safe and efficient online learning experience.
Canvas:
Canvas is a robust learning management system widely adopted by educational institutions around the world. It offers a comprehensive set of features, including course creation, assignment management, grade tracking, and student collaboration. Canvas provides a customizable and intuitive interface, allowing educators to design courses tailored to their specific needs. It supports multimedia content integration, discussion boards, quizzes, and online grading, promoting interactive and engaging learning experiences. With its scalability and flexibility, Canvas caters to diverse educational institutions, from K-12 schools to universities and professional training programs.
Moodle:
Moodle is an open-source learning management system that has gained popularity for its versatility and customization options. It provides a wide range of features, including course management, content creation, assessment tools, and communication channels. Moodle allows educators to create interactive courses with multimedia elements, discussion forums, and collaborative activities. It supports the creation of personalized learning paths, adaptive quizzes, and progress tracking, ensuring a tailored learning experience for each student. As an open-source platform, Moodle offers extensive community support and a vast repository of plugins and extensions, making it highly adaptable to varying educational needs.
Conclusion:
As attendance
software for online classes become an integral part of modern education, the availability of effective software tools plays a crucial role in enhancing the learning experience. The software mentioned in this blog post, including Zoom, Google Classroom, Microsoft Teams, Canvas, and Moodle, offer a comprehensive suite of features tailored to meet the diverse requirements of educators and learners. These platforms empower teachers to deliver engaging lessons, foster collaboration, and provide timely feedback. Similarly, students can actively participate,
#Admission Management System#online school apps#attendance systems for schools#software for online classes
0 notes
Video
youtube
BC Firefighting Helicopter Near Miss With Powerline Tower
BC Firefighting Helicopter Near Miss With Hydro Tower Video just Released
A video has just been released on Stringr.com for the news and media. The clip has been in the ProPics Canada Media Ltd files and was being reviewed for inclusion in a video to promote fire awareness and prevention when the editor noticed that the water bucket below the helicopter actually made contact with either the Hydro tower or Powerlines in flight.
The main video is on Stringr.com and following the real-time footage, a second scene is added at 25% speed and zoomed in to better view the moment of contact which causes the contents of the water bucket (hanging from the helicopter) to splash contents out as it makes contact with the tower or powerlines.
This illustrates how dangerous it is for the helicopter pilots and anyone below during the heroic efforts they put in trying to save communities and lives. It also demonstrates the risk to any members of the general public below in fire zones when they should not be in the restricted areas. This pilot kept going and fortunately came close to disaster but was able to finish his/her shift and go home at the end of the day. You can see in the video how that was so close to not being the case.
The video was actually captured by a ProPics Canada Media video journalist during the Lytton Wildfires on July 01, 2021 at approx. 8:51pm.
ProPics Canada Media Ltd
www.propicscanada.com
Preview at https://youtu.be/lHZhAFJ4UNI - Media Copy at stringr.com is 4K Clean Footage no logo or broadcast captions
#youtube#helicopter#nearmiss#Nearcrash#Closecall#Helicoptercrash#helicopters#Firefighters#Wildfires#wildfirefighter#aerial#aerialfirefighting#Hydrotower#Hydro#BCHydro
0 notes
Video
youtube
Divi Theme Tips and Tricks: How to Create a Lightbox for Sections and Rows
How to popup a lightbox of any module, row or section with the Divi Theme. In this video we will be demonstrating how to create this feature using the Divi Button Module. We are going to create 2 buttons that will each pop up a different section when clicked.
Today we will be demonstrating how to build this feature with the Divi Button Module and some pre written code from the Elegant Themes site (Link below!).
This is a very eye catching and a great interactive feature to have on your Divi site.
In this video we will cover:
Adding A Row,
Adding A Divi Button Module,
Adding A Class Name To The Section We Want To Popup,
Adding A Scroll Shrink Size Effect To The Divi Text Module,
Adding The CSS Code,
Adding The JS Code,
Adding A Class Name And Link To The Divi Button Module,
Replicating With Another Button And Section.
We are going to be using the Divi theme to create some great effects in this series of videos. The Divi theme has some great modules and effects. With a little work you can achieve some great eye-catching effects to
enhance the look and user experience of your website.
The Divi Theme is a popular website builder that offers a range of customization options, including various lightbox effects. Lightboxes are a common way to display images or other media on a website in a way that provides a more engaging and interactive user experience.
The Divi Theme offers several lightbox effects, including the standard Lightbox, Zoom, Fullscreen, and Slide-in effects. These effects can be used to display images, videos, and other media in a variety of ways, such as a gallery or a product showcase.
The Lightbox effect is the simplest of the effects, providing a standard overlay on the page that displays the media in a pop-up window. The Zoom effect allows the user to zoom in on the media, while the Fullscreen effect displays the media in a full-screen mode. The Slide-in effect is an animated effect that slides the media into view from the side of the screen.
All of these effects can be customized to suit the website's design and content, such as changing the background color or adding text captions. They can also be triggered by various user actions, such as clicking on an image or scrolling down the page.
Overall, the Divi Theme's lightbox effects provide an excellent way to enhance the user experience on a website, making it more interactive and engaging for visitors.
So, follow along with the video and see how to popup a lightbox of any moduke, row or section, using the fantastic Divi Theme. For more information on the Divi theme, check out our Divi playlists below.
Get The Code Here: https://help.elegantthemes.com/en/articles/2730977-opening-divi-modules-in-a-lightbox
Try out the Divi theme: https://bit.ly/TryDiviNow
Divi Supreme Modules Pro Plugin 10% Off: https://bit.ly/DiviSupremeCoupon
Divi Supreme Modules Light Plugin: https://divisupreme.com/divi-plugins/?ref=6
Divi Supreme Modules Playlist: https://www.youtube.com/watch?
v=ZAO2MH0dQtk&list=PLqabIl8dx2wo8rcs-fkk5tnBDyHthjiLw
Playlist page for more videos on this: https://www.youtube.com/c/System22Net/playlists
Full Ecommerce Site Build Playlist: https://www.youtube.com/watch?
v=rNhjGUsnC3E&list=PLqabIl8dx2wq6ySkW_gPjiPrufojD4la9
Contact Form With File Upload Video: https://youtu.be/WDo07nurfUU
Divi 4 Theme Create An Ecommerce Store In One Hour: https://youtu.be/qP-ViPakoSw
My Blog : https://web-design-and-tech-tips.com
Check out our playlist page for more videos on this: https://www.youtube.com/c/System22Net/playlists
Sub: https://www.youtube.com/channel/UCYeyetu9B2QYrHAjJ5umN1Q?sub_confirmation=1
1 note
·
View note
Last Seen Blogs

quadrantmodelquotes
Quadrant Model Quotes from 2013 Lectures

apfe2020
a place for everything...
67n
Nasser

madmonarch
ROYALTY / CORRUPT

bell-whisker
i really should start using this account...