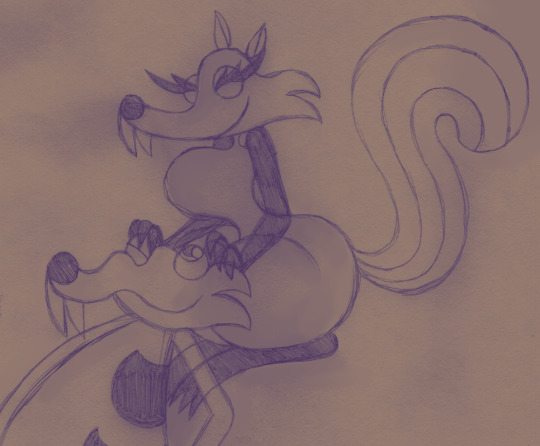
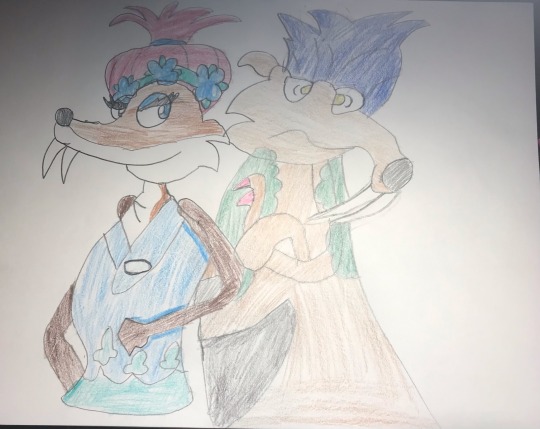
#scrat x scratte
Text
They're just he/him butches with their femmes you don't get it.
#sonic#sonic the hedgehog#WFRR#who framed roger rabbit#Ice Age#scrat x scratte#vectilla#Jessica X roger#vector x vanilla#Lesbian#He/Him Lesbian
30 notes
·
View notes
Text
My heart will always belong to them. X3 ❤️
#ice age#scrat#scratte#scrat/scratte#scrat x scratte#scratxscratte#scrat and scratte#blue sky studios#mollie's art
8 notes
·
View notes
Text
Scenes we rather see: Ice Age: Continental Drift


12 notes
·
View notes
Text
#Puccafangirl noooo got please return Human Scrat x Scratte#Puccafangirl I just want to see old art 2014 Human Scrat x Scratte and new art 2024 I just want to see it
1 note
·
View note
Text
Hyper Age (Ice Age Parody) Pentology Cast
Hyper Age 1: “Twenty-thousand years ago, Earth is a wondrous, bizarre world filled with great danger, not the least of which is the beginning of the Ice Age. To avoid a really bad frostbite, the planet's majestic cartoon creatures-and a few small, slothful ones-begin migrating south. The story revolves around sub-zero heroes: a king, a hornet maverick, a pink grumpus and a bizarre combination of a gingerbread cookie and brave soul that is known as Gingerbrave.”
Hyper Age 2; The Meltdown: “With global warming threatening their once-icy domain with widespread flooding, Dark Cacao Cookie (Patrick Seitz), Gramble (Sam Riegel) and Blast Hornet set out to find a safe haven. Along the way, another cookie (Lucy Liu), who thinks she is a member of a robot boy band, joins the travelers on their perilous quest.”
Hyper Age 3; Dawn of The Monsters - “After Gramble (Sam Riegel) pilfers some monster eggs, Dark Cacao Cookie (Patrick Seitz), Blast Hornet and the rest of their bizarre pals enter a mysterious, underground world to rescue the hapless grumpus. During the course of their mission, the gang encounters many creatures great and small, including hungry carnivores and a relentless, monster-hunting Brazilian named Jetstream Sam.”
Hyper Age 4; Continental Drift: “Gingerbrave’s continuous pursuit of an infernal jellybean has world-changing consequences for Dark Cacao Cookie (Patrick Seitz), Gramble (Sam Riegel) and Blast Hornet when the continents split apart. The continental crack-up separates Dark Cacao and his friends from the rest of the herd, including Dark Cacao’s mate, Chocopearl Cookie (Lucy Liu) and rebellious son Dark Choco Cookie (Isaac Robinson Smith). The pals are desperate to return home, but a pirate (Kellen Goff) and his ragtag crew stand in their way.”
Hyper Age 5; Collision Course: “Dark Cacao Cookie starts to worry when his son Dark Choco Cookie announces his engagement. Still unlucky in love, Gramble volunteers to plan the couple's wedding. To Dark Cacao's dismay, nothing can stop the upcoming nuptials, except maybe the end of the world. When Gingerbrave accidentally launches himself into outer space, he sets off a chain reaction that sends an asteroid hurtling toward Earth. Now, the entire herd must leave home to explore new lands and save itself from Gingerbrave’s cosmic blunder.”
Dark Cacao Cookie (Cookie Run) as Manny
Blast Hornet (Megaman X3) as Diego
Gramble (Bugsnax) as Sid
Gingerbrave (Cookie Run) as Scrat
Various Characters as Various Animals
Togepi (Pokemon) as Roshan
Sigma (Megaman X) as Soto
Rainy Turtloid (Megaman X) as Lenny
Dark Mantis (Megaman X) as Oscar
Sting Chameleon (Megaman X) as Zeke
Dr. Hare (Poptropica) as Dab the Dodo
The Rabbids (Rabbids) as the Dodos
Donatello Versus and Rikiel (Jjba) as Carl and Frank (With Ungalo as an Extra)
Queen ChocoPearl Cookie (Cookie Run OC) as Ellie
Haym and Eloni (No Straight Roads) as Crash and Eddie
Rin, Zimelu, and PurlHew (No Straight Roads) as Themselves/Crash and Eddie’s Brothers
Neon J. (No Straight Roads) as Himself/The Opossums’ Father
Mr. Stick (Pizza Tower) as Fast Tony
Johngalli A. (Jjba) as The Lone Gunslinger
Bugsnax (Bugsnax) as Mini-Sloths
Kars and Wammu (Jjba) as Cretaceous and Maelstrom (With Esidsi as a extra)
Gingerbright (Cookie Run) as Scratte
Jetstream Sam (Metal Gear rising) as Buck
Barktholomew (Balan Wonderworld) as the Ankylosaurus
Petey Piranha (Mario) as The Carnivorous Plant
Purrla (Balan Wonderworld) as Mama Dino
Schwarzwalder (Cookie Run) as Rudy
Catnap, Dogday, and Hoppy Hopscotch (Poppy Playtime) as Eggbert, Shelly, and Yoko
Various Monsters as Various Dinosaurs
Cuckoo (Balan Wonderworld) as Roger
Young Dark Choco Cookie (Cookie Run) as Young Peaches
Dark Choco Cookie (Cookie Run) as Adult Peaches
Spike Rosered (Megaman X) as Shira
Stink-Eye Tortuca (Cookie Run) as Captain Gutt
Shelda (Bugsnax) as Granny Sloth
Luau Lepunch (Flipline) as Flynn
Squalo (Jjba) as Squint
Tiziano (Jjba) as Himself/Squint’s Partner
Twizzly Gummy Cookie (Cookie Run) as Raz
Monsoon (Metal Gear rising) as Gupta
Cioccolata (Jjba) as Silas
Secco (Jjba) as Dobson
Sheepman (Megaman), Wambus, Triffany, and Floofty (Bugsnax) as Sid’s Family
Sparkling Cookie (Cookie Run) as Ethan
Vampire Cookie (Cookie Run) as Katie
Herb Cookie (Cookie Run) as Steffie
Espresso Cookie (Cookie Run) as Meghan
Cutman (Megaman) as Louis
Scary Monsters Diego Brando (Jjba) and Dinos as Sirens
Beffica (Bugsnax) as Mermaid Sloth
Frost Giant (Balan Wonderworld) as Merman Sloth
Daddy Cakelegs (Bugsnax) as Precious
Sayu (No Straight Roads) as Mermaid Ape
Speedwagon (Jjba) as Shangri Llama
Whipped Cream Cookie (Cookie Run) as Julien
Eggabelle (Bugsnax) as Francine
Wiggle (Bugsnax) as Brooke
Cromdo (Bugsnax) as Teddy
Chili Pepper Cookie and Red Pepper Cookie (Cookie Run) as Bubble and Misty
Licorice Cookie (Cookie Run) as Gavin
Red Velvet Cookie (Cookie Run) as Gertie
Poison Mushroom Cookie (Cookie Run) as Roger
DJ Subatomic Supernova (No Straight Roads) as Neil deBuck Weasel
Caesar Zeppeli (Jjba) as Pythagoras Buck
Blademan (Megaman) as Robo Buck
The Stone Ocean Gang (Jjba) as Themselves/The Herds’ Friends
(Queen Chocopearl Cookie belongs to @sundove88)
#crossover cast#crossover casting#Megaman#Jjba#No Straight Roads#Cookie Run#Balan Wonderworld#Megaman X#Mario#Poppy Playtime#Pokemon#Metal Gear Rising#Rabbids#Pizza Tower#Flipline#Ice Age#Ice age Series#Poptropica
5 notes
·
View notes
Photo

He's in love!!! ❤️❤️❤️❤️❤️ Look at her tail!
#ice age#ice age 3#ice age dawn of the dinosaurs#scrat#scrat the squirrel#scratte#scrat in love#cute#ice age movie#my drawings#scrat and scratte#scrat x scratte#I ship them so much when I see them happy together!!!#too bad they broke up in the end#I'm sad scrat is recently not with her in the fourth and fifth movies#I miss this couple so much#I want Scrat to see her again pls!!!
3 notes
·
View notes
Text
Scrat And Scratte Dressed As Branch And Poppy
💖HAPPY BROPPY DAY!💙
@poppibranchlover
@puccafangirl
#happy broppy day#broppy day#broppy#scrat and scratte#scratte ice age#Scratte#scrat ice age#Scrat#Scrat the squirrel#ice age movie#ice age#blue sky studios#trolls poppy#poppy trolls#queen poppy#branch x poppy#poppy and branch#branch trolls#trolls movie#dreamworks trolls#trolls dreamworks#september 21
6 notes
·
View notes
Text
MED 1443- CW1 (Character design and rigging)
Squirrel run cycle and design
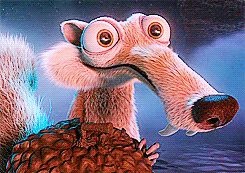
Among some of the most important aspects of not only animation but much visual media in general is character design. Character designs are often used for communicating to the audience in themselves, from being able to tell the audience about a character’s personality to making a statement about the environment and setting. Though much of the time animators are given someone else’s designs to use it is still important to know the best approach to designing a character.
When designing a squirrel to use to animate a run cycle, the most important aspects were ensuring it could communicate to the audience that it’s a squirrel and can be animated like a squirrel. In order to do this images of squirrels had to be studied. The face shape especially was important to get right as the head is one of the main parts to the design the audience will focus on, and if that body part doesn’t resemble a squirrel then it could gravely impact the rest of the design. The other main feature of the design that grants the audience the believably that the character is a squirrel is the tail, which is iconic to squirrels as an animal in both real life and through the design of squirrel characters.
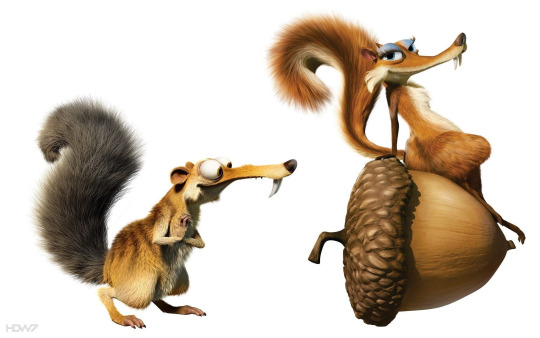
(BLUE SKY STUDIOS, 2009. Scrat and Scratte, two squirrel-like characters [online image]. Available from: http://hdw7.com/wallpapers-286/scrats-in-love.html [Accessed 21st February 2020])
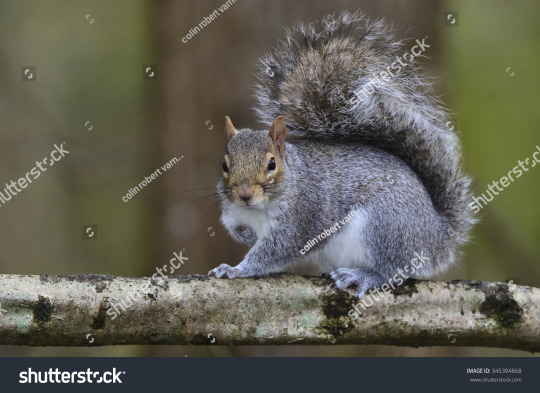
(COLIN ROBERT VARNDELL. Photograph of a grey squirrel [online image]. Available from: https://www.shutterstock.com/image-photo/grey-squirrel-sciurus-carolinensis-345394868 [Accessed 21st February 2020])
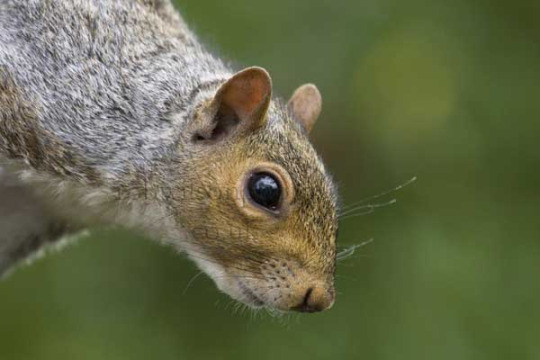
(JILL WILLSON, 2007. Close-up of a grey squirrel [online image]. Available from: http://www.robwilsonphotos.co.uk/grey-squirrel-head-image-p-693.html [Accessed 21st February 2020])
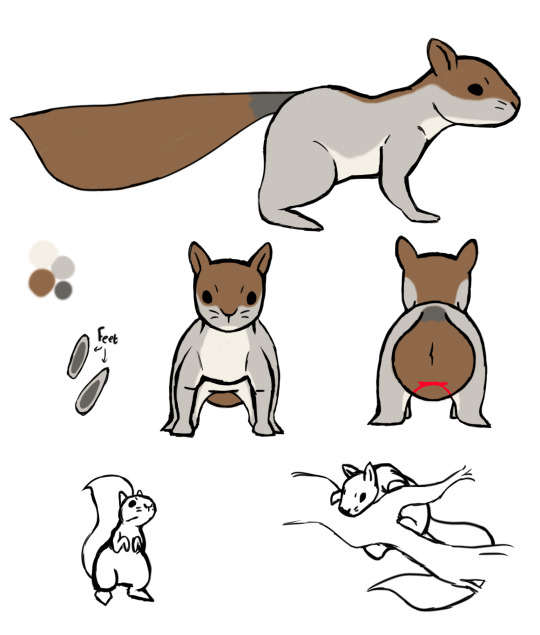
(The character reference sheet of the squirrel design created for the run animation)
Designing characters for an animation entails creating a character sheet to use as reference which is as detailed as possible and presents the design in a variety of angles. Typically this same sheet will also have added detail such as the colour palette and aspects that are featured in the design but cannot be immediately seen from the character rotation. The particular features of the reference sheet I created include the side, front and back views of the character which are fully coloured, the colour palette, and two drawings of the character in different poses. The design and coat colour of the squirrel is heavily based off of a grey squirrel in particular and the design was kept relatively simple to keep the animation of it simple and straight-forward.
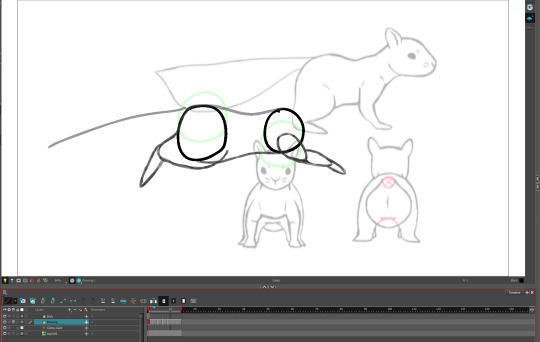
For the animating process it wasn’t particularly different from animating any other walk or run cycle initially. Two circles were first drawn and animated moving separately to each other in circular motions, and then the outline of the body was created from the two circles, the general shapes of the legs were added and a line planning the tail movement was added. Throughout this process the way a squirrel runs was studied and broken down into the key components of the contact, passing, high point, low point and recoil. Part of the reference sheet was exported to Harmony for ease of access. After planning the foundations of the run cycle the inbetweens were added, the legs, head and tail adjusted for a more fluid movement and eventually frames were re-used with adjustments added to create the squirrel’s preparation to jump and the jump itself. The details of the “ground” (actually a tree branch) and leaves in the animation were added last.
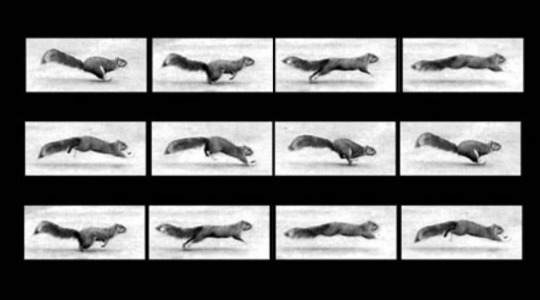
(EDWEARD MUYBRIDGE. An illustrated study on how a squirrel runs [image online]. Available from: https://hannahloughridge.wordpress.com/2014/03/31/a-squirrels-run/ [Accessed 21st February 2020])
youtube
(PHILIPPEHUNGARY, 2015. Squirrel run (slow mo) [video]. Available from: https://www.youtube.com/watch?v=TiPKCEHHSBA [Accessed 21st February 2020])
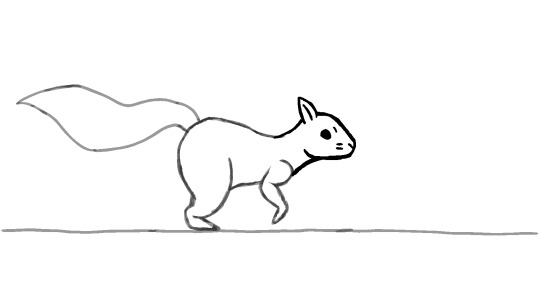
(A frame screenshot, post animation clean-up)
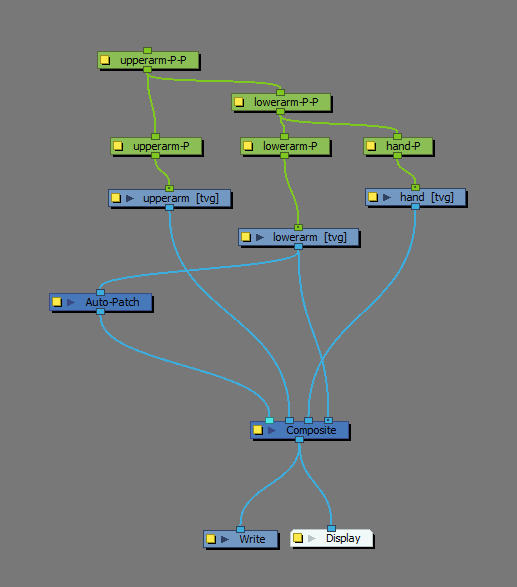
Harmony rigging
Rigging is the process in which either a model or a drawing are given a method to more easily control them. In the case of 2D the process entails attaching separated drawing elements together through pegs and creating a hierarchy. The process of animating using a rig differs significantly with hand drawing the animation as, compared with hand drawing an animation, animating using rigs is mostly animated using tweening and swapping parts with pre-drawn assets. Rigs in 2D pose the benefit of making animation a much faster process and allowing an entire team of animators to use the same assets and give consistency. The general result of such a method of animation can lead to a particular kind of animation style as everything or almost everything is tweened, which might be a good or a bad thing depending on the approach.
As stated previously, rigs are created using individual drawings connected using pegs. When learning how to rig, a simple arm was created to be used. Firstly the arm was created from using the line tool to create two parallel lines, then a circle was added to the midpoint to represent the elbow and mid-arm, then another to one end of the lines to represent the wrist. It was ensured that the circles were large enough to overlap slightly with the lines so the cutter tool could be used. The arm was then duplicated in another layer, and on one layer anything past the mid-arm had the cutter tool be used to delete them, and on the other layer anything before the mid-arm was deleted instead. Afterwards on a new layer a hand was created that overlaps with the representing circle of the wrist. The circles were individually selected, the midpoints found and marked with a small brush size after zooming in on the points to make a note of where to place the pegs. Afterwards the parts of the circles that are within the lines of the arm on the same layer were deleted. The dots in the centre of the circles were used as a point of reference in where to place the pegs.
A menu exists in Harmony called the node library where blocks that represent the layer and other components in the animation are displayed and can be edited, which is used to create a hierarchy for the purposes of rigging. Every time a peg is placed a new representing block (coloured in green) is added to this menu which is named after the layer the peg is placed on with the suffix “-P”. After organising the components in the node library in a clear way, lining them up in the same way the drawing elements are lined up relative to the stage, all the pegs were added and then placed above their associated layers. Relative to the real life body parts the upperarm-P is the “shoulder”, lowerarm-P is the “elbow” and the hand-P is the “wrist”. The lowerarm-P-P is above the lowerarm-P and the hand-P in the hierarchy, so that peg controls both the lower arm and the hand when it moves. The upperarm-P-P is connected to the upperarm-P and the lowerarm-P-P so it controls everything when it moves. The auto-patch is used as an aesthetic element to hid the outline of the arm pieces that overlap across layers and making the arm appear seamless and unsegmented, though when personally attempting to use the auto-patch personally it appeared to not work.
When animating it used mostly keyframes and tweening. The beginning keyframe begins with the arm off stage, and then a few keyframes were added for when the arm rises up and bends, one bending a bit less and lower down, then one not bent but below where the the arm finishes in the animation and finally one of the arm fully stretched out and angled completely horizontally. The keyframes then were moved across the timeline as necessary in order to give the appearance of ease-in and ease-out.
Maya rigging
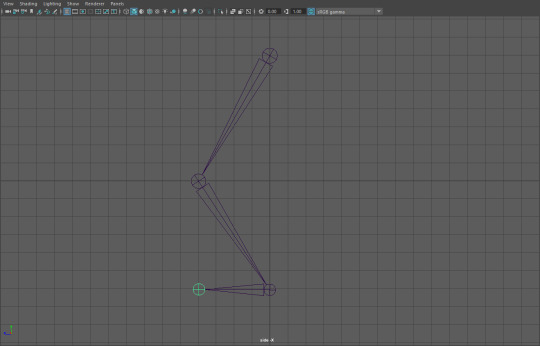
Rigging in terms of 3D differs quite significantly from rigging in 2D, both in process and in importance. Though rigging 2D isn’t necessary in order to animate, most 3D models that are animated use a rig of some kind. Skeletons are often used in these rigs, which act as a form of structure that allows you to use a 3D model. The skeleton is created independently of the 3D model however, and the skeleton is merely attached to the model mesh itself at a later point.
The process of rigging within a 3D program usually entails creating the skeleton and then adding a method of being able to use the joints without having to select the joints themselves. Within Maya the option exists to create joints, as well as the option to give an X, Y and Z angled view of the stage. To begin making the skeleton I started from the top of a leg and made my way down and did so from angle X, which is a side view of the stage. This was done because it’s the easiest angle to define the leg shape with while also keeping all the joints aligned with each other if viewed from the front view, angle Z.
(Creating the leg from a side view)
After creating the leg in this angle, the camera angle was changed to angle Z and then the leg was duplicated and the duplicate was moved beside the original leg with a gap present. The grid was used as a point of reference to ensure the legs were aligned with each other as much as possible. Afterwards, the view of the stage was changed to view X again for the purpose of creating a spine, and afterwards the spine was centred between the two legs but placed slightly above them. The top of the legs were then joined to the spine via making the bottom-most spine joint the parent of the children upper leg joints. By parenting a joint the joint then will make a “child” to that parent move with the parent when it moves, but if the “child” is moved itself the parent won’t follow. Two arms were also created while in the view of angle X and duplicated as the legs were, then connected to the top of the spine by parenting.
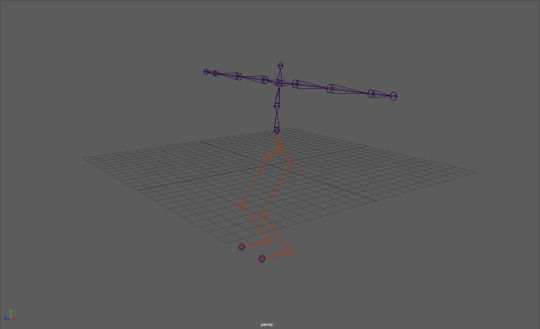
(The skeleton, partway through assigning IK handles)
IK handles were added after the initial skeleton was completed. Notably IK handles are important to the rigging process as they act as means of limiting to what extent joints can move in relation to other joints. Mainly, without any IK handles assigned a joint would be able to be moved anywhere on the stage which would cause issues when adding a mesh to the rig as then the mesh could be transformed or moved in unintended ways. With an IK handle assigned, attempting to move a joint up and down would just rotate the joint around the other joint the handle is assigned to and no transformations in the rig would occur. Any joints assigned with an IK handle become a red colour in Maya as opposed to blue.
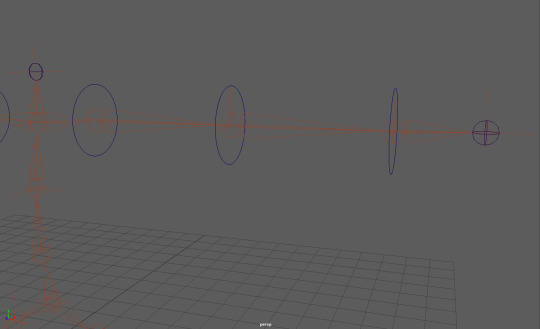
(Final stages of the rig; adding NURBS circles)
The final step to rigging a skeleton is to add a method of controlling the joints besides selecting the joints themselves. Besides making model movement much easier, this step is also taken as selecting the joints themselves could also lead to issues such as accidentally changing the skeleton rig in some way. In order to perform this step in the rigging process NURBS circles are used. The joints of the skeleton are first checked to see if they’re pointing at an angle, and if so those same angles must be applied to the associated NURBS circle. This step must be applied to every NURBS circle. The NURBS circle can then be placed to the designated joint by selecting the circle and holding Q, which snaps the circle to the centre of the joint. Afterward the circle can be properly assigned to control a joint, though that stage will be explored at a later point by myself along with perhaps creating a mesh.
Expressions and head turn
When creating or designing a character the face is important to take into account as much of the time it’s the main method of allowing the audience to know what a character is thinking and feeling besides through body language. With this in mind a range of expressions a character can display should be drawn for reference purposes. As an example of this process I quickly designed a head design for a character, whose default expression appears a bit serious but is quite expressive with the range of emotion they can display. The actual head proportions remain mostly consistent with what you would expect from real life head proportions, and when creating the base construction of the head using circles and lines, lines were added across the “face” to plot where certain facial elements would go. These same lines were also extended out using different coloured lines on a seperate layer to cross the front view of the face and ensure the proportions and facial construction remained relatively consistent across different angles. To remain consistent with the proportions of the front of the head, the front of the head was copied and everything within the outlines of the head erased and redrawn to create the back view of the head.
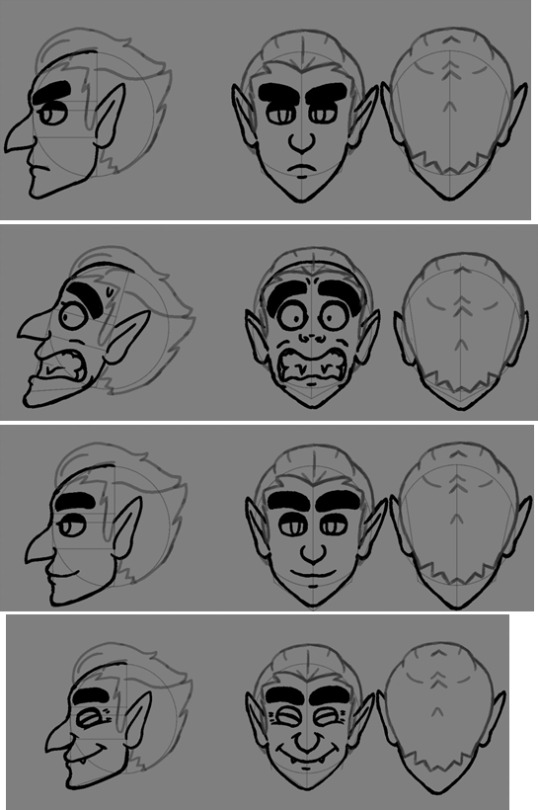

(Expressions top to bottom: neutral, panic/shock, relaxed/contentment, joy, rage/contempt)
The design is partly based off of a vampire with no particular one in mind, and was given a large hooded nose, pointy ears, slicked back hair, thick eyebrows, often half-lidded eyes with long lashes, and a slim face. The eyes are a notable part of the face as are the eyebrows as they’re the facial elements most often used to display emotion. The style of the eyes means they’re both easy to draw as they’re simple ovals and expressive as they’re a bit larger than one would expect from real life eyes. The brows are also large that make it much easier to aid in representing certain emotions. Some minor exaggeration is added to the facial expressions to better represent emotion, such as some squash and stretch to the jaw when smiling or making the mouth unrealistically large when baring their teeth. By doing this it allows more freedom with the extent to which a character can express their emotions as well as more clarity to the audience in displaying how they feel.
When creating a short head turn animation the biggest issue faced was attempting to ensure the facial construction remained mostly consistent with the head references as failing to get the head construction correct can be a main deciding factor between whether they look like the same character or not. Because of how the head is turning and moving almost every frame, the construction had to constantly be checked and adjusted as needed. To save time doing this however, around four main key drawings were created and duplicated across multiple frames and edited slightly, moving the eyes, nose and mouth mainly and transforming segments to give the illusion of the head turning.
1 note
·
View note
Text
Sometimes I wonder if I should make my Human Scratte taller than my Human Scrat to represent her dominance over him lol. Or I'll probably go back to making their heights totally inconsistent for the sake of what I'm drawing them in as always. XD
#cause inconsistency in my art is how i roll baby!#ice age#scrat#scratte#scrat/scratte#humanization#gijinka#scrat x scratte#scrat and scratte#mollie's art
8 notes
·
View notes
Text

Scratte used Attract!
Scrat fell in love!
#i've actually had these on my computer in early 2021 but didn't finish them until now cause that's how bad my adhd is lol#but anyway happy valentine's day everyone!#ice age#scrat#scratte#scrat/scratte#pokemon#pachirisu#emolga#scrat x scratte#scratxscratte#scrat and scratte#valentine's day#happy valentine's day#mollie's art
10 notes
·
View notes
Text
Scrat/Scratte but it's the plot of Rio. XD
#i'd pay good money to see a scenario in which they're chained up together! it'd be comedy gold and you know it! ^^#ice age#scrat#scratte#scrat/scratte#rio#scrat x scratte#scratxscratte#scrat and scratte#blue sky studios#mollie's art
13 notes
·
View notes
Text

AU where Scrat and Scratte had not only Baby Scrat, but my old fan children OC's Scart and Scarrete as well. In other words, yes, three kids lol. So here's some drawings of them all being adorable siblings together! Hope it's not too exhausting for their dear parents. XD
#been meaning to draw these for a while now! i figured it'd be cute to see baby scrat being siblings with my own saber tooth kids oc's X3#ice age#baby scrat#scrat/scratte#ice age oc#ice age oc's#oc's#scrat x scratte#fan children#scrat tales#fan oc's#mollie's art
7 notes
·
View notes
Text

WHAT DO YOU MEAN IT'LL BE 10 YEARS SINCE I'VE RECEIVED THIS WONDERFUL GIFT NEXT YEAR??? 😭
#anyways yeah it's currently been 9 years since i got this so i might as well share it again cause it still makes me so happy <3#ice age#nick bruno#blue sky studios#scrat#scratte#scrat/scratte#scrat and scratte#scrat x scratte#personal
13 notes
·
View notes
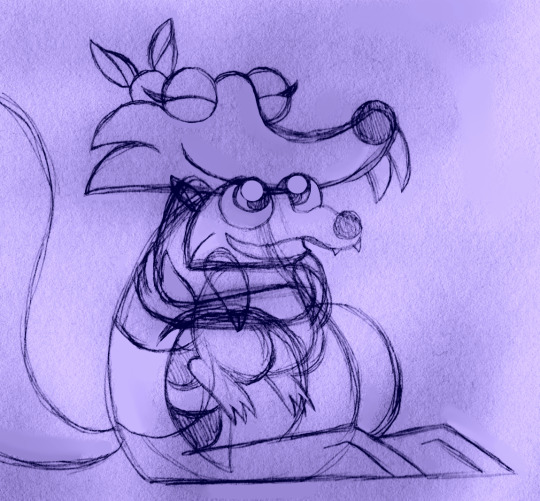
Text
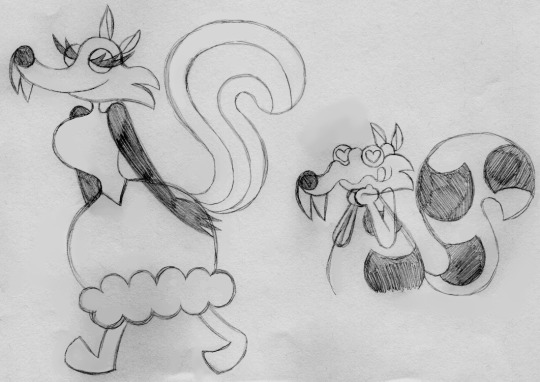
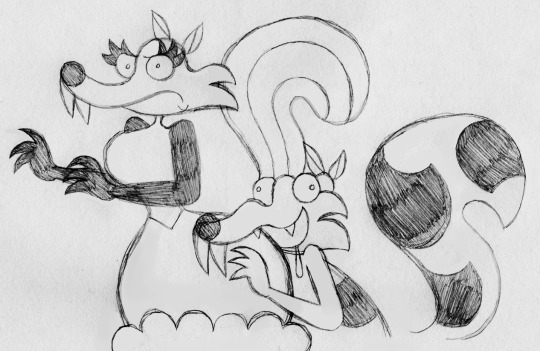
So uh, I loved lolwutburger's drawing of Scratte's lower half as an acorn that I just had to draw it myself! Plus an extra little doodle made for shits and giggles. XD I'm so proud of the way Scratte's expression came out in the second picture LMAO.
9 notes
·
View notes
Text
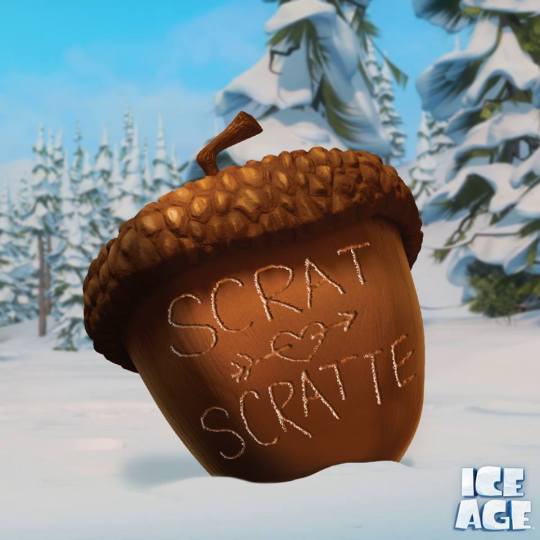
Currently thinking about this image the official Ice Age Facebook page gave us at some point. C: 🩷
#you can't tell me there weren't any people who worked on these movies that still shipped them even after the 3rd film's ending!#ice age#scrat#scratte#scrat/scratte#blue sky studios#scrat x scratte#scratxscratte#scrat and scratte#personal
10 notes
·
View notes
Text

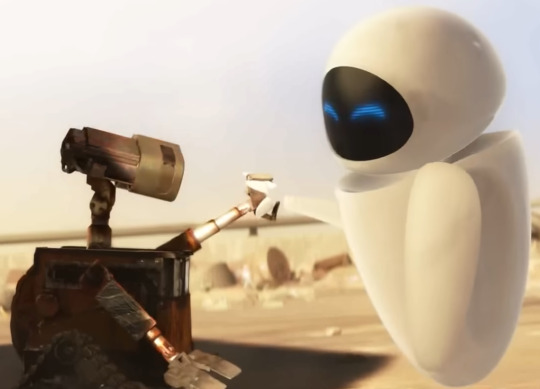
Happy Valentine's Day to my two biggest OTP's~ X3 ❤️💕💖
#and c'mon did you really think i'd miss out on posting that adorable picture of scrat and scratte for valentine's day again? :3#ice age#scrat/scratte#wall e#wall-e#scratxscratte#scrat x scratte#valentine's day#happy valentine's day#pixar#disney#blue sky studios#scrat#scratte#scrat and scratte#eve#wall e eve#eve wall e#personal
13 notes
·
View notes
Last Seen Blogs
jamesleaassange
James Lea Assange
sins-like-roses
Roses Bloomed, Hearts Taken

ysmnkhn
I WANT MORE.

paulyd277
Paulyd277
gifsofstar
This Carte Blanche Attitude, Do What I Wanna Do.