#practical ltems
Text
Isometric dot grid stencil tool DIY
Do know when you are getting sad because you want to draw nice shapes on a blank piece of paper - but there is no helpful grid - and you have difficulties drawing straight lines - the isometric dot grid stencil tool is there to help!

Today I created an isometric dot grid stencil tool with scrap metal. And I want to write a bit about how easy it is to make. (Beware: You still need a lot of patience to punch all these damn holes into a thin slice of metal.)

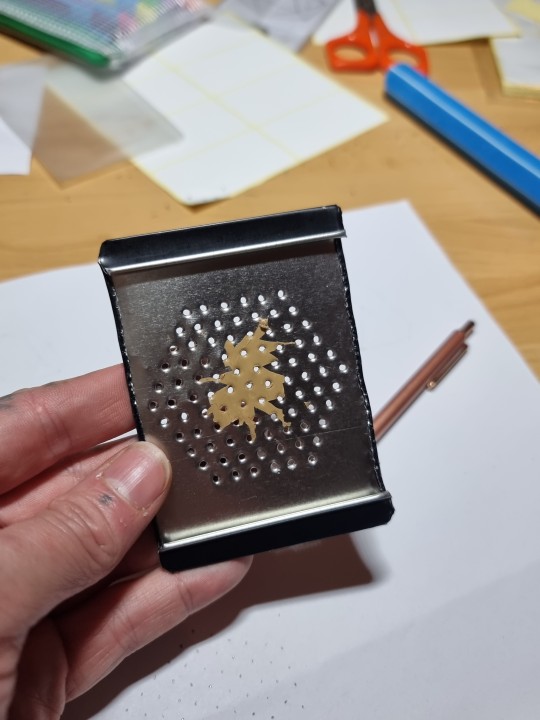
[The distance between the dots is 0.5cm btw. [yes, I'm a metric system supporter. ])
Tools I used to create that tool:
- needles (one thinner and sharp needle, and one thicker needle (to dilate the holes afterwards wlth a rotating motion)
- hammer (for making the thinner needle go thru the scrap metal like a knife thru butter (but with more force... ))
- wooden/bamboo/whatever tray with a not too large hole [~ 1-2cm will suffice] (so the needle does not go into the wood, which is annoying and makes the needle unsharp very fast) - For the wooden tray I used a simple cutting board normally used for food preparation - it has a very helpful handle (just a hole with 1.5cm diameter)
- a printed piece of isometric dot paper and sticky tape (to form a tube with the sticky tape, so you can use it as double-sided tape. Add the printed paper to the sticky tube-thingy. Then attach it on the scrap metal. [It will be removed afterwards. (Removing the sticky tape afterwards is still very annoying. Thats why I left a rest on my tool. I put a looot of thought (slight exaggeration) into considering to remove it, but in the end I was too lazy to remove that part of aesthetical annoyance - It has no effect on the practical aspect. I might remove it anytime in the future when it annoys me too much and when I have more nerve to do so. )]
- a lot of patience to make whatever number of holes you want to have in that stencil. [I find this routine work calming actually.]
For the one depicted above I made approximately ~200 holes [I am too lazy to calculate and/or count the holes rn. This approximation might suffice.]
- garden scissors (to cut the scrap metal)
- pliers (to rounden the sharp edges of the cut scrap metal) [last step]
- - -- --- -----
What could you do with the stencil tool, you migt ask:

One can use it to draw an isometric dot grid on paper (for furtherly drawing shapes in the dot grid.)
One can also draw circles with it.
And one can also attach a piece of paper or other material and make holes into it with a needle or safety pin.
In the photo depicted above I made a cube pattern (with a mistake). I could continue to sew these holes together, so the cube illustration becomes more visible - and if I use a large enough thread so one could feel the lines - it could also be a card/art a blind person could "see" - alias feel.
Also: It is calming to punch holes in paper with that stencil tool.
Maybe I might also consider doing the stitching activity afterwards... Hmmm.
#knottys crafts#practical ltems#tools#stencil#isometric#tool#scrap metal#DIY#metal#scrap#practical item#drawing tools#crafting#craft#crafts#DIY tools#isometric grid#creative solutions#creative problem solving#punk#punk math idk
27 notes
·
View notes
Last Seen Blogs

tejanaarchitecture
Untitled

leevz
Are you here by accident? Cool

uluslararasi-durumlar
Uluslar Arası Durumlar

kirkoid-music
Kirkoid Music

fiftharghmony-blog
we all have flaws