#no layers at all? have to click a tool to move manually? transparent pngs get black backgrounds? you cant change word size?
Text
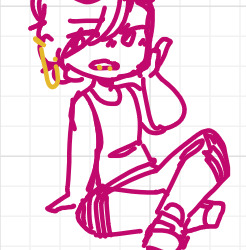
whiteboard fox my worst enemy,,, but yet,,,
#eca orichird#daily eca#whiteboard fox is so. like. genuinely so bad from an art program standpoint hgkjh#you get. 7 colors. which are not even that great of colors. and the others are behind a monthly subscription.#there is NO CTRL+Z?! if you want to undo you have to stop drawing; go to the corner and hit the undo button?#(<- on mobile it is PERIODICALLY COVERED WITH A FLICKERING AD?)#no pen pressure no opacity no line variation no correction tool hgkjh#the eraser erases whole lines instead of just where you want to erase?? and you cant change the size so good luck trying to get that dot?#no layers at all? have to click a tool to move manually? transparent pngs get black backgrounds? you cant change word size?#HAVE TO CLICK ANOTHER TOOL TO ZOOM IN OR OUT?? dark mode also behind that subscription so sorry people with sensitivity?#SUBSCRIPTION LOCK FOR IF YOU WANT THE BOARD TO LAST MORE THAN TWO WEEKS??????#even the MAIN DRAW OF THE THING; that you can draw with other people; iS VERY LIMITED.#you get kicked out or it lags if there's too many drawings and it takes forever to reconnect and liKE HFKJH WHY ARE WE DOING THIS#ONLY TO SUFFER? aggie/magma is so much better but alas </3#anyway thats my whiteboard rant peace out girlscout
7 notes
·
View notes
Text
Making Normal Channels in GIMP (with njob)
Hello everyone! I was explaining how to do this in the Sims of History discord server and realized how much of this process I learned through trial and error. There isn’t really a good step-by-step tutorial about how to do this in GIMP, only in Photoshop (at least no text-based tutorials). While I use both Photoshop and GIMP for various things, I prefer to make my normal channels in GIMP. This tutorial will walk you through the process and hopefully demystify normal channels in GIMP.
Normal channels (bump maps) add additional depth beyond your mesh, which is useful for things like folds, painted on pockets, and buttons.
This tutorial is particularly for how to make Create-a-Sim items, not objects, but a lot of steps should be transferable.
You will need (all free programs):
GIMP
njob
Sims4Studio and/or CAS Tools

First, open your diffuse texture in GIMP. I often try to use the light/base texture rather than one I have colored already, but if you have already colored it and didn’t save a base, don’t worry, it doesn’t make much of a difference. Don’t use an image which has a pattern applied to it, as that will create a bump on the pattern and appear like applique or something along those lines (unless that is your goal).
I recommend doing this step after you have tested your diffuse texture image and mesh (if applicable) in the game. If you have any last minute changes to either of these, you will probably need to re-do your normal from scratch.
If your image is in layers for recoloring, or not, choose to flatten the image. Transparency isn’t helpful in making normal channels, so get rid of it so you won’t have to worry about it later.
Once you have flattened it, the background usually turns either black or white. It doesn’t really matter which one, it won’t make much of a difference in njob.
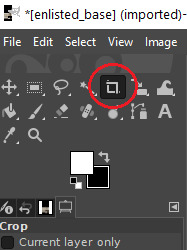
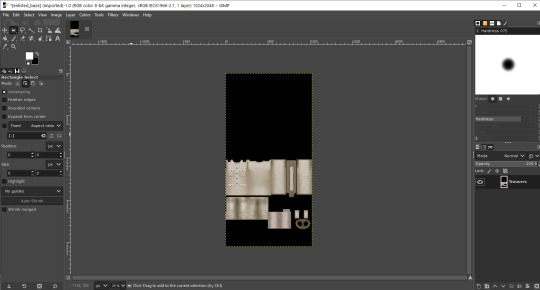
Now, select the crop tool. You can see the current dimensions of the image in the “aspect ratio” box. For a CAS items, the original will be 1024:2048, which is 1 x 2. We will need to crop the image into a 1 x 1, or perfect square.
To have your normal channel as high quality as possible, you should use 1024:1024. This will work for clothing items like full body outfits, tops, bottoms, gloves, socks, and tights (basically anything mapped in this bottom portion of the UV map). For all of these items, you must use a square and cannot crop it to be smaller. For shoes, this means a very large blank area.
For accessory items like jewelry and hats, the cropping is different. For instance, a hat would be 512:256. If you are unsure of the dimensions to use, export the normal channel on the maxis item and copy its dimensions. The following instructions will assume you are making a clothing item and not an accessory item.
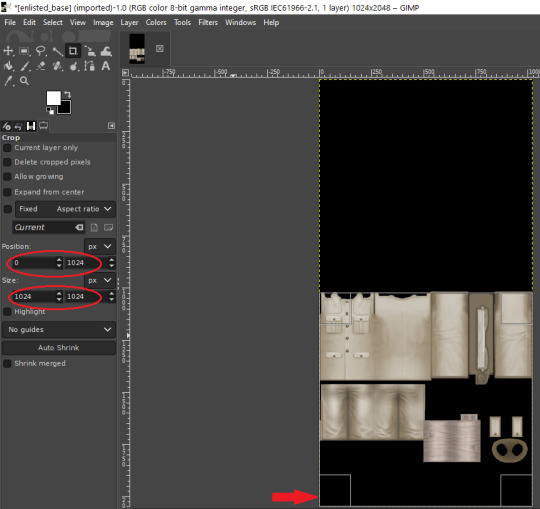
Click anywhere on the image while you have the crop tool active, then adjust your dimensions in the box to the left. You can manually type it in or drag the box and follow the size in the box as you drag.
The box should be perfectly aligned with the bottom and have no space below. If you have space below, just drag it as far to the bottom as you can. GIMP will stop you from dragging it outside of your current dimensions. If a little is sticking out at the top, that is okay. Nothing can be mapped outside of the 1024:1024 dimensions, so it is probably just bleed over or space filler that you are cropping off.
Press “Enter” on your keyboard to complete the crop.

Optional Step: If you desire, you may want to decrease the brightness and increase the contrast on your image so there will be more for njob to pick up. If you already have a lot of contrast, you may not need to do this.
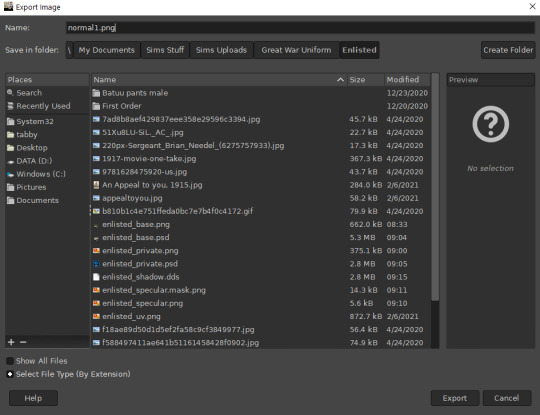
Next, export your image as a PNG or BMP. Be sure to not overwrite your original diffuse texture.
You can now close GIMP, though you will need to open it again later.
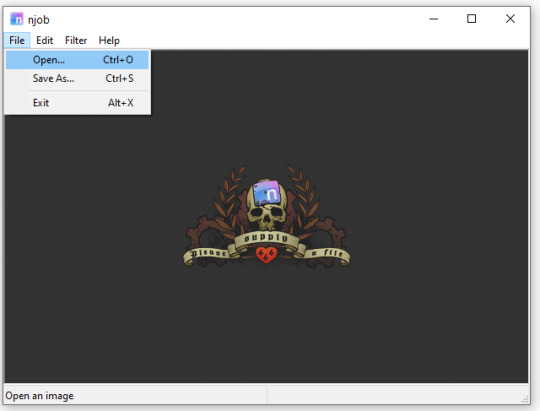
Open njob, then your saved, cropped image.
Maximize your screen so you can see what you’re doing.

Go to Filter > Diffusemap > Heightmap and select that option.
The screen will pause to load for a bit before opening up a new box.

Your image will convert to black and white and may look a bit strange. The first step is to change your “Course Detail” setting to the lowest (or close to the lowest) setting and your “Fine Detail” to the highest setting. I generally play around with the “Mid Detail” and “Scale” until I get what I want. Try to have what you want to be visible stand out, while folds should be soft and fuzzy but still somewhat distinguishable.
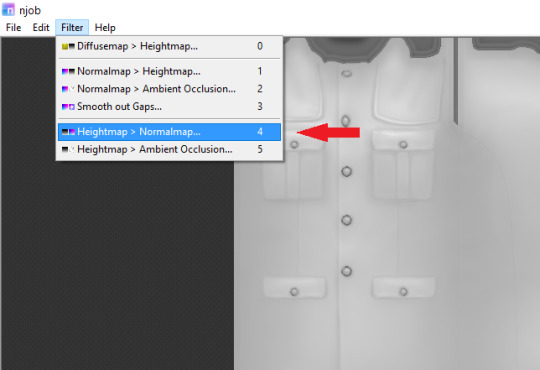
Once you have what you need, click OK and go to Filter > Heightmap > Normalmap

There are two settings, “Scale” and “Blur Radius.” Neither of them have “ideal” settings, so you will need to adjust as you need. “Scale” controls the depth of the contrast and “Blur Radius” impacts the softness of the image. If your edges are too harsh, your normal map may look odd in game.
You will probably also have lines in areas in no texture. This is normal, and I will go over how to remove those later.
Once you are satisfied with how things look, save the image as a bitmap.
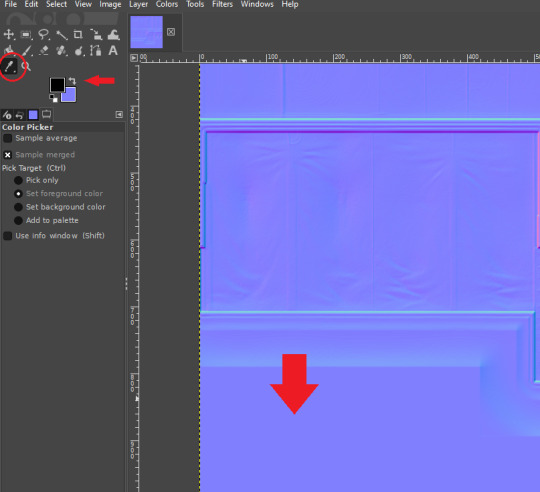
Now, open your bitmap image in GIMP. It is time to clean up the image and get rid of the artifacts. Unfortunately, unlike a specular, a normal map doesn’t have a mask to prevent bleed over onto skin or other textures. The unused areas need to be a midrange, solid grey. It is easier to edit at this step before you create your transparency.
Select a midrange blue color from one of the blank areas with your color selector and make it your background color by using the arrow button between the foreground and background colors.
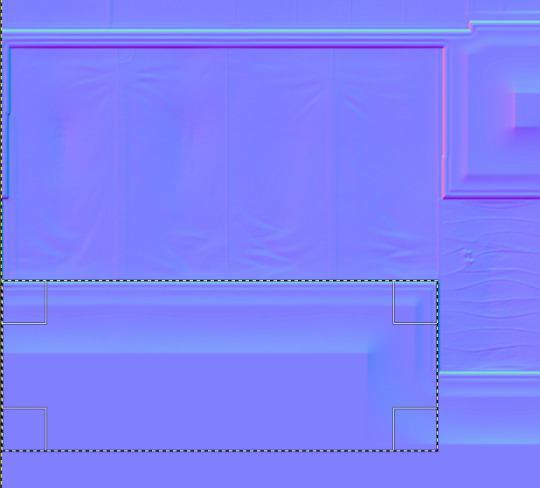
Select the areas that should be blank and delete them, which will replace the lines with a solid blue color. This would be areas around the neck, wrists and ankles, and also places like the filler beneath skirts and tops that doesn’t need texturing. Be sure to select the odd lines around the image, which are usually a bright teal or hot pink color. Those can be very visible.
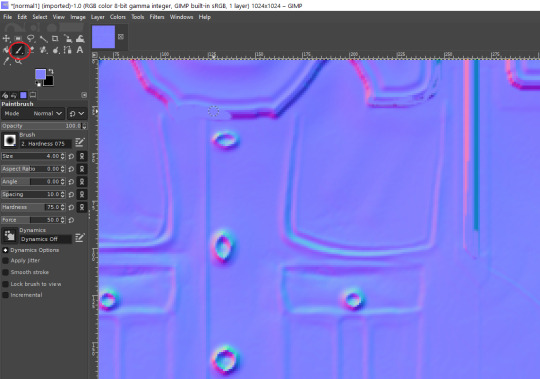
Sometimes, you may need to take your paintbrush and clean up the artifacts if they are in curved or very small areas. If anything looks too sharp, you can also use the smudge brush to smooth it out (very lightly). But don’t move anything around too much.
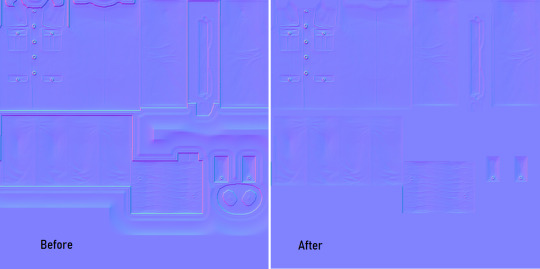
Once you have cleaned up your image, export it again as a bitmap. This is just so you can go back to it if you make a mistake later or need to modify it. Usually I save it as a new image, but you can overwrite the old one if you are feeling confident.
I have to point out that sometimes you can get away with not cleaning the artifacts from your image. But I have had too many issues with it in the past to skip this step.
Now it is time to make the normal map. Finally!

In the layers area, right click on your single layer and add an alpha channel to it. There is also a small button at the bottom you can use to add an alpha channel. You will need this transparency for the next step.
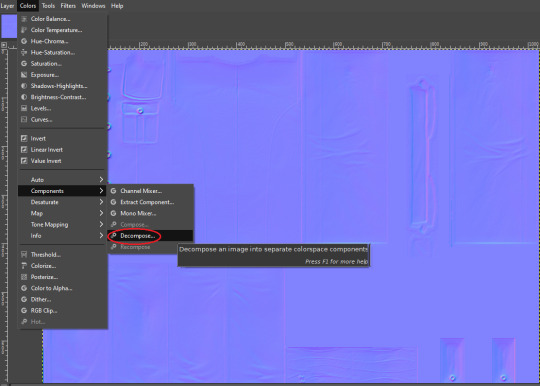
Next, go to Colors > Components > Decompose.

A small box will open up. Change your color model from RGB to RGBA to enable the alpha channel as a separate channel (layer).

Now, a new image will open that is your bitmap but greyscale. You will see four layers on the side called red, green, blue and alpha.
Select the red layer and click CTRL + A on your keyboard to select the entire layer. Then, click CTRL + C to copy the layer. (If you don’t have a keyboard, you can do “Select all” and “Copy” but this takes longer).
Now, go to your layer named alpha and press CTRL + V (paste) and CTRL + H (to anchor the layer). Now, you have replaced the alpha channel with the red channel.
Next, go to the green layer and select and copy it. Paste and anchor it into the red and blue layers, just as you did before with the red layer and alpha layer.

Your image won’t look too much different right now, it will just look like the green alpha channel rather than the visible red alpha channel when you opened it. Go back to the top bar and choose Colors > Components > Recompose. This will alter your original image, so the one you have open in layers will stay open. Go back up to the top and select the original image to go back to it, or close your layered image.

Now, your image should have changed from mostly blue to a transparent, mid-range gray with only a few elements visible. This is how it is supposed to look. If you don’t have transparency or it looks very different, then you probably messed up somewhere. Generally, I find it easier to go back to the original cleaned up bitmap (that you saved for future use) and start from scratch rather than trying to figure out where I messed up. That is usually faster.
Next, export your single-layer image as a PNG or DDS file (your preference). You will need a DDS plugin to save DDS files.
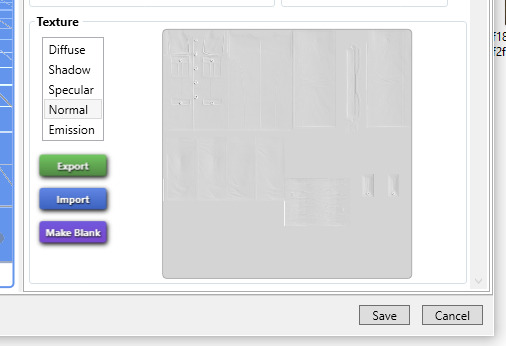
Open your item in Sims4Studio and import your new image file in the normal texture category. You will see a small preview in the box, which will probably show more details than you were able to see in GIMP. If it looks correct, save it and go to check it in game or in CASTools (which has a feature for previewing bumpmaps that can help you check for alignment problems). CASTools can be particularly useful if your computer doesn’t open the Sims quickly and you want to preview multiple bumpmaps. The only issue with CASTools is that it doesn’t really look much like it will look in game.
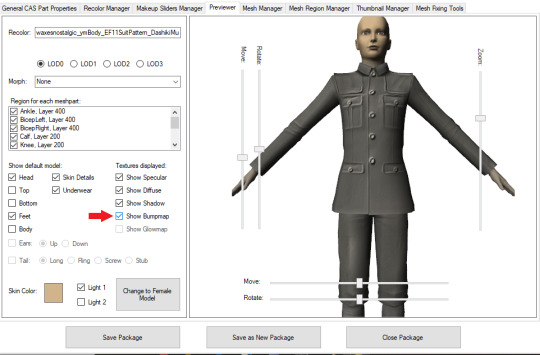
In CASTools. You have to select to see the bumpmap in the Previewer tab.
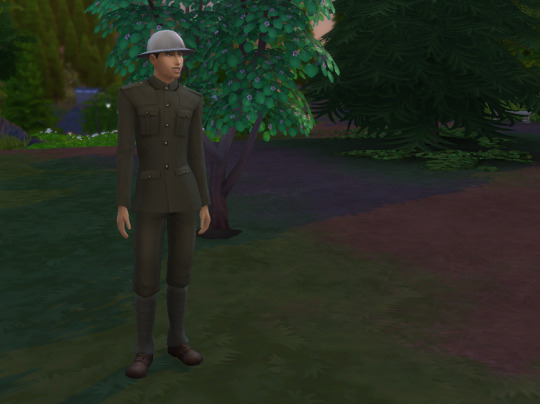
In game.
As I have only been making normal channels for a few months now, it’s possible I have missed some things, so if you know an easier or better way let me know and I can update the tutorial. I hope this is useful to you!
93 notes
·
View notes
Note
how did you make your icon like that
like what exactly?? how did i do the non-binary pride gradient or how did i do the hearts?
I got the idea for the pride ‘twibbon’ from @stiilesstilinski if you have an older version of photoshop then you can just follow their tutorial. If you have an earlier version then you might have a little bit of difficultly so I’ll just walk you through my process under the cut. It’s not that much different though tbh.
mk so,
First, you can either just google ‘pride twibbons’ to get the flag you want or go here and see if they have it there. Same goes for the hearts just google ‘pride hearts’ or ‘bisexual flag hearts’ or whatever it is you’re looking for.
Now, you have your icon open in photoshop, and you have your twibbon and little heart pngs ready. (make sure they are transparent or it won’t work!)
Let’s start by clicking the little padlock icon so your icon changes from background to layer 0. Then create a new empty layer.

Next, make sure you have layer 1 selected and then you are going to make a white circle in the middle of your icon with the paint brush tool, like so. You’ll most likely have to change the size of your brush depending on the size of your icon. Also, remember to have your brush set 100% hardness. You can find brush settings here:

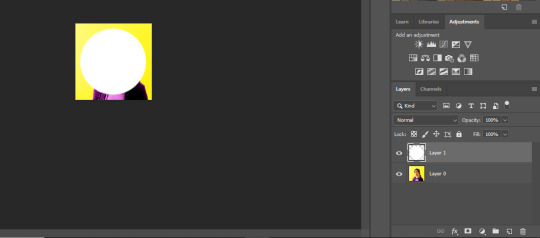
The size of your circle is up to you, if you can’t get the twibbon to fit how you want you can always adjust the size later on. Try and get the circle to be in the middle by using the move tool. You can click on the move tool and either move it manually and use the pink lines as a guide or you can use the arrows on your keyboard and eyeball it.
Next we are going to move layer 1 underneath layer 0 (this is why we unlocked the background layer) and then create a clipping mask on layer 0. To create a clipping mask, you right click layer 0 and click create clipping mask.

Once you’ve done that your icon should now look like this:

If you aren’t happy with how the subject is framed within the circle then click on the move tool and then use the arrows on your keyboard to move them around (make sure you have layer 0 selected to do this)
If you want the circle a little bigger, click on layer 1, click edit (along the top of your screen), and then click free transform. and then there ya go! Just don’t forget to leave enough empty room for the twibbon (again, can always adjust again later) if you do this, make sure the little link has been selected (see below) because then that will keep your circle a perfect circle and won’t change the aspect ratio.

Once you are happy with everything, we start with the pride stuff baby !!
open your selected pride twibbon and drag it over to the icon we’ve been working on. Make sure the twibbon layer is on top of all the other layers. If you can’t see the twibbon, don’t panic! It might just be in stealth mode a little bigger than your icon. All you gotta do is go back to the free transform tool but this time you just have the twibbon layer selected. Adjust the twibbon to fit around your icon and voilà! pride icon complete. (If while adjusting the twibbon with the free transform tool it starts to look a bit blurry and pixelated, don’t worry! Once you’ve clicked enter it will clear right back up.) Now all you gotta do is save it as a png.
If you want to add little pride hearts you just follow the same steps as you did with the twibbon.
If you want to make sure you keep the transparency of your icon, you have to change it by going into your desktop theme settings and then click the little pencil next to avatar and change it that way. Click save and then there ya go, cute little transparent pride icon!
I’m not the best at explaining stuff so if you get confused through out any of this, just message me or send me another ask and I’ll help you figure it out!
final product:

6 notes
·
View notes
Text
Paint Tool Sai 1.2.5 Crack
Paint Tool Sai 1.2.5 Crack is a lightweight raster graphics editor and Sai Download software for Microsoft Windows developed and published by Systemax Software. Development of the software began on August 2, 2004, and the first alpha version was released on October 13, 2006. SAI’s official release (1.0.0) was on February 25, 2008, and an update preview was released shortly after.
The Paint Tool Sai Crack is available in both Japanese, and an official English translation. An unofficial user-made translation for the software also exists. Paint Tool Sai is available on Microsoft Windows 98, Me, 2000, XP, Vista, 7, 8, 8.1 and 10.
Paint Tool Sai 1.2.5 Crack is a lightweight painting application. The user interface allows multiple documents to be opened at the same time. The drawing canvas can be both zoomed and rotated using the sliders on the navigator or the hotkeys configured on the keyboard. The toolbar on the top part of the screen also includes a button to mirror the drawing view without mirroring the actual drawing. It is also possible to open multiple viewports to the same document.
Get Paint Tool Sai
An application-wide scratchpad (which can be used as a color mixing panel) is provided, which is saved between sessions. Colors can be stored in the swatches panel. Various raster drawing tools are implemented, such as the Airbrush, Watercolor, Pen, and Marker, which can all be easily customized, and stored in slots in the user interface of the application.
There is also a set of vector drawing tools intended for inking, which, like the raster tools, can be configured to be pen pressure-sensitive. Paint Tool Sai Free Download Full Version was developed by Systemax software and its first version was released on October 13th 2006. It is a graphics editor, support layer and data acquisition. It is not free, it costs about 5400 yen (yen), so you will have to give up a little cash, but you will get a lot.
This software can be used in English and Japanese. It has an easy-to-use interface and supports Intel MMX technology. The software is also tested and the virus is free. The interface is simple and somewhat outdated. The software is incompatible with Mac. Work can be done on separate layers, which can be grouped and have opacity masks. In addition to this, layers can be masked by clipping them to a lower layer.
This allows one to add shading and highlights to an area without creating new masks for the additional layers.There is also a pen movement and pressure smoothing feature which can be manually configured as to how much effect it has.Selection tools include the simple square selection, the lasso, and magic wand, which can be configured for anti-aliasing. Paint Tool Sai Crack Free Download Full Version is also a selection brush tool, which can be customized like the drawing brush.
Paint Tool Sai 1.2.5 Crack Full Latest License Key
Paint Tool Sai 1.2.5 Crack Full comes with a full set of transformation tools that can work on selections, including move, resize, rotate, and a free (perspective) transform. Any series of transforms can be set up and then applied at once to a specific selection minimizing the softening of the image. There are two caveats with using the transform tools that often confuse new users and are not made clear bySai Paint Tool Full Version Free included English documentation.
Paint Tool Sai Free Free Download Windows 8 includes several tools for creating a selection, but only the rectangular (rubber band) selection tool shows the transformation options. But it does not matter how a selection is initially created, selecting the rectangular selection tool will then show the transformation options which will work fine with it. Effectively the ‘rectangular selection’ tool button (a dotted rectangle in the tool palette) is also the ‘make transform tools visible’ tool button.
Second, to apply the conversion tool to the selection on the vector layer, an inconspicuous additional step is required. After creating a raster selection in any way, the user must click “Select” on the menu bar and then click “Paint Tool Sai Download” or “Select Stroke” in the “Dropdown” menu, then highlight the selected point in the option set And affected by the conversion tool. As expected.
These points remain selected until the menu is opened again, clicking to clear the selected point, even if another raster selection was made. Many quite experienced users think that the conversion tool does not work at all on the vector layer. This was mistakenly repeated in some review articles. Users provided tutorials on the web. One of them was Wikipedia articles.
Paint Tool Sai 1.2.5 Crack Of Key Features:
The use of this software requires basic knowledge of windows operations, folder management, and web browser file downloads.
It contains basic tools such as paint brushes, pencils, erasers, air brushes and watercolors.
You can rotate, flip and zoom in/out your picture.
You can change the saturation, color, and hue of the image.
It has features such as canvases and layers that give your images a neat and tempting effect.
It allows multiple documents to be opened at the same time.
It provides a scraper that can be used as a color mixing panel. The new color formed can be saved in the swatch panel.
It provides a drawing canvas that can be rotated and scaled using the slider.
Multiple view ports for the same document can be opened.
Shadows and highlights can be added to drawings by using multiple layers and opacities that are cut together.
The software displays transparency and white in the same way, resulting in a noticeable difference.
It includes some selection tools such as wands, lassos, and square options.
It supports multiple formats such as West, PSD, BMP, JPG, PNG, TGA and more.
There is no function to print documents, but they can be converted to different formats, such as. BMP or. PSD file.
It provides a line working layer for creating lines, edits, pressures, curves, and thickness tools.
Various functions and tools can be customized from the built-in options dialog.
The software provides a help section to eliminate confusion about its work, personal functions, and customization. The “help” section removes all confusion about software use and functionality.
It provides stunning and beautiful anti-aliased drawings.
The software provides users with a 31-day free trial period. After the tracking period expires and the user must purchase a license, it automatically disables the tool.
The program does not crash and is bug-free.
Supported OS
Windows 98
Windows 2000
Windows XP
Windows Vista
Windows 7
Windows 8
Windows 8.1
Window 10
The post Paint Tool Sai 1.2.5 Crack appeared first on cracksouls.
from cracksouls https://ift.tt/2kI6Vij
via IFTTT
0 notes
Last Seen Blogs
haymurforever
Hayat and Murat

mvrstoreaus
MVR Store | iPhone Accessories Store
silupi
SiLuPi
designerliquid
Designer Liquid

piedrasdebuddha
Piedras de Buddha