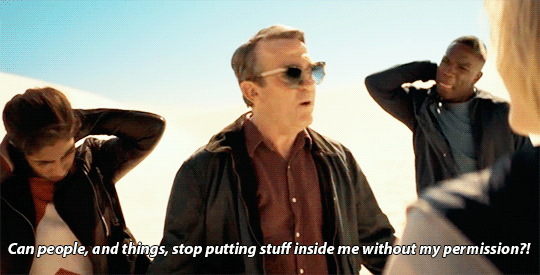
#i wanted to make those gifs bigger but the quality is bad so the smaller the better ^^'
Text

EarthMix ✦ ViVi Men
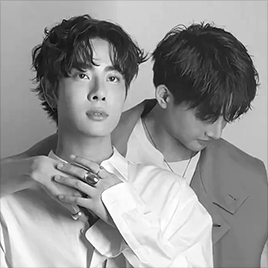
#tusernix#tusersilence#tuserrowan#khaotunq#userdragonz#tuserhidden#uservid#usermask#userjamiec#tusermona#gifs#earthmix#earth pirapat#mix sahaphap#thai actors#that second gif#they look so damn good!!#i wanted to make those gifs bigger but the quality is bad so the smaller the better ^^'
102 notes
·
View notes
Photo


HOW TO: MAKE HIGH-QUALITY GIFS
Hi! A few people have asked me about my gif-making process and an anon asked about my coloring on a specific Bridgerton set. So, I decided to make a tutorial combining both! This is a very in-depth tutorial but there’s also nothing groundbreaking here. If you enjoy seeing how other people work like I do, this is for you <3 very long tutorial under the cut!
tech:
★ laptop: macbook pro (13-inch, M1, 2020)
★ external hard drive: seagate one touch ssd 1TB*
tools:
★ adobe photoshop 2022
★ mpv 0.29.1**
★ windscribe (vpn)
★ qBitt⚆rrent (for tv & film)
★ 4k video downloader (for music videos, trailers, interviews, etc.)
★ rizz’s action pack by @anyataylorjoy (highly recommend!)
resources:
★ resource directory by @usergif (a source blog I created for gif effects!)
* I have 2 externals, one dedicated just to storing all my 4k Star Wars files and another for Bridgerton and everything else
** I use this version of MPV bc the other ones weren’t compatible with my laptop for some reason. This one works well for me and doesn’t create duplicate screencaps which I’ve heard is a problem with other versions
PHASE 1: Prepare Your Base Gif
1.1 – Download video files.
I personally like not having to do this regularly for 2 reasons: (1) I t*rrent (I use r@rbg — make sure to use a VPN if you t*rrent!) and (2) I mainly work with 4k files which can take forever to download, especially old media, and I’m not trying to waste my life away. That’s why I keep my files on an external hard drive, so I only need to download when new content drops.
TIP A: Footage Type & File Size
As you saw in the header gifs, I work with HDR footage. You may have heard some gif-makers talk about HDR or 4K screencaps looking like the colors are faded or washed out. They are:
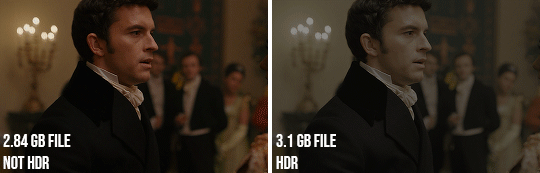
(I don’t have examples of the Mandalorian because I only have that in 4K which is always HDR — so I’m going to stick to using this Bridgerton clip for examples. Also, I made the Mando header gif a long time ago and I’m not letting it go to waste now lol.)
Some people don’t like working with HDR as a base, which is understandable! There are ways you can make your screencap software fix the coloring automatically. But my mentality is: I’m lazy, I’m used to it, I’m already coloring it anyway, and the muted coloring gives me a sense of control over the entire palette — instead of fighting with the existing colors from the original color grading. (I also talked to a videographer at work about this and he mentioned he prefers to color grade with this faded/washed-out look as a base too!)
For the sake of the demo, I tried to color these two scenes as equally as possible in black and white so you can decide if there’s a difference:

Ultimately, the file type you use is up to you! Hopefully this demo helps you make that choice easier. This tutorial is going to focus on HDR footage though.
The size of your file matters too! 4k (2160p) isn’t always better than 1080p (but it typically is for me which is why I prefer to use 4k footage when it’s available). But the main thing is to look at the GB size of your file.
1.2 – Make screencaps.
I use MPV which works great with 4k .mkv files (PS can’t read .mkv files if you try to Import Video Frames to Layers). Check out this tutorial for the basics on getting MPV set up and how to make screencaps.
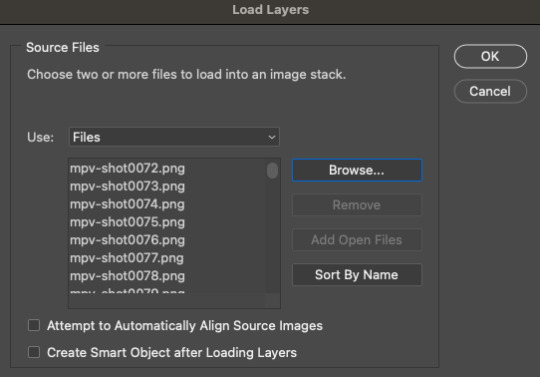
1.3 – Import screencaps.
Load your caps into PS by going to File > Scripts > Load Files Into Stack. Some people upload using Image Sequence because it loads faster, but idk. I don’t really care because I’m never uploading that many caps at a time that I need it to go any faster. This is what the Load Layers window looks like:
1.4 – Make Frames from Layers.
Recently, I’ve been using the Script Action in Rizz’s Action Pack (linked at the top of this tutorial — if you use it, be sure to like and reblog Rizz’s post!) with some actions of my own added to make it perfect for my process. Actions are huge timesavers because all you do is press play!
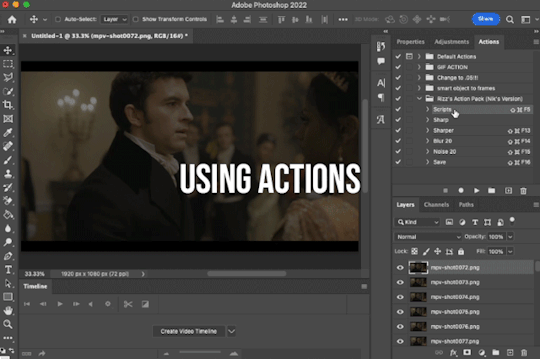
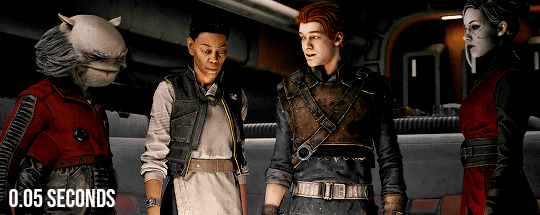
But to do this manually, you can simply select all the layers, click Create Frame Animation, click the menu in the Timeline tab (upper right), and click Make Frames from Layers. Click Reverse Frames in the same menu so your caps are in the correct sequential order and set your frame delay to 0.05 seconds.
1.5 – Crop and Resize.
For this gif, I want my dimensions to be 540px wide x 350px tall. Do this to your liking but remember, Tumblr’s max width is 540px (here’s a guide for other dimensions). Any width smaller will be stretched and look bad. Any width larger will be compressed, make your gif file huge, and look bad.
P.S. RESAMPLE SETTINGS MATTER! Check out this resample experiment to figure out which one you prefer. I tend to stick to “Bilinear”
TIP B: Preserving Cropped Pixels
Have you ever cropped something, done all your coloring, then wished you could nudge your image just 5 pixels over only to realize you can’t because you’ll have 5 pixels of transparent space on the side? Uncheck “Delete Cropped Pixels” so you can change your image positioning later if needed!

TIP C: 2-Pixel “Buffer”
Something I do (and some gif-makers I know do) is resize with a 2-pixel “buffer.” Gifs sometimes have a slightly transparent border or “halo” effect. You can see it a lot when viewing Tumblr in dark mode. To get rid of it, I resize a tad bigger and then crop out the extra pixels. So, for example, since I’m making a 540x350 (w x h) gif, I’ll resize it to 542px width first. After I’ve converted to a smart object (Step 1.6), I’ll crop out those extra pixels so it’s a perfect 540x350.
(Btw, you can also do this in the export window by setting “Matte” to none. I guess I’m old school for doing this? Idk I haven’t properly tested and compared both methods.)
1.6 – Convert from Frame Animation to Video Timeline.
The sharpening action in Rizz’s Action Pack does everything in one go: converts from Frame Animation to Video Timeline, converts frames into a smart object, and sharpens your gif.
If you’d rather do this step manually, just select all your frames and click “Convert to Video Timeline” in the Timeline menu panel OR click this button:
Then, select all your layers in the right panel, right-click, click “Convert to Smart Object,” and add your sharpening filters.
Again, I’m a huge fan of actions, so I’d rather just hit play on Rizz’s action. It includes two sharpening presets and is super easy to tinker with if you want to add more sharpening or put other filters like Gaussian Blur, Reduce Noise, or Noise on top.
I’ve been using Rizz’s “Sharper” Action and occasionally throw a Gaussian Blur filter set to a radius of 1.0 pixels at 20-40% opacity (or sometimes a Reduce Noise filter), depending on the gif. Here are my usual Reduce Noise settings which I typically set to around 40% opacity:

In this gif, I used Reduce Noise at 40% and Gaussian Blur at 20% lol.
If you prefer using your own sharpening settings but want to use this action for the converting steps, just right-click the Smart Filters under the smart object and click Clear Smart Filters. Then, apply your own sharpening settings.
If you followed TIP C, my 2-pixel “buffer” trick, from Step 1.5, go ahead and delete those extra pixels now! I go to Image > Canvas Size and type in the gif dimensions I want there, 540x350 in this case:

If you had “Delete Cropped Pixels” unchecked, you can move your gif around until you like how your gif is positioned. Your gif should be looking sharp and perfectly sized now, with no weird borders hanging around the edges.
Let’s move on to the fun part!

PHASE 2: Coloring
Disclaimer: this is MY process for coloring, not the be-all and end-all. Everyone has their personal favorite adjustment layers and unique styles, and it’s all preference! The only wrong way to color is by whitewashing, redwashing, etc.
These steps are also just my typical steps, but I always color from scratch and my adjustments always depend on the scene. A dark, yellow-tinted scene from Narcos will be a completely different process from a bright, outdoor scene in Star Wars.
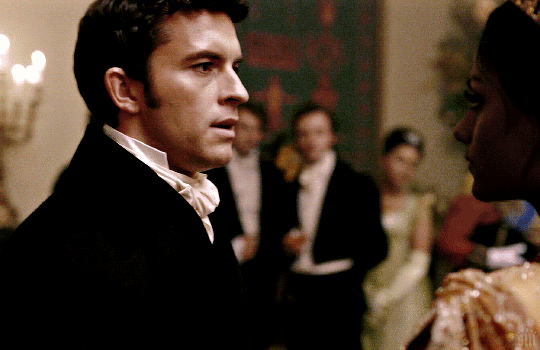
Because an anon asked for it, I’ll be demonstrating my coloring on the gif above from this Bridgerton set. It’ll be a little hard to explain because it’s like a method-to-my-madness, lives-in-my-mind-untranslated thing — but I’ll try my best and mostly use screenshots to demo!
MY LAYERS PANEL OVERVIEW:
2.1 – Brighten + Color Correct
My go-to adjustment layers: Curves, Levels, and Brightness/Contrast (set to screen).
So, like I said, I use 4K/HDR footage which gives me a pretty washed out starting point coloring wise, but I actually love this as a base for coloring! I’m repeating myself but a videographer I work with said he films low-contrast because it provides the best base for natural-looking color grading. And I trust him and myself because I’ve been coloring like this for a long time lol.
ADJUSTMENT 1: Brightness/Contrast 1
When it comes to brightening, I’ve found myself starting to do this neat trick someone from usergif taught me! Literally just slap a Brightness/Contrast layer down, don’t move the sliders, set the blending mode to “Screen,” and lower the opacity to your liking so you don’t start out with a blindingly bright and pixelated gif.

Then, I pretty much always go in with a Curves and Levels adjustment. And I actually do a hint of color-correcting with them too!
ADJUSTMENT 2: Levels 1
In the RGB channel, I don’t add too much darkness just yet but I definitely bump up the highlights (right slider) a lot. I lift the reds in the Red channel a bit, especially when I’m working on a gif with people. It helps bring back some life to the otherwise washed-out coloring of HDR footage. In this one, I also lifted the greens and blues a bit too! When I say “lift,” I just mean I’m bringing those colors forward or emphasizing them.
ADJUSTMENT 3: Curves 1
I only tinkered with the RGB and Red channels this time — and no fancy S-curves here. But sometimes, I’ll also go into the Green and Blue channels if I didn’t do enough in my first Levels layer. You can see here that I barely even nudged that Red curve up lol. Why do I make such minor adjustments? My brain can’t explain. I just move things, decide if I like it, and stick with it. 🤷🏻♀️

2.2 – Basic Colors + Extra Brightness
My go-to adjustment layers: Selective Color, Curves, and Color Balance.
ADJUSTMENT 4: Selective Color 1
Since my gif didn’t have any true green, cyan, blue, or magenta colors, I didn’t play with those channels at all. But there’s a lot of yellow in the background and a variety of reds and yellows in the people’s skin tones which is why I adjusted those two color channels.
You might notice that I increase the blacks in my Red and Yellow channels. I actually do this almost all the time. I kind of think of coloring like makeup?? Idk if that sounds weird. But the blacks kind of add some dimension the way contour would, and my HDR footage naturally lacks this.
Something else I almost always do is bump up the whites in the White channel. I love really bright whites and, with an ideally lit scene, it acts as the highlight makeup lol. It gives me some good dimension on nose bridges, cheekbones, and high planes of the face
I do some overall adjustments in the Neutrals and Blacks channels, but very minor since I have more coloring to do!

ADJUSTMENT 5: Curves 2
Just a teeny tiny curves layer with an itty bitty S-curve (for contrast and so I can see what I’m doing lol)

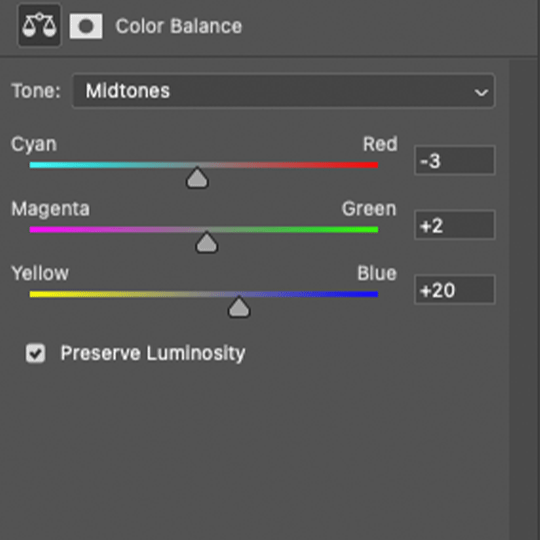
ADJUSTMENT 6: Color Balance 1
I never really know what I’m doing with color balance. There’s no formula I follow or pattern of adjustments I always do. This step is literally the epitome of push the buttons and hope it does something good.
2.3 – Adjust Skin Tones and Other Colors
My go-to adjustment layers: Selective Color and Hue/Saturation.
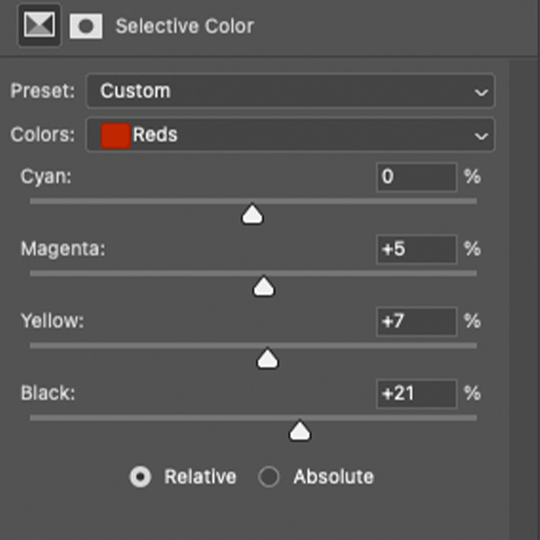
ADJUSTMENT 7: Selective Color 2
Again, I’m only focusing on the Red and Yellow color channels, adding more blacks to each again. Then, bumping up Whites and doing super minor adjustments in Blacks.
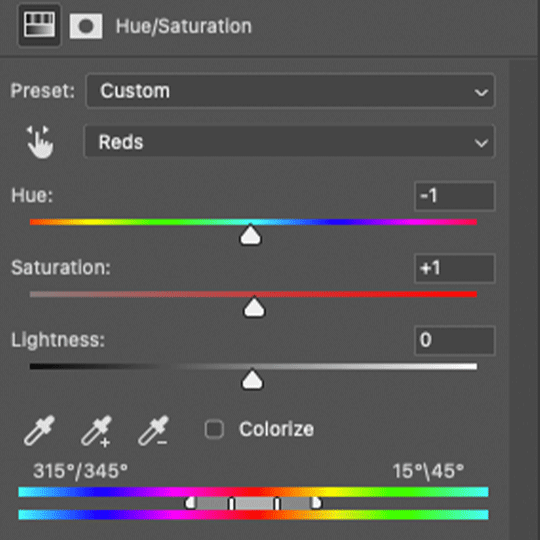
ADJUSTMENT 8: Hue/Saturation 1
Here’s where I do a lot of my skin tone correction. I try to be hyperaware of representing skin tones accurately and naturally, while still having that HQ-looking dimension. By no means am I saying I’m perfect at coloring skin tones, but I do my best using this adjustment.
Again, there aren’t other colors in this scene besides Reds and Yellows, so that’s what I’m tweaking. I do sort of follow a pattern here which is:
Reds Channel: slide down the hue slider a *tad* and I’ll sometimes lower the lightness (I didn’t do that here but I do in the next Hue/Saturation layer)
Yellows Channel: slide down the hue slider so any overly yellow hues move closer to a neutral-magenta hue AND lower the saturation so the skin doesn’t look sallow.
2.4 – Shadows & Light
My go-to adjustment layers: Levels and Exposure.
ADJUSTMENT 9: Levels 2
This is super simple. I’m just adding back some contrast. That’s kind of my trick for HQ-looking gifs. I bumped up the highlights (right slider) a lot again and darkened the shadows (left slider).

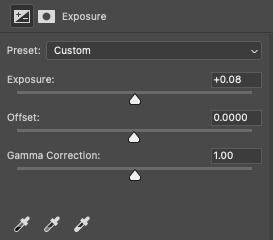
ADJUSTMENT 10: Exposure 1
I only do this sometimes when I want the light parts of my gif to be extra bright, and even then, I barely push the exposure up (I’ve only increased it by 0.08 here lol). Exposure can totally mess up your gif, so be sparing with this if you decide to use it.
2.5 – Repeat as Needed
These are my go-to adjustment layers for basic coloring (i.e. no fancy color palettes or major color manipulation — if you want a tutorial on color manipulation, I made one on usergif right here!). And I tend to add several (but not too many) layers until I get it where I want. Usually, the only additional step I’d do for a color-focused set is add a few Gradient Map layers!
Here are my remaining layers and their settings:

ADJUSTMENT 11: Levels 3
Some final contrast gets added here and some last-minute color correction. For example, if I find I’ve made my subjects’ skin tones too red or yellow, I’ll pull down the left slider in the Red channel to bring back some cyan or bump up the Blues.

ADJUSTMENT 12: Hue/Saturation 2
Only in Reds and Yellows again, I pretty much follow the same principles of my first Hue/Saturation layer. This time, I did lower the lightness in Reds. Their skin was looking a bit too saturated with Red, so this helped me bring it back to a slightly more natural-looking but still high-contrast state and I reduced saturation.

ADJUSTMENT 13: Selective Color 3
Idk why I did this originally... I didn’t bump up the whites and I didn’t touch any other color channels. But I guess my highlights were looking a bit too green-blue, so I bumped up the yellows and magentas a lot and pulled down the cyans.
And here are all the adjustments in action, step by step:

You can see how the middle adjustments were making them look quite red, but the final coloring is more neutral imo.
Now, time to save your gif!
PHASE 3: Exporting the Final Gif
3.1 – Convert Back to Frame Animation + Fix Frame Rate
If you can avoid it, DO NOT export your gif then reopen it to adjust the frame rate. Reopening your gif adds an extra, unnecessary compression step when you already have to go through the unavoidable steps of PS optimizing your gif for web and Tumblr compressing gifs over 3MB.
I love Rizz’s Action Pack mainly for the “Save” action which takes all the guesswork out of this step! Just hit play and your gif will be ready to export in seconds. If you prefer to convert back to frames manually, I’ve written all the steps out here!
Remember to set your looping option to “Forever” and then fix your frame delay aka frame rate (the speed at which your frames play). The generally preferred frame delay among gif-makers is 0.05 seconds (in fact, I’ve heard some blogs won’t reblog your gifs if they don’t appear to be set to this speed!).

But the speed also depends on the FPS of your original file! For example, when I gif video games (like Jedi: Fallen Order) which I believe are at 60 FPS, I tend to make my speed 0.04 (or sometimes faster).

I know that seems like such a minor difference, but as you make more gifs, you’ll be able to tell which speed looks the most natural!
Before exporting, just always be sure to play your gif back, check that you like the speed, and delete any accidental duplicate frames! (Duplicate frames can happen if you animate using keyframes.) They may seem minor, but it’s something I personally can notice even if it’s just one duplicate frame... and it can throw off the entire smooth flow of your gif.
TIP D: MARKETING FOR DISCORD USERS (lol) 🤡
If you share your gifs in a creator server, here’s a fun tip that totally exposes me as a marketer. While you’re in Frame Animation, move your frames around before saving it so that your best-looking frame is Number 1. THIS is the frame people see in your embedded preview link when you share your gifs on Discord. (If your selected frame is in the middle of your gif, just be sure to move all the frames after it too so your gif still loops properly. Like, if you have 10 frames but want frame 5 to be featured in the Discord preview, move frames 5-10 before frames 1-4. Now, your frame sequence is 5, 6, 7, 8, 9, 10, 1, 2, 3, 4 — #5 being the featured frame.)
Your gifs loop anyway, so your first frame doesn’t have to be the first part of your scene :) By being purposeful with your “first” frame, you have control over the still image people see in the server. And if you choose a really good frame, who knows? Maybe more people who aren’t in that fandom will be curious enough to click it because it looks so good and enticing lol
See this preview? That’s actually the end of my gif, but it’s the best part:
(also, not me just realizing I posted this set on 4/20 lmao that was so unplanned a;lsdjk)
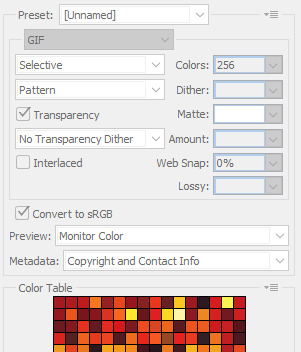
3.2 – Save For Web
Go to File > Export > Save for Web (Legacy) to get your gif ready to export!
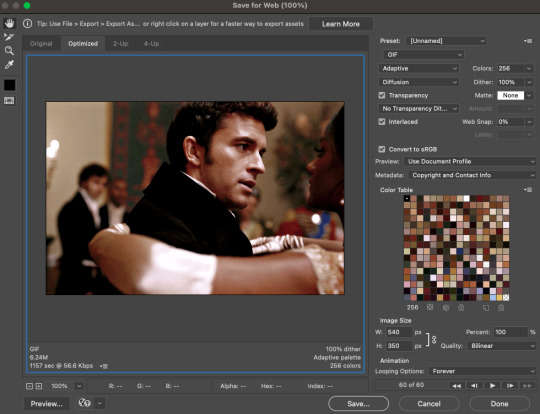
There are still some extra settings to play with here, mainly the Color Reduction Algorithm:
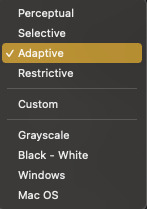
And the Dither Algorithm:

Typically, gif-makers only use Selective or Adaptive and Diffusion or Pattern.
Again, these settings are going to be up to your personal preference. My usual is Adaptive-Diffusion.
On occasion, I’ll go for Selective-Diffusion. And I don’t usually prefer the Pattern dither because I hate seeing the grid lines it produces. But there have been some gifs (like the first one in this set) where I have a solid background color and Pattern yields the best-looking gif. So, I’ll always toggle through the options to see which one I think looks best!
Check out this guide that shows all the setting side by side!
TIP E: How to Keep Your Gif Under 10MB (Tumblr’s current max gif size)
Try to to keep your number of frames as low as possible. I think my average is 60 frames or so. Sometimes I can get away with more depending on the scene.
Make your gif smaller. Obviously, if you’re making a full-width gif, you can’t make it smaller than 540px wide. But you can shorten the height of your gif if your composition allows it!
Add more blacks to your coloring. Idk why this works but it usually does for me. More contrast or something
Try not to use too many adjustment layers (I say this but I don’t usually do this a;slkdjf)
This isn’t my personal preference and I’ll avoid it when possible, but you can add Lossy which is a compression setting that’s available when you do Selective color reduction. It helps reduce the file size, but I’d never go over 10 on Lossy:

3.3 – Upload to Tumblr
Use the Photo Post option not Text Post. Gifs uploaded in a Text Post may look okay on the dash, but they can get very wonky on different themes, create size inconsistencies, and make the gutter wider than the 4-pixel default. (Plus, if you share your gifs in a Discord server — your embedded preview will be all tiny!)

Contrary to some beliefs, uploading to drafts does not mess with the quality of your gif anymore than publishing it instantly. So, go ahead and put your gifs in the drafts so you can see how it’ll all look before posting!
I tend to leave my gifsets in drafts for at least a day so I can criticize myself more 🤡 kidding... a little... but I’ve also heard that keeping your sets in drafts helps them appear in the search/tags faster. I’ve never had problems with my stuff showing up in tags, so maybe that’s true!
And that’s it!
Thanks for reading my dissertation on Tumblr gifs lmao. I hope it was clearer than it was long and ramble-y... and I hope it’s helpful for some beginner gif-makers out there! If not, here are some of the best basic giffing/coloring tutorials I know:
giffing and coloring tutorial by sashafierce
giffing 101 by msmarvel
gif tutorial by kylos
gifmaking for beginners by hayaosmiyazaki
coloring tutorial by magnusedom
and check out usergif’s resource directory here for more help!
[You can also find my other tutorials/resources here]
Before I go, let me just say a few TUMBLR/GIF ETIQUETTE things:
Clearly gif-making is a process. And it is art, whether you use fancy effects or not. So DON’T STEAL GIFS, don’t even use them as a base for your own adjustments. Use this tutorial if you need help making your own gifs from scratch!
Another thing: give credit when credit is due! Trends come and go in gif-making, but you absolutely should link “insp” in the caption of your post (not in the source link and not in the tags). The caption is the most visible and intentional spot, which means it’s the most deliberate acknowledgement of your source of inspiration. If you didn’t come up with a concept yourself (be honest with yourself), just link it! It doesn’t make your post ugly or cluttered. It helps spread awareness to other talented creators that some of your followers otherwise may not encounter in their fandom. And doesn’t it feel good when more people see what you’ve made and celebrate it with you? Give that same feeling to the source of your inspo!
Lastly, remember: don’t let anyone tell you that the gif styles you like aren’t right or aren’t beautiful. Gif-making is about having fun and creating art! As long as you like what you’ve made and it doesn’t harm any person/community or perpetuate problematic behaviors (i.e. whitewashing), then do what you want! It’s your blog!!
Have fun! <3
#photoshop tutorial#gif tutorial#completeresources#dailyresources#userkosmos#usershreyu#uservalentina#useralison#usernums#tuserkay#usercim#userk8#tuserrex#userannalise#useryoshi#userelio#tuserabbie#uservivaldi#resource*#myedit*
2K notes
·
View notes
Text
Killjoy gun tutorial!
I want to preface this by saying that my method has been certainly used by other people and i don't claim credit for it at all, but people on here saw my gun and wanted a tutorial, so here it is.
Also, this craft isnt exactly a quick one (especially if you have to cut everything out with scissors) so beware of that before starting
Things you'll need:
A thickish piece of cardboard (i used an old shoebox)
Two pieces of scrap paper
Glue (i used gluesticks but stuff like elmer's glue would definitely work better)
Scissors or a box cutter
A ruler
A pencil or writing utensil of any kind
Colored paper or paint for the outside
How to do it:
look up a killjoy gun template on google images (make sure it's one that's free to use!) And download it.
Print out the template or trace it twice on scrap paper (make sure it’s the right size for your hands!)
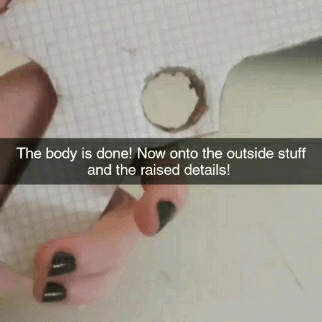
Cut out one of the templates, (cut out the circle for the trigger too!) and glue it on one of the pieces of cardboard. this will be the first layer to the body of the gun.
Once you cut that out, take that first layer and glue it to another piece of cardboard, and cut around that. This is the second layer. Keep on adding layers until you’re satisfied with the thickness. i personally did eight layers but it depends on how thick your cardboard actually is and what size your hands are! (if you have bigger hands i suggest doing more layers and if you’re making this for a child or if you have smaller hands i think you can get away with six layers. i don’t suggest doing any less than those or your gun will be flimsy and it’ll bend easily though)
now it should look something like this! (sorry for the bad quality this is from my snapchat lol)
now time for part two of the tutorial! the main part of the show, the outside.
if you’re using paint this part should be pretty easy for you, you can just paint it and skip ahead to the part where i explain how to do the raised details, if you’re using colored paper like i did read this part too!
first, i did the edge of the gun and the inside part of the trigger. (i’m talking about the part that shows the raw edges of the cardboard)
i took some yellow paper and cut out multiple strips of paper that were roughly 4cm wide (i would do more if your gun is thicker than mine. mine was about 1.5cm thick at this stage) and glued that paper into one long strip of paper, long enough to wrap around my gun completely.
i applied some glue on the edge of my gun (i suggest starting from the top part because it’s straight and easier to do) and stuck it on the middle of the strip of paper. then i went down the edge of my gun, cutting a slit on the paper whenever it curved and i glued down the flaps on the edges (i don’t suggest doing this without the flaps if you’re using gluesticks because it won’t stay on)
i don’t have progress photos for this step so sorry if it’s a bit hard to understand
then, for the inside of the trigger i did the same thing, just cutting multiple slits of paper so it would curve right.
now the hardest part is done! from here it’s all pretty simple.
now, for the main color of the gun, i did pretty much the same thing i did when i was building the layers: i glued the gun to a piece of cardstock (do one side at a time!) and cut around that, then i did the other side the same way.
now the gun is almost done!
now, take that secod template from the beginning and cut out the raised part on the top and the handle (you can do a ring around the trigger if you want, but i didn’t bother with that)
now, the next step’s explanation is a bit weird but i hope it makes sense with the image. sorry for that :,)
take the template of the top part and trace it on a scrap piece of paper, and add two lines that are as long as the thickness of your gun and the thickness of your cardboard times two on the longest side of it, extending it. then flip the template over and trace that again, at the end of those lines, closing off the shape.
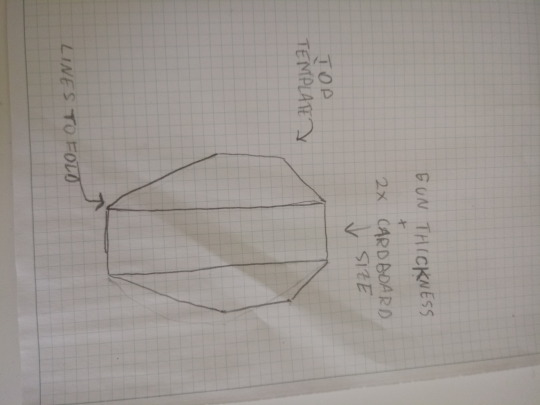
(this is not precise or to scale, it's to explain how it should look)
not take that and trace it on some carboard, then cut it out and fold it (see the picture- it explains where you should fold it. i can’t really explain it myself sorry lol)
now take that cardboard and wrap it in paper or paint it the color(s) you want and glue it on your gun!
now, the raised details for the handle are pretty much the same- take the template, trace it on the cardboard, decorate it and glue it to the gun.
and you’re done, finally!
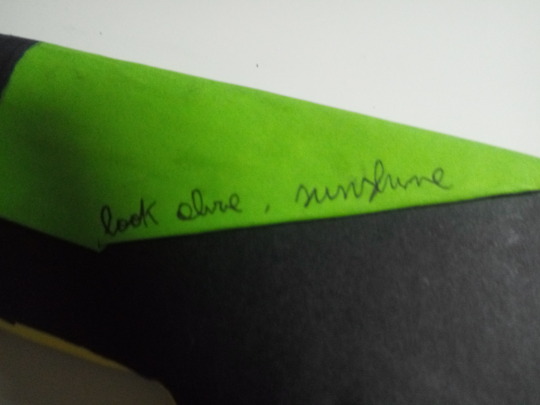
down below is my gun, if you actually have the patience to do this rb this with your results or tag me in a post!

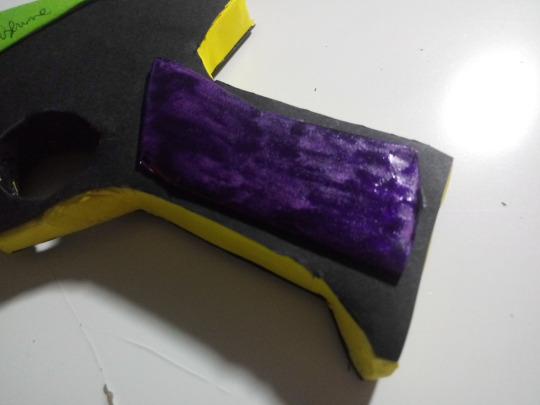

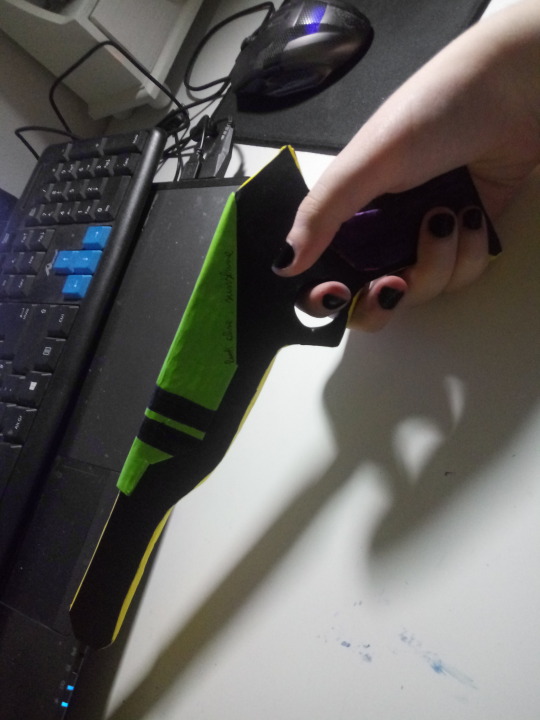
442 notes
·
View notes
Text
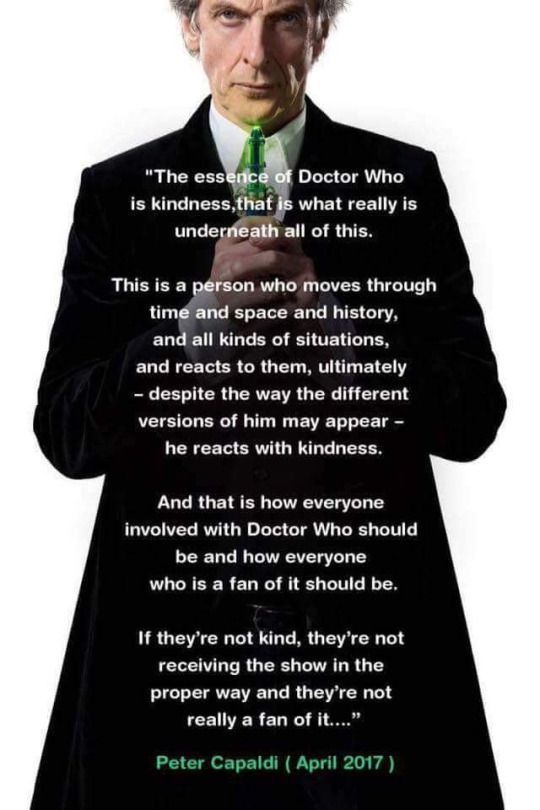
A Treatise On the Doctor

I don't know how to start this. Because I think of Peter Capaldi's words when he said that the only thing required to be a Doctor Who fan, is kindness.
I like 13 and think Chibnall is doing his best job writing the show.
So I struggle to write this because I am engaging against that very unkindness in the Doctor Who fandom, and trying very hard not to be angry back. "Allways try to be nice but never fail to be kind." But I've begun to wonder more and more if those who speak so loudly against the show really know what the show itself is about.
Enough of talking about other people though, cause frankly they're only important as set-up for this conversation. And again, I'm working kind.
So here's what you're gonna learn from this lifelong fan (and the best Tl;dr you're gonna get):
1. The Doctor sucks. From the very beginning. People complain about character traits now that have been around as long as the show.
2. Due to the Doctor's suckage, they tend to do more harm than good. (And because of this, most of the Doctor's "friends" along the way have been, well, let's leave it at the air quotes for now cause it's a damn big list of "BOOOO!!!".)
3. All of the showrunners and writers and actors and editors and everyone else has allways knows this and has played it this way.
4. And last but not least, since this is a time travel show. If you wanna know what and why stuff is happening now, look it up. Everything that happened before is allways in play.
5. None of this is bad, and in fact, it makes the show morally grayer. It's about kindness at all costs. Even your own.

A. First things first, the hard thing. The Doctor is not grrrreat. I mean, sure they try, but they fail a lot more often. In Extremis, a majority of those fatality index counts come from people the Doctor failed to save. That's why it's worded so specifically as "cause of death". All the death's caused by the Doctor's very interaction with time and lack of saving those around them. And part of it's not their fault, but more often than not, the Doctor says I can save you, and can't, won't, or chooses not to.
And that would be alright, but it took them over 1000 years to realize they should start letting their companions lead lives outside of theirs so THEY DON'T DIE. A bit too long as someone who claims to be better.
Not to mention how many times the Doctor is dismissive of their companions and the people around them only to use them for their help and just bug off again. If they truly cared and wanted to help, they would stay and listen in between adventures. Their lifespan is near infinite anyway. What's a few extra Earth hours with some friends you made along the way. You know, maybe fix some of the psychological and emotional damage created by encountering things behind a human's original scope of reasoning. But nope, we gotta go adventure more, byyyyeee!!

So when people talk about these qualities in 13 in a negative aspect I have to laugh because I'm not sure if they understand the joke. Cause we're talking about an alien that grew up around a species calling themselves Time Lords. I try not to blame them too much for it. 1 had to learn how to be hospitable to humans and it's been a bit of a slow learning curve ever since.
B. After the Doctor survived the horrors of the Time War and happened upon a human companion they felt worth connecting to, what did they do? They took Rose to watch her planet burn in front of her eyes. Great, first date, amirite?
And that's a little bit of companion damage. Do you know that the Doctor is responsible for the almost complete genocide of the Silurian race across multiple occasions. I am legitimately surprised there are any left after all of the ones the Doctor has killed. Like before, they cause destruction either purposefully or accidentally or simply by force of being there.
Remember before how I said that the Doctor just flies away. Yeah, they leave a lot of problems behind when they do (something that I can see Chibnall is planting the seeds of). If you had a time and space machine and practically unlimited capabilities and you choose to just leave after a situation and not check up on them from time to or see if there are any other underlying crises to be solved. But oh no, "gotta follow that rule of time and keep going even though I stopped in the first place because of how interested I was.". This is why 9 has a great arc about this. He thought he killed all the Daleks. They came back. He thought he'd gotten rid of the Slitheen. They came back. He thought he saved Satellite 5 from aliens. But opsies, they came back. And look! They're Daleks. Which he "finally" got rid of.
The Doctor just bounces around all carefree and without an ounce of care for themselves, their companions or consequences unless there's consequences for themselves or their companions. Then they get indignant.

Is that really kind of the person you want flying around fixing things in time and space? Who knows. But at least they are trying. Most of the time the T.A.R.D.I.S. lands somewhere and the authority figures are the most pretentious bull-headed pigs you can find. To me, I laugh cause it seems like both sides end up getting a taste of their own medicine. Usually with the bull charging to death in a sad glory while the Doctor wiles on metaphorically about not being as good as them.
But again, as a "superior" alien with "advanced" technology and "culture" you'd think they'd just know better already. But that's all part of the character. The Doctor may be in flux, but true change is difficult. The real hero of every story is the other people BESIDES the Doctor.
Cause the title is Doctor *Who* . The Who being half of the title, despite having less letters. It's the constant question of "What and why and who is that crazy person that's trying to help?" Why do you think they keep flying back to Earth? (Besides set construction reasons.) They've grown as attached to us as we have to them. And at this point, a lot of their saving us is guilt and embarrassment at having a hand in our timeline.
This is also the same reason the Doctor dumps companions in a fluff. Baggage. Every time a companion gets too heavy to carry the memories of... off they fly.
Except for 13. She's stayed. To this end, we can see how the Doctor changes. Not on our smaller, human timelines, but on the timeline of a god with way too much power.
D. With that in mind, we go Classic. It's the Who you need to consult if you wish to make any critique on what's happening now. Because how can you know how a part operates inside of a whole without seeing the whole part?
Cause I don't know if you've watched it but it can be rough, and I don't mean in the sense of production value (which admittedly they do a fairly decent job of using what money they had. A problem the BBC plagues to Doctor Who to this day.). The 3rd Doctor shits on every one they call friends constantly and then turns around expecting help. 4 did the same. Then 5 masked that contempt with a plucky face and a cheeky word. But it was still there, bubbling out of 6 and 7 as the inability to suffer fools gladly and using their own righteousness to enact change in their companions. A trait that kept going til an entire war and regeneration was used solving the question of "Doctor Who?" Only for them to try and forget twice more by putting on their pretty grinning faces and running away from it.
And I'm only talking from a companion perspective. Each of the Doctors has enacted their own form of genocide on countless species. Sure, it's to "save humans" but at the end of the day you'd have to ask yourself if we're really worth that blood. And this is all in the Doctor's history. As much as they claim better, they're hands are still gushing red.
The Doctor left Jo because she fell in love. They drove Adric to put their life on the line in order to feel adequate. The entirety of the Silurian race has been wiped out fivefold under their watch, with one time by their hand itself. Same for several other singular and unique species you won't be able to find elsewhere in the universe. 7 used time travel to enact a personality change in Ace while simultaneously using her as a pawn in an interdimensional war. The Time War itself. Sure it got erased but the Doctor still did those things ("War" Doctor or whatever nonsense titles they feel necessary to delude themselves). The entirety of Amy's childhood was destroyed by their presence, and Rory got erased. Twice! Sarah Kingdom. We know the list. Hell, the Doctor whisked Barbara and Ian away because they wanted to teach the snobby humans some lessons.
They may have a time machine, but we have the bill of their actions. This is where 13 excels. Because they're trying to be better than themselves. They've learnt the lessons of all those years traveling and the failures they wish they could reverse but don't as a way of keeping a scoreboard of pain. It's not perfect by any means, but look at 12 needing cue cards to understand and react to human grief under duress. They've come a helluva long way. After 50 years, I'm inclined to believe better. After all, it's what the Doctor would want.
E. You know how people like the ASOIAF series because it offers up morally complex characters existing in a morally complex world where black and white are harder to define than grey? Have you ever thought of Doctor Who as the same? Strip past the fairytale and adventure and "wibbly wobbly timey wimeyness and it's just people reacting to situations. We're just harder on the Doctor because they're hard on us. You could go round and round on who's the bigger killer, but at the end of the day Time Lords and humans fight and feel about the same things. It's allways been a joke to pretend otherwise.
That's why I love the Timeless Child. Not for making the Doctor anymore special but for saying that even despite having all of their specialness ripped away and repurposed to create a lie of a society then having the memory wiped of said event, the Doctor broke out of their mold, stole a TARDIS and told the Time Lords to fuck off. That's not a Captain America/Superman hero. That's Batman in space with a society of Lex Luthor's. Gotham and Gallifrey. The Doctor saw what they were a part of and broke free, without even knowing the more horrifying truth. Cause it's the thing I see many fans missing because they're so preocuppied with the Doctor being special. The thing that made the Doctor different was their ability to know the difference and walk away to find better. Now, the Doctor has a reason to go back and find out why they never stopped running.
The Time Lords might be the greatest monsters in the universe. It is in the name. "Lords". Those who would lord over us and impose their will with a banthium fist.
And this is a children's show.
C the thing is, the people who made and make this show all collectively rail against one thing: Hate. Kindness is the way of Doctor's. Even if they're sawing off your leg, it's to do the kindness of saving your life. This is because the people who make this (United Kingdomers) have seen centuries of war and conflict and oppression enacted by their own country in the name of progress. And they want to see it no more. Look no further than any of the Doctor's adventures with UNIT. Allways advocating for peace and being ignored for the comfortable war-cry. It's why it's hard to blame the Doctor when we do very similar and often worse (though we don't have time travel.... yet). The creators of this show know better, see better, and wrote better, to know that the powers that be nipped would nip their creations and sanitize them. So they wrote their messages so strong that you can feel them from the future. They're powerfull enough that even across eras they have all collectively moved me to write this.
That's another point I have to laugh at people saying Doctor Who has never been in your face about progressive politics. The Green Death. Survival. Trial of a Timelord (Yes, all of it. Sit down and power through.) The Happiness Patrol is one of my all time favorite episodes for going there in this regard. People may poo poo but history has its' eyes on you. Doctor Who loves taking potshots at the issues of the day. As long as you don't make the aliens black of course. Make them all the colors of the rainbow but never make them black. That'd be too on the nose (That's something they used to say back in the day! Crazy how far we've come).

So bravoa to Chibnall for continuing the legacy of Doctor Who. From where I'm standing, he's not doing anything different than any other showrunner before him. Cause if you want to argue canon, you at least have to know what created it. This show owes what it is to those Classic eras. And if you think Chibnall is shitting on those years and your childhood.... well, then why did you read this whole thing?
#doctor who#the doctor#jodie whittaker#peter capaldi#matt smith#david tennant#christopher eccleston#john hurt#paul mcgann#sylvester mccoy#colin baker#peter davison#tom baker#jon pertwee#patrick troughton#william hartnell#chris chibnall#steven moffat#russell t davies#mark gatiss#robert holmes#john nathan turner
41 notes
·
View notes
Text
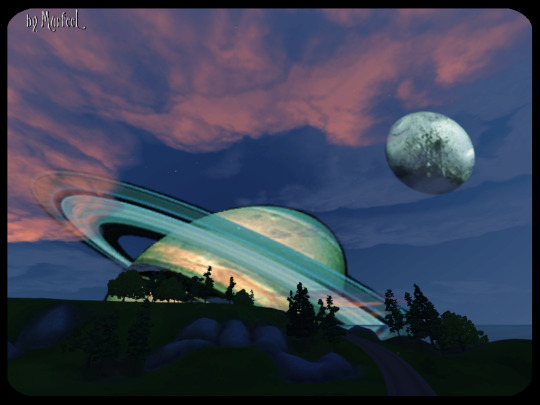
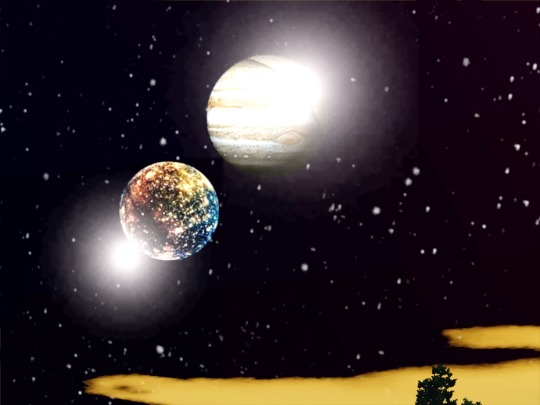
Double Moons - Default Replacement Mod
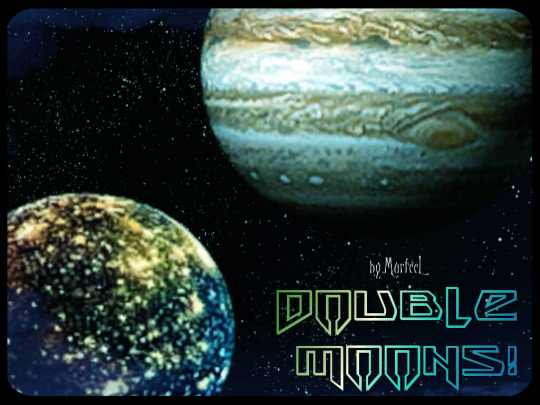
“One small step for simmers, one giant leap for Murf!“
I’ve always wanted something like this in my game, and my 2018 New Years Resolution is to learn to make new things, so here we are: double moons for y'all to use in whatever world you want! :D
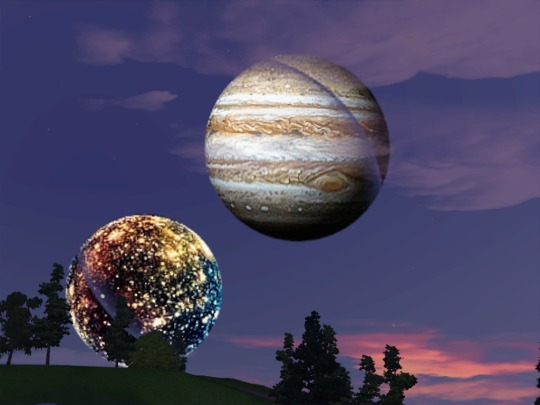
Jupiter and Callisto
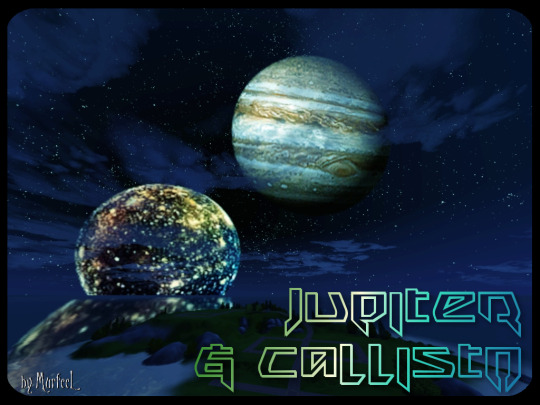
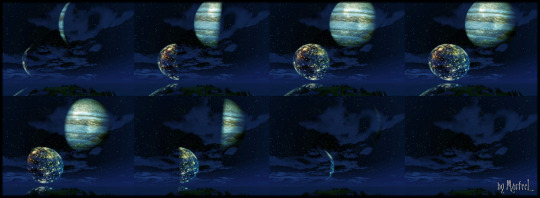
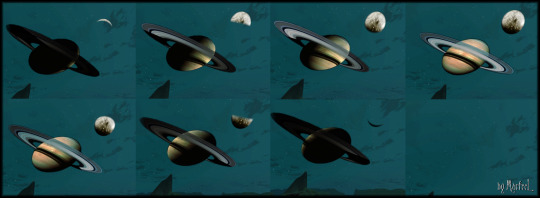
There’s phases included for those of y’all with Supernatural Lunar Phases turned on.
(HD view here)
Included is a 2000 and 4000 size file - the pics show only the 4000, which is effing huge in the sky -- you have zoom all the way out to see it all.
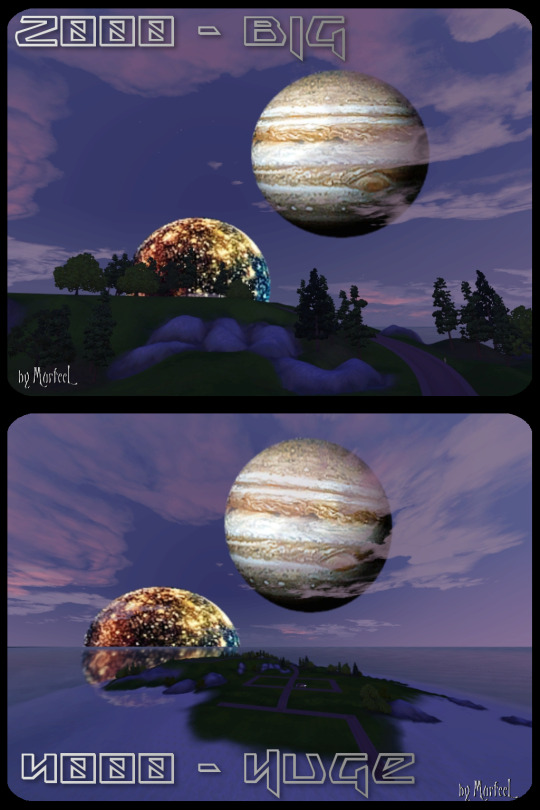
So, yeah, you get choices in case you want it to appear that your worlds closer (4000) or farther away (2000) from the crap in the sky.
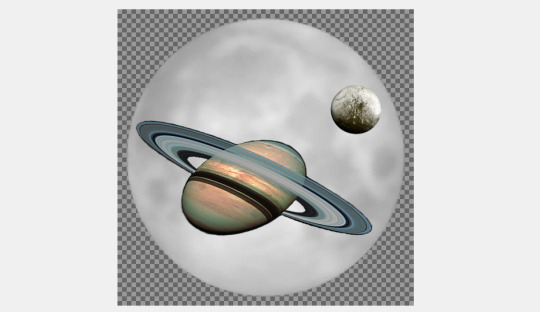
Saturn and Iapetus
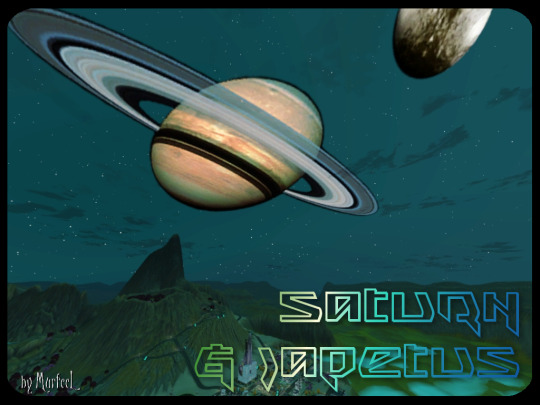
Included again is a 2000 and 4000 size file - the pics show only the 4000 flavor, which is effing huge in the sky -- you have zoom all the way out to see it all.
Here’s the only picture I took of 2000:
There’s phases included too for those of y’all with Supernatural Lunar Phases.
(HD view here)
For Saturn I converted a Skyrim moon replacement mod - I edited out the Earth from all the phases, and I changed the colors because I’m gaudy like that. Then I added Iapetus because reasons. :P
You only need the Basegame for this mod to work -- though you won’t be able to use any of the lunar phases without the Supernatural EP, just the Full Moon. Which is the best phase anyway, so who cares!
This will conflict with any mod that alters all these files:
YOU CAN ONLY USE ONE FILE AT A TIME.
Download 2000 & 4000-size moons (package files): SimFileShare
Download (beta version) 1000-size moons: https://murfeelee.tumblr.com/post/170633556094/so-murfeelee-asked-if-anyone-had-tried-out-her
And as a little something extra, I decided to make this post double (lol) as....
☽✶•.¸(✶•.¸★¸.•✶´)¸.•✶´☾ ☆«´¨`•°°•´¨`»☆ ☽.¸.•✶(¸.•✶´★`✶•.¸)`✶•.☾
Welcome to Murf’s School of Crap and Crap-Making!
School Motto: Prepare to be tortured! For Science!
Lesson #12: Jumping Over EA’s Moons to Make Your Own!
☽✶•.¸(✶•.¸★¸.•✶´)¸.•✶´☾ ☆«´¨`•°°•´¨`»☆ ☽.¸.•✶(¸.•✶´★`✶•.¸)`✶•.☾
I dunno about y’all, but I have never seen this done before; people making multiple moon replacement mods rather than just one. So I figured I’d walk those interested through the process -- though really it’s barely any different from making the zillion other moon replacement mods already out there.
All you need is S3PE and a .dds texture image program (GIMP/Paint.net/etc).
You can download EA’s moon textures in the MTS thread here.
Ready? Here we go!
So what you do is open up the EA textures in an image program -- on this new godawful Windows 10 Dell laptop I haven’t secured a pirated copy of Photoshop yet, so I’m settling on GIMP for the interim (which in my limited experience has been a piece of crap with DDS files. So I have to use Paint.net in order to make the dds properly, but yeah, I’m using GIMP right now).
So open EA’s textures -- start with the full moon one (especially for y’all without the SN EP).
Though this tutorial only covers making Twin/Double moons, it works for adding however many moons you freaking want.
And it doesn’t even need it to be round/moon-shaped!
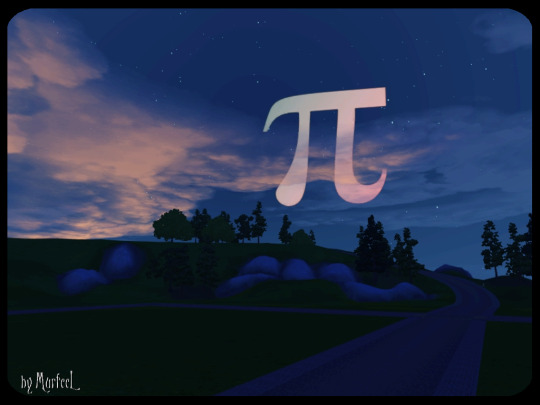
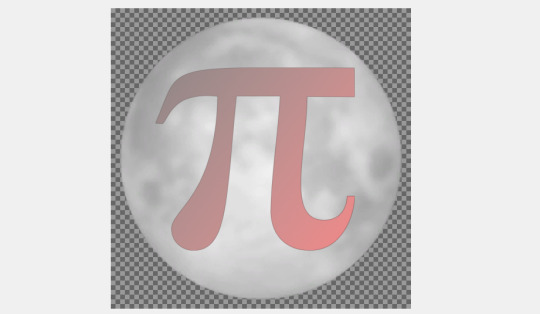
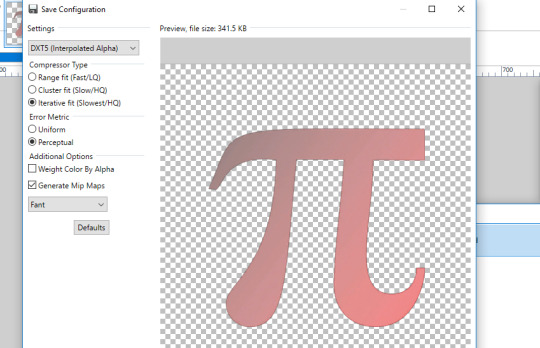
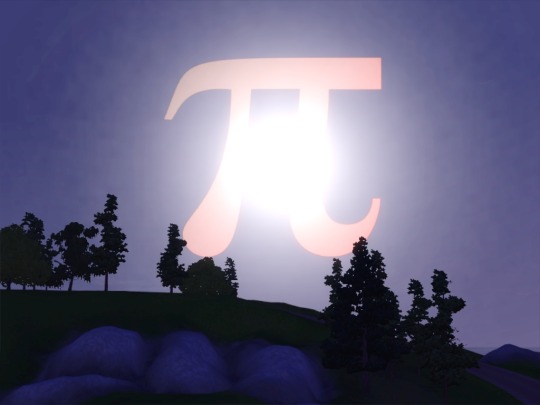
Pi in the Sky. Cuz I’m a little snot, that’s why! :P
(If you’re somehow desperate for Pi in the Sky, you can DL the beta version here -- there are no phases included, and it’s pink. Cuz of course. :P)
Size In DDS Layers
The key is to have your image fit inside the limits of EA’s default full moon.

If your image is too big and goes over the moon’s edges, you’ll end up with the BS cropping I initially suffered through:
Again: It doesn’t matter what image you use, as long as it fits within EA’s moon.
My Steps
This is nothing new for y’all familiar with making regular moon replacements. I just wanted to show how I do it in GIMP, cuz alpha channels in GIMP confused THE EFF out of me with all their Floating Anchor BULLSH!TE and I could barely find any help online navigating this nonsense.
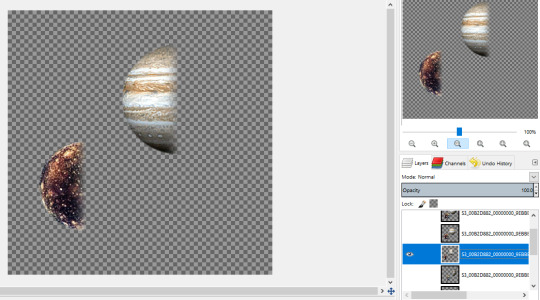
I did each of the moons separately, then pasted them together when I was done. So I’m only gonna walk through making one of the moons, not both - same steps y’all.
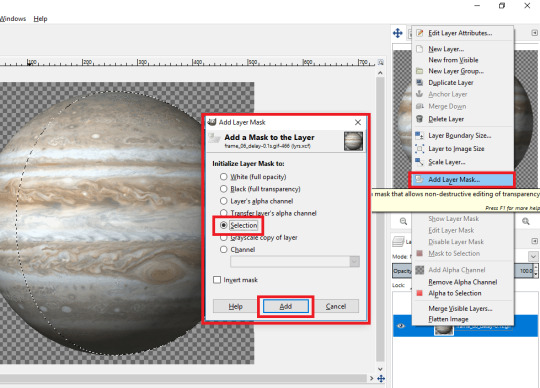
Start with opening one of EA’s moon phase images, then open your first moon you want to use. Make sure they’re the same size this time. It’ll look like this:

Now Hide the custom moon layer, and go into the Channels tab. Where it says Alpha Channel, right-click it and select Channel to Selection.

The little marching ants dotted lines will move around the image, so you’re good.

Go back to the Layers tab, and this time Hide EA’s moon and Show your custom moon, so you see the marching ants on yours.

Now right-click your custom moon’s Layer and select Add Layer Mask. It’ll give you a bunch of options -- choose Selection.
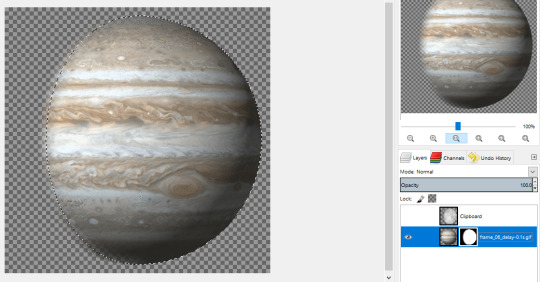
Wash Rinse Repeat for your second moon, arrange the two of them however you want on the canvas, then Merge the Layers together into one.
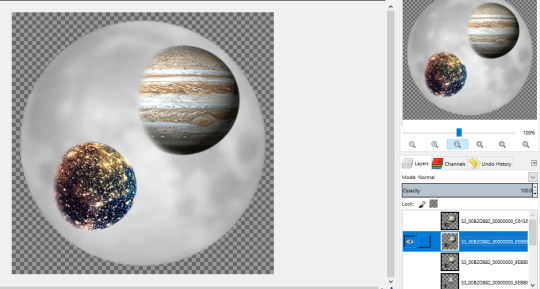
And remember -- when you’re done you have to rescale everything so they fit together within the frame of EA’s full moon.
The texture resolution quality is gonna BAIL on you, so you’ll need to use stuff like Sharpen and Contrast, in order to bring back some of the original quality.

It’s a bit tedious cuz you have to do this for every effing phase (7 phases -- the New Moon one stays clear cuz duh).
When you’ve got your phase finished, and you’re ready to save it as a DDS file, there’s an issue. In Photoshop and Paint.net, what you see is what you get when you save a file. DDS files need their dimensions to be multiples of 256 or whatever -- 256x256, 512x512, 1024x768, 2048x2048, etc. Try any other multiples, and things like TSRW will crash on you -- quickly.
So here comes GIMP when you try to save a dds image with a transparent background: rather than just saving the image as it is, GIMP will for whatever reason wrap around the actual image, not the whole canvas. So when you save it, if your image is only 325x418 on a 512x512 canvas, then 325x418's the dimensions GIMP’s gonna save your dds as -- WHICH IS BAD!!!
I have ZERO clue how to fix this issue, so what I’ve done is save the images as a PNG, since GIMP saves them with the transparency and dimensions just fine. Then I open the png in Paint.net, and export it out as a DTX5 dds.
THERE! Boom! The precious time lost scratching my frikkin head over GIMP’s strange way of dealing with Alphas!
Size In-Game
Now as you can see, your finished moons are gonna be however many multiple times smaller than EA’s moon, even if you use 512x512 dimensions rather than EA’s standard 256x256.
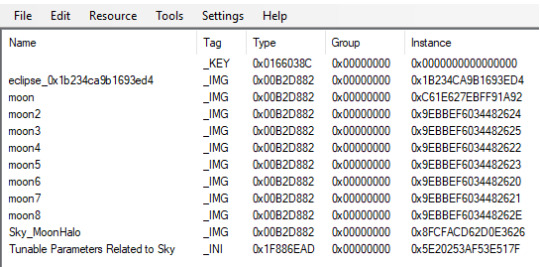
You fix this in the SkyCommon.ini file that alters the Moon Radius parameters.
(S3_1F886EAD_00000000_5E20253AF53E517F_Tunable Parameters Related to Sky%%+_INI.ini)
Find EA’s in something like C:\Program Files (x86)\Electronic Arts\The Sims 3\GameData\Shared\NonPackaged\Ini.
Import it right into S3PE, right-click it, and click Notepad, so you can edit it.
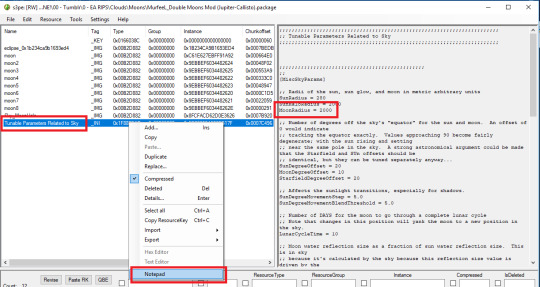
The only thing you need to touch is where it says Moon Radius = 200. Increase the number and the moon looks bigger in-game. Decrease the number and the moon size gets smaller.
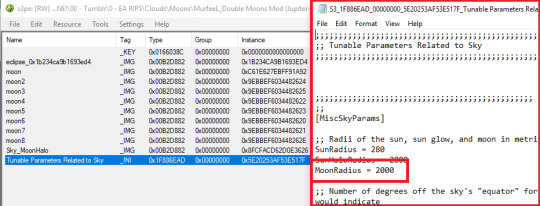
If you’re squeezing all these moons into your dds, and you’ve got like 2 moons that are 10x smaller than EA’s moon, then you should increase 200 to 2000 -- that’s my mindset.
Whatever number you choose, when you’re happy click Save and exit out of Notepad, and it’ll ask you “Resource has been updated. Commit changes?“ so click Yes. Then Save your package again.
So that’s the whole size & texture thing. ^_^
The Glow Thing
You‘re gonna have to modify EA’s Moon Glow texture so that it’s perfectly transparent.
(EA’s default one is included in the MTS post here. I included the clear one I modified in the DLs.)

Otherwise you’ll end up with this hot mess:

I tried to do The Most and actually make a real edit of the glow -- but it was actually The Least. U_U
Just freaking get rid of it, whatever.
So yeah, when you’re done, just open up S3PE and Import in all of the .dds textures, plus the .ini. S3PE will then auto-generate a _KEY file for you, just leave it. Save your work as a package file, and that’s it!
Now go forth and do the moon walk! (^0^)/

103 notes
·
View notes
Photo
Lately, I have received several messages here on tumblr asking: How do you do it? How do you colour gifs? What? How? Whaaat? So… I decided to share some of my deepest secrets and commonly used technics with you. Be my guest.
I would like to stress that this is not a step-by-step tutorial. There are tons of there on tumblr already, I don’t think there’s a need for another one. What you are about to read is a list of my personal tips. Having said that, please note that there are million ways how to make gifs. Everybody has their own unique style and that is amazing; that is how it should be. Maybe you will find here something useful, maybe you will not.
To be honest, I can’t colour properly. I can’t make bright, vibrant, high contrast gifs. Whenever I aim for them (and I really do that from time to time), it’s a disaster. That is why I use all those below listed hacks; to cover the fact that I can’t colour the way everybody else colours. Welcome to my personal Photoshop hell.
Oh, and one more thing, before we really start. It is vital to acknowledge that everybody has a different monitor with different settings. You might spend hours colouring a gifset and be really proud and satisfied with it and then you look at it at your friend’s computer and just go FUCK! Suddenly, your perfectly coloured and balanced gifs are too yellow or blurry and everything is runied. Well, you must count with it, although there is nothing to be done about it, I guess.
~~~
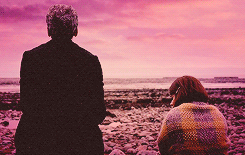
Let’s start with the most important rule ever. The golden rule. Number one rule. It has been said many, many times, but I must repeat again. Are you ready? NEVER use one colouring on two different scenes. This barely ever works. If you make a nice PSD, of course, save it, but be careful about using it on different scenes. Every scene is very individual – the lightning is different; the basic colours are different too. I recommend everyone to colour every gif from a scratch, it does pay off. You asked for a proof? Here it is.
I coloured this lovely scene from the The Rings of Akhaten.

Then I thought that I might use the same PSD on a different scene. Let’s say I’d like to colour a scene from Dark Water; the one when Clara stole they keys. Both are orange-based, right? What could go wrong? Here is the result without prior editing.

Ewww, ugly, so ugly.

Even though I made it brighter and did not touch the actual colours, it doesn’t do the scene justice.
~~~
Technical background
To extract frames, I use KM Player. For the actual giffing, I work with Adobe Photoshop.
The better the quality of the video you extract is, the better your gifs will look. That’s quite a simple, yet important fact. I usually use 1080p, sometimes 720p, but never 480p. Working with original DVDs is, of course, the best way, if you have a disc drive.
When extracting the frames in KM Player, I extract every or every other frame. Both are fine, but don’t forget to change the speed of the gif accordingly. I use 0,9/0,1 for gifs with every extracted frame, 0,12 for the other options. Oh yes, I like my gifs to move slooowly.
Rescaling
This way of rescaling might be caused by the fact that I can’t do it properly; so I came up with my own way. When I was younger, in the old and dark days of my Photoshop adventures, I used Image Size to make my gifs smaller. But it didn’t quite work out. Years have passed and I discovered that using Canvas Size + Manual Scale is much better. How do I do it?
In Canvas Size I choose the dimensions I want and then rescale the gifs manually by Edit > Transform > Scale. Do not forget to hold Shift to contain the proportions! FIRST rescale your gif, THEN convert it into timeline and smart objects. If you do it this way, the gif will be neat looking. Why do I do it anyway?


The first gif is was rescaled my way. The other one was not. Can you spot the difference? I think that the first one is neater and cleaner.
Oh, and one more thing. When I rescale my gifs, I always make sure that it is one or two pixels bigger than the canvas itself. When you sharpen the gif later in the process, you will not have to put up with those ugly oversharpen edges.
Sharpening
Here’s how I do it. Enough said.

Colouring
Now this is the tricky part. It always depends on the scene you are colouring, but I don’t use many tools to colour a gif. Six or seven layers and I am done.
I always start with Curves/Brightness and Contrast. I think it makes sense to first adjust the brightness and play with the colours afterward.
I never use Vibrance. Why? Vibrance works with all colours at once and that is the main problem. I think that the best way is to work with the colours separately.
If you want to make a certain colour brighter and more vibrant, use Colour balance and Selective colour instead.
Work with Colour fills. They can do miracles! And I’m not even exaggerating. Work with different opacity settings and opacity fill. My most favourites are:
Lighten/Screen

Multiply/Darken


Soft light

Black and white gifs
That is impossible to colour, damn it! What do I do, I tried everything, but it still looks so crappy! The other gifs are fine, but this one looks horrible? What do I do???
Yeah, what do you do? What do I do? I make it black and white. ¯\_(ツ)_/¯
Yes, it might be considered lazy, but it, is fact, lifesaving. And I do think that taking this risk or whatever you people call it, can make you gifset more interesting. Again, try to play with colour fill to make the gifs look softer.


Using a texture
Textures are my best friends. And I really mean it! They can help you hide those ugly visible pixels in dark gifs.

If you want to use a texture on a gif (as I often always do), applying it should be the first thing you do. The texture will always be present and you must adjust the rest of layers to it. I usually use Lighten or Screen setting. And don’t forget to play with opacity! It can make a big difference. But always make sure that the texture is the TOP layer.

Saving
When I save my gifs, I use the following settings. I think that almost everybody uses them. In case you need them anyway, here you go.
Putting a gifset together
To be honest, this, after all what has been said above, is the most important thing to me in the whole giffing experience. I can’t just sit, open my laptop and think: Hmmm, today I might gif something from… let’s say The Name of the Doctor, pick up eight random scenes, colour them separately, put them together and click publish. I just can’t do it. I must plan every gifset to every single detail. I think about the colour scheme, proportions. I combinate, experiment, put a gifset together one by one until I am fully satisfied; until it is perfectly balanced in every aspect. If you think that it takes a lot of time, you are right! But in the end, it is worth it, because the results will be… well, not bad. Example one / two / three.
~~~
And that’s it, my friends. Don’t forget – don’t be afraid to experiment! Look at me; I started with this. And look where I am now. Everybody can make an improvement. Make special gifs, look for new ideas and methods, look for interesting parallels and, most importantly, have fun! :)
(So… what do you think? Was it OK? Helpful? Interesting? Share your thoughts and comments!)
230 notes
·
View notes
Last Seen Blogs

themantidy
MANTIDY
milkywaywtf
Milkywaywtf

spider-man-across-kmunanya
(CB01) — Spider-Man: Across the Spider-Verse Streaming-ITA sen

towingservicecirclepines
Untitled
svmmerlovex
svmmerx