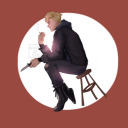
#i used a soft pencil brush as opposed to my usual hard marker and it looks all loosey goosey
Text

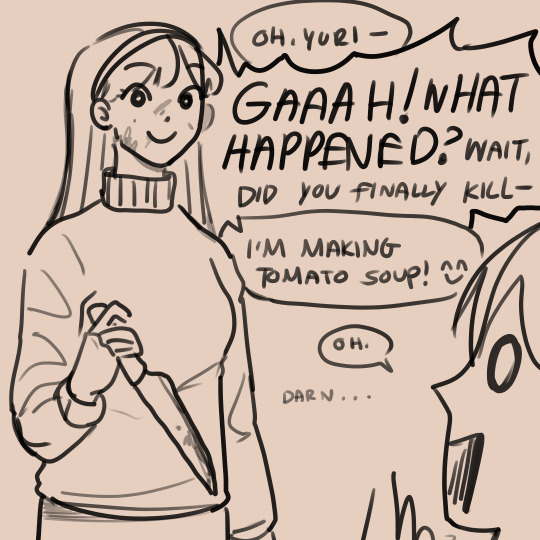
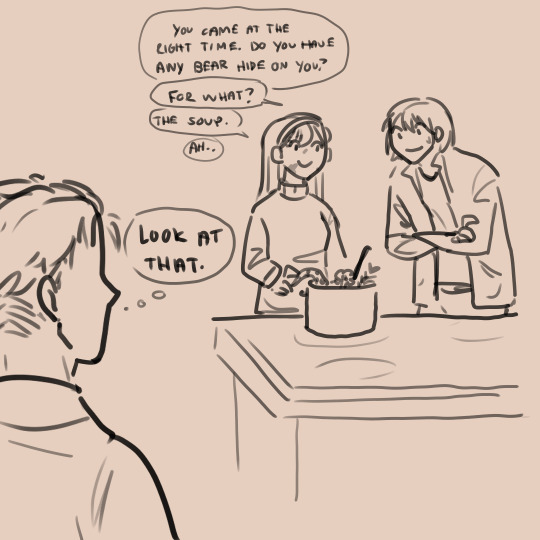
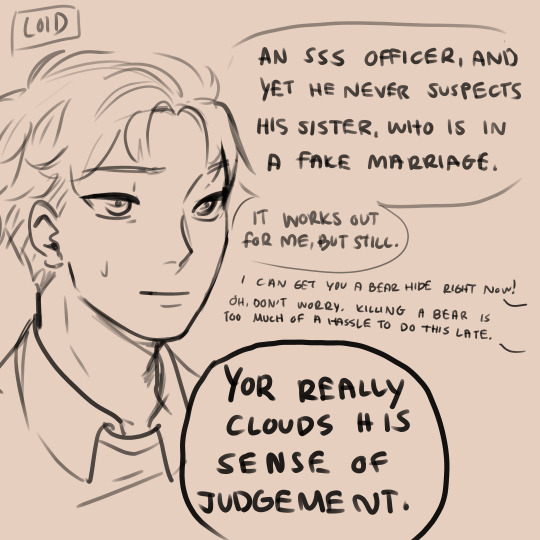


loid is the master of irony
#i used a soft pencil brush as opposed to my usual hard marker and it looks all loosey goosey#spy x family#my art#loid forger#yor forger#sxf#twiyor#my comic#sxf loid#sxf yor#yuri briar#sxf yuri#loidyor#loiyor
6K notes
·
View notes
Photo
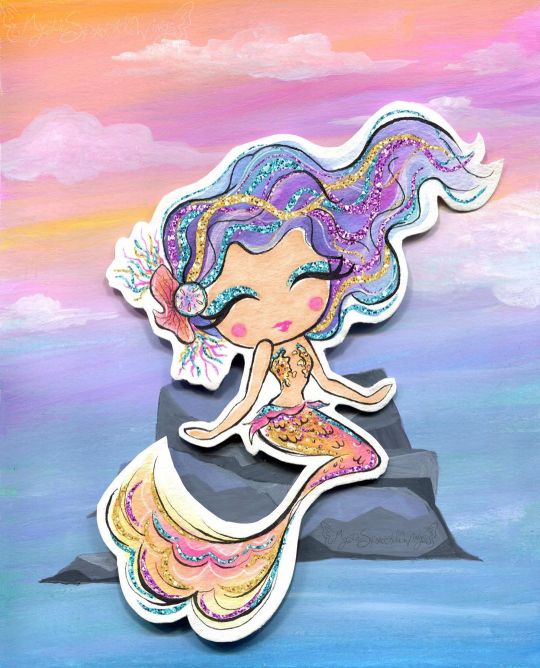
Sparkle By the Sea
Pardon me as I just barely squeeze a MerMay piece of art in.
I'll be honest with you guys, I've been pretty lacking in artistic motivation since NaPoWriMo ended. Although if you've noticed my lack of uploads, you probably could've already guessed that. This isn't abnormal for the aftermath of a month-long challenge for me, especially with a brand-new video game calling my name at every moment of the day, but even so I feel like this particular motivation drought was a bit different.
Part of it definitely had to do with the changes to DeviantArt that I'm sure I don't need to remind everyone of, but that's been more of me dreading seeing what the state of the community is than anything else. (However, I have noticed I'm not a fan of the new tag system over the old category one, as confusing as the category system could be sometimes.) Rather, I think this lake of motivation has more to do with the fact that being largely absent from all social media during NaPo reminded me...well, that I hate social media.
This is really a bigger discussion for a journal or something, but suffice to say it did not feel good to realize just how many literal hours I had previously been spending trying to desperately to scrape up just a little bit of support on other social media platforms (namely Twitter), versus the more natural growth I see here on dA that also feels a lot more genuine and less forced/obligatory.
I can't really explain it, but that reminder/realization really helped my brain slip back into a place where I felt like creating again. And with that, I'll transition into talking about the art and save the social media talk for, as I said, a journal or something later on.
Naturally, I've been seeing a lot of mermaid art this month and every year I feel the urge to get in on the fun, though I know better than to try actually doing the MerMay Challenge (especially not this year after having just done NaPo), so I usually either do a one-off drawing or if I'm too busy with other projects I just skip it. But I was starting to feel that need to make art in my brain again and I've had a specific set of stickers from the dollar store sitting in my stash for quite a while now that more or less sealed the deal for me.
How do these stickers fit into the mix? Well, I originally fell in love with/picked them up because they are mermaid-themed and absolutely adorable--See for yourself! And I thought they would make for nice decals in a book project since they're wall stickers and therefore repositionable with minimal adhesive-yuck. And at first, I thought maybe I'd end up making them into said hypothetical book project in time for MerMay...except that felt a little cheap in combination with my lack of uploads. Did I really want to come back with a book project featuring mermaids I didn't even draw? And for MerMay of all things?
So I sat on the idea and left the stickers out where I could see them, and eventually I sat down and took a closer look at them. The art style, upon further inspection, actually didn't look like it would be too far outside my usual art-making realms...Most of the coloring looks a lot like watercolor, except for the skin which I thought was flat and smooth like alcohol marker and the glitter accents which from my perspective pretty much had to be digital, but could potentially be replicated with glittery/metallic supplies...
And that was the moment the idea hatched. I decided I'd try drawing a mermaid myself in the same style. This would work for MerMay, have something to do with the stickers, and based on my plans would work well for me as a mixed-media project, which as I'm sure I've said before is where I think my artistic talent shines best.
I thought the scariest part was going to be replicating the looser and less strict line style, and to a point it was, but it wasn't nearly as bad as I thought it was going to be. I find it's usually kind of tricky to explain this, but really what this part of the process boils down to for me (if I'm replicating an existing style and not using my own), is really just studying the original artwork(s) and looking for patterns, then trying to stick to those patterns. For example, the style here features fairly large & rounded faces, and the hands are more like hand-shaped mittens (which was great news by the way because hands are always a pain in the butt for me), so I did my best to emulate those features.
As per usual, I did start with a sketch, but I tried to keep it looser than usual, and then when I did the inking I started with my 0.2 Micron, again trying to keep things loose and no be too fussy if I could help it. Then I went back with a brush tip liner from Prismacolor to get more natural variation in the lines and to force myself to not have quite so much control over the line weight.
I was also very careful with my choice of liners because I knew pretty much everything except the skin was going to see a lot of watercolors, which meant the lines had to be waterproof. And of course, I went with watercolor paper (my nice 100% cotton stuff this time) to make sure I didn't have any issues with blending or layering.
Now, at this stage, I didn't know what I was going to do for the background, though I was leaning towards the idea of making one separately and placing the mermaid on top afterward, as sort of a nod to the original mermaids being stickers. But I wasn't totally sure yet.
What I was sure of was how scared I was to just dive into coloring. The sketching and inking and gone so well I was thinking I was in for a rude awakening at any moment. So, just in case, I scanned my uncolored lines as a fall-back if I royally screwed up. With my paranoid mind set at ease (for the most part), I could begin with color application.
I started with the skin since it was the easiest; Just one good layer of alcohol marker, leaving a little white space here and there like the artwork I was emulating. Although 1. The marker color turned out a bit darker than I was expecting and later blended too well with her tail, so I had to lighten it in Photoshop, and 2. because watercolor paper really soaks up the ink, I ended up with less white space than I thought I would. But beyond that, this step went off without a hitch.
So then came the second-scariest part: The watercolor. I used a mixture of my Master's Touch watercolors and Mermaid Markers (yes, that was a very conscious supply choice ) and tried to take my time and be mindful of the color balance I was looking for.
I'd decided ahead of time that I wanted to try and stick with a soft-ish palette like the original art, but I still wanted my choices to be different. Since yellow/gold is featured in the original but not used for a tail color, that's what I went with, and I opted for the blue-y-purple hair since a soft blue and purple are also prominent in the original and based on color-theory would be a nice contrast to the gold-orange tail. Though I did also try to get some pink in both the tail and the hair for a bit of unity and calling back to the pink in the original art.
The trickiest part with the coloring was actually the tiny lips and blush spots. I ended up using a fluorescent pink for that turned out as more of a red originally and had to be touched-up via Photoshop because of that and also because of the lightening I did to the skin. It's more that it was a bit of a challenge to get the shapes of these much smaller areas right and in the correct place, since I had to use very minimal pencil markings, lest I end up with nasty graphite marks mixed into the paint.
Getting the hair to be dark enough without being extreme compared to the rest of the drawing was also a great test of patience, but it ultimately worked out, I think.
I also had a hard time deciding what color the piece of coral in her hair should be, which is why it ended up as this vague dusky-orange color. And I got more pink on the sand dollar next to it than I intended, but neither of those things is a huge deal.
While I waited for all that to dry though, I had to decide how I was going to go about tackling all that extreme sparkle the original art had. I could have just added it in digitally and not even attempted it traditionally, but everything else had gone so smoothly that I decided to push my luck this time.
Originally, I started with just glittery gel pens, but I found pretty quickly that they were sinking back into the colors underneath them too much and thus just weren't doing what I wanted. I wanted high-impact sparkle. After some brief consideration, I turned to the metallic watercolor sets I have made by Art Philosophy, which are very high-impact metallic and pretty opaque, which would work well over my failed gel pen and would work wonders for the areas where I wanted that high-impact over an opposing color. (I.E. Where I wanted the blue sparkle over a very orange-yellow area, which would normally make brown mud if the color on top wasn't opaque.)
The funny part about that is that I originally used a different shade of purple and gold for those areas of sparkle that I ended up completely covering with different shades (the purple needed to be lighter and the gold needed to be darker/more gold and less yellow). And her eye shadow cover saw all three colors before I settled; The purple just seemed wrong, and the gold blended too well with her skin. I thought the blue wouldn't work so close to her blue hair, but it actually ended up looking the best out of the three.
Although, I do have to make a full disclosure that the high-impact sparkle you see here is in fact where I went in and re-did it digitally once I scanned the artwork in. Unfortunately, glitter and metallic supplies just don't scan very well and usually end up looking too dark, dull, or flat by comparison. The metallic paints work just fine in person since you can move the art and see how they reflect the light, but it just doesn't work in a still image that's been captured by having a bright light uniformly shined over it.
Still, re-tooling the sparkle digitally ended up being an interesting challenge, especially since it's been a fairly long time since I was messing with digital textures like this.
Also worth noting is that I had to re-paint some of the metallic areas because they weirdly lifted off onto the plastic cover I used to protect the art when I pressed it onto the background to make the glue stick. I'm not sure if it's because those were the extra-layered areas and they hadn't fully dried all the way down to the paper, or if that particularly plastic just picks up this metallic paint really easily or what.
And speaking of that background...
Like I said earlier, I wasn't really sure what I wanted to do for a background for a while, but after reviewing my mermaid-centric Pinterest board I decided a simple rock seat and something to vaguely suggest the ocean/water without getting too detailed would suffice just fine. Based on that, I felt like using gouache would work nicely (and I just really felt like using the gouache since I don't find a lot of opportunities to use it) and that a color scheme that flipped her hair and tail colors would be best for the effect I wanted.
I've found I really like the Strathmore 400 series mixed media paper for gouache because of how smooth it is, so I cut a piece down to size and got busy.
For the most part, I just kind of went in with the colors doing whatever felt right, and trying to use some gouache I'd already mixed from past projects (since gouache can be reactivated and I've found this kind, in particular, seems to reactivate really nicely) either on their own or to mix the colors I felt like I needed. And I also tried to do a lot of blending straight on the paper to get more variations in color and make things a bit more lively.
Oddly enough, this ended up being a good example of gouache's covering power because I accidentally started applying the colors upside down--using more greens and blues on top and more pinky-purple on the bottom--and not only had to flip the paper around but also had to do a fair amount of covering the colors I'd already put down with colors you don't really want to mix with them because they don't make very pretty results. But it worked out just fine, so yay!
I also added some clouds for a little extra ambiance, which I think looks quite nice.
Believe it or not, the most difficult thing about the background was the rocks. I spent far longer than I care to admit (or bothered to document, for that matter) trying and in many ways failing to mix the proper shades of gray I wanted, and the end result didn't turn out quite as clean and graphic as I had hoped, but by the time I put the mermaid on top, you really can't tell because you can only see a fraction of what's actually there. And I mean, the end result isn't terrible, it's just not quite what I was picturing in my mind's eye is all.
Personally, I know it's kind of an odd choice, but I really like how there's no defining line between the water and the sky, and yet you still get a clear idea that they're separate and the rocks aren't just floating in space. I'm not sure how, but I think I'd like to work with this kind of ambiguity more often. It's like a step between abstract and more structured art.
Anyway. With the background done, the next step was to attach the mermaid, which I felt like doing in a more 3D and less flat manner, so I chopped up a cardboard box that previously held a chocolate bunny I had on hand and glued some pieces together to boost the mermaid up a bit. This where those deep shadows between her and the background are coming from.
Here I feel the need to insert a comment about how difficult it was to get my tacky glue to dispense the glue for me, though there's a chance this is because I need to poke the opening in the tip to be a bit wider. (You have to poke it open yourself and I always felt like I never did get it open quite enough...unless you like strenuous hand exercises...)
Of course, once all the above was done then I had to scan the art in, which I was admittedly a bit nervous about after the incident with the plastic cover peeling off the metallic paint (though fortunately, the scanner glass didn't have the same effect), and then all that was left wad the digital retouches.
Overall, I'm really happy with how this turned out. It doesn't blend in as well as I originally wanted it to with the original art, but in the end, that doesn't really bother me. It's just a nice piece of art on its own that is also unique from what I normally do...except it's still got a lot of similar elements to how I normally make art. It feels a lot like the days when all I made was fanart. The key difference here is that I know myself better as an artist now and thus can use that knowledge to my advantage.
I can't promise this a return to regular posting for me, though I do hope it's a gateway to me posting more frequently at least, but I can say I do intend on getting back to working on art more often and therefore being more present online again. At the very least, I can happily tell you guys that I have a couple of new art supplies en route to me that I've been wanting for a while and am excited to share with you once they arrive. If nothing else, we at least have that to look forward to!
____
Artwork © me, MysticSparkleWings
____
Where to find me & my artwork:
My Website | Commission Info + Prices | Ko-Fi | dA Print Shop | RedBubble | Twitter | Tumblr | Instagram
1 note
·
View note
Text
My Makeup List
This is a list of all the makeup I own. Some of this makeup I love, and some I don’t. I would certainly not recommend just going out and buying this makeup list, or even the products I like from it, because everybody’s face is different. This is just to show you what a fairly average full kit of makeup looks like.
You probably don’t need all of this, but after a few years of wearing makeup, you end up with all of it. I am very good at throwing out things I don’t use, so I use everything on this list, but some of it pretty rarely. If you have any questions about what all of this is, my Makeup Glossary will probably have the answer.
Eyeshadow
Covergirl Eye Enhancers in Blushing Nude
This was my go to eyeshadow palette for a while. It only had four colors, but I wasn’t getting too adventurous. I am out of one of the colors on it and don’t end up using it much anymore.
Maybelline Palette in The Blushed Nudes
I have a thing for blushed nudes. This is a twelve color palette as opposed to four and is slightly higher quality than the Covergirl eyeshadows. It is my new everyday palette because there are so many looks, but they all are in one consistent style.
Maybelline Expert Wear Eyeshadow in Night Sky
This is a black eyeshadow I use for really smoky looks occasionally. More often, I use it on a very small brush to darken up and matte down shininess in my eyeliner.
Mascara
Maybelline Lash Sensation
I got this as a waterproof mascara to use at the pool and beach. It works well for that, but it’s hard to wash off so I don’t wear it when I’m not swimming. It doesn’t have the volume of my other mascaras.
Maybelline The Rocket Volume Express
This was my everyday mascara for a long time. It created a lot of volume. It did have a small problem with clumping which, while not bad, is the reason I moved on. I still use it for nighttime looks like clubbing and concerts.
Covergirl Lashblast Volume
This is the new iconic mascara you see everywhere now. The orange tube. I just switched to it because it is both waterproof and high volume. It is not quite as high volume, so no clumping problems, and not quite as waterproof, so it washes off easily. I still use my other two for swimming and clubs respectively.
Eyeliner
L’Oreal Carbon Black Telescopic Liquid Liner
This was my standard liquid liner for years until I finally splurged on a high end eyeliner. It is a great liner, but it takes a while to dry. It dries a slightly shiny black, like graphite, so I would do a small bit of black eyeshadow over it afterwards. It’s great for a drugstore liquid liner.
Stilla Stay All Day Liquid Liner
This liquid liner dries in ten seconds and is an incredibly deep black. It’s so waterproof that it doesn’t come off when I shower, I have to use makeup remover wipes or lotion or coconut oil. It’s easy to control and makes wings a breeze. I was hesitant to buy high end eye makeup, but it was one of my best purchases
Revlon Colorstay Eyeliner Pencil
This pencil has a built in sharpener and smudger. It’s a fantastic black and stays on the lash line much longer than most. I use it for subtle looks where I don’t want liquid liner, or for my bottom lash with liquid liner, since you cant use liquid liner on your waterline.
Rimmel Soft Kohl Pencil in White
This is a white eyeliner I use on my bottom waterline when I want to make my eyes look bigger. I think it looks a bit unnatural during the day, so I’m probably buying a peach one soon. As for now, I only use it at night for special events and clubbing.
Eye Primer
Elf Sheer Eye Primer
This is a quick and easy eye primer I use for more subtle nude eyeshadow looks if I’m concerned I’ll be sweating. It really doesn’t see that much use.
NYX White Eyeshadow Base
This is the primer I usually use. It’s a thick paste that i put on in a thin layer. Because it’s white, it really makes colors pop. I use it with nude eyeshadow to make pinks really pop out. It doesn’t work as well for smoky eyes, but it’s still my go to.
Foundation and Powder
Japonesque Luminous Foundation
This is my most expensive bit of makeup. It’s so important to get a foundation that is a perfect match for your skin, and sometimes you get lucky and can use revlon, but sometimes you have to splurge for something more specific. I love this foundation. Even professional makeup artists have been surprised when I told them I was wearing foundation. It’s practically invisible.
Rimmel Stay Matte Transparent Pressed Powder
This powder doesn’t leave much of a color. I just use a very small amount for making my nose less shiny and for prepping my pores for foundation. It is perfect for a subtle powder that you will be using in conjunction with a foundation.
Wet n Wild Coloricon Bronzer in Reserve Your Cabana
I use the bronzer as an all around powder and highlighter to pull attention to the center of my face. I’m probably not going to be buying it again, opting instead for my full contouring kit, but it worked well while it lasted. It could be a bit too shiny sometimes.
Base Makeup
NYX Incredible Waterproof Concealer
I use this on the occasional skin blemish, but usually I use it as an under eye concealer. It blends very well for a stick concealer. I wear it almost every day.
NYX Tea Tree Balance Skin Elixir
This is my primer. I put it on before I do any base makeup, no matter what. It makes my skin look and feel great, and makes my makeup pop. The tea tree oil is good for blemishes, too. It’s a must for me.
Contour and Blush
NYC Smooth Skin Bronzing Face Powder in Sunny
This is a bronzer widely used for contouring. It has great color for it, but I eventually got a bit tired of blending it, as it tended to settle in my foundation quickly, and took a while to blend out. I still use it for broad contours.
ELF Contour Palette
This is my first contour palette, and I like it so far. I still use bronzer occasionally, but this is much better for my jawline, right under my cheekbones, and my nose. The highlighter works particularly well.
NYX Powder Blush in Dusty Rose
I always buy new blushes and then don’t use them because this one works so well for me. It’s my only blush and the moment. When I run out, I’ll experiment with some others, but probably also buy this one again.
Brows
NYX Eyebrow Marker in Medium
This has been my go to for eyebrows for a while. It is subtle and natural looking. I can put it on in small strokes that mimic my brows. Most people can’t tell when I wear it.
ELF Gel and Powder Eyebrow Kit in Medium
This is great for a less subtle brow. This is what I use for more stylized looks. It can be used for subtle looks as well, but I have been falling back on my eyebrow marker for those subtle looks still.
Lipstick
Covergirl Lip Perfection in Hot
This is a bright red lipstick that I love. I don’t use it much anymore, because I have a copy of the newer version, but I take this one with me for traveling.
Covergirl Colorlicious in Hot
This is just the new lip perfection. It’s the same bright red color. This is my everyday lip color. I know most people don’t usually go for reds as a daily look, but I love this red so much.
L’Oreal Color Riche in Tropical Coral
This was my go to lipstick when I was still scared to wear reds out. It was pretty natural on me, but tended a bit too pink. I still use it on rare occasion if I need some variety.
Lip Liner
NYX Lip Liner in Bloom
I use this as a lip liner that I smudge in for gloss only looks, but I also sometimes use it on my whole lips as a lip color. This is close to my natural lip color and so if i need something more subtle than red, it’s a good choice for me.
Covergirl Lip Perfection in Passion
This is the lipliner that matched my two covergirl lipsticks I like so much. Unfortunately, this pencil is almost impossible to sharpen. I end up not using this much, opting to brush on the lipstick around the lines first.
Rimmel Lasting Finish in Cherry Kiss
I like using a slightly darker lip liner and smudging it into the lips as a sort of lip primer. I only wear it at night. I put on my lipstick with a brush, and it’s an intense lipstick, so I don’t wear liner during the day.
Lip Gloss and Balm
Revlon Colorburst in Bordeaux
I don’t wear this lip gloss often, but it gets some occasional use. It’s a dark color but goes well over red. I use it for darker and smokier nighttime looks.
Rimmel Stay Glossy in Clear
i don’t like putting colored gloss over my red lipstick, so I usually do this one. It really makes the colors under it pop.
Revlon Super Lustrous in Firecracker
This is a bright red lip gloss that I use with my red lipstick at night sometimes. It’s a pretty solid red, but because it doesn’t have the same type of purple undertones you can get in a lipstick, it looks a bit orange in the light. At night its just fine.
Unknown Lip Gloss
I don’t know what this is. It was given to me by a friend in high school and has no labels. It tastes like oranges and is really shiny. I sometimes use it by itself for nighttime looks, but the glitter’s a bit extreme. It pretty much only ever gets used at the club.
EOS Smooth Sphere Lip Balm in Summer Fruit
I use this lip balm over lip color, so it has some staining on it. It has a smooth finish that isn’t too glossy, but still adds some shine. I love the tastes of EOS lip balms in general, and my lips don’t get too chapped, so I don’t need something too heavy duty.
EOS Smooth Sphere Lip Balm in Sweet Mint
This is the same as my other lip balm, but in a different flavor. This one I never use with color, so I put it on when I’m wearing nothing else, like for going outside or if my lips are actually chapped.
Face Brushes
Real Techniques Miracle Complexion Sponge
Actually, I have two of these. They are perfect for putting on foundation, blending, and work great at applying any sort of base around the eyes. I definitely have replaced foundation brushes with sponges because of these.
Real Techniques Expert Face Brush
This is what I use for most of my blending, as well as for powder when I’m using powder as my primary base. It’s soft and easy to keep clean.
Generic Target Powder Brush
This was a generic brush that I got from Target a long time ago. I don’t know much about it. I usually use my expert face brush for powder, so I don’t have much need for a powder brush, but if I need to stipple my nose or forehead, this is what I use.
Ecotools Sheer Finish Kabuki Brush
I use this for highlighter, blending, occasionally for powder for my nose, or for blush if I want a very broad blended brush. I can often find uses for it. It’s really soft and handy.
Elf Bronzing Brush
I use this for blush instead of bronzer. The angle makes it great for shaping the apples of my cheeks. it’s the best blush brush I’ve ever used. I’m sure it’s great for bronzer as well.
Covergirl Blending Brush
I don’t really use this brush. Occasionally if another brush is dirty, I’ll use this to blend a specific area. I also use it to sweep off the excess powder from the lids of my powder, bronzer, palettes, and the like. It cleans well.
Generic Target Contouring Brush
I use this to apply bronzer for broad contours, like the hollows of my cheeks, or my hairlines. Occasionally I use it on my jawline as well. It isn’t the most comfortable, but it keeps clean well. I would replace if it weren’t for the fact that my new contour kit has largely phased out the bronzer I use it with.
ELF Small Angled Brush
I use this with my ELF brow kit for precise brow lines. It’s small and easy to work with, and longer than your average brow brush. I still use my brow marker often for very fine details, but this gives a similar type of precision.
ELF Small Angled Brush
This is the same as my brow brush, but I use this one for lipstick. I prefer putting on lipstick with a brush so that I can get very clean points on the two corners, and so I can have a particularly defined cupids bow. I think it’s easier this way.
Eye Brushes
Ecotools Eyeshadow Brush
This is a broad eyeshadow brush. I just use it for blending for the most part. It’s very soft, but it is a bit harder to clean than the other one.
Generic Target Defining Eye Brush
This brush isn’t particularly comfortable, but it’s very effective. This is the brush I used to use for applying eyeshadow carefully to just my lid. I just replaced it, but I still use it for smoky eyes so I don’t stain my normal brushes, which primarily are used for nudes.
Generic Target Eyeshadow Brush
I used this brush in conjunction with the previous one for apply color all around my eye and blend. I’ve replaced it, but it will probably also still be useful for smoky eyes.
ELF Eyeshadow Brush
This is my new brush for applying makeup all around my eye and for blending. It is longer and easier to control, as well as softer.
ELF Defining Eye Brush
I use this for lid color on my eyes. Like the target one, it can be used to apply color more precisely. Like the other ELF replacement, though, it is easier to control and softer.
Eye Crease Brush
This replaces my lost target generic eye crease brush. It applies my darkest shade right to my crease, allowing me to have fine control over the line their for things like cut creases and slight smoky looks, as well as just general eye defining.
Target Generic Eye Sponge
This little sponge on a stick is good for applying my NYX eyeshadow base. It picks up the cream well. I don’t use it for anything else, though, because it’s very hard to wash off.
ELF Mini Blending Brush
This is a very small, very thin brush. I only use it for applying black eyeshadow to my eyeliner line, because it’s so thin. It works very well for that. I don’t think it will see much use now that I have a liquid liner that already dries matte, however.
Tools
NYX Matte Finish Setting Spray
This spray holds all of my makeup in face. This one doesn’t leave any sheen and doesn’t feel sticky. It lasts for a long time. It’s all around what I’m looking for in a setting spray.
ELF Travel Eyelash Curler
This eyelash curler can’t reach all the way to the base, but it’s very small and impossible to hurt yourself with, so it’s great for using when traveling, in the car, or just to keep in a purse.
Revlon Eyelash Curler
This is just a normal metal eyelash curler. I suspect that these are all basically the same, they have been in my experience, but this is the one I bought when I first got started and I’ve never seen a reason to replace it. It works just fine.
#beauty#makeup#products#eyeliner#eyeshadow#brows#lips#lipstick#mascara#fashion#face#countouring#guide#tutorial#how to#list#easy#beginner#started#basics
6 notes
·
View notes
Last Seen Blogs
queer-book-character-tournament
Queer Book Ship Tournament

qoxocovonun
Untitled
penpressure
Pen Pressure

escritos-perdidos
Escritos Perdidos