#gwen stefani urban decay eyeshadow tutorial
Text
Urban Decay Eye Makeup Tutorial
Urban Decay Eye Makeup Tutorial
If you’re freaking out over what to dress up as this halloween, we can help. Yup, why not approach your close trekkie and go for a air-conditioned AF space-age look? Urban Decay Electric Palette Makeup Tutorial | Umakeup | Urban Decay Eye Makeup Tutorial Image Source: umakeup.com Check out our easy-peasy architecture tutorial below… Advertisement – Continue Reading Below Neutral Smokey Eyes using…
View On WordPress
#eye makeup tutorial urban decay 2#eye makeup tutorial urban decay 3#gwen stefani urban decay eyeshadow tutorial#urban decay eye makeup tutorial#urban decay smokey eye makeup tutorial
0 notes
Text
Hi guys!
As you know I got the Urban Decay Gwen Stefani Palette last month. I love the entire palette including the shade Danger which is a very highly pigmented navy blue.
I have seen a fair few reviews and this colours gets ignored a fair bit. A lot of people prefer the neutrals to this pop of vibrancy.
I love this shade and it has enabled me to be more adventurous with my eye looks. I have worn it a lot lately, and today I wanted to share with you the way that I wear it.
Rest of Face
Keep quite neutral. I teamed this with a subtle pink blush and pink lipstick.
Eyes
I first primed the lids using my MAC Paintpot in Painterly, and applied the shade Stark across the lid.
I then took the shade Danger on a dampened flat shadow brush and applied this to the lid. This shadow does have a lot of fallout so do pat away the excess. I took this just above the crease, and applied the excess to my lower lash line. Then, taking a clean blending brush, blended out the crease.
In the actual crease, I softened the crease line using Anaheim.
Over the top of Danger, I then applied 1987 on a fluffy blending blush. This is a dirty gold colour and softens the harshness of the blue colour.
As a liner, I applied Blackout on a liner brush and soften this with a smudger brush.
I then took Blonde and applied this to my brow bone (brows have been filled in using the Benefit Gimme Brow).
And that is how I use the navy blue colour. How do you use it?
If you don’t, please show this shade a bit more love. It truly is a stunning shade.
Bye for now!
xxx
How I Use the Shade ‘Danger’ Hi guys! As you know I got the Urban Decay Gwen Stefani Palette last month. I love the entire palette including the shade Danger which is a very highly pigmented navy blue.
0 notes
Photo
Best Ideas For Makeup Tutorials : Urban Decay Gwen Stefani Eyeshadow Palette http://ift.tt/2ERG0J5
0 notes
Text
Easy Eyeshadow Tutorial for Beginners
Okay, y’all. I know I’m not the only one who is exhausted by impossible makeup tutorials. I mean I LOVE seeing artists work, but it’s tough to see a tutorial knowing that you won’t be able to replicate it! So today I’m showing you guys my go-to eyeshadow look! It’s easy, versatile, only requires a few shadows and one brush, and you can use just about any color. Did I mention no eyeliner? Holla.
Before you start this tutorial, make sure to prime your eyes! Not sure what primer is? Need an affordable, cruelty free option that works amazing? I’ve got you covered. Click here to read my post on the best eyeshadow primer, then come back here!
Choose Your Eyeshadows
First up, choose your three shadows. You want one that’s matte and very close to the color of your skin tone. I usually just open a palette and pick the lightest matte shade. Then you want a “medium” matte shade for your crease – obviously this is a broad term but it’s because you really can use any color. In my photos I’m wearing a pinky nude shade but I do this often with warm browns too. Then last, you need a shimmery shade that matches your medium shade. Do something in the same color family and a similar color or lighter.
I used Stark from the Urban Decay Gwen Stefani palette as my skintone shade, Labyrinth from Colourpop as my medium/crease shade and Steady from the Gwen Stefani palette as my shimmer shade.
Note: your crease shade NEEDS to be matte, especially if you have hooded eyes. You never want to put a shimmer shade in your crease if you have hooded eyes because it makes the hood more prominent. A matte shade will help give the illusion of a bigger crease and help “push back” that hood visually.
Just to give you another example, here’s an affordable palette you can use to create this look, the elf Everyday Smokey palette. I’ve labeled the lid shade I would use with a 1, medium/crease shade options with a 2 and shimmer shades with a 3.
Grab the Right Brush
Now you need your tool – a fluffy eyeshadow blending brush is all you need! You DEFINITELY want something fluffy because this look is all about blending. I’ve linked a few affordable options below, I really love Real Techniques and you get two brushes for the price of one!
!function(doc,s,id){ var e, p, cb; if(!doc.getElementById(id)) { e = doc.createElement(s); e.id = id; cb = new Date().getTime().toString(); p = '//shopsensewidget.shopstyle.com/widget-script.js?cb=1493784565409?cb=' + cb; e.src = p; doc.body.appendChild(e); } if(typeof window.ss_shopsense === 'object'){ if(doc.readyState === 'complete'){ window.ss_shopsense.init(); } } }(document, 'script', 'shopsensewidget-script');
Apply your light eyeshadow
Okay first up, sweep the lightest shade you chose all over your lid and up onto the crease. You’re not really going to see it on your eye but this is going to make blending way easier.
Apply shadow to the crease
Now start slow and apply your medium shade to your crease. Dip your brush into the shadow, tap the excess off and sweep, starting in the outer corner so most of the product is there. Leave the lid blank! Repeat and build up the color to your desired level of intensity. Once you’re done, dip back into your light matte shade (the one you put all over your lid earlier) and sweep it along the top of your crease just to help blend out the shadow a bit more. Keep sweeping your brush along the top of your shadow (without adding more product) to continue blending the product out. You want your eyeshadow to be diffused, you don’t want a harsh line where your eyeshadow ends.
Tip: make sure to open your eyes and look straightforward in the mirror occasionally. You might have to apply the shadow a bit higher than you think especially if you have round, hooded eyes (like me).
Add shadow to the bottom lid
This step is optional, but you can also take your medium shade and smudge it along the bottom lash line. If you don’t have a smudge brush, just pinch your fluffy brush so that it’s flat and use that! Multi tasking! I think this just helps finish out the look, but I know some people don’t like having anything under the eye.
Add shimmer to the center of the lid
Last but not least, use your ring finger to pat the shimmery shade onto your lid. Again, repeat and build it up to the desired level of intensity. Afterwards, you might need to go back over the crease with your brush (don’t apply more product though), just to make sure everything is blended nicely.
Just to recap:
Light shadow all over the lid and in the crease
Medium matte shadow in the crease – BLEND
Medium matte shadow under the eye
Pat shimmer shadow on the lid
Apply mascara and you’re done! No liner, nothing. Super easy and super versatile! To me, this look is the perfect balance between a “no makeup” look and a full on smoky eye. It’s a little dramatic but still completely appropriate for everyday wear. If you want it to be less dramatic, go with a lighter shade in the crease and for more drama, go darker and add false lashes. Easy!
My finished look:
Alright babes, what’s your go-to eyeshadow look? Let me know in the comments! And of COURSE if you like this tutorial let me know and make sure to tag me on social media (@valerybrennan) if you give it a try. I’m dying to see!
xoxo
Valery
PS Don’t forget to pin it!
The post Easy Eyeshadow Tutorial for Beginners appeared first on Valery Brennan.
from Easy Eyeshadow Tutorial for Beginners
1 note
·
View note
Text
LUXURY PRODUCTS | Worth The Money – Tati (GlamLifeGuru)
LUXURY PRODUCTS | Worth The Money – Tati (GlamLifeGuru)
These are the MOST RIDICULOUSLY priced products that are actually AMAZING! Please click the like button and comment below what you’d like to see next week. Thanks so much for watching. xo’s ~ Tati
PS … If you’re in Santa Monica today come to my meetup between 2pm – 4pm – click here for details » » » http://bit.ly/SCLMeetUp xo’s ~ Tati
✔ VIDEOS MENTIONED
» » » Watch Last Nights HOT PRODUCT on Style Code Live
http://bit.ly/July14_StyleCodeLiveHotProduct
» » » Watch FOIL MASK … WTF??? https://www.youtube.com/watch?v=6LCMFyD_lGU&index=1&list=PL-2O9EScQNtvgwFumo5KVsqoCLt5S2aca
» » » Watch PRESS-ON EYESHADOW … OMG!!! https://www.youtube.com/watch?v=TsTfujsNcAg&index=1&list=PL-2O9EScQNtvDFLqdQCnpvFHCQsocw3-i
» » » Watch FAVORITE LUXURY MAKEUP | Worth the money
youtube
✔ PRODUCTS MENTIONED & LINKS
Nurse Jamie Instant Uplift Facial Firming Beauty Tool
http://bit.ly/29Jgg26
Beenigma ALL in ONE Face Cream – I got the 50% code again!
http://bit.ly/50-Off-Beenigma-Deal
Peter Thomas Roth 24K Gold Pure Luxury Cleansing Butter
http://bit.ly/29HxHoR
Sol De Janeiro Brazilian Bum Bum Cream
http://bit.ly/29CEPNA
Artis Brush Oval 7
http://bit.ly/29B2VJp
Chantecaille Longest Lash Mascara
http://bit.ly/29XvYsb
Lip Fusion XL
http://bit.ly/29HxPVs
La Prairie Cellular Treatment Loose Powder, Translucent #1 0
http://bit.ly/29IWXbJ
Guerlain L’Or Radiance Concentrate with Pure Gold
http://bit.ly/29zEbVG
Guerlain Météorites Light Reveling Pearls of Powder
http://bit.ly/29M83xF
Parfums de Marly – Meliora Eau de Parfum 5
http://bit.ly/29UBuMp
✔ MAKEUP WORN
Face:
Benefit Porefessional
Boscia Tsubaki Glotion Luminizing Moisturizer
Milani Conceal+Perfect 2 in 1 Foundation // 03 Light Beige
Nude Progenius Rescue Oil
Tarte Shape Tape Contour Concealer // Medium
Benefit Hoola Bronzer
Hourglass Ambient Lighting Palette
Scott Barnes Pressed Powder // Petal
Violet Voss Pro Highlighting Powders
Laura Geller Baked Body Frosting // Hawaiian Glow
Anastasia Gleam Glow Kit
Eyes:
Photofocus Eyeshadow Primer
Dose of Colors Hidden Treasure Palette
Viseart Matte Eyeshadow Palette // 07 Cool Matte
Lorac Mega Pro Eyeshadow Palette
Too Faced Sketch Marker // Charcoal Black
Too Faced Sketch Marker // Black
Chantecaille Longest Lash Mascara
Brows:
Kiss i-Envy Brow Stamp// Dark Brown
Anastasia Brow Wiz // Taupe
Benefit Gimme Brow // 3
Lips:
Makeup Forever Lip Line Perfector
Urban Decay x Gwen Stefani Glide on Lip Pencil// Wonderland
Urban Decay x Gwen Stefani Glide on Lip Pencil // Rock Steady
Maybelline Color Jolt Lip Paint// 30 Red-dy or Not
Lip Fusion XL
✔ S N A P C H A T
TatiWestbrook
✔ I N S T A G R A M
http://instagram.com/glamlifeguru
✔ T W I T T E R
http://twitter.com/#!/glamlifeguru
✔ F A C E B O O K
http://facebook.com/GlamLifeGuru
✔ WRITE TO ME HERE
Tati / Glam Life Guru
1905 Wilcox Ave.
Suite #111
Los Angeles, CA 90068
Hi I’m Tati from GlamLifeGuru, I’m glad you found my video, please be sure to check out my collection of videos on my YouTube beauty channel GlamLifeGuru where you’ll find my best beauty tips, tricks and favorites on everything from top luxury cosmetics to my favorite drugstore makeup. Whether you’re looking for a new product review, tutorial, beauty tip, haul or perhaps even a giveaway, I hope you enjoy watching.
http://vitamincserum.healthpro.org
The post LUXURY PRODUCTS | Worth The Money – Tati (GlamLifeGuru) appeared first on Vitamin C Serum Store.
0 notes
Text
I have wanted to do a tutorial with this palette since I got it last month! The shadows are really smooth and buttery. They blend like a dream!
I wanted to do a slightly edgier eyeshadow look than normal. I didn’t want to copy Gwen’s style completely, but I used only this eyeshadow palette for the actual eye look.
Let’s get on with it.
◊ Face ◊
Okay, so to begin the face, I buffed my Charlotte Tilbury Magic Foundation into my face. I patted away any streaks using a damp blending sponge. Under my eyes and over any redness, I then applied my Bare Minerals Bareskin Concealer. This is an amazing concealer and a little really does go a long way. I then applied a fair bit of Charlotte Tilbury Airbrush Flawless Finish Powder to set everything into place.
To bring back some colour to my face, I applied Bare Mineral’s Warmth under my cheek bones and across the temples, then any excess got swept under my jawline.
As for blush, I used a touch of Urban Decay’s Afterglow Blush in Video. I concentrated this on the cheek bones rather than bring it up to the apples of my cheeks. I then added a touch of highlight using my Bare Minerals Secret Radiance across my cheek bones.
This finished the face makeup.
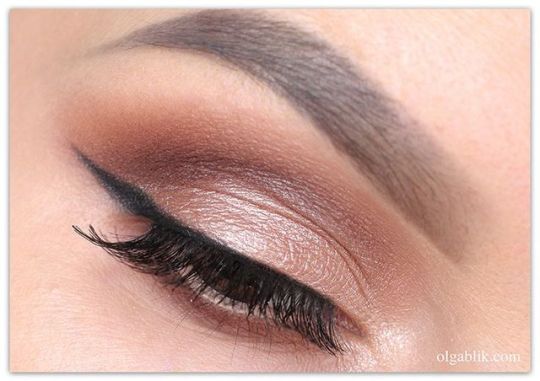
◊ Eyes ◊
Now onto my favourite part!
I first applied the shade Stark across my lid to neutralise any redness and prime the lid. Then, on a damp eyeshadow brush I applied the shade Punk to the lid, taking it just below the crease line. I then applied some of the same shade dry to blend out into the crease. I added any excess to the lower lash line, leaving no gaps between my upper and lower lashline. Punk is a very dark burgundy brown. It’s beautiful.
I then took the shade Steady and applied this over the top of Punk to add a touch of shimmer, blending out the edges with a clean fluffy brush. I took this shade over the dark brown on my lower lash line to diffuse it slightly. In the inner corner of my eye I applied the shade Baby.
Once I had filled in my brows using my Benefit Brow Zings, I applied the shade Pop to my brow bone.
To add a touch of liquid liner, I used a wet liner brush in the shade Blackout and applied this really close to my upper lash line.
To tightline my eyes, I applied Urban Decay’s 24/7 Glide On Liner in Demolition. I didn’t want any gaps of white in this look, and this matched the Punk and Steady hybrid shade quite well.
Finally, I applied my Benefit They’re Real Tinted Primer and Charlotte Tilbury Full Fat Lashes Mascaras to finish the eyes.
◊ Lips ◊
To finish the look, I used one of the free sample lipstick pods that came with the palette to copy Gwen’s statement red lip. I picked the shade 714, applying with a lip brush.
And that is the finished look! What do you think of it? I hope you have as much fun with the palette as I have.
Bye for now!
xxx
Gwen Stefani Eyeshadow Palette Tutorial I have wanted to do a tutorial with this palette since I got it last month! The shadows are really smooth and buttery.
#Bare Minerals#Benefit#Blush#Bronzer#charlotte tilbury#Eyeshadow#Foundation#Gwen Stefani#High End#Lipstick#Magic is in the Makeup#Makeup#Urban Decay
0 notes
Last Seen Blogs

heynatasa
HEYNATASA

digitalmarketingservicesdelhi
Digital Marketing

nandosembiring
Untitled

l3ns3
DAYUM!

babyeveneinbendrownednugget
Baby Even, Ein, Ben Drowned & Nugget